1. Replace the update source and download source
Using the command lsb_release -a view the current raspberry pie system version. The code of this version is "buster"
pi@raspberrypi:~ $ lsb_release -a
No LSB modules are available.
Distributor ID:	Raspbian
Description:	Raspbian GNU/Linux 10 (buster)
Release:	10
Codename:	buster
Replace mirror source
sudo nano /etc/apt/sources.list
Add a # at the beginning of the first line and copy the following contents to the last line, as shown in the figure:
deb http://mirrors.tuna.tsinghua.edu.cn/raspbian/raspbian/ stretch main contrib non-free rpi
deb-src http://mirrors.tuna.tsinghua.edu.cn/raspbian/raspbian/ stretch main contrib non-free rpi
Check the address of the image source. The version code used is "stretch"
Then change the corresponding "stretch" to "buster"
First press ctrl+o on the keyboard, then press enter to save, and then press ctrl+x to exit the nano editor and return to the command line interface
Then enter the following command to update the latest software list of image source of Tsinghua University
sudo apt-get update
Then restart the raspberry pie
sudo reboot
2. Install numpy
Open the command line interface and enter the following command to install the Python scientific computing library numpy
sudo pip3 install numpy
3. Expand the root directory to the entire SD card in the raspberry pie setting
Enter the command in the command line interface to enter the raspberry pie configuration interface, and use the up and down keys and left and right keys to switch the cursor position
sudo raspi-config
Select Advanced Options
Select expand file system and expand the root directory to the SD card to make full use of the storage space of the SD card. If this step is not carried out, the subsequent commands will be stuck. Exit the setup interface and restart raspberry pie
sudo reboot
4. Install the library required by OpenCV
Run the following eight commands
sudo apt-get install build-essential git cmake pkg-config -y
sudo apt-get install libjpeg8-dev -y
sudo apt-get install libtiff5-dev -y
sudo apt-get install libjasper-dev -y
sudo apt-get install libpng12-dev -y
sudo apt-get install libavcodec-dev libavformat-dev libswscale-dev libv4l-dev -y
sudo apt-get install libgtk2.0-dev -y
sudo apt-get install libatlas-base-dev gfortran -y
5. Download OpenCV
Enter the following three commands on the command line and download two compressed packages to the / home/pi/Downloads directory of raspberry pie. The first compression package is 86.8MB, and the second compression package is 54.5MB:
cd /home/pi/Downloads
wget https://github.com/Itseez/opencv/archive/3.4.0.zip
wget https://github.com/Itseez/opencv_contrib/archive/3.4.0.zip
Unzip the two compressed packages
cd /home/pi/Downloads
unzip opencv-3.4.0.zip
unzip opencv_contrib-3.4.0.zip
6. Set compilation parameters
Set compilation parameters
cd /home/pi/Downloads/opencv-3.4.0
mkdir build
cd build
Set CMAKE parameters
cmake -D CMAKE_BUILD_TYPE=RELEASE -D CMAKE_INSTALL_PREFIX=/usr/local -D INSTALL_C_EXAMPLES=ON -D INSTALL_PYTHON_EXAMPLES=ON -D OPENCV_EXTRA_MODULES_PATH=/home/pi/Downloads/opencv_contrib-3.4.0/modules -D BUILD_EXAMPLES=ON -D WITH_LIBV4L=ON PYTHON3_EXECUTABLE=/usr/bin/python3.5 PYTHON_INCLUDE_DIR=/usr/include/python3.5 PYTHON_LIBRARY=/usr/lib/arm-linux-gnueabihf/libpython3.5m.so PYTHON3_NUMPY_INCLUDE_DIRS=/home/pi/.local/lib/python3.5/site-packages/numpy/core/include ..
Judge whether you have successfully configured CMAKE according to the following figure. If it fails, it may be because the paths of the two compressed packets do not strictly follow the above requirements. If successful, you can start the most important compilation
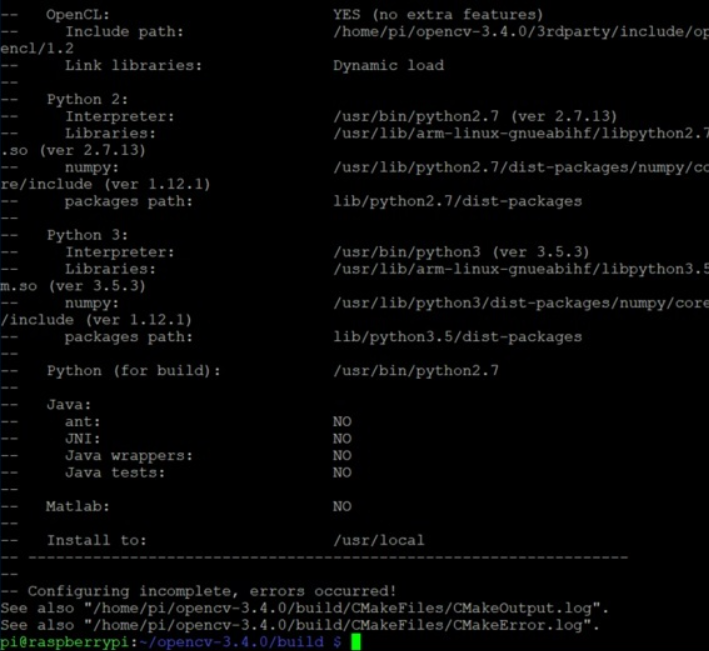
Failed to configure CMAKE
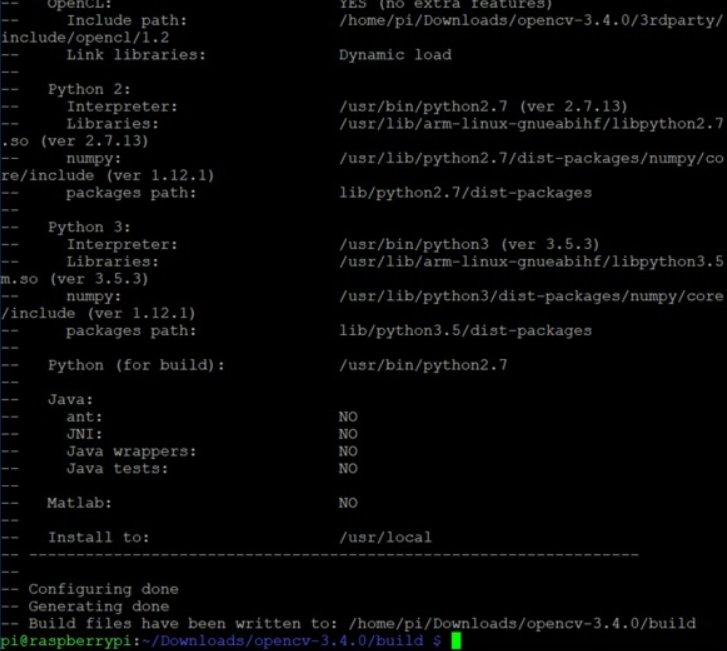
CMAKE configuration succeeded
7. Compile OpenCV3
Enter the build folder for compilation to prevent ssh disconnection from causing compilation failure. Raspberry pie should ensure sufficient power supply, and it is best not to carry out other operations
cd /home/pi/Downloads/opencv-3.4.0/build
 sudo make -j4 2>&1 | tee make.log
About 18% of the compilation may report fatal error: opencv2 / xfeatures2d / CUDA HPP: there is no such file or directory
This is due to the fact that we installed opencv in Python 2 environment before. We can solve this problem by copying two files: Add / home/pi/Downloads/opencv_contrib-3.4.3/modules/xfeatures2d/include/opencv2 Copy and paste the HPP file into / home/pi/Downloads/opencv-3.4.3/modules/stitching/include/opencv2 directory
When compiling to about 81%, the error build target opencv may be reported_ Tracking [makefile: 163: all] error
This is mainly because the downloaded package is incomplete. Copy the missing files to: home/pi/Downloads/opencv_contrib-3.4.3/modules/xfeatures2d/src/
Missing file download link: https://share.weiyun.com/6gaKPUXf Password: c6myk6
When compiling to about 99%, you may report an error make [2]: * * * [modules / Python 3 / cmakefiles / opencv_python 3. Dir / build. Make: 56: modules / Python 3 / cmakefiles / opencv_python 3. Dir / _ / src2 / CV2. CPP. O] error 1
make[1]: *** [CMakeFiles/Makefile2:21149: modules/python3/CMakeFiles/opencv_python3.dir/all] Error 2
make: *** [Makefile:138: all] Error 2
Find cv2.0 in the path home/pi/Downloads/opencv-3.4.0/modules/python/scr2 CPP this file
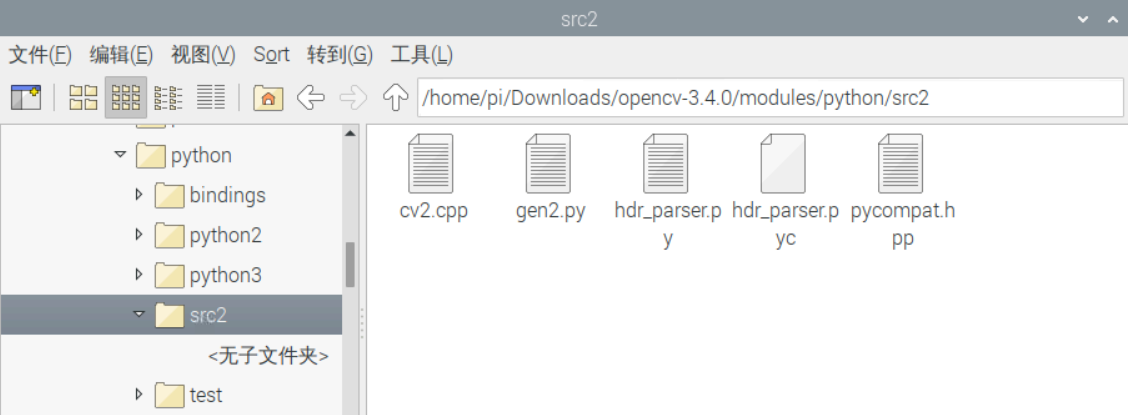
texteditor opens and turns to line 885
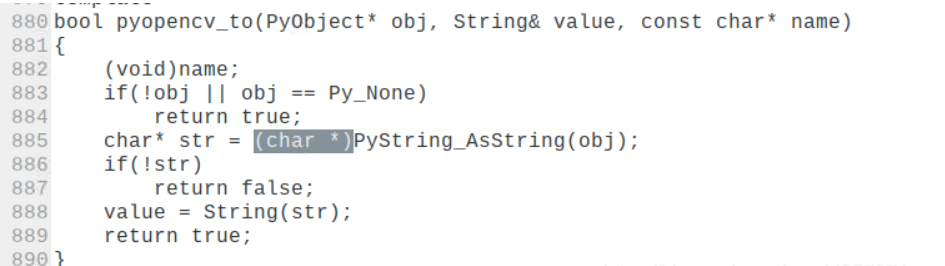
Add a (char *) before it
Then compile it again. You can pass it after stopping in this place for a long time
8. Install OpenCV3
After compiling, you can proceed to the last step - installation
sudo make install
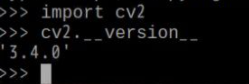
9. Test OpenCV on Python 3
After installation, enter Python 3 on the command line and press enter
import cv2
enter
cv2.__version__
If the results in the figure below appear, it indicates that OpenCV in Python 3 environment is successfully installed