Installation and use of Nacos
1, Introduction
Nacos component is a recommended implementation component of registry and configuration center in spring cloud component library.
- As a registry
- As the configuration center
2, Install the Nacos registry
- Download Nacos server: https://github.com/alibaba/nacos/releases
- Installation: after decompression, enter the bin folder and execute the following commands in cmd:
startup -m standalone
-
visit http://localhost:8848/nacos/
-
Log in using the default nacos/nacos
3, Register
1. Write a service provider and register with Nacos
1.1 create springboot sub module
Address of proxy server connected to springboot initializer: https://start.aliyun.com
1.2 introducing dependencies
 <dependency>
     <groupId>com.alibaba.cloud</groupId>
     <artifactId>spring-cloud-starter-alibaba-nacos-discovery</artifactId>
</dependency>
1.3 preparation of configuration files
# apply name
spring.application.name=my-provider
# Application service WEB access port
server.port=8001
# Nacos help documentation: https://nacos.io/zh-cn/docs/concepts.html
# Nacos certification information
spring.cloud.nacos.discovery.username=nacos
spring.cloud.nacos.discovery.password=nacos
# Nacos service discovery and registration configuration, where the sub attribute server addr specifies the Nacos server host and port
spring.cloud.nacos.discovery.server-addr=localhost:8848
# Register with the specified namespace of nacos. The default is public
spring.cloud.nacos.discovery.namespace=public
1.4 write service interface
@RestController
@RequestMapping("/device")
public class MyDeviceController {
    @GetMapping("/hello")
    public String hello(){
        return "hello nacos!";
    }

}
2. Write service consumers and register on Nacos
2.1 create springboot sub module
Address of proxy server connected to springboot initializer: https://start.aliyun.com
2.2 introducing dependencies
 <dependencies>
        <dependency>
            <groupId>org.springframework.boot</groupId>
            <artifactId>spring-boot-starter-web</artifactId>
        </dependency>
        <dependency>
            <groupId>org.springframework.cloud</groupId>
            <artifactId>spring-cloud-starter-netflix-ribbon</artifactId>
            <version>2.2.5.RELEASE</version>
        </dependency>
        <dependency>
            <groupId>org.springframework.boot</groupId>
            <artifactId>spring-boot-starter</artifactId>
        </dependency>
        <dependency>
            <groupId>com.alibaba.cloud</groupId>
            <artifactId>spring-cloud-starter-alibaba-nacos-config</artifactId>
        </dependency>
        <dependency>
            <groupId>com.alibaba.cloud</groupId>
            <artifactId>spring-cloud-starter-alibaba-nacos-discovery</artifactId>
        </dependency>

        <dependency>
            <groupId>org.springframework.boot</groupId>
            <artifactId>spring-boot-starter-test</artifactId>
            <scope>test</scope>
            <exclusions>
                <exclusion>
                    <groupId>org.junit.vintage</groupId>
                    <artifactId>junit-vintage-engine</artifactId>
                </exclusion>
            </exclusions>
        </dependency>
2.3 preparation of configuration files
# apply name
spring.application.name=my-consumer
server.port=9001
# Nacos help documentation: https://nacos.io/zh-cn/docs/concepts.html
# Nacos certification information
spring.cloud.nacos.discovery.username=nacos
spring.cloud.nacos.discovery.password=nacos
# Nacos service discovery and registration configuration, where the sub attribute server addr specifies the Nacos server host and port
spring.cloud.nacos.discovery.server-addr=localhost:8848
# Register with the specified namespace of nacos. The default is public
spring.cloud.nacos.discovery.namespace=public
2.4 write bean configuration class and inject RestTemplate to realize ribbon communication
@Configuration
public class RestConfig {

    @Bean
    @LoadBalanced
    public RestTemplate restTemplate(){
        return new RestTemplate();
    }

}
2.5 write the interface, declare the services to be subscribed to nacos, and make remote calls
@RestController
@RequestMapping("/device")
public class DeviceController {

    @Autowired
    private RestTemplate restTemplate;

    @GetMapping("/sayHello")
    public String sayHello() {
        String url = "http://my-provider/device/hello";
        String result = restTemplate.getForObject(url, String.class);
        return result;
    }


}
2, Nacos health status inspection mechanism
Service registration: the Nacos Client will register its own service with the Nacos Server by sending a REST request and provide its own metadata, such as ip address, port and other information. After Nacos Server receives the registration request, it will store these metadata information in a double-layer memory Map.
Service heartbeat: after the service is registered, the Nacos Client will maintain a regular heartbeat to continuously notify the Nacos Server that the service is always available to prevent it from being rejected. The default is to send a heartbeat every 5s.
Service synchronization: Nacos Server clusters will synchronize service instances with each other to ensure the consistency of service information.
Service discovery: when calling the service of the service provider, the service consumer (Nacos Client) will send a REST request to the Nacos Server to obtain the service list registered above and cache it locally. At the same time, a scheduled task will be started locally in the Nacos Client to regularly pull the latest registry information of the server and update it to the local cache
Service health check: Nacos Server will start a scheduled task to check the health of registered service instances. For instances that do not receive client heartbeat for more than 15s, its health attribute will be set to false (not found when client service is found). If an instance does not receive heartbeat for more than 30s, Directly reject the instance (if the rejected instance resumes sending heartbeat, it will be re registered)
3, Nacos realizes the function of configuration center
Like Spring Cloud Config, the configuration center implemented by Nacos also needs two roles: server (integrated with the registry) and client.
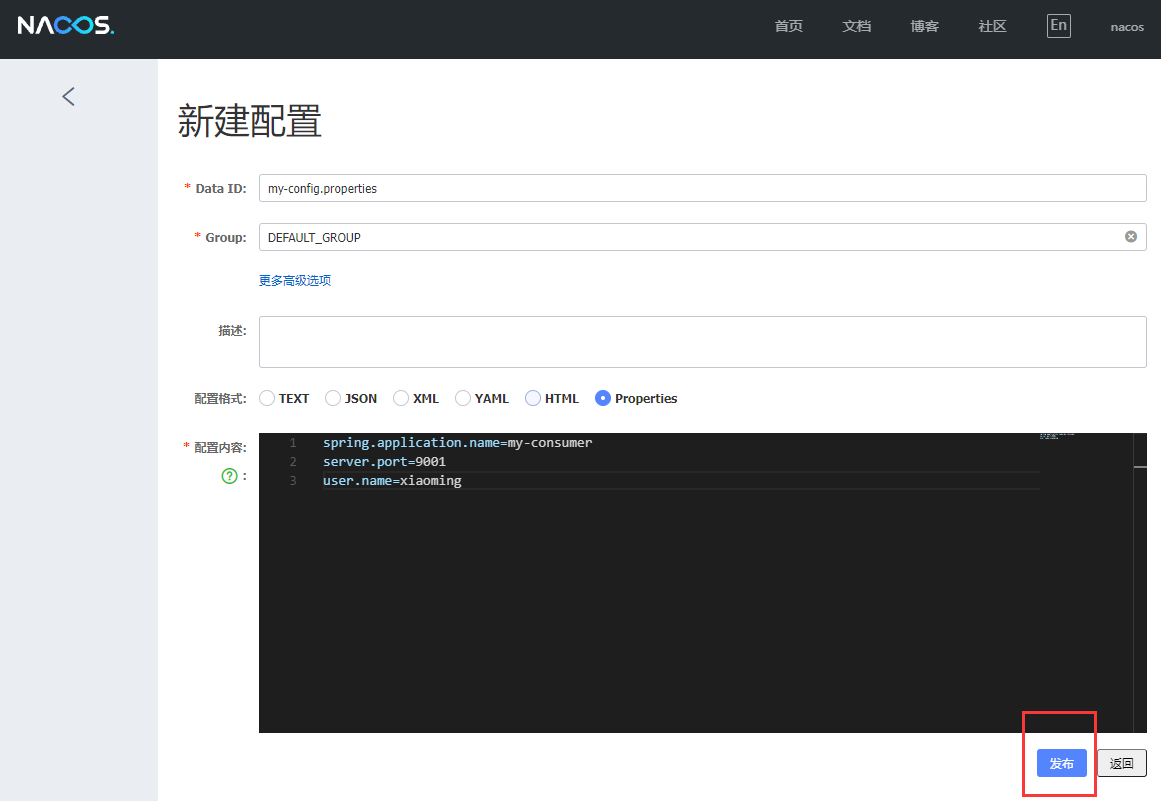
1. Server setting configuration file
2. Client profile
2.1 introducing dependencies
				<dependency>
            <groupId>com.alibaba.cloud</groupId>
            <artifactId>spring-cloud-starter-alibaba-nacos-config</artifactId>
        </dependency>
2.2 write bootstrap properties
# Nacos help documentation: https://nacos.io/zh-cn/docs/concepts.html
# Nacos certification information
spring.cloud.nacos.config.username=nacos
spring.cloud.nacos.config.password=nacos
#spring.cloud.nacos.config.contextPath=/nacos
## Set the server address of the configuration center
spring.cloud.nacos.config.server-addr=localhost:8848
# The namespace of the Nacos configuration center. It should be noted that if you use the public namcespace, please do not fill in this value, just leave it blank
#spring.cloud.nacos.config.namespace=
spring.cloud.nacos.config.name=my-config
spring.cloud.nacos.config.file-extension=properties
spring.cloud.nacos.config.group=DEFAULT_GROUP
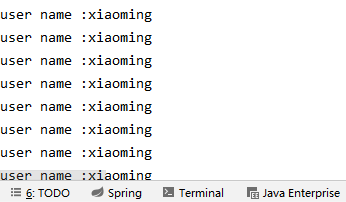
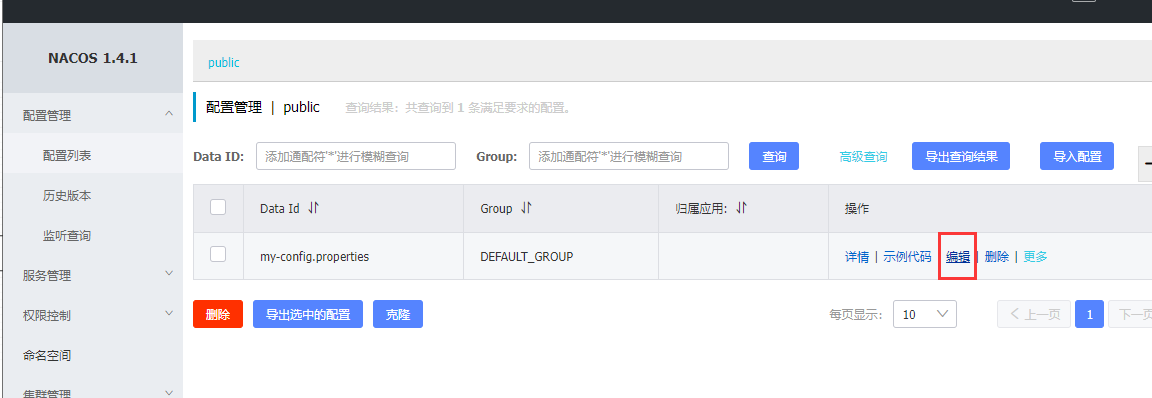
2.3 start the project and experience the hot update (modify the configuration on the server and the client can obtain it in real time)
@SpringBootApplication
public class MyConsumerApplication {

    public static void main(String[] args) {
        ConfigurableApplicationContext applicationContext = SpringApplication.run(MyConsumerApplication.class, args);
      //Repeatedly obtain the latest user in the configuration file name
        for (;;) {
            try {
                Thread.sleep(200);
            } catch (InterruptedException e) {
                e.printStackTrace();
            }
            String userName = applicationContext.getEnvironment().getProperty("user.name");

            System.out.println("user name :" +userName);
        }
    }

}
2.4 start the project and print circularly
2.5 modify server configuration file
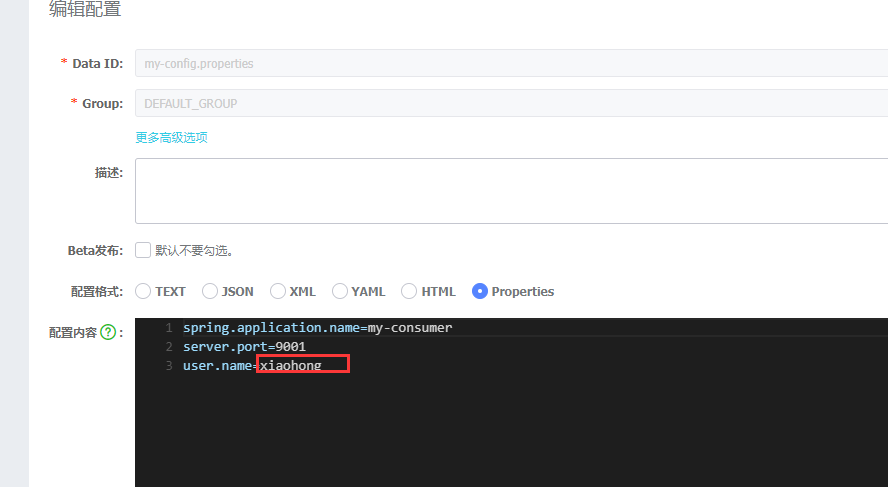
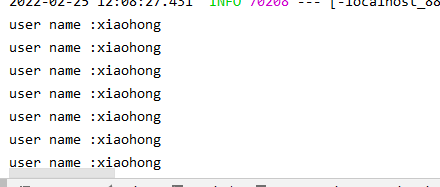
2.6 at this time, the idea console changes to circular printing xiaohong