background
A project needs to realize the localization of all basic software, in which the operating system specifies Galaxy Kirin v4 and the CPU uses Feiteng processor. I don't have this domestic processor locally, but Feiteng is a 64 bit processor based on ARMv8 architecture, so theoretically, the hardware based on this CPU architecture should be OK.
The first thing I think of is raspberry pie. This development board integrates ARM CPU. However, it needs to see whether it is ARMv8 architecture. If it happens to be available, you can try it. But it's also a little heavy. It's good to be able to simulate the CPU. Finally, I found it QEMU This tool can run on Windows.
This article will create a virtual machine simulating ARM64 platform on Windows 10 to install Galaxy Kirin operating system.
environment
- Host operating system: Windows 10 professional edition
- Host CPU platform: x86-64
- Virtual machine software: QEMU
download
Galaxy Kirin v4 ARM version download address: 「Inspur」- NF2180M3 (ARMv8) – K4NZ BLOG
QEMU download address: Download QEMU – QEMU
UEFI firmware of QEMU: https://releases.linaro.org/c...
Virtual network card tool: https://pan.baidu.com/s/1sFSH...
install
1. Installing QEMU
Execute the installation file and install all the way. The default configuration here is unchanged.
2. Configure virtual machine network
This step is to create a Tap network card for the virtual machine in the host, and use the virtual network card tool in the [Download] step.
This tool is extracted from a VPN software and the command to create a virtual network card:
tapctl create --name tap0
With this command, you can delete:
tapctl delete tap0
Note: tap0 is the name of the virtual network card. You can name it according to your habits without repeating it.
Then share the host network for the virtual network card, as shown in the figure below: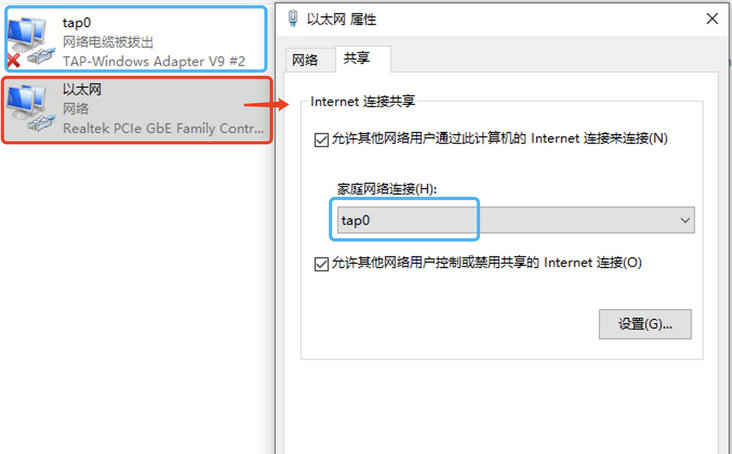
3. Create virtual machine
This tool needs to use commands. Here, write a batch file: create Bat, as follows:
"C:\Program Files\qemu\qemu-img.exe" create -f qcow2 D:\qemu\kylin-v4-arm64\kylin-v4-arm64.qcow2 50G

"C:\Program Files\qemu\qemu-system-aarch64.exe" ^
-m 2048 ^
-cpu cortex-a53 ^
-smp 4,cores=4,threads=1,sockets=1 ^
-M virt ^
-bios D:\qemu\kylin-v4-arm64\QEMU_EFI.fd ^
-device VGA ^
-device nec-usb-xhci ^
-device usb-mouse ^
-device usb-kbd ^
-cdrom D:\qemu\kylin-4.0.2-server-sp2-arm64.iso ^
-net nic,model=virtio ^
-net tap,ifname=tap0 ^
-boot d D:\qemu\kylin-v4-arm64\kylin-v4-arm64.qcow2
In brief, two commands are executed:
The first line is to create a mirror image. The name of the image file with path is: D: \ QEMU \ kylin-v4-arm64 \ kylin-v4-arm64 Qcow2, the size is 50G. Paths and names can be defined according to their own needs.
The second line is to create the virtual machine in the image created in the first line.
- -M specifies the memory size in M. 2048 is 2G.
- -CPU specifies the CPU model. cortex-a53 is an ARMv8 processor.
- -smp is the number of logical processors, the number of cores per CPU, the number of threads per CPU, and the number of CPUs.
- -The path of bios UEFI firmware is mentioned in the steps of [Download] above.
- -The address of the cdrom disc image file. Here is the path where the operating system installs the image.
- -boot the file path of the current virtual machine image.
- -net tap specifies that the back-end network type is TAP, and ifname specifies that the name of the TAP network card is tap0.
4. Install operating system
Run the batch program create. Above as an administrator Bat, and then start the QEMU window and start the installation of the operating system.
There's nothing to say here. Just follow the prompts step by step. In order to facilitate operation, it is recommended to install graphical interface.
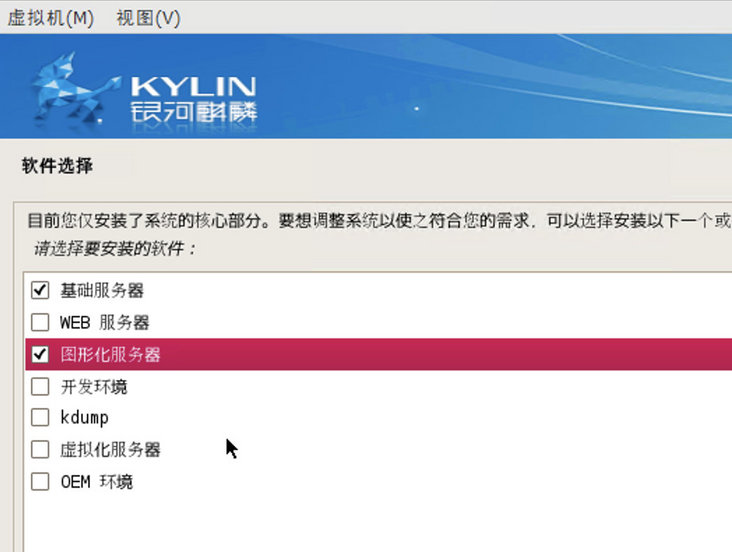
The installation process is slow, please wait patiently.
5. Start the operating system
After installation, you need to remove the CD image when restarting, otherwise you will enter the installation interface.
Exit the current QEMU window and recreate a batch file start bat:
"C:\Program Files\qemu\qemu-system-aarch64.exe" ^
-m 2048 ^
-cpu cortex-a53 ^
-smp 4,cores=4,threads=1,sockets=1 ^
-M virt ^
-bios D:\qemu\kylin-v4-arm64\QEMU_EFI.fd ^
-device VGA ^
-device nec-usb-xhci ^
-device usb-mouse ^
-device usb-kbd ^
-net nic,model=virtio ^
-net tap,ifname=tap0 ^
-boot d D:\qemu\kylin-v4-arm64\kylin-v4-arm64.qcow2
These parameters are similar to the parameters of creating virtual machine above, which will not be introduced here.
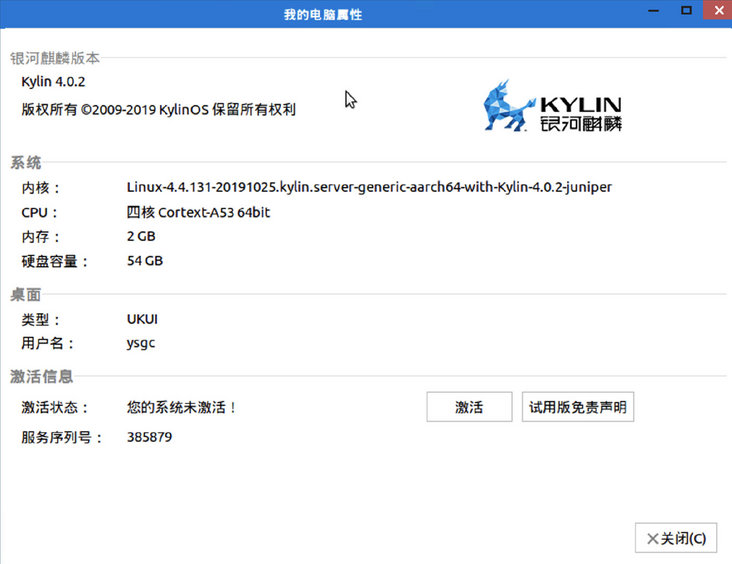
Run start as administrator Bat, after startup, check the computer properties. aarch64 mentioned in the system kernel is supported by ARMv8 architecture.
6. Change package source
The default package source of Galaxy Kirin v4 is CD, which may be difficult to do. However, this operating system is based on ubuntu 16.04, so the package source of ubuntu 16.04 should be OK. However, it should be noted that the package source for ARM architecture is different from x64. Here is a mirror package source of Tsinghua University, which can be accessed faster in China.
deb http://mirrors.ustc.edu.cn/ubuntu-ports/ xenial main multiverse restricted universe
deb http://mirrors.ustc.edu.cn/ubuntu-ports/ xenial-backports main multiverse restricted universe
deb http://mirrors.ustc.edu.cn/ubuntu-ports/ xenial-proposed main multiverse restricted universe
deb http://mirrors.ustc.edu.cn/ubuntu-ports/ xenial-security main multiverse restricted universe
deb http://mirrors.ustc.edu.cn/ubuntu-ports/ xenial-updates main multiverse restricted universe
deb-src http://mirrors.ustc.edu.cn/ubuntu-ports/ xenial main multiverse restricted universe
deb-src http://mirrors.ustc.edu.cn/ubuntu-ports/ xenial-backports main multiverse restricted universe
deb-src http://mirrors.ustc.edu.cn/ubuntu-ports/ xenial-proposed main multiverse restricted universe
deb-src http://mirrors.ustc.edu.cn/ubuntu-ports/ xenial-security main multiverse restricted universe
deb-src http://mirrors.ustc.edu.cn/ubuntu-ports/ xenial-updates main multiverse restricted universe
7. Reuse image
For the image of the installed system, you can make a backup by copying the image file.
If you accidentally damage the system, you can restart a clean environment with the backup image to avoid the long system installation process.
You can also start multiple virtual machines by copying multiple image files, but you have to think about what to do with the network, so you don't bother to toss around here.
The above is the main content of this article. If there are mistakes and omissions, please correct them.
Get more architecture knowledge, please pay attention to WeChat official account firefly. Original content, please indicate the source for reprint.