The server
Server: services msc
Registry: regedit
View computer model: dxdiag
Set the subnet address of NAT in vmware workstation to 192.168.2.0
mybatis.mapper-locations=classpath:mappers/*.xml
windows query port number
netstat -ano
Idea shortcut key usage
Ctrl + Alt + M - auto generate method call
ctrl+shift+y - English Chinese Translation
Ctrl+Alt+T generate try catch perhaps Alt+enter
CTRL+ALT+T Put the selected code in TRY{} IF{} ELSE{} in
Ctrl + O override method
Ctrl + I Implementation method
ALT+Enter import package,Automatic correction
ALT+/ Code prompt
CTRL+J Automatic code
CTRL+ALT+Space code prompt
CTRL+ALT+L formatting code
CTRL+ALT+O Optimize imported classes and packages
CTRL+E Recently changed code
CTRL+P Method parameter prompt
Ctrl+Alt+V Extract variables

Query shortcut
Ctrl+Shift+Backspace You can jump to the last edited location
CTRL+ALT+ left/right Where the front and rear navigation has been edited
ALT+7 The left window displays the structure of the current file
 double-click SHIFT Find files in all directories of the project
CTRL+G Positioning row
CTRL+F Find text in current window
CTRL+R Replace text in current window
ALT+SHIFT+C Find modified files
CTRL+E Recently opened files
CTRL+SHIFT+O Pop up display search content
Ctrl+W Select the code and press continuously to have other effects
F2 or Shift+F2 Highlight error or warning quick location
CTRL+SHIFT+B Find class for variable
Ctrl+Shift+Up and down keys move code up and down
Ctrl+Alt+ left/right Return to the last browse location
Ctrl+X Delete row
Ctrl+D Copy line
Ctrl+/ or Ctrl+Shift+/ Notes(// Or /... /)
Ctrl+H Show class structure diagram
Ctrl+Q Display comment document
Alt+F1 Find the location of the code
Alt+1 Quickly open or hide the project panel
Alt+ left/right Toggle code view
ALT+ ↑/↓ Fast moving positioning between methods
CTRL+ALT+ left/right Where the front and rear navigation has been edited
Ctrl+Shift+Backspace You can jump to the last edited location
Alt+6 lookup TODO

Other shortcut keys
SHIFT+ENTER Start another line
CTRL+Z Retrogression(revoke)
CTRL+SHIFT+Z forward(Cancel cancel)
CTRL+ALT+F12 Open folder in Explorer
ALT+F1 Find the directory location of the file
SHIFT+ALT+INSERT Vertical edit mode
CTRL+F4 Close current window
Ctrl+~,Quick switching scheme (interface appearance, code style, shortcut key mapping and other menus)

Debug shortcut
 In fact, commonly used is F8 F7 F9 The most noteworthy thing is Drop Frame You can start running code from scratch.

alt+F8 debug Check view value when
Alt+Shift+F9,choice Debug
Alt+Shift+F10,choice Run
Ctrl+Shift+F9,compile
Ctrl+Shift+F8,View breakpoints
F7,Step into
Shift+F7,Smart step in
Alt+Shift+F7,Forced entry
F8,Step over
Shift+F8,Step out
Alt+Shift+F8,Forced stepping
Alt+F9,Run to Cursor
Ctrl+Alt+F9,Force run to cursor
F9,Recovery procedure
Alt+F10,Navigate to breakpoint

restructure
Ctrl+Alt+Shift+T,Refactoring pop-up menu
Shift+F6,rename
F6,move
F5,copy
Alt+Delete,Safe deletion
Ctrl+Alt+N,inline
1.1.1 Linux usage
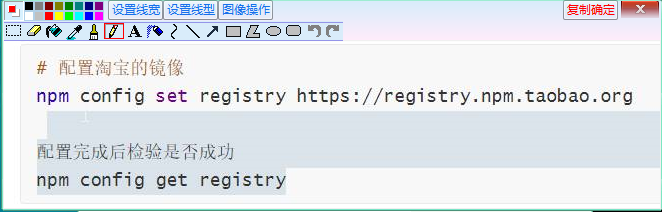
//The image of Taobao needs to be imported
//Front end link back end VUE
npm install concurrently
//Install node -sass
npm i node-sass --sass_binary_site=https://npm.taobao.org/mirrors/node-sass/
nginx software Winds version: https://www.cnblogs.com/jiangwangxiang/p/8481661.html
Query started successfully: tasklist /fi "imagename eq nginx.exe"
nginx Software Linux version: https://blog.csdn.net/weixin_43544679/article/details/102779522
//Linux uses startup commands
nginx installation
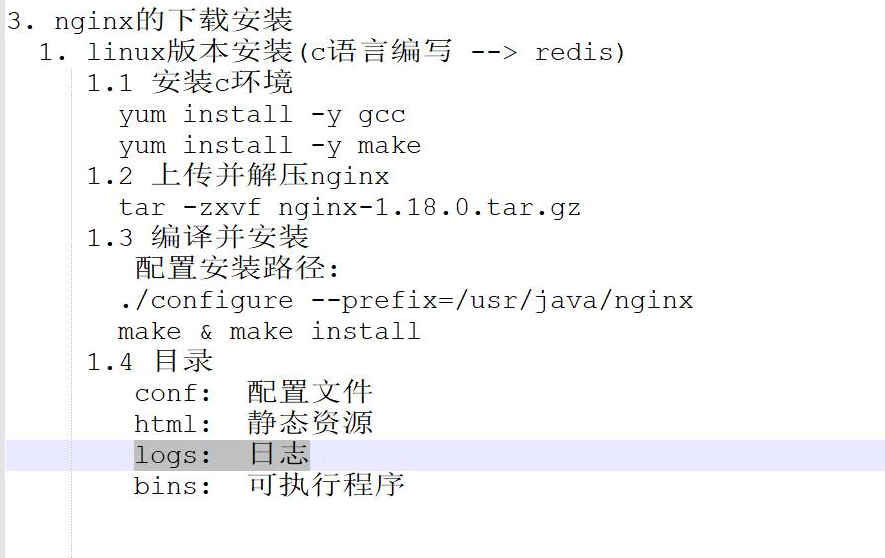
1.1.2 Linux startup in nginx
1.fdfs_trackerd
See: Usage: FDFS_ trackerd <config_ file> [start | stop | restart]
2.cd /usr/java/nginx
3.cd sbin
4 ./nginx
5.ps aux|grep nginx
6. Power on to view FDFS_ Tracker and FDFS_ Status of storage
ps -aux | grep fdfs
If not started:
systemctl start fdfs_trackerd
systemctl start fdfs_storage
1.2.1 basic Linux operation
Redis installation
Redis installation
The path is cd /usr/local/bin
cd /opt/module
Linux switching users
su user name
cd enters the root directory
Close network manager
systemctl stop NetworkManager
Unzip the tar file
tar -zxvf elasticsearch-6.2.3. tar. GZ (file name) - C /usr/local/mysql (specify path)
Remember to modify permissions under root
chown hadoop:hadoop erlang-22.3.4.3-1.el7.x86_64.rpm (file name)
Rename:
mv original name / new name
Save file:
: wq force save: wq!
Force exit without saving file
:q :q!
create folder
mkdir file name
remove folders
rm -rf bin6/appendonly.aof bin6/dump.rdb bin6/nodes.conf
Copy file:
cp -r original path * new path
Exit file from file
wq
Background operation:
[root@hdp01 redis-4.0.9]# redis-server redis.conf
Port query
netstat -nltp
Background shutdown
Redis cli - P 6379 (port number) shutdown
Script:
mv stop stop.sh (file name)
Redis operation command
redis-cli
Change to script:
chmod 777 file name
Copy virtual machine:
ctrl+insert copy text
shift + insert paste text
1.3.1 establishment of redis cluster
1. Open Bin1 / redis Conf search 😕 Change cluster to: cluster enabled yes
/Port modify port number
2. Copy 6 bin s as the redis interface image
Remember to open redis server redis.com in the bin directory conf
Modify redis Conf port number forced saving: wq!
3. Enter this folder: cd /opt/module/redis-4.0.9/src/
To find redis trib rb
4. Copy redis
cp redis-trib.rb /usr/local/redis/cluster/
5. Return
cd /usr/local/redis/cluster/
6.redis.gma3.2.1 path:
cd /home/hadoop/
gem install redis
7. Implementation
./redis-trib.rb create --replicas 1 192.168.2.101:6379 192.168.2.101:6380 192.168.2.101:6381 192.168.2.101:6382 192.168.2.101:6383 192.168.2.101:6384
8. The script starts the cluster

#!/bin/bash
for PORT in {1..6}
do
 cd bin${PORT}
 redis-server redis.conf
 cd ..
done
9. The script closes the cluster

#!/bin/bash
for PORT in {6379..6384}
do
 redis-cli -p ${PORT} shutdown
done
1.4.1 installation of Es
Create user
Useradd admin (random name)
passwd asmin
cd enters hadoop user
1. Convert the of root user to other users: (remember to execute it in root user)
chown hadoop:hadoop elasticsearch-6.2.3.tar.gz (file name)
2. Enter a YML file VIM elasticsearch. In the config folder of elasticsearch-6.2.3 yml
Paste in the following paragraph
	cluster.name: usian
	node.name: usian_node_1
	network.host: 0.0.0.0
	http.port: 9200
	transport.tcp.port: 9300
	node.master: true
	node.data: true
	discovery.zen.ping.unicast.hosts: ["0.0.0.0:9300", "0.0.0.0:9301"]
	bootstrap.memory_lock: false
	path.data: /usr/java/elasticsearch-6.2.3/data
	path.logs: /usr/java/elasticsearch-6.2.3/logs
	http.cors.enabled: true
	http.cors.allow-origin: /.*/
3. Configure JVM options
Change to 512M according to the memory of your virtual machine
4. Enter the bin directory to execute/ elasticsearch
Report a problem
[1]: max file descriptors [4096] for elasticsearch process is too low, increase to at least [65536]
[2]: max virtual memory areas vm.max_map_count [65530] is too low, increase to at least [262144]
solve the problem
1. Switch to root first
2. Switch to VIM / etc / security / limits conf
3. Add to terminal
		* soft nofile 65536
		* hard nofile 65536
4. Path: VIM / etc / sysctl conf
add to
vm.max_map_count=655360
5. test
sysctl -p
[root@hdp01 elasticsearch-6.2.3]# ulimit -hu
	-bash: ulimit: -h: invalid option
	ulimit: usage: ulimit -SHacdefilmnpqrstuvx
[root@hdp01 elasticsearch-6.2.3]# ulimit -Hu
	7185
6. Switch back to the hadoop user and execute su hadoop
./elasticsearch
7. Visit: http://192.168.2.101:9200/
		{
			"name" : "usian_node_1",
  			"cluster_name" : "usian",
  			"cluster_uuid" : "54Hp3HJOQXm-PyM45JsPNQ",
  			"version" : {
   			 "number" : "6.2.3",
  			  "build_hash" : "c59ff00",
   			 "build_date" : "2018-03-13T10:06:29.741383Z",
    			 "build_snapshot" : false,
 			   "lucene_version" : "7.2.1",
  			  "minimum_wire_compatibility_version" : "5.6.0",
  			  "minimum_index_compatibility_version" : "5.0.0"
 				 },
  			"tagline" : "You Know, for Search"
			}
Then the construction is completed!
1.5.1 installing kibana Windows version
1. Unzip the compressed package and open the file kibana yml
The revision was originally an annotation. Untie him
		server.port: 5601
		server.host: "0.0.0.0"
		elasticsearch.url: "http://192.168.2.101:9200"
2. Implementation
Double click / bin / kibana bat
3. Access test
http://localhost:5601/
1.6.1 install head Windows version
1. Unzip and press shift to enter the powershell window
2. Enter npm start
> elasticsearch-head@0.0.0 start E:\headWindows\elasticsearch-head-master
> grunt server
Local Npm module "grunt-contrib-jasmine" not found. Is it installed?
Running "connect:server" (connect) task
Waiting forever...
Started connect web server on http://localhost:9100
See this sentence, this is a successful download!!!
3. Test
http://localhost:9100/
4. Modify cluster port path
Top http://192.168.2.101:9200/

1.7.1ES introduction
1.7.1 addition of index
PUT /h2005
{
  "settings": {
    "number_of_shards": 2,   #Number of slices (number of main slices)
    "number_of_replicas": 1  #Number of copies ()
  }
}
1.7.2 modification of index
Remember! Once an index is created, the number of primary shard s cannot be changed. You can change the number of replica Shards.
PUT /h2005/_settings
{
    "number_of_replicas": 0
}
1.7.3 deletion of index
DELETE /h2005
1.8.1 using mapping
POST usage
Generated fields
POST /h2005/student/_mapping
{
  "properties": {
    "name": //Field name
    {
      "type": "text" //Field type
    },
    "age":
    {
      "type": "integer"
    },
    "gender":
    {
      "type": "text"
    }
  }
}
GET get content
GET /h2005/student/_mapping
Modification and deletion:
Only fields can be added and fields cannot be modified
You cannot just delete mapping (by deleting the index)
1.9.1 document creation
POST /h2005/student/1
{
  "name":"zs",
  "age":10,
  "gender":"man"
}
1.9.1 document search
GET h2005/student/_search
document query
_search?q=fieldname:fieldvalue
1.10.1 Luke use
1. Find the file and execute Luke Bat file
2. Copy the data in elastic search in Linux to the desktop
3. Find the path ***** \ data\nodes data \ nodes \ 0 \ indices\indices
1.11.1 Lucene word splitter
1. Drag the folder to plugins in elasticsearch and rename it lk
2. Enter the config file in lk
3.vim my.dic add a sentence
Test: cat my dic

vim IKAnalyzer.cfg.xml
my.dic
stopword.dic
1.12.1 database installation
-
Query mysql installation
rpm -qa | grep -i mysql
rpm -qa | grep -i mariadb -
Uninstall setup
rpm -e --nodeps mariadb-libs-5.5.64-1.el7.x86_64 -
Upload and unpack mysql
tar -xvf mysql-5.7.23-1.el7.x86_64.rpm-bundle.tar -
Install mysql service
rpm -ivh mysql-community-common-5.7.23-1.el7.x86_64.rpm
rpm -ivh mysql-community-libs-5.7.23-1.el7.x86_64.rpm
rpm -ivh mysql-community-client-5.7.23-1.el7.x86_64.rpm
rpm -ivh mysql-community-server-5.7.23-1.el7.x86_64.rpm -
service mysql start
systemctl start mysqld -
View password and log in
cat /var/log/mysqld.log
password : yph5agK16t//
mysql -uroot -p -
When modifying the password policy and password, remember to enter mysql to modify
set global validate_password_policy=0;
set password=password('root1234'); -
Modify remote access permissions
grant all privileges on . to 'root'@'%' identified by 'root1234' with grant option;
flush privileges; -
Modify mysql configuration file
vim /etc/my.cnf
apiDoc installation_ use
windows install - apocm execution window
use:
1. Create apidoc. In the root directory of the project json
{
  "?name": "Document name",
  "name": "Approval process background API file",
  "?version": "Document version number. When a new version needs to be upgraded, this version number needs to be modified synchronously. In this way, the interface method will select the latest version of interface description by default",
  "version": "1.0.0",
  "?description": "Document description",
  "description": "Approval process background related API Interface:<a href='http://gitlab. wandatech-dev.com/wanda/api/admin-api/approval-admin-api' target='_ Blank '> check the source code < / a > ",
  "?title": "browser title display",
  "title": "Approval process background API file",
  "?url": "Shown in the interface description url route",
  "url": "http://admin-gateway.wd-dev.com/api",
  "?sampleUrl": "The default in the send interface example url route",
  "sampleUrl": "http://admin-gateway.wd-dev.com/api",
  "?template": "Template attribute settings",
  "template": {
    "forceLanguage": "zh_cn",
    "withCompare": true,
    "withGenerator": true,
    "aloneDisplay": false
  }
}
2.apidoc -i Project - Directory 1 -o specify directory
git command
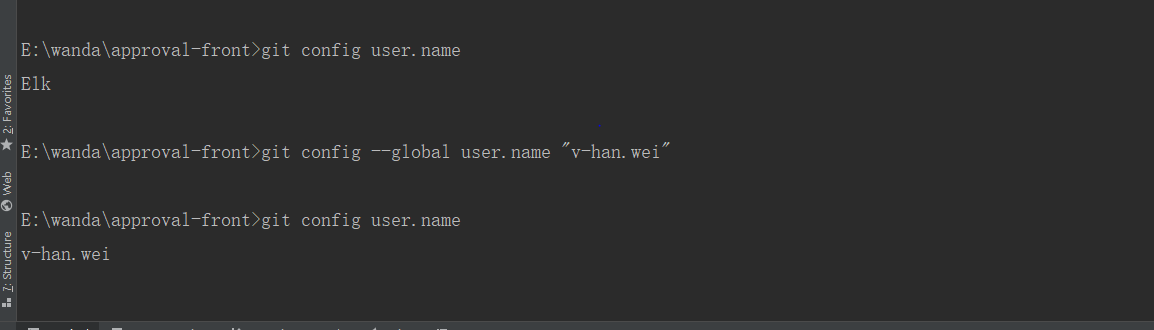
Query git upload Name:
git config user.name
Modify git upload Name: ps: modify global git name
git config --global user.name "User name"