1, Introduction
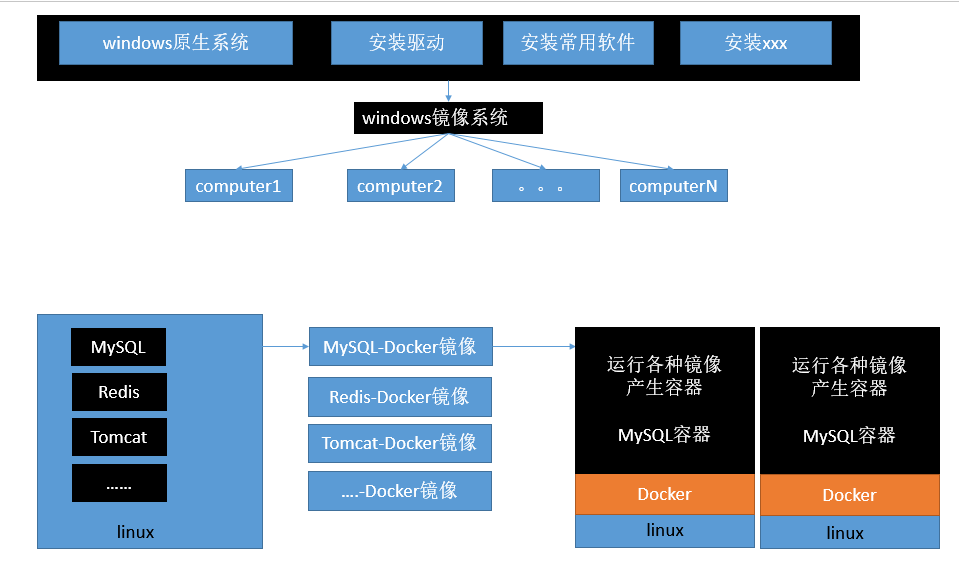
Docker is an open source application container engine; Is a lightweight container technology;
Docker supports compiling software into an image; Then, configure various software in the image and publish the image, so that other users can directly use the image;
The running image is called a container, and the container startup is very fast.
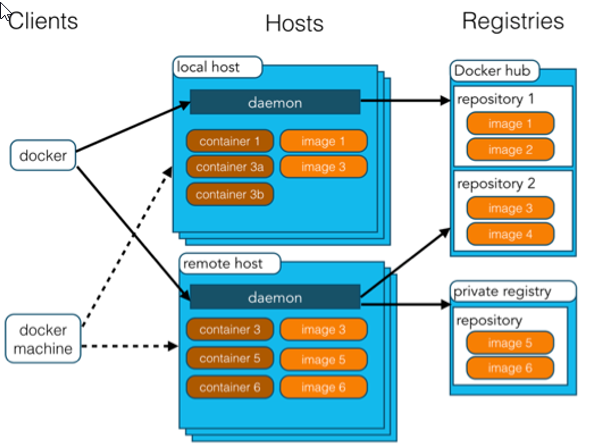
Concept:
- Docker host: the machine on which the docker program is installed (docker is directly installed on the operating system);
- Docker client: connect to the docker host for operation;
- docker repository (Registry): used to store various packaged software images;
- Docker images: images packaged by software; Put it in docker warehouse;
- docker container: the instance after the image is started is called a container; A container is an application or group of applications that run independently
Steps to use Docker:
- Install Docker
- Go to the Docker warehouse to find the corresponding image of the software;
- Run the image using Docker, and the image will generate a Docker container;
- The start and stop of the container is the start and stop of the software;
2, Install Docker
-
Check the kernel version, which must be 3.10 or above
My is the Centos7 and linux 3.10 kernel installed by aliyun. docker officially says it is at least 3.8 or above, and it is recommended to be above 3.10
Log in to the root account and view the kernel version as follows:uname ‐r [root@loaclhost ~]# uname -r 3.10.0-957.21.3.el7.x86_64
-
Install docker
yum install docker
-
Enter y to confirm installation
-
Start docker
systemctl start docker

[root@localhost ~]# systemctl start docker
[root@localhost ~]# docker ‐v
Docker version 1.12.6, build 3e8e77d/1.12.6
-
Boot docker
systemctl enable docker

[root@localhost ~]# systemctl enable docker
Created symlink from /etc/systemd/system/multi‐user.target.wants/docker.service to
/usr/lib/systemd/system/docker.service.
-
Stop docker
systemctl stop docker
3, Docker common commands & Operations
1. Mirror operation
| operation | command | explain |
|---|---|---|
| retrieval | docker search keyword eg: dockersearch redis | Often go to the docker hub to retrieve the image details, such as the image TAG |
| Pull | docker pull image name: tag | : tag is optional. Tag indicates the label. Most of them are software versions. The default is latest |
| list | docker images | View all local mirrors |
| delete | docker rmi image-id | Deletes the specified local mirror |
docker official website: https://hub.docker.com/
2. Container operation
Software image (QQ installer) -- running image -- generating a container (running software, running QQ);
1. Search image
 [root@localhost ~]# docker search tomcat

2. Pull image
 [root@localhost ~]# docker pull tomcat

3. Boot container based on image
 docker run ‐‐name mytomcat ‐d tomcat:latest

4. Viewing running containers
 docker ps

5. Stop the running container
 docker stop Container id

6. View all containers
 docker ps ‐a

7. Start container
 docker start container id

8. Delete a container
 docker rm container id

9. Start a port mapped tomcat
 [root@localhost ~]# docker run ‐d ‐p 8888:8080 tomcat
 ‐d: Background operation
 ‐p: Map the host's port to one of the container's ports    Host port:Port inside container

10. For the sake of demonstration, it is simply closed linux Firewall
 service firewalld status ;View firewall status
 service firewalld stop: Turn off firewall

11. Viewing container logs
 docker logs container‐name/container‐id

For more commands, see
 https://docs.docker.com/engine/reference/commandline/docker/
You can refer to each mirrored document
4, Sample installation MySQL
1. Pull the image mysql5 seven
docker pull mysql:5.7 #Due to network problems, the pull may fail. Try several more times ~, or configure the alicloud image accelerator
2. Check whether the docker image is downloaded successfully
docker images

3. Create mysql container
docker run --name mysql -p 3306:3306 -e MYSQL_ROOT_PASSWORD=123456 -d mysql:5.7

--name Container name, set to mysql;

-p Port mapping. Host port: container port;

-v  To mount the host directory to the container directory, you need to mount the original data and configuration files;

-e Container variables. MYSQL_ROOT_PASSWORD=123456,Set the password to 123456;

-d Run the container in the background and return to the container ID
After installation, MySQL services and storage mounts are all in the container. In case the container goes down once, the content will disappear, so you need to put the data on the host.
# create folder
mkdir -p /data/mysql/datadir
mkdir /data/mysql/conf.d

docker run --name mysql5.7 -p 3320:3306
	-v /data/mysql/datadir/:/var/lib/mysql -v /data/mysql/conf.d:/etc/mysql/conf.d  # Put the mysql storage path into the new datadir folder and the configuration file into conf.d
	-e MYSQL_ROOT_PASSWORD=123456 -d mysql:5.7
4. View running status
docker ps

Enter docker:
 docker exec -it 0b478a07def6 /bin/bash
  #/bin/bash: after entering the container, the status is interactive, that is, you can issue commands

5. Remote tool connection test
- If it is an ECS, remember to open the port number

- Turn off firewall or open port for local virtual machine
Firewalld is installed by default in Centos7. If it is not installed, you can use Yum install firewalld firewalld config to install it.
1.Start firewall
 systemctl start firewalld

2.Disable firewall
 systemctl stop firewalld

3.Set startup
 systemctl enable firewalld

4.Stop and disable boot
 sytemctl disable firewalld

5.service iptables restart
 firewall-cmd --reload

6.View status
 systemctl status firewalld perhaps firewall-cmd --state

7.View version
 firewall-cmd --version

8.view help
 firewall-cmd --help

9.View area information
 firewall-cmd --get-active-zones

10.View the area information of the specified interface
 firewall-cmd --get-zone-of-interface=eth0

11.Reject all packages
 firewall-cmd --panic-on

12.Cancel reject status
 firewall-cmd --panic-off

13.Check whether to reject
 firewall-cmd --query-panic

14.Add interface to area(The default interfaces are public)
 firewall-cmd --zone=public --add-interface=eth0(Permanent plus --permanent then reload firewall)

15.Set default interface area
 firewall-cmd --set-default-zone=public(Effective immediately without restart)

16.Update firewall rules
 firewall-cmd --reload or firewall-cmd --complete-reload(The difference between the two is that the first one does not need to be disconnected firewalld One of the characteristics is dynamic
 Add a rule. The second one needs to be disconnected, which is similar to restarting the service)

17.View all open ports in the specified area
 firewall-cmd --zone=public --list-ports

18.Open the port in the specified area (remember to restart the firewall)
 firewall-cmd --zone=public --add-port=80/tcp(Permanent plus --permanent)


 –zone Scope
 –add-port=8080/tcp Add a port in the format:/Communication protocol
 –permanent #It will take effect permanently. It will become invalid after restart without this parameter
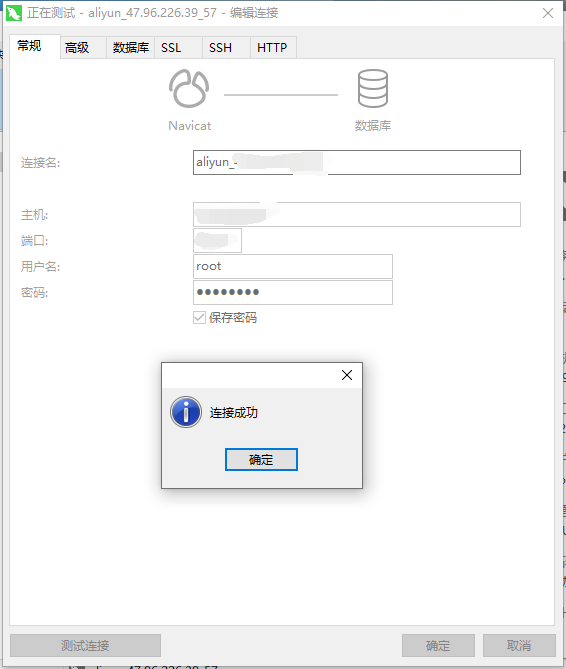
Finally, the connection is successful!!!