Vue 2.0 began to support server-side rendering, so this article is also based on Vue 2.0 version or more. There is still little information rendered by the server on the internet. The most classic one is Vue-hacker-news, the author of Vue, the God of Youyuxi. When I do Vue project in the company, I have been suffering from the product, customer's demand for first screen loading, SEO, and many solutions. This time, in view of the inadequacies of browser rendering, I used server rendering, and made two identical Demo s as a comparison, which can more intuitively compare the front-end and back-end of Vue. Rendering.
Let's take a look at two Demo s separately. (Welcome to star t, welcome to pull request)
- Browser-side rendering Demo: https://github.com/monkeyWangs/doubanMovie
- Server renders Demo: https://github.com/monkeyWangs/doubanMovie-SSR
The results of the two sets of codes are to show the Douban Movie, and the effect is similar. Let's briefly explain the mechanism of the project.
I. Browser-side Rendering Douban Film
First, we built a Vue project with scaffolding on the official website.
npm install -g vue-cli
vue init webpack doubanMovie
cd doubanMovie
npm install
npm run dev
In this way, we can simply build a cli framework. The next thing we need to do is configure Vue-router, Vuex, and then configure our webpack proxyTable to support proxy access to Douban API.
1. Configuring Vue-router
We need three navigation pages: on-screen, on-screen, Top250; one detail page, and one search page. Here I configure their respective routes. Configure the following information under router/index.js:
import Vue from 'vue'
import Router from 'vue-router'
import Moving from '@/components/moving'
import Upcoming from '@/components/upcoming'
import Top250 from '@/components/top250'
import MoviesDetail from '@/components/common/moviesDetail'

import Search from '@/components/searchList'

Vue.use(Router)
/**
 * Routing Information Configuration
 */
export default new Router({
  routes: [
    {
      path: '/',
      name: 'Moving',
      component: Moving
    },
    {
      path: '/upcoming',
      name: 'upcoming',
      component: Upcoming
    },
    {
      path: '/top250',
      name: 'Top250',
      component: Top250
    },
    {
      path: '/search',
      name: 'Search',
      component: Search
    },
    {
      path: '/moviesDetail',
      name: 'moviesDetail',
      component: MoviesDetail
    }

  ]
})
So our routing information is configured, and every time we switch routes, try not to repeat requests for data, so we also need to configure the keep-alive component: in the app.vue component.
<keep-alive exclude="moviesDetail">
   <router-view></router-view>
</keep-alive>
Such a basic Vue-router is configured.
2. Introducing Vuex
Vuex is a state management model developed specifically for Vue.js applications. It uses centralized storage to manage the state of all components of an application, and ensures that the state changes in a predictable manner with corresponding rules. Vuex is also integrated into Vue's official debugging tool devtools extension, providing advanced debugging functions such as zero-configuration time-travel debugging, status snapshot import and export.
In short, Vuex is equivalent to setting the global variable of read and write permission in a sense, saving the data to the "global variable" and reading and writing the data through certain methods.
Vuex does not limit your code structure. However, it sets out a number of rules to be followed:
-
The state of the application hierarchy should be centralized into a single store object.
-
Submitting mutation is the only way to change state, and the process is synchronous.
-
Asynchronous logic should be encapsulated in action.
For large applications, we want to split Vuex-related code into modules. The following is an example of project structure:
├── index.html
├── main.js
├── api
│   └── ... # Extract API requests
├── components
│   ├── App.vue
│   └── ...
└── store
    ├── index.js          # Where we assemble modules and export store s
    └── moving            # Film module
        ├── index.js      # Where modules are assembled and exported
        ├── actions.js    # Module Basic action
        ├── getters.js    # Module level getters
        ├── mutations.js  # Module level mutations
        └── types.js      # Module level types
So we started to create a new folder named store in our src directory. For later consideration, we created a new moving folder to organize movies. Considering that all actions, getters, mutations are written together, the files are too confusing, so I extracted them separately.
After the Stre folder is built, we will start to refer to the Vuex instance in main.js:
import store from './store'
new Vue({
  el: '#app',
  router,
  store,
  template: '<App/>',
  components: { App }
})
In this way, we can use Vuex in all the subcomponents through this.$store.
3.webpack proxyTable proxy cross-domain
Web pack development environment can use proxyTable to proxy cross-domain, and production environment can configure proxy cross-domain according to their respective servers. Under our project config/index.js file, you can see a property of proxyTable, which we can simply rewrite.
proxyTable: {
      '/api': {
        target: 'http://api.douban.com/v2',
        changeOrigin: true,
        pathRewrite: {
          '^/api': ''
        }
      }
    }
So when we visit
localhost:8080/api/movie
In fact, what we visited was
http://api.douban.com/v2/movie
This achieves a cross-domain request scheme.
So far, the main configurations of the browser side have been described. Now let's see the results of the operation.

In order to introduce how browser rendering works, let's run npm run build to see what the hell is in our release file.
After the run build, there will be a dist directory. We can see that there is an index.html in it. This is the html that will be displayed on our final page. When we open it, we can see the following:
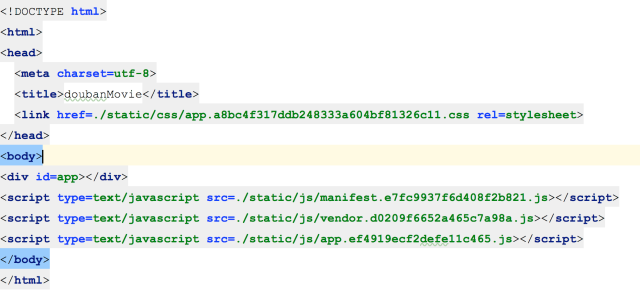 Observed partners can find that we do not have redundant DOM elements, only a div, then how to render the page? The answer is js append. Yes, the following js are responsible for innerHTML. js is executed by browser interpretation, so we call it browser rendering, which has several fatal shortcomings:
- js is placed at the end of DOM. If the js file is too large, it will inevitably cause page blocking. The user experience is obviously not good (which is what I've been repeatedly asked about in the company by the product)
- Not conducive to SEO
- The client runs on the old JavaScript engine
For people in some parts of the world, computers may only be used by computers made in 1998 to access the Internet. While Vue can only run on browsers above IE9, you may also want to provide basic content for older browsers - or use it on the command line. Lynx Fashionable hackers
Based on the above problems, the server is ready to render...
2. Rendering Douban Film on the Server Side
Let's start with a server rendering sketch of Vue's official website.
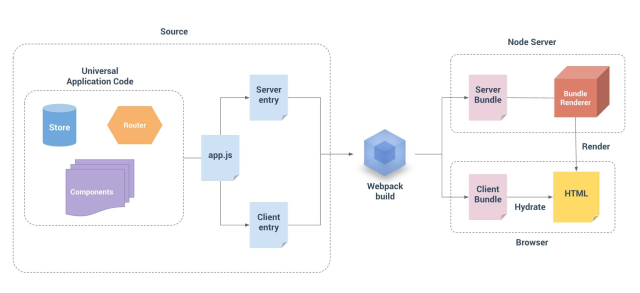
As can be seen from the diagram, SSR has two entry files, client.js and server.js, which contain application code. Web pack is packaged into server bundles for server and client bundles for client through two entry files. When the server receives requests from client, a render is created. The Dyer bundleRenderer, which reads the server bundle file generated above and executes its code, then sends a generated html to the browser. After the client loads the client bundle, it will Hydration with the DOM generated by the server (judge the DOM and its upcoming). Whether the generated DOM is the same or not, if the same, mount the client's Vue instance on the DOM, otherwise a warning will be raised.
Specific realization:
We need Vuex, router, server, service caching, proxy across domains.. Let's take our time.
1. Establishing Noejs Service
First we need a server, so express is a good choice for nodejs. Let's build a server.js
const port = process.env.PORT || 8080
app.listen(port, () => {
  console.log(`server started at localhost:${port}`)
})
This is used to start the service listening port 8080.
Then we start processing all get requests, and when we request the page, we need to render the page.
app.get('*', (req, res) => {
  if (!renderer) {
    return res.end('waiting for compilation... refresh in a moment.')
  }

  const s = Date.now()

  res.setHeader("Content-Type", "text/html")
  res.setHeader("Server", serverInfo)

  const errorHandler = err => {
    if (err && err.code === 404) {
      res.status(404).end('404 | Page Not Found')
    } else {
      // Render Error Page or Redirect
      res.status(500).end('500 | Internal Server Error')
      console.error(`error during render : ${req.url}`)
      console.error(err)
    }
  }

  renderer.renderToStream({ url: req.url })
    .on('error', errorHandler)
    .on('end', () => console.log(`whole request: ${Date.now() - s}ms`))
    .pipe(res)
})
Then we need to proxy requests so that we can cross-domain. We introduce the http-proxy-middleware module:
const proxy = require('http-proxy-middleware');//Introducing Agent Middleware
/**
 * proxy middleware options
 * Proxy cross-domain configuration
 * @type {{target: string, changeOrigin: boolean, pathRewrite: {^/api: string}}}
 */
var options = {
  target: 'http://api.douban.com/v2', // target host
  changeOrigin: true,               // needed for virtual hosted sites
  pathRewrite: {
    '^/api': ''
  }
};

var exampleProxy = proxy(options);
app.use('/api', exampleProxy);
So our server.js is configured. Next we need to configure the server-side entry file and the client-side entry file. First, we need to configure the client-side file and create a new src/entry-client.js.
import 'es6-promise/auto'
import { app, store, router } from './app'

// prime the store with server-initialized state.
// the state is determined during SSR and inlined in the page markup.
if (window.__INITIAL_STATE__) {
  store.replaceState(window.__INITIAL_STATE__)
}

/**
 * Asynchronous component
 */
router.onReady(() => {
  // Start mounting on dom
  app.$mount('#app')
})

// service worker
if (process.env.NODE_ENV === 'production' && 'serviceWorker' in navigator) {
  navigator.serviceWorker.register('/service-worker.js')
}
The client entry file is very simple. It synchronizes the data sent by the server and mounts the Vue instance on the DOM rendered by the server.
Configure the server-side entry file: src/entry-server.js
import { app, router, store } from './app'

const isDev = process.env.NODE_ENV !== 'production'

// This exported function will be called by `bundleRenderer`.
// This is where we perform data-prefetching to determine the
// state of our application before actually rendering it.
// Since data fetching is async, this function is expected to
// return a Promise that resolves to the app instance.
export default context => {
  const s = isDev && Date.now()

  return new Promise((resolve, reject) => {
    // set router's location
    router.push(context.url)

    // wait until router has resolved possible async hooks
    router.onReady(() => {
      const matchedComponents = router.getMatchedComponents()
      // no matched routes
      if (!matchedComponents.length) {
        reject({ code: 404 })
      }
      // Call preFetch hooks on components matched by the route.
      // A preFetch hook dispatches a store action and returns a Promise,
      // which is resolved when the action is complete and store state has been
      // updated.
      Promise.all(matchedComponents.map(component => {
        return component.preFetch && component.preFetch(store)
      })).then(() => {
        isDev && console.log(`data pre-fetch: ${Date.now() - s}ms`)
        // After all preFetch hooks are resolved, our store is now
        // filled with the state needed to render the app.
        // Expose the state on the render context, and let the request handler
        // inline the state in the HTML response. This allows the client-side
        // store to pick-up the server-side state without having to duplicate
        // the initial data fetching on the client.
        context.state = store.state
        resolve(app)
      }).catch(reject)
    })
  })
}
server.js returns a function that accepts a context parameter passed from the server and returns the Vue instance through promise. Context generally contains the URL of the current page. First, we call router.push(url) of Vue-router to switch to the corresponding route, and then call getMatchedComponents method to return the corresponding component to be rendered. Here, we check whether the component has fetchServerData method, and if it has, it will be executed.
The following line of code loads the data acquired by the server onto the context object, which is then sent directly to the browser to synchronize the data (status) with the client's Vue instance.
context.state = store.state
Then we configure the client and the server webpack separately. Here we can refer to the configuration on my github fork. There are annotations in each step. I won't go into any more details here.
Then we need to create app.js:
import Vue from 'vue'
import App from './App.vue'
import store from './store'
import router from './router'
import { sync } from 'vuex-router-sync'
import Element from 'element-ui'
Vue.use(Element)

// sync the router with the vuex store.
// this registers `store.state.route`
sync(store, router)

/**
 * Create a vue instance
 * Inject router store into all the subcomponents here
 * This allows you to use `this. $router'and `this. $store' anywhere.`
 * @type {Vue$2}
 */
const app = new Vue({
  router,
  store,
  render: h => h(App)
})

/**
 * Export router and store.
 * There is no need to mount on app here. This is different from browser rendering.
 */
export { app, router, store }
In this way, there will be a common instance Vue for the server-side entry file and the client-side entry file, which is not much different from the Vue instance we wrote before, but we will not put app moun t on DOM here, because this instance will also run on the server-side, where app will be exposed directly.
Next, create a routing router and create Vuex just like the client. You can refer to my project in detail.
At this point, the server rendering configuration is simply introduced. Now let's start the project briefly.
 Here, as with the server interface, the difference is that URLs are no longer the #/ they used to be, but the form of requests./
In this way, whenever the browser sends a request for a page, the server renders a DOM string back and displays it directly in the browser section, thus avoiding many problems of browser-side rendering.
Speaking of SSR, Web pages were rendered on the server side long before SPA (Single Page Application) came into being. After receiving the client request, the server splices the data and template into a complete page to respond to the client. Client-side direct rendering, when users want to browse new pages, they must repeat this process and refresh the pages. This experience is almost unacceptable in the current development of Web technology, so more and more technical solutions emerge, striving to achieve no page refresh or partial refresh to achieve excellent interactive experience. . But SEO is lethal, so everything looks at the application scenario, here only to provide you with technical ideas, Vue development to provide more than one possible solution.
In order to compare the results of two renderings more clearly, I did an experiment. After build ing two projects, I simulated the production environment. In the browser netWork, I simulated the 3g network speed environment. First, I looked at the rendering results of the server.
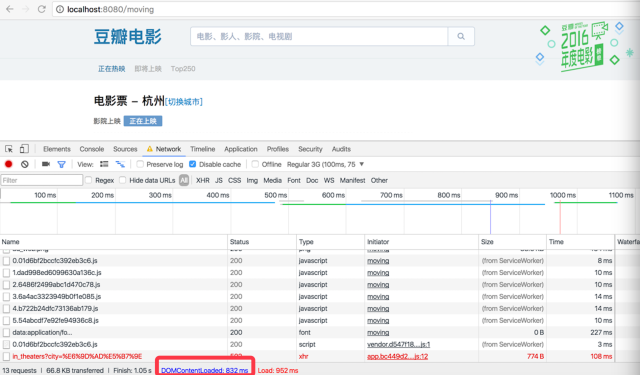 You can see that it took 832 MS to load the DOM as a whole; users may visit websites from a distance when the network is slow - or through poor bandwidth. In these cases, minimize the number of page requests to ensure that users see the basic content as soon as possible.
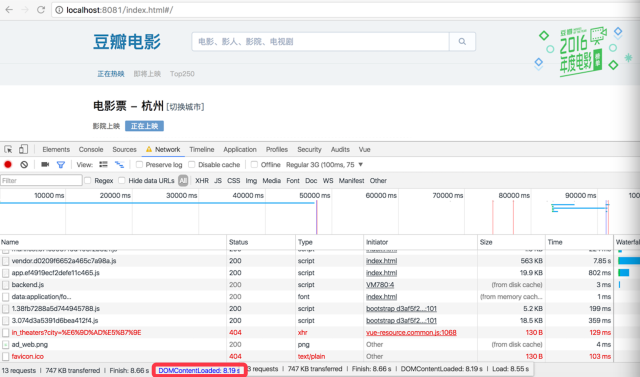
Then we can see that one of the vendor.js has reached 563KB, and the overall load time has reached 8.19s. This is because of the single page file, all the logic code will be packaged into a js. Can be used branch Web pack splitting code avoids forcing users to download the entire single-page application, but it is far less efficient than downloading a single pre-rendered HTML file.