preface:
Hello, guys, I'm running snail rz. Of course, you can call me snail Jun. I'm a rookie who has studied Java for more than half a year. At the same time, I also have a great dream, that is, to become an excellent Java Architect one day.
This SpringBoot basic learning series is used to record the whole process of learning the basic knowledge of SpringBoot framework (this series is written with reference to the latest SpringBoot tutorial of crazy God in station B. because it was sorted out before, but it was not released at that time, there may be errors in some places. I hope you can correct them in time!)
After that, I will try to update this series at a faster rate every day. If you haven't learned SpringBoot yet, you can learn from my blog; Of course, the little friends who have studied can also review the basics with me. Finally, I hope I can make progress with you! Come on! Boys!
Due to its long length, I will divide it into two blogs. The first one mainly understands the concept of Swagger, learns the integration of Swagger with SpringBoot, and configures Swagger and scanning interface; The next part mainly studies whether Swagger configuration starts and sets Swagger document comments, as well as Swagger online test, etc.
Special reminder: previous blog link: Integrated Swagger framework for SpringBoot basic learning (Part I))
Today we come to the ninth stop of spring boot basic learning: integrating Swagger framework (Part 2). No more nonsense, let's start today's learning content!
9.5 configure whether to start Swagger
9.5.1 write Swagger configuration class and access page test
1. Modify Swagger configuration class code
package com.kuang.swagger.config;

/**
 * @ClassName SwaggerConfig
 * @Description Swagger Configuration class
 * @Author Gallop de snail rz
 * @Date 2021/10/1
 */

// Register the SwaggerConfig class as a configuration class
@Configuration
// Turn on support for Swagger2
@EnableSwagger2
public class SwaggerConfig {

    // Use the @ Bean annotation to register the docket as a Bean node in the IOC container
    @Bean
    public Docket docket() {
        // The return value is to create a new Docket class, and the parameter of its constructor is documentationtype.swagger_ 2 (indicates that the document type is Swagger2)
        return new Docket(DocumentationType.SWAGGER_2)
                // Set apiInfo to custom
                .apiInfo(myApiInfo())
                // Whether to enable swagger (the default is true, which means it is enabled. Here, it is set to false, that is, it does not turn off enabling)
                .enable(false)
                // Api selector
                .select()
                // Set the api information, pass in the parameter requesthandlerselectors, and configure the basePackage information (scan the specified basic package path)
                .apis(RequestHandlerSelectors.basePackage("com.kuang.swagger.controller"))
                // Construction (the design idea is factory mode)
                .build();
    }

    // Configure Swagger apiInfo
    private ApiInfo myApiInfo() {

        // Author's name, url and email address
        Contact contact = new Contact("Gallop de snail rz","https://mp.csdn.net/?spm=1000.2115.3001.4503","1441505359@qq.com");
        // The return value is to create a new ApiInfo class and set the basic information
        return new ApiInfo("custom SwaggerApi file",
                            "Riding the wind and waves sometimes, Hang cloud sails straight to the sea",
                            "V1.0",
                            "http://localhost:8080/hello",
                             contact,
                            "Apache 2.0",
                            "http://www.apache.org/licenses/LICENSE-2.0",
                            new ArrayList<>());
    }

}
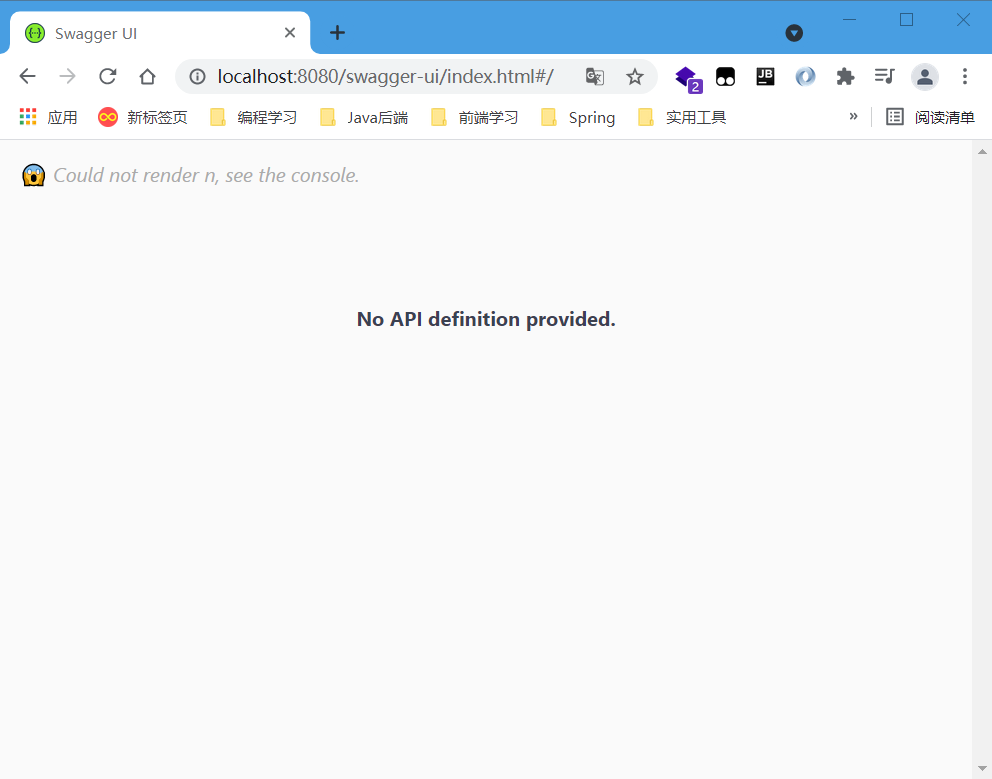
2. Access page test results
- It can be found that when we visit the index.html page of Swagger UI again, the Swagger API document information we expect does not appear. Instead, there is a bold reminder of "no API definition available" in the middle of the page. Carefully look at the upper left corner of the page, there is also a shocked emoji expression (inexplicably cute), followed by "can not represent n, See the prompt of "console"
9.5.2 setting Swagger can only be used in the development environment
1. General realization idea
If we only want Swagger to be used in the development environment, but not online, how should we implement it?
Implementation idea:
- Judge whether it is the production environment flag = false
- Inject enable(flag)
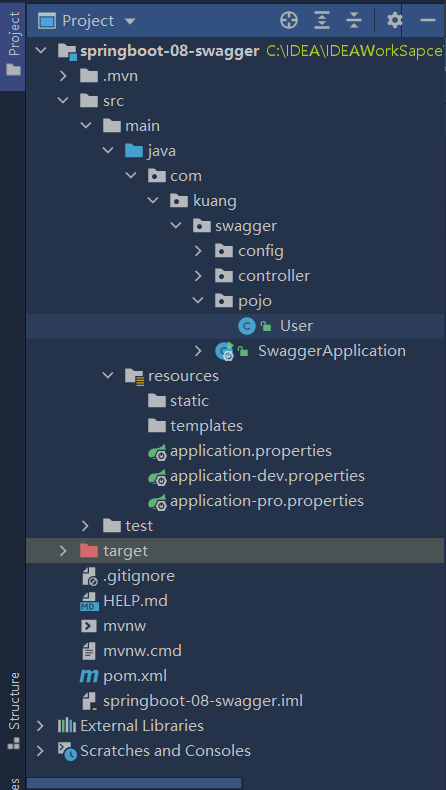
2. View the project structure and write the configuration file
2-1 the basic project structure is as follows:
- Create the application-dev.properties configuration file and application-pro.properties configuration file in the resources file directory, corresponding to the development environment and the online environment respectively
2-2 writing configuration file information
- Write the application.properties configuration file
# Core idea: open the development environment (dev) and close the online environment (pro)
# Set the active environment to dev (development environment)
spring.profiles.active=dev
- Write the application-dev.properties configuration file
# Set the port number of the development environment to 8081
server.port=8081
- Write the application-pro.properties configuration file
# Set the port number of the online environment to 800
server.port=8080
3. Analysis of profiles and Environment class source code
3-1 view the source code of Profiles class
package org.springframework.core.env;

// Use the @ FunctionalInterface annotation to indicate that it is a functional interface
@FunctionalInterface
public interface Profiles {

    /**
	 * Tests whether the Profiles instance matches the given active profile predicate
	 * @param activeProfiles Is a predicate that tests whether a given profile is active
	 */
    boolean matches(Predicate<String> var1);

    /**
     * of method
     * @param String profiles of type, where "..." represents variable length parameters
     * @return Returns a new profile class instance
     */
    static Profiles of(String... profiles) {
        return ProfilesParser.parse(profiles);
    }

}
3-2 view the source code of Environment class
package org.springframework.core.env;

// Environment interface, inheriting the parent class propertyresolver (property resolver)
public interface Environment extends PropertyResolver {

	/**
	 * Returns whether one or more specified profiles are active
	 * If there is no explicit active profile, whether to include one or more specified profiles in the set set of the default profile
	 * If a profile starts with "!", the logic is reversed. If the specified profile is not active, the method will return true
	 * For example, using env.acceptsProfiles("p1", "!p2") means that true will be returned if profile 'p1' is active or 'p2' is not active
	 * @throws If the parameter is set to 0 or any profile is nul, empty, or blank, an illegalargumentexception (illegal parameter exception) will be thrown
     * @ param  profiles Profile, whose type is String... And represents variable length String type
     * @ return boolean The type value is true or false
	 */
	@Deprecated // The @ Deprecated annotation indicates that the current version is outdated
	boolean acceptsProfiles(String... profiles);

	/**
	 * Returns a call to the getActiveProfiles() method to get whether the active profile matches the specified predicate Profiles
	 * @ param  profiles Profile, whose type is String... And represents variable length String type
     * @ return boolean The type value is true or false
	 */
	boolean acceptsProfiles(Profiles profiles);

}
4. Modify Swagger configuration class and test results
4-1 write Swagger configuration class implementation code
package com.kuang.swagger.config;

/**
 * @ClassName SwaggerConfig
 * @Description Swagger Configuration class
 * @Author Gallop de snail rz
 * @Date 2021/10/1
 */

// Register the SwaggerConfig class as a configuration class
@Configuration
// Turn on support for Swagger2
@EnableSwagger2
public class SwaggerConfig {

    // Use the @ Bean annotation to register the docket as a Bean node in the IOC container
    @Bean
    public Docket docket(Environment environment) {

        // Set the Swagger environment to be displayed (set "dev" and "pro" here to represent the development and online environment respectively)
        Profiles profiles = Profiles.of("dev","pro");

        // Determine whether you are in the environment you set by using the acceptsProfiles() method of the environment class
        boolean flag = environment.acceptsProfiles(profiles);

        // The return value is to create a new Docket class, and the parameter of its constructor is documentationtype.swagger_2 (indicating that the document type is Swagger2)
        return new Docket(DocumentationType.SWAGGER_2)
                // Set apiInfo to custom
                .apiInfo(myApiInfo())
                // Whether to enable swagger (the default is true, which means it is enabled. Here, it is set to false, that is, it does not turn off enabling)
//                .enable(false)
                //Judge the value of the flag bit to determine whether to turn on Swagger
                .enable(flag)
                // Api selector
                .select()
                // Set the api information, pass in the parameter requesthandlerselectors, and configure the basePackage information (scan the specified basic package path)
                .apis(RequestHandlerSelectors.basePackage("com.kuang.swagger.controller"))
                // Construction (the design idea is factory mode)
                .build();
    }

    // Configure Swagger apiInfo
    private ApiInfo myApiInfo() {

        // Author's name, url and email address
        Contact contact = new Contact("Gallop de snail rz","https://mp.csdn.net/?spm=1000.2115.3001.4503","1441505359@qq.com");
        // The return value is to create a new ApiInfo class and set the basic information
        return new ApiInfo("custom SwaggerApi file",
                            "Riding the wind and waves sometimes, Hang cloud sails straight to the sea",
                            "V1.0",
                            "http://localhost:8080/hello",
                             contact,
                            "Apache 2.0",
                            "http://www.apache.org/licenses/LICENSE-2.0",
                            new ArrayList<>());
    }

}
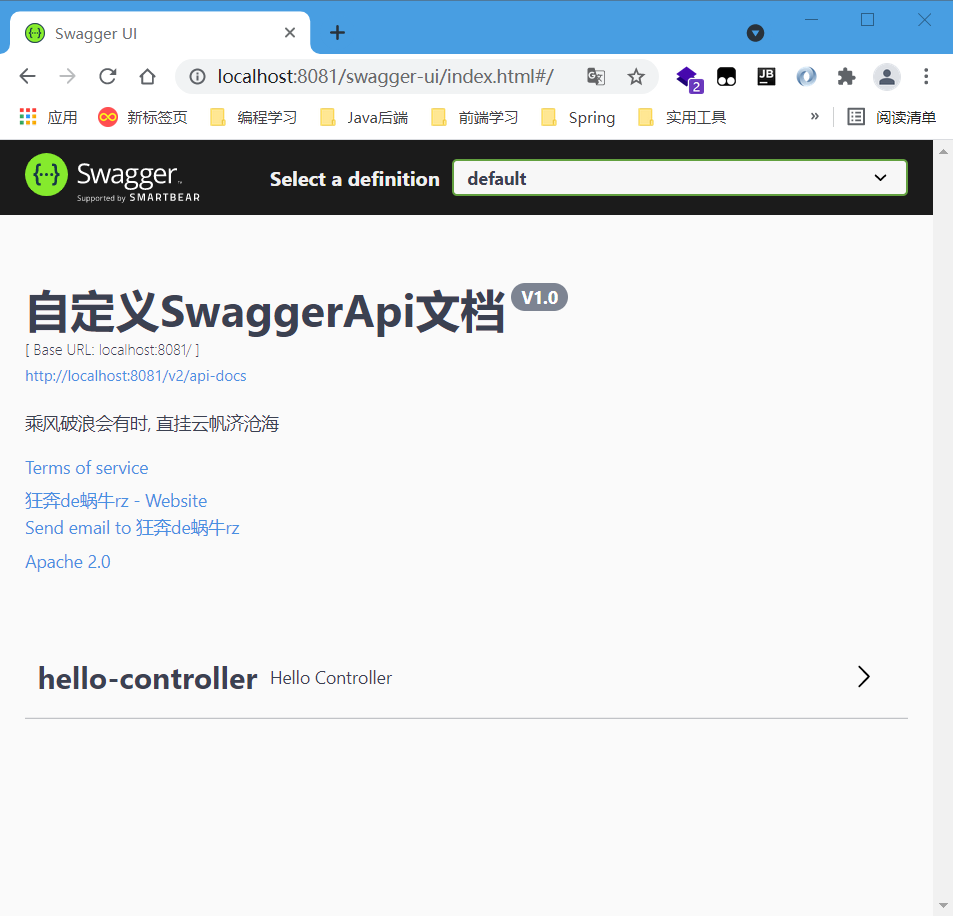
4-2 access page test results
- It can be found that the port number behind localhost is 8081, that is, the port number corresponding to the development environment
5. Change the active environment to production environment
5-1 modifying configuration file information
# Core idea: open the development environment (dev) and close the online environment (pro)
# Modify the active environment to pro (i.e. online environment)
spring.profiles.active=pro
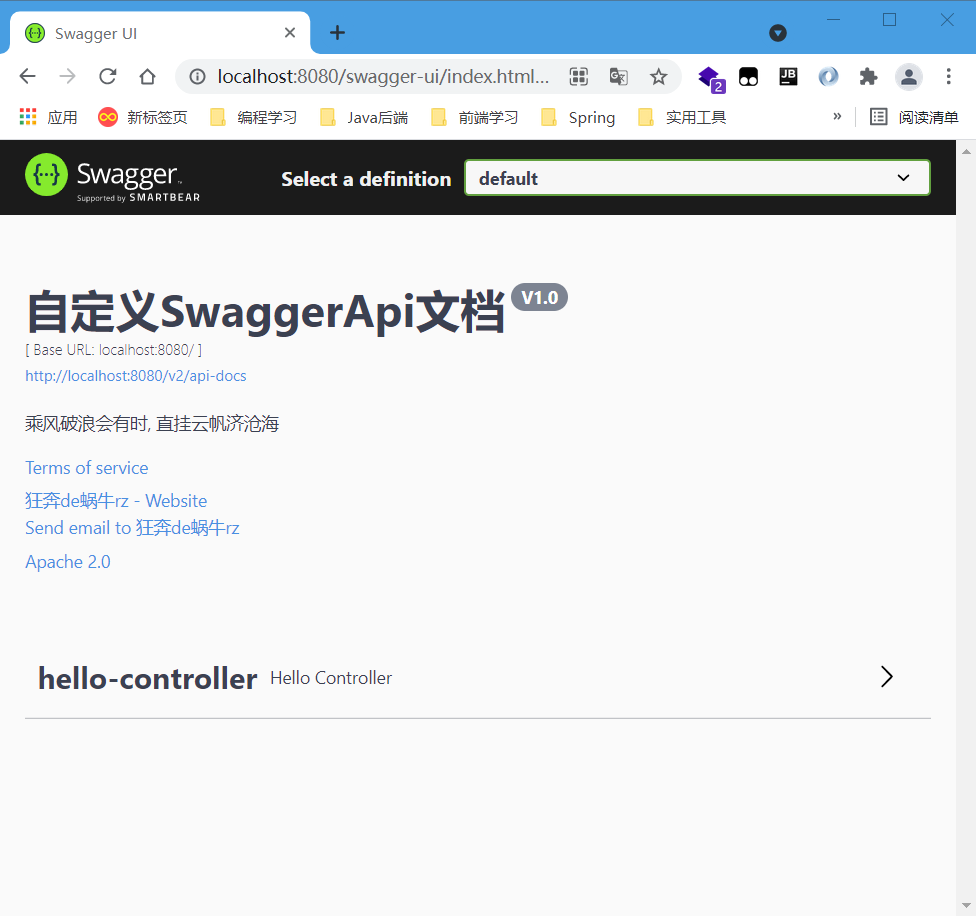
5-2 page access test results
- It can be found that the port number behind localhost is 8080, that is, the port number corresponding to the online environment
9.5.3 Swagger configuring multiple API document groups
1. General realization idea
- How to configure grouping of multiple API documents?
Just create multiple Docket instances. Be careful not to duplicate the names!
2. Modify Swagger configuration class
package com.kuang.swagger.config;

/**
 * @ClassName SwaggerConfig
 * @Description Swagger Configuration class
 * @Author Gallop de snail rz
 * @Date 2021/10/1
 */

// Register the SwaggerConfig class as a configuration class
@Configuration
// Turn on support for Swagger2
@EnableSwagger2
public class SwaggerConfig {

    /**
     * Configure multiple groupings of API documents
     */

    // Use the @ Bean annotation to register docket1 as a Bean node in the IOC container
    @Bean
    public Docket docket1() {
        //The return value is to create a Docket class (its parameter document type is Swagger2) and set its group alias to "development B"
        return new Docket(DocumentationType.SWAGGER_2).groupName("development B");
    }

    // Use the @ Bean annotation to register docket2 as a Bean node in the IOC container
    @Bean
    public Docket docket2() {
        //The return value is to create a Docket class (its parameter document type is Swagger2) and set its group alias to "test 1"
        return new Docket(DocumentationType.SWAGGER_2).groupName("Test 1");
    }

    // Use the @ Bean annotation to register docket3 as a Bean node in the IOC container
    @Bean
    public Docket docket3() {
        //The return value is to create a Docket class (its parameter document type is Swagger2) and set its group alias to "test 2"
        return new Docket(DocumentationType.SWAGGER_2).groupName("Test 2");
    }

    // Use the @ Bean annotation to register the docket as a Bean node in the IOC container
    @Bean
    public Docket docket(Environment environment) {

        // Set the Swagger environment to be displayed (set "dev" and "pro" here to represent the development and production environment respectively)
        Profiles profiles = Profiles.of("dev","pro");

        //Determine whether you are in the environment you set by using the acceptsProfiles() method of the environment class
        boolean flag = environment.acceptsProfiles(profiles);

        // The return value is to create a new Docket class, and the parameter of its constructor is documentationtype.swagger_ 2 (indicates that the document type is Swagger2)
        return new Docket(DocumentationType.SWAGGER_2)
                // Set apiInfo to custom
                .apiInfo(myApiInfo())
                //Set the group name as "development A"
                .groupName("development A")
                //Judge the value of the flag bit to determine whether to turn on Swagger
                .enable(flag)
                // Api selector
                .select()
                // Set the api information, pass in the parameter requesthandlerselectors, and configure the basePackage information (scan the specified basic package path)
                .apis(RequestHandlerSelectors.basePackage("com.kuang.swagger.controller"))
                // Construction (the design idea is factory mode)
                .build();
    }

    // Configure Swagger apiInfo
    private ApiInfo myApiInfo() {

        // Author's name, url and email address
        Contact contact = new Contact("Gallop de snail rz","https://mp.csdn.net/?spm=1000.2115.3001.4503","1441505359@qq.com");
        // The return value is to create a new ApiInfo class and set the basic information
        return new ApiInfo("custom SwaggerApi file",
                            "Riding the wind and waves sometimes, Hang cloud sails straight to the sea",
                            "V1.0",
                            "http://localhost:8080/hello",
                             contact,
                            "Apache 2.0",
                            "http://www.apache.org/licenses/LICENSE-2.0",
                            new ArrayList<>());
    }

}
3. Access page test results
3-1 accessing the "development A" group

3-2 accessing the "development B" group

3-3 accessing the test 1 group

3-3 access test 2 group

9.5.4 setting Models of API documents
1. Basic structure of the project
- Create a pojo package under the com.kuang.swagger package under the src source file to create the User entity class

2. Write User entity class
be careful:
To facilitate the demonstration, the fields of the User entity class are decorated with public. Of course, this will not be done in real development.
If you are not used to this, you only need to modify the field of the entity class to private, and then generate the corresponding get and set methods!
2-1 the user entity class is decorated with public
package com.kuang.swagger.pojo;

import io.swagger.annotations.ApiModel;
import io.swagger.annotations.ApiModelProperty;

/**
 * @ClassName User
 * @Description User Entity class
 * @Author Gallop de snail rz
 * @Date 2021/10/3
 */

public class User {

   // user name
   public String username;
   // password
   public String password;

}
2-2 the user entity class is decorated with private
package com.kuang.swagger.pojo;

import io.swagger.annotations.ApiModel;
import io.swagger.annotations.ApiModelProperty;

/**
 * @ClassName User
 * @Description User Entity class
 * @Author Gallop de snail rz
 * @Date 2021/10/3
 */

public class User {

    // user name
    private String username;
    // password
    private String password;

    /**
     * Generate corresponding get and set methods
     */

    public String getUsername() {
        return username;
    }

    public void setUsername(String username) {
        this.username = username;
    }

    public String getPassword() {
        return password;
    }

    public void setPassword(String password) {
        this.password = password;
    }

    // Parameterized constructor
    public User(String username, String password) {
        this.username = username;
        this.password = password;
    }

}
3. Modify the Hello front-end controller code
package com.kuang.swagger.controller;

import com.kuang.swagger.pojo.User;
import org.springframework.web.bind.annotation.*;

/**
 * @ClassName HelloController
 * @Description Hello Front end controller
 * @Author Gallop de snail rz
 * @Date 2021/10/3
 */

// Use the @ RestController annotation to implement the Controller interface and make the method return a string
@RestController
public class HelloController {

    // Use the @ GetMapping annotation to set the request mapping path. The request method is get type
    @GetMapping("/hello")
    public String hello() {
        return "hello";
    }

    // Use the @ PostMapping annotation to set the request mapping path. The request method is post type
    @PostMapping("/addUser")
    // As long as there is an entity class in the return value of the interface, it will be scanned into Swagger
    public User addUser () {
        // The return value creates a User object for
        return new User();
    }

}
4. Add API document comments to the user entity class
4-1 modifying User entity class
package com.kuang.swagger.pojo;

import io.swagger.annotations.ApiModel;
import io.swagger.annotations.ApiModelProperty;

/**
 * @ClassName User
 * @Description User Entity class
 * @Author Gallop de snail rz
 * @Date 2021/10/3
 */

// Use @ ApiModel annotation to annotate the entity class
@ApiModel("User entity class")
public class User {

    /**
     * user name
     * Use the @ ApiModelProperty annotation to annotate the entity class field
     */
    @ApiModelProperty("user name")
    private String username;

    /**
    * password
    * Use the @ ApiModelProperty annotation to annotate the entity class field
    */
    @ApiModelProperty("user name")
    private String password;

    /**
     * Generate corresponding get and set methods
     */

    public String getUsername() {
        return username;
    }

    public void setUsername(String username) {
        this.username = username;
    }

    public String getPassword() {
        return password;
    }

    public void setPassword(String password) {
        this.password = password;
    }

    // Parameterized constructor
    public User(String username, String password) {
        this.username = username;
        this.password = password;
    }

}
4-2 access page test results
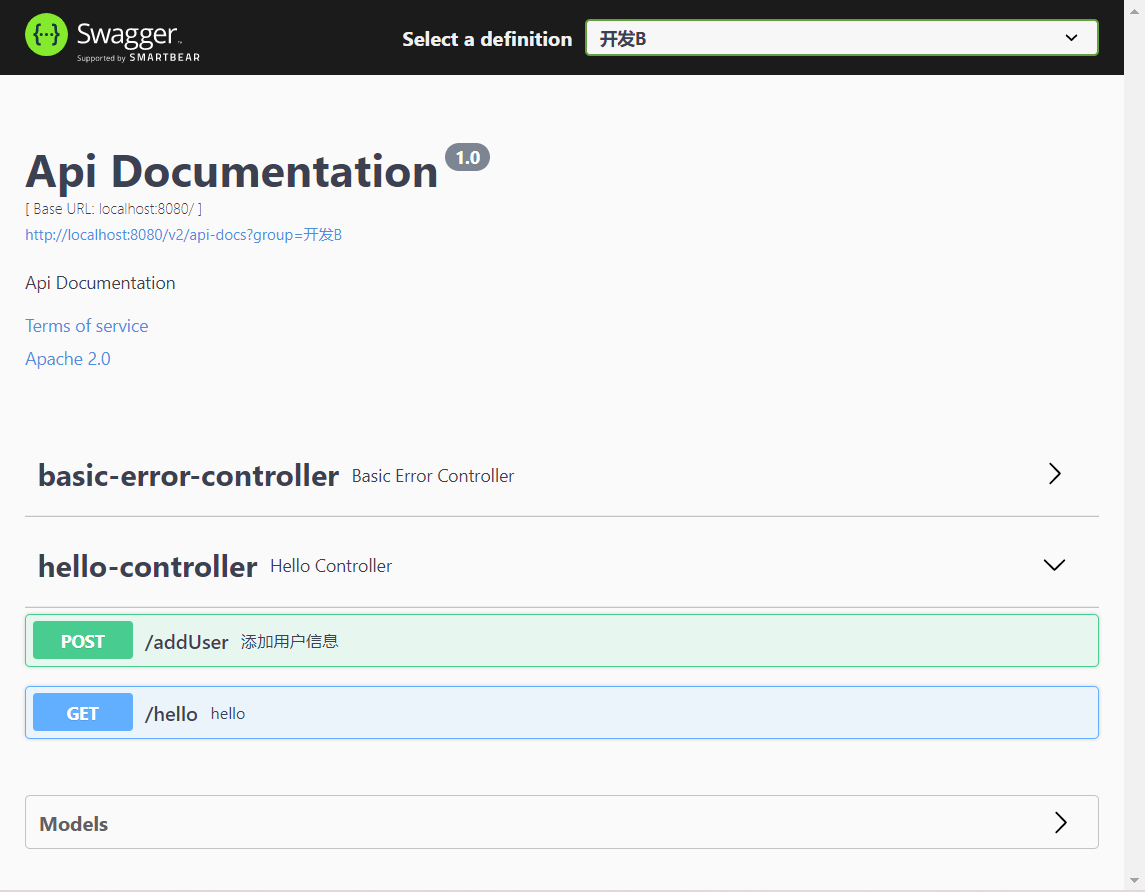
-
Access development B group
Select development group B in the selection group in the upper right corner of the page

-
No document comments
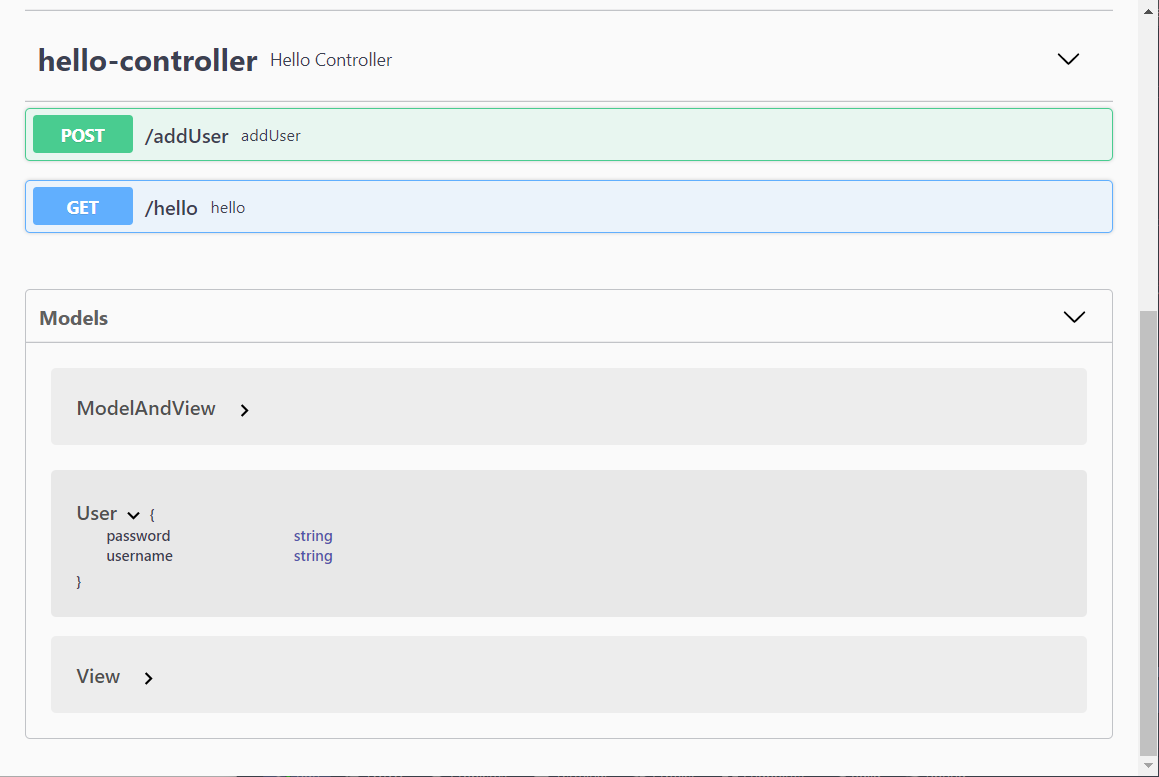
You can find that the User entity classes and fields in the Models model do not have any comments
-
After adding document comments
You can find that the User entity class and field in the Models model are annotated

9.6 setting Swagger document comments
9.6.1 add only method notes
1. Modify Hello front-end controller code
package com.kuang.swagger.controller;

/**
 * @ClassName HelloController
 * @Description Hello Front end controller
 * @Author Gallop de snail rz
 * @Date 2021/10/4
 */

// Use the @ RestController annotation to implement the Controller interface and make the method return a string
@RestController
public class HelloController {

    // Use the @ GetMapping annotation to set the request mapping path. The request method is get type
    @GetMapping("/hello")
    public String hello() {
        return "hello";
    }

    // Use @ ApiOperation to set the document comment of the method
    @ApiOperation("Add user information")
    // Use the @ PostMapping annotation to set the request mapping path. The request method is post type
    @PostMapping("/addUser")
    // As long as there is an entity class in the return value of the interface, it will be scanned into Swagger
    public User addUser () {
        // The return value creates a User object for
        return new User();
    }

}
2. View the page and access the test results
- You can find that the comment "add user information" is added after the addUser method of the Hello controller controller
9.6.2 add method notes and parameter notes
1. Modify Hello front-end controller code
package com.kuang.swagger.controller;

/**
 * @ClassName HelloController
 * @Description Hello Front end controller
 * @Author Gallop de snail rz
 * @Date 2021/10/4
 */

// Use the @ Api(tags = "XXX") annotation to set the document annotation of the controller class
@Api(tags = "Hello Front end controller class")
// Use the @ RestController annotation to implement the Controller interface and make the method return a string
@RestController
public class HelloController {

    // Use @ ApiOperation to set the document comment of the method
    @ApiOperation("Add user information")
    // Use the @ PostMapping annotation to set the request mapping path. The request method is post type
    @PostMapping("/addUser")
    // As long as there is an entity class in the return value of the interface, it will be scanned into Swagger
    public User addUser () {
        // The return value creates a User object for
        return new User();
    }

    // Use @ ApiOperation to set the document comment of the method
    @ApiOperation("Get user information")
    // Use the @ GetMapping annotation to set the request mapping path. The request method is of type get, {username} represents the placeholder
    @GetMapping("/getUser")
    // Use the @ ApiParam annotation to set the parameter document annotation of the method
    public String getUser (@ApiParam("user name") String username) {
        //The return value is "helloXXX"
        return "hello"+username;
    }

}
2. View the page and access the test results
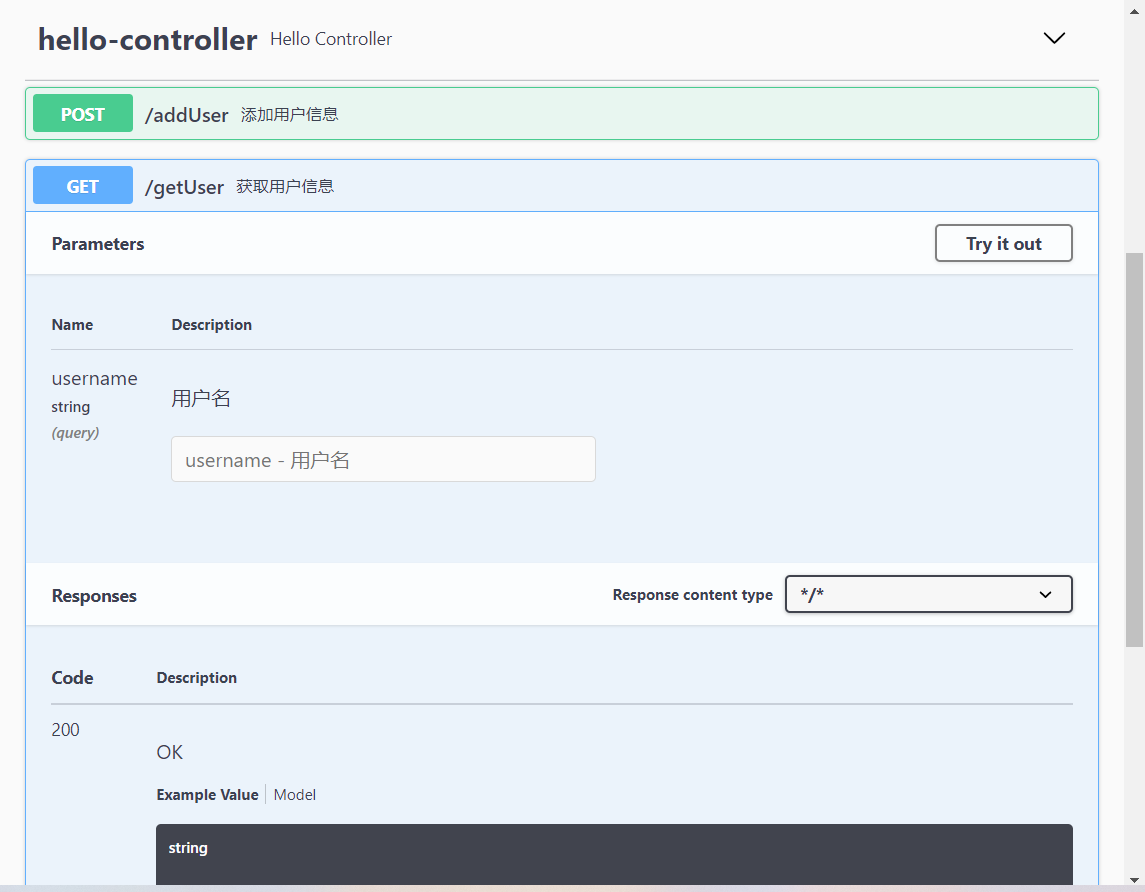
- It can be found that the comment of "user information" is added after the getUser method of the Hello controller controller, and the comment of "user name" is also added after the parameter username of the method!
9.6.3 add method comments, parameters and class comments
1. Modify Hello front-end controller code
package com.kuang.swagger.controller;

import com.kuang.swagger.pojo.User;
import io.swagger.annotations.Api;
import io.swagger.annotations.ApiOperation;
import io.swagger.annotations.ApiParam;
import org.springframework.web.bind.annotation.*;

/**
 * @ClassName HelloController
 * @Description Hello Front end controller
 * @Author Gallop de snail rz
 * @Date 2021/10/4
 */

// Use the @ Api(tags = "XXX") annotation to set the document annotation of the controller class
@Api(tags = "Hello Front end controller class")
// Use the @ RestController annotation to implement the Controller interface and make the method return a string
@RestController
public class HelloController {

    // Use @ ApiOperation to set the document comment of the method
    @ApiOperation("Add user information")
    // Use the @ PostMapping annotation to set the request mapping path. The request method is post type
    @PostMapping("/addUser")
    // As long as there is an entity class in the return value of the interface, it will be scanned into Swagger
    public User addUser () {
        // The return value creates a User object for
        return new User();
    }

    // Use @ ApiOperation to set the document comment of the method
    @ApiOperation("Get user information")
    // Use the @ GetMapping annotation to set the request mapping path. The request method is of type get, {username} represents the placeholder
    @GetMapping("/getUser")
    // Use the @ ApiParam annotation to set the parameter document annotation of the method
    public String getUser (@ApiParam("user name") String username) {
        // The return value is "helloXXX"
        return "hello"+username;
    }

}
2. View the page and access the test results
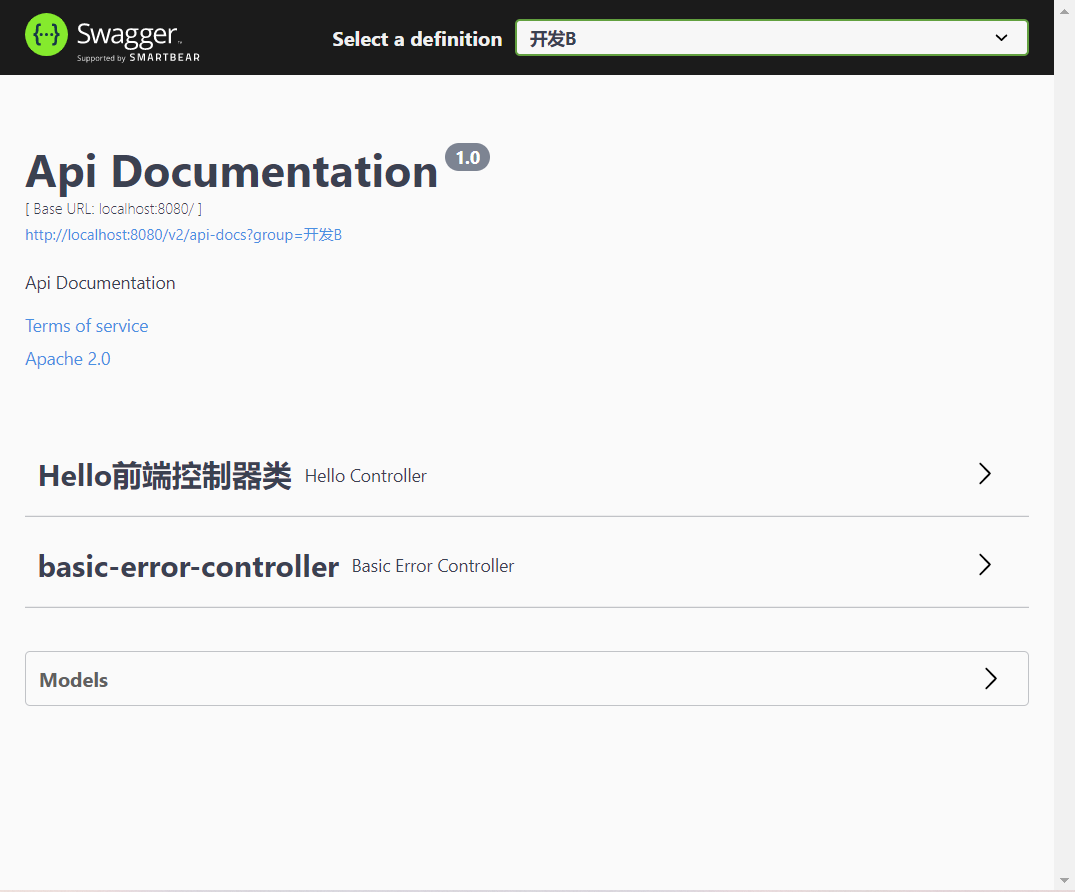
- You can find that the Hello Controller in front of the Hello Controller is displayed as a comment for the "Hello front-end controller class"
9.7 Swagger online test
9.7.1 test of obtaining user information
1. Modify Hello front-end controller
package com.kuang.swagger.controller;

import com.kuang.swagger.pojo.User;
import io.swagger.annotations.Api;
import io.swagger.annotations.ApiOperation;
import io.swagger.annotations.ApiParam;
import org.springframework.web.bind.annotation.*;

/**
 * @ClassName HelloController
 * @Description Hello Front end controller
 * @Author Gallop de snail rz
 * @Date 2021/10/4
 */

// Use the @ Api(tags = "XXX") annotation to set the document annotation of the controller class
@Api(tags = "Hello Front end controller class")
// Use the @ RestController annotation to implement the Controller interface and make the method return a string
@RestController
public class HelloController {

    // Use @ ApiOperation to set the document comment of the method
    @ApiOperation("Get user information")
    // Use the @ GetMapping annotation to set the request mapping path. The request method is of type get, {username} represents the placeholder
    @GetMapping("/getUser/{username}")
    // Use the @ ApiParam annotation to set the parameter document annotation of the method
    // Use the @ PathVariable annotation to bind the specified parameter to the url path
    public String getUser (@ApiParam("user name") @PathVariable("username") String username) {
        // The return value is "helloXXX"
        return "hello"+username;
    }

}
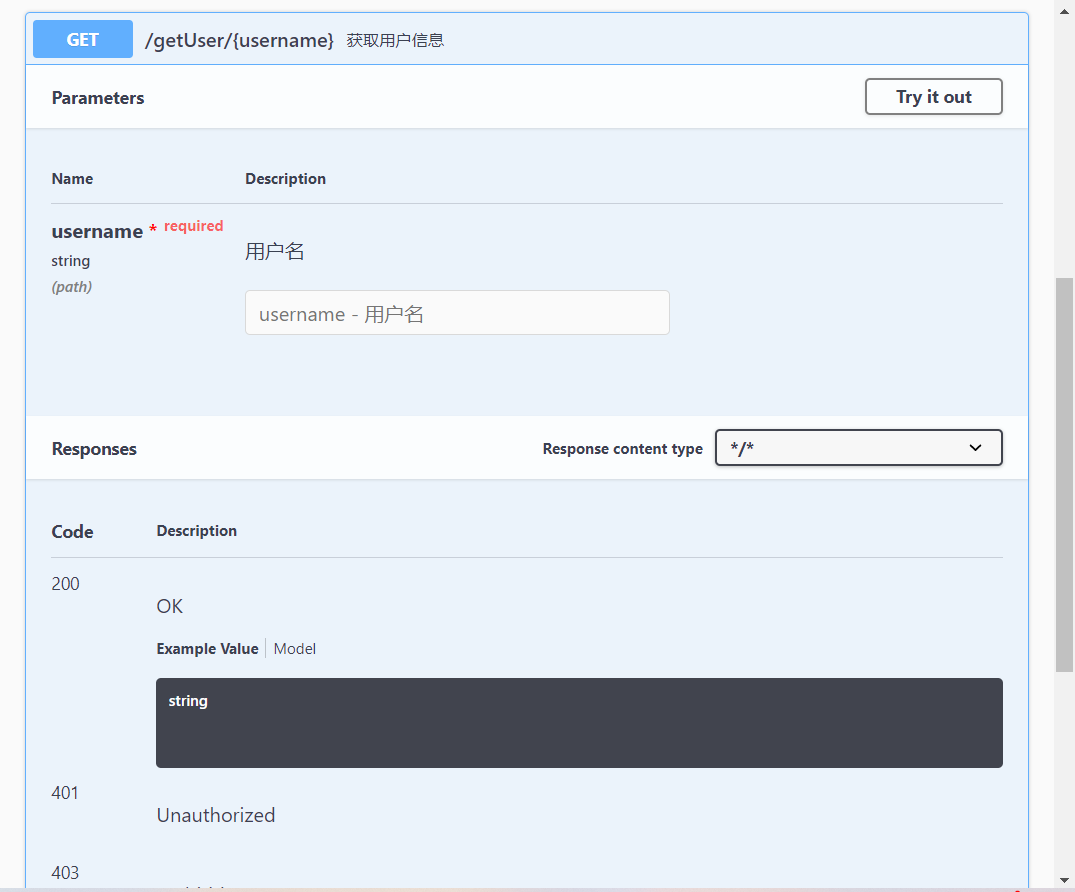
2. Test process
2-1 enter the test page
- First, after clicking the getUser method, you can see that an online test page containing Parameters and Responses response information appears
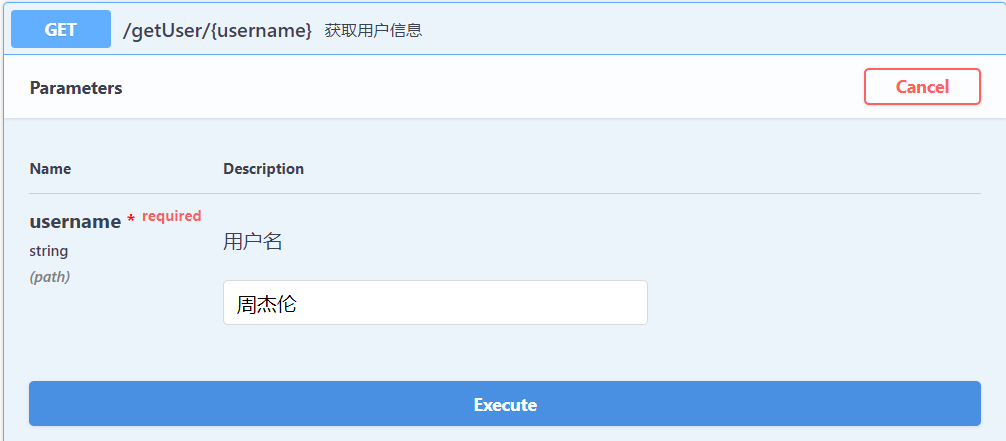
2-2 setting test information
- Then click the "Try it out" button in the upper right corner of the test page (i.e. try it), and you will enter the debugging page. Enter "Jay Chou" in the input box behind the username in the praameters parameter, and then click the "Execute" button to test
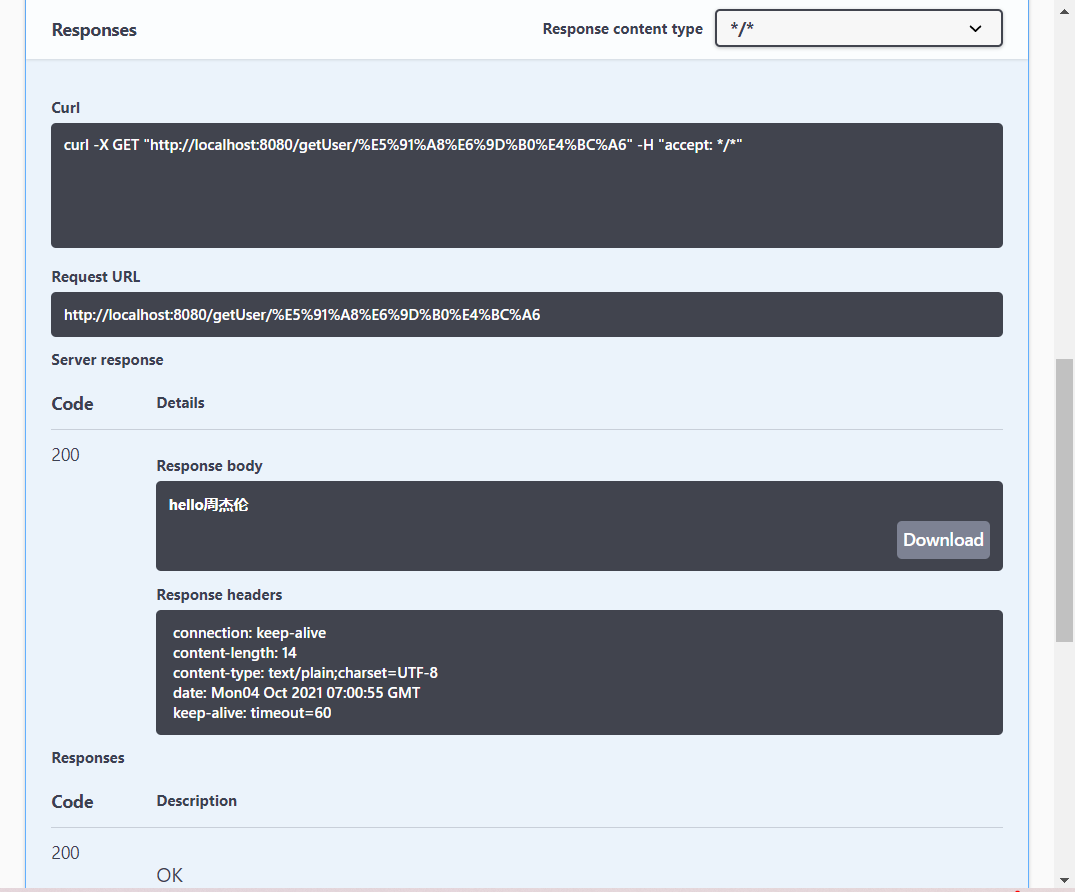
3. Test results
- Finally, we can see that the Code status Code is 200 in the responses, and the information of "hello Jay Chou" is successfully displayed in the response body in the details
9.7.2 add user information test
1. Modify Hello front-end controller
package com.kuang.swagger.controller;

import com.kuang.swagger.pojo.User;
import io.swagger.annotations.Api;
import io.swagger.annotations.ApiOperation;
import io.swagger.annotations.ApiParam;
import org.springframework.web.bind.annotation.*;

/**
 * @ClassName HelloController
 * @Description Hello Front end controller
 * @Author Gallop de snail rz
 * @Date 2021/10/4
 */

// Use the @ Api(tags = "XXX") annotation to set the document annotation of the controller class
@Api(tags = "Hello Front end controller class")
// Use the @ RestController annotation to implement the Controller interface and make the method return a string
@RestController
public class HelloController {

    // Use @ ApiOperation to set the document comment of the method
    @ApiOperation("Add user information")
    // Use the @ PostMapping annotation to set the request mapping path. The request method is post type
    @PostMapping("/addUser")
    // As long as there is an entity class in the return value of the interface, it will be scanned into Swagger
    // Use the @ RequestBody annotation to automatically bind JSON format parameters to the User entity class
    public User addUser (@ApiParam("User entity class") @RequestBody User user) {
        //The return value is the user object
        return user;
    }

}
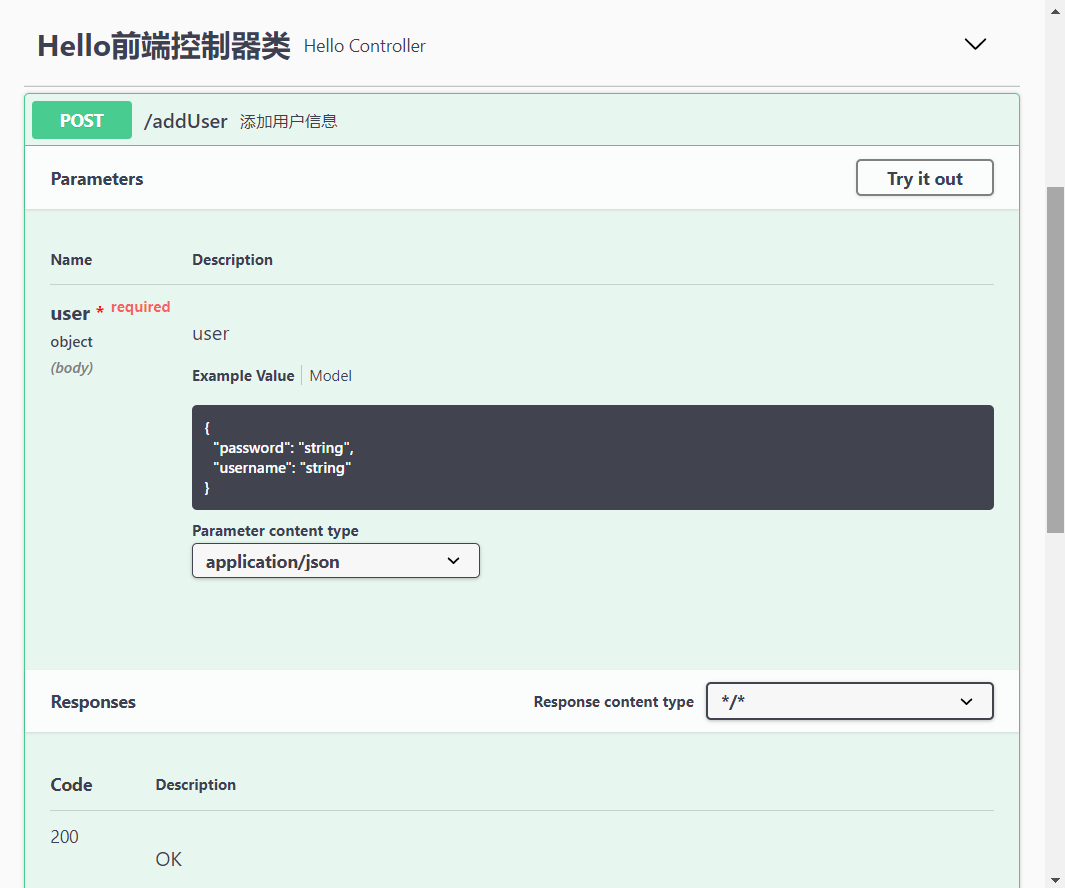
2. Test process
2-1 enter the test page
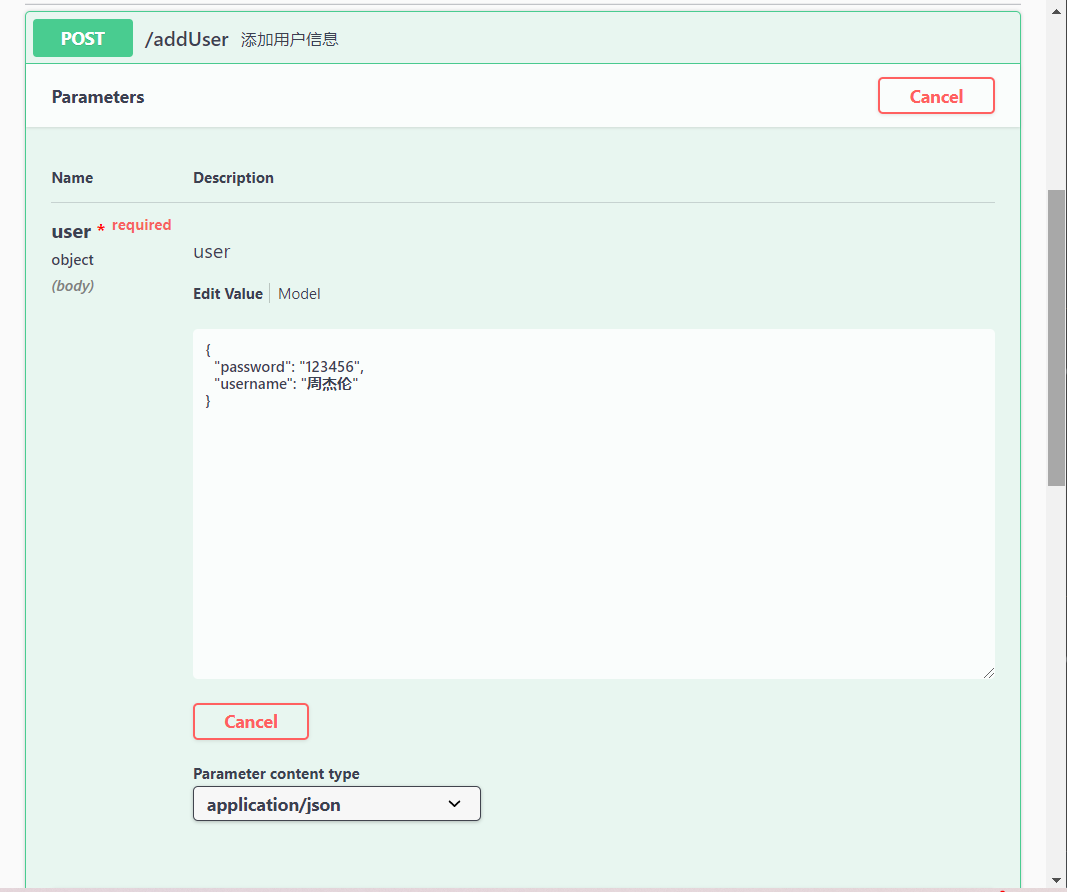
- First, after clicking the addUser method, you can see that an online test page containing Parameters and Responses response information appears
2-2 setting test information
- Then click the "Try it out" button in the upper right corner of the test page (i.e. try it), and you will enter the debugging page. Write the json format information in the "Edit Value" text field after the user in the Prameters parameter (Note: the parameter content type under the Edit Value is "application/json"), for example {"password": "123456", "username": "Jay Chou"}, and then click the "Execute" button to test
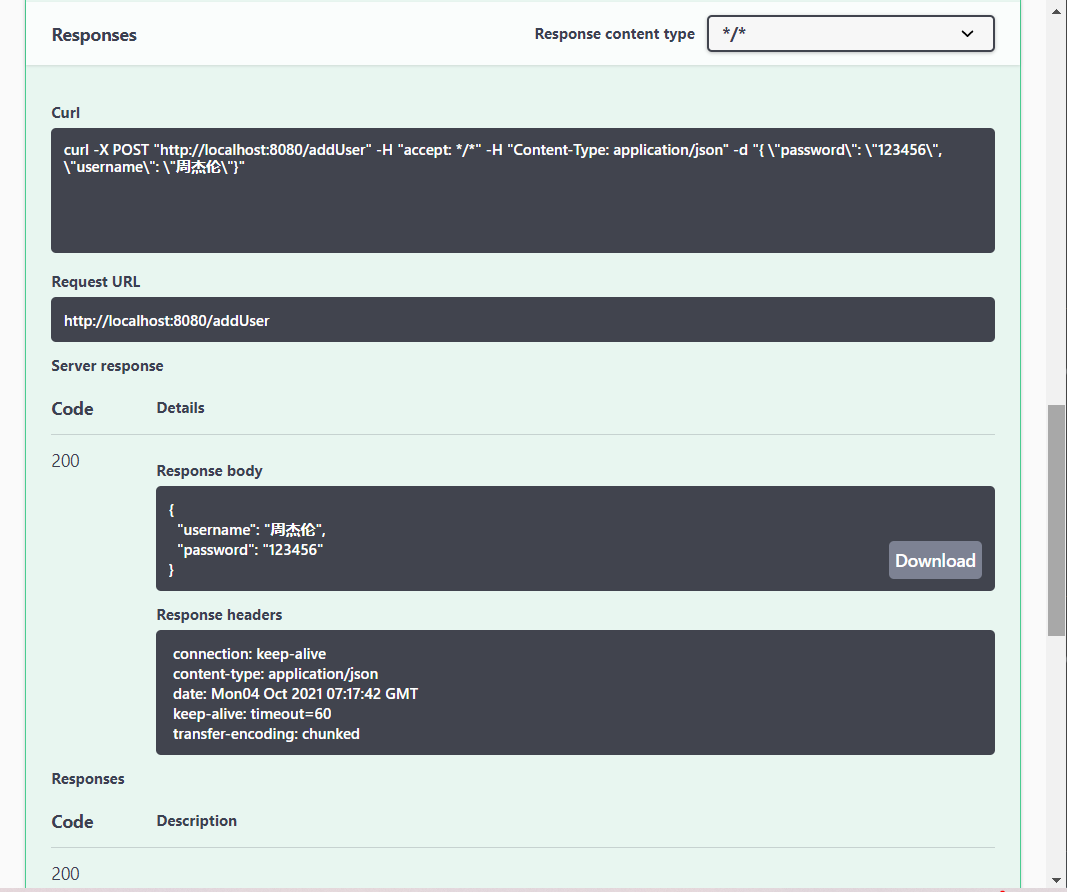
3. Test results
- Finally, we can see that the Code status Code is 200 in the responses, and the user information in json format is successfully displayed in the response body in the details
9.8 Usage Summary of swagger
Summary:
- By using Swagger, add document annotation information to difficult interfaces or attributes (to prevent front-end and back-end development quarrels)!
- API interface documents can be updated in real time, and the front end can see the update information of the back end in time (so the back end can't be lazy)!
- At the same time, it supports online testing, which is equivalent to postman, efficient and convenient!
- Swagger is an excellent API documentation tool, which is used by many and all large companies!
Note: when the project is officially released, remember to close Swagger. On the one hand, for security reasons, on the other hand, save memory!
Well, today's study on the integration of Swagger framework (Part I) of SpringBoot basic learning is over. Welcome to actively study and discuss. If you like, you can pay attention to Mr. snail. By the way, let's have a one click three links. See you next time. Bye!
Reference blog link: https://zhuanlan.zhihu.com/p/40819897 (SpringFox first experience)
Reference video link: https://www.bilibili.com/video/BV1PE411i7CV([crazy God says Java] the latest tutorial of SpringBoot, the IDEA version is easy to understand)