1, Product creation
1. Functional requirements
| APP end function | describe |
|---|---|
| Mode selection | Preservation mode and deodorization mode |
| Deodorization time | You can define the deodorization working time of the equipment |
| Deodorization gear adjustment | Strong, medium and weak grades are supported |
| Low power alarm | Low battery report, APP end alarm |
| Device end function | describe |
|---|---|
| Distribution network mode | Press and hold the key for 5s, the equipment enters the distribution network state, and the indicator flashes quickly |
| Deodorization gear adjustment | Short press the key to cycle the strong, medium and weak gears |
| Reset button | Short press the reset button to reset the program |
2. Environment construction
(1) Product creation
The intelligent deodorant uses the panel of temperature and humidity sensor this time. Therefore, when creating the product, select the temperature and humidity sensor under the sensing category, and the communication mode is Bluetooth.
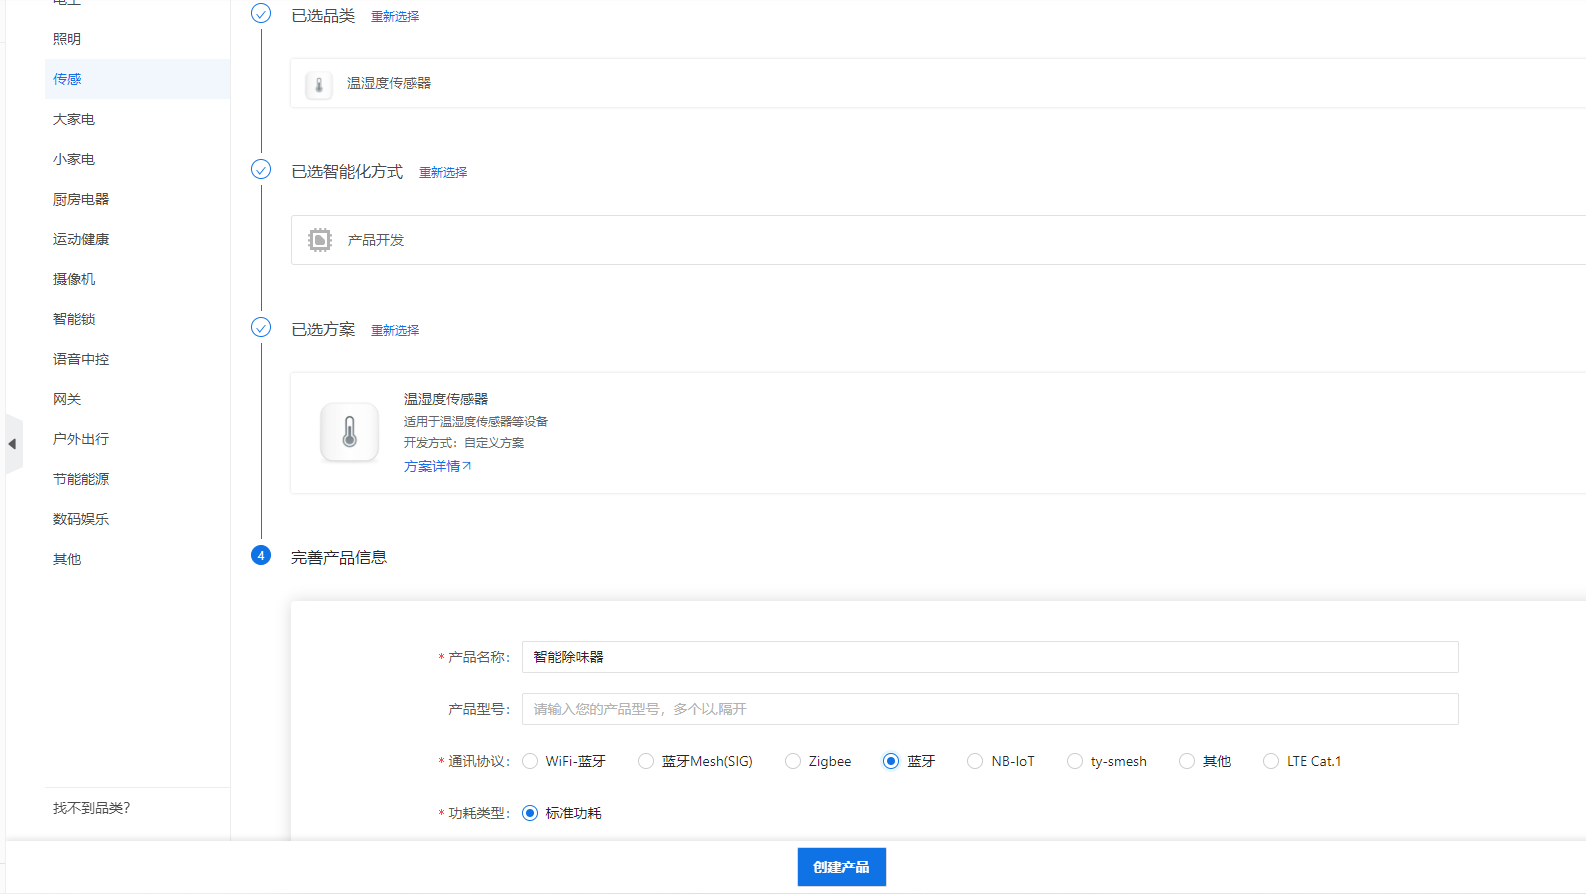
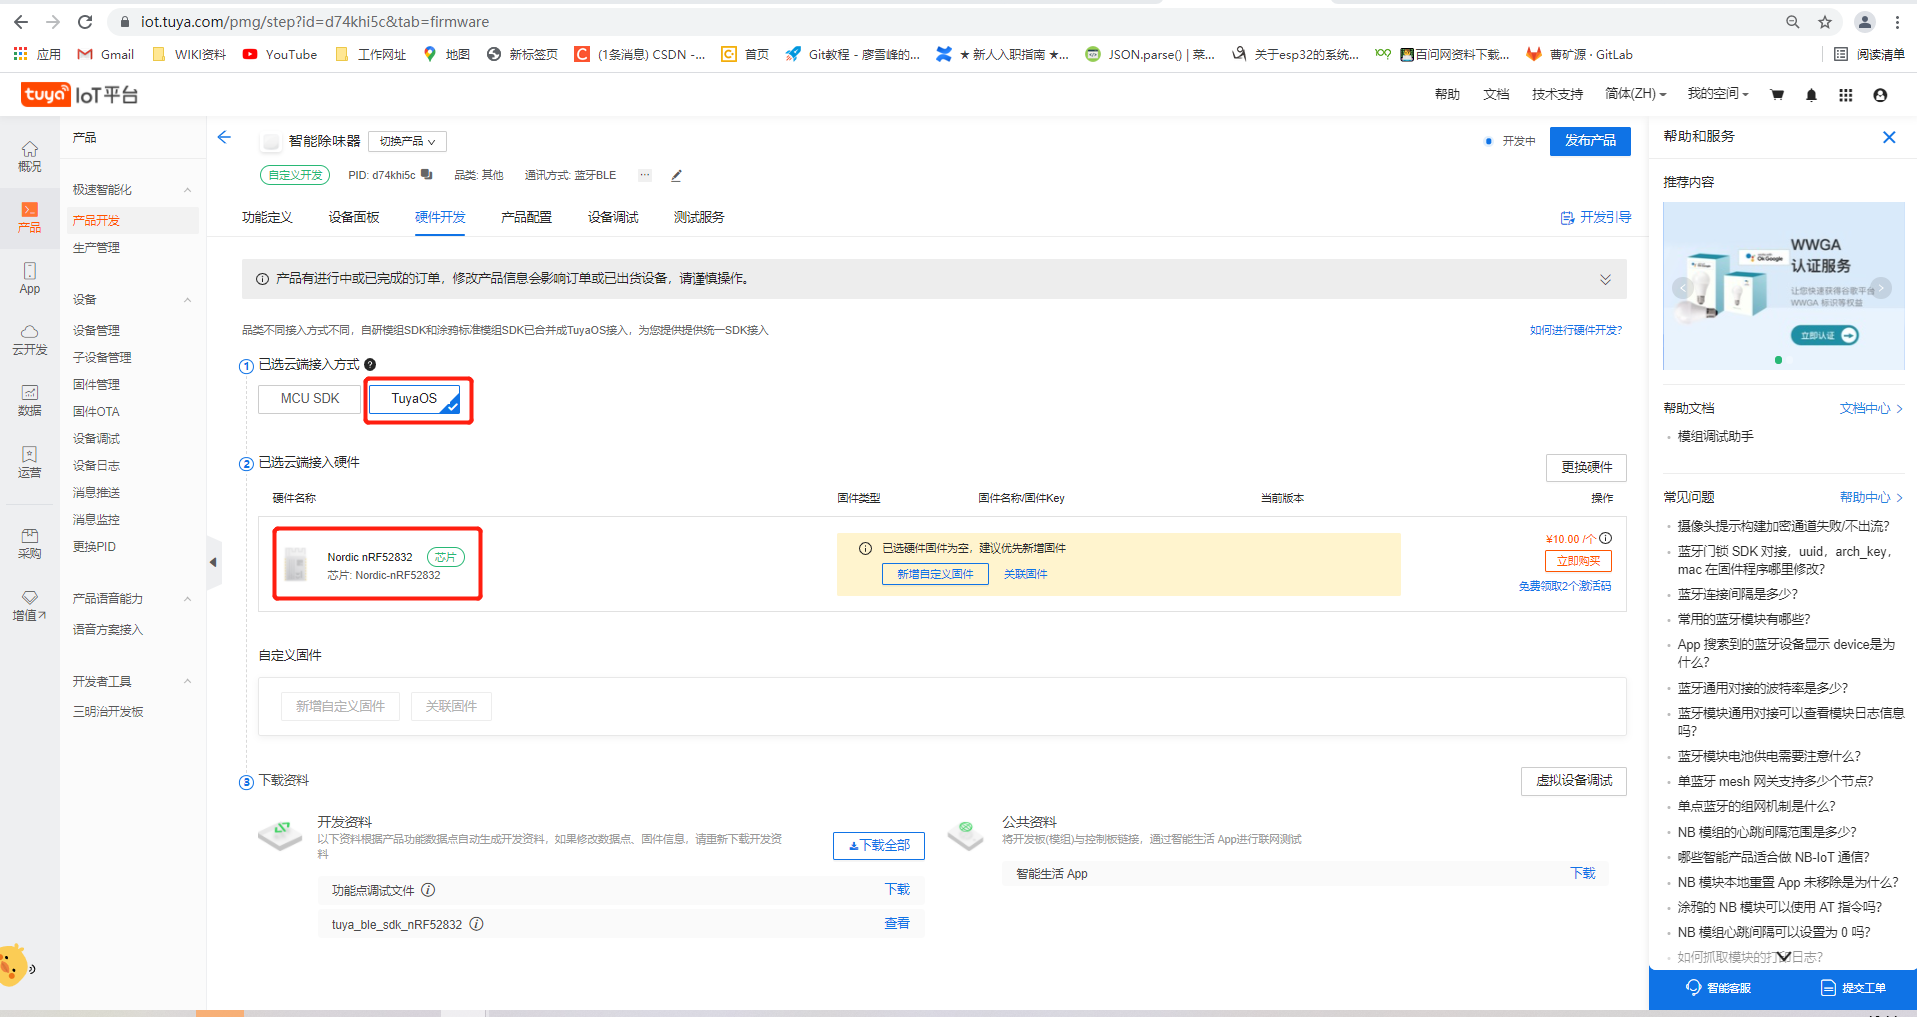
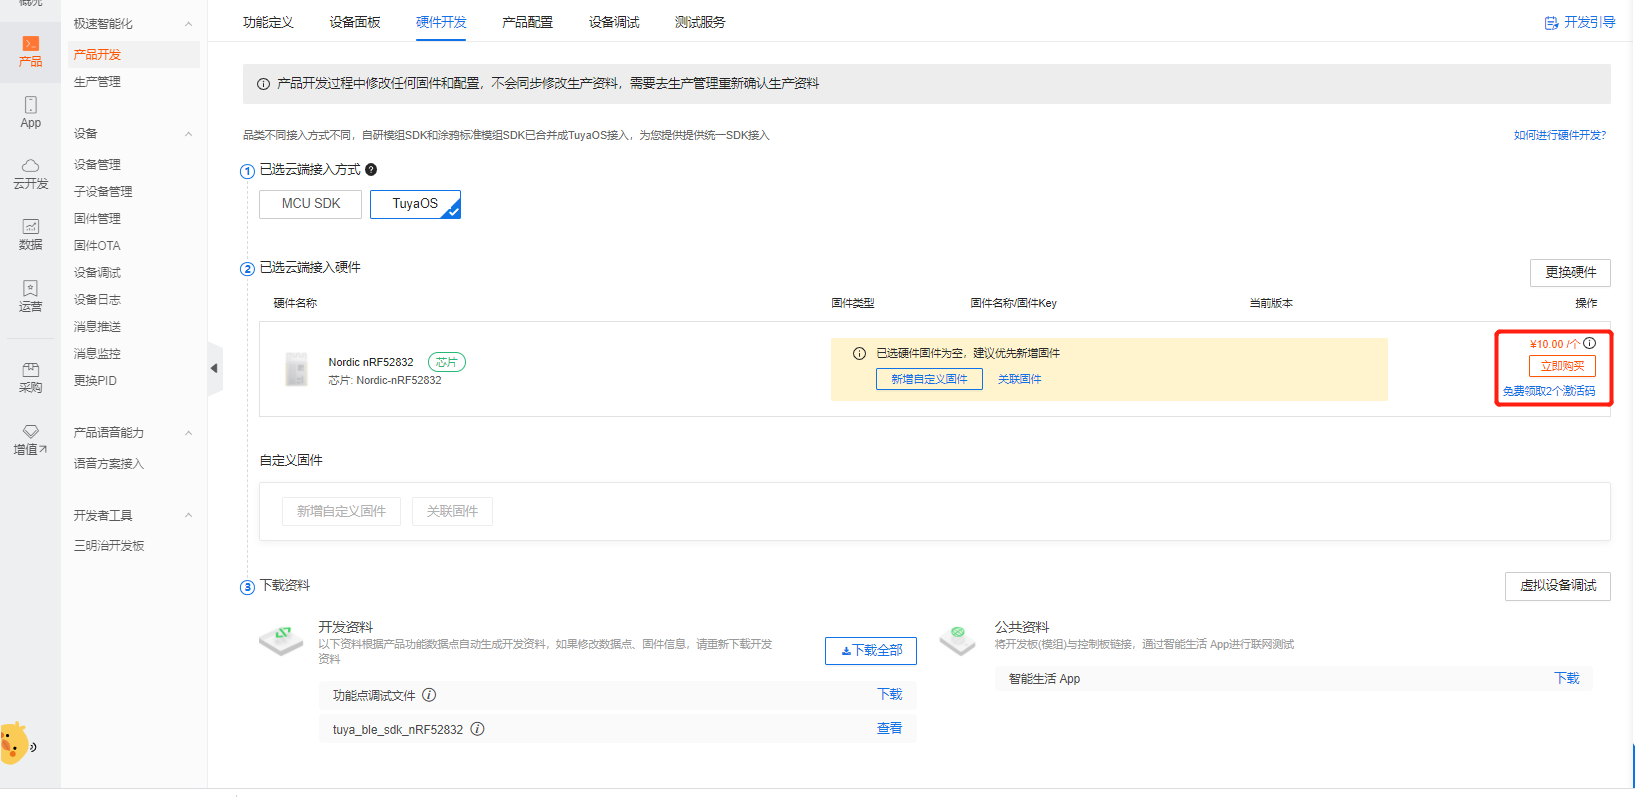
All function points are selected by default (arbitrary deletion may cause panel data loss or failure to open the panel, etc.). Select the temperature and humidity Studio panel for the panel. In the hardware development, select the corresponding module, and finally receive the activation code for subsequent development.
(2) Get sdk
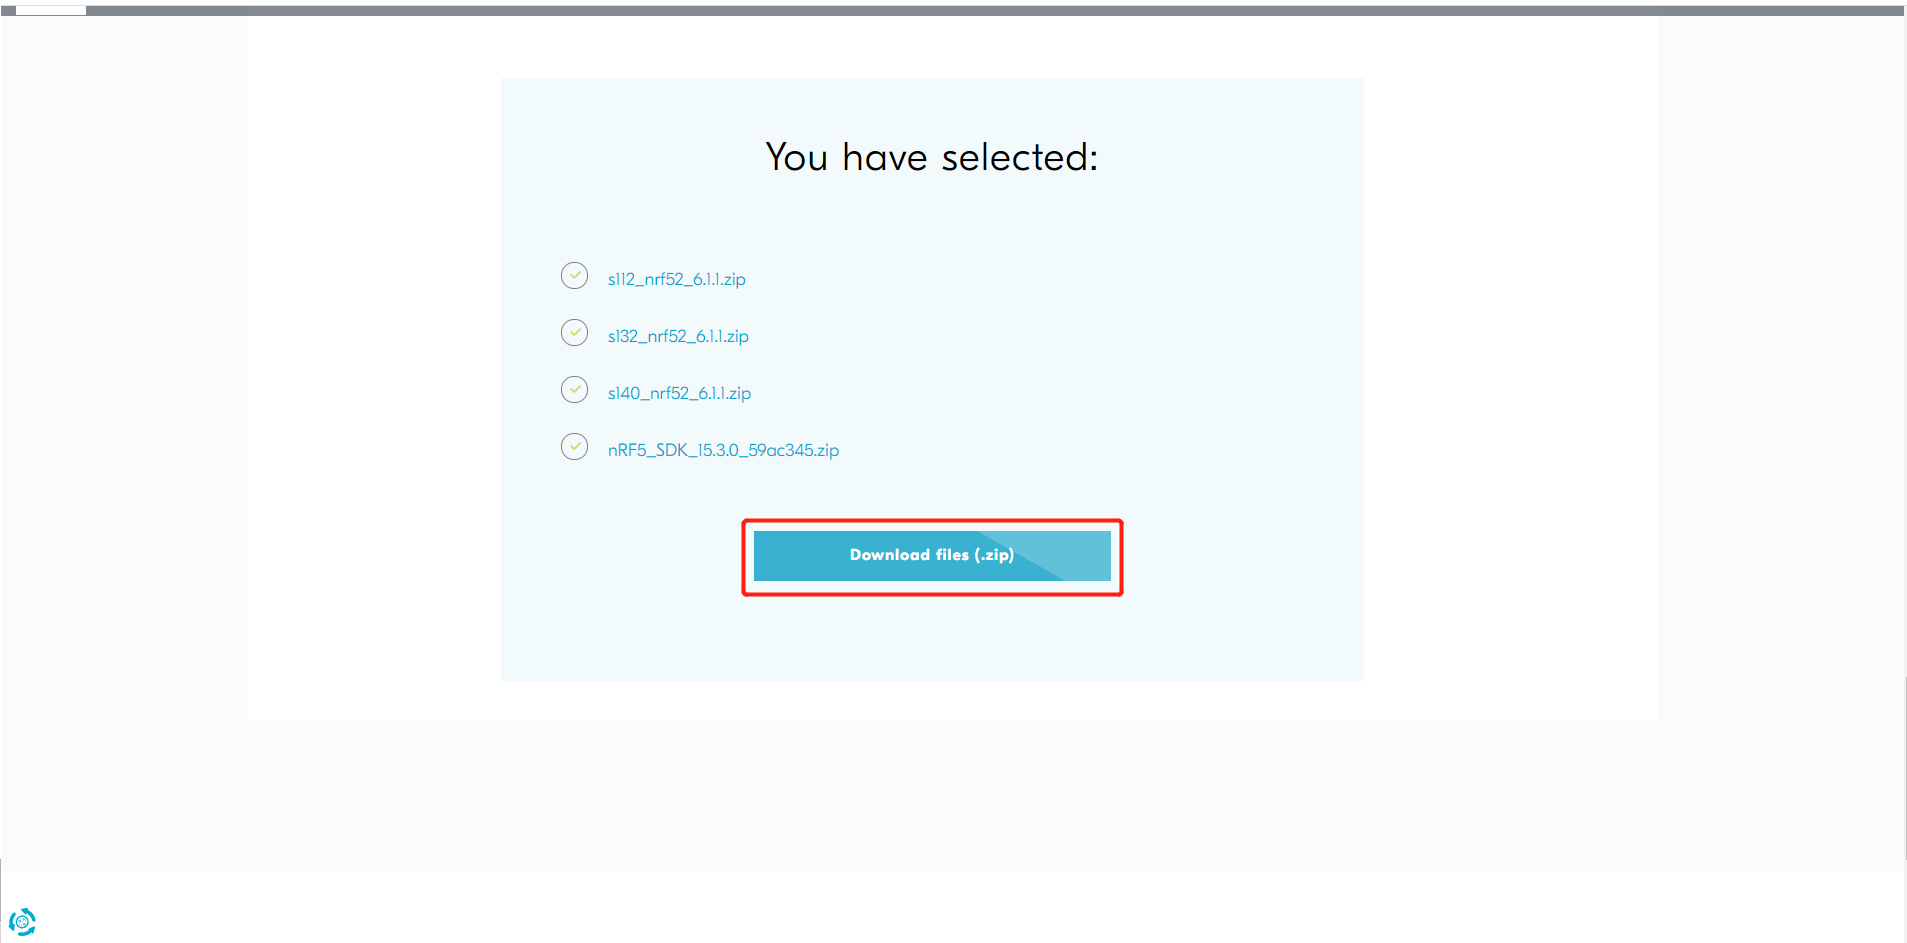
- Obtain the original (Nordic nRF52832) SDK: https://www.nordicsemi.com/Products/Development-software/nrf5-sdk/download#infotabs The SDK version used in the development of the intelligent deodorant project is 15.3.0
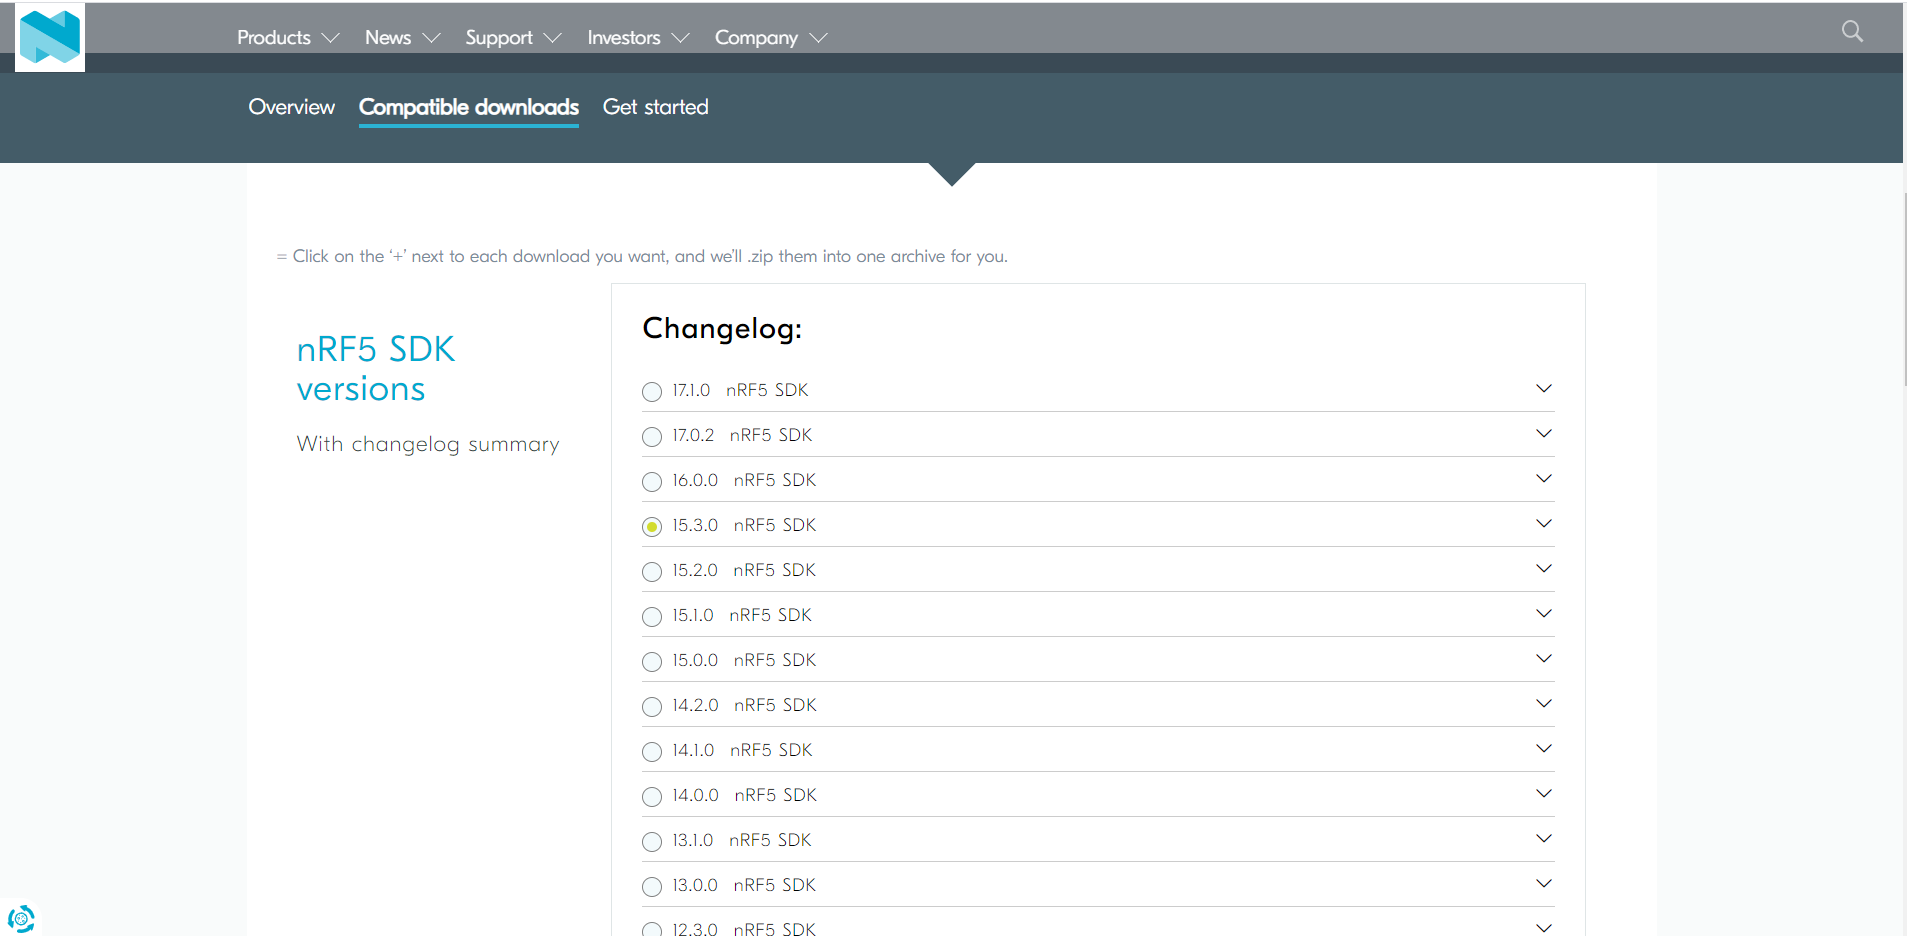
Note: do not put the downloaded SDK in the shared folder or Chinese path of Linux, otherwise unknown errors such as No such file or directory will appear during compilation.
After downloading the nRF52832 SDK, find the corresponding DeviceDownload Zip file, unzip it, then enter the DeviceDownload folder and unzip nRF5SDK153059ac345 again.
- Tuya sdk get
In the environment construction, after selecting the corresponding module (TYBN1 this time) in the hardware development step, download the SDK data corresponding to the module, and open tuya-ble-sdk-demo-project-nrf52832-v2 after decompression A folder with the same name will appear in the 1.0 folder.

Copy this folder to devicedownload \ nrf5sdk153059ac345 \ nrf5 of the original SDK_ SDK_ 15.3.0_ 59ac345\examples\ble_ Under the peripheral folder.
install ARM CMSIS4.5.0 . After downloading and installing, open tuya-ble-sdk-demo-project-nrf52832-v2 1.0\pca10040\s132\arm5_ no_ keil project under packages folder.
(3) Download the installation package corresponding to the chip
- Opening the project for the first time will automatically download the installation package corresponding to nRF52832 chip.
- (optional) after the installation package is downloaded, the following error message will be displayed if it is developed for the first time. You can ignore the error message and continue to complete the installation.
Cannot execute external request (Install Pack, "NordicSemiconductor:nRF_DeviceFamilyPack"): Pack not found
Cannot execute external request (Install Pack, "NordicSemiconductor:nRF_DeviceFamilyPack:8.24.1"): Pack not found
Install as shown in the figure below:
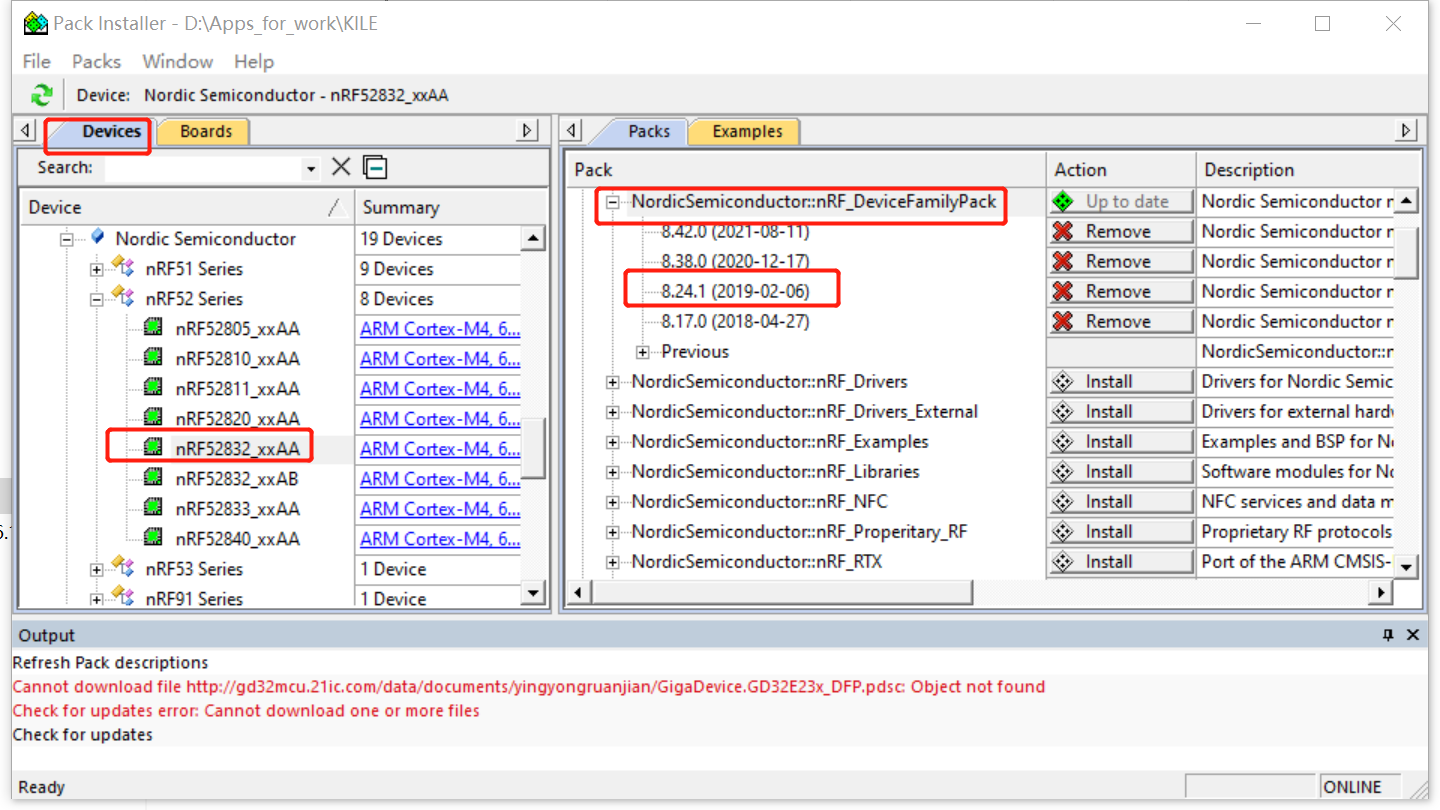
After installation, restart keil to compile.
Note: error RTE \ device \ nrf52832 may appear during compilation_ xxAA\system_ nrf52. C (30): error: #5: cannot open source input file "nrf52_errors. H": No such file or directory is due to the keil version.
Just use DeviceDownload\nRF5SDK153059ac345\nRF5_SDK_15.3.0_59ac345\modules\nrfx\mdk_ nrf52. C replace devicedownload \ nrf5sdk153059ac345 \ nrf5_ SDK_ 15.3.0_ 59ac345\examples\ble_ peripheral\tuya-ble-sdk-demo-project-nrf52832-V2. 1.0\pca10040\s132\arm5_ no_ packs\RTE\Device\nRF52832_ System under XXAA folder_ nrf52. C, then close the keil project, and then reopen the project to compile.
(4) Modify PID, UUID, Auth_key, MAC address
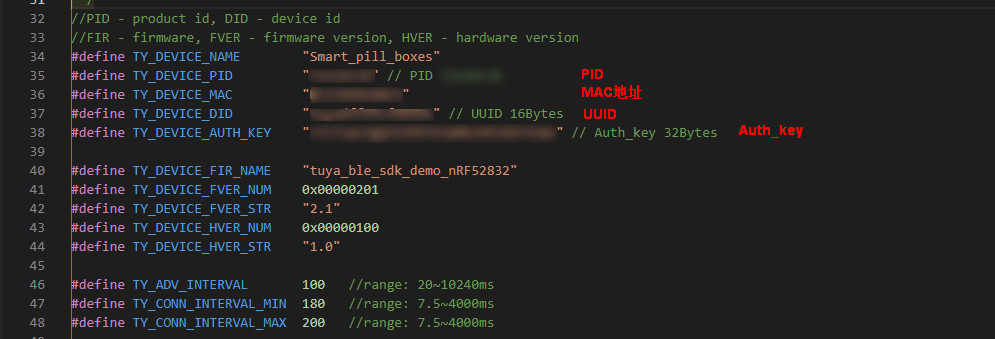
Open Tuya_ ble_ sdk_ Tuya found in demo folder_ ble_ sdk_ demo. H the UUID and Auth in the authorization code list obtained on the IoT platform_ Key, MAC and PID of the created product shall be filled in the position shown in the figure below.
In Tuya_ ble_ sdk_ demo. Use in C file_ ext_ license_ key,device_ id_ The value of len is changed to 1 and device respectively_ ID_ Len (16), otherwise uuid and auth modified in the previous step_ Key and so on will not take effect.

3. Equipment connection
After successful compilation, connect the J-Link burner to the development board. The connection is as follows:
| Module corresponding pin | Serial port corresponding pin |
|---|---|
| VCC | VCC(3.3V) |
| Module corresponding pin | JLINK corresponding pin |
|---|---|
| SWDIO | SWDIO |
| SWC | SWCLK |
| GND | GND |
4. Log view
Log view usage J-Link RTT Viewer Software. After downloading, search for j-flash VX in the start menu Xxb (version number of x.xx) and open it. Click file - > new project chip and select nRF52832_xxAA click OK.
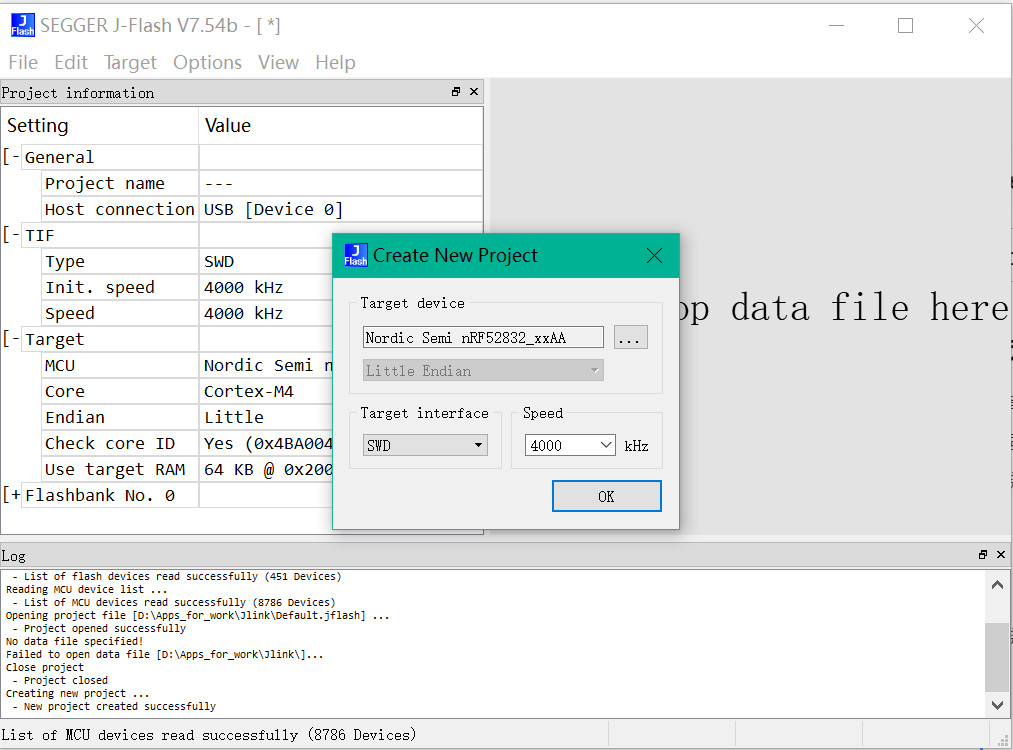
Click file - > open data file and select Tuya ble SDK demo project nrf52832-v2 1.0\pca10040\s132\arm5_ no_ S132 under packages \ hex \ material folder_ nrf52_ 6.1.1_ softdevice. Hex file
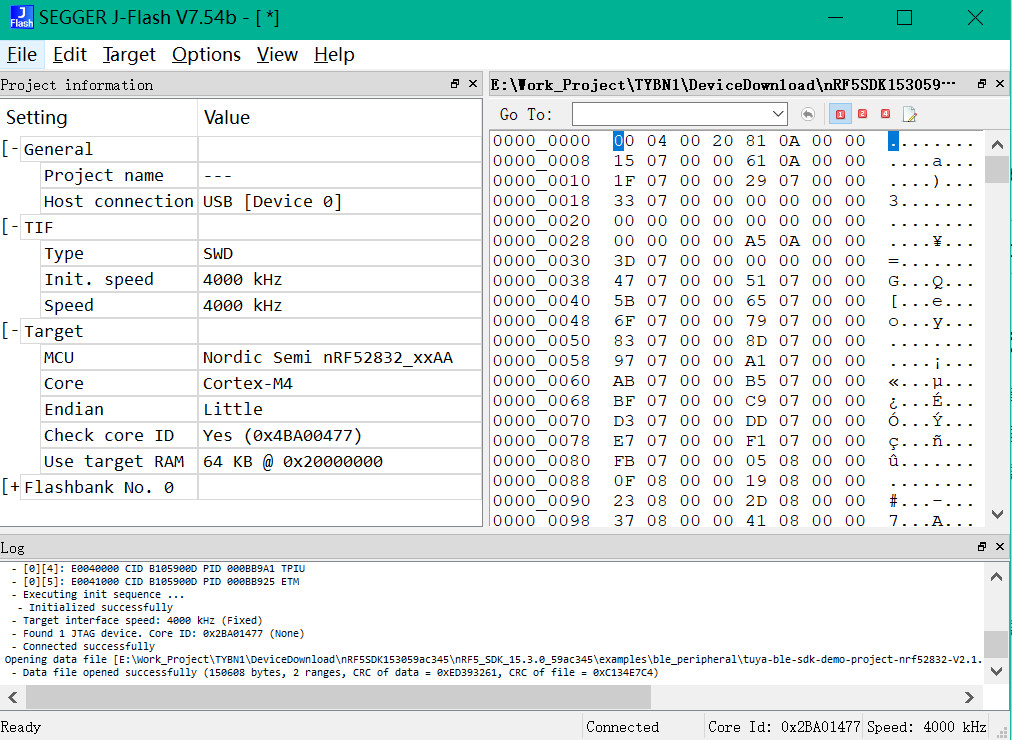
Click target - > connect, and then click target - > production programming to download the protocol stack firmware. After the download is successful, the lower log port will have the words Data file opened successfully. Finally, click target - > disconnect to disconnect.
Log is off by default. Enable the log by modifying the macro. The operation steps are as follows:
(1) find tuya-ble-sdk-demo-project-nrf52832-v2 1.0\tuya_ ble_ sdk_ demo\board\nRF52832\tuya_ ble_ Custom under the port folder_ tuya_ ble_ config. H documents. Add line 113 TUYA_APP_LOG_ENABLE log output enable.
(2) find_ peripheral\tuya-ble-sdk-demo-project-nrf52832-V2. 1.0\tuya_ ble_ sdk_ Board in demo \ board folder H documents. Put line 38 TY_LOG_ENABLE log output enable.
(3) after modification and compilation, burn the hex file to the module. The log viewing method is as follows:
Open the j-link RTT viewer VX After xxb, the following dialog box will pop up automatically:
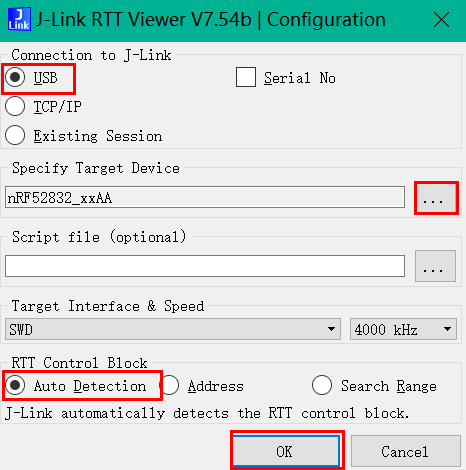
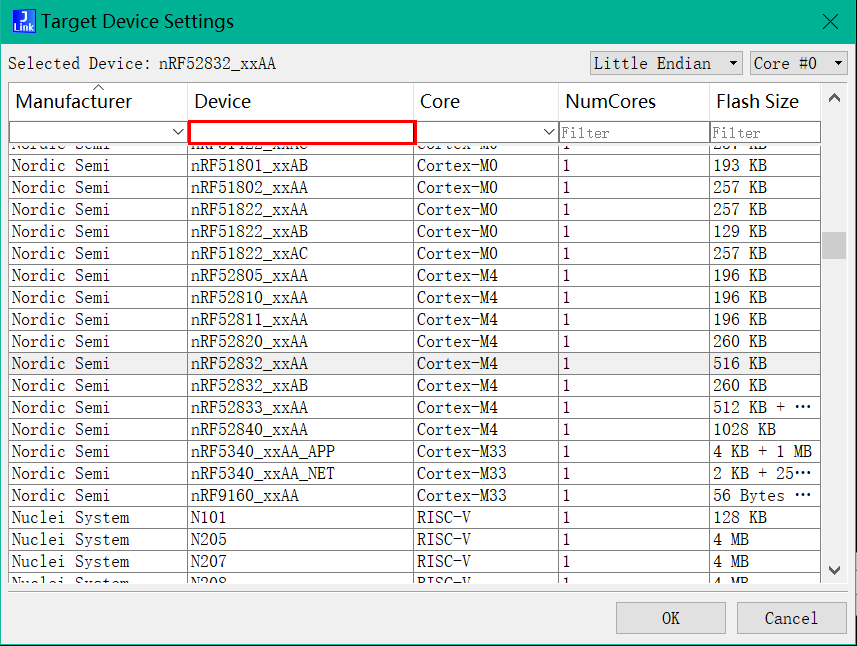
Select USB, click in Specify Target Device, the following pop-up window will appear, and enter nrf52832 in the red box_ XXAA press enter and double-click to select. Finally, select the red box option in the figure above in turn and click OK to complete the setting.
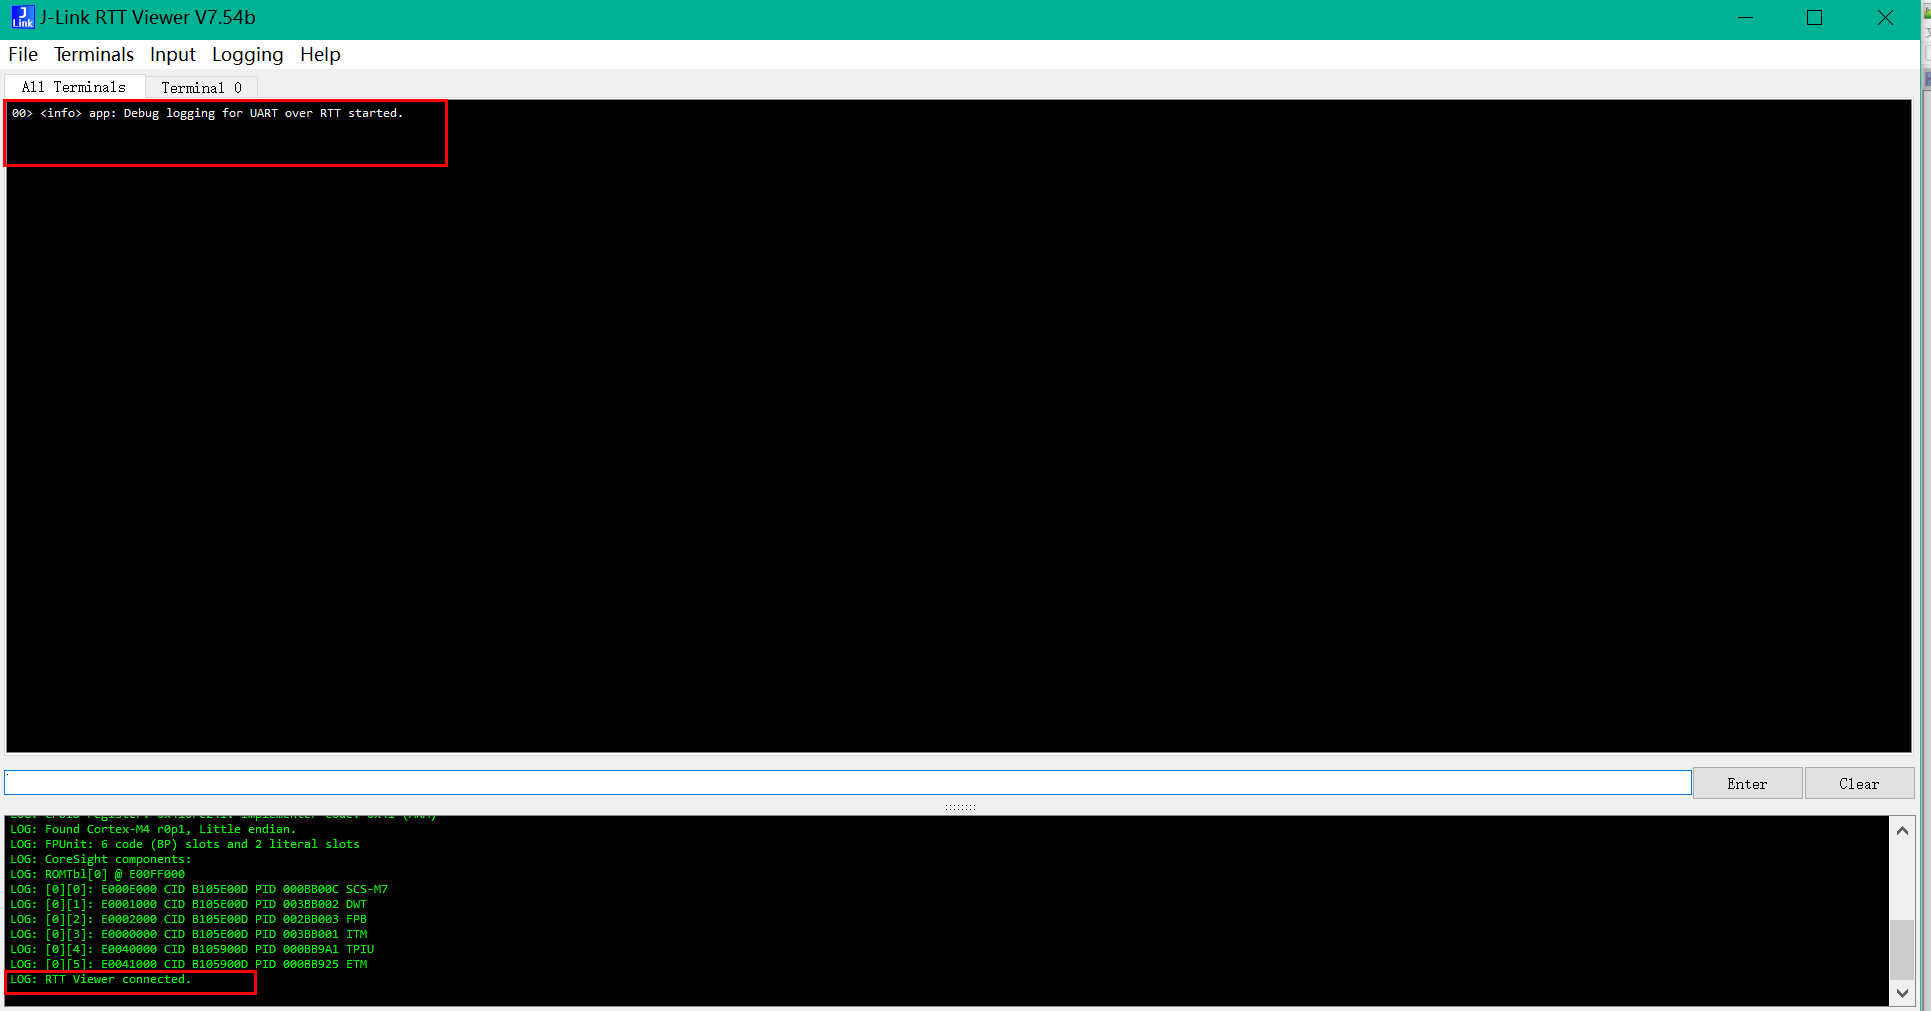
When the following contents appear in the interface, it indicates that the connection is successful and the log can be viewed normally.
5. Modify test macro
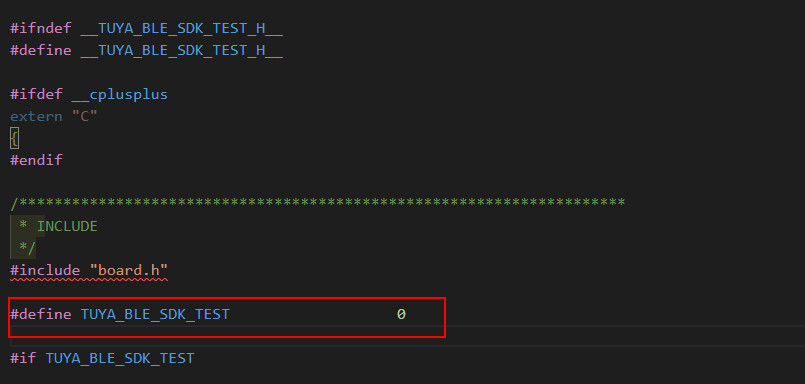
Open the project directory Tuya_ ble_ sdk_ Tuya under demo_ ble_ sdk_ test. H file, define the macro in line 29 as Tuya_ BLE_ SDK_ When test is turned off, this macro is the switch of test mode. If it is turned on, the test function module will occupy the resources of relevant IO ports, so that some IO ports and relevant peripherals cannot be used normally
The reference website of nRF52832 learning notes is as follows:
Link: https://blog.csdn.net/qq_36347513/category_9591718.html
2, Software scheme
1. Code structure
The software code structure of intelligent deodorant is as follows:
└── tuya_ble_sdk_demo
├── app
├── board
│ ├── nRF52832
│ │ ├── include
│ │ │ ├── tuya_appointment_timing_function.h
│ │ │ ├── tuya_battery_check.h
│ │ │ ├── tuya_ble_handle.h
│ │ │ ├── tuya_deodorizer_temperature_humidity.h
│ │ │ ├── tuya_key_process.h
│ │ │ └── tuya_pwm.h
│ │ ├── src
│ │ │ ├── tuya_appointment_timing_function.c. equipment timing
│ │ │ ├── tuya_battery_check.c. The deodorant completes the back connection and reports the data
│ │ │ ├── tuya_ble_handle.c DP point data processing
│ │ │ ├── tuya_deodorizer_temperature_humidity.c automatic gear adjustment
│ │ │ ├── tuya_ key_ process. Manual adjustment gear c
│ │ │ └── tuya_pwm.c. deodorization mode and preservation mode
2. Working mode
The intelligent deodorizer has two working modes: deodorization and insurance:
| pattern | function |
|---|---|
| Deodorization mode | Ozone ion generator and negative ion generator work together |
| Preservation mode | The ozone ion generator is closed and the negative ion generator works |
Among them, the deodorization mode and fresh-keeping mode have strong, medium and weak gear adjustments respectively. By setting different PWM duty cycle of the connecting pins of the ozone ion generator and the negative ion generator, the ozone ion generator and the negative ion generator are in different working intensities, and the three grades of strong, medium and weak are simulated. The corresponding relationship of PWM duty cycle is as follows:
| Gear | PWM duty cycle |
|---|---|
| Strong file | 100% |
| Mid range | 70% |
| Weak gear | 50% |
In order to enrich the content of the panel, the deodorant panel selects the temperature and humidity Studio panel to display the temperature and humidity in the working process and form a temperature and humidity curve to record the data. When the product is created, the original DP function point is defaulted (arbitrary deletion may lead to panel data loss or inability to open the panel, etc.). The specific DP points are described as follows:
Custom functions:
| DP point name | DP ID | Data transmission type | data type |
|---|---|---|---|
| Working mode | 101 | Distributable and reportable (rw) | Enum (Enum) |
| Gear | 103 | Distributable and reportable (rw) | Enum (Enum) |
| timing | 104 | Distributable and reportable (rw) | Enum (Enum) |
In the standard function of temperature and humidity, DP ID 3 and 4 are used as two function points of battery power alarm and battery power display.
Realization of function code of intelligent deodorizer in the first gear of deodorization mode:
/**
* @function: ty_ozone_first_gear_pwm_init
* @brief: Ozone negative ion generator working mode
* @param[in]: void
* @return: success -> 0   fail -> else
*/
uint32_t ty_ozone_first_gear_pwm_init(void)
{
    uint32_t ret = 0;
    ozone_pwm.pin = OZONE_PWM_PIN;            //Connecting pin of ozone ion generator
    ozone_pwm.pin2 = NEGATIVE_ION_PWM_PIN;    //Negative ion generator connection pin
    ozone_pwm.polarity = 0;
    ozone_pwm.freq = 1000;
    ozone_pwm.duty = 50;
    negative_ion_pwm.duty = 50;

    ret = ty_pwm_init(&ozone_pwm);
    if(ret != 0){
        TUYA_APP_LOG_INFO("OZONE first pwm failed to initialize");
        return 1;
    }
    ty_pwm_start(&ozone_pwm);
    return 0;
}
Function code realization of intelligent deodorant in the first gear of fresh-keeping mode:
/**
* @function: ty_negative_ion_first_gear_pwm_init
* @brief: Anion generator working mode
* @param[in]: void
* @return: success -> 0   fail -> else
*/
uint32_t ty_negative_ion_first_gear_pwm_init(void)
{
    uint32_t ret = 0;
    negative_ion_pwm.pin = NRFX_PWM_PIN_NOT_USED;
    negative_ion_pwm.pin2 = NEGATIVE_ION_PWM_PIN;
    negative_ion_pwm.polarity = 0;
    negative_ion_pwm.freq = 1000;
    negative_ion_pwm.duty = 50;

    ret = ty_pwm_init(&negative_ion_pwm);
    if (ret != 0)
    {
        TUYA_APP_LOG_INFO("NEGATIVE_ION first pwm failed to initialize");
        return 1;
    }
    return 0;
}
3. Gear adjustment
The gear is divided into automatic gear and manual gear.
- Automatic gear adjustment
The deodorant obtains the temperature and humidity through the SHT30 temperature and humidity sensor, and automatically adjusts the gear according to different temperature and humidity data (after adjustment, the changed gear DP will be reported to the APP panel). The corresponding relationship between temperature and humidity processing logic and gear is as follows:
| temperature | humidity | Gear |
|---|---|---|
| (temperature > 10) && (temperature < 15) | (humidity > 60) && (humidity < 65) | Strong file |
| (temperature > 15) && (temperature < 22) | (humidity > 30) && (humidity < 50) | Mid range |
| (temperature > 22) && (temperature < 29) | (humidity > 55) && (humidity < 75) | Weak gear |
The function codes reported by the deodorant automatic gear adjustment and gear DP after automatic gear adjustment are as follows:
/**
* @function: ty_gear_adjustment_using_temmperature_humidity
* @brief: Automatic gear adjustment according to different temperature and humidity
* @param[in]: void
* @return: success -> 0   fail -> else
*/
uint32_t ty_gear_adjustment_using_temmperature_humidity(void)
{
    int32_t temperature = 0;
    int32_t humidity = 0;
    temperature = (int32_t)tuya_sht3x_collect_state.temperature_value;
    humidity = (int32_t)tuya_sht3x_collect_state.humidity_value;

    if ((temperature > 10) && (temperature < 15) && (humidity > 60) && (humidity < 65))
    {
        if (mode_selection.fresh_keeping_mode == 1)
        {
            ty_ozone_three_gear_pwm_init();
            ty_indicator_light();
            ty_third_gear();
        }
        if (mode_selection.deodorization_mode == 1)
        {
            ty_ozone_three_gear_pwm_init();
            ty_negative_ion_three_gear_pwm_init();
            ty_indicator_light();
            ty_third_gear();
        }
    }
    else if ((temperature > 15) && (temperature < 22) && (humidity > 30) && (humidity < 50))
    {
        if (mode_selection.fresh_keeping_mode == 1)
        {
            ty_ozone_second_gear_pwm_init();
            ty_indicator_light();
            ty_second_gear();
        }
        if (mode_selection.deodorization_mode == 1)
        {
            ty_ozone_second_gear_pwm_init();
            ty_negative_ion_second_gear_pwm_init();
            ty_indicator_light();
            ty_second_gear();
        }
    }
    else if ((temperature > 22) && (temperature < 29) && (humidity > 55) && (humidity < 75))
    {
        if (mode_selection.fresh_keeping_mode == 1)
        {
            ty_ozone_first_gear_pwm_init();
            ty_indicator_light();
            ty_first_gear();
        }
        if (mode_selection.deodorization_mode == 1)
        {
            ty_ozone_first_gear_pwm_init();
            ty_negative_ion_first_gear_pwm_init();
            ty_indicator_light();
            ty_first_gear();
        }
    }
    else
    {
        ;
    }

    return 0;
}
/**
* @function: ty_first_gear
* @brief: Adjust one gear to report DP
* @param[in]: void
* @return: success -> 0   fail -> else
*/
uint32_t ty_first_gear(void)
{
    uint32_t ret = 0;
    uint8_t dp_length = 5;
    uint8_t send_buf[5] = {0};
    send_buf[0] = tuya_dp_id.gear_adjustment_id;
    send_buf[1] = tuya_dp_id.gear_adjustment_type;
    send_buf[2] = 0x00;
    send_buf[3] = 0x01;
    send_buf[4] = 0x00;
    ret = tuya_ble_dp_data_send(tuya_dp_id.sn_data + 2, DP_SEND_TYPE_ACTIVE, DP_SEND_FOR_CLOUD_PANEL, DP_SEND_WITHOUT_RESPONSE, send_buf, dp_length);
    return 0;
}
- Manual gear adjustment
Short press the key to realize the cyclic switching of strong, medium and weak gears of the deodorant. After adjustment, the changed gear DP will be reported to the APP panel. The core function codes are as follows:
/**
* @function: ty_device_key_gear_adjust
* @brief: Ozone generator and anion generator gear adjustment
* @param[in]: void
* @return: success -> 0   fail -> else
*/
uint32_t ty_device_key_gear_adjust(void)
{
    uint32_t gear_mode_ret = 0;
    uint32_t pin_level_state = 0;
    pin_level_state = ty_reset_key_state.key_short_press;
    if (pin_level_state == 1)
    {
        ty_delay_us(10);
        if (pin_level_state == 1)
        {
            gear_mode_ret = ty_get_device_gear_mode();              //Get the current gear

            switch (gear_mode_ret)
            {
                case 1:
                    if(mode_selection.fresh_keeping_mode == 1)
                    {
                        ty_negative_ion_second_gear_pwm_init();     //Fresh mode second gear
                        ty_indicator_light();
                        ty_second_gear();                           //Report the current gear
                    }
                    if(mode_selection.deodorization_mode == 1)
                    {
                        ty_ozone_second_gear_pwm_init();            //Deodorization mode second gear
                        ty_indicator_light();
                        ty_second_gear();                           //Report the current gear
                    }

                    break;
                case 2:
                    if (mode_selection.fresh_keeping_mode == 1)
                    {
                        ty_negative_ion_three_gear_pwm_init();      //Fresh mode second gear
                        ty_indicator_light();
                        ty_third_gear();                            //Report the current gear
                    }
                    if (mode_selection.deodorization_mode == 1)
                    {
                        ty_ozone_three_gear_pwm_init();             //Deodorization mode second gear
                        ty_indicator_light();
                        ty_third_gear();                            //Report the current gear
                    }

                    break;
                case 3:
                    if (mode_selection.fresh_keeping_mode == 1)
                    {
                        ty_negative_ion_first_gear_pwm_init();      //Fresh mode second gear
                        ty_indicator_light();
                        ty_first_gear();                            //Report the current gear
                    }
                    if (mode_selection.deodorization_mode == 1)
                    {
                        ty_ozone_first_gear_pwm_init();             //Deodorization mode second gear
                        ty_indicator_light();
                        ty_first_gear();                            //Report the current gear
                    }

                    break;
                default:
                    break;
            }
            ty_sht3x_reset(); //i2c prohibit initialization
            ty_sht3x_init();  //Temperature and humidity sensor initialization

        }
    }
    ty_reset_key_state.key_short_press = 0;
    return 0;

}
4. Low power consumption
If the device is at low power or the device arrives regularly, it enters low power consumption, and then the intelligent deodorant needs to report low power DP to the APP panel, which will give a low power alarm.
The intelligent deodorant enters low power consumption and reports low power to the APP panel. The function code is as follows:
/**
* @function:ty_device_stop_work
* @brief: Turn off the peripherals and the device enters low power consumption
* @param[in]: void
* @return: success -> 0   fail -> else
*/

uint32_t ty_device_stop_work(void)
{
    ty_sht3x_single_messure();                //Turn on the single measurement mode of temperature and humidity sensor to reduce power consumption
    nrf_gpio_pin_write(BOOST_PIN,0);          //Turn off the boost circuit
    ty_switch_off_fan();                      //Turn off the fan
    ty_switch_off_indicator_light();          //Turn off the indicator light
    ty_negative_ion_pwm_stop();               //Turn off the ozone ion generator and anion generator
    //ty_ble_stop_adv();                      // Bluetooth broadcast off function
    ty_uart_uninit();                          //Disable serial port initialization
    ty_uart2_uninit();                          //Disable serial port initialization
    ty_rtc_uninit();                            //Disable RTC initialization
    ty_spi_disable();                           //Disable spi initialization

    ty_adc_uninit(&battery_check_adc);         //Prohibit power detection
    ty_sht3x_reset();                         //Turn off the temperature and humidity sensor
    low_power.low_power_glag = 1;               //The device enters a low-power state
    appointment_timing_close.reservation_timing_off_flag = 1;
    return 0;
}
/**
* @function:ty_low_power_dp_send
* @brief: Low power report
* @param[in]: void
* @return: success -> 0   fail -> else
*/
uint32_t ty_low_power_dp_send(void)
{
    uint32_t ret = 0;
    uint8_t dp_length = 5;
    uint8_t send_buf[5] = {0};
    send_buf[0] = tuya_dp_id.low_power_alarm_id;
    send_buf[1] = tuya_dp_id.low_power_alarm_type;
    send_buf[2] = 0x00;
    send_buf[3] = 0x01;
    send_buf[4] = 0x00;

    ret = tuya_ble_dp_data_send(tuya_dp_id.sn_data, DP_SEND_TYPE_ACTIVE, DP_SEND_FOR_CLOUD_PANEL, DP_SEND_WITHOUT_RESPONSE, send_buf, dp_length);
    if(ret != 0)
    {
        TUYA_APP_LOG_INFO("ty_low_power_dp_send  failed to send");
    }
    return 0;
}
5. Equipment timing
The reservation timing is realized through RTC. There are four options for the working hours of the equipment:
| Equipment running time | Device shutdown |
|---|---|
| 15 minutes | Turn off after 15 minutes of operation |
| 30 Minutes | Shut down the equipment after 30 minutes of operation |
| 1 hour | The equipment is shut down after 1 hour of operation |
| 2 hours | After 2 hours of operation |
For example, when the intelligent deodorant is set at the APP side for 15 minutes, first calculate the RTC time stamp after 15 minutes. The calculation code is as follows:
/**
* @function:ty_rtc_get_time_and_fifteen_points_update_flag
* @brief: Make an appointment for 15 minutes, obtain the time and update the flag bit
* @param[in]: void
* @return: success -> 0 fail -> else
*/
uint32_t ty_rtc_get_time_and_fifteen_points_update_flag(void)
{
uint32_t current_time = 0; //Get current RTC time
ty_rtc_get_time(¤t_time);
appointment_time_arrival.time_end = current_time + APPOINTMENT_TIMING_FIFTEEN_POINTS; //Get the current time plus the timestamp after 15 minutes
time_end_flag_bit.time_end_flag = 1;
return 0;
}
Then judge whether the current timestamp is greater than or equal to appointment in the main() function_ time_ arrival. time_ The value of the end structure member. If the condition is met, the device calls ty_device_stop_work() interface, the device enters the low-power state, and the core code is as follows:
/**
* @function:ty_check_appointment_time
* @brief: Determine whether the appointment time has arrived
* @param[in]: void
* @return: success -> 0   fail -> else
*/
uint32_t ty_check_appointment_time(void)
{
    uint32_t appointment_time = 0;
    if(!time_end_flag_bit.time_end_flag)
        return 0;

    while (time_end_flag_bit.time_end_flag)
    {
        ty_rtc_get_time(&appointment_time);
        if (appointment_time >= appointment_time_arrival.time_end)    //Judge whether the scheduled deodorant has arrived for a long time
        {
            appointment_time_arrival.time_end = 0;
            time_end_flag_bit.time_end_flag = 0;
            ty_device_stop_work();                                   //Turn off the device and enter the low-power state
        }
    }

    return 0;
}
3, Summary
So far, the prototype of intelligent refrigerator deodorizer has been completed, which can be controlled by APP and key. It has the functions of mode switching, gear adjustment, automatic timing, low battery alarm and so on. The intelligent deodorant uses ozone generator and anion generator to produce ozone and anion. It can sterilize, remove peculiar smell, purify air and keep food fresh. It is a very good intelligent hardware product. On the basis of this intelligent deodorizer, there are many functions that can be further developed and improved. At the same time, you can enrich its functions based on graffiti IoT platform, build more intelligent product prototypes more conveniently, and accelerate the development process of intelligent products.