This article assumes that the reader is a developer familiar with JavaScript and React[1], has a certain understanding of Flow[2], or is familiar with the concepts related to Flow smart contract language Cadence[3].
Through this article, we will be familiar with and build a local development environment, and use JavaScript to complete the call and interaction of the chain according to the existing JS-SDK[4].
Include the following:
-
Build local development simulation environment
-
Deploy development wallet service
-
Create a local account using Dev Wallet
-
Query account information and execute Cadence
-
This department deploys and interacts with Cadence contract
The tutorial content refers to the original flow JS SDK quick start [5], which is slightly supplemented according to the latest code and examples.
Initialize warehouse and development environment
In order to facilitate readers' understanding, we directly use the code base officially provided by flow JS SDK as the basis, and make some adjustments to the original example. Please refer to the warehouse react FCL demo [6] of fork to complete the deployment and demonstration
git clone https://github.com/caosbad/react-fcl-demo.git
    cd react-fcl-demo
    yarn
First clone the remote warehouse to the local location, and then install the dependency in the instance project. Then, yarn will create a package The items in the JSON file depend on downloading @ onflow/fcl @ onflow/sdk @ onflow / six set code @ onflow / dev wallet @.
- @onflow/fcl[7] - one layer encapsulation of @ onflow/sdk based on the needs of DApp developers.
@onflow/sdk[8] --
-
Use JavaScript to build [9], resolve [10], send [11] and decode[12] tools to interact with the Flow chain.
-
@Onflow / dev wallet [13] - a local wallet environment for testing and development.
Before that, we also need to initialize the local simulator of Flow and start the wallet dev service
Installing and starting the simulator
The simulator is to help us start a local Flow network and Ethereum ganache on this machine. For the download and installation steps of the simulator, please refer to the instructions here [14].
   // Linux and macOS
    sh -ci "$(curl -fsSL https://storage.googleapis.com/flow-cli/install.sh)"

    // Windows
    iex "& { $(irm 'https://storage.googleapis.com/flow-cli/install.ps1') }"
// --The init parameter is added at the first startup. If it has been initialized, execute the start command directly
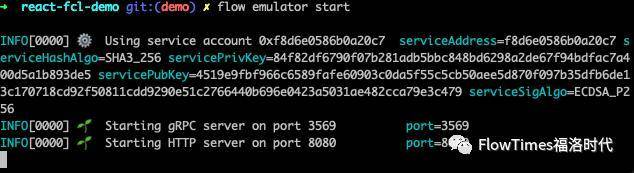
flow emulator start --initAfter executing the init command in the directory of the sample project, we will find that there is an "init flow" in the directory JSON file, some of the following structures:
  {
        "accounts": {
            "service": {
                "address": "f8d6e0586b0a20c7",
                "privateKey": "84f82df6790f07b281adb5bbc848bd6298a2de67f94bdfac7a400d5a1b893de5",
                "sigAlgorithm": "ECDSA_P256",
                "hashAlgorithm": "SHA3_256"
            }
        }
    }
After the simulator starts, you will see the log of successful startup. The simulator provides an interface for gRPC and http communication
Next, start Dev wallet on the new terminal
Start Dev wallet service
In package JSON file, we can see that there are so-called "dev wallet" and "dev wallet win" scripts in the configuration item of "scripts". Now overwrite the existing configuration with the "privateKey" generated by the simulation initialization in the previous step.
Then execute # yarn run dev wallet # or # yarn run dev wallet win
After success, you will see the following log:
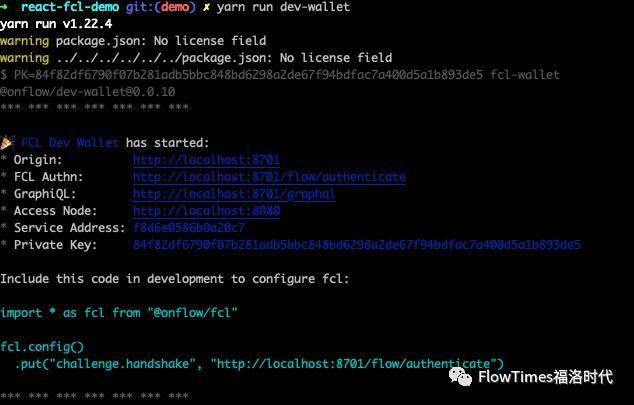
Multiple services are started here. At the same time, note that the service address and private key are consistent with those generated by the simulator.
The environment has been configured successfully. The next step is to start the sample project:
Start demonstration project
yarn start
Make sure that the simulator and Dev wallet are also started. We can see some sample operations on the page. Let's learn some details of the interaction from the code level
Get the latest blockchain
  // hide/demo/GetLatestBlock.tsx
    import { decode, send, getLatestBlock } from "@onflow/fcl"

    const GetLatestBlock = () => {
      const [data, setData] = useState(null)

      const runGetLatestBlock = async (event: any) => {
        event.preventDefault()

        const response = await send([
          getLatestBlock(),
        ])

        setData(await decode(response)) // Decode the returned data and update the state
      }
Return results
{
"id": "de37aabaf1ce314da4a6e2189d9584b71a7f302844b4ed5fb1ca3042afbad3d0", // id of the block
"parentId": "1ae736bdea1065a98262348d5a7a2141d2b21a76ac2184b3e1181088de430255", // id of the previous block
"height": 2,
"timestamp": {
"wrappers_": null,
"arrayIndexOffset_": -1,
"array": [
1607256408,
195959000
],
"pivot_": 1.7976931348623157e+308,
"convertedPrimitiveFields_": {}
},
"collectionGuarantees": [
{
"collectionId": "49e27fcf465075e6afd9009478788ba801fefa85a919d48df740e541cc514497",
"signatures": [
{}
]
}
],
"blockSeals": [],
"signatures": [
{}
]
}Query user information
Here we need to enter the user address to complete the query
 // hide/demo/GetAccount.tsx
      const runGetAccount = async (event: any) => {
        const response = await fcl.send([
          fcl.getAccount(addr), // Get user information by address
        ])

        setData(await fcl.decode(response))
      }
    ```

    ```json
    {
      "address": "01cf0e2f2f715450", // address
      "balance": 0,
      "code": {},
      "keys": [
        {
          "index": 0,
          "publicKey": "7b3f982ebf0e87073831aa47543d7c2a375f99156e3d0cff8c3638bb8d3f166fd0db7c858b4b77709bf25c07815cf15d7b2b7014f3f31c2efa9b5c7fdac5064d", // Public key
          "signAlgo": 2,
          "hashAlgo": 3,
          "weight": 1000,
          "sequenceNumber": 1
        }
      ]
    }
Execute script
Executing a script can be understood as a query operation without user authorization
 // hide/demo/ScriptOne.tsx

    const scriptOne = `\
    pub fun main(): Int {
      return 42 + 6
    }
    `

    const runScript = async (event: any) => {
        const response = await fcl.send([
          fcl.script(scriptOne),
        ])
        setData(await fcl.decode(response)) // 48
      }
Parse the result of the script run with the defined structure
Here we can see that complex data structures can be defined in the smart contract, and the data can be deconstructed through the type of typescript, which can friendly associate the complex data with the front-end application layer.
// hide/model/Point.ts here defines the type of structure data
    class Point {
      public x: number;
      public y: number;

      constructor (p: Point) {
        this.x = p.x
        this.y = p.y
      }
    }

    export default Point;

    // hide/demo/ScriptTwo.tsx
    const scriptTwo = `
    pub struct SomeStruct {
      pub var x: Int
      pub var y: Int

      init(x: Int, y: Int) {
        self.x = x
        self.y = y
      }
    }

    pub fun main(): [SomeStruct] {
      return [SomeStruct(x: 1, y: 2), SomeStruct(x: 3, y: 4)]
    }
    `;

    fcl.config()
      .put("decoder.SomeStruct", (data: Point) => new Point(data)) // Here, the deconstruction method of fcl to data is defined

      const runScript = async (event: any) => {
        event.preventDefault()

        const response = await fcl.send([ // The execution of script can be considered as a read operation without user authorization
          fcl.script(scriptTwo),
        ])

        setData(await fcl.decode(response))
      }

    // Replace public in class with public in script
Here are some points to note:
-
Decoder in config. SomeStruct name should be the same as that in the script
-
The data in some functions should specify the corresponding type, that is, the Point type responsible for deconstruction
-
Deconstructed types need to have their own constructors
// Output results
Point 0
{
"x": 1,
"y": 2
}
--
Point 1
{
"x": 3,
"y": 4
}
--```
### Login (create account) logout
Make sure we run locally Dev wallet service
stay demo Click login on the page of / register Dev wallet The authorization page will be published:

Then click authorize to enter update profile Interface of

After saving and applying, Dev The wallet can transfer the information of personal data into the database, and the subscription function will perform replacement and pass back the user's information as a parameter // hide/demo/Authenticate.tsx
const signInOrOut = async (event: any) => {
event.preventDefault()
if (loggedIn) {
fcl.unauthenticate() // logout
} else {
fcl.authenticate() // sign in or sign up, the Dev wallet window will be called out here
}
}
// line:38
fcl.currentUser().subscribe((user: any) => setUser({...user})) // fcl.currentUser() provides a listening method and dynamically obtains User data
For application developers, fcl helps us manage users' login status and required authorization operations, and will send the chapter of transaction.
// user return value
{
  "VERSION": "0.2.0",
  "addr": "179b6b1cb6755e31", // User's address
  "cid": "did:fcl:179b6b1cb6755e31",
  "loggedIn": true, // Login status
  "services": [ // service data
    {
      "type": "authz",
      "keyId": 0,
      "id": "asdf8701#authz-http-post",
      "addr": "179b6b1cb6755e31",
      "method": "HTTP/POST",
      "endpoint": "http://localhost:8701/flow/authorize",
      "params": {
        "userId": "37b92714-2713-41b0-9749-fc08b3fdd827"
      }
    },
    {
      "type": "authn",
      "id": "wallet-provider#authn",
      "pid": "37b92714-2713-41b0-9749-fc08b3fdd827",
      "addr": "asdf8701",
      "name": "FCL Dev Wallet",
      "icon": "https://avatars.onflow/avatar/asdf8701.svg",
      "authn": "http://localhost:8701/flow/authenticate"
    }
  ]
}
Dev wallet The data of the calling configuration file is stored in GraphQL In the data service for the second login by Dev wallet Call presentation

### Send transaction
// hide/demo/SendTransaction.tsx
const simpleTransaction = `
transaction {
execute {
log("A transaction happened")
}
}
`
const { transactionId } = await fcl.send([
fcl.transaction(simpleTransaction),
fcl.proposer(fcl.currentUser().authorization), // Transaction trigger
fcl.payer(fcl.currentUser().authorization), // Fee payer
])
setStatus("Transaction sent, waiting for confirmation")
const unsub = fcl
.tx({ transactionId })
.subscribe((transaction: any) => {
setTransaction(transaction) // Update state
if (fcl.tx.isSealed(transaction)) {
setStatus("Transaction is Sealed")
unsub()
}
})
Different from the execution script, the 'transaction' call here needs to initiate a transaction, which is equivalent to executing the transaction operation on the chain. Although only the log is executed here, the transaction initiator and expense payer still need to be specified.
// Return value of successful script operation
{
  "status": 4,
  "statusCode": 0,
  "errorMessage": "",
  "events": [] // Triggered event list
}
Since the Cadence script only executes log, there is no data returned in the event ###Deployment contract Here we define an example contract and declare a publicly callable function to trigger the event of the contract through externally initialized parameters. Here, we change the variables of the contract
// hide/demo/DeployContract.tsx
//The contract script needs to be deployed. Here, for the convenience of testing, I added the access(all) access permission statement
const simpleContract = `
access(all) contract HelloWorld {
  pub let greeting: String
  pub event HelloEvent(message: String)

  init() {
    self.greeting = "Hello, World!"
  }

  pub fun hello(message: String): String {
    emit HelloEvent(message: message)
    return self.greeting
  }
}
`

//Script for deploying contracts for accounts
const deployScript = `
transaction(code: String) {
  prepare(acct: AuthAccount) {
      acct.contracts.add(name: "HelloWorld", code: code.decodeHex())
  }
}
`


const runTransaction = async (event: any) => {
    const result = await Send(simpleContract, deployScript); //  send here is an encapsulation function
    setTransaction(result); //  Update state
  }


// hide/helper/fcl-deployer.ts
export async function Send(code: string, deployScript: string) {
    const response = await fcl.send([
        setCode({
            proposer: fcl.currentUser().authorization,
            authorization: fcl.currentUser().authorization,
            payer: fcl.currentUser().authorization,
            code: code,
            deployScript: deployScript
        })
    ])

    try {
      return await fcl.tx(response).onceExecuted() / / return the execution result
    } catch (error) {
      return error;
    }
}
  *The Send function encapsulates the signature information of the current user

  *Both Cadence contract and Cadence deployment script are their own contracts

  * `fcl.tx(res).onceExecuted ` can be used as a listening function for transaction execution

  * `acct.contracts.add(name: "HelloWorld", code: code.decodeHex()) ` where the 'name' parameter of the 'add' function needs to be consistent with the name declared in the contract script

  *There can only be one contract with the same name under one account
//Return value of deployment contract
{
  "status": 4,
  "statusCode": 0,
  "errorMessage": "",
  "events": [
    {
      "type": "flow.AccountContractAdded"
      "transactionId": "8ba62635f73f7f5d3e1a73d5fd860ea7369662109556e510b4af904761944e2a", // trx id
      "transactionIndex": 1,
      "eventIndex": 0,
      "data": {
        "address": "0x179b6b1cb6755e31", / / address
        "codeHash": [...], //  The contract code after the code is omitted here
        "contract": "HelloWorld" / / contract name
      }
    }
  ]
}
###Interaction with contracts

On the interface, we need to enter the address of the deployed contract account before we can successfully introduce the contract and call its public function. Pay attention to the transaction body called (wrapped by the transaction, calling the contract code during execution), and massage the parameters of the contract method
// hide/demo/ScriptOne.tsx
//addr here is the address of our deployment contract
const simpleTransaction = (address: string | null) => `\
  import HelloWorld from 0x${address}

  transaction {
    execute {
      HelloWorld.hello(message: "Hello from visitor")
    }
  }
`
  const runTransaction = async (event: any) => {
    try {
      //Obtain transaction monitoring through transactionId
      const { transactionId } = await fcl.send([
        fcl.transaction(simpleTransaction(addr)),
        fcl.proposer(fcl.currentUser().authorization),
        fcl.payer(fcl.currentUser().authorization),
      ])
      //Definition of transaction listening function. The return value is the function of canceling listening
      const unsub = fcl
        .tx({
          transactionId, / / deconstruct the transaction id
        })
        .subscribe((transaction: any) => {
          setTransaction(transaction) / / update state

          if (fcl.tx.isSealed(transaction)) {
            unsub() / / cancel listening
          }
        })
    } catch (error) {
      setStatus("Transaction failed")
    }
  }
{
  "status": 4,
  "statusCode": 0,
  "errorMessage": "",
  "events": [
    {
      "type": "A.179b6b1cb6755e31.HelloWorld.HelloEvent"
      "transactionId": "28ec7c9c0eecb4408dfc3b7b23720a6038a8379721eb7b532747cfc016a3b1cc",
      "transactionIndex": 1,
      "eventIndex": 0,
      "Data": {/ / data
        "message": "Hello from visitor" / / parameters for event listening
      }
    }
  ]
}
```
-
unsub = fcl.tx({transactionId}).subscribe(func) is a method of monitoring transaction results, which is equivalent to FCL tx(response). onceExecuted()
-
The type of the event is based on A. user address Contract name Event name rules
-
fcl has decoded the acquired data, and you can directly see the returned results
Finally, the contract monitoring function can obtain the event triggered by the contract and return it to us through the callback function.
last
Now we are familiar with how to interact with the flow chain through fcl. We have been eliminated from the minimum knowledge of developing DApp on the flow chain. Next, we can continue to do some tests according to the existing demo, or deeply explore the codes and services related to Dev wallet, flow- sdk or Cadence. I believe we will gain more.
reference
````[1] React: https://reactjs.org/
[2] Flow: https://www.onflow.org/
[3] Cadence: https://docs.onflow.org/tutorial/cadence/00-introduction
[4] JS-SDK: https://github.com/onflow/flow-js-sdk
[5] flow-js-sdk quick start: https://github.com/onflow/flow-js-sdk/tree/master/packages/fcl#quick-start
[6] react-fcl-demo: https://github.com/caosbad/react-fcl-demo
[7] @onflow/fcl: https://github.com/caosbad/flow-js-sdk/blob/master/packages/fcl
[8] @onflow/sdk: https://github.com/caosbad/flow-js-sdk/blob/master/packages/sdk
[9] build: https://github.com/caosbad/flow-js-sdk/blob/master/packages/sdk/hide/build
[10] resolve: https://github.com/caosbad/flow-js-sdk/blob/master/packages/sdk/hide/resolve
[11] send: https://github.com/caosbad/flow-js-sdk/blob/master/packages/send
[12] decode: https://github.com/caosbad/flow-js-sdk/blob/master/packages/decode
[13] @onflow/dev-wallet: https://github.com/caosbad/flow-js-sdk/blob/master/packages/dev-wallet
[14] instructions: https://github.com/onflow/flow/blob/master/docs/cli.md#installation