1 integrated SpringBoot
1.1 introduction to spring boot
Spring Boot is a rapid development framework of spring. It is designed based on Spring 4.0. Using Spring Boot development can avoid some cumbersome engineering construction and configuration. At the same time, it integrates a large number of common frameworks to quickly import dependent packages and avoid the conflict of dependent packages. Basically, the commonly used development frameworks support Spring Boot development, such as MyBatis, Dubbo, etc., especially the spring family, such as Spring cloud, Spring mvc, Spring security, etc. using Spring Boot development can greatly improve productivity, so the utilization rate of Spring Boot is very high.
This chapter explains how to develop Spring Security applications through Spring Boot, which provides Spring Boot starter security for developing Spring Security applications.
1.2 create maven project
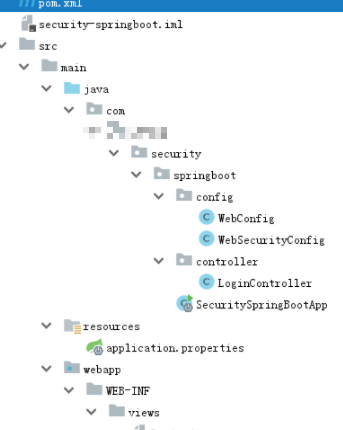
1) Create maven project security spring boot. The project structure is as follows:
2) Introduce the following dependencies:
<?xml version="1.0" encoding="UTF-8"?>
<project xmlns="http://maven.apache.org/POM/4.0.0"
         xmlns:xsi="http://www.w3.org/2001/XMLSchema-instance"
         xsi:schemaLocation="http://maven.apache.org/POM/4.0.0 http://maven.apache.org/xsd/maven-
4.0.0.xsd">
    <modelVersion>4.0.0</modelVersion>
    <groupId>com.lw.security</groupId>
    <artifactId>security-springboot</artifactId>
    <version>1.0-SNAPSHOT</version>
    <parent>
        <groupId>org.springframework.boot</groupId>
        <artifactId>spring-boot-starter-parent</artifactId>
        <version>2.1.3.RELEASE</version>
    </parent>
    <properties>
        <project.build.sourceEncoding>UTF-8</project.build.sourceEncoding>
        <maven.compiler.source>1.8</maven.compiler.source>
        <maven.compiler.target>1.8</maven.compiler.target>
    </properties>
    <dependencies>
        <!-- Here is>spring boot rely on-->
        <dependency>
            <groupId>org.springframework.boot</groupId>
            <artifactId>spring-boot-starter-web</artifactId>
        </dependency>
        <!-- Here is>spring security rely on-->
        <dependency>
            <groupId>org.springframework.boot</groupId>
            <artifactId>spring-boot-starter-security</artifactId>
        </dependency>
        <!-- Here is jsp rely on-->
        <dependency>
            <groupId>javax.servlet</groupId>
            <artifactId>javax.servlet-api</artifactId>
            <scope>provided</scope>
        </dependency>
        <!--jsp Page usage jstl label -->
        <dependency>
            <groupId>javax.servlet</groupId>
            <artifactId>jstl</artifactId>
        </dependency>
        <dependency>
            <groupId>org.springframework.boot</groupId>
            <artifactId>spring-boot-starter-tomcat</artifactId>
            <scope>provided</scope>
        </dependency>
        <!--For compilation jsp -->
        <dependency>
            <groupId>org.apache.tomcat.embed</groupId>
            <artifactId>tomcat-embed-jasper</artifactId>
            <scope>provided</scope>
        </dependency>
         <dependency>
            <groupId>org.projectlombok</groupId>
            <artifactId>lombok</artifactId>
            <version>1.18.0</version>
          </dependency>
    </dependencies>
    <build>
        <finalName>security-springboot</finalName>
        <pluginManagement>
            <plugins>
                <plugin>
                    <groupId>org.apache.tomcat.maven</groupId>
                    <artifactId>tomcat7-maven-plugin</artifactId>
                    <version>2.2</version>
                </plugin>
                <plugin>
                    <groupId>org.apache.maven.plugins</groupId>
                    <artifactId>maven-compiler-plugin</artifactId>
                    <configuration>
                        <source>1.8</source>
                        <target>1.8</target>
                    </configuration>
                </plugin>
                <plugin>
                    <artifactId>maven-resources-plugin</artifactId>
                    <configuration>
                        <encoding>utf-8</encoding>
                        <useDefaultDelimiters>true</useDefaultDelimiters>
                        <resources>
                            <resource>
                                <directory>src/main/resources</directory>
                                <filtering>true</filtering>
                                <includes>
                                    <include>**/*</include>
                                </includes>
                            </resource>
                            <resource>
                                <directory>src/main/java</directory>
                                <includes>
                                    <include>**/*.xml</include>
                                </includes>
                            </resource>
                        </resources>
                    </configuration>
                </plugin>
            </plugins>
        </pluginManagement>
    </build>
</project>
1.3 spring container configuration
SpringBoot project startup will automatically scan all beans under the package where the startup class is located and load them into the spring container.
1) Spring Boot configuration file
Add application. Under resources Properties, as follows:
server.port=8080
server.servlet.context-path=/security-springboot
spring.application.name = security-springboot
2) Spring Boot startup class
@SpringBootApplication
public class SecuritySpringBootApp {
    public static void main(String[] args) {
        SpringApplication.run(SecuritySpringBootApp.class, args);
    }
}
1.4 Servlet Context configuration
Due to the automatic assembly mechanism of Spring boot starter, there is no need to use @ EnableWebMvc and @ ComponentScan here. WebConfig is as follows
@Configuration
public class WebConfig implements WebMvcConfigurer {
    //The default URL root path jumps to / login, which is provided by spring security
    @Override
    public void addViewControllers(ViewControllerRegistry registry) {
        registry.addViewController("/").setViewName("redirect:/login");
    }
}
The video parser is configured in application In properties
spring.mvc.view.prefix=/WEB-INF/views/
spring.mvc.view.suffix=.jsp
1.5 security configuration
Due to the automatic assembly mechanism of Spring boot starter, @ EnableWebSecurity is not required here. The content of WebSecurityConfig is as follows
@Configuration
public class WebSecurityConfig extends WebSecurityConfigurerAdapter {
   //The content is consistent with the Spring security primer
    //Configure user information service
    @Override
    @Bean
    public UserDetailsService userDetailsService() {
        InMemoryUserDetailsManager manager = new InMemoryUserDetailsManager();

        manager.createUser(User.withUsername("zhangsan").password("123").authorities("p1").build());
        manager.createUser(User.withUsername("lisi").password("456").authorities("p2").build());
        return manager;
    }

    @Bean
    public PasswordEncoder passwordEncoder() {
        return NoOpPasswordEncoder.getInstance();
    }

    //Configure security interception mechanism
    @Override
    protected void configure(HttpSecurity http) throws Exception {
        http.authorizeRequests()
                .antMatchers("/r/r1").hasAuthority("p1")
                .antMatchers("/r/r2").hasAuthority("p2")
                .antMatchers("/r/**").authenticated()
                .anyRequest().permitAll()
                .and()
                .formLogin().successForwardUrl("/login-success");
    }
}
1.6 testing
The content of LoginController is the same as that of Spring security starter.
@RestController
public class LoginController {
  //The content is omitted Consistent with Spring security starter
    @RequestMapping(value = "/login-success",produces = {"text/plain;charset=UTF-8"})
    public String loginSuccess(){
        return " Login successful";
    }
    /**
     * Test resource 1
     * @return
     */
    @GetMapping(value = "/r/r1",produces = {"text/plain;charset=UTF-8"})
    public String r1(){
        return " Access resource 1";
    }

    /**
     * Test resource 2
     * @return
     */
    @GetMapping(value = "/r/r2",produces = {"text/plain;charset=UTF-8"})
    public String r2(){
        return " Access resource 2";
    }
}
Test process:
1. Test certification
2. Test exit
3. Test authorization
2 working principle
2.1 overview of structure
The problem solved by Spring Security is security access control, and the security access control function is actually to intercept all requests entering the system and verify whether each request can access its expected resources. According to the previous knowledge, it can be realized through technologies such as Filter or AOP. The protection of Web resources by Spring Security depends on Filter, so start with this Filter and gradually go deep into the principle of Spring Security.
When initializing Spring Security, a Servlet filter named SpringSecurityFilterChain will be created, and the type is org springframework. security. web. Filterchainproxy, which implements javax Servlet. Filter, so external requests will pass through this class. The following figure is the structure diagram of Spring Security filter chain:
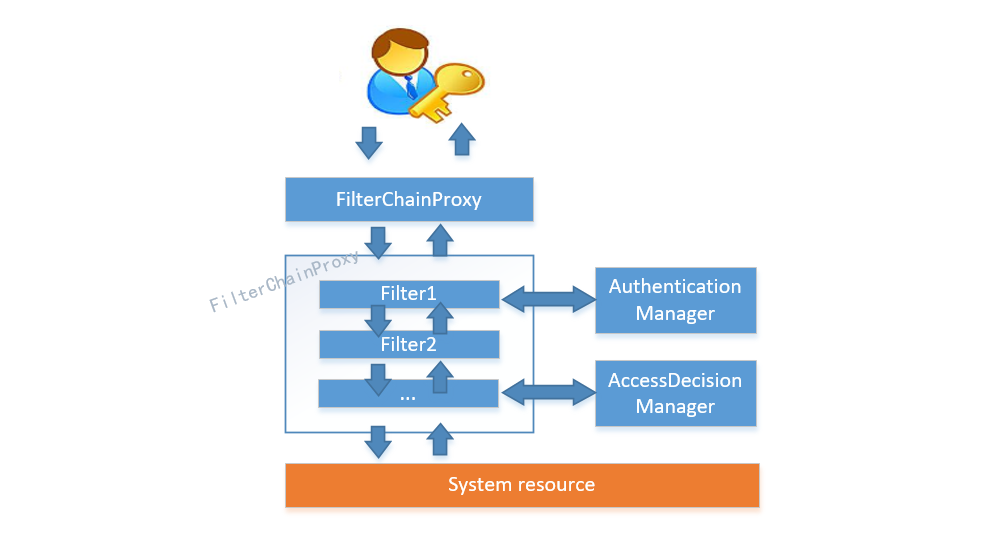
Filter chainproxy is a proxy. What really works is the filters contained in SecurityFilterChain in FilterChainProxy. At the same time, these filters are managed by Spring as beans. They are the core of Spring Security and have their own responsibilities, but they do not directly handle user authentication or user authorization, Instead, they are handed over to the authentication manager and the access decision manager for processing. The following figure is a UML diagram of the related classes of FilterChainProxy.
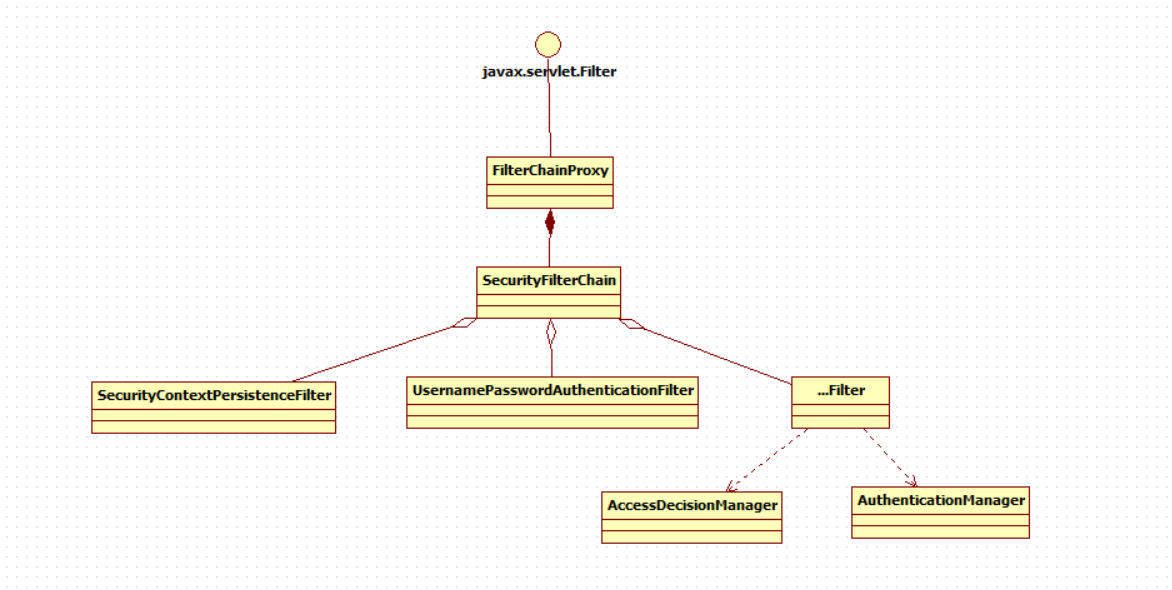
The realization of spring Security function is mainly completed by a series of filter chains.
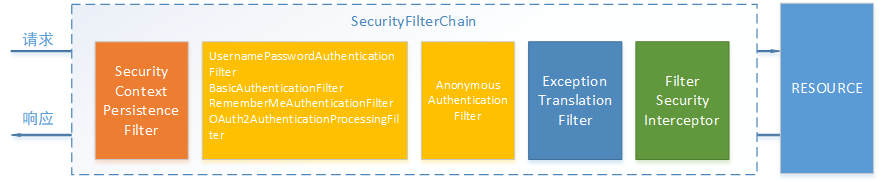
The following describes the main filters in the filter chain and their functions:
SecurityContextPersistenceFilter this Filter is the entrance and exit of the whole interception process (that is, the first and last interceptors). It will obtain the SecurityContext from the configured SecurityContextRepository at the beginning of the request, and then set it to the SecurityContextHolder. After the request is completed, save the SecurityContext held by the SecurityContextHolder to the configured SecurityContextRepository, and clear the SecurityContext held by the SecurityContextHolder;
UsernamePasswordAuthenticationFilter is used to process authentication from form submissions. The form must provide the corresponding user name and password, and there are also AuthenticationSuccessHandler and AuthenticationFailureHandler to process after successful or failed login, which can be changed according to the needs;
The FilterSecurityInterceptor is used to protect web resources. It uses the AccessDecisionManager to authorize access to the current user, which has been described in detail earlier;
ExceptionTranslationFilter can catch and handle all exceptions from FilterChain. However, it can only handle two types of exceptions: AuthenticationException and AccessDeniedException. It will continue to throw other exceptions.
2.2 certification process
2.2.1 certification process
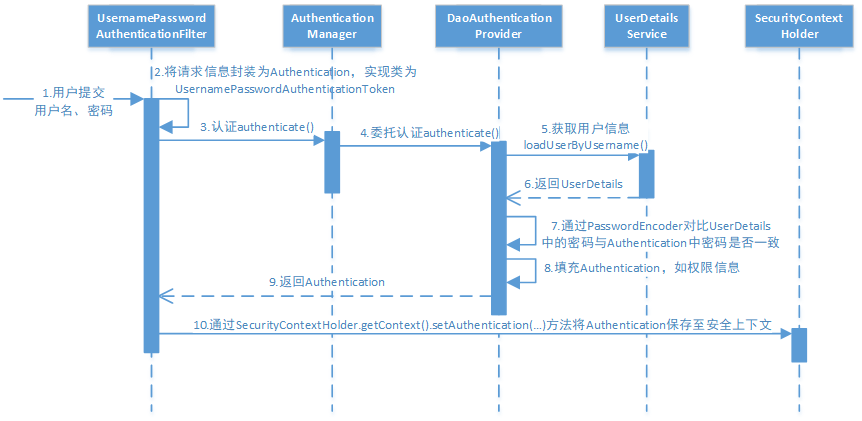
Let's analyze the certification process carefully:
-
The user name and password submitted by the user are obtained by the UsernamePasswordAuthenticationFilter in SecurityFilterChain and encapsulated as a request for Authentication. Usually, it is the implementation class of UsernamePasswordAuthenticationToken.
-
Then the filter submits the Authentication to the Authentication manager for Authentication
-
After successful Authentication, the AuthenticationManager identity manager returns an Authentication instance filled with information (including the permission information, identity information and details mentioned above, but the password is usually removed).
-
The SecurityContextHolder security context container fills in the Authentication of the information in step 3 through
SecurityContextHolder.getContext().setAuthentication(...) method, set to it. It can be seen that the AuthenticationManager interface (Authentication manager) is the core interface related to Authentication and the starting point of initiating Authentication. Its implementation class is ProviderManager. Spring Security supports multiple Authentication methods. Therefore, ProviderManager maintains a List to store multiple Authentication methods. Finally, the actual Authentication work is completed by the AuthenticationProvider. We know that the corresponding AuthenticationProvider implementation class of web form is DaoAuthenticationProvider, and its internal maintenance is a UserDetailsService, which is responsible for obtaining UserDetails. Finally, the AuthenticationProvider populates UserDetails into Authentication.
The general relationship of certified core components is as follows:
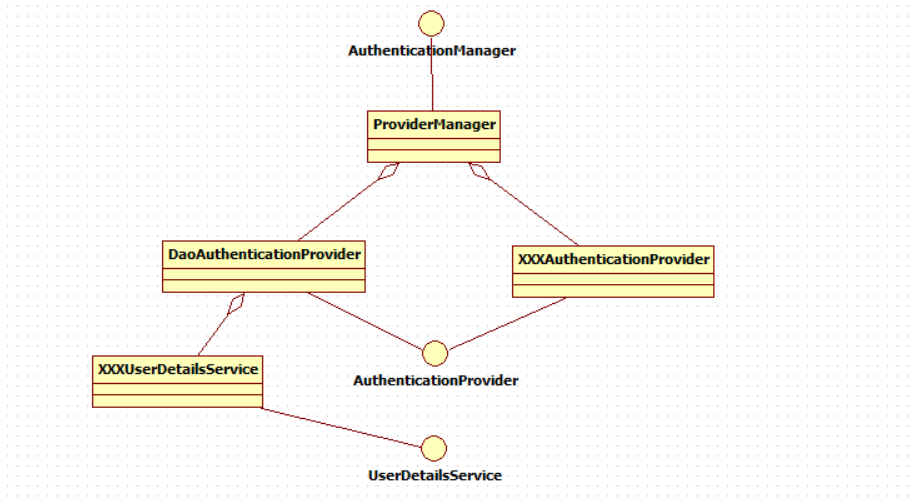
2.2.2.AuthenticationProvider
Through the previous Spring Security authentication process, we know that the authentication manager entrusts the AuthenticationProvider to complete the authentication.
AuthenticationProvider is an interface defined as follows:
public interface AuthenticationProvider {
    Authentication authenticate(Authentication authentication) throws AuthenticationException;
    boolean supports(Class<?> var1);
}
The authenticate() method defines the implementation process of Authentication. Its parameter is an Authentication, which contains the user and password submitted by the login user. The return value is also an Authentication, which is generated after reassembling the user's permissions and other information after successful Authentication.
Spring Security maintains a List to store multiple authentication methods. Different authentication methods use different authenticationproviders. There are many examples, such as AuthenticationProvider1 when logging in with user name and password, AuthenticationProvider2 when logging in with SMS, etc.
Each AuthenticationProvider needs to implement the supports () method to indicate the Authentication method it supports. For example, we use form Authentication. When submitting a request, Spring Security will generate a UsernamePasswordAuthenticationToken, which is an Authentication
It encapsulates the user name and password information submitted by the user. Correspondingly, which AuthenticationProvider handles it?
We found the following code in the base class AbstractUserDetailsAuthenticationProvider of DaoAuthenticationProvider:
public boolean supports(Class<?> authentication) {
    return UsernamePasswordAuthenticationToken.class.isAssignableFrom(authentication);
}
That is, when the user name and password are submitted by the web form, Spring Security is handled by DaoAuthenticationProvider.
Finally, let's take a look at the structure of authentication. It is an interface, which we mentioned earlier
UsernamePasswordAuthenticationToken is one of its implementations:
public interface Authentication extends Principal, Serializable {         (1)
    Collection<? extends GrantedAuthority> getAuthorities();              (2)

   Object getCredentials();   (3)
    Object getDetails();                                                  (4)
    Object getPrincipal();                                                (5)
    boolean isAuthenticated();
    void setAuthenticated(boolean var1) throws IllegalArgumentException;
}
(1) Authentication is the interface in the spring security package, which directly inherits from the Principal class, which is located in Java In the security package. It represents an abstract Principal identity. Any Principal has a name, so it contains a getName() method.
(2) getAuthorities(), a list of permission information. By default, it is some implementation classes of the GrantedAuthority interface, usually a series of strings representing permission information.
(3) getCredentials(), credential information, password string entered by the user, is usually removed after authentication to ensure security.
(4) getDetails(). The implementation interface in a web application is usually WebAuthenticationDetails, which records the visitor's ip address and sessionId value.
(5) getPrincipal(), identity information. In most cases, it returns the implementation class of the UserDetails interface. UserDetails represents the details of the user. The UserDetails taken from Authentication is the current login user information. It is also one of the common interfaces in the framework.
2.2.3.UserDetailsService
1) Know UserDetailsService
Now we know that DaoAuthenticationProvider handles the authentication logic of web forms. After successful authentication, it gets an authentication (implemented by usernamepasswordauthenticationtoken), which contains the identity information (Principal). This identity information is an Object. In most cases, it can be forcibly transformed into a UserDetails Object.
DaoAuthenticationProvider contains a UserDetailsService instance, which is responsible for extracting user information userdetails (including password) according to the user name, and then DaoAuthenticationProvider will compare whether the user password extracted by UserDetailsService matches the password submitted by the user as the key basis for successful authentication, Therefore, you can define custom authentication by exposing the custom UserDetailsService as a spring bean.
public interface UserDetailsService {
UserDetails loadUserByUsername(String username) throws UsernameNotFoundException;
}
Many people confuse the responsibilities of DaoAuthenticationProvider and UserDetailsService. In fact, UserDetailsService is only responsible for loading user information from a specific place (usually a database), that's all. DaoAuthenticationProvider is more responsible. It completes the complete Authentication process and fills the UserDetails into Authentication.
It has been mentioned above that UserDetails is user information. Let's take a look at its true face:
public interface UserDetails extends Serializable {
   Collection<? extends GrantedAuthority> getAuthorities();
   String getPassword();
   String getUsername();
   boolean isAccountNonExpired();
   boolean isAccountNonLocked();
   boolean isCredentialsNonExpired();
   boolean isEnabled();
}
It is very similar to the authentication interface. For example, they all have username and authorities. getCredentials() in authentication and getPassword() in UserDetails need to be treated differently. The former is the password certificate submitted by the user and the latter is the password actually stored by the user. Authentication is actually a comparison between the two. getAuthorities() in authentication is actually formed by getAuthorities() of UserDetails. Remember the getDetails() method in the authentication interface? The UserDetails user details are passed
AuthenticationProvider is populated after authentication.
By implementing UserDetailsService and UserDetails, we can complete the expansion of user information acquisition method and user information field. Inmemoryuserdetailsmanager (memory authentication) and JdbcUserDetailsManager(jdbc authentication) provided by Spring Security are the implementation classes of UserDetailsService. The main difference is to load users from memory or database.
2) Testing
Customize UserDetailsService
@Service
public class SpringDataUserDetailsService implements UserDetailsService {
    @Override
    public UserDetails loadUserByUsername(String username) throws UsernameNotFoundException {
        //Login account
        System.out.println("username="+username);
        //Query the database according to the account number
        //Static data is temporarily used here
        UserDetails userDetails =
User.withUsername(username).password("123").authorities("p1").build();
        return userDetails;
    }
}
Mask the definition of UserDetailsService in the security configuration class
/*    @Bean
    public UserDetailsService userDetailsService()  {
        InMemoryUserDetailsManager manager = new InMemoryUserDetailsManager();

manager.createUser(User.withUsername("zhangsan").password("123").authorities("p1").build());
        manager.createUser(User.withUsername("lisi").password("456").authorities("p2").build());
        return manager;
    }*/
Restart the project and request authentication. The loadUserByUsername method of SpringDataUserDetailsService is called to query user information.
2.2.4.PasswordEncoder
1) Meet PasswordEncoder
After the DaoAuthenticationProvider Authentication processor obtains UserDetails through UserDetailsService, how does it compare with the password in the Authentication request?
Here, in order to adapt to a variety of encryption types, Spring Security also abstracts. DaoAuthenticationProvider compares passwords through the matches method of PasswordEncoder interface, and the specific details of password comparison depend on the implementation:
public interface PasswordEncoder {
    String encode(CharSequence var1);
    boolean matches(CharSequence var1, String var2);
    default boolean upgradeEncoding(String encodedPassword) {
        return false;
    }
}
Spring Security provides many built-in passwordencoders, which can be used out of the box. To use a PasswordEncoder, you only need to make the following statement, as follows:
@Bean
public PasswordEncoder passwordEncoder() {
    return  NoOpPasswordEncoder.getInstance();
}
NoOpPasswordEncoder adopts string matching method and does not encrypt and compare passwords. The password comparison process is as follows:
1. User input password (clear text)
2. DaoAuthenticationProvider gets UserDetails (where the correct password of the user is stored)
3. DaoAuthenticationProvider uses PasswordEncoder to verify the entered password and the correct password. If the passwords are consistent, the verification passes, otherwise the verification fails.
The verification rule of NoOpPasswordEncoder compares the entered password with the correct password in UserDetails. If the string content is consistent, the verification passes, otherwise the verification fails.
BCryptPasswordEncoder, Pbkdf2PasswordEncoder, SCryptPasswordEncoder, etc. are recommended for practical projects. You can see the specific implementation of these passwordencoders if you are interested.
2) Using BCryptPasswordEncoder
1. Configure BCryptPasswordEncoder
Define in the security configuration class:
@Bean
public PasswordEncoder passwordEncoder() {
    return new BCryptPasswordEncoder();
}
The test finds that the authentication fails. The prompt: Encoded password does not look like BCrypt.
reason:
Because the original password (e.g. 123) is stored in UserDetails, it is not in BCrypt format.
Track the code in line 33 of DaoAuthenticationProvider to view the content in userDetails, and track the code in line 38 to view the type of PasswordEncoder.
2. Test BCrypt
Test the BCrypt encryption and verification method through the code below
Add dependency:
<dependency>
    <groupId>org.springframework.boot</groupId>
    <artifactId>spring-boot-starter-test</artifactId>
    <scope>test</scope>
</dependency>
Write test method:
@RunWith(SpringRunner.class)
public class TestBCrypt {
    @Test
    public void test1(){
        //Encrypt the original password
        String hashpw = BCrypt.hashpw("123",BCrypt.gensalt());
        System.out.println(hashpw);
        //Verify whether the original password and BCrypt password are consistent
        boolean checkpw = BCrypt.checkpw("123",
"$2a$10$NlBC84MVb7F95EXYTXwLneXgCca6/GipyWR5NHm8K0203bSQMLpvm");
        System.out.println(checkpw);
    }
}
3. Modify security configuration class
Change the original password in UserDetails to BCrypt format
manager.createUser(User.withUsername("zhangsan").password("$2a$10$1b5mIkehqv5c4KRrX9bUj.A4Y2hug3I
GCnMCL5i4RpQrYV12xNKye").authorities("p1").build());
The password stored in the database in the actual project is not the original password, but the encrypted password.
2.3. Authorization process
2.3.1 authorization process
By getting started quickly, we know that Spring Security can be accessed through HTTP Authorizerequests () protects web requests from authorization. Spring Security uses standard Filter to intercept web requests, and finally realizes authorized access to resources.
The authorization process of Spring Security is as follows:
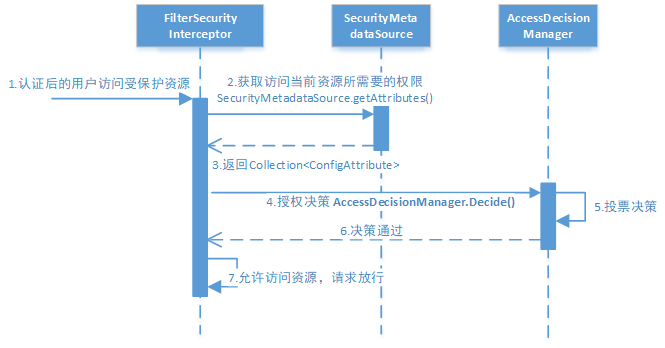
Analyze authorization process:
-
Intercept the request. The authenticated user accessing the protected web resources will be intercepted by the subclass of FilterSecurityInterceptor in SecurityFilterChain.
-
Get the resource access policy, and the FilterSecurityInterceptor will get the resource access policy from the subclass of SecurityMetadataSource
DefaultFilterInvocationSecurityMetadataSource gets the permissions required to access the current resource
Collection .
SecurityMetadataSource is actually the abstraction of read access policy, and the read content is actually the access rules we configured. Read access policy, such as:
http
.authorizeRequests()
        .antMatchers("/r/r1").hasAuthority("p1")
        .antMatchers("/r/r2").hasAuthority("p2")
        ...
\3. Finally, the FilterSecurityInterceptor will call the AccessDecisionManager to make an authorization decision. If the decision is passed, access to resources will be allowed, otherwise access will be prohibited.
The core interface of AccessDecisionManager is as follows:
public interface AccessDecisionManager {
   /**
   * The parameters passed are used to determine whether the user has access to the corresponding protected resources
   */
    void decide(Authentication authentication , Object object, Collection<ConfigAttribute>
configAttributes ) throws AccessDeniedException, InsufficientAuthenticationException;
 //Slightly
}
Here we will highlight the parameters of decision:
authentication: the identity of the visitor to access the resource
object: the protected resource to be accessed. The web request corresponds to FilterInvocation
configAttributes: is the access policy of protected resources, which is obtained through SecurityMetadataSource.
The decide interface is used to identify whether the current user has access to the corresponding protected resources.
2.3.2 authorization decision
The access decision manager uses voting to determine whether protected resources can be accessed.
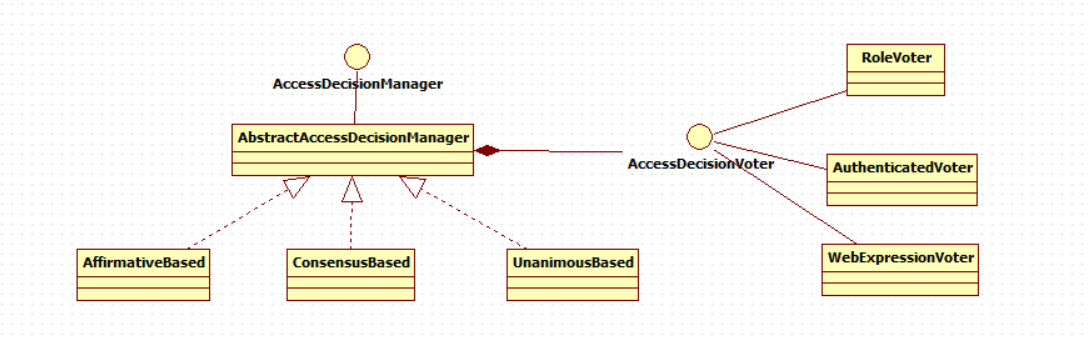
As can be seen from the above figure, a series of accessdecisionvoters contained in the AccessDecisionManager will be used to vote whether Authentication has access to the protected object. The AccessDecisionManager will make the final decision according to the voting results.
AccessDecisionVoter is an interface in which three methods are defined. The specific structure is as follows.
public interface AccessDecisionVoter<S> {
    int ACCESS_GRANTED = 1;
    int ACCESS_ABSTAIN = 0;
    int ACCESS_DENIED = -1;
    boolean supports(ConfigAttribute var1);
    boolean supports(Class<?> var1);
    int vote(Authentication var1, S var2, Collection<ConfigAttribute> var3);
}
The return result of the vote () method will be one of the three constants defined in AccessDecisionVoter. ACCESS_ Grant agrees, ACCESS_DENIED means rejected, ACCESS_ABSTAIN abstained. If an AccessDecisionVoter cannot determine whether the current Authentication has access to the corresponding protected object, the return value of its vote() method should be waiver ACCESS_ABSTAIN.
Spring Security has built-in three voting based AccessDecisionManager implementation classes as follows: confirmativebased, ConsensusBased and UnanimousBased,.
The logic of confirmativebased is:
(1) As long as there is an AccessDecisionVoter, the vote is access_ Grant agrees to the user's access;
(2) If all abstain, it also means passing;
(3) If no one votes in favor, but someone votes against, an AccessDeniedException will be thrown.
Spring security uses confirmativebased by default.
The logic of ConsensusBased is:
(1) If there are more affirmative votes than negative votes, it means that it is passed.
(2) Conversely, if there are more negative votes than affirmative votes, an AccessDeniedException will be thrown.
(3) If the affirmative vote is the same as the negative vote and is not equal to 0, and the value of the attribute allowifequalgranteddeniedecisions is true, it indicates that it is passed. Otherwise, an exception AccessDeniedException will be thrown. The value of the parameter allowIfEqualGrantedDeniedDecisions defaults to true.
(4) If all accessdecisionvoters abstain, it depends on the value of the parameter allowIfAllAbstainDecisions. If the value is true, it means passing. Otherwise, an exception AccessDeniedException will be thrown. The value of the parameter allowIfAllAbstainDecisions is false by default.
The logic of UnanimousBased is a little different from the other two implementations. The other two will pass all the configuration attributes of the protected object to AccessDecisionVoter for voting at one time, while UnanimousBased will only pass one ConfigAttribute to AccessDecisionVoter for voting at one time. This means that if the logic of our AccessDecisionVoter is that as long as one of the passed ConfigAttribute can match, we will vote in favor, but if we put it in UnanimousBased, the voting result will not necessarily be in favor.
The logic of UnanimousBased is as follows:
(1) If a ConfigAttribute configured by a protected object is opposed by any AccessDecisionVoter, an AccessDeniedException will be thrown.
(2) If there is no negative vote, but there is an affirmative vote, it means that it is passed.
(3) If you abstain completely, it will depend on the value of the parameter allowIfAllAbstainDecisions. If true, it will pass, and if false, it will throw an AccessDeniedException.
Spring Security also has built-in voter implementation classes, such as RoleVoter, AuthenticatedVoter and WebExpressionVoter. You can consult the materials and learn by yourself.
3 custom authentication
Spring security provides a very good authentication extension method, such as quickly storing user information into memory. In actual development, user information is usually in the database. Spring security can read user information from the database, and spring security also supports a variety of authorization methods.
Custom login page 1.3
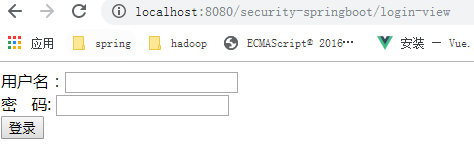
In quick launch, you may want to know where the login page comes from? Because we didn't provide any HTML or JSP files. The default configuration of Spring Security does not explicitly set a login page URL, so Spring Security will automatically generate a login page URL according to the enabled functions, and use the default URL to process the login submission content, jump to the default URL after login, and so on. Although the automatically generated login page is easy to start and run quickly, most applications want to define their own login page.
3.1.1 certification page
Log in the security spring MVC project Copy the JSP to the security springboot and keep the directory consistent.

3.1.2 configure authentication page
In webconfig Configure authentication page address in Java:
// The default URL root path jumps to / login, which is provided by spring security
@Override
public void addViewControllers(ViewControllerRegistry registry) {
    registry.addViewController("/").setViewName("redirect:/login-view");
    registry.addViewController("/login-view").setViewName("login");
}
3.1.3 security configuration
Configure the seal login information in WebSecurityConfig:
// Configure security interception mechanism
@Override
protected void configure(HttpSecurity http) throws Exception {
    http
            .authorizeRequests()
            .antMatchers("/r/**").authenticated()
            .anyRequest().permitAll()
            .and()
            .formLogin()                 (1)
          .loginPage("/login-view")        (2)
          .loginProcessingUrl("/login")      (3)
          .successForwardUrl("/login-success")   (4)
          .permitAll();
}
(1) Allow form login
(2) Specify our own login page and spring security will redirect to / login view
(3) Specify the URL of login processing, that is, the destination path of user name and password form submission
(4) Specify the jump URL after successful login
(5) We must allow all users to access our login page (for example, for authenticated users), this formlogin () The permitall () method allows any user to access all URL s of a form based login.
3.1.4 testing
When the user is not authenticated, the resources accessing the system will be redirected to the login view page
Enter the account and password, click login, and an error will be reported:
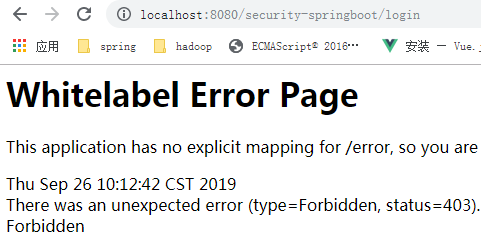
Problem solving:
spring security limits most methods except get to prevent CSRF (Cross Site Request Forgery).
Solution 1:
Shield CSRF control, that is, spring security no longer restricts CSRF.
Configure WebSecurityConfig
@Override
protected void configure(HttpSecurity http) throws Exception {
    http.csrf().disable()  //Shield CSRF control, that is, spring security no longer restricts CSRF
            ...
}
This case adopts method 1
Solution 2:
In login Add a token to the JSP page, and spring security will verify the token. If the token is legal, you can continue to request. Modify login jsp
<form action="login" method="post">
    <input type="hidden"  name="${_csrf.parameterName}"   value="${_csrf.token}"/>
   ...
</form>
3.2 connection database authentication
In the previous example, we store the user information in memory, and the user information in the actual project is stored in the database. This section realizes reading the user information from the database. According to the previous research on the authentication process, you only need to redefine the UserDetailService to query the database according to the user account.
3.2.1 create database
Create user_db database
CREATE DATABASE `user_db` CHARACTER SET 'utf8' COLLATE 'utf8_general_ci';
Create t_user table
CREATE TABLE `t_user` (
  `id` bigint(20) NOT NULL COMMENT 'user id',
  `username` varchar(64) NOT NULL,
  `password` varchar(64) NOT NULL,
  `fullname` varchar(255) NOT NULL COMMENT 'User name',
  `mobile` varchar(11) DEFAULT NULL COMMENT 'cell-phone number',
  PRIMARY KEY (`id`) USING BTREE
) ENGINE=InnoDB DEFAULT CHARSET=utf8 ROW_FORMAT=DYNAMIC
3.2.2 code implementation
1) Define dataSource
In application Properties configuration
spring.datasource.url=jdbc:mysql://localhost:3306/user_db
spring.datasource.username=root
spring.datasource.password=mysql
spring.datasource.driver-class-name=com.mysql.jdbc.Driver
2) Add dependency
<dependency>
    <groupId>org.springframework.boot</groupId>
    <artifactId>spring-boot-starter-test</artifactId>
    <scope>test</scope>
</dependency>
<dependency>
    <groupId>org.springframework.boot</groupId>
    <artifactId>spring-boot-starter-jdbc</artifactId>
</dependency>
<dependency>
    <groupId>mysql</groupId>
    <artifactId>mysql-connector-java</artifactId>
    <version>5.1.47</version>
</dependency>
3) Define Dao
Define the model type, and define UserDto in the model package:
@Data
public class UserDto {
    private String id;
    private String username;
    private String password;
    private String fullname;
    private String mobile;
}
Define UserDao in Dao package:
@Repository
public class UserDao {
    @Autowired
    JdbcTemplate jdbcTemplate;
    public UserDto getUserByUsername(String username){
        String sql ="select id,username,password,fullname from t_user where username = ?";
        List<UserDto> list = jdbcTemplate.query(sql, new Object[]{username}, new
BeanPropertyRowMapper<>(UserDto.class));
        if(list == null && list.size() <= 0){
            return null;
        }
        return list.get(0);
    }
}
3.2.3 define UserDetailService
Define SpringDataUserDetailsService under the service package:
@Service
public class SpringDataUserDetailsService implements UserDetailsService {
    @Autowired
    UserDao userDao;
    @Override
    public UserDetails loadUserByUsername(String username) throws UsernameNotFoundException {
        //Login account
        System.out.println("username="+username);
        //Query the database according to the account number
        UserDto user = userDao.getUserByUsername(username);
        if(user == null){
            return null;
        }
        // Static data is temporarily used here
        UserDetails userDetails =
User.withUsername(user.getFullname()).password(user.getPassword()).authorities("p1").build();
        return userDetails;
    }
}
3.2.4 testing
Enter the account number and password, request authentication and tracking code.
3.2.5 using BCryptPasswordEncoder
According to the usage of PasswordEncoder we mentioned earlier, the following work needs to be done to use BCryptPasswordEncoder:
1. Define BCryptPasswordEncoder in the security configuration class
@Bean
public PasswordEncoder passwordEncoder() {
    return  new BCryptPasswordEncoder();
}
2. The password in UserDetails is stored in BCrypt format
In the front, the user information is queried from the database, so the password in the database should be stored in BCrypt format

4 sessions
After the user authentication is passed, in order to avoid authentication for each operation of the user, the user's information can be saved in the session. After the thread is bound to the current SecurityContext, it can be used to manage the user's identity through the securityspring.
4.1. Get user identity
Write LoginController, implement the test resources of / r/r1 and / r/r2, and modify the loginSuccess method. Pay attention to the getUsername method. The method for spring security to obtain the current login user information is securitycontextholder getContext(). getAuthentication()
@RestController
public class LoginController {
    /**
     * User login succeeded
     * @return
     */
    @RequestMapping(value = "/login-success",produces = {"text/plain;charset=UTF-8"})
    public String loginSuccess(){
        String username = getUsername();
        return username + " Login successful";
    }
   /**
     * Get the current login user name
     * @return
     */
    private String getUsername(){
        Authentication authentication = SecurityContextHolder.getContext().getAuthentication();
        if(!authentication.isAuthenticated()){
            return null;
        }
        Object principal = authentication.getPrincipal();
        String username = null;
        if (principal instanceof org.springframework.security.core.userdetails.UserDetails) {
            username =
((org.springframework.security.core.userdetails.UserDetails)principal).getUsername();
        } else {
            username = principal.toString();
        }
        return username;
    }
    /**
     * Test resource 1
     * @return
     */
    @GetMapping(value = "/r/r1",produces = {"text/plain;charset=UTF-8"})
    public String r1(){
        String username = getUsername();
        return username + " Access resource 1";
    }
    /**
     * Test resource 2
     * @return
     */
    @GetMapping(value = "/r/r2",produces = {"text/plain;charset=UTF-8"})
    public String r2(){
        String username = getUsername();
        return username + " Access resource 2";
    }
}
test
Access resources before login
Redirected to the login page.
Access resources after login
Successfully accessed resources as follows:

4.2 session control
We can accurately control when a session is created and how Spring Security interacts with it through the following options:
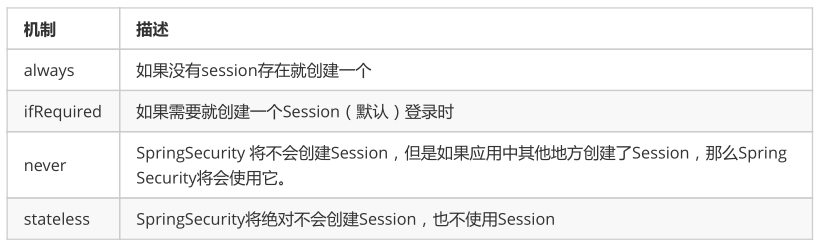
This option can be configured in the following ways:
@Override
protected void configure(HttpSecurity http) throws Exception {
   http.sessionManagement()
        .sessionCreationPolicy(SessionCreationPolicy.IF_REQUIRED)
}
By default, Spring Security will create a new Session, ifRequired, for each user who successfully logs in.
If you select never, it indicates that Spring Security will not create a session for users who have successfully logged in, but if your application creates a new session somewhere, Spring Security will use it.
If you use stateless, it means that Spring Security will not create a session for users who log in successfully, and your application will not allow new sessions. And it implies that cookie s are not used, so every request needs to be re authenticated. This stateless architecture is applicable to the REST API and its stateless authentication mechanism.
4.3 session timeout
You can set the timeout of Session in the servlet container. Set the Session validity as 3600s as follows;
spring boot configuration file:
server.servlet.session.timeout=3600s
After the session times out, you can set the jump path through Spring Security.
http.sessionManagement()
    .expiredUrl("/login-view?error=EXPIRED_SESSION")
    .invalidSessionUrl("/login-view?error=INVALID_SESSION");
Expired means that the session has expired, and invalidSession means that the passed in sessionid is invalid.
4.4 secure session cookie
We can use httpOnly and secure tags to protect our session cookie s:
- httpOnly: if true, the browser script will not be able to access the cookie
- secure: if true, the cookie will only be sent over an HTTPS connection
spring boot configuration file:
server.servlet.session.cookie.http-only=true
server.servlet.session.cookie.secure=true
4.5 exit
Spring security implements logout exit by default and accesses / logout. As expected, spring has also done a good job in the exit function for us.

Click "Log Out" to exit successfully.
After exiting, visit other URLs to judge whether the exit is successful.
You can also customize the exit success page here:
Configure in protected void configure(HttpSecurity http) of WebSecurityConfig:
.and()
.logout()
.logoutUrl("/logout")
.logoutSuccessUrl("/login-view?logout");
When the exit operation starts, the following occurs:
- Invalidate HTTP Session
- Clear SecurityContextHolder
- Jump to / login -view?logout
However, similar to configuring the login function, we can further customize the exit function:
@Override
protected void configure(HttpSecurity http) throws Exception {
    http
            .authorizeRequests()
       //...
            .and()
            .logout()                                                    (1)
                .logoutUrl("/logout")                                    (2)
                .logoutSuccessUrl("/login-view?logout")                  (3)
                .logoutSuccessHandler(logoutSuccessHandler)              (4)
           .addLogoutHandler(logoutHandler)                         (5)
                .invalidateHttpSession(true);                             (6)

}
(1) Provide system exit support, and the WebSecurityConfigurerAdapter will be automatically applied
(2) Set the URL that triggers the exit operation (default is / logout)
(3) URL to jump after exit. The default is / login?logout .
(4) The customized LogoutSuccessHandler is used to handle when the user exits successfully. If this option is specified, the setting of logoutSuccessUrl() will be ignored.
(5) Add a LogoutHandler to clean up when the user exits The default SecurityContextLogoutHandler will be added as the last LogoutHandler.
(6) Specifies whether to invalidate HttpSession on exit. The default setting is true.
Note: if you want logout to take effect under the GET request, you must turn off CSRF () to prevent CSRF attacks disable(). If CSRF is enabled, you must use post to request / logout
logoutHandler:
In general, the implementation classes of LogoutHandler are used to perform the necessary cleanup, so they should not throw exceptions.
Here are some implementations provided by Spring Security:
- PersistentTokenBasedRememberMeServices is based on the relevant cleanup of the memberme function of persistent token
- TokenBasedRememberMeService related cleanup of token based memberme function
- The Cookie clearinglogouthandler cleans up cookies when exiting
- CsrfLogoutHandler is responsible for removing csrfToken when exiting
- Related cleanup of SecurityContextLogoutHandler when exiting
The chained API provides a shortcut to call the corresponding LogoutHandler implementation, such as deleteCookies().
4.6 authorization
4.6.1 general
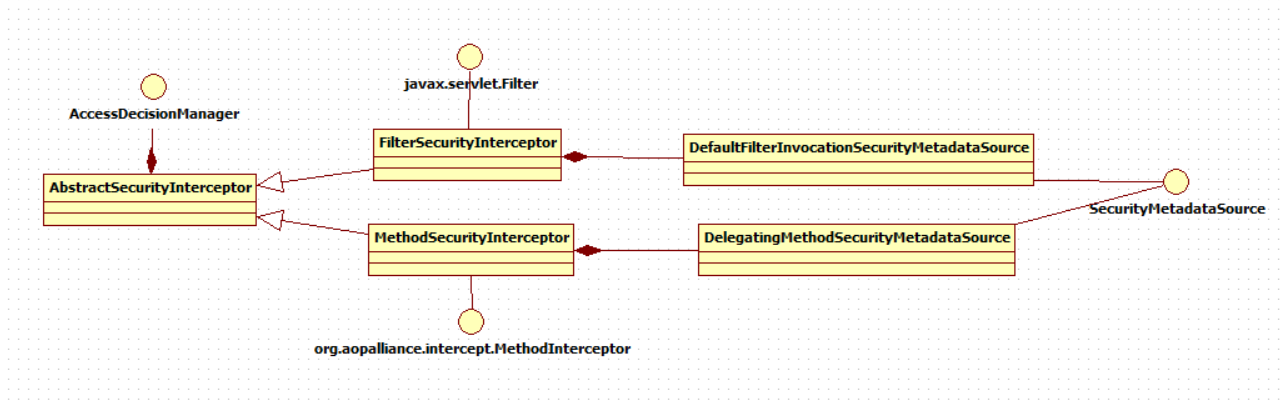
The ways of authorization include web authorization and method authorization. Web authorization is authorized through url interception, and method authorization is authorized through method interception. They will call the accessDecisionManager to make authorization decisions. If it is web authorization, the interceptor is FilterSecurityInterceptor; If it is method authorization, the interceptor is MethodSecurityInterceptor. If web authorization and method authorization are adopted at the same time, the web authorization is executed first, then the method authorization is executed, and finally the decision is passed, the access to resources is allowed, otherwise the access will be prohibited.
Class relationships are as follows:
4.6.2. Prepare the environment
4.6.2.1 database environment
In t_ Create the following table for user database:
Role table:
CREATE TABLE `t_role` (
  `id` varchar(32) NOT NULL,
  `role_name` varchar(255) DEFAULT NULL,
  `description` varchar(255) DEFAULT NULL,
  `create_time` datetime DEFAULT NULL,
  `update_time` datetime DEFAULT NULL,
  `status` char(1) NOT NULL,
  PRIMARY KEY (`id`),
  UNIQUE KEY `unique_role_name` (`role_name`)
) ENGINE=InnoDB DEFAULT CHARSET=utf8
insert  into `t_role`(`id`,`role_name`,`description`,`create_time`,`update_time`,`status`) values
('1','administrators',NULL,NULL,NULL,'');
User role relationship table:
CREATE TABLE `t_user_role` (
  `user_id` varchar(32) NOT NULL,
  `role_id` varchar(32) NOT NULL,
  `create_time` datetime DEFAULT NULL,
  `creator` varchar(255) DEFAULT NULL,
  PRIMARY KEY (`user_id`,`role_id`)
) ENGINE=InnoDB DEFAULT CHARSET=utf8
insert  into `t_user_role`(`user_id`,`role_id`,`create_time`,`creator`) values
('1','1',NULL,NULL);
Permission table:
CREATE TABLE `t_permission` (
  `id` varchar(32) NOT NULL,
  `code` varchar(32) NOT NULL COMMENT 'Permission identifier',
  `description` varchar(64) DEFAULT NULL COMMENT 'describe',
  `url` varchar(128) DEFAULT NULL COMMENT 'Request address',
  PRIMARY KEY (`id`)
) ENGINE=InnoDB DEFAULT CHARSET=utf8
insert  into `t_permission`(`id`,`code`,`description`,`url`) values ('1','p1','Test resources
1','/r/r1'),('2','p3','Test resource 2','/r/r2');
Role permission relationship table:
CREATE TABLE `t_role_permission` (
  `role_id` varchar(32) NOT NULL,
  `permission_id` varchar(32) NOT NULL,
  PRIMARY KEY (`role_id`,`permission_id`)
) ENGINE=InnoDB DEFAULT CHARSET=utf8
insert  into `t_role_permission`(`role_id`,`permission_id`) values ('1','1'),('1','2');
4.6.2.2 modifying UserDetailService
1. Modify dao interface
Add in UserDao:
// Query user permissions according to user id
public List<String> findPermissionsByUserId(String userId){
    String sql="SELECT * FROM t_permission WHERE id IN(\n" +
            "SELECT permission_id FROM t_role_permission WHERE role_id IN(\n" +
            "\tSELECT role_id FROM t_user_role WHERE user_id = ? \n" +
            ")\n" +
            ")";
    List<PermissionDto> list = jdbcTemplate.query(sql, new Object[]{userId}, new
BeanPropertyRowMapper<>(PermissionDto.class));
    List<String> permissions = new ArrayList<>();
    list.iterator().forEachRemaining(c->permissions.add(c.getCode()));
    return permissions;
}
2. Modify UserDetailService
Implement read permission from database
@Override
public UserDetails loadUserByUsername(String username) throws UsernameNotFoundException {
    //Login account
    System.out.println("username="+username);
    //Query the database according to the account number
    UserDto user = userDao.getUserByUsername(username);
    if(user == null){
        return null;
    }
    //Query user permissions
    List<String> permissions = userDao.findPermissionsByUserId(user.getId());
    String[] perarray = new String[permissions.size()];
    permissions.toArray(perarray);
    //Create userDetails
    UserDetails userDetails =
User.withUsername(user.getFullname()).password(user.getPassword()).authorities(perarray).build();
    return userDetails;
}
4.6.3 web authorization
In the above example, we have completed authentication interception and simple authorization protection for some resources under / r / * * but what should we do if we want flexible authorization control? By giving http Authorizerequests() adds multiple child nodes to customize the requirements to our URL, as shown in the following code:
@Override
protected void configure(HttpSecurity http) throws Exception {
    http
            .authorizeRequests()                                                           (1)
            .antMatchers("/r/r1").hasAuthority("p1")                                       (2)
            .antMatchers("/r/r2").hasAuthority("p2")                                       (3)
            .antMatchers("/r/r3").access("hasAuthority('p1') and hasAuthority('p2')")      (4)
            .antMatchers("/r/**").authenticated()                                          (5)
           .anyRequest().permitAll()                                                      (6)
       .and()
             .formLogin()
        // ...
}
(1) http. The authorizerequests () method has multiple child nodes, and each macher executes in the order they are declared.
(2) Specify the "/ r/r1"URL and have p1 permission to access it
(3) Specify the "/ r/r2"URL and have p2 permission to access it
(4) "/ r/r3"URL is specified and can only be accessed with p1 and p2 permissions at the same time
(5) The "/ r / * *" resources other than r1, r2 and r3 are specified and can be accessed through identity authentication. Here, use the SpEL (Spring Expression Language) expression..
(6) The remaining unmatched resources are not protected.
be careful:
The order of rules is important, and more specific rules should be written first Now, all contents starting with / admin need to be authenticated users with admin role, even the / admin / login path (because / admin / login has been matched by / admin / * * rule, the second rule is ignored)
.antMatchers("/admin/**").hasRole("ADMIN")
.antMatchers("/admin/login").permitAll()
Therefore, the login page rule should precede the / admin / * * rule For example
.antMatchers("/admin/login").permitAll()
.antMatchers("/admin/**").hasRole("ADMIN")
Common methods to protect URL s are:
authenticated() protects the URL and requires user login
permitAll() specifies that the URL does not need to be protected. It is generally applied to static resource files
hasRole(String role) restricts the access of a single ROLE, and the ROLE will be added "ROLE_" So "ADMIN" will be compared with "ROLE_ADMIN"
hasAuthority(String authority) restricts access to a single permission
hasAnyRole(String... roles) allows multiple roles to access
hasAnyAuthority(String... authorities) allows multiple permissions to access
access(String attribute) this method uses a SpEL expression, so you can create complex constraints
hasIpAddress(String ipaddressExpression) restricts the IP address or subnet
4.6.4 method authorization
Now we know how to use HTTP Authorizerequests() authorizes and protects web resources from spring security2 Since version 0, it supports the security of service layer methods. In this section, you will learn three types of annotations @ PreAuthorize,@PostAuthorize, @Secured.
We can use the @ EnableGlobalMethodSecurity annotation on any @ Configuration instance to enable annotation based security.
The following will enable the @ Secured annotation for Spring Security.
@EnableGlobalMethodSecurity(securedEnabled = true)
public class MethodSecurityConfig {// ...}
Then adding annotations to a method (on a class or interface) limits access to that method. Spring Security's native annotation support defines a set of properties for this method. These will be passed to the AccessDecisionManager for actual decisions:
public interface BankService {
@Secured("IS_AUTHENTICATED_ANONYMOUSLY")
public Account readAccount(Long id);
@Secured("IS_AUTHENTICATED_ANONYMOUSLY")
public Account[] findAccounts();
@Secured("ROLE_TELLER")
public Account post(Account account, double amount);
}
The above configuration indicates that the readAccount and findAccounts methods can be accessed anonymously. The underlying layer uses the WebExpressionVoter voter, which can be tracked from line 23 of the confirmativebased code..
The post method needs to be accessed by the TELLER role, and the RoleVoter voter is used at the bottom.
Use the following code to enable support for prePost annotations
@EnableGlobalMethodSecurity(prePostEnabled = true)
public class MethodSecurityConfig {
// ...
}
The corresponding Java code is as follows:
public interface BankService {
@PreAuthorize("isAnonymous()")
public Account readAccount(Long id);
@PreAuthorize("isAnonymous()")
public Account[] findAccounts();
@PreAuthorize("hasAuthority('p_transfer') and hasAuthority('p_read_account')")
public Account post(Account account, double amount);
}
The above configuration indicates that the readAccount and findAccounts methods can be accessed anonymously, and the post method needs to have P at the same time_ Transfer and p_read_account permission can be accessed. The underlying layer uses WebExpressionVoter voter, which can be tracked from line 23 of confirmativebased code.