Introduction to DNS
DNS (Domain Name System) domain name resolution service is used to resolve domain names or ip addresses and correspond them one by one. DNS system is a distributed data structure, DNS is an application layer protocol, and uses port 53 numbers of tcp and udp. Port 53 of tcp is used for synchronization between the primary server and the standby server, and port 53 of udp is used for domain name resolution. DNS server is divided into master domain name server, slave domain name server and cache domain name server. Master domain name server: it is used for the host to request mapping records and maintain local mapping records. Slave domain name server: it is responsible for synchronizing with the master domain name server and caching domain name server: it maintains its own local mapping records.
FQDN
fqdn (fully qualified domain name) consists of host name and domain name. A fully qualified domain name is divided into root domain, top-level domain, secondary domain, tertiary domain... And host name. Take www.baidu.com For example, look back and forward. Www. 68mn COM is the top-level domain Baidu is the secondary domain, WWW is the host name, and the root domain behind com is omitted
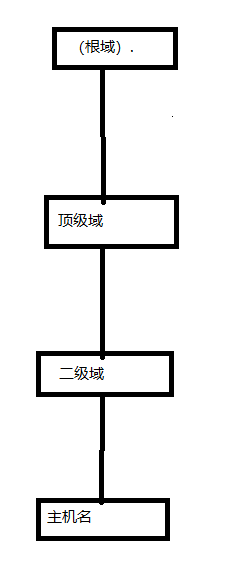
In the top-level domain com is generally a business type net is generally a network type org is generally a non - profit type edu is generally the type of education industry cn is generally a country type. These top-level domains are not fixed, but are classified by convention. In the host name, www is used for web pages, mail is used for mail, and news is used for news.
DNS resolution principle
The client can view its own cache, directly access it if it has one, find the hosts file if it has none, directly access it if it has one, and find the dns server if it has none,
The dns server checks its own cache, returns it to the client if it has one, and starts looking for the root domain if it has none, and accesses it level by level.
First visit
If the client wants to connect to a domain name, first go to the DNS server to check the mapping table of ip and domain name. If it finds no, then go to the root domain. The root domain starts to search, but the root domain does not know the domain name, only the top-level domain is managed by the root domain. The root domain returns a message to the DNS server, tells the server the top-level domain, asks the server to find the top-level domain, and then asks the server to find the top-level domain. The top-level domain does not know, but the secondary domain is managed by the top-level domain, and asks the server to find the secondary domain. Step by step, finally, the server finds the last domain. The last domain finds that the host belongs to others, and then tells the server to find it. At this time, the DNS server records the location and ip address of the host, and then the DNS server returns the information to the client. The client records the mapping of the domain name and ip address in the DNS cache.
Second visit
The client directly accesses the domain name. If the DNS cache is gone, it goes to the DNS server to request the mapping of the domain name and ip address. If there is DNS, it returns to the client. The client records it in the table and then accesses it. Without the first access step.
DNS setup
Build dns service and httpd service on the previous basis, and make Windows clients access the published web pages through domain names.
First install dns and httpd
yum -y install bind     Download and install dns,there bind Because dns Service predecessor is bind Used
yum -y install httpd	download httpd service
vim enters / etc / named conf
Revise lines 12-21
12 options {
13         listen-on port 53 { any; };     any It means listening to port 53 of all hosts
14         listen-on-v6 port 53 { ::1; };
15         directory       "/var/named";
16         dump-file       "/var/named/data/cache_dump.db";
17         statistics-file "/var/named/data/named_stats.txt";
18         memstatistics-file "/var/named/data/named_mem_stats.txt";
19         recursing-file  "/var/named/data/named.recursing";
20         secroots-file   "/var/named/data/named.secroots";
21         allow-query     { any; };    	Allow any host access
vim enters / etc / named rfc1912. zones
Add the following on line 18
18 zone "shiki.com" IN {        ""With the domain name in the middle, you can customize it at will
19  type master; 				Decide whether this server is the primary server or the standby server. It is good by default
20  file "shiki.com.zone";		Followed by the name of the data file, which identifies a region file, and then calls the file when it is called.
21 allow-update { none; };		Allow or disallow dynamic update dns
22 };
Enter the / var/named directory Copy and paste localhost into Shiki com. zone
cp -p named.localhost shiki.com.zone
vim shiki.com.zone        Edit this file
        NS      @
        A       127.0.0.1
www     A       192.168.214.214    hold AAAA Change the line like this, and change the following address to your own ip address
Start the dns service after all are completed
systemctl start named start-up dns service
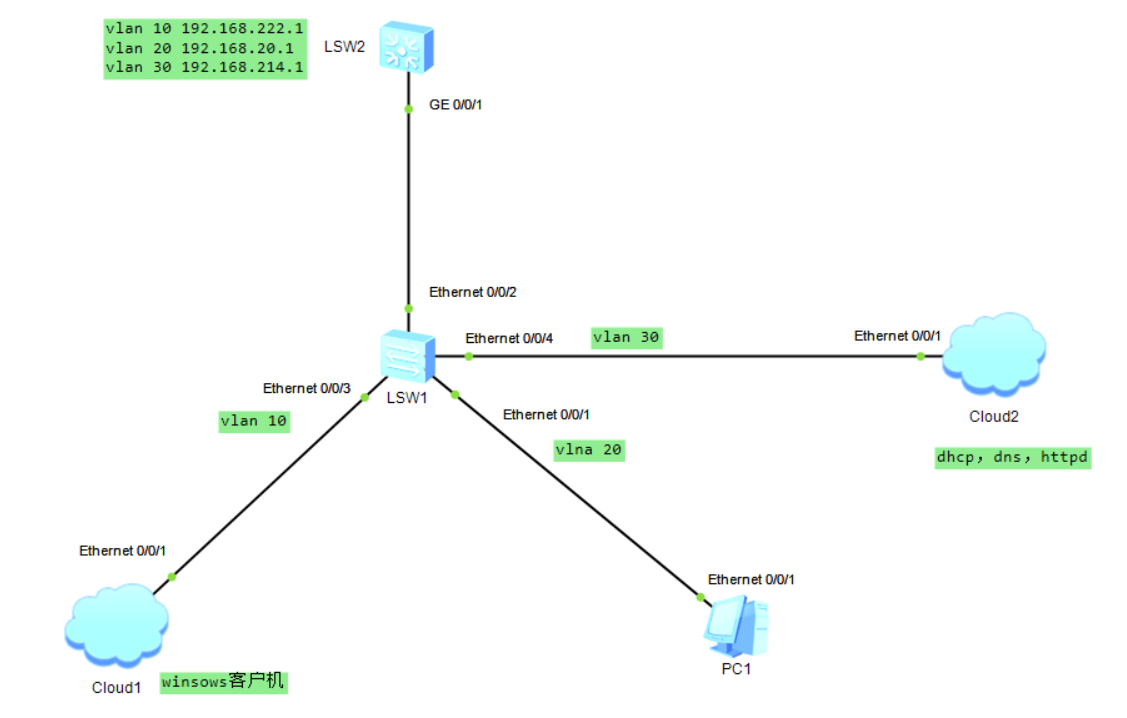
Set the layer-2 switch
[sw1]vlan batch 10 20 30          add to vlan
Info: This operation may take a few seconds. Please wait for a moment...done.
[sw1]inter e0/0/3
[sw1-Ethernet0/0/3]p l a 		 Set for each interface access Mode and set separately vlan
[sw1-Ethernet0/0/3]p d v 10
[sw1-Ethernet0/0/3]inter e0/0/1
[sw1-Ethernet0/0/1]p l a
[sw1-Ethernet0/0/1]p d v 20
[sw1-Ethernet0/0/1]inter e0/0/4
[sw1-Ethernet0/0/4]p l a
[sw1-Ethernet0/0/4]p d v 30
[sw1-Ethernet0/0/4]inter e0/0/2
[sw1-Ethernet0/0/2]p l t
[sw1-Ethernet0/0/2]p t a v a
Set up the layer 3 switch and don't forget to add vlan
[sw2]inter g0/0/1
[sw2-GigabitEthernet0/0/1]p l t
[sw2-GigabitEthernet0/0/1]p t a v a
[sw2-GigabitEthernet0/0/1]inter vlan 10     Enter virtual interface settings ip address
[sw2-Vlanif10]ip address 192.168.222.1 24
[sw2-Vlanif10]q
[sw2]dhcp en
[sw2]dhcp enable       open dhcp service
Info: The operation may take a few seconds. Please wait for a moment.done.
[sw2]inter vlan 10
[sw2-Vlanif10]dhcp select relay     open dhcp relay
[sw2-Vlanif10]dhcp relay server-ip 192.168.214.214    hold dhcp Service orientation dhcp The server
[sw2-Vlanif10]inter vlan 20
[sw2-Vlanif20]dhcp select relay
[sw2-Vlanif20]dhcp relay server-ip 192.168.214.214
[sw2-Vlanif20]inter vlan 30
[sw2-Vlanif30]dhcp select relay
[sw2-Vlanif30]dhcp relay server-ip 192.168.214.214
[sw2]inter vlan 20
[sw2-Vlanif20]ip address 192.168.20.1 24
[sw2-Vlanif20]inter vlan 30
[sw2-Vlanif30]ip address 192.168.214.1 24
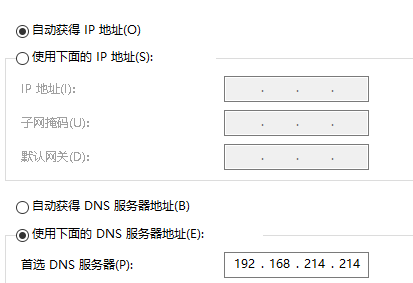
Manually set the dns of windows as your own dns server
Create directory under / var / index.html HTML file. Modifying this file can modify the home page information of the web page
vim /var/www/html/index.html    Edit file
long may the sunshine           Write information to file
systemctl start httpd           Open service
Access domain names using windows
