We previously said that k8s uses deployment and statefulset workload resources to maintain stateless and stateful applications, respectively. In this short article we will learn how to use DaemonSet to maintain a daemon process (application).
1. What is a DaemonSet?
DaemonSet is a workload resource (daemon) that ensures that a Pod must be running on all or some nodes, and when nodes join the cluster, a Pod is added to them.
Here are some common use cases:
- Cluster daemons, such as Kured, node-problem-detector
- Log collection daemons, such as fluentd, logstash
- Monitor daemons, such as promethues node-exporter
By creating a DaemonSet, you can ensure that the protection process pod is scheduled to run on each available node.
2. How does DaemonSet work?
The DaemonSet is a Kubernetes work resource object managed by a controller manager. By declaring a desired daemonset state, we indicate that a specific Pod is required on each node. The coordinated control loop compares the expected state with the current observed state. If the observed node does not have a matching Pod, the DaemonSet controller will automatically create one. You can refer to the previous k8s Workflow Details
This process includes existing nodes and all newly created nodes. However, the PD created by the DaemonSet controller is ignored by the Kubernetes scheduler, that is, the DaemonSet Pod s are created and dispatched by the DaemonSet controller. Two subtle issues arise:
- Inconsistency of Pod behavior: A normal Pod is in Pending state while waiting for dispatch after it is created, and a DaemonSet Pods is not in Pending state after it is created.
- Pod preemption is handled by the default scheduler. When preemption is enabled, the DaemonSet controller makes scheduling decisions regardless of Pod priority and preemption.
So after k8s v1.12, the DaemonSet Controller will add the.spec.nodeAffinity field to the PD of the DaemonSet, not the.spec.nodeName field, and further bind the Pod to the target node by the kubernetes scheduler. If the nodeAffinity field already exists for the OD of the DaemonSet, the value of that field will be replaced.
nodeAffinity:
  requiredDuringSchedulingIgnoredDuringExecution:
    nodeSelectorTerms:
    - matchFields:
      - key: metadata.name
        operator: In
        values:
        - target-host-name
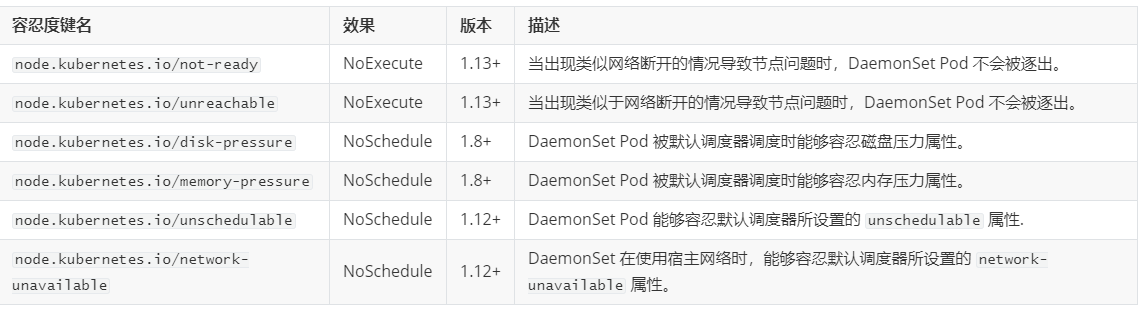
The default tolerance rules for daemonset pod are as follows:
DaemonSet creates a Pod on each node by default. Of course, you can also use a node selector to limit the number of acceptable nodes. The DaemonSet controller will only create a Pod on nodes that match the predefined nodeSelector field in the YAML file. We'll use it below.
3. DaemonSet instance
Create DaemonSet
We just need to adjust the kind in the previous deployment to DaemonSet to create a DaemonSet daemon
apiVersion: apps/v1
kind: DaemonSet
metadata:
  name: my-daemonset
spec:
  selector:
    matchLabels:
      app: my-daemon
  template:
    metadata:
      labels:
        app: my-daemon
    spec:
      containers:
        - name: daemonset-container
          image: httpd
          ports:
          - containerPort : 80
View resource status after apply application
$ kubectl get daemonset
NAME            DESIRED   CURRENT   READY   UP-TO-DATE   AVAILABLE   NODE SELECTOR            AGE
my-daemonset    1         1         1       1            1           <none>                   10m
Since our minikube has only one node, only one copy is created, and the daemonset pod is seen by the get on the node
$ kubectl get pod
NAME                  READY   STATUS    RESTARTS   AGE
my-daemonset-97z2g    1/1     Running   0          10m
You can see in the daemonset resource state that the value of NODE SELECTOR is none. Obviously, we can make the DaemonSet controller create pods only on nodes that match the Node selection operator by adding a nodeSelector to the pod template. Next, we add a nodeSelector
apiVersion: apps/v1
kind: DaemonSet
metadata:
  name: my-daemonset
spec:
  selector:
    matchLabels:
      app: my-daemon
  template:
    metadata:
      labels:
        app: my-daemon
    spec:
      containers:
        - name: daemonset-container
          image: httpd
          ports:
          - containerPort : 80
      nodeSelector:
       kubernetes.io/hostname: minikube
This way our pod will only create the pod of the DaemonSet daemon on the Node where hostname is minikube
$ kubectl get daemonset
NAME            DESIRED   CURRENT   READY   UP-TO-DATE   AVAILABLE   NODE SELECTOR                     AGE
my-daemonset    1         1         1       1            1           kubernetes.io/hostname=minikube   30m
In addition to controlling node dispatch through nodeSelector, daemonset pod can also be dispatched to "abnormal" Node through tolerations, a tolerance policy mentioned above.
Let's take a look at fluentd's official elastic search daemonset
Source file address: fluentd-daemonset-elasticsearch.yaml
apiVersion: apps/v1
kind: DaemonSet
metadata:
  name: fluentd
  namespace: kube-system
  labels:
    k8s-app: fluentd-logging
    version: v1
spec:
  selector:
    matchLabels:
      k8s-app: fluentd-logging
      version: v1
  template:
    metadata:
      labels:
        k8s-app: fluentd-logging
        version: v1
    spec:
      tolerations:
      - key: node-role.kubernetes.io/master
        effect: NoSchedule
      containers:
      - name: fluentd
        image: fluent/fluentd-kubernetes-daemonset:v1-debian-elasticsearch
        env:
          - name:  FLUENT_ELASTICSEARCH_HOST
            value: "elasticsearch-logging"
          - name:  FLUENT_ELASTICSEARCH_PORT
            value: "9200"
          - name: FLUENT_ELASTICSEARCH_SCHEME
            value: "http"
          # Option to configure elasticsearch plugin with self signed certs
          # ================================================================
          - name: FLUENT_ELASTICSEARCH_SSL_VERIFY
            value: "true"
          # Option to configure elasticsearch plugin with tls
          # ================================================================
          - name: FLUENT_ELASTICSEARCH_SSL_VERSION
            value: "TLSv1_2"
          # X-Pack Authentication
          # =====================
          - name: FLUENT_ELASTICSEARCH_USER
            value: "elastic"
          - name: FLUENT_ELASTICSEARCH_PASSWORD
            value: "changeme"
          # Logz.io Authentication
          # ======================
          - name: LOGZIO_TOKEN
            value: "ThisIsASuperLongToken"
          - name: LOGZIO_LOGTYPE
            value: "kubernetes"
        resources:
          limits:
            memory: 200Mi
          requests:
            cpu: 100m
            memory: 200Mi
        volumeMounts:
        - name: varlog
          mountPath: /var/log
        # When actual pod logs in /var/lib/docker/containers, the following lines should be used.
        # - name: dockercontainerlogdirectory
        #   mountPath: /var/lib/docker/containers
        #   readOnly: true
        # When actual pod logs in /var/log/pods, the following lines should be used.
        - name: dockercontainerlogdirectory
          mountPath: /var/log/pods
          readOnly: true
      terminationGracePeriodSeconds: 30
      volumes:
      - name: varlog
        hostPath:
          path: /var/log
      # When actual pod logs in /var/lib/docker/containers, the following lines should be used.
      # - name: dockercontainerlogdirectory
      #   hostPath:
      #     path: /var/lib/docker/containers
      # When actual pod logs in /var/log/pods, the following lines should be used.
      - name: dockercontainerlogdirectory
        hostPath:
          path: /var/log/pods
In particular, in order to collect pod logs on the master node, fluentd is tolerated to be dispatched to the master node, where tolerations are as follows

Daemon Pods Communication
Several modes of communication with Pod in the DaemonSet are as follows:
- Push: Configure the Pod in the DaemonSet to send updates to another service, such as a statistics database.
- NodeIP and known ports: Pods in the DaemonSet can use hostPort to access Pods through node IP. Clients can get a list of node IPs in some way, and based on this they can also get the corresponding ports. For example, node-exporter for prometheus.
- DNS: Create a headless service with the same Pod selection operator to discover the DaemonSet by using the endpoints resource or retrieving multiple A records from DNS.
DaemonSet Update
If a node's label is modified, the DaemonSet immediately adds a Pod to the newly matched node and deletes the Pod on the mismatched node.
You can delete a DaemonSet. If the --cascade=orphan option is specified using kubectl, the Pod will remain on the node. Next, if you create a new DaemonSet that uses the same selection operator, the new DaemonSet will adopt the existing pod. If a Pod needs to be replaced, the DaemonSet will be replaced according to its updateStrategy.
Such as node-exporter in prometheus

The above is about DaemonSet in k8s.
Reference resources:
I hope your composition will help you a little. If there are any mistakes in the content, please correct them. Public Name - [Container Cloud Practice]
You may reproduce, modify or publish this article at will without my consent. Read through the blog: iqsing.github.io