MySQL introduction and installation
1, MySQL overview
1. Relational database and non relational database
RDBMS (relational database management system) is a relational database management system.
In short, relational database refers to a database that uses two-dimensional tables to organize data.

Extension: there are generally two kinds of databases in the industry, relational database and non relational database. Non relational databases do not maintain data through two-dimensional tables, but through key/value pairs.
2. Common relational databases
oracle, mysql, DB2 (IBM), Sybase, SQL server (Microsoft), IBM Informix
The biggest feature of relational database is transaction consistency, so it also has a lot of overhead in the maintenance of transaction consistency
3. What is a transaction
1) A transaction consists of one or more sql statements;
2) For operations in a transaction, these sql statements are either executed successfully or not executed. This is a transaction.
For example:
-
land ATM Machine, enter the password;
-
Connect to the database and verify the password;
-
Verify successfully and obtain user information, such as deposit balance;
-
The user enters the amount to be transferred and presses the OK key;
-
==Deduct the corresponding amount on the user account from the background database( update Statement);==
-
==Increase the corresponding amount to the opposite account from the background database( update Statement);==
-
Confirm, return card and leave;
4. Transaction characteristics (ACID)
-
Atomicity:
All operations in a transaction are inseparable in the database. Either all operations are completed or none are executed.
-
Consistency:
It means that the transaction must change the database from one consistency state to another, that is, a transaction must be in the consistency state before and after execution, and the integrity of relational data and the consistency of business logic cannot be destroyed.
-
Isolation:
The execution of a transaction is not disturbed by other transactions, and the intermediate results of transaction execution must be transparent to other transactions. Isolation is that when multiple users access the database concurrently, such as operating the same table, the transactions opened by the database for each user cannot be disturbed by the operations of other transactions. Multiple concurrent transactions should be isolated from each other.
-
Durability:
Persistence means that once a transaction is committed, the changes to the data in the database are permanent. Even in the case of database system failure, the operation of committing a transaction will not be lost.
High requirements for data consistency; Typical bank and payment system;
5. MySQL database overview
- MySQL is a relational database management system
- It is developed by MySQL AB company in Sweden and currently belongs to Oracle
- MySQL is a C/S architecture
6. MySQL database version
-
**Community Edition: MySQL Community Edition (GPL)**
- It can be regarded as the "extensive experience version" (mouse version) of the enterprise version, which has not passed the stress test and performance test of each proprietary system platform
- It is published based on GPL protocol and can be downloaded and used at will
- There are no official technical support services
-
**Enterprise Edition: MySQL Enterprise Edition(commercial)**
- It provides comprehensive advanced functions, management tools and technical support
- Good security, stability and scalability
-
Cluster version: MySQL Cluster CGE(commercial)
Extension: how to define the naming method of versions?
| edition | explain |
|---|---|
| α Alpha version | Internal test version, for internal communication or testing by professional testers. There are many bugs. It's best not to install them for ordinary users. |
| β (Beta) version | The public beta version is used by professional enthusiasts for large-scale testing. There are some defects, and this version is not suitable for ordinary users. |
| γ (Gamma) version | The fairly mature beta version is almost the same as the upcoming official version. |
| Final | Official version |
| Free | Free version |
| Release | Release version |
| Standard | Standard Version |
| Mini | Mini compact version, only the most basic functions |
| Upgrade | Upgrade version |
| GA(GenerallyAvailable) | The development team believes that this version is stable and can be used in more critical occasions. |
| Retail | Retail Edition |
7. Get MySQL software
Official website: www.mysql.com com
Step 1: click Downloads to download

Step 2: find the Community Edition
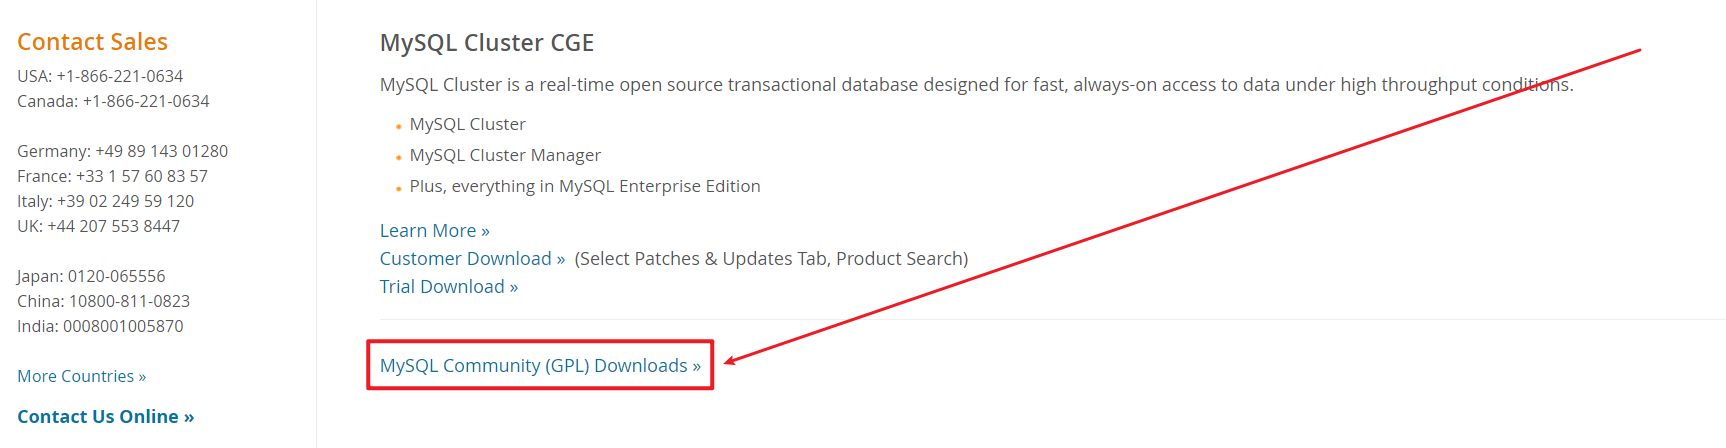
Step 3: Click to enter the MySQL Community Edition download page
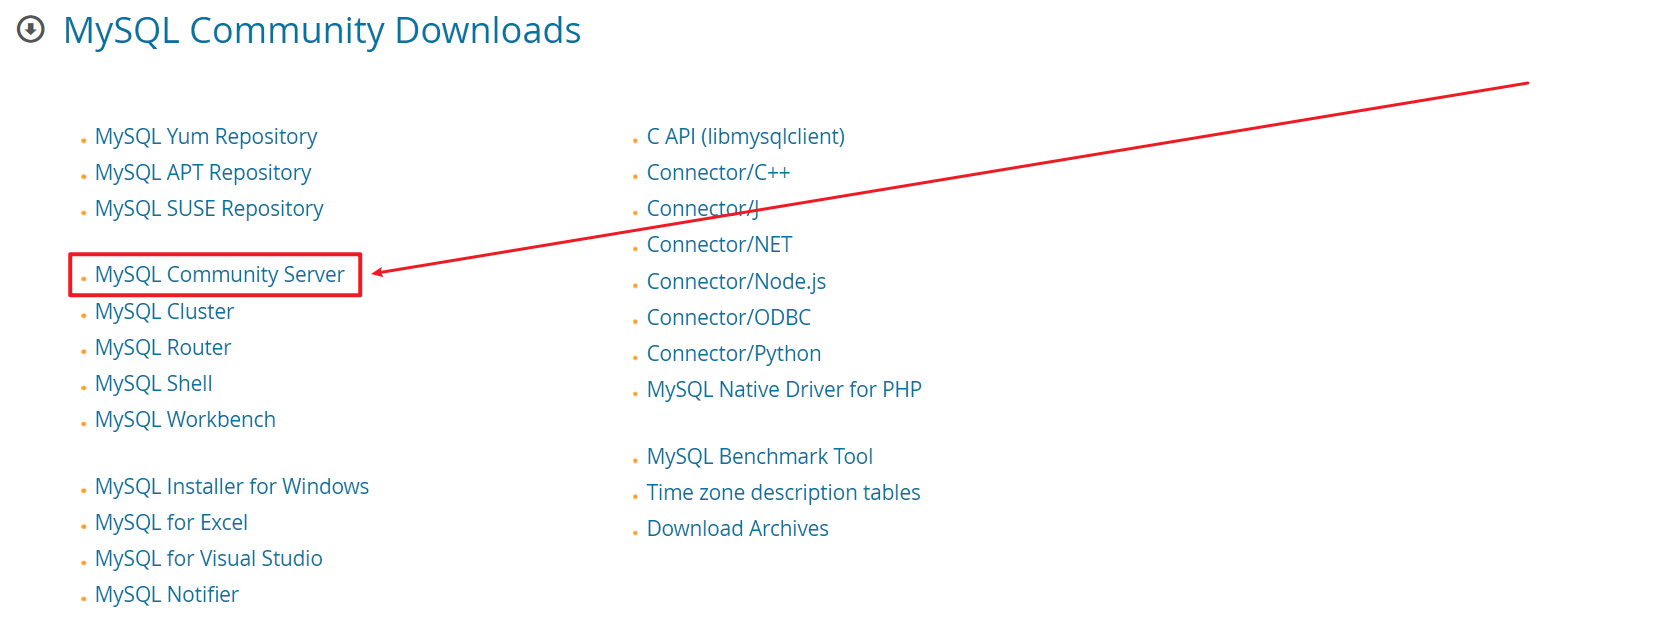
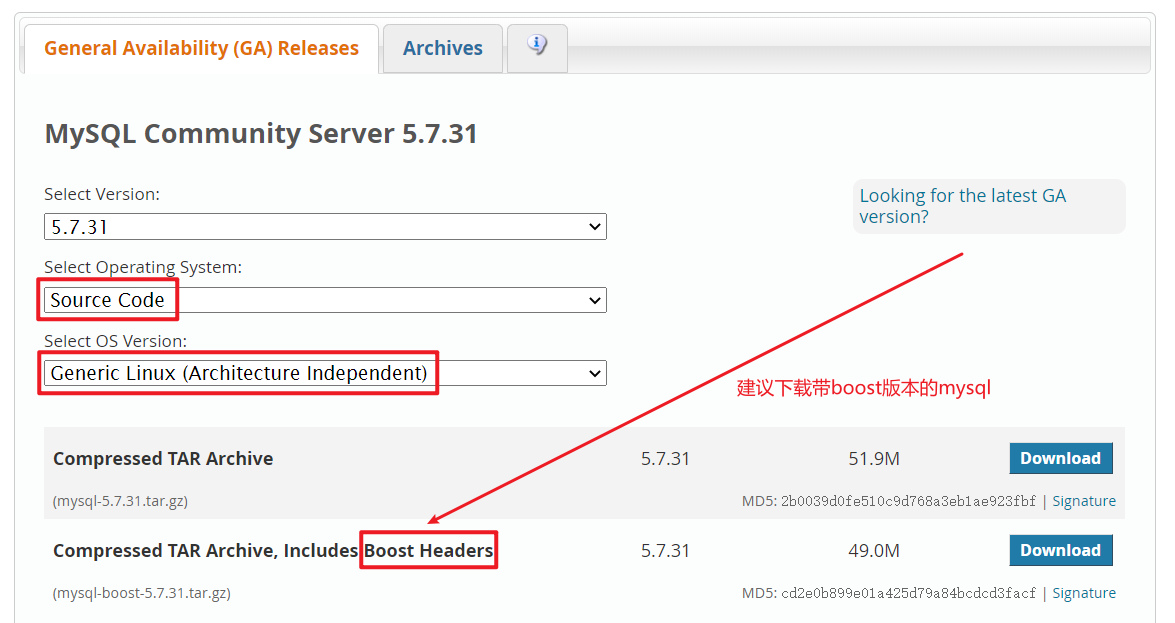
Step 4: select the appropriate version
① GLIBC Version (equivalent to green version in Windows)
② Source code compiled version (three steps of source code compilation = > configuration + compilation + installation)
2, Centos7 6 operating system installation
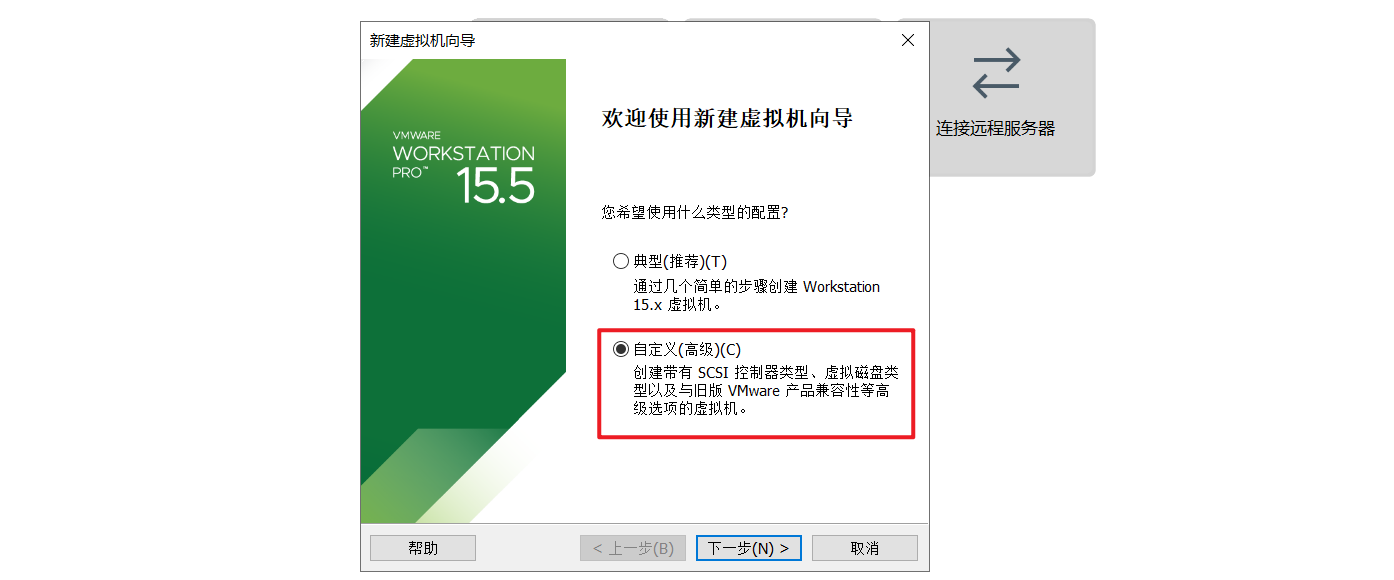
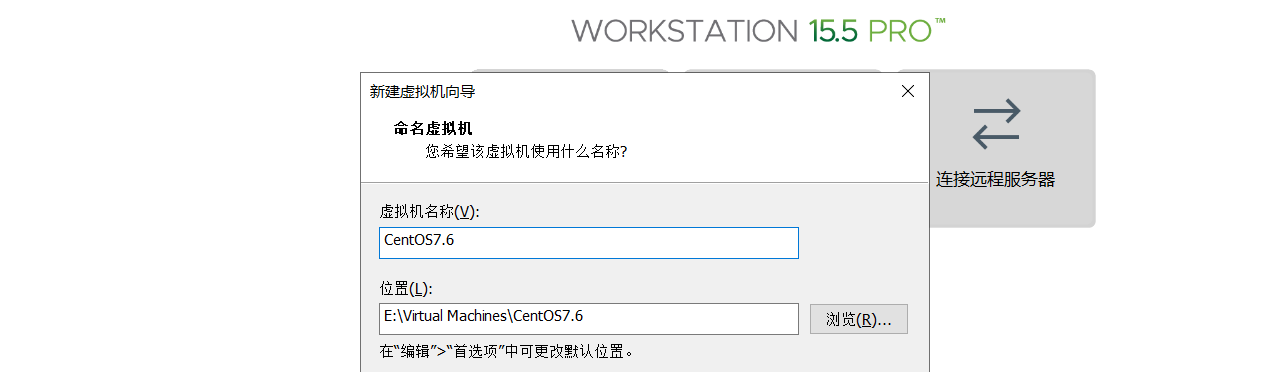
1. Create a custom virtual machine environment
Step 1: select custom (set the server environment according to requirements)
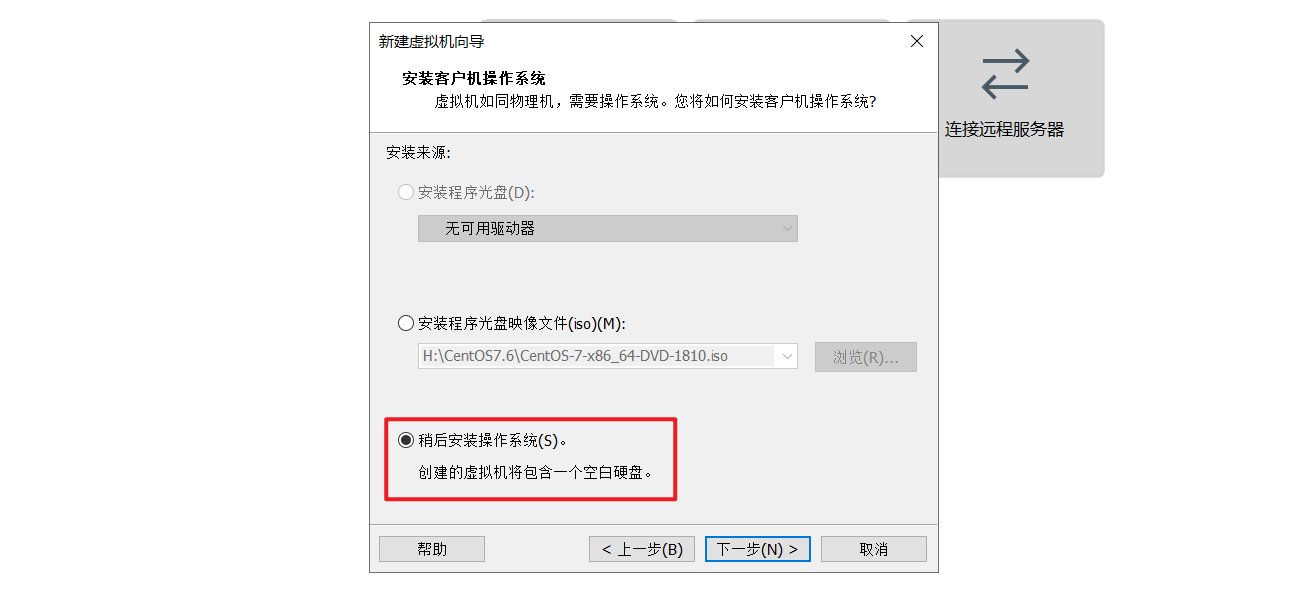
Step 2: choose to install the operating system later
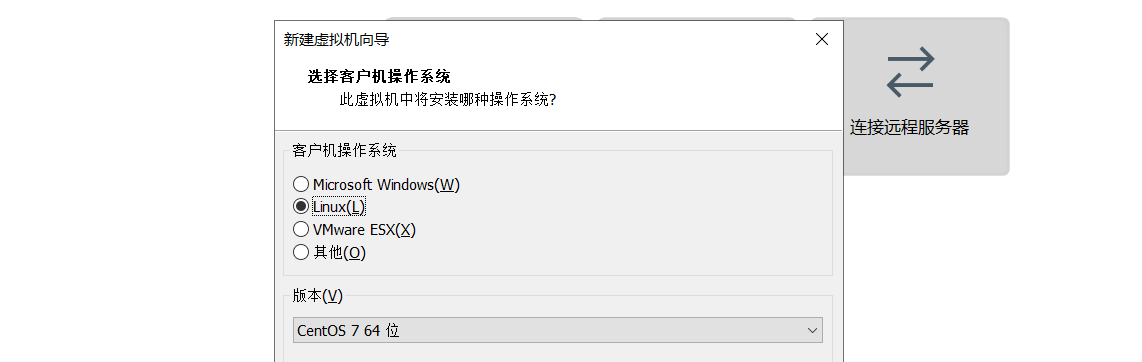
Step 3: select the operating system type
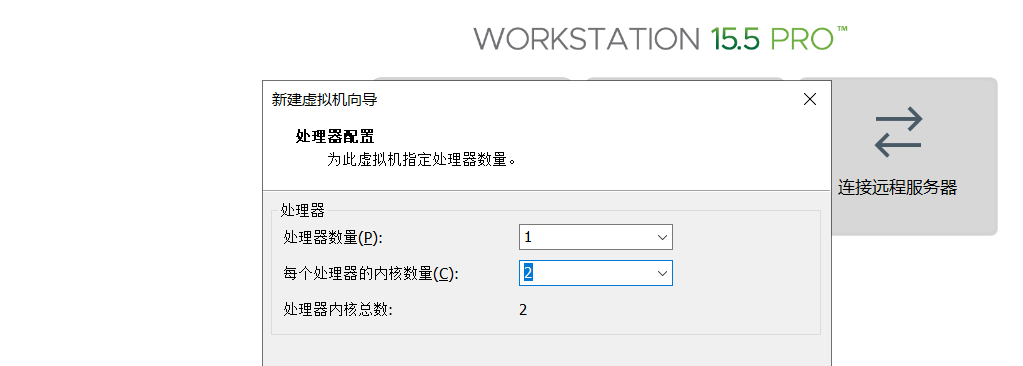
Step 5: set the number of CPU cores
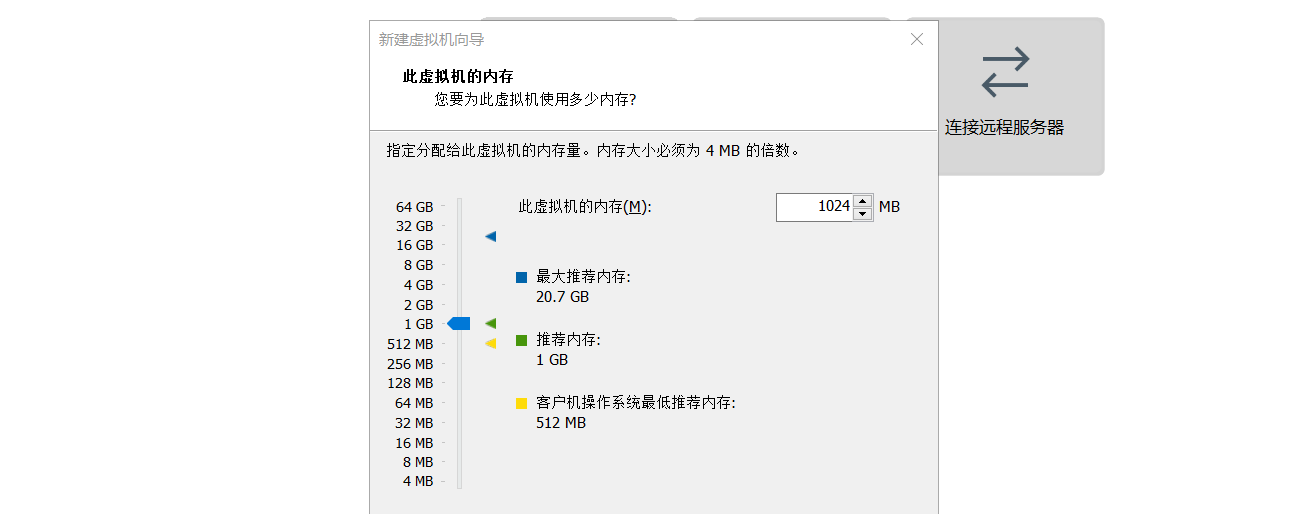
Step 6: set MEM memory
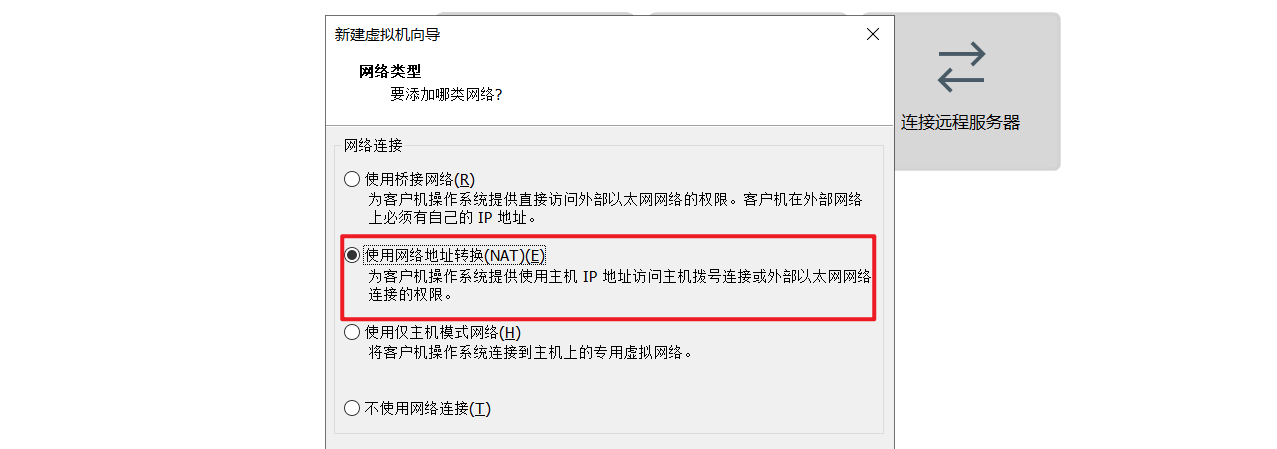
Step 7: set up network connection (NAT mode)
All the rest are default. Go to the next step until the setting is completed!
2. Install centos7 6 minimize mode
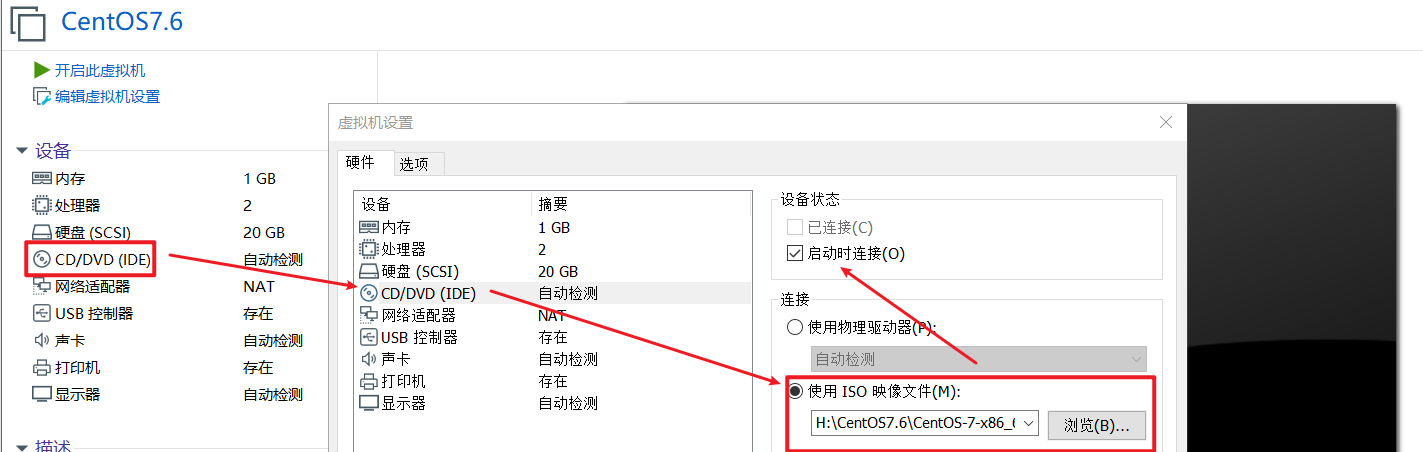
Step 2: start the virtual machine and install centos7 six

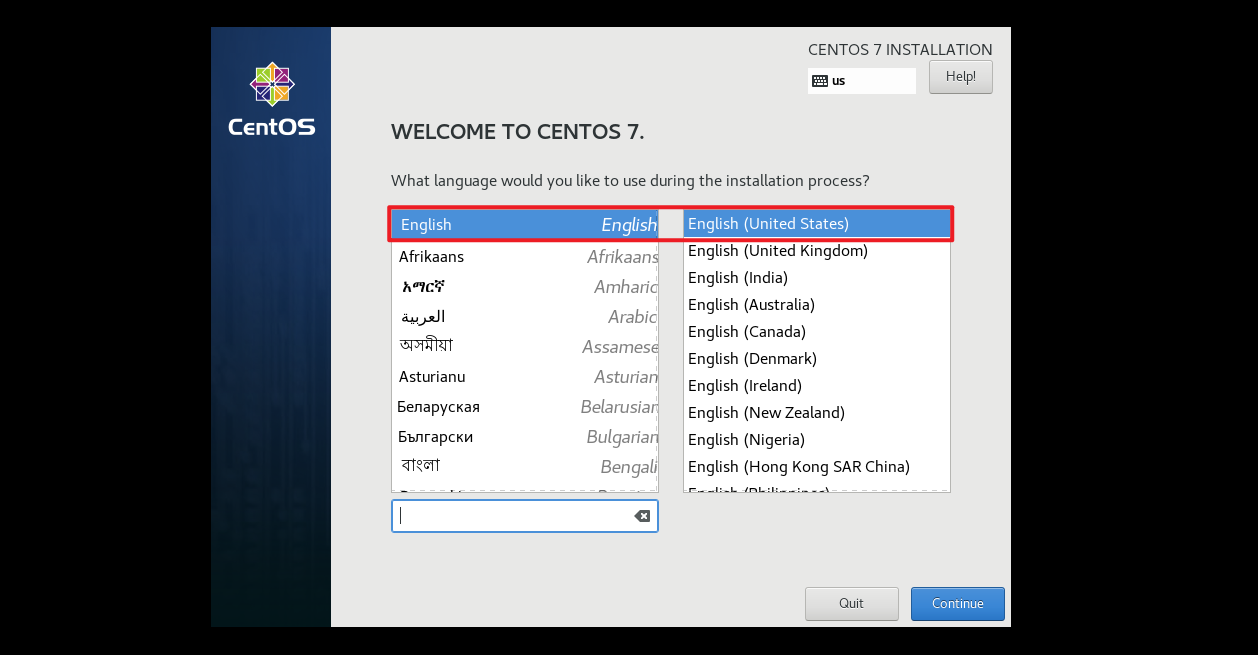
Step 3: set the installation language (all English must be selected)
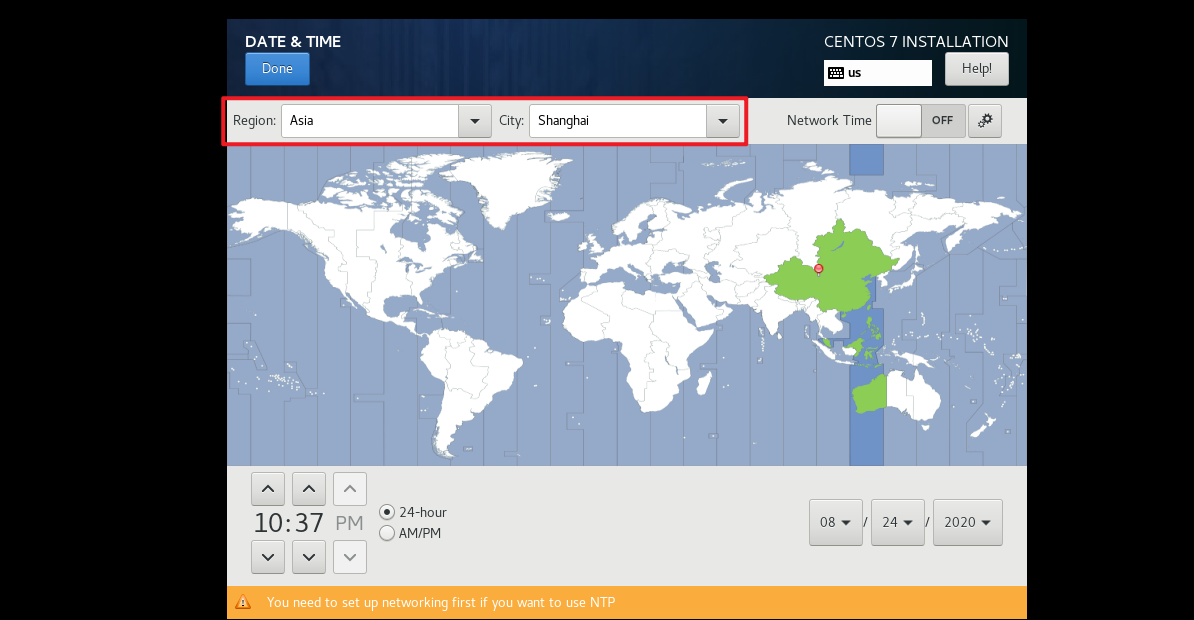
Step 4: set the server time (Asia/Shanghai)
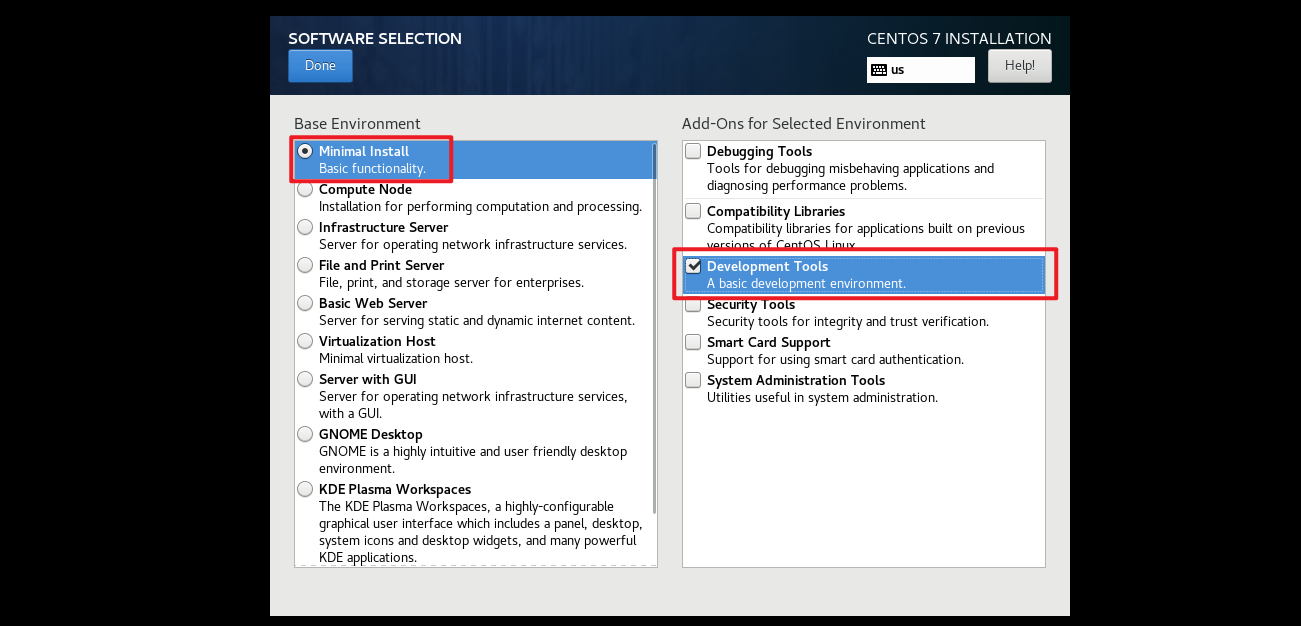
Step 5: select and minimize the software, and then check the development tool (mainly GCC compiler)
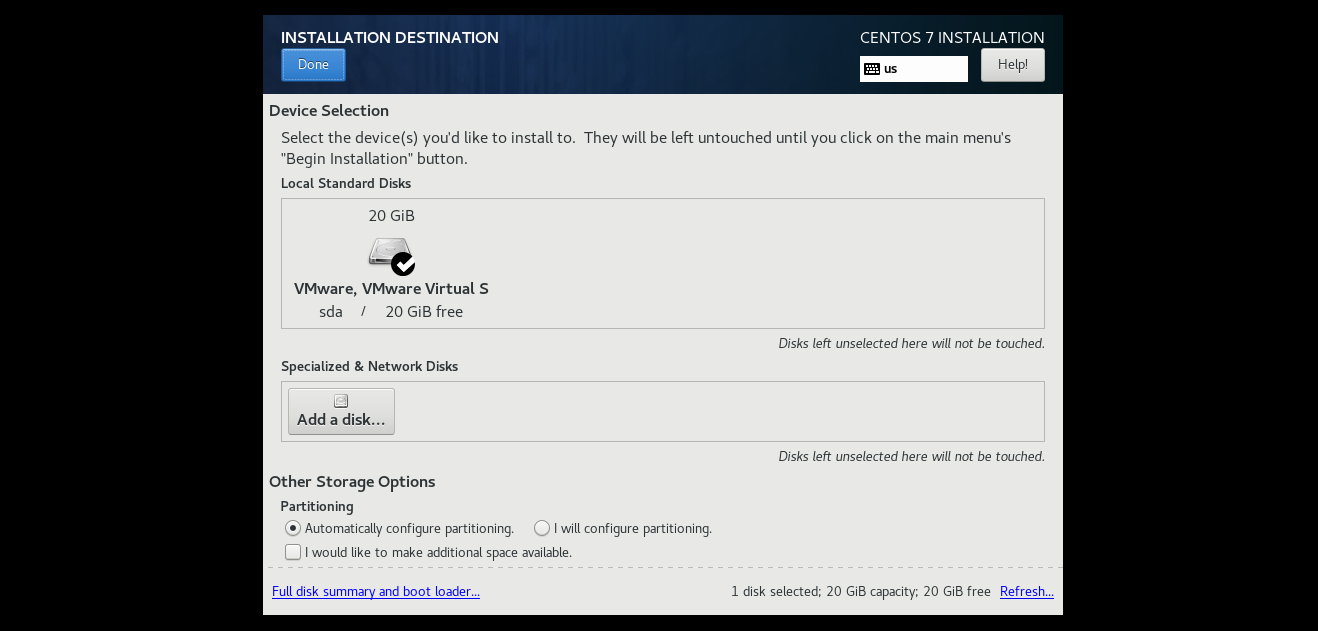
Step 6: Auto partition
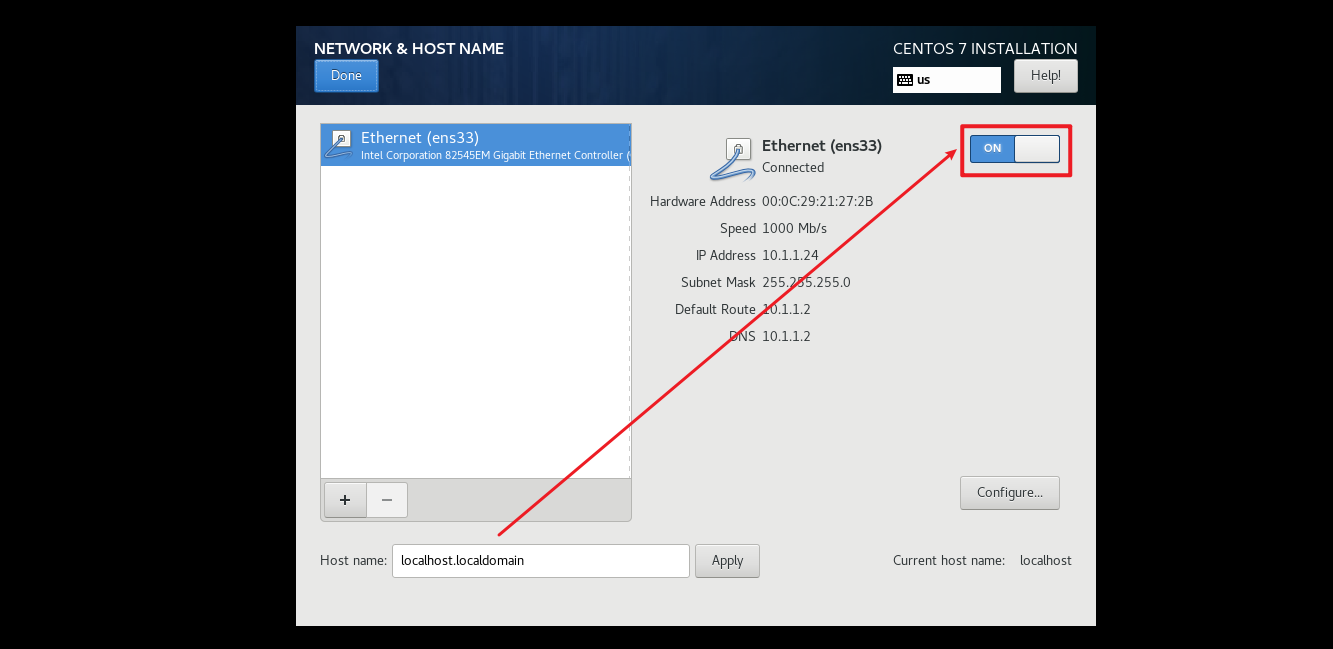
Step 7: set the network connection as automatic connection (automatically connect to the network after startup)
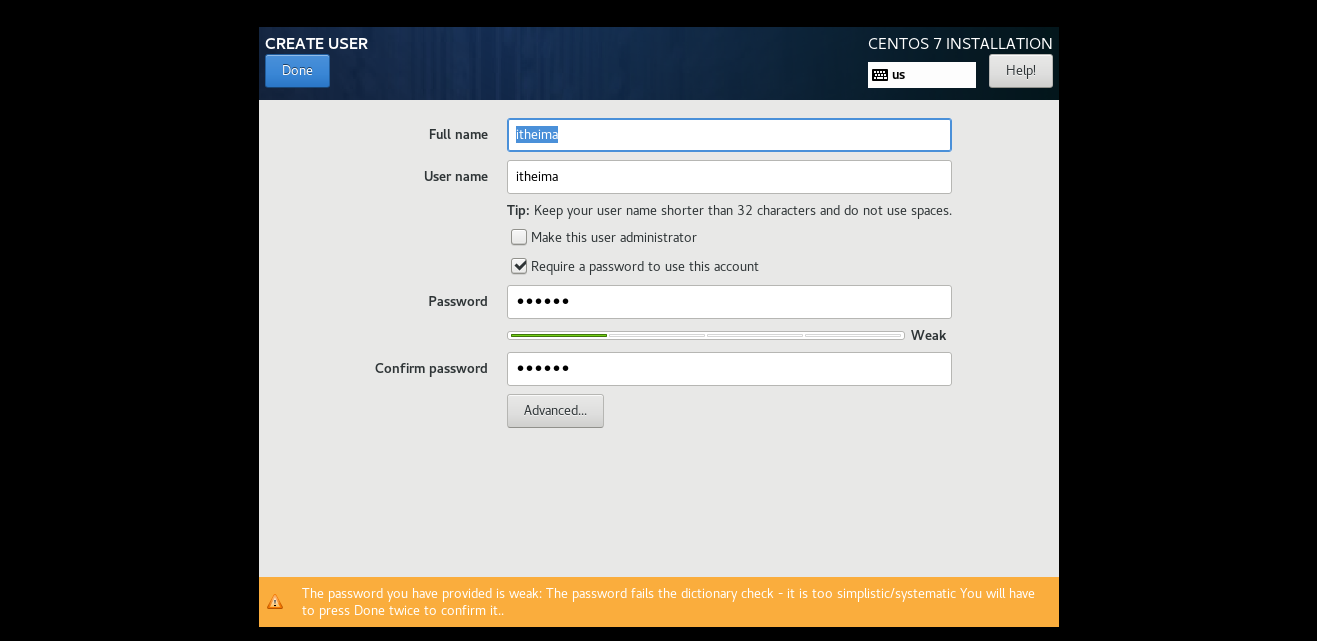
Step 8: set the ROOT account password and user-defined user (itheima is recommended)
3,CentOS7.6 operating system minimization and subsequent configuration
① Set host name
# hostnamectl set-hostname centos7.itcast.cn
# su
② Change the IP acquisition method to static setting and bind hostname + IP to / etc/hosts
# vi /etc/sysconfig/network-scripts/ifcfg-ens33
TYPE="Ethernet"
BOOTPROTO="none"
IPADDR=10.1.1.10
NETMASK=255.255.255.0
GATEWAY=10.1.1.2
DNS1=8.8.8.8
DNS2=119.29.29.29
NAME="ens33"
DEVICE="ens33"
ONBOOT="yes"

# vi /etc/hosts
10.1.1.10 centos7.itcast.cn

# systemctl restart network
 If it is in the form of multiple network cards, it is recommended to use ifdown And ifup
# ifdown ens33
# ifup ens33

# ip a
③ Turn off firewall and SELinux
# systemctl stop firewalld
# systemctl disable firewalld

# setenforce 0
# vim /etc/selinux/config
SELINUX=disabled
④ Configure public network YUM source (Tencent can be considered)
# yum install wget -y
# mv /etc/yum.repos.d/CentOS-Base.repo /etc/yum.repos.d/CentOS-Base.repo.backup
# wget -O /etc/yum.repos.d/CentOS-Base.repo http://mirrors.cloud.tencent.com/repo/centos7_base.repo

# yum clean all
# yum makecache
⑤ Install extension software (bash completion automatic completion, vim editor, net tools network toolkit and ntpdate time synchronization tool)
# yum install bash-completion vim net-tools ntpdate -y
⑥ ntpdate time synchronization
# ntpdate 120.25.108.11
4. Take a snapshot: put CentOS 7 6. Minimize the system as a template machine
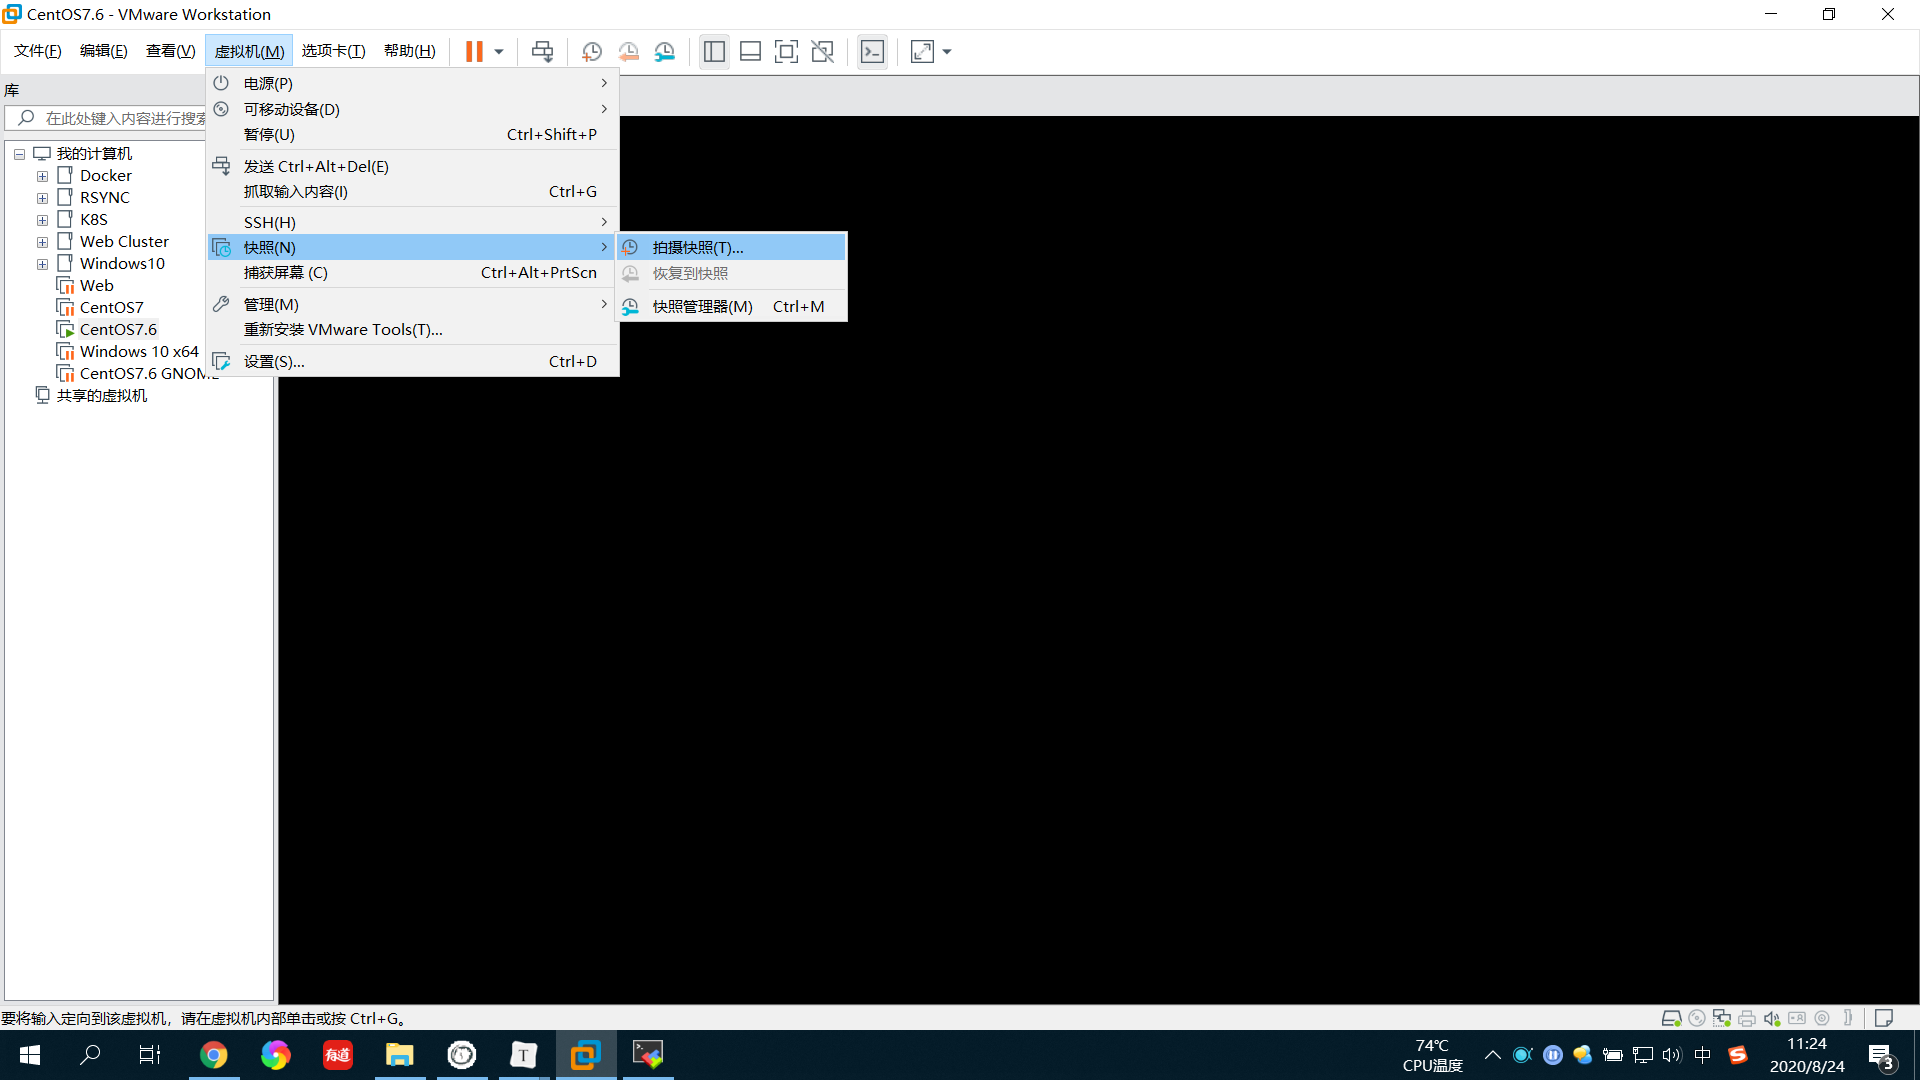

After the snapshot is taken, the machine can be shut down and used as the master machine for cloning in the future!
3, Several methods of MySQL installation
1. MySQL installation method
Binary package installation
① Install using yum or rpm (omitted)
② glibc version installation (equivalent to green software in Windows)
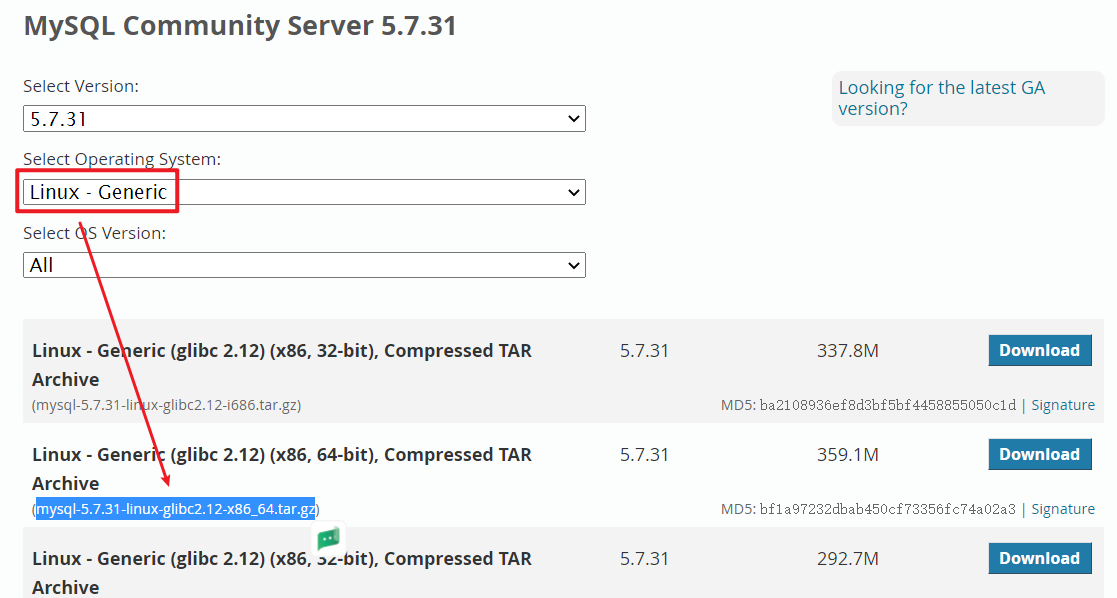
Name: mysql-5.7.31-linux-glibc2 12-x86_ 64.tar. gz
It depends on the [^ glibc] Library and can be installed under the general Linux system
Source package compilation and installation
Name: mysql-5.7.31 tar. GZ can be compiled and installed under general Linux.
2. Differences between the three installation methods
| Installation mode | advantage | shortcoming |
|---|---|---|
| rpm | Easy installation and uninstallation | Poor customizability |
| glibc | Customizability is more flexible than rpm package | The installation is more complicated than rpm package, and the database needs to be initialized manually |
| Source installation | The most customizable, customized according to needs and functions | The installation is troublesome, and the database needs to be initialized manually |
In enterprises, the installation of databases rarely uses rpm, and most of them are based on source code installation and glibc installation!
3. Distinguish between database and database instance
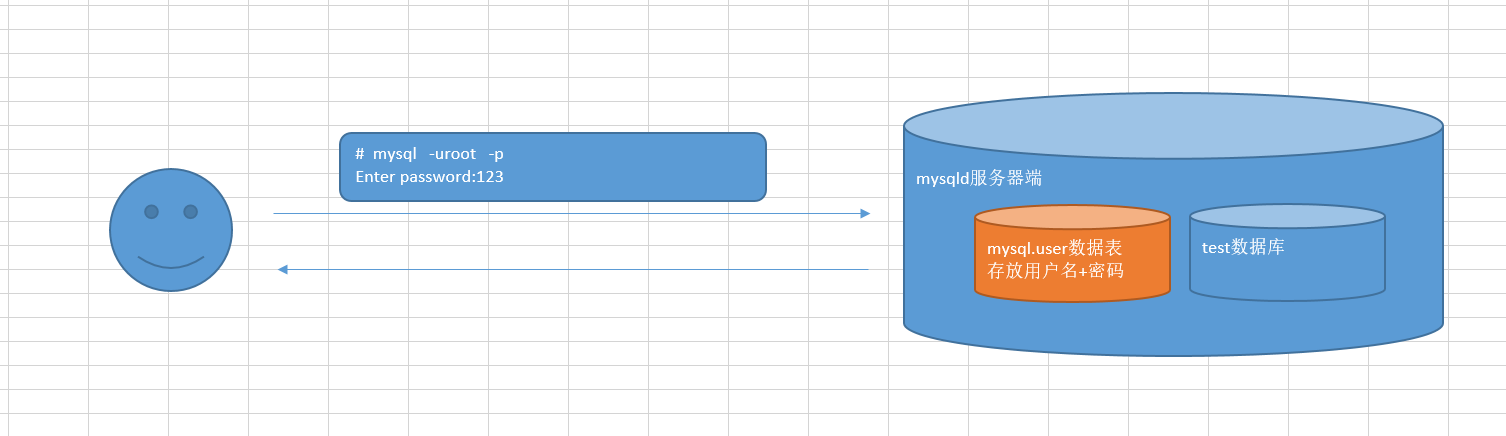
What is a MySQL database?
Database: a collection of data files on the operating system or storage. In mysql database, the database file can be * frm,. MYD,. MYI,*. For files ending in ibd, the file types of different storage engines are different.
Second, what is a MySQL database instance?
Database instance: it is composed of background process or thread and a shared memory area. Shared memory can be shared by running background threads. The database instance is the one that really operates the database.
Note: MySQL's background daemon mysqld is a single process multi-threaded working mode.
What is a MySQL database server?
**Database server: * * deploy the server that installs the database instance.
IV. what is the relationship between database and database instance?
Generally, database instances and databases are one-to-one correspondence, that is, a database instance corresponds to a database; However, in a clustered environment, there are multiple database instances that share a database. oracle RAC
4, GLIBC version installation of MySQL
1. Get MySQL GLIBC version

2. Learn to read official documents
3. Install MySQL dependency library software
Step 1: clone the template machine to generate a MySQL server
Step 2: start the system
Step 3: change the host name to MySQL itcast. Cn, and then restart the network
Step 4: take a snapshot
Step 5: install the dependent libaio Library
# yum install libaio -y
4. Upload the software package and decompress it to understand the directory structure
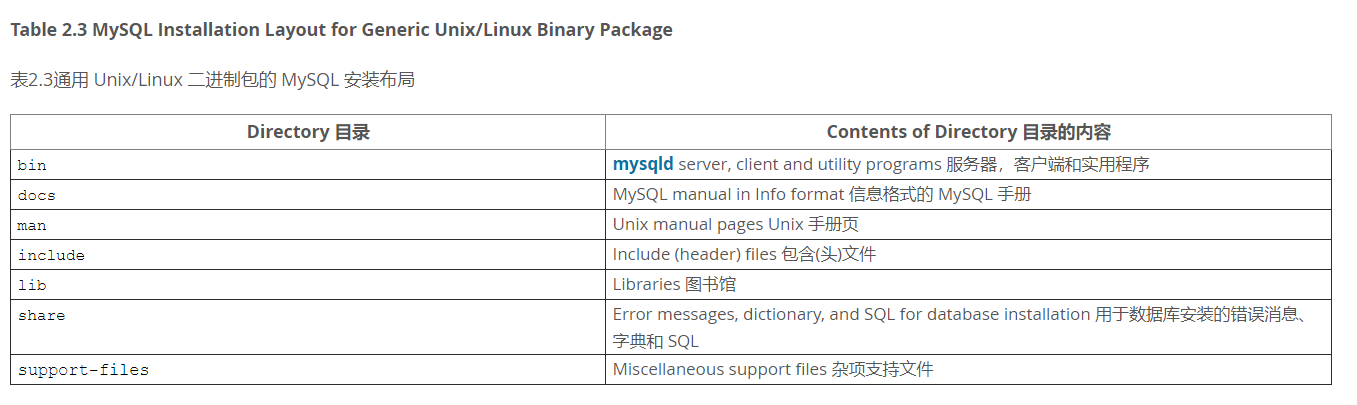
# tar -xf mysql-5.7.31-linux-glibc2.12-x86_64.tar.gz
# ls mysql-5.7.31-linux-glibc2.12-x86_64
After decompression, the directory structure is shown in the following figure:
Installation requirements:
| option | Value (custom or default) |
|---|---|
| Installation path | /mysql_3306 |
| Data path | /mysql_3306/data |
| Port number | 3306 |
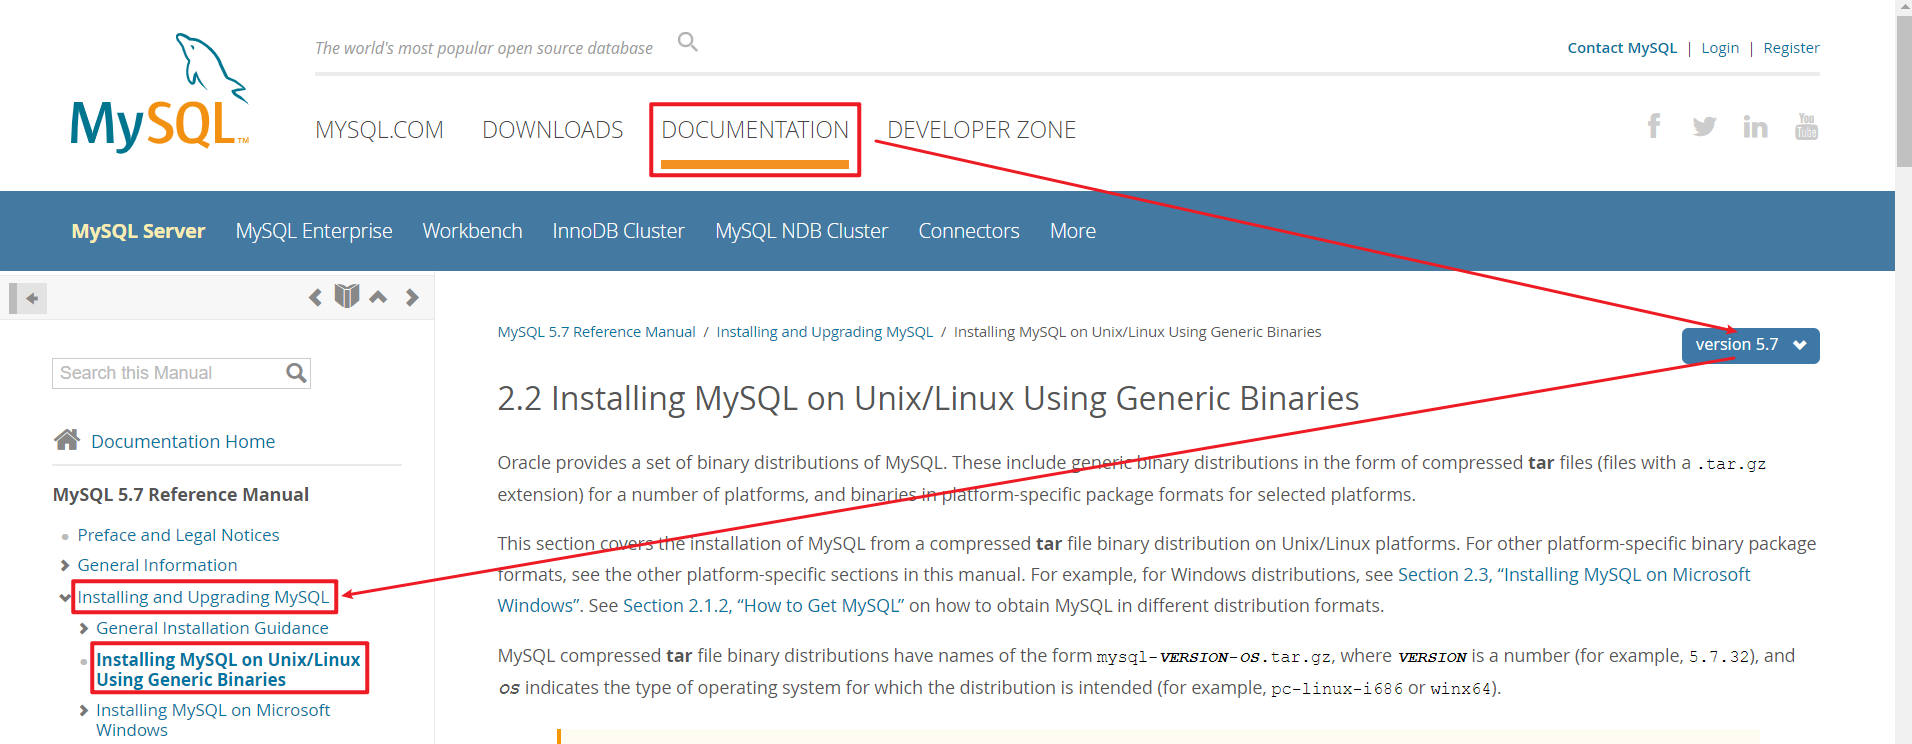
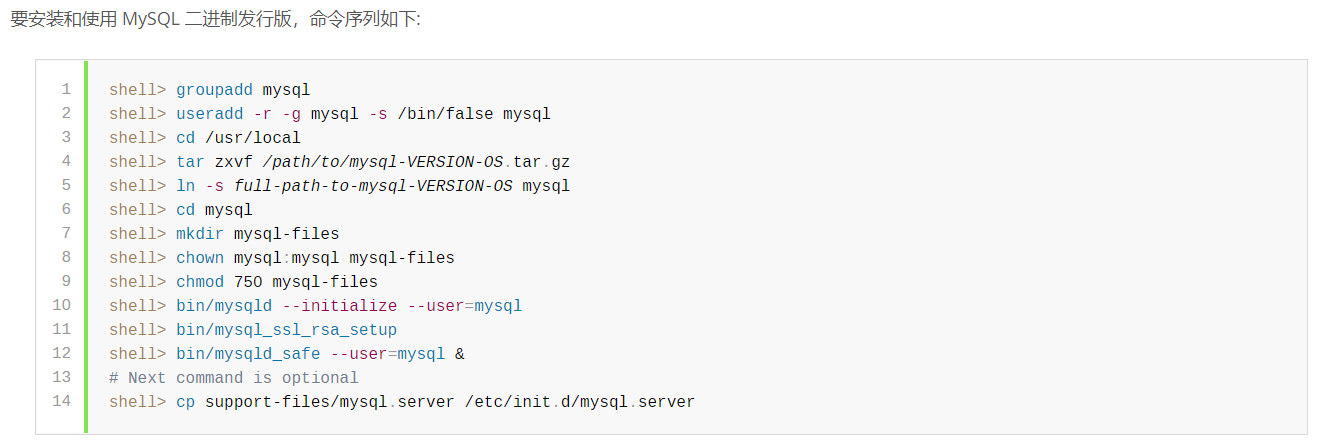
5. Installation of software (see official instructions)
https://dev.mysql.com/doc/refman/5.7/en/binary-installation.html
Step 1: create a special database account mysql (its group is also mysql)
# useradd -r -s /sbin/nologin mysql
# id mysql
Step 2: clear the original mariadb configuration file (/ etc/my.cnf) in the system
# rm -rf /etc/my.cnf
Step 3: move the compressed package (GBLIC version) extracted from Mysql to the / root directory, and then rename it mysql_ three thousand three hundred and six
# mv mysql-5.7.31-linux-glibc2.12-x86_64 /mysql_3306
Step 4: switch to mysql working directory / mysql_3306, create a mysql files
# cd /mysql_3306
# mkdir mysql-files
Step 5: change the MySQL files permission
# chown mysql:mysql mysql-files
# chmod 750 mysql-files
Step 6: initialize the database (you can initialize the database and generate a random password)
# bin/mysqld --initialize --user=mysql --basedir=/mysql_3306
 Option Description:
--initialize 	 Initialize (really start working)
--user=mysql 	 with mysql The user's identity initializes the database, and the generated files are mysql As owner
--basedir=xxx    mysql Its installation directory is very important

After running, observe the last line and save root The password of the account for later use.
2020-08-24T06:46:24.889735Z 1 [Note] A temporary password is generated for root@localhost: (cn_jS+*n2wh
Experience: to check whether the mysql software is initialized successfully, it mainly depends on whether the data folder is generated under the mysql directory, and there must be at least one mysql folder in the folder.
Step 7: set up a secure encrypted connection (SSL). The data transmission will be encrypted, which is suitable for sensitive data
# bin/mysql_ssl_rsa_setup --datadir=/mysql_3306/data
Step 8: start MySQL database
# cp support-files/mysql.server /etc/init.d/mysql_3306
Note: by default, the database of GBLIC version is required to be installed in / usr/local/mysql directory, and its mysql The corresponding directory in the server script is also / usr/local/mysql, which will cause Mysql to fail to start. Therefore, you can change its basedir and datadir variables
# vim /etc/init.d/mysql_3306
46 that 's ok basedir=/mysql_3306
47 that 's ok datadir=/mysql_3306/data
Step 9: start the MySQL database (you can't use systemctl, you can only use service)
# service mysql_3306 start
Starting MySQL.Logging to '/mysql_3306/data/mysql.itcast.cn.err'.
Special note: when MySQL is started successfully, its log will be automatically written to the host name in the data directory Err file, this file must be read more. It involves MySQL failure to start and startup error. 99% of the detailed reasons are The problem can be found in err file!
6. FAQ on software installation
Question 1: why do I have to delete / etc / my CNF file, what is the impact of not deleting it?
Answer: / etc / my CNF file is a configuration file reserved by the operating system for mariadb software. The main reason why this file must be deleted is that when initializing the database, first look for my in its own installation directory CNF configuration file, if any, will be automatically initialized according to the configuration information in it. If not, go to / etc directory to find my The CNF file, if any, will still be initialized according to its internal configuration, but due to my The CNF file belongs to mariadb, which will lead to our initialization. If we follow the configuration of mariadb, it will lead to initialization failure.
Question 2: what exactly does the MySQL files folder do?
A: at present, mysql files is useless, but you must create it, because GLIBC belongs to binary packages, and many of its configurations have been defaulted, including the mysql files folder. Without this folder, mysql may not start.
MySQL files: mainly used for importing and exporting data files (backup and restore). MySQL backup will generate a file, which can be XXX SQL or XXX txt. MySQL files is the default directory specified during import and export.
Question 3: how to judge whether the database is initialized successfully?
A: the error prone part of database installation is initialization. Once initialization fails, 100% of the database starts with an error. How to confirm whether the database is initialized successfully? It mainly depends on whether a data folder is generated under the installation directory.
Be sure to be careful. The folder name is data (data directory), not date (time)
Question 4: why must mysql The server is placed in / etc / init D directory, no release?
A: it's OK not to put it, but you can't use the service command to start and add it to the startup item at this time. Only through bin / mysqld_ The safe script starts the database.
/etc/init.d is the service script directory in CentOS6 and earlier versions. As long as you put the Shell startup script in this directory, you can use service for management.
Question 5: why do I have to change / etc / init d/mysql_ basedir and datadir in 3306?
A: GLIBC is a binary version. Many contents have been configured by default, including the default installation path / usr/local/mysql. Once your mysql is not installed in this directory, you must manually set the location of basedir and datadir, otherwise the script cannot start the mysql program
Question 6: how to make mysql start automatically?
# chkconfig --list 				 Query all startup items in the system
# chkconfig --add mysql_3306 must be compatible with / etc / init The script names in the D directory are consistent
# chkconfig mysql_3306 on 		 Turn on all four modes of 2345 (3 character interface and 5 graphic interface)
In CentOS6 and previous versions, it controls the startup of services
7. Subsequent configuration of MySQL GLIBC version
Step 1: change the password of the administrator root account
- Method 1:
[root@node1 mysql_3306]# bin/mysqladmin -uroot password '123' -p
Enter password:Enter the temporary password generated just after initialization
- Method 2
mysql> set password=password('456');   		//Future versions will be deprecated
 perhaps
mysql> set password='123';					//recommend

After the reset is completed, it is recommended to refresh the permissions to take effect immediately
mysql> flush privielges;
Step 2: add the mysql client command to the environment variable, which can be accessed at any time in the future
# echo 'export PATH=$PATH:/mysql_3306/bin' >> /etc/profile
# source /etc/profile

After setting, we can call it anywhere mysql Client commands
# mysql -uroot -p
Enter password:123
Step 3: manually define MySQL configuration files (very important)
# vim /mysql_3306/my.cnf
[mysqld]
basedir=/mysql_3306
datadir=/mysql_3306/data
socket=/tmp/mysql.sock
 Option Description:
[mysqld]	The representative is configured for the server side
basedir		Represents the installation directory of the database
datadir		Represents the data directory, which is specially used to store data files in the future (core directory)
socket		Represents a socket file, which provides a bridge between the client and the server

# service mysql_3306 restart
C (client) = = = connect the MySQL command (socket) to the mysqld server-side program
Step 4: security configuration (important for production environment)
# mysql_secure_installation
All the way Y, done!
It mainly includes a series of functions, such as whether to start the password toe device, whether to set the root password, whether to allow root remote connection, whether to remove the test database and so on.
FAQ: how to turn off MySQL password strength detection?
# vim /mysql_3306/my.cnf
[mysqld]
...
validate_password=OFF

# service mysql_3306 restart
5, MySQL source code compilation and installation
1. Refer to the official MySQL source code installation document
Official documents: https://dev.mysql.com/doc/refman/5.7/en/source-configuration-options.html
Three steps of source code installation: configuration - > compilation - > installation
####I. installation instructions
- Software package introduction
mysql-boost-5.7.31.tar.gz Available in any distribution Linux Lower installation
II. Installation requirements
| Installation requirements | Specific configuration |
|---|---|
| Installation directory (basedir) | /mysql_3307 |
| Data directory (datadir) | /mysql_3307/data |
| Port number | 3307 |
| socket file location | $basedir/mysql.sock |
| character set | utf8mb4 |
####III. understanding configuration options
- Common configuration options
| configuration option | describe | Default value | recommended value |
|---|---|---|---|
| CMAKE_INSTALL_PREFIX | Installation base directory (basedir) | /usr/local/mysql | According to demand |
| MYSQL_DATADIR | Data directory (datadir) | $basedir/data | According to demand |
| SYSCONFDIR | Default profile my CNF path | /etc | |
| MYSQL_TCP_PORT | TCP/IP port | 3306 | Non default port |
| MYSQL_UNIX_ADDR | socket file path | /tmp/mysql.sock | $basedir/ |
| DEFAULT_CHARSET | Default character set | latin1 | utf8mb4 |
| DEFAULT_COLLATION | Default verification rules | latin1_swedish_ci | utf8mb4_general_ci |
| WITH_EXTRA_CHARSETS | Extended character set | all | all |
| ENABLED_LOCAL_INFILE | Enable the function of loading external data files locally | OFF | Recommended on |
| WITH_SSL | SSL support type | system | Explicit assignment is recommended |
| WITH_BOOST | Location of the Boost library source code | The Boost library is necessary for building MySQL. It is recommended to download it in advance |
- Storage engine related configuration items
explain:
The following option values are Boolean, 0 or 1; 0 means it is not compiled into the server, 1 means it is compiled. It is recommended to statically compile it into the server.
Other storage engines can be installed through with according to actual requirements_ xxxx_ STORAGE_ Compile to the server with engine = 1.
| configuration option | describe |
|---|---|
| WITH_INNOBASE_STORAGE_ENGINE | Build the InnoDB storage engine plug-in as a static module and compile it into the server; It is recommended to compile into the server |
| WITH_PARTITION_STORAGE_ENGINE | Partition supported |
| WITH_FEDERATED_STORAGE_ENGINE | Can the local database access remote mysql data |
| WITH_BLACKHOLE_STORAGE_ENGINE | The black hole storage engine receives data, but does not store it, and directly discards it |
| WITH_MYISAM_STORAGE_ENGINE | Statically compile the MYISAM storage engine into the server |
2. MySQL source code compilation and installation
It is recommended that you take a snapshot before compiling and installing the source code
Step 1: install the dependent libraries required for MySQL compilation
# yum -y install ncurses-devel cmake libaio-devel openssl-devel
Step 2: upload the software to the server and unzip it
# tar -xf mysql-boost-5.7.31.tar.gz
# cd mysql-5.7.31
Step 3: configuration (configuration based on cmake)
# vim myconfig.sh
cmake . \
-DCMAKE_INSTALL_PREFIX=/mysql_3307 \
-DMYSQL_DATADIR=/mysql_3307/data \
-DMYSQL_TCP_PORT=3307 \
-DMYSQL_UNIX_ADDR=/mysql_3307/mysql.sock \
-DWITH_INNOBASE_STORAGE_ENGINE=1 \
-DWITH_PARTITION_STORAGE_ENGINE=1 \
-DWITH_FEDERATED_STORAGE_ENGINE=1 \
-DWITH_BLACKHOLE_STORAGE_ENGINE=1 \
-DWITH_MYISAM_STORAGE_ENGINE=1 \
-DENABLED_LOCAL_INFILE=1 \
-DEXTRA_CHARSETS=all \
-DDEFAULT_CHARSET=utf8mb4 \
-DDEFAULT_COLLATION=utf8mb4_general_ci \
-DWITH_SSL=system \
-DWITH_BOOST=boost
# chmod +x myconfig.sh
# ./myconfig.sh

Option Description:
-DCMAKE_INSTALL_PREFIX : Installation path
-DMYSQL_DATADIR : Data directory
-DMYSQL_TCP_PORT : Port number
-DMYSQL_UNIX_ADDR : Socket file location
Step 4: compile and install
# make -j2 && make install
 Option Description:
-j2 : It means that multiple threads are started at the same time to realize the compilation operation
3. Analysis of common problems of compilation error reporting
Problem 1: installation fails because there is no boost
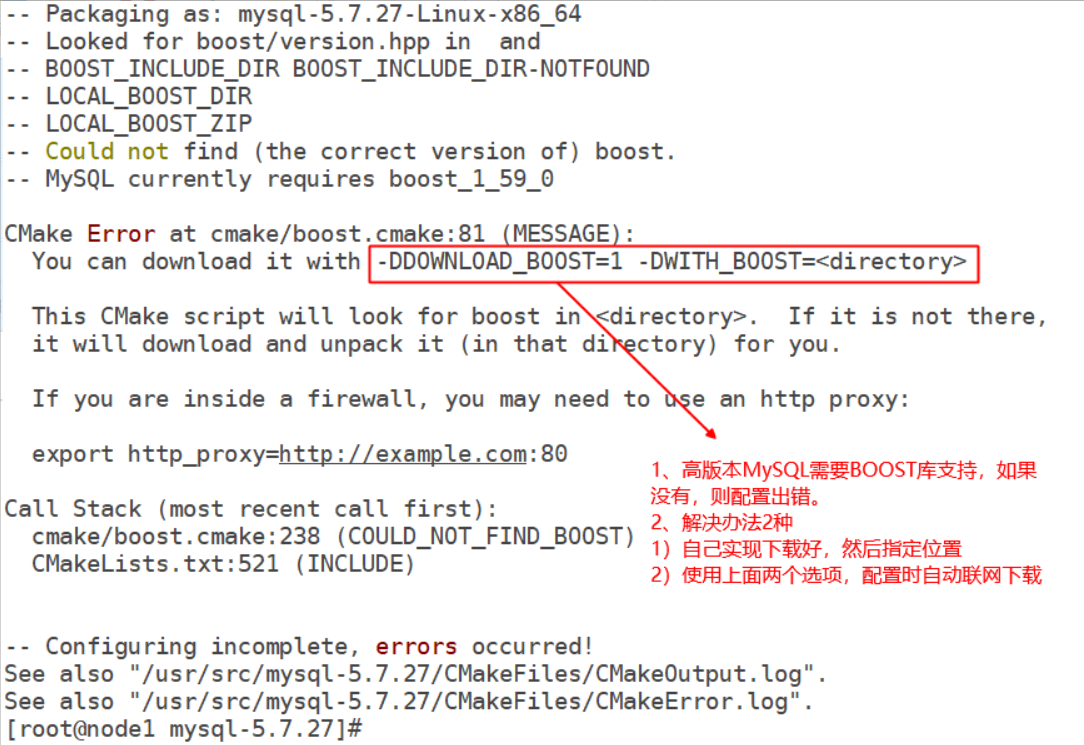
Problem 2: an error is reported during compilation and installation
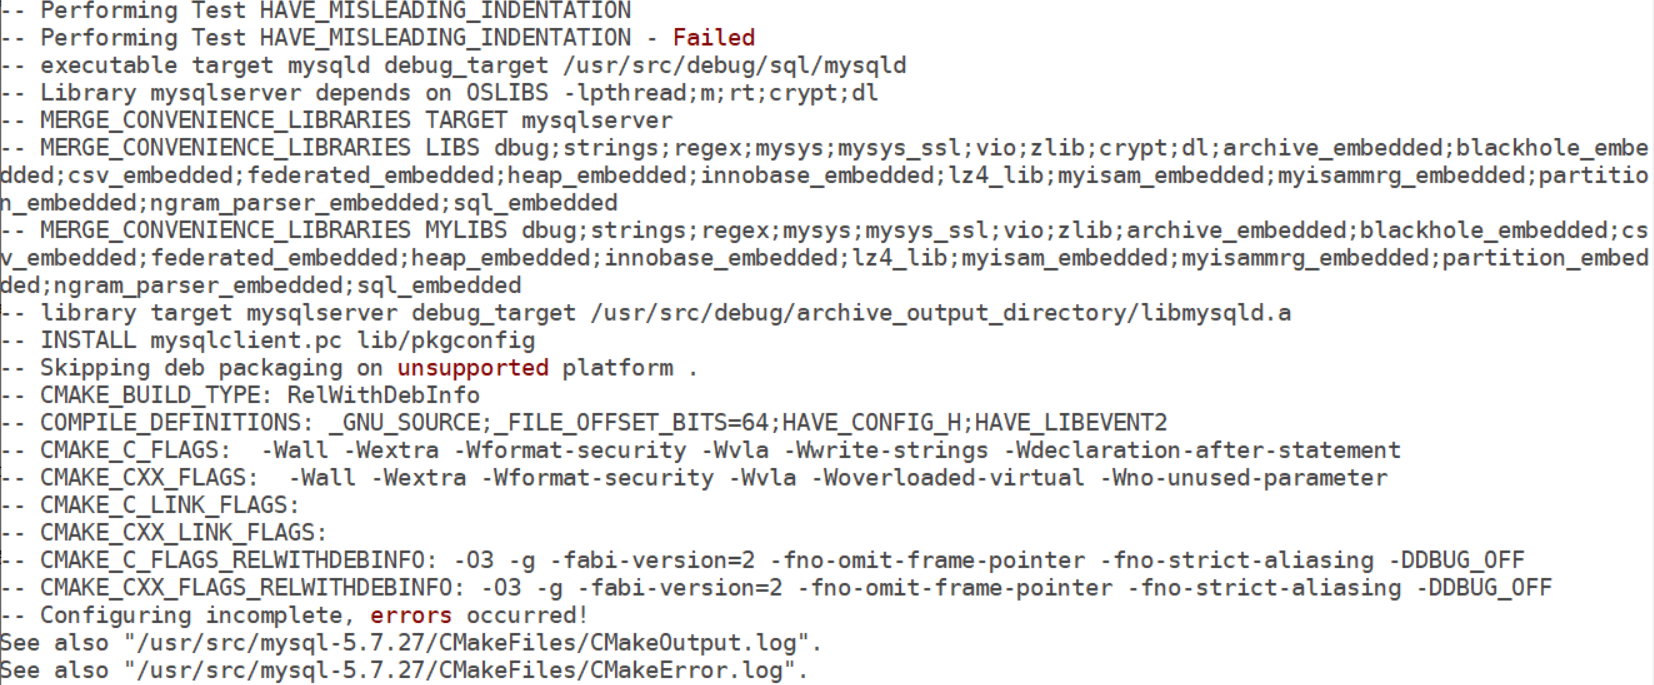
Solution: you can only recompile it
# rm -f CMakeCache.txt
# make -j2 && make install
4. MySQL database initialization
**Note: * * enter the installation directory / MySQL_ three thousand three hundred and seven
# cd /mysql_3307
Step 1: create MySQL files directory
Create system variable`secure_file_priv`Restrict import and export directories and modify permissions
# mkdir mysql-files
# chown -R mysql:mysql /mysql_3307
# chmod 750 mysql-files
Step 2: database initialization
# bin/mysqld --initialize --user=mysql --basedir=/mysql_3307 --datadir=/mysql_3307/data
...
2020-08-24T11:07:37.621346Z 1 [Note] A temporary password is generated for root@localhost: O6.iHqrZgzz7
Step 3: copy mysql Server script to / etc / init D directory, and then start the database
# cp support-files/mysql.server /etc/init.d/mysql_3307
# service mysql_3307 start
Solution to startup exception:

View mysql itcast. cn. Err this error log

The main reason for the above problems is that MySQL is a user of / mysql_3307 directory does not have permission to write files. Write mysql_socket file.
Solution:
# chown -R mysql.mysql /mysql_3307
5. Subsequent configuration after MySQL source code compilation and installation
Step 1: write MySQL configuration file, my cnf
# vim /mysql_3307/my.cnf
[mysqld]
basedir=/mysql_3307
datadir=/mysql_3307/data
socket=/mysql_3307/mysql.sock

# service mysql_3307 restart
Step 2: set the password of the administrator
# bin/mysqladmin -uroot password '123' -p
Enter password:O6.iHqrZgzz7
Step 3: security settings
# bin/mysql_secure_installation
Step 4: add mysql_3307 to startup item
# chkconfig --add mysql_3307
# chkconfig mysql_3307 on
6, MySQL FAQ solutions
1. How do I access different databases?
**Method 1: * * directly use = = corresponding client software access
Visit 5.7.31 Version database:
[root@node1 ~]# /mysql_3306/bin/mysql -uroot -p
Enter password:
Welcome to the MySQL monitor.  Commands end with ; or \g.
Your MySQL connection id is 3
Server version: 5.7.31 MySQL Community Server (GPL)

Visit 5.7.31 Version database:
[root@node1 ~]# /mysql_3307/bin/mysql -uroot -p
Enter password:
Welcome to the MySQL monitor.  Commands end with ; or \g.
Your MySQL connection id is 7
Server version: 5.7.31 Source distribution
Method 2: define alias access
[root@node1 ~]# alias mysql_3306="/mysql_3306/bin/mysql"
[root@node1 ~]# alias mysql_3307="/mysql_3307/bin/mysql"
[root@node1 ~]# mysql_3306 -uroot -p
Enter password:
Welcome to the MySQL monitor.  Commands end with ; or \g.
Your MySQL connection id is 4
Server version: 5.7.31 MySQL Community Server (GPL)

[root@node1 ~]# mysql_3307 -uroot -p
Enter password:
Welcome to the MySQL monitor.  Commands end with ; or \g.
Your MySQL connection id is 8
Server version: 5.7.27 Source distribution
Method 3: copy the corresponding command to the PATH recognized by PATH and rename it
[root@node1 ~]# unalias mysql_3306
[root@node1 ~]# unalias mysql_3307
+++++++++++++++++++++I am the gorgeous separator+++++++++++++++++++++++++++
[root@node1 ~]# cp /mysql_3306/bin/mysql /usr/bin/mysql_3306
[root@node1 ~]# cp /mysql_3307/bin/mysql /usr/bin/mysql_3307
[root@node1 ~]# which mysql_3306
/usr/bin/mysql_3306
[root@node1 ~]# which mysql_3307
/usr/bin/mysql_3307
**Deep thinking: what is the essence of our ability to connect to the database? Answer: socket
2. Solution of MySQL forgetting password
**Knock on the blackboard: * * it's important to find a solution to the problem!
1. Skip authorization table (generic)
1. Skip the authorization table and restart the database (take GLIBC 3306 as an example)
① Close database
[root@node1 ~]# mysqladmin shutdown -p
Enter password:
② Skip authorization table startup
**Friendly tips: * * the start-up process may have twists and turns. Calm analysis and misreading the report will be solved!
# /mysql_3306/bin/mysqld --defaults-file=/mysql_3306/my.cnf --skip-grant-tables --skip-networking=on --user=mysql &
II. Refresh authorization table (important)
# mysql -uroot -p
Enter password:Don't enter anything, just enter

mysql> flush privileges;
Query OK, 0 rows affected (0.00 sec)
III. change password
mysql> alter user 'root'@'localhost' identified by '123';
Query OK, 0 rows affected (0.00 sec)
**Add: * * if it fails, use the following statement to modify the password
mysql> UPDATE mysql.user SET authentication_string = PASSWORD('MyNewPass')
WHERE User = 'root' AND Host = 'localhost';
mysql> FLUSH PRIVILEGES;
After changing the password, use the jobs + kill Command to stop the running mysqld process. Then use service to start the service
# jobs
# kill %1

# service mysql_3306 start
2. Unix and Unix like system reset (understand)
One stop database
[root@node1 ~]# mysqladmin shutdown -p
Enter password:
Second, write and create password statements to the file
# echo "ALTER USER 'root'@'localhost' IDENTIFIED BY '123';" >> /mysql_3306/mysql.pass
 Note: this file must be for the startup user, such as mysql Have all permissions
# chown -R mysql. /mysql_3306
III. specify the password file to start the database
# mysqld --defaults-file=/mysql_3306/my.cnf --init-file=/mysql_3306/mysql.pass --user=mysql &
IV. delete the password file and test it
# rm -f /mysql_3306/mysql.pass
# mysql -uroot -p
Query OK, 0 rows affected (0.00 sec)
**==Supplement:==**If not, use the following statement to modify the password

```powershell
mysql> UPDATE mysql.user SET authentication_string = PASSWORD('MyNewPass')
WHERE User = 'root' AND Host = 'localhost';
mysql> FLUSH PRIVILEGES;
After changing the password, use the jobs + kill Command to stop the running mysqld process. Then use service to start the service
# jobs
# kill %1

# service mysql_3306 start
2. Unix and Unix like system reset (understand)
One stop database
[root@node1 ~]# mysqladmin shutdown -p
Enter password:
Second, write and create password statements to the file
# echo "ALTER USER 'root'@'localhost' IDENTIFIED BY '123';" >> /mysql_3306/mysql.pass
 Note: this file must be for the startup user, such as mysql Have all permissions
# chown -R mysql. /mysql_3306
III. specify the password file to start the database
# mysqld --defaults-file=/mysql_3306/my.cnf --init-file=/mysql_3306/mysql.pass --user=mysql &
IV. delete the password file and test it
# rm -f /mysql_3306/mysql.pass
# mysql -uroot -p