Introduction to jQuery
Reasons for introducing jQuery
When writing code in js, you will encounter some problems:
-
The window.onload event has an event coverage problem, so only one event can be written.
-
Code fault tolerance is poor.
-
Browser compatibility issues.
-
Writing is cumbersome and the amount of code is large.
-
The code is messy and the pages are everywhere.
-
Animation effects are hard to achieve.
As shown in the following figure:
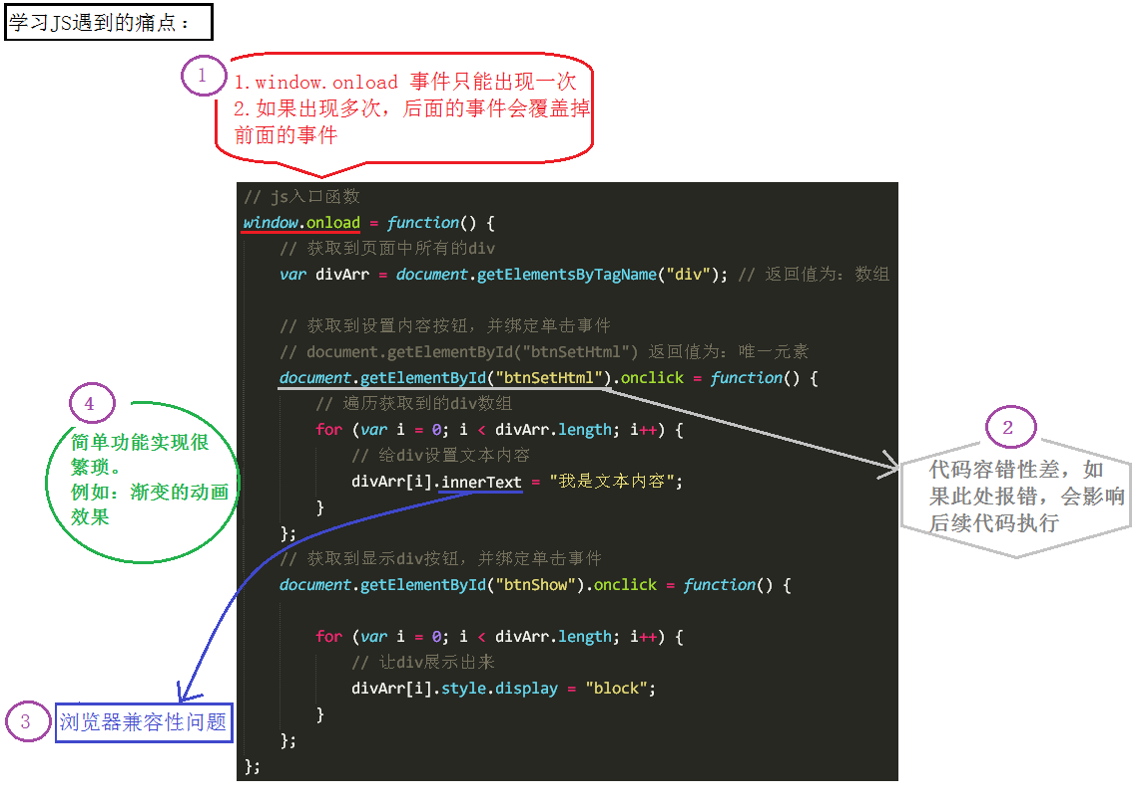
The emergence of jQuery can solve the above problems.
What is jQuery
jQuery is a library of js. It encapsulates some functions commonly used in our development process. It is convenient for us to call and improve the efficiency of development.
js library is to put our commonly used functions into a separate file, when we use it, we can directly refer to the page.
The following is jQuery's information:
-
Official website: http://jquery.com/
-
Official API Documents: http://api.jquery.com/
-
Chinese Culture API Documents: http://www.css88.com/jqapi-1.9/
Learning jQuery is mainly about what to learn
Initially, I mainly learned how to use jQuery to manipulate DOM. In fact, I learned the API s encapsulated by jQuery.
The common feature of these APIs is that they are almost all methods. Therefore, when using jQuery API, they are all method calls, that is to say, parentheses (), which contain the corresponding parameters, different parameters, different functions.
First Experience of jQuery
Now use native js to write the following code:
<!DOCTYPE html>
<html>
<head lang="en">
    <meta charset="UTF-8">
    <title></title>
    <style>
        div {
            height: 100px;
            background-color: pink;
            margin: 10px;
            display: none;
        }
    </style>

    <script>
        //Native js
        window.onload = function () {
            var btn = document.getElementsByTagName("button")[0];
            var divArr = document.getElementsByTagName("div");

            btn.onclick = function () {
                for (var i = 0; i < divArr.length; i++) {
                    divArr[i].style.display = "block";
                    divArr[i].innerHTML = "Life No.1";
                }
            }
        }
    </script>
</head>
<body>

<button>Show five div Box and Setting Content</button>
<div></div>
<div></div>
<div></div>
<div></div>
<div></div>

</body>
</html>
If you write in jQuery, keep the rest of the code unchanged, and change the code in the < script > section to: (need to be introduced in advance)
<script src="jquery-1.11.1.js"></script>
    <script>

        //jquery version
        $(document).ready(function () {
            //Get elements
            var jQbtn = $("button");//Get elements by tag name
            var jQdiv = $("div");//Get elements by tag name
            //Binding events
            jQbtn.click(function () {
                jQdiv.show(1000);//Display box.
                jQdiv.html("tomorrow!");//Setting content
                //The two lines above can be written as chain programming: jQdiv.show(3000).html(1111);

            });//Events are bound by methods.

        });
    </script>
Two Characteristics of jQuery
(1) Chain programming: for example. show() and. html() can be linked to. show().html().
Chain programming principle: return this.
Usually, chain programming can only be continued by setting up operations. Because when the operation is acquired, the corresponding value is returned, and this cannot be returned.
(2) Implicit iteration: Implicit corresponds to explicit. Implicit iteration means that within a method, all matched elements are iterated, and the corresponding method is executed; instead of having to loop again, it simplifies our operation and makes it convenient for us to call.
If the value of a multielement is obtained, in most cases the value of the first element is returned.
Use of jQuery
Basic steps for using jQuery
(1) Introduction
(2) Entry function
(3) Functional Implementation Code (Event Processing)
As shown in the following figure:
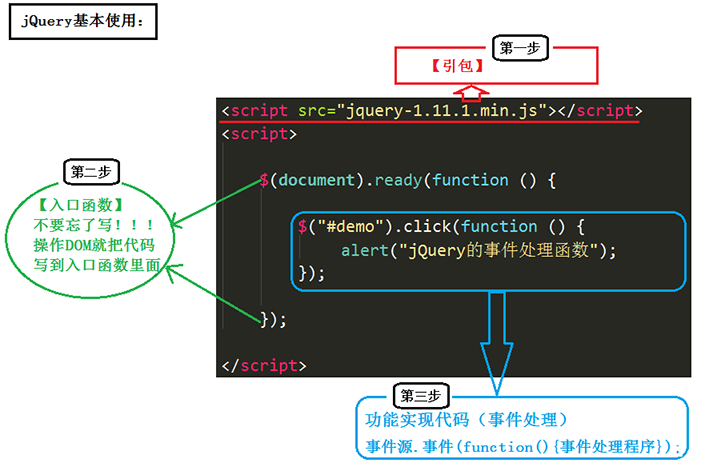
Mainly, the code of the guide must be at the top of the js code.
Version of jQuery
jQuery has two major versions:
-
Version 1.x: The latest version is v1.11.3.
-
Version 2.x: The latest version is v2.1.4 (IE6, 7, 8 are no longer supported).
-
Version 3.x.
PS: The development version is generally more than 1.10.
Taking v1.11.1 as an example, we downloaded it and found that there are two files in it:

The difference between them is:
-
The first is the uncompressed version and the second is the compressed version.
-
Usually in the development process, you can use any version; however, when the project is online, it is recommended to use the compressed version.
jQuery's entry functions and $symbols
Entry function (important)
The entry function of native js refers to: window.onload = function() {}; as follows:
//The entry function of native js. All content on the page is loaded before it is executed.
        //Not only should the text be loaded, but also the picture be loaded before the function is executed.
       window.onload = function () {
           alert(1);
       }
The entry function of jQuery is written in the following ways:
Writing 1:
//1. When the document is loaded and the picture is not loaded, this function can be executed.
       $(document).ready(function () {
           alert(1);
       })
Writing 2: (A concise version of Writing 1)
// 2. When the document is loaded and the picture is not loaded, this function can be executed.
  $(function () {
           alert(1);
       });
Writing 3:
// 3. When the document is loaded and the picture is loaded, the function is executed.
 $(window).ready(function () {
           alert(1);
       })
The difference between jQuery entry function and js entry function:
Distinction 1: The number of writing is different:
-
The entry function of Js can only appear once, and there will be event coverage problems many times.
-
The entry function of jQuery can occur any number of times, and there is no event coverage problem.
The second difference is that the execution time is different:
-
The entry function of Js is not executed until all file resources have been loaded. These file resources include: page documents, external JS files, external css files, pictures and so on.
-
The entry function of jQuery is executed after the document is loaded. Document loading means that when the DOM tree is loaded, the DOM can be manipulated without waiting for all external resources to be loaded.
Document loading order: from top to bottom, while parsing while executing.
jQuery's $symbol
jQuery uses $symbols for reasons: concise writing, distinctive from other characters, and easy to remember.
JQuery takes up two of our variables: $and jQuery. When we print them in code:
 <script src="jquery-1.11.1.js"></script>
    <script>

        console.log($);
        console.log(jQuery);
        console.log($===jQuery);


    </script>
The printing results are as follows:
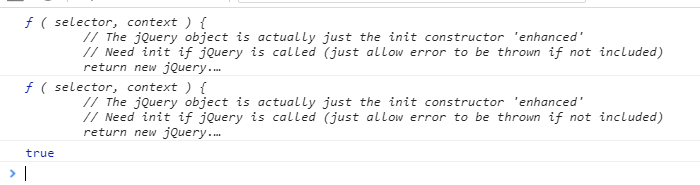
As you can see from the print results, $stands for jQuery.
How do you understand the $symbol in jQuery?
In fact, it represents a function name as follows:
$(); // Call the function we customized above$

	$(document).ready(function(){}); // Call the entry function

	$(function(){}); // Call the entry function

	$("#BtnShow"// Gets the element whose id attribute is btnShow

	$("div") // Get all div tag elements
As shown above, the $function in jQuery makes different calls to achieve different functions depending on the incoming parameters. The jQuery object is returned.
JQuery, a js library, provides another function in addition to $: jQuery. The relationship between jQuery function and $: jQuery ===$.
Comparisons between DOM objects and jQuery objects in js (emphasis, difficulty)
The difference between them
The element retrieved through jQuery is an array containing DOM objects in the native JS. Give an example:
For the following div structure:
<div></div>
<div class="box"></div>
<div id="box"></div>
<div class="box"></div>
<div></div>
The way to get these element nodes through native js is:

    var myBox = document.getElementById("box"); // Get a single element by id
    Var box Arr = document. getElements ByClassName ("box"); and // Getting through class is an array
    var divArr = document.getElementsByTagName("div"); // The array is retrieved through the tag
 The way to get these element nodes through jQuery is: (all of them are arrays)

    // Gets an array containing DOM objects in the native JS.
    var jqBox1 = $("#box");
    var jqBox2 = $(".box");
    var jqBox3 = $("div");
Let's print it out and see:
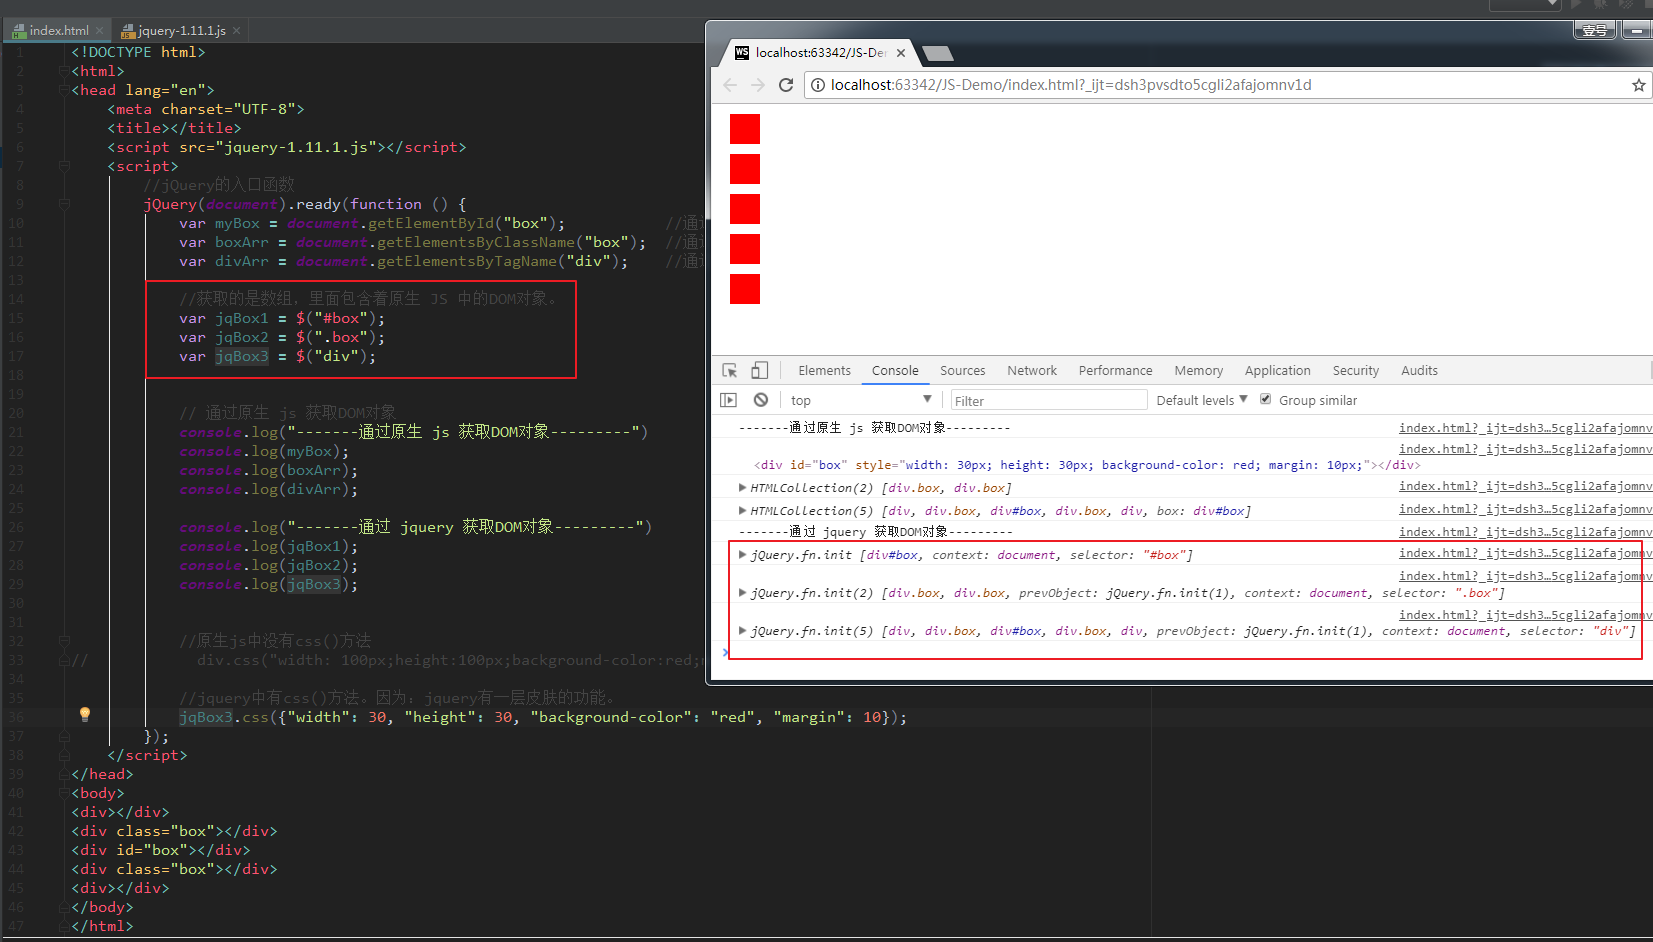
As shown in the figure above, because JQuery has its own css() method, we can also directly set css attributes to div in our code.
Summary: jQuery is to re-wrap DOM objects to give them jQuery methods.
Conversion between the two
1. DOM object to jQuery object:
$(js object);
Examples: (Take the code in the previous paragraph for example)
//Transformation.
	jqBox1 = $(myBox);
	jqBox2 = $(boxArr);
	jqBox3 = $(divArr);
Once the DOM object is converted into a jquery object, the above functions can be invoked directly.
2. jQuery object to DOM object:
jquery object [index]; // mode 1 (recommendation)

	jquery object. get(index);//mode 2
Once the jQuery object is converted into a DOM object, some functions provided by the DOM can be invoked directly. For example:
//After jquery object is converted into DOM object
    jqBox3[0].style.backgroundColor = "black";
    jqBox3.get(4).style.backgroundColor = "pink";
Summary: If you want to set attributes or methods in which way, you must convert them to that type.
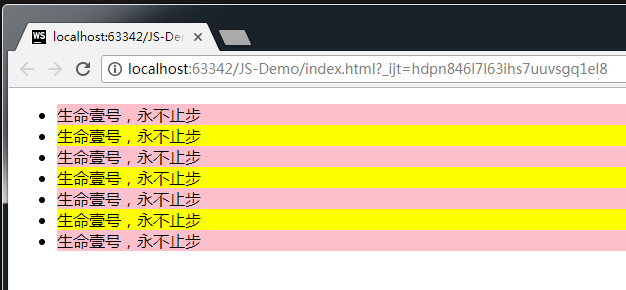
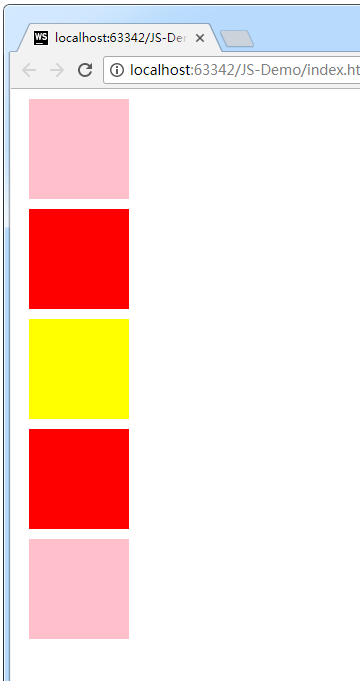
Examples: interlaced discoloration
The code is as follows:
<!DOCTYPE html>
<html>
<head lang="en">
    <meta charset="UTF-8">
    <title></title>
    <script src="jquery-1.11.1.js"></script>
    <script>
        //Entry function
        jQuery(function () {
            var jqLi = $("li");
            for (var i = 0; i < jqLi.length; i++) {
                if (i % 2 === 0) {
                    //jquery object, converted into js object
                    jqLi[i].style.backgroundColor = "pink";
                } else {
                    jqLi[i].style.backgroundColor = "yellow";
                }
            }
        });
    </script>
</head>
<body>
<ul>
    <li>Life's No. 1, Never Stop</li>
    <li>Life's No. 1, Never Stop</li>
    <li>Life's No. 1, Never Stop</li>
    <li>Life's No. 1, Never Stop</li>
    <li>Life's No. 1, Never Stop</li>
    <li>Life's No. 1, Never Stop</li>
    <li>Life's No. 1, Never Stop</li>
</ul>
</body>
</html>
The results are as follows:
jQuery selector
The selectors we used to learn from CSS are:
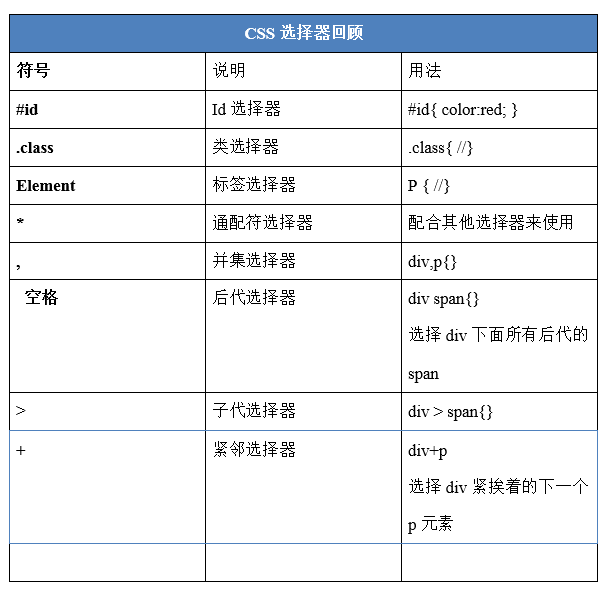
Let's learn about jQuery selector today.
JQuery selector is a powerful manifestation of jQuery, which provides a set of methods to make it easier for us to get the elements in the page.
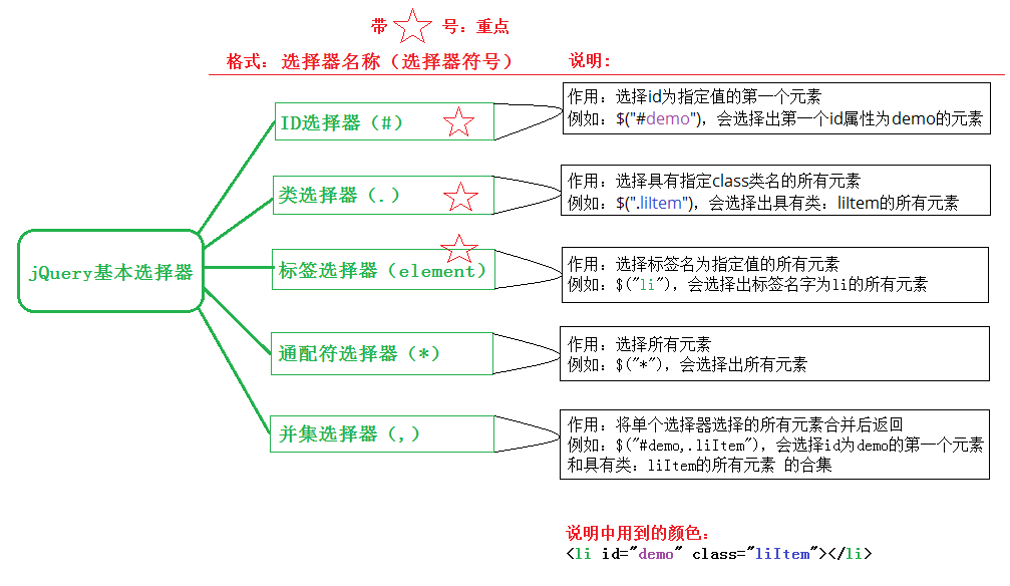
1. Basic selector of jQuery
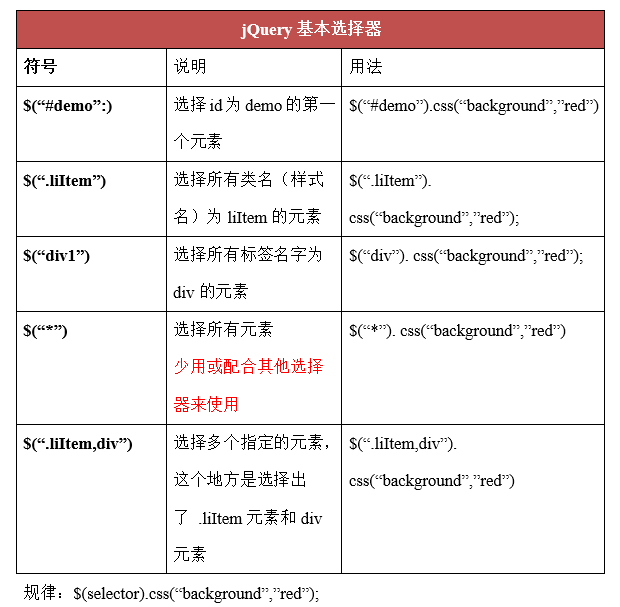
The explanation is as follows:
Give an example:
<!DOCTYPE html>
<html>
<head lang="en">
    <meta charset="UTF-8">
    <title></title>
    <script src="jquery-1.11.1.js"></script>
    <script>
        //Entry function
        jQuery(document).ready(function () {

            //Three ways to get jquery objects
            var jqBox1 = $("#box");
            var jqBox2 = $(".box");
            var jqBox3 = $("div");

            //Operational Label Selector
            jqBox3.css("width", 100);
            jqBox3.css("height", 100);
            jqBox3.css("margin", 10);
            jqBox3.css("background", "pink");

            //Operational class selector (implicit iteration, no one-by-one settings)
            jqBox2.css("background", "red");

            //Operating id selector
            jqBox1.css("background", "yellow");

        });
    </script>
</head>
<body>

<div></div>
<div class="box"></div>
<div id="box"></div>
<div class="box"></div>
<div></div>

</body>
</html>
The results are as follows:
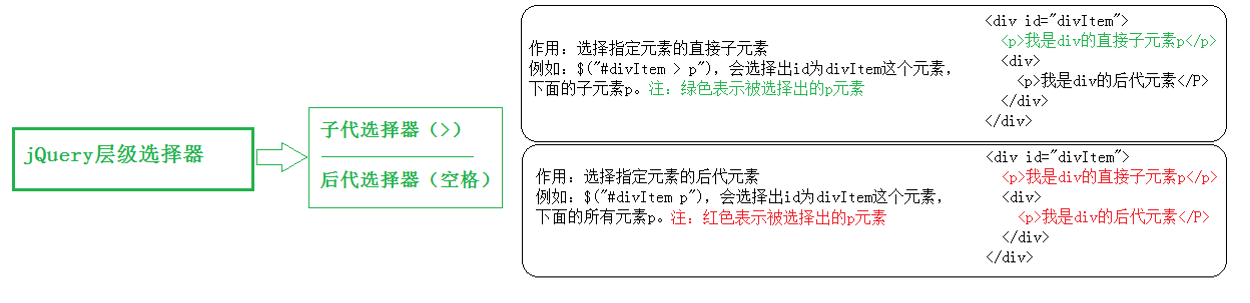
2. Hierarchical selector
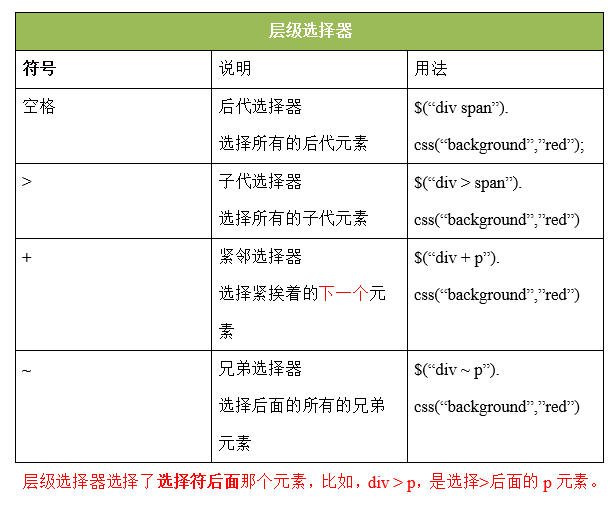
The explanation is as follows:
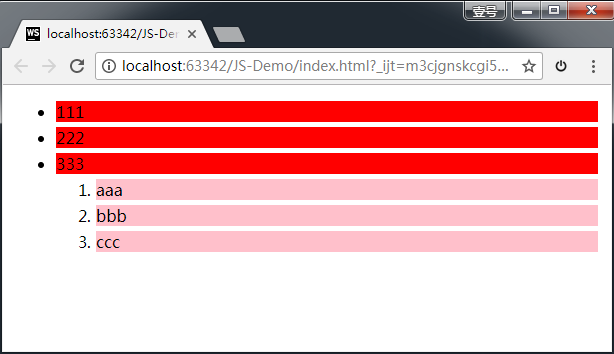
Give an example:
<!DOCTYPE html>
<html>
<head lang="en">
    <meta charset="UTF-8">
    <title></title>
    <script src="jquery-1.11.1.js"></script>
    <script>
        $(function () {
            //Get li in ul set to pink
            //Future generations: great-grandchildren, great-grandchildren, great-grandchildren and great-grandchildren.
            var jqLi = $("ul li");
            jqLi.css("margin", 5);
            jqLi.css("background", "pink");

            //Progeny: Parent Son
            var jqOtherLi = $("ul>li");
            jqOtherLi.css("background", "red");
        });
    </script>
</head>
<body>
<ul>
    <li>111</li>
    <li>222</li>
    <li>333</li>
    <ol>
        <li>aaa</li>
        <li>bbb</li>
        <li>ccc</li>
    </ol>
</ul>
</body>
</html>
Effect:
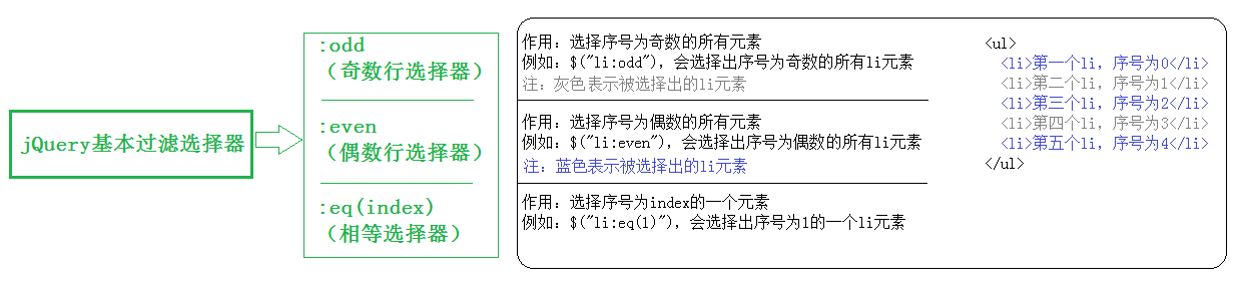
3. Basic filter selector

Explanation:
Give an example:
<script src="jquery-1.11.1.js"></script>
<script>
$(document).ready(function () {
// :odd
$("li:odd").css("background", "red");
// :even
$("li:even").css("background", "green");
// :eq(index)
$("ul li:eq(3)").css("font-size", "30px"); //Setting the font of the fourth li
// :lt(index)
$("li:lt(6)").css("font-size", "30px");
// :gt(index)
$(".ulList1 li:gt(7)").css("font-size", "40px");
// :first
$(".ulList li:first").css("font-size", "40px");
// :last
$("li:last").css("font-size", "40px");
});
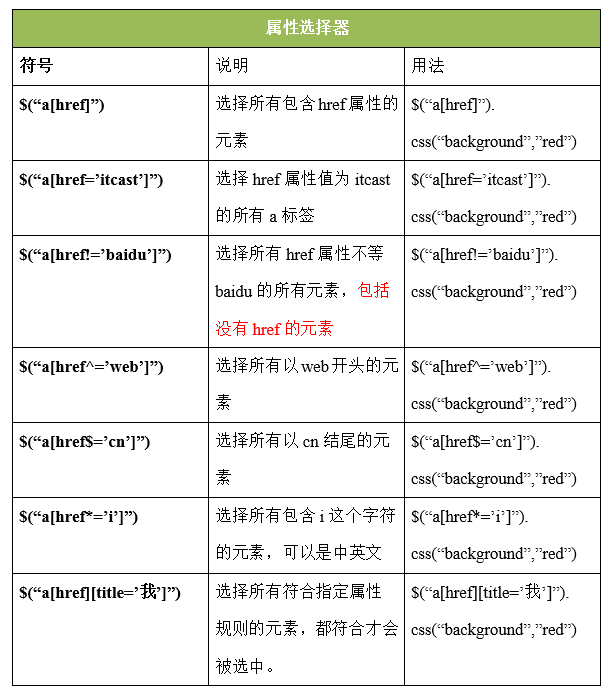
</script>4. Attribute selector
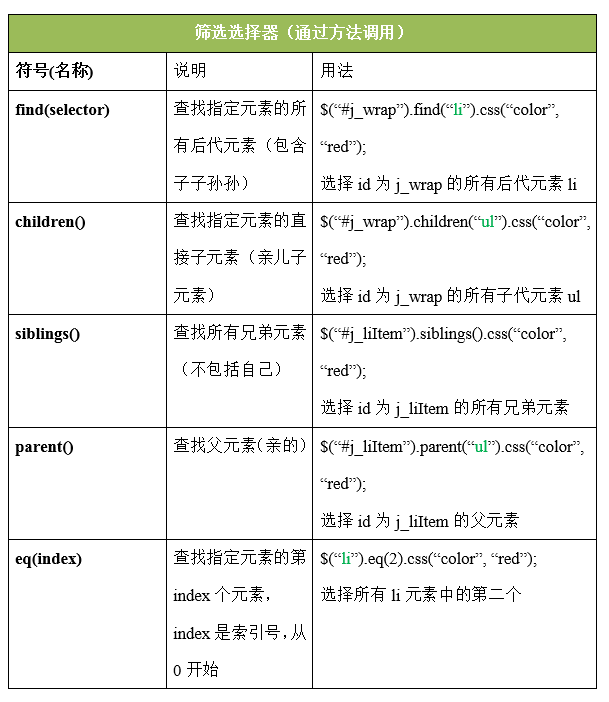
5. Screening selector
Give an example:
<!DOCTYPE html>
<html>
<head lang="en">
<meta charset="UTF-8">
<title></title>
<script src="jquery-1.11.1.js"></script>
<script>
jQuery(function () {
var jqul = $("ul");
//find(selector); find from descendants of jquery objects
//You must set parameters if you don't specify that you can't get elements. length === 0
jqul.find("li").css("background", "pink");
console.log(jqul.find());
//chidlren(selector); Find from the descendants of jquery objects
//Not writing parameters means getting all the child elements.
jqul.children("li").css("background", "green");
//EQ (index value); find the elements of the index value from the descendants of jquery objects
//Write the number of arrays in this array.
jqul.children().eq(0).css("background", "red");
//next(); the next sibling element of the element
jqul.children().eq(0).next().css("background", "yellow");
//siblings(selector); all sibling elements of the element
jqul.children().eq(0).next().siblings().css("border", "1px solid blue");
//parent(); the parent element of the element (not related to location)
console.log(jqul.children().eq(0).parent());
});
</script>
</head>
<body>
<ul>
<li>Life's No. 1, Never Stop</li>
<li class="box">Life's No. 1, Never Stop</li>
<span>Life's No. 1, Never Stop</span>
<li class="box">Life's No. 1, Never Stop</li>
<i>Life's No. 1, Never Stop</i>
<li>Life's No. 1, Never Stop</li>
<a id="box" href="#"Life is a sign that never stops.</a>
<ol>
<li>I am ol In li</li>
<li>I am ol In li</li>
<li>I am ol In li</li>
<li>I am ol In li</li>
</ol>
</ul>
</body>
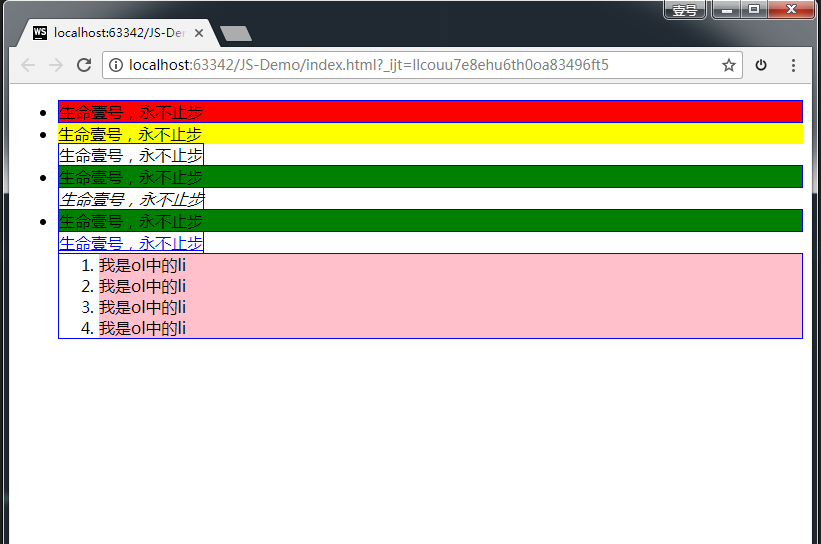
</html>Effect:
Give an example
Example 1: When the mouse hovers, a drop-down menu pops up [Important]
Full version code:
<!DOCTYPE html>
<html>
<head lang="en">
    <meta charset="UTF-8">
    <title></title>
    <style type="text/css">
        * {
            margin: 0;
            padding: 0;
        }

        ul {
            list-style: none;
        }

        .wrap {
            width: 330px;
            height: 30px;
            margin: 100px auto 0;
            padding-left: 10px;
            background-color: pink;
        }

        .wrap li {
            background-color: yellowgreen;
        }

        .wrap > ul > li {
            float: left;
            margin-right: 10px;
            position: relative;
        }

        .wrap a {
            display: block;
            height: 30px;
            width: 100px;
            text-decoration: none;
            color: #000;
            line-height: 30px;
            text-align: center;
        }

        .wrap li ul {
            position: absolute;
            top: 30px;
            display: none;
        }
    </style>
    <script src="jquery-1.11.1.js"></script>
    <script>
        //Entry function
        $(document).ready(function () {
            //Requirement: Put the mouse in the first-level li and let the ul display in it. Remove the concealment.
            var jqli = $(".wrap>ul>li");

            //Binding events
            jqli.mouseenter(function () {
                //This is used in this location.
                // console.log(this); // print results are dom objects in js. Note: In the event of jquery object binding, this refers to the dom object in js. [Important]

                //Let ul in this show.
//                The method of native js is: this. children [1]. style. display = block;
                //Wrap the dom object of js as jquery object, and then operate with jquery method
                $(this).children("ul").show();
            });

            //Binding events: Hide the drop-down menu when the mouse moves away
            jqli.mouseleave(function () {
                $(this).children("ul").hide();
            });
        });
    </script>

</head>
<body>
<div class="wrap">
    <ul>
        <li>
            <a href="javascript:void(0);">Level 1 menu 1</a>
            <ul>
                <li><a href="javascript:void(0);">Level 2 menu 1</a></li>
                <li><a href="javascript:void(0);">Level 2 Menu 2</a></li>
                <li><a href="javascript:void(0);">Level 2 menu 3</a></li>
            </ul>
        </li>
    </ul>
</div>
</body>
</html>
In the code above, we can see that it is very convenient to operate with jQuery.
The results are as follows:
The usage of this:
In the code above, the core line of code is:
	$(this).children("ul").show();

	$(this).children("ul").hide();
If I write this line of code directly as a DOM object:
	jqli.children("ul").show();

	jqli.children("ul").hide();
The result is: (not what we expect)
By comparing the two graphs, we can see the function of this: who is calling the function, this means who.
Example 2: Mouse hover time-varying color
The complete code is as follows:
<!DOCTYPE html>
<html>
<head lang="en">
    <meta charset="UTF-8">
    <title></title>
    <script src="jquery-1.11.1.js"></script>
    <script>
        $(function () {

            //Requirements; Interlace discoloration; Mouse hover, but also discoloration.
            var jqli1 = $("li:odd");
            var jqli2 = $("li:even");
            jqli1.css("background", "#cccccc");
            jqli2.css("background", "white");

            //Mouse hover time-varying
            var color = "";
            $("li").mouseenter(function () {
                color = $(this).css("background");  //Save the previous color and restore it when the mouse leaves.
                $(this).css("background", "green");
            });
            //When the mouse leaves, it returns to its original color.
            $("li").mouseleave(function () {
                $(this).css("background", color);
            });
        });
    </script>
</head>
<body>

<ul>
    <li>Life's No. 1, Never Stop</li>
    <li>Life's No. 1, Never Stop</li>
    <li>Life's No. 1, Never Stop</li>
    <li>Life's No. 1, Never Stop</li>
    <li>Life's No. 1, Never Stop</li>
    <li>Life's No. 1, Never Stop</li>
</ul>

</body>
</html>
The results are as follows:
Example 3: Highlighting
Requirements: When hovering the mouse, highlight this li, so that other Li are translucent.
When implemented with jQuery's choice, you will find it very convenient.
The complete code is as follows:
<!DOCTYPE html>
<html>
<head lang="en">
    <meta charset="UTF-8">
    <title></title>
    <style type="text/css">
        * {
            margin: 0;
            padding: 0;
        }

        ul {
            list-style: none;
        }

        body {
            background: #000;
        }

        .wrap {
            margin: 100px auto 0;
            width: 630px;
            height: 394px;
            padding: 10px 0 0 10px;
            background: #000;
            overflow: hidden;
            border: 1px solid #fff;
        }

        .wrap li {
            float: left;
            margin: 0 10px 10px 0;

        }

        .wrap img {
            display: block;
            border: 0;
        }
    </style>
    <script src="jquery-1.11.1.js"></script>
    <script>
        jQuery(window).ready(function () {
            //Requirement: Mouse into li, other Li translucent, opacity value of current box is 1
            $(".wrap").find("li").mouseenter(function () {
                //Chain programming
                $(this).css("opacity", 1).siblings("li").css("opacity", 0.4);
            });

            //When leaving wrap, the opacity value of all li is 1.
            $(".wrap").mouseleave(function () {
                $(this).children().children("li").css("opacity", 1);
//                $(".wrap li").css("opacity",1);
            });
        });
    </script>
</head>
<body>
<div class="wrap">
    <ul>
        <li><a href="#"><img src="images/01.jpg" alt=""/></a></li>
        <li><a href="#"><img src="images/02.jpg" alt=""/></a></li>
        <li><a href="#"><img src="images/03.jpg" alt=""/></a></li>
        <li><a href="#"><img src="images/04.jpg" alt=""/></a></li>
        <li><a href="#"><img src="images/05.jpg" alt=""/></a></li>
        <li><a href="#"><img src="images/06.jpg" alt=""/></a></li>
    </ul>
</div>
</body>
</html>
The results achieved are as follows:

Note that in the css layout here, each image is stored in a li. After setting the width of Li's father, and then setting Li to float, it can be arranged in two rows adaptively.
Engineering documents:
Example 4: Accordion effect
Full version code:
<!DOCTYPE html>
<html>
<head lang="en">
    <meta charset="UTF-8">
    <title></title>
    <style type="text/css">
        * {padding: 0;margin: 0;}
        ul { list-style-type: none;}

        .parentWrap {
            width: 200px;
            text-align:center;

        }

        .menuGroup {
            border:1px solid #999;
            background-color:#e0ecff;
        }

        .groupTitle {
            display:block;
            height:20px;
            line-height:20px;
            font-size: 16px;
            border-bottom:1px solid #ccc;
            cursor:pointer;
        }

        .menuGroup > div {
            height: 200px;
            background-color:#fff;
            display:none;
        }

    </style>
    <script src="jquery-1.11.1.min.js"></script>
    <script>
        $(function () {
            //Requirement: Click on span to display the div below. Let other divs be hidden.
            $(".parentWrap span").click(function () {
//                $(this).next().show();
//                // Let others hide
//                // Click on span's father li, all the brothers li, and all the children div are hidden.
//                $(this).parent("li").siblings("li").children("div").hide();
                //Connecting Programming
                $(this).next().show().parent("li").siblings("li").find("div").hide();
            });
        })
    </script>
</head>
<body>
<ul class="parentWrap">
    <li class="menuGroup">
        <span class="groupTitle">Title 1</span>
        <div>I popped up. div1</div>
    </li>
    <li class="menuGroup">
        <span class="groupTitle">Title 2</span>
        <div>I popped up. div2</div>
    </li>
    <li class="menuGroup">
        <span class="groupTitle">Title 3</span>
        <div>I popped up. div3</div>
    </li>
    <li class="menuGroup">
        <span class="groupTitle">Title 4</span>
        <div>I popped up. div4</div>
    </li>
</ul>
</body>
</html>
Effect:
Note the use of selectors here: parent, next
Example 5: Taobao boutique clothing advertising
Full version code:
<!DOCTYPE html>
<html>
<head lang="en">
    <meta charset="UTF-8">
    <title></title>
    <style type="text/css">
        * {
            margin: 0;
            padding: 0;
            font-size: 12px;
        }

        ul {
            list-style: none;
        }

        a {
            text-decoration: none;
        }

        .wrapper {
            width: 298px;
            height: 248px;
            margin: 100px auto 0;
            border: 1px solid pink;
            overflow: hidden;
        }

        #left, #center, #right {
            float: left;
        }

        #left li, #right li {
            background: url(images/lili.jpg) repeat-x;
        }

        #left li a, #right li a {
            display: block;
            width: 48px;
            height: 27px;
            border-bottom: 1px solid pink;
            line-height: 27px;
            text-align: center;
            color: black;
        }

        #left li a:hover, #right li a:hover {
            background-image: url(images/abg.gif);
        }

        #center {
            border-left: 1px solid pink;
            border-right: 1px solid pink;
        }
    </style>
    <script src="jquery-1.11.1.js"></script>
    <script>
        jQuery(function () {
            //Requirement: The mouse is placed in the li on both sides, so that the li of the corresponding index value in the middle ul is displayed, and other hiding. (li on the right side needs + 9)
            //First tie on the left. Get the binding mouseenter
            $("#left li").mouseenter(function () {
                //Display the middle li of the corresponding index value
                //Alert ($(this). index (); gets the index value
                $("#center li").eq($(this).index()).show().siblings("li").hide();
            });

            //Right
            $("#right li").mouseenter(function () {
                //Display the middle li of the corresponding index value
                //Alert ($(this). index (); gets the index value
                $("#center li:eq(" + ($(this).index() + 9) + ")").show().siblings("li").hide();
            });
        });
    </script>
</head>
<body>
<div class="wrapper">

    <ul id="left">
        <li><a href="#">Women's Boots</a></li>
        <li><a href="#">Snow boots</a></li>
        <li><a href="#">Winter Skirt</a></li>
        <li><a href="#">Woven overcoat</a></li>
        <li><a href="#">Sweaters</a></li>
        <li><a href="#">Cotton Clothes</a></li>
        <li><a href="#">Women's trousers</a></li>
        <li><a href="#"> down jacket</a></li>
        <li><a href="#">Jeans</a></li>
    </ul>
    <ul id="center">
        <li><a href="#"> < img src=" images / boots. jpg "width=" 200 "height=" 250 "/>"</a></li>
        <li><a href="#"> < img src=" images / snow boots. jpg "width=" 200 "height=" 250 "/>"</a></li>
        <li><a href="#"> < img src=" images / winter skirt. jpg "width=" 200 "height=" 250 "/>"</a></li>
        <li><a href="#"> < img src=" images / woolen overcoat. jpg "width=" 200 "height=" 250 "/>"</a></li>
        <li><a href="#"> < img src=" images / sweaters. jpg "width=" 200 "height=" 250 "/>"</a></li>
        <li><a href="#"> < img src=" images / cotton clothes. jpg "width=" 200 "height=" 250 "/>"</a></li>
        <li><a href="#"> < img src=" images / pants. jpg "width=" 200 "height=" 250 "/>"</a></li>
        <li><a href="#"> < img src=" images / down jacket. jpg "width=" 200 "height=" 250 "/>"</a></li>
        <li><a href="#"> < img src=" images / jeans. jpg "width=" 200 "height=" 250 "/>"</a></li>
        <li><a href="#"> < img src=" images / women's bag. jpg "width=" 200 "height=" 250 "/>"</a></li>
        <li><a href="#"> < img src=" images / men's bag. jpg "width=" 200 "height=" 250 "/>"</a></li>
        <li><a href="#"> < img src=" images / hiking shoes. jpg "width=" 200 "height=" 250 "/>"</a></li>
        <li><a href="#"> < img src=" images / belts. jpg "width=" 200 "height=" 250 "/>"</a></li>
        <li><a href="#"> < img src=" images / scarf. jpg "width=" 200 "height=" 250 "/>"</a></li>
        <li><a href="#"> < img src=" images / leather clothes. jpg "width=" 200 "height=" 250 "/>"</a></li>
        <li><a href="#"> < img src=" images / men's sweaters. jpg "width=" 200 "height=" 250 "/>"</a></li>
        <li><a href="#"> < img src=" images / men's cotton clothes. jpg "width=" 200 "height=" 250 "/>"</a></li>
        <li><a href="#"> < img src=" images / men's boots. jpg "width=" 200 "height=" 250 "/>"</a></li>
    </ul>
    <ul id="right">
        <li><a href="#">Women's Bag</a></li>
        <li><a href="#">Men's Bag</a></li>
        <li><a href="#"Mountaineering shoes"</a></li>
        <li><a href="#">Belt</a></li>
        <li><a href="#">Scarf</a></li>
        <li><a href="#">Leather Clothes</a></li>
        <li><a href="#">Men's sweaters</a></li>
        <li><a href="#">Men's Cotton Clothes</a></li>
        <li><a href="#">Men's Boots</a></li>
    </ul>
</div>
</body>
</html>
Effect:
Engineering documents: