What is the MCCS framework?
In last article Introduce MCCS: A New Construction Method of iOS APP In this article, we introduce what MCCS is. MCCS is a design pattern, and its concrete implementation is the MCCS framework.
MCCS framework currently only has the version of O-C language, and there is no Swift version at present.
The current version of the MCCS framework is 0.5.1 and its address is https://gitee.com/kmyhy/MCCS framework.
You can download it directly or install it with CocoaPods. It currently provides a framework (binary mode), no source code.
Install MCCS framework
Installation with CocoaPods is very simple, which is the recommended installation method. Edit your Podfile file and add:
pod 'MCCSframework','~>0.5.1'
Then pod install. Note that the MCCS framework relies on third-party libraries, which are automatically installed in your project after pod install. This is equivalent to adding the following to your Podfile file:
pod 'IGListKit', '~> 2.0.0'
pod 'UICollectionViewLeftAlignedLayout'
pod 'AFNetworking'
pod 'MBProgressHUD', '~> 0.9.2'
pod 'JSONModel'
pod 'Masonry'
pod 'ReactiveObjC', '~> 3.0.0'  #RAC
pod 'MJRefresh'
In addition, you need to modify the Building Settings of the project, set Enable Bitcode to NO, and Allow Non-modular... Set it to YES.
Once set up, you can use the MCCS framework in your project.
Writing APP with MCCS Architecture
After installation, you can use MCCS architecture to write APP in the project. Note that MCCS and MVC are seamlessly compatible and do not require you to break the original project structure and code writing. You can use both MVC and MCCS in your project. Some simple interfaces are still built by MVC, while complex interfaces are built by MCCS.
Of course, for demonstration purposes, we can start with some less "complex" interfaces.
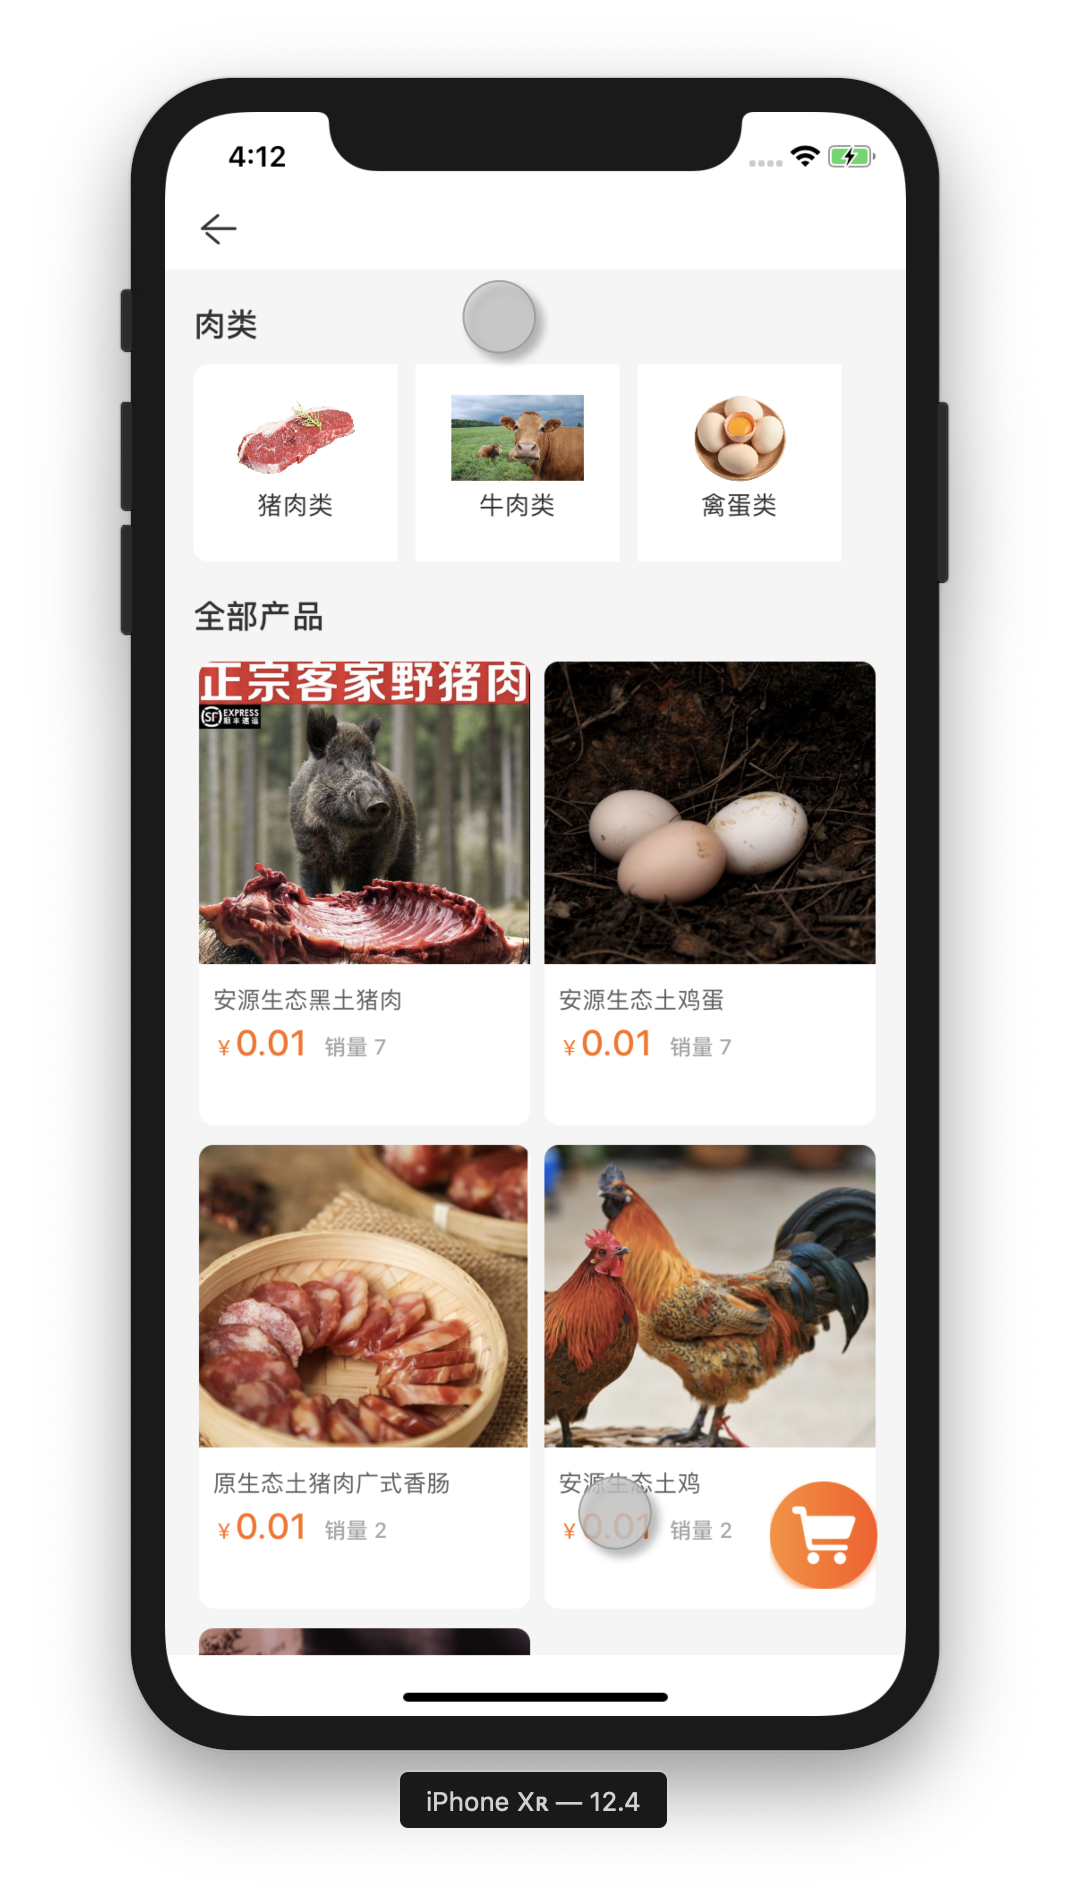
Suppose we want to implement such an interface:
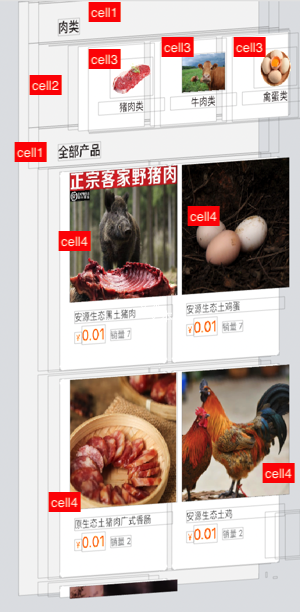
According to the principles mentioned above, we can divide it into several different cell types, as shown in the following figure:
Among them:
- In this UI, there are two lists. The horizontal list above represents the second-level categorization list of meat below: pork, beef... Wait. The following list shows the list of goods when the user selects a secondary category, and if the user does not select it, the list of goods at the whole level is displayed.
- Both lists have their own titles, which we can draw with the same cell, so they are both named cell1.
- Among them, the first list uses cells to be grouped into one group, cell 2. This list actually has only one cell. The cell last time contains a UICollection View that allows horizontal scrolling. The secondary classification is actually the cell of the UICollection View, cell 3.
- The cell used in the second list belongs to cell 4.
This will involve four UICollectionViewCell classes in the UI. After dividing up the cells, let's see how these cells need to be managed by several sub-controllers.
Because the sub-controller is actually responsible for managing the screen for ViewController, each sub-controller separately controls a section of the screen. From the view, the whole screen is divided into four sections from top to bottom, so we need four sub-controllers.
Attention should be paid here to:
- A sub-controller can only manage a segment of the screen, note that it is "segment" rather than "slice", because this area can only be divided horizontally, not vertically, and not irregularly shaped. So it can only be a rectangle, and the width of the rectangle must occupy the full width of the screen.
- The scope of the division can only be the scrolling area of the screen. Fixed areas, such as the header navigation bar and the bottom TabBar, cannot be counted - these are the areas that ViewController manages, and the sub-controllers cannot overstep.
- The titles of both lists are actually very simple text display, so two sub-controllers can be displayed with the same sub-controller class, using two instances of one class.
Therefore, the whole interface needs four Cell classes and three sub-controller classes.
Drawing cell
-
Cells that display list titles can use the OneLabelCell class provided by the framework.
This cell contains only one attribute lbTitle of UILabel.
-
The second-level cell can use the EmbedCollectionViewCell class provided by the framework. A UICollection View is nested in this cell.
-
The nested UICollection View in the cell of the secondary classification needs to use a cell, and we need to create the cell used by the Collection View itself.
Create a new UICollection ViewCell, called Second Category Cell, and check Alson create XIB File.
Open Second Category Cell and drag in a UI Image View and a UILabel: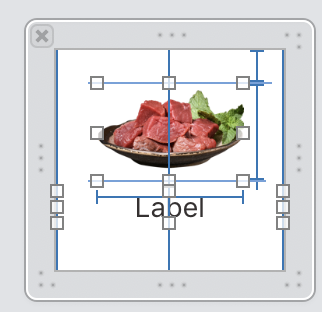
Create two IBOutlet s:
#import <MCCSframework/NibCollectionViewCell.h>

@interface SecondCategoryCell : NibCollectionViewCell
@property (weak, nonatomic) IBOutlet UIImageView *ivImage;
@property (weak, nonatomic) IBOutlet UILabel *lbTitle;

@end
Note that this inherits the NibCollectionViewCell provided by the framework. NibCollectionViewCell provides the ability to instantiate a UICollectionViewCell from a xib file.
-
The cell used in the list of goods is Optimum Goods Cell. Optimum GoodsCell.xib contains a UI Image View and three Label s:
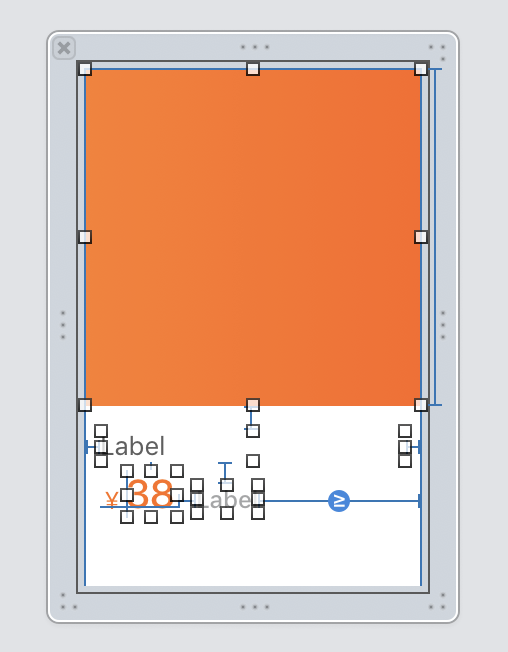
The IBOutlet created in Optimum GoodsCell is as follows:
#import <MCCSframework/Configurable.h>

@interface OptimumGoodsCell : NibCollectionViewCell<Configurable>
@property (weak, nonatomic) IBOutlet UILabel *lbPurchaser;
@property (weak, nonatomic) IBOutlet UILabel *lbPrice;
@property (weak, nonatomic) IBOutlet UIView *shadowView;
@property (weak, nonatomic) IBOutlet UILabel *lbName;
@property (weak, nonatomic) IBOutlet UIImageView *ivImage;
@end
Note that the Configurable interface provided by the framework is implemented here. The interface needs to implement a configWithObject:(id)obj method. Optimum GoodsCell implements this method:
	#import "OptimumGoodsCell.h"

#import "Goods.h"
#import <SDWebImage/UIImageView+WebCache.h>
#import <MCCSframework/Utils.h>
#import <MCCSframework/NSString+Add.h>


@implementation OptimumGoodsCell

-(void)configWithObject:(id)obj{
    if([obj isKindOfClass:Goods.class]){
        Goods* goods = (Goods*)obj;
        // Price
        self.lbPrice.text = f2s(goods.price,2);
        // Sales volume
        self.lbPurchaser.text = [NSString stringWithFormat:@"Sales volume %ld",goods.salesVolume];
        // Trade name
        self.lbName.text = goods.productName;
        // Commodity pictures
        [self.ivImage sd_setImageWithURL:remoteImgAddr(goods.mainImgId) placeholderImage:[UIImage imageNamed:@"commodity"]
         ];
    }
}
cell is created, and then the sub-controller.
Implementing sub-controllers
The three subcontroller classes discussed above are:
- OneLabelSC: Used to display the titles of two lists in the view. The managed cell s include OnceLabelCell.
- SecondCategory SC: Used to display a list of secondary classifications, managed cells include EmbedCollection ViewCell (and nested SecondCategory cell).
- Optimum Goods SC: Used to display a list of goods, managed cells include Optimum Goods cell.
OneLabelSC Subcontroller
OneLabelSC.h:
	#import <MCCSframework/SubController.h>

	@interface OneLabelSC : SubController
	@property (strong, nonatomic) NSString* title;
	@property (strong, nonatomic) UIFont* font;
	@property (strong, nonatomic) UIColor* color;
	@property(assign, nonatomic) CGFloat height;
	@property(assign, nonatomic) CGFloat leading;
	@end
- Subcontrollers must inherit the framework's SubController.
- This sub-controller displays only one line of title text that occupies a certain height. So we need title, font, color, height and other attributes. They are used to represent the content of text, font size, font color and line height respectively.
- The learning attribute is used to control the indentation distance of the text.
OneLabelSC.m:
```
#import <MCCSframework/dimensions.h>
#import <MCCSframework/OneLabelCell.h>
#import <MCCSframework/UIColor+Hex.h>

@implementation OneLabelSC

// 1
-(instancetype)init{
if(self = [super init]){
    self.font = [UIFont boldSystemFontOfSize:15];
    self.color = hex_color(0x333333);
    self.height = 50;
    self.leading = 20;
}
return self;
}
// 2
- (NSInteger)numberOfItems{

return 1;
}
// 3
- (CGSize)sizeForItemAtIndex:(NSInteger)index{
return CGSizeMake(SCREEN_WIDTH, _height);
}
// 4
-(UICollectionViewCell *)cellForItemAtIndex:(NSInteger)index{

OneLabelCell* cell = [self.collectionContext dequeueReusableCellOfClass:[OneLabelCell class] forSectionController:self atIndex:index];// Crash!!! [MultilineTextInputCell new];

cell.lbTitle.text = _title;
cell.lbTitle.textColor = _color;
cell.lbTitle.font = _font;
cell.lbTitleLeading.constant = 20;

return cell;
}
@end

```
To inherit SubController, you need to override five methods of SubController. Of the five methods, only three must be implemented. These methods have been introduced in the previous article. Here we cover only three of them.
- In the initialization method, we set the default values of several attributes of the sub-controller.
- The numberOfItems method returns an integer to determine how many cell s will be contained in this subcontroller. For headings, return 1.
- The sizeForItemAtIndex method specifies the size of each cell. Because this cell actually occupies the entire screen width, we use the SCREEN_WIDTH macro as the cell width, which is contained in the <MCCS framework/dimensions.h> header file. Cell height is specified by the height attribute of the title.
- In the cellForItemAtIndex method, we need to provide the cell object managed by the SubController. Configure these cells at the same time. Here we configure OneLabelCell's label text, font or color, etc.
Second Category SC Subcontroller
SecondCategorySC.h:
#import "GoodsType.h"
#import <MCCSframework/SubController.h>

@interface SecondCategorySC : SubController
@property (strong, nonatomic) GoodsType* goodsType;  // 1
@property (strong, nonatomic) void(^subclassSelected)(TypeNode* subclass);// 2

@end
- This sub-controller has an attribute goodsType, which is actually the data model that the sub-controller is rendering. This model is an entity class GoodsType, which is used to represent commodity classification. We will introduce it in the section "Model".
- There is also a block attribute that handles events when the secondary classification is selected by the user.
SecondCategorySC.m:
#import <MCCSframework/dimensions.h>
#import <ReactiveObjC.h>
#import "SecondCategoryCell.h"
#import <MCCSframework/EmbedCollectionViewCell.h>
#import <MCCSframework/UIImage+Extension.h>
#import <MCCSframework/UIColor+Hex.h>
#import <MCCSframework/Utils.h>
#import <MCCSframework/NSString+Add.h>
#import "UIViewController+Navigation.h"
#import <SDWebImage/UIImageView+WebCache.h>

@interface SecondCategorySC()<UICollectionViewDelegate,UICollectionViewDataSource>
@end
@implementation SecondCategorySC
- (NSInteger)numberOfItems{
    return 1;
}

- (CGSize)sizeForItemAtIndex:(NSInteger)index{
    return CGSizeMake(SCREEN_WIDTH, 110);
}

-(UICollectionViewCell *)cellForItemAtIndex:(NSInteger)index{

    EmbedCollectionViewCell* cell = [self.collectionContext dequeueReusableCellOfClass:EmbedCollectionViewCell.class forSectionController:self atIndex:index];

    [cell.collectionView registerNib:[UINib nibWithNibName:@"SecondCategoryCell" bundle:nil] forCellWithReuseIdentifier:@"SecondCategoryCell"];
    cell.collectionView.delegate = self;
    cell.collectionView.dataSource = self;
    [cell.collectionView reloadData];

    cell.collectionViewLeading.constant = 16;
    cell.collectionViewTrail.constant = 16;
    cell.collectionView.layer.cornerRadius = 8;
    return cell;
}

#pragma mark -----UICollectionViewDataSource-----
- (UICollectionViewCell *)collectionView:(UICollectionView *)collectionView cellForItemAtIndexPath:(NSIndexPath *)indexPath{

    SecondCategoryCell* cell = [collectionView dequeueReusableCellWithReuseIdentifier:@"SecondCategoryCell" forIndexPath:indexPath];
    TypeNode* node = _goodsType.children[indexPath.row];
    if(!stringIsEmpty(node.icon)){
        [cell.ivImage sd_setImageWithURL:remoteImgAddr(node.icon) placeholderImage:[UIImage imageNamed:@"goodstype_placeholder"]];

    }
    cell.lbTitle.text = _goodsType.children[indexPath.row].categoryName;
    return cell;
}

//How many cell s are there in each group?
- (NSInteger)collectionView:(UICollectionView *)collectionView numberOfItemsInSection:(NSInteger)section{
    return _goodsType.children.count;
}

#pragma mark -----UICollectionViewDelegate-----
- (void)collectionView:(UICollectionView *)collectionView didSelectItemAtIndexPath:(NSIndexPath *)indexPath{
    TypeNode* subclass = _goodsType.children[indexPath.item];
    if(_subclassSelected){
        _subclassSelected(subclass);
    }
}

//Define the size of each cell
- (CGSize)collectionView:(UICollectionView *)collectionView layout:(UICollectionViewLayout*)collectionViewLayout sizeForItemAtIndexPath:(NSIndexPath *)indexPath{
    return CGSizeMake(114,110);
}
@end
This sub-controller has more code than before, because the sub-controller implements the UICollection View Delegate protocol and UICollection View Data Source protocol in addition to the three necessary methods to implement SubController.
Among the three methods that SubController must cover, the first two methods are simple, and only the cellForItemAtIndex method needs to be noted. In this method:
- We created an EmbedCollectionViewCell instance. This class is provided by the framework, it is a special cell, just embedded in a UICollectionView, without any other UI.
- After creating the EmbedCollectionViewCell instance, we need to register a cell for its UICollectionView and set its delegate and datasource -- here we set both to self. So we can use the sub-controller as the data source and delegate of CollectionView.
So next we need to implement the UICollectionViewDelegate protocol and the UICollectionViewDataSource protocol. This section is no different from what we do with UIKit. You should be familiar with it.
- In the numberOfItemsInSection method, we decide to display several cell s according to the number of secondary classifications contained in the data model.
- In the cellForItemAtIndexPath method, we create the Second CategoryCell object and render the cell according to the data model.
- In didSelectItemAtIndexPath method, we transfer the secondary classified data selected by the user to the outside world by block call.
Optimum Goods SC Subcontroller
Optimum Goods SC manages cell s that display lists of goods. Class declarations are as follows:
#import "Goods.h"
#import <MCCSframework/SubController.h>

@interface OptimumGoodsSC : SubController
@property (strong, nonatomic) NSMutableArray<Goods*>* goodsArray;
@end
goodsArray is a model array whose type is the Goods type, which is used to represent the specific data of a commodity. This class is introduced in the "Model" section.
Class is implemented as follows:
#import "OptimumGoodsSC.h"
#import "OptimumGoodsCell.h"
#import <MCCSframework/dimensions.h>

@implementation OptimumGoodsSC
- (instancetype)init{
    self = [super init];
    if (self) {
        self.inset=UIEdgeInsetsMake(0, 16, 0, 0);
        self.minimumLineSpacing=5;
        self.minimumInteritemSpacing=2;
    }
    return self;
}
-(NSMutableArray<Goods*>*)goodsArray{
    if(!_goodsArray){
        _goodsArray = [NSMutableArray new];
    }
    return _goodsArray;
}
- (NSInteger)numberOfItems{
    return self.goodsArray ? self.goodsArray.count: 0;
}

- (CGSize)sizeForItemAtIndex:(NSInteger)index{

    return CGSizeMake((SCREEN_WIDTH-32)/2,265);
}

-(UICollectionViewCell *)cellForItemAtIndex:(NSInteger)index{
    OptimumGoodsCell* cell = [self.collectionContext dequeueReusableCellOfClass:OptimumGoodsCell.class forSectionController:self atIndex:index];
	[cell configWithObject:_goodsArray[_noSectionTitle ? index : index-1]];
	return cell;
}
@end
Most of the code is the same routine as the previous sub-controllers, but the difference is:
- In the init method, we set an inset attribute. As the name implies, this property is used to set the area margin managed by the sub-controller.
- In the cellForItemAtIndex method, a cell instance is created. But we didn't configure every attribute of the cell one by one because it was too cumbersome. Instead, we called the cell's configWithObject: method to pass model data to the cell and configure itself by the cell itself. Configurable WithObject: The method is the method in the Configurable protocol, and
The OptimumGoodsCell class implements this method (see the Drawing cell section).
Model
In the sub-controller, we use two model classes Goods and GoodsType, which are no different from the model used in normal APP, as opposed to the model in MVC.
GoodsType Model
In fact, this model contains two classes:
#import <MCCSframework/JKModel.h>

@interface TypeNode : JKModel
@property (strong, nonatomic) NSString* categoryId;
@property (strong, nonatomic) NSString* categoryName;
@property (strong, nonatomic) NSString* description;
@property (strong, nonatomic) NSString* icon;
@end

@interface GoodsType : JKModel

@property (nonatomic,copy)   TypeNode *parent;
@property(nonatomic,strong)  NSArray<TypeNode*> *children;

@end
JKModel is provided by the framework for parsing data in JSON format (using JSONModel).
Goods model
The model also includes two classes:
#import <MCCSframework/JKModel.h>
#import "PageModel.h"

NS_ASSUME_NONNULL_BEGIN

@interface Goods : JKModel
@property (strong, nonatomic) NSString* id;
@property (strong, nonatomic) NSString* productId;// Use productId instead of id to inquire about product details
@property (strong, nonatomic) NSString* categoryId;
@property (strong, nonatomic) NSString* belongsShopId;
@property (strong, nonatomic) NSString* productName;
@property (strong, nonatomic) NSString* introduction;// Text introduction
@property (strong, nonatomic) NSString* mainImgId;// cover photo
@property (strong, nonatomic) NSString* imgId;// Display Id List of Pictures
@property(assign, nonatomic) CGFloat price;// Price
@property(assign, nonatomic) CGFloat discountPrice;// Discount
@property (strong, nonatomic) NSString* priceUnit;// Company
@property(assign, nonatomic) NSInteger inventory;// Stock
@property(assign, nonatomic) NSInteger salesVolume;// Sales volume
@property (strong, nonatomic) NSString* shipMethod;// Distribution Mode 1 Self-lifting Off-line
@property (strong, nonatomic) NSString* remarks;//
//@ property (strong, nonatomic) NSString* amount; // This field will appear when checking my order

// Non-entity mapping attributes
@property(assign, nonatomic) NSInteger amount;
@property(assign, nonatomic) BOOL checked;
@end

@interface GoodsPage : PageModel
@property (strong, nonatomic) NSArray<Goods*>* records;
@end
People who often use JSON Models should be very familiar with these codes, basically code generated by tools. GoodsPage is the paging data returned by the interface. It mainly contains an array of Goods. In addition, it contains some attributes inherited from the parent PageModel, such as page number, page size, etc.
Implementing Controller
When cell, sub-controller and model are ready, it is a very simple process to realize the controller.
The class declaration of the controller is as follows:
#import <MCCSframework/NavBarVC.h>
#import "GoodsType.h"

@interface SecondCategoryVC : NavBarVC // 1
@property (strong, nonatomic) GoodsType* goodsType; // 2
@end
- Inheritance framework provides NavBarVC, so we have an off-the-shelf navigation bar available.
- A goodsType attribute is passed in from the outside world, which is actually a parameter passed from the first-level category selection page to represent the user's currently selected commodity-level classification.
In EcondCategory VC.m, we first declare two attributes:
@interface SecondCategoryVC()

@property (strong, nonatomic) SecondCategorySC* subclassSC;// Secondary Category List
@property (strong, nonatomic) OptimumGoodsSC* optimumSC;// List of commodities
@end
Secondary classified sub-controllers and commodity list sub-controllers correspond to each other. Then, two sub-controllers are initialized in the way of lazy loading:
// MARK: - Lazy load
-(OptimumGoodsSC*)optimumSC{
    if(!_optimumSC){
        _optimumSC = [OptimumGoodsSC new];
    }
    return _optimumSC;
}
-(SecondCategorySC*)subclassSC{
    if(!_subclassSC){
        _subclassSC = [SecondCategorySC new];
        _subclassSC.goodsType = _goodsType;
        @weakify(self)
        _subclassSC.subclassSelected = ^(TypeNode * _Nonnull subclass) {
            @strongify(self)
            NSLog(@"Users chose a secondary classification:%@",subclass.categoryName);
        };
    }
    return _subclassSC;
}
Note that in the secondary classification sub-controller, we set the subclass Selected block so that when the user selects a secondary classification, the name of the secondary classification will be printed.
Then the viewDidLoad method:
-(void)viewDidLoad{
    [super viewDidLoad];

	  // 1
    self.pageHeader.title = @"";
    self.pageHeader.rightButtonHidden = YES;
    // 2
    [self.collectionView mas_makeConstraints:^(MASConstraintMaker *make) {
        make.top.mas_equalTo(self.pageHeader.mas_bottom);
        make.left.mas_equalTo(0);
        make.right.mas_equalTo(0);
        make.bottom.mas_equalTo(0);
    }];
    // Drop-down refresh
    @weakify(self)
    [self.collectionView addHeader:^{
        @strongify(self)
        [self.collectionView.mj_header endRefreshing];
        [self loadFirstPage];
    }footer:^{
        @strongify(self)
        [self.collectionView.mj_footer endRefreshing];
        [self loadNextPage];
    }];

    // 3
    [self addSC:[self labelSC:_goodsType.parent.categoryName]];
    [self addSC:self.subclassSC];
    [self addSC:[self labelSC:@"All merchandise"]];
    [self addSC:self.optimumSC];

    [self.adapter reloadDataWithCompletion:nil];
    // 4
    [self loadFirstPage];
}
-
There is a page header property in the parent NavBarVC, which is actually a navigation bar control. We need to set its title. Otherwise, it will show the "installation progress" by default and hide its rightButton. Otherwise, it will show a "publish" button by default.
-
Constraints on CollectionView must be set (using Masonry), otherwise CollectionView will not be displayed (default frame is 0). In addition, we set up the pull-up and pull-down actions of CollectionView to support pull-up loading and pull-down refreshing. This requires importing the UIScrollView+addMJ.h classification provided by the framework.
-
Add the four sub-controllers implemented above. Where labelSC: Method creates a single line title text (sub-controller) with a specified title. The method is as follows:
-(OneLabelSC*)labelSC:(NSString*)title{
OneLabelSC* _labelSC = [OneLabelSC new];
_labelSC.title = title;
return _labelSC;
}
When we call addSC (add sub-controller), rmSC (delete sub-controller), insSC (insert sub-controller) and other methods, we must not forget to call adapter's reloadDataWithCompletion method.
-
Call the loadFirstPage method to load the first page of data.
These two methods are used when setting up the pull-up and pull-down block s of CollectionView:
-(void)loadFirstPage{
    self.collectionView.pageNum = 0;
    [self loadNextPage];
}
-(void)loadNextPage{

    if(self.collectionView.pageNum <=0){
        [self.optimumSC.goodsArray removeAllObjects];
    }

    Goods* goods = [Goods new];
    goods.belongsShopId =@"1";
    goods.shipMethod=@"Offline self mention";
    goods.id=@"84bd38cdb9b811e9acf6fa163e17a4af";
    goods.salesVolume=0;
    goods.productName=@"Colorful potatoes";
    goods.mainImgId=@"1565253738300";
    goods.price=6.9000000000000004;
    goods.discountPrice=5.1799999999999997;
    goods.categoryId=@"2";

    [self.optimumSC.goodsArray addObject:goods];
    self.collectionView.pageNum++;

    [self.optimumSC.collectionContext reloadSectionController:self.optimumSC];
}
Used for pull-down refresh and pull-up loading respectively. Of course, it's all mock data now. Later we will use a separate article to show how to use the network module in the MCCS framework to load real network data. As a demonstration, you can use analog data here.
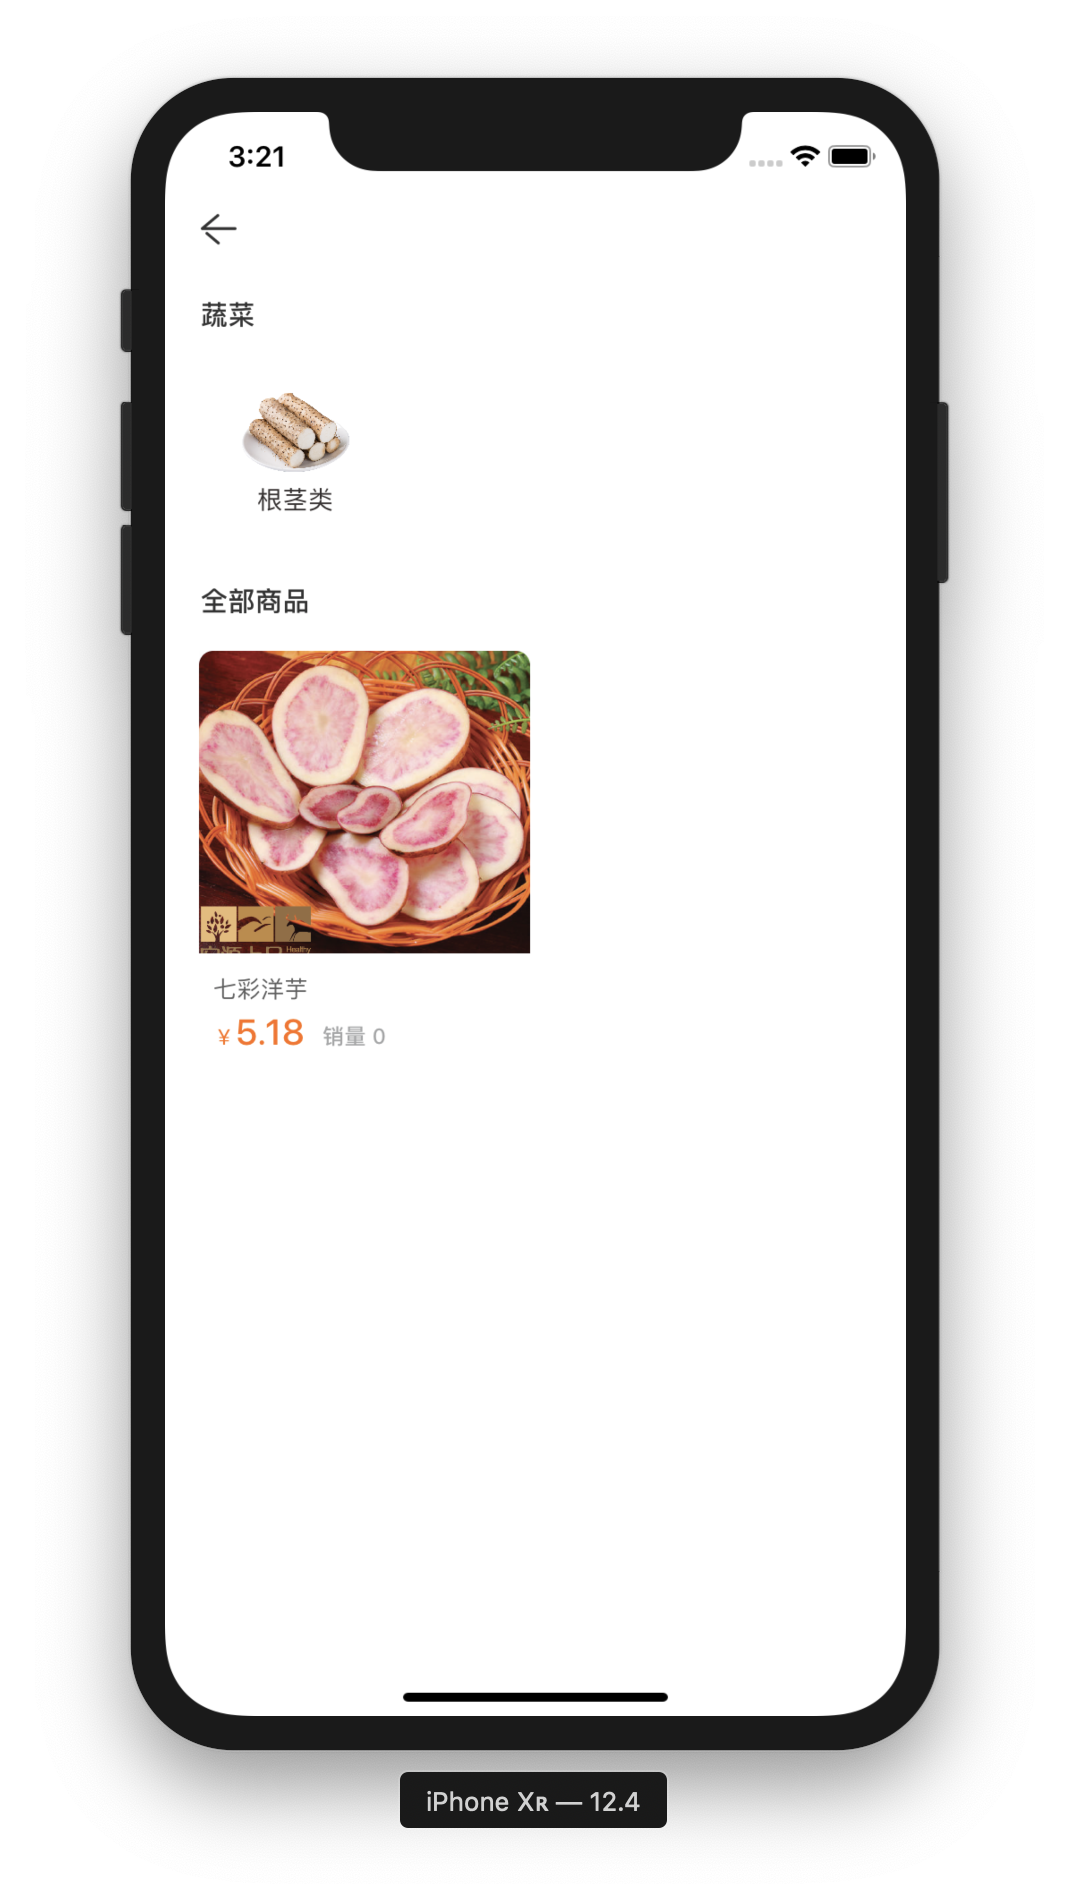
Another work is how to present Second Category VC. You can use presentViewController or Navigation Controller PUSH. Assuming the latter, the code might be as follows:
 	 GoodsType* goodsType = [GoodsType new];
    goodsType.parent = [TypeNode new];
    goodsType.parent.categoryName = @"Vegetables";
    goodsType.parent.icon = @"1564740275739";

    TypeNode *child = [TypeNode new];
    child.categoryName = @"Rhizome";
    child.icon = @"1564740355725";
    goodsType.children =@[child];

    [self pushSecondCagtegory:goodsType];
The goodsType here is still mock simulation data. Running the program, the effect is as follows:
There is no problem with pull-up loading:

Note that you may notice that when you run with your own code, all the pictures in the cell (secondary classification, merchandise pictures) will not be displayed. This is not a problem with the MCCS framework itself. Instead, these image resources are not provided in the source code. If you just want to see the effect, search the sd_setImageWithURL keyword and find these places:
[self.ivImage sd_setImageWithURL: remoteImgAddr (goods.mainImgId) placeholder Image:[UIImage imageNamed:@ "Goods"]
Replace the URL parameter from the remoteImgAddr function with any image resource that your APP can find.
End
This concludes the first introduction to the MCCS framework. I believe you have found that the examples used in the tutorial are "close" to real cases, and many problems also exist in production. At the same time, the framework also provides a large number of practical functions, tool classes and classifications, so that programmers only need to write business code in many real projects.