1 what is a Graph
The pictures introduced in this article are different from the common pictures in daily life. Generally, in English, in order to distinguish these two different graphs, the former is called Image and the latter is called Graph. In Chinese, the former will be emphasized as "picture", while the latter will be emphasized as "topology map", "network map", etc.
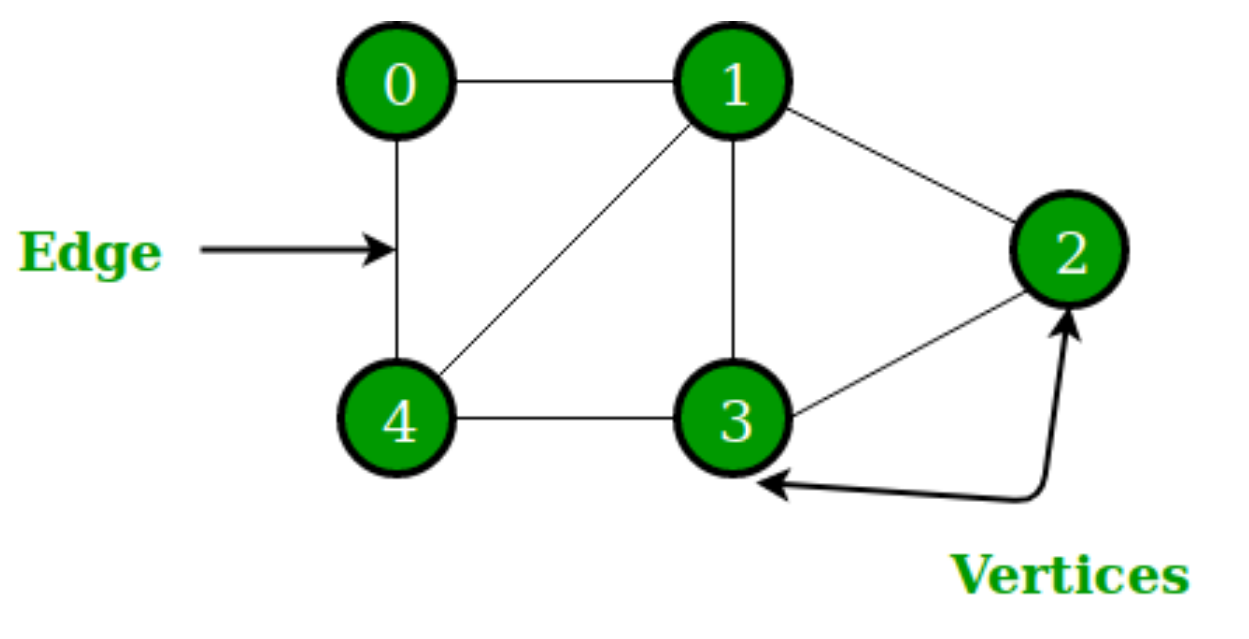
A Graph consists of small dots (called vertices or nodes, i.e. vertices) and lines or curves (called edges, i.e. edges) connecting these dots. The term "Graph" was first proposed by Sylvester in 1878.
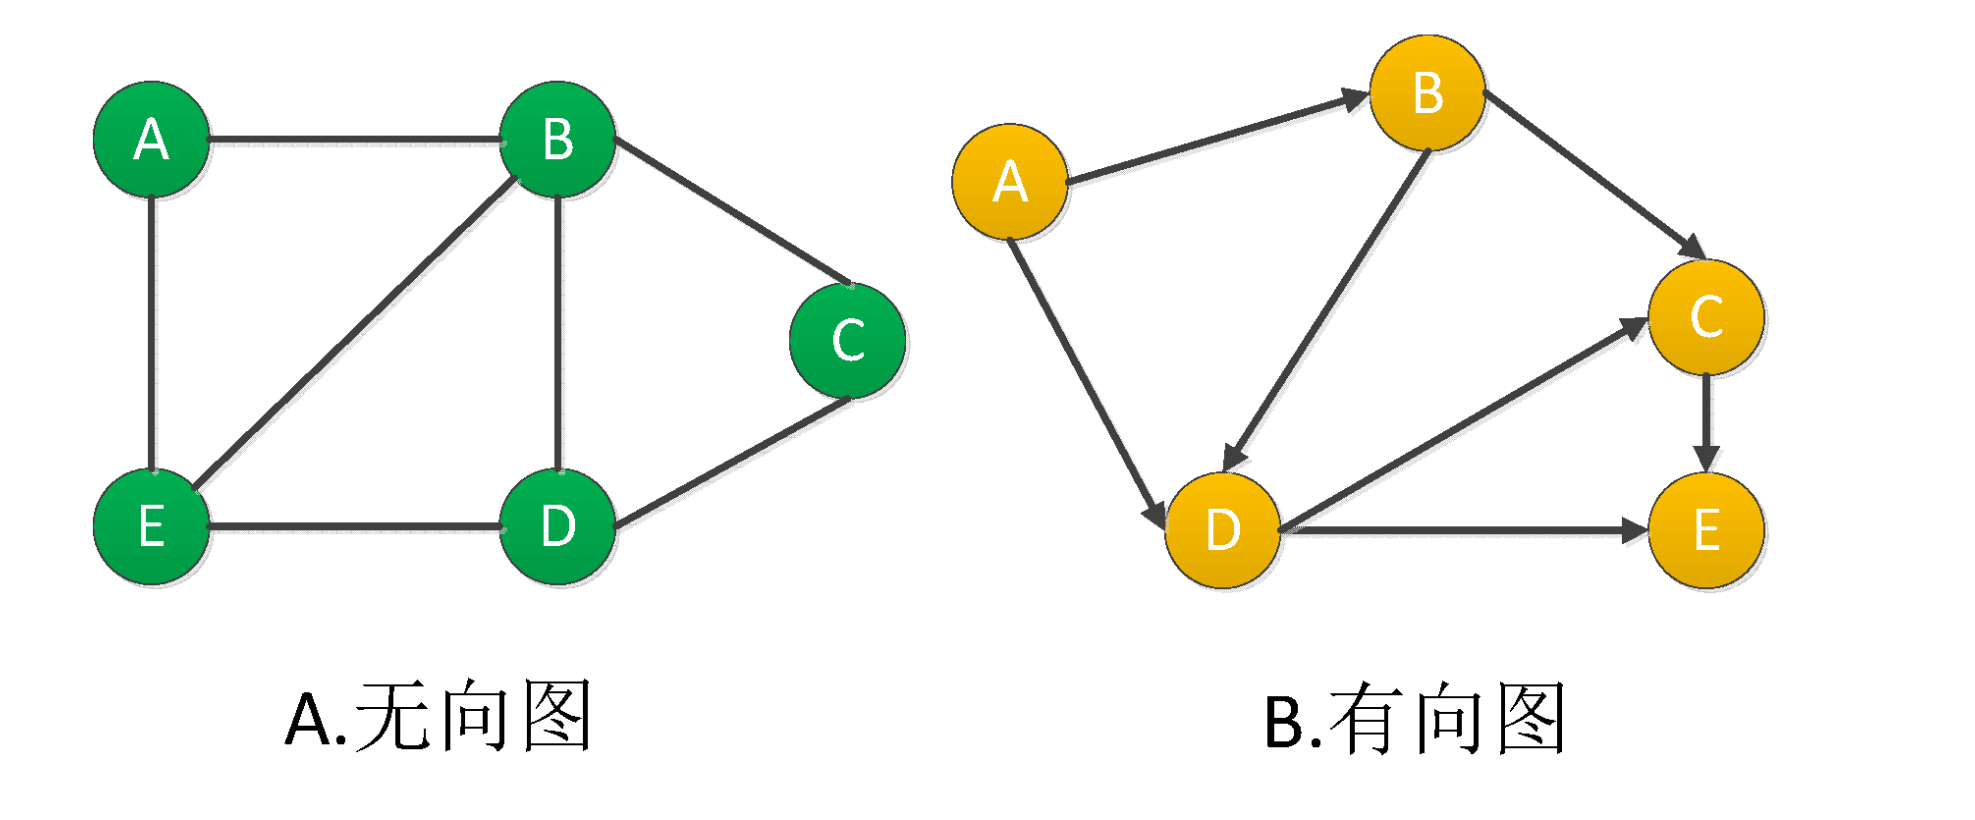
Graphs can also be divided into undirected graphs and directed graphs.
2 what is a graph database
Graph database is a database dedicated to storing and retrieving information from a huge graph network. It can efficiently store the data in the graph as vertices and edges, and attach properties to points and edges.
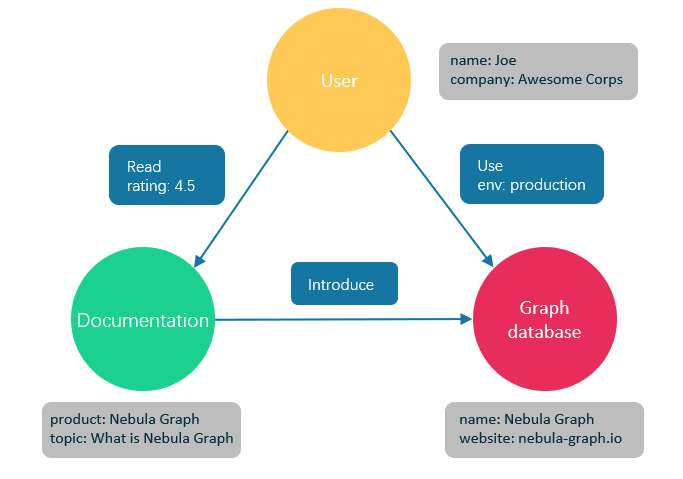
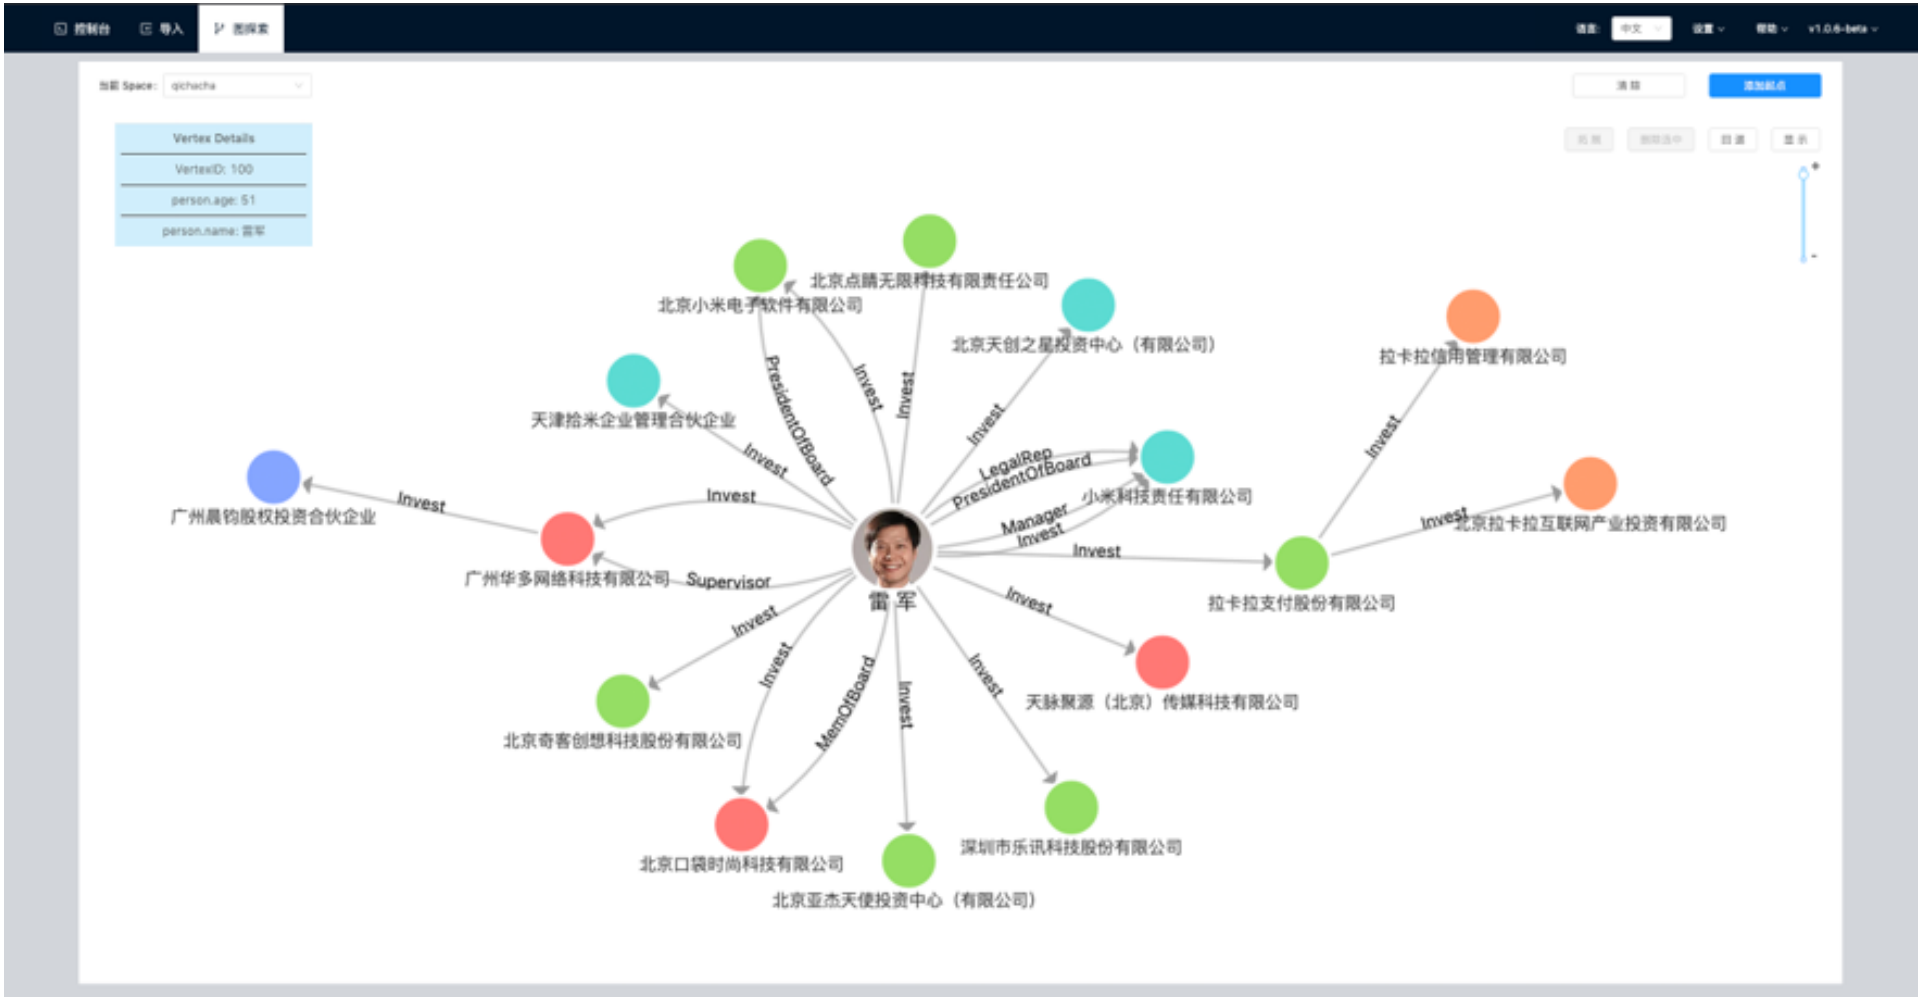
Figure 3 application example of database
For example, companies such as enterprise inspection or BOSS directly employ such companies to model the relationship of commercial equity networks. In this network, the point is usually a natural person or an enterprise, usually a natural person's equity relationship with an enterprise. The attributes on the point can be natural person's name, age, ID number and so on. The attributes on the side can be the amount of investment, investment time and director. Supervisor high position relationship.
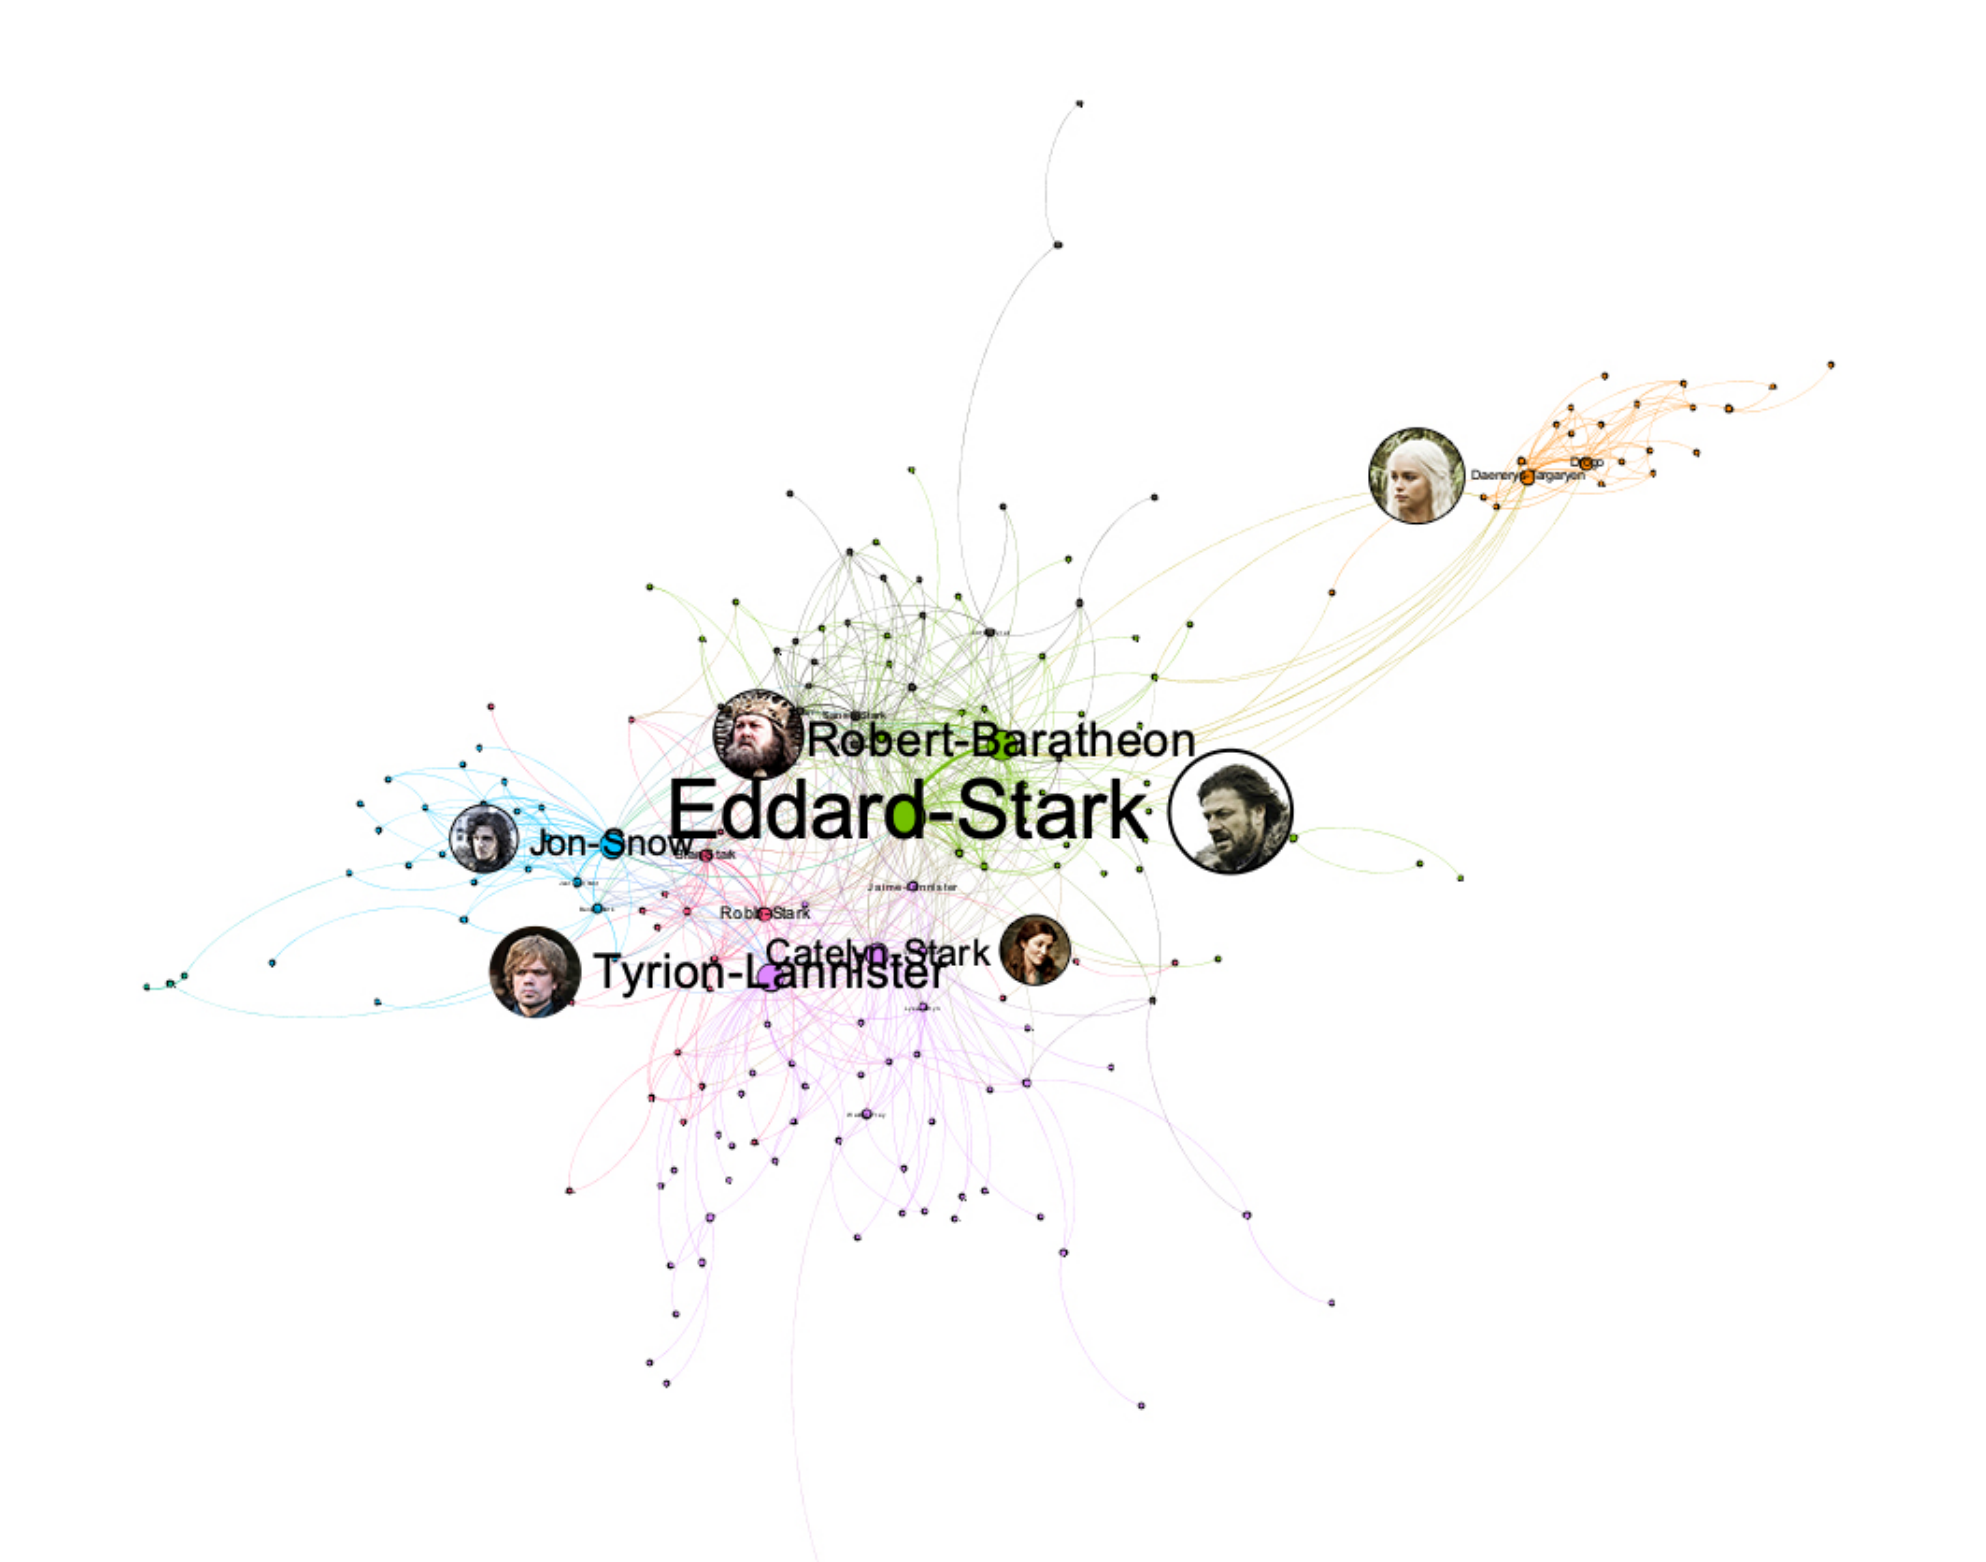
The graph relationship can also be a character relationship network in a TV series like the game of power: the point is the character, and the side is the interactive relationship between the characters; the attribute of the point is the character's name, age, camp, etc., and the attribute (distance) of the side is the number of interactions between the two characters. The more frequent the interaction, the closer the distance.
4 Introduction to the concept of nebula graph
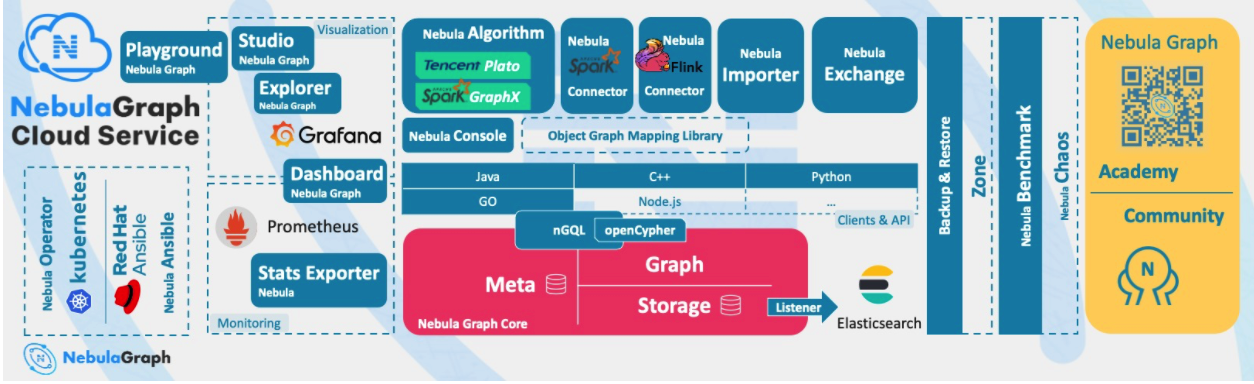
Nebula Graph is an open source, distributed and easy to expand native graph database, which can carry hundreds of billions of points and trillions of edges of large-scale data sets, and provide millisecond queries.
4.1 Nebula data model
- Graph Space: graph Space is a collection of graph data isolated from each other in Nepal graph, which is similar to the concept of database in MySQL.
- Vertex: point is used to save solid objects. Its characteristics are as follows:
- Points are identified by a point identifier (VID or Vertex ID). Vid is unique in the same graph space. Vid is an int64, or fixed_string(N).
- A point must have at least one Tag or multiple tags, but it cannot have no Tag.
- Edge: an edge is used to connect points and represents the relationship or behavior between two points. Its characteristics are as follows:
- There can be multiple edges between two points.
- Edges are directional, and there is no undirected edge.
- Quad < start VID, Edge type, edge sort value (Rank), end VID > is used to uniquely identify an edge. An edge has no EID.
- One edge has only one Edge type.
- An edge has only one rank. It is int64 and the default is 0.
- Tag: the type of point, which defines a set of attributes that describe the point type.
- Edge type: the type of edge, which defines a set of attributes describing the type of edge. The functions of Tag and edge type are similar to the table structure of "point table" and "edge table" in relational database.
- Properties: properties refer to information stored in the form of key value pairs.
4.2 overview of nebula architecture
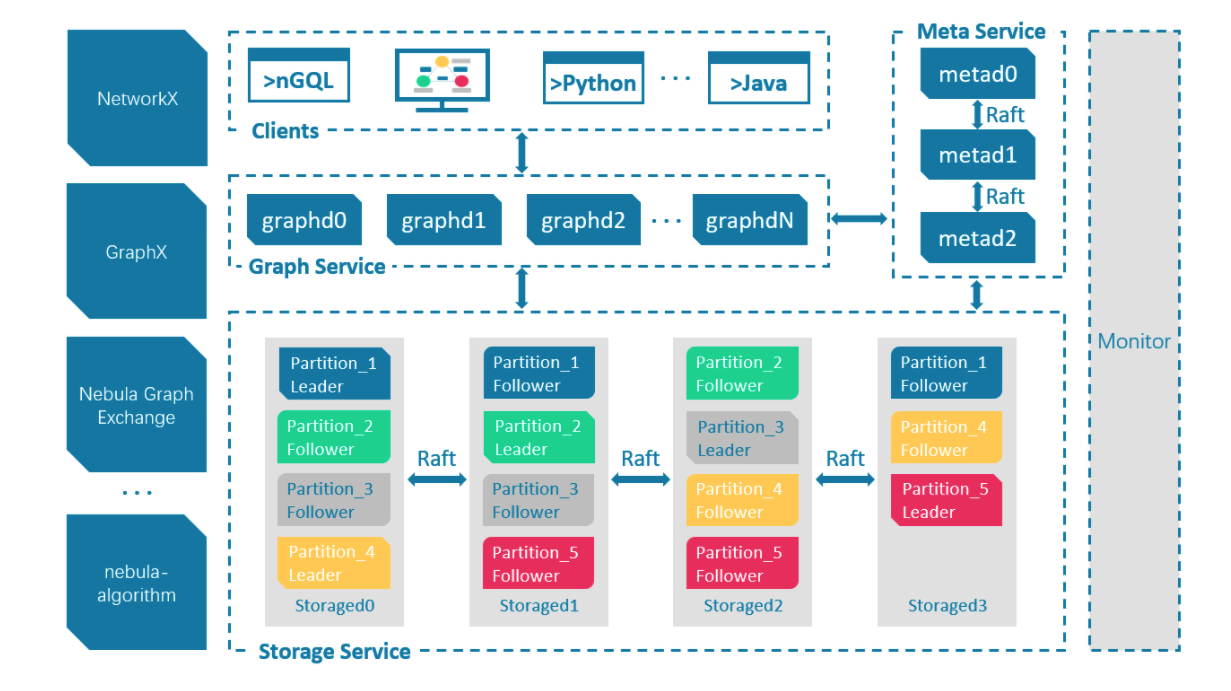
Nebula Graph is composed of three services: Graph service, Meta service and Storage service. It is an architecture that separates Storage and computing.
- Graph service is mainly responsible for processing query requests, including four steps: parsing query statements, verifying statements, generating execution plans, and executing according to the execution plans.
- Meta service is responsible for managing metadata information, including user account and permission information, fragment location information, graph space, Schema information, job information, etc.
- The Storage service is responsible for the Storage of data and ensures the consistency between multiple copies of data through the Raft protocol.
4.3 Nebula quick start
This article will introduce how to install Nebula through RPM on Centos7 operating system.
4.3.1 installing Nebula Graph
Download the RPM installation package.
wget https://oss-cdn.nebula-graph.com.cn/package/2.6.1/nebula-graph-2.6.1.el7.x86_64.rpm
Install the RPM package.
sudo rpm -ivh nebula-graph-2.6.1.el7.x86_64.rpm
4.3.2 start the Nebula Graph service
Nebula Graph uses the script nebula.service to manage services, including start, stop, restart, abort, and view.
The default path of nebula.service is / usr/local/nebula/scripts. If the installation path has been modified, please use the actual path.
The syntax of the nebula.service script is as follows.
sudo /usr/local/nebula/scripts/nebula.service
[-v] [-c <config_file_path>]
<start|stop|restart|kill|status>
<metad|graphd|storaged|all>
The parameters are described below.
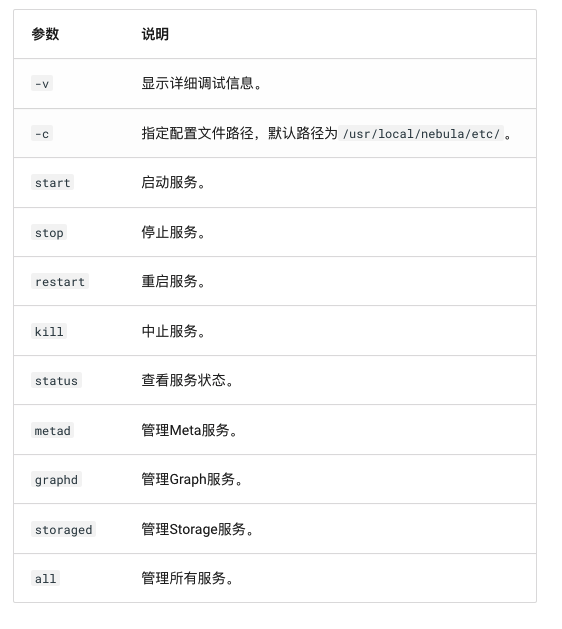
We use the following command to enable all services of Nebula Graph, including Meta service, Graph service and Storage service.
sudo /usr/local/nebula/scripts/nebula.service start all
Check the status of all services, and you can see that the services of Nepal graph have been started normally.
sudo /usr/local/nebula/scripts/nebula.service status all

# Return results
[WARN] The maximum files allowed to open might be too few: 1024
[INFO] nebula-metad(de03025): Running as 62568, Listening on 9559
[INFO] nebula-graphd(de03025): Running as 62658, Listening on 9669
[INFO] nebula-storaged(de03025): Running as 62673, Listening on 9779
4.3.3 connecting the Nebula Graph
Nebula Graph supports many types of clients, including CLI client, GUI client and client developed by popular programming languages. You can view the details Overview of Nebula Graph ecological tools.
Next, we will describe how to use the native CLI client, the Nebula Console, to connect to the Nebula Graph database.
First at Github Download page of Nebula Console Select the corresponding binary file according to the system and CPU architecture of the machine. The CPU architecture of the machine I use is x86#u 64, so I choose to download the binary file of amd64 here.
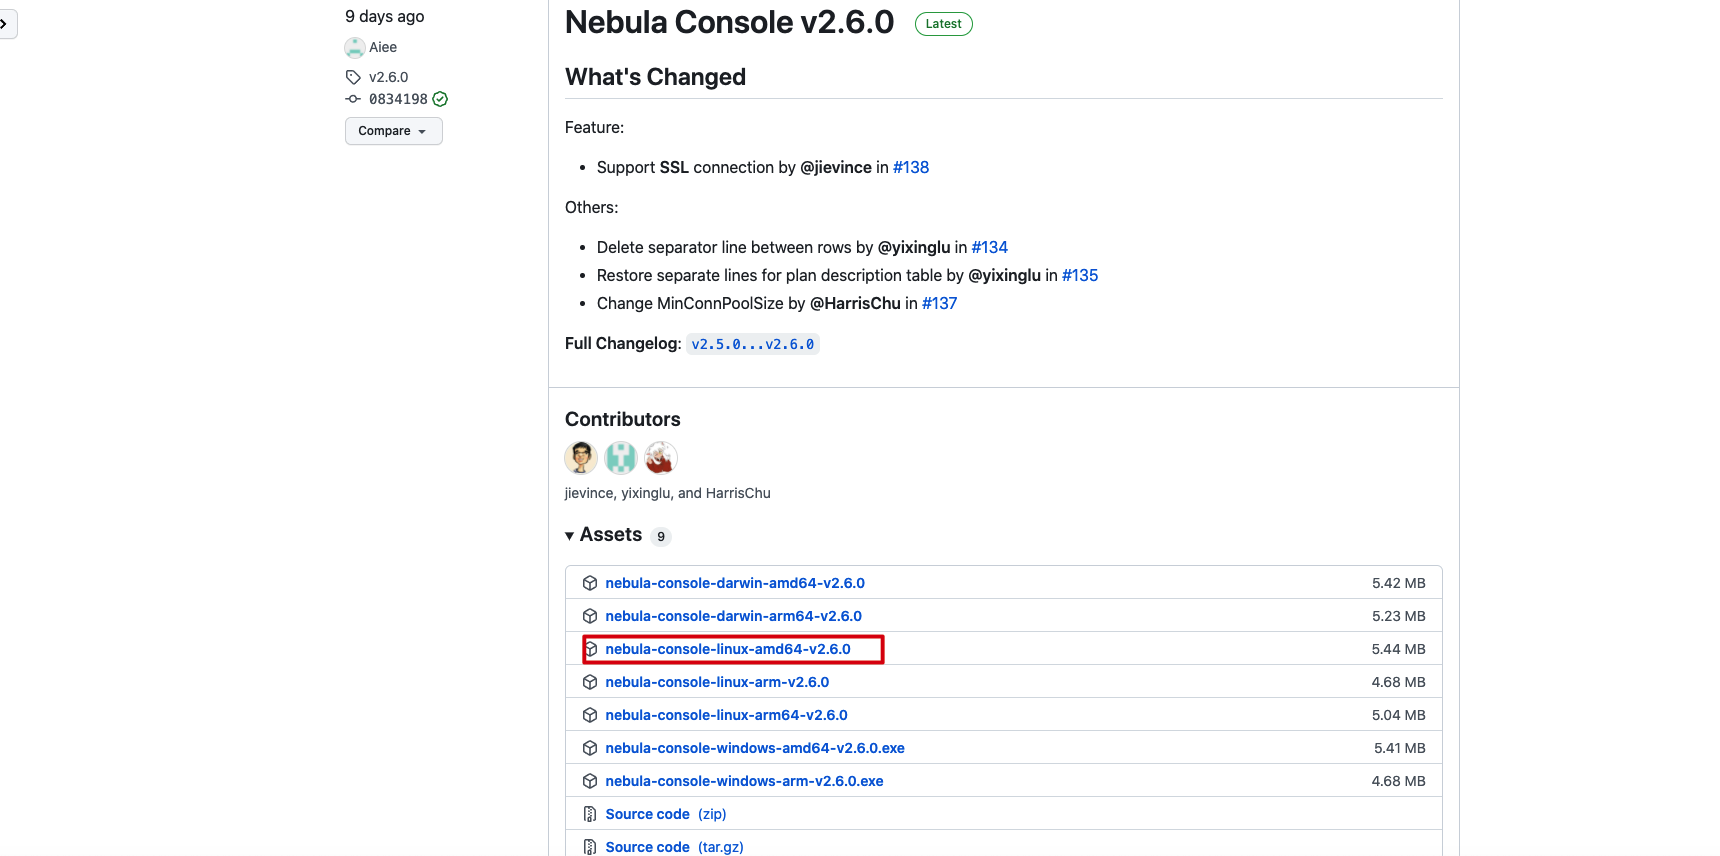
For ease of use, rename the file Nebula console.
wget https://github.com/vesoft-inc/nebula-console/releases/download/v2.6.0/nebula-console-linux-amd64-v2.6.0
mv nebula-console-linux-amd64-v2.6.0 nebula-console
Give executable permissions to the nebula console binary.
chmod +x nebula-console
The syntax of the nebula console is as follows.
./nebula-console -addr <ip> -port <port> -u <username> -p <password> [-t 120] [-e "nGQL_statement" | -f filename.nGQL]
The parameters are described below.
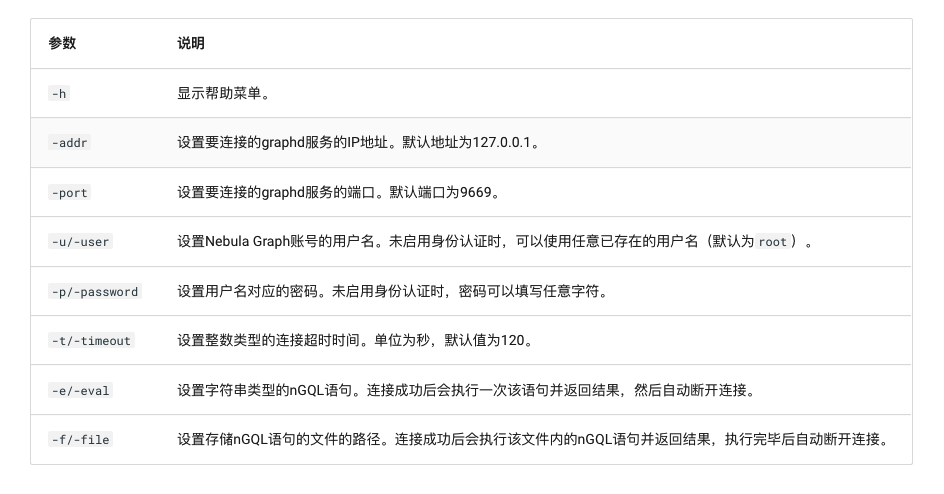
Use the following command to connect to the Nebula Graph.
./nebula-console -addr 192.168.1.12 -port 9669 -u root -p nebula
Seeing the following output indicates that the connection is successful.

4.3.4 using common commands
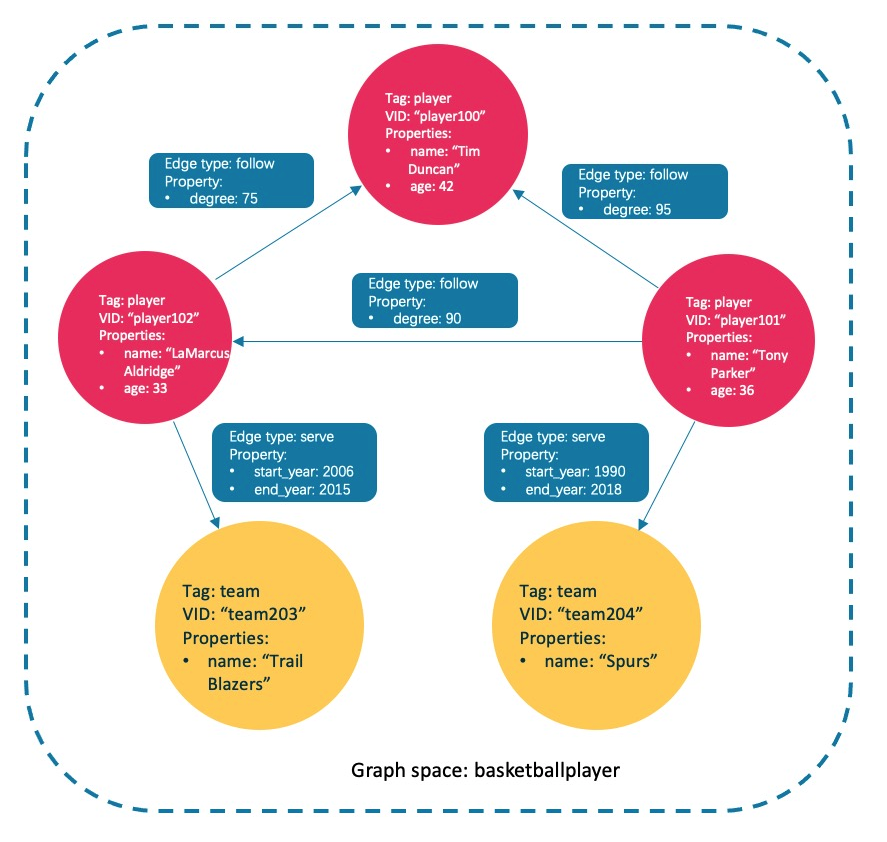
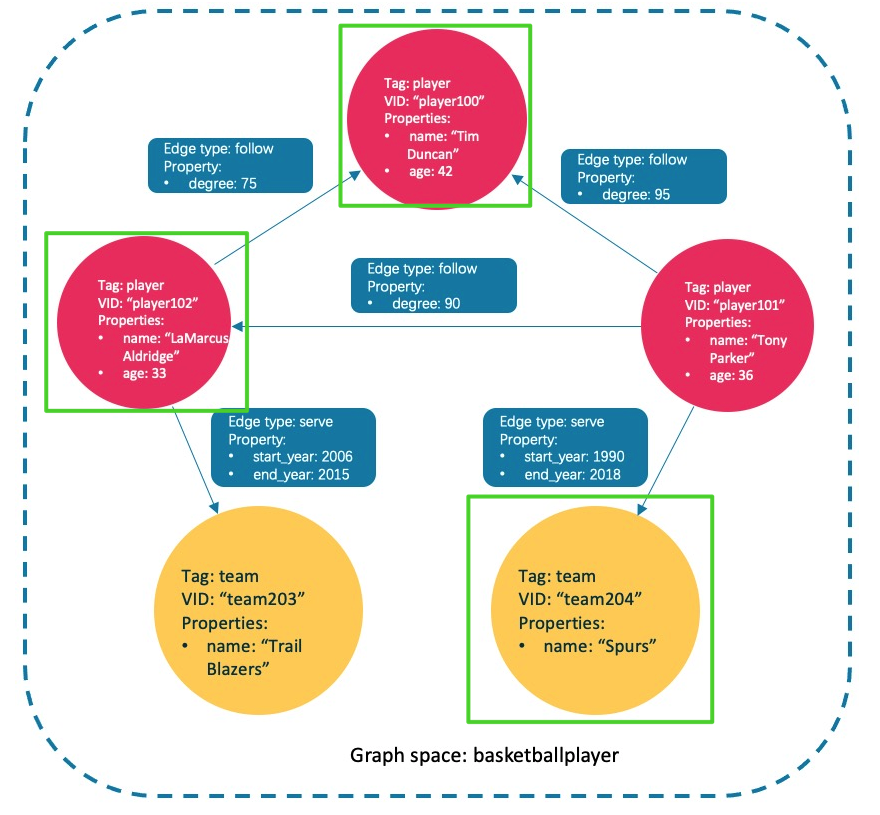
Next, we will use the data set in the figure below to demonstrate the basic operation syntax of Nepal graph, including the statements used for Schema creation and common addition, deletion, modification and query operations. nGQL (Nepal graph query language) It is a declarative graph query language used by Nebula Graph, supports flexible and efficient graph patterns, and nGQL is a SQL like query language designed for developers and operation and maintenance personnel, which is easy to learn.
The following table is an example of the structure of the basketball layer dataset, including two types of points (player, team) and two types of edges (serve, follow).
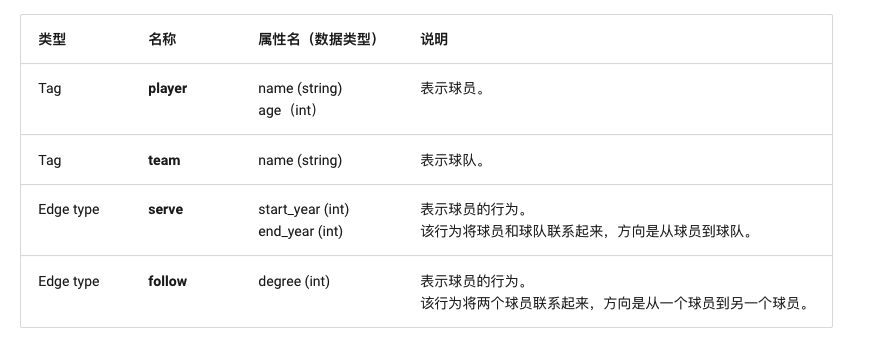
This article will use the data set shown in the figure below to demonstrate the syntax of the basic operation.
4.3.4.1 creating and selecting a graph space
Execute the following statement to create a graph space named basketball player.
(root@nebula) [(none)]> CREATE SPACE basketballplayer(partition_num=15, replica_factor=1, vid_type=fixed_string(30));
Select the graph space basketball layer.
(root@nebula) [(none)]> USE basketballplayer;
View the created graph space.
(root@nebula) [basketballplayer]>  SHOW SPACES;
+--------------------+
| Name               |
+--------------------+
| "basketballplayer" |
+--------------------+
4.3.4.2 create Tag and edge types
The functions of Tag and Edge type are similar to the table structure of "point table" and "edge table" in relational database. Create Tag: player and team, and Edge type: follow and serve.
CREATE TAG player(name string, age int);
CREATE TAG team(name string);
CREATE EDGE follow(degree int);
CREATE EDGE serve(start_year int, end_year int);
4.3.4.3 insertion points and edges
You can use the INSERT statement to INSERT an edge based on an existing Tag insertion point or an existing Edge type.
Insert points representing players and teams.
INSERT VERTEX player(name, age) VALUES "player100":("Tim Duncan", 42);
INSERT VERTEX player(name, age) VALUES "player101":("Tony Parker", 36);
INSERT VERTEX player(name, age) VALUES "player102":("LaMarcus Aldridge", 33);
INSERT VERTEX team(name) VALUES "team203":("Trail Blazers"), "team204":("Spurs");
Insert an edge representing the relationship between the player and the team.
INSERT EDGE follow(degree) VALUES "player101" -> "player100":(95);
INSERT EDGE follow(degree) VALUES "player101" -> "player102":(90);
INSERT EDGE follow(degree) VALUES "player102" -> "player100":(75);
INSERT EDGE serve(start_year, end_year) VALUES "player101" -> "team204":(1999, 2018),"player102" -> "team203":(2006, 2015);
4.3.4.4 index creation
The execution of MATCH and LOOKUP statements depends on indexes, but indexes can lead to a significant reduction in write performance (90% or more). Please do not use indexes in the production environment unless you are clear about the business impact of using indexes.
The data of "written but not indexed" must be re indexed, otherwise these data cannot be returned in MATCH and LOOKUP statements. See Rebuild index.
The native index can query data based on the specified attributes. The creation of a native index can be divided into the following three cases:
- Create a Tag/Edge type index. Tag Index and Edge type index are used for queries related to tag and Edge type. For example, use LOOKUP to find all points with Tag player.
- Create a single attribute index. Attribute index applies to attribute based queries, such as finding all points with age == 19 based on attribute age.
- Create a composite attribute index (follow the "leftmost matching principle").
You can view the details about creating an index CREATE INDEX
4.3.4.4.1 create index for TAG
To create an index for TAG team, you need to rebuild the index to ensure that it takes effect on existing data. Note that we wait for 20s before rebuilding the index, because the newly created index will not take effect immediately, because the index creation is asynchronous, and Nepal graph needs to complete the index creation in the next heartbeat cycle.
# Create index for Tag team_index_1.
CREATE TAG INDEX team_index_1 ON team();
# Rebuild the index to ensure that it takes effect on existing data.
:sleep 20
REBUILD TAG INDEX team_index_1;
Create a single attribute index for the name attribute of TAG player and a composite attribute index for the name and age attributes.
# Create a single attribute index for the name attribute of Tag player_index_1.
# The index length is 10. That is, only the first 10 characters of the attribute name are used to create the index.
CREATE TAG INDEX player_index_1 ON player(name(20));
# Rebuild the index to ensure that it takes effect on existing data.
REBUILD TAG INDEX player_index_1;

# Create a composite attribute index for the name and age attributes of Tag player_index_2.
CREATE TAG INDEX player_index_2 ON player(name,age);
# Rebuild the index to ensure that it takes effect on existing data.
:sleep 20
REBUILD TAG INDEX player_index_2;
The newly created index will not take effect immediately. Creating a new index and trying to use it immediately (such as LOOKUP or REBUILD INDEX) usually fail (an error can't find xxx in the space). Because the creation step is implemented asynchronously, Nebula Graph cannot complete the index creation until the next heartbeat cycle. You can use one of the following methods:
- 1. Find a new index in the result of SHOW TAG/EDGE INDEXES statement.
- 2. Wait for two heartbeat cycles, such as 20 seconds. If you need to modify the heartbeat interval, modify the parameter heartbeat for all profiles_ interval_ secs.
4.3.4.4.2 create index for EDGE type
The way to create an index for EDGE type is the same as the point, except that the keyword can be changed to EDGE.
# Create an index for the degree attribute of EDGE follow and rebuild the index.
CREATE EDGE INDEX follow_index_1 on follow(degree);
:sleep 20
REBUILD EDGE INDEX follow_index_1;

# Create an index for EDGE serve and rebuild the index.
CREATE EDGE INDEX serve_index_1 on serve();
:sleep 20
REBUILD EDGE INDEX serve_index_1;


# Create a composite attribute index for EDGE serve and rebuild the index.
CREATE EDGE INDEX serve_index_2 on serve(start_year,end_year);
:sleep 20
REBUILD EDGE INDEX serve_index_2;
4.3.4.5 view index
View the indexes created for TAG player and team.
(root@nebula) [basketballplayer]> SHOW TAG INDEXES;
+------------------+----------+-----------------+
| Index Name       | By Tag   | Columns         |
+------------------+----------+-----------------+
| "player_index_1" | "player" | ["name"]        | # Single attribute index
| "player_index_2" | "player" | ["name", "age"] | # Composite attribute index
| "team_index_1"   | "team"   | []              | # TAG Index
+------------------+----------+-----------------+
View the indexes created for EDGE follow and serve.
(root@nebula) [basketballplayer]> SHOW EDGE INDEXES;
+------------------+----------+----------------------------+
| Index Name       | By Edge  | Columns                    |
+------------------+----------+----------------------------+
| "follow_index_1" | "follow" | ["degree"]                 | # Single attribute index
| "serve_index_1"  | "serve"  | []                         | # EDGE index
| "serve_index_2"  | "serve"  | ["start_year", "end_year"] | # Composite attribute index
+------------------+----------+----------------------------+
4.3.4.6 delete index
Delete the index of TAG player_index_2.
(root@nebula) [basketballplayer]> DROP TAG INDEX player_index_2;
Delete index of EDGE serve_index_2.
(root@nebula) [basketballplayer]> DROP EDGE INDEX serve_index_2;
4.3.4.7 query data
Query data mainly includes the following four statements:
- The GO statement can traverse the database according to the specified conditions. The GO statement starts at one or more points and traverses along one or more edges. You can use the returned information specified in the YIELD clause.
- The FETCH statement can obtain the properties of a point or edge.
- The LOOKUP statement is index based and is used together with the WHERE clause to find data that meets specific conditions.
- MATCH statement is the most commonly used to query graph data. Compared with other query statements such as GO or LOOKUP, the syntax of MATCH is more flexible. The MATCH statement can describe various graph patterns. It relies on the index to MATCH the data model in the Nepal graph.
4.3.4.7.1 GO statement example
Start with the player with VID of player 101 in TAG player and find the connected player along the edge follow.
(root@nebula) [basketballplayer]> GO FROM "player101" OVER follow;
+-------------+
| follow._dst |
+-------------+
| "player100" |
| "player102" |
+-------------+
4.3.4.7.2 example of fetch statement
Query the attribute value of the player with VID of player 100 in TAG player.
(root@nebula) [basketballplayer]> FETCH PROP ON player "player100";
+----------------------------------------------------+
| vertices_                                          |
+----------------------------------------------------+
| ("player100" :player{age: 42, name: "Tim Duncan"}) |
+----------------------------------------------------+
Obtain all attribute values of the edge serve connecting player 102 and team 203.
(root@nebula) [basketballplayer]> FETCH PROP ON serve "player102" -> "team203";
+-----------------------------------------------------------------------+
| edges_                                                                |
+-----------------------------------------------------------------------+
| [:serve "player102"->"team203" @0 {end_year: 2015, start_year: 2006}] |
+-----------------------------------------------------------------------+
4.3.4.7.3 example of lookup statement
List all vids of TAG player.
(root@nebula) [basketballplayer]> LOOKUP ON player;
+-------------+
| VertexID    |
+-------------+
| "player100" |
| "player102" |
| "player103" |
+-------------+
Lists the start, destination, and rank of all edges of EDGE serve.
(root@nebula) [basketballplayer]> LOOKUP ON serve;
+-------------+-----------+---------+
| SrcVID      | DstVID    | Ranking |
+-------------+-----------+---------+
| "player101" | "team204" | 0       |
| "player102" | "team203" | 0       |
+-------------+-----------+---------+
LOOKUP can also be filtered based on where conditions, such as querying start in EDGE serve_ Year = = attribute value for 2006.
(root@nebula) [basketballplayer]> LOOKUP ON serve where serve.start_year == 2006;
+-------------+-----------+---------+
| SrcVID      | DstVID    | Ranking |
+-------------+-----------+---------+
| "player102" | "team203" | 0       |
+-------------+-----------+---------+
4.3.4.7.4 example of match statement
Query the attribute values of TAG player and team through the MATCH statement.
# Query the attribute value of the point with Tag player
(root@nebula) [basketballplayer]> MATCH (x:player) return x;
+-----------------------------------------------------------+
| x                                                         |
+-----------------------------------------------------------+
| ("player100" :player{age: 42, name: "Tim Duncan"})        |
| ("player101" :player{age: 36, name: "Tony Parker"})       |
| ("player102" :player{age: 33, name: "LaMarcus Aldridge"}) |
+-----------------------------------------------------------+

# Query the attribute value of the point with Tag team
(root@nebula) [basketballplayer]> MATCH (x:team) return x;
+------------------------------------------+
| x                                        |
+------------------------------------------+
| ("team203" :team{name: "Trail Blazers"}) |
| ("team204" :team{name: "Spurs"})         |
+------------------------------------------+
You can also query according to the attribute where the index is located. For example, we can query the attribute value named Tony parker in the name field of TAG player.
(root@nebula) [basketballplayer]> MATCH (v:player{name:"Tony Parker"}) RETURN v;
+-----------------------------------------------------+
| v                                                   |
+-----------------------------------------------------+
| ("player101" :player{age: 36, name: "Tony Parker"}) |
+-----------------------------------------------------+
Since the name attribute on the TAG team is not indexed, it cannot be queried based on the name attribute.
(root@nebula) [basketballplayer]> MATCH (v:team{name:'Spurs'}) RETURN v;
[ERROR (-1005)]: IndexNotFound: No valid index found
Use MATCH to query the attribute value of EDGE serve.
(root@nebula) [basketballplayer]> MATCH ()-[e:serve]-()  RETURN e;
+-----------------------------------------------------------------------+
| e                                                                     |
+-----------------------------------------------------------------------+
| [:serve "player101"->"team204" @0 {end_year: 2018, start_year: 1999}] |
| [:serve "player102"->"team203" @0 {end_year: 2015, start_year: 2006}] |
+-----------------------------------------------------------------------+
4.3.4.7.5 actual query examples
Use the following statement to query the players and teams related to Tony Parker.
(root@nebula) [basketballplayer]> MATCH p=(v:player{name:"Tony Parker"})-->(v2)   RETURN p
+-------------------------------------------------------------------------------------------------------------------------------------------+
| p                                                                                                                                         |
+-------------------------------------------------------------------------------------------------------------------------------------------+
| <("player101" :player{age: 36, name: "Tony Parker"})-[:serve@0 {end_year: 2018, start_year: 1999}]->("team204" :team{name: "Spurs"})>     |
| <("player101" :player{age: 36, name: "Tony Parker"})-[:follow@0 {degree: 95}]->("player100" :player{age: 42, name: "Tim Duncan"})>        |
| <("player101" :player{age: 36, name: "Tony Parker"})-[:follow@0 {degree: 90}]->("player102" :player{age: 33, name: "LaMarcus Aldridge"})> |
+-------------------------------------------------------------------------------------------------------------------------------------------+
Players and teams associated with Tony Parker are identified with green boxes in the figure below.
4.3.4.8 modify points and edges
Users can modify existing data using UPDATE statements or UPDATE statements. UPDATE is a combination of UPDATE and INSERT. When using UPSERT to UPDATE a point or edge, if it does not exist, the database will automatically INSERT a new point or edge.
First, query the current attribute value of TAG player.
(root@nebula) [basketballplayer]> match (n:player) return n;
+-----------------------------------------------------------+
| n                                                         |
+-----------------------------------------------------------+
| ("player100" :player{age: 42, name: "Tim"})               |
| ("player101" :player{age: 36, name: "Tony Parker"})       |
| ("player102" :player{age: 33, name: "LaMarcus Aldridge"}) |
+-----------------------------------------------------------+
Use UPDATE to modify the name attribute of the player whose VID is player 100, and then use the FETCH statement to check the results.
(root@nebula) [basketballplayer]> UPDATE VERTEX "player100" SET player.name = "Tim";

(root@nebula) [basketballplayer]> FETCH PROP ON player "player100";
+---------------------------------------------+
| vertices_                                   |
+---------------------------------------------+
| ("player100" :player{age: 42, name: "Tim"}) |
+---------------------------------------------+
Execute the UPSERT statement to operate the existing player 101 and the nonexistent player 103 respectively. Through the MATCH query, you can see that the value of the original player 101 has been modified in the UPSERT and the newly inserted player 103.
(root@nebula) [basketballplayer]> UPSERT VERTEX "player101" SET player.name = "CRIS", player.age = 18;
(root@nebula) [basketballplayer]> UPSERT VERTEX "player103" SET player.name = "THOMAS", player.age = 20;


(root@nebula) [basketballplayer]> match (n:player) return n;
+-----------------------------------------------------------+
| n                                                         |
+-----------------------------------------------------------+
| ("player101" :player{age: 18, name: "CRIS"})              |
| ("player100" :player{age: 42, name: "Tim"})               |
| ("player102" :player{age: 33, name: "LaMarcus Aldridge"}) |
| ("player103" :player{age: 20, name: "THOMAS"})            |
+-----------------------------------------------------------+
4.3.4.9 delete points and edges
Delete point.
nebula> DELETE VERTEX "player101";
Delete edges.
nebula> DELETE EDGE follow "player101" -> "team204";
4.3.4.10 delete TAG and EDGE
Before deleting TAG/EDGE, make sure that TAG/EDGE does not contain any index, otherwise a conflict error [ERROR (-8)]: Conflict will be reported when dropping tag!
Delete TAG.
# Delete TAG's index
DROP TAG INDEX player_index_1;
DROP TAG INDEX team_index_1;

# Delete TAG
DROP TAG player;
DROP TAG team;
Delete EDGE.
# Delete index for EDGE
DROP EDGE INDEX follow_index_1
DROP EDGE INDEX serve_index_1

# Delete EDGE
DROP EDGE follow;
DROP EDGE serve;
5. Deploy the Nebula Graph cluster
In the production environment, in order to ensure the high availability and high performance of services, Nebula Graph is usually deployed in a cluster.
5.1 machine planning
Graph service, Meta service and Storage service are deployed on all three servers. These three services are the core components of Nebula Graph. Deploy the Nebula Dashboard and Nebula Graph Studio services on the ydt-net-nebula1 server for visual operation and monitoring.
| host name | IP address | role |
|---|---|---|
| ydt-net-nebula1 | 11.8.38.149 | Nebula Graph,Nebula Dashboard,Nebula Graph Studio |
| ydt-net-nebula2 | 11.8.38.150 | Nebula Graph |
| ydt-net-nebula3 | 11.8.38.151 | Nebula Graph |
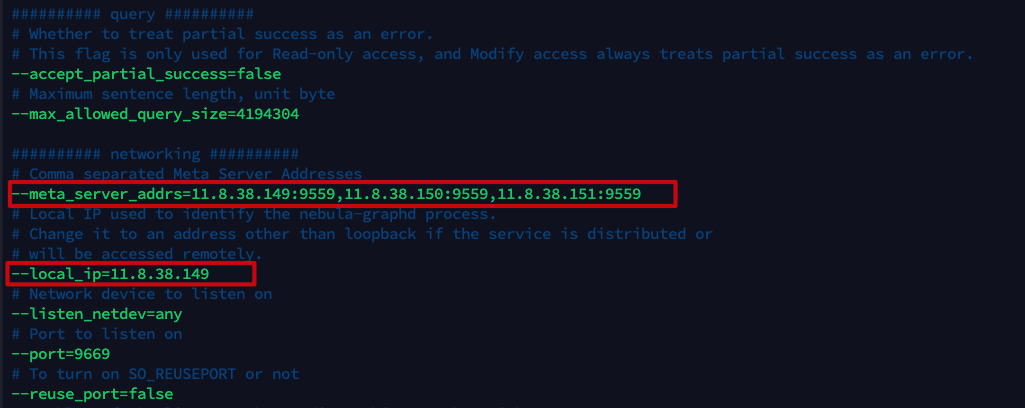
5.2 modifying configuration files
Modify the configuration files of nebula-graphid.conf, nebula-stored.conf and nebula-metad.conf of the three machines respectively. In these three configuration files, only -- meta needs to be modified_ server_ Addrs and__ local_ip two parameters.
- --Meta_ server_ The addrs parameter indicates the address and port of the Meta service. The value of this parameter is the same for all machines.
- --local_ip refers to the IP listening service of the machine. Each machine needs to change its own IP address.
5.3 start up service
On 3 servers, use the following command to enable all services of Nebula Graph, including Meta service, Graph service and Storage service.
sudo /usr/local/nebula/scripts/nebula.service start all
5.4 verifying the status of the Nebula cluster
Connect any machine that has started the Graph service through the Nebula Console, and execute the command SHOW HOSTS to check the cluster status.
# Connect Graph service
./nebula-console --addr 11.8.38.149  --port 9669 -u root -p nebula

# View cluster status
(root@nebula) [(none)]> SHOW HOSTS;
+---------------+------+----------+--------------+--------------------------------------------+--------------------------------------------+
| Host          | Port | Status   | Leader count | Leader distribution                        | Partition distribution                     |
+---------------+------+----------+--------------+--------------------------------------------+--------------------------------------------+
| "11.8.38.149" | 9779 | "ONLINE" | 0           | "No valid partition"   | "No valid partition"   |
| "11.8.38.150" | 9779 | "ONLINE" | 0           | "No valid partition"   | "No valid partition"   |
| "11.8.38.151" | 9779 | "ONLINE" | 0           | "No valid partition"   | "No valid partition"   |
| "Total"       |      |          | 0           | "No valid partition"   | "No valid partition"   |
+---------------+------+----------+--------------+--------------------------------------------+--------------------------------------------+
6. Install Nebula Dashboard
The Nebula Dashboard is a visual tool for monitoring the status of machines and services in the Nebula Graph cluster.
- Monitor the status of all machines in the cluster, including CPU, memory, load, disk and traffic.
- Monitor the information of all services in the cluster, including service IP address, version and monitoring indicators (such as query quantity, query delay, heartbeat delay, etc.).
- Monitor the information of the cluster itself, including service information, partition information, configuration and long-term tasks of the cluster.
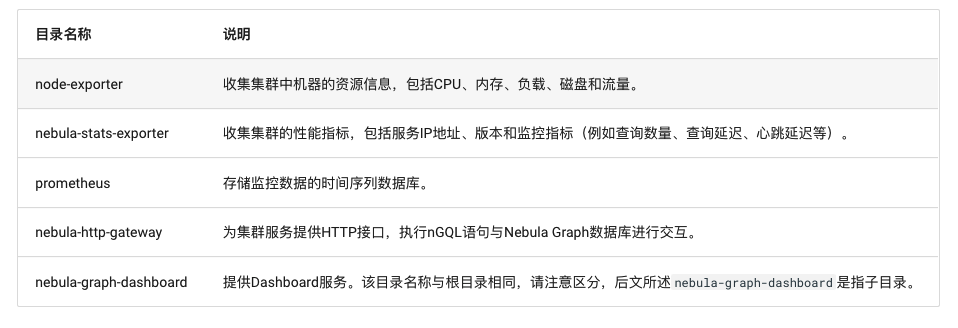
The Nebula Dashboard consists of the following five services, which are This address After downloading and decompressing the compressed package, you can see five subdirectories in the directory Nepal graph dashboard, corresponding to the directories of five services respectively. Except that the node exporter service needs to be deployed on all three servers, other services only need to be deployed on ydt-net-nebula1.
6.1 deploy node exporter service
Execute the following command in the directory node exporter to start the service:
nohup ./node-exporter --web.listen-address=":9100" &
6.2 deploying the nebula stats exporter service
Modify the file config.yaml in the directory Nebula stats exporter to configure the HTTP ports of all services.
version: v0.0.2
nebulaItems:
  - instanceName: metad0
    endpointIP: 11.8.38.149
    endpointPort: 9559
    componentType: metad
  - instanceName: metad1
    endpointIP: 11.8.38.150
    endpointPort: 9559
    componentType: metad
  - instanceName: metad2
    endpointIP: 11.8.38.151
    endpointPort: 9559
    componentType: metad
  - instanceName: graphd0
    endpointIP: 11.8.38.149
    endpointPort: 9669
    componentType: graphd
  - instanceName: graphd1
    endpointIP: 11.8.38.150
    endpointPort: 9669
    componentType: graphd
  - instanceName: graphd2
    endpointIP: 11.8.38.151
    endpointPort: 9669
    componentType: graphd
  - instanceName: storaged0
    endpointIP: 11.8.38.149
    endpointPort: 9779
    componentType: storaged
  - instanceName: storaged1
    endpointIP: 11.8.38.150
    endpointPort: 9779
    componentType: storaged
  - instanceName: storaged2
    endpointIP: 11.8.38.151
    endpointPort: 9779
    componentType: storaged
Execute the following command to start the service:
nohup ./nebula-stats-exporter --listen-address=":9200" --bare-metal --bare-metal-config=./config.yaml &
6.3 deploying prometheus services
Modify the file prometheus.yaml in the directory Prometheus, and configure the IP address and port of node exporter service and Nebula stats exporter service.
global:
  scrape_interval:     5s # The interval between collection of monitoring data. The default is 1 minute.
  evaluation_interval: 5s # Alarm rule scan interval. The default is 1 minute.
scrape_configs:
  - job_name: 'node-exporter'
    static_configs:
      - targets: [
          '11.8.38.149:9100', # The IP address and port of the node exporter service.
          '11.8.38.150:9100',
          '11.8.38.151:9100'
        ]
  - job_name: 'nebula-stats-exporter'
    static_configs:
      - targets: [
         '11.8.38.149:9200',  # The IP address and port of the nebula stats exporter service.
        ]
Execute the following command to start the service:
nohup ./prometheus --config.file=./prometheus.yaml &
6.4 deploy the nebula HTTP gateway service
Execute the following command in the directory Nebula HTTP gateway to start the service:
nohup ./nebula-httpd &
6.5 deploy the Nepal graph dashboard service
Modify the file custom.json in the directory Nebula Graph dashboard / static / to configure the IP address and port of the Graph service.
{
    "connection": {
        "ip": "11.8.38.149",
        "port": 9669
    },
    "alias": {
        "ip:port": "instance1"
    },
    "chartBaseLine": {

    }
}
Start the service by executing the following command in the directory Nepal graph dashboard:
npm run start
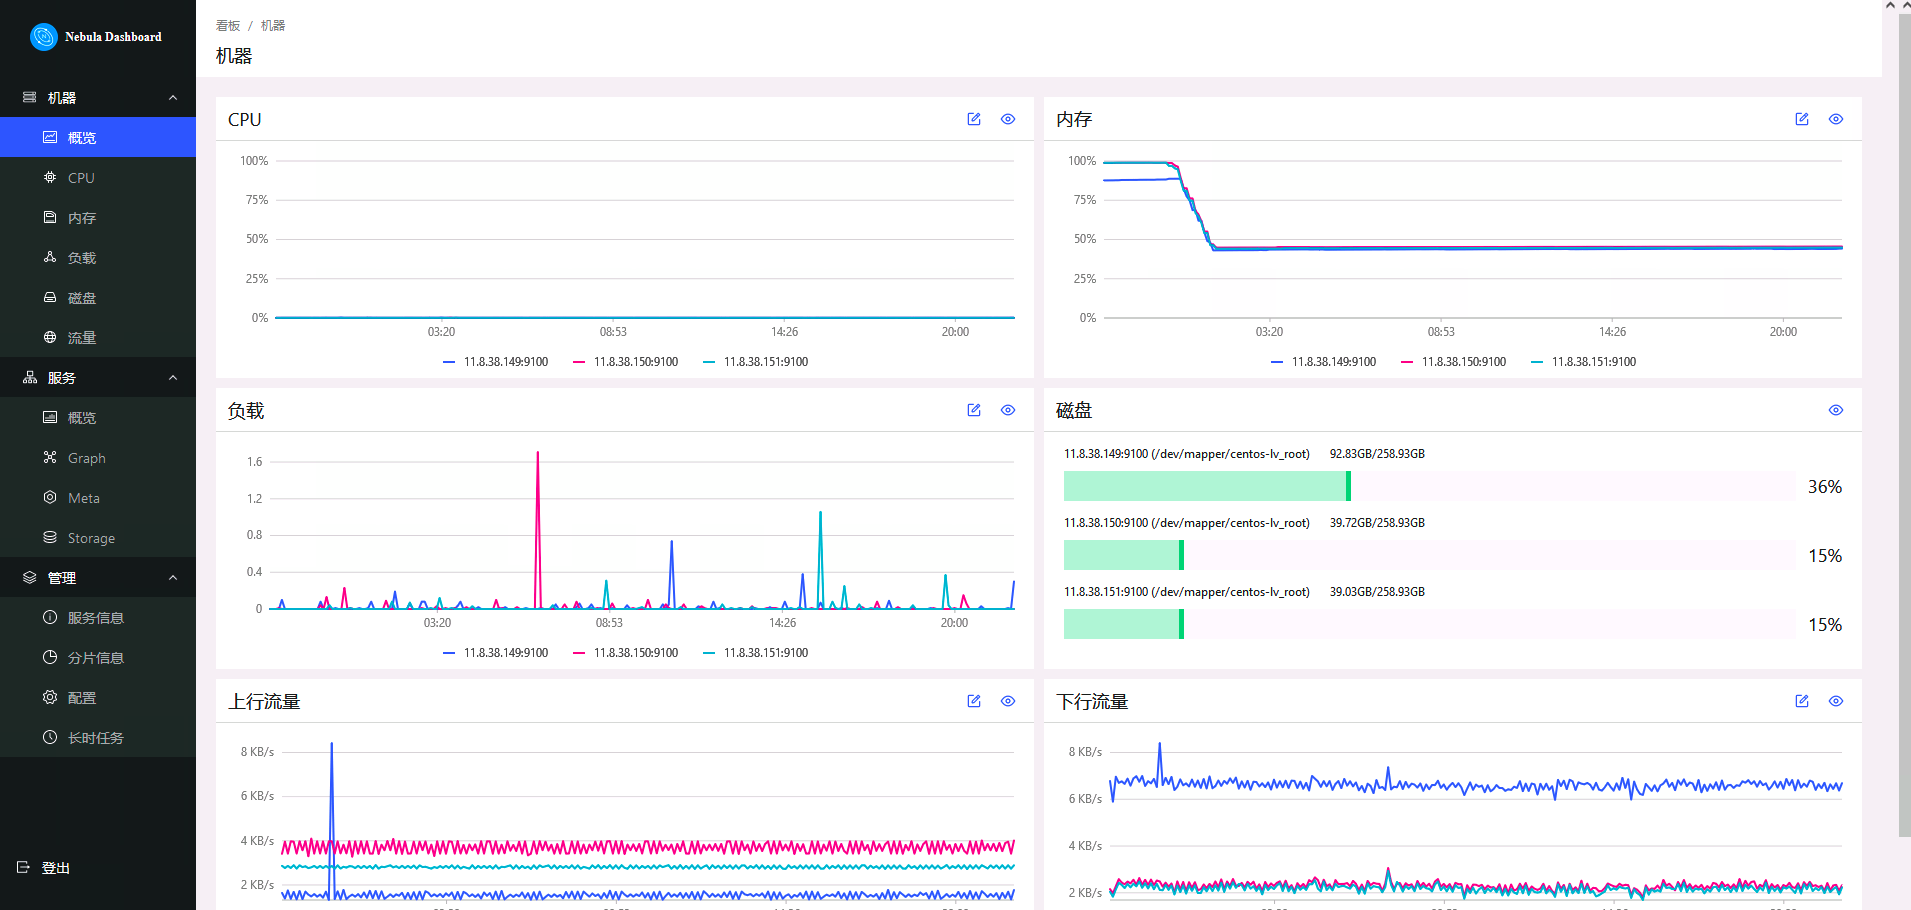
6.6 accessing the Nebula Dashboard interface
Enter in the browser http://11.8.38.149:7003 Access the Graph Dashboard interface. User name: root, password: nebula. On the Nebula Dashboard interface, we can see CPU, memory, disk utilization, uplink and downlink traffic and other information.
7 installing Nebula Graph Studio
Nebula Graph Studio is an open source visualization tool of graph database that can be accessed through the Web. It is used with Nebula Graph kernel to provide one-stop services such as composition, data import, writing nGQL query, graph exploration and so on.
7.1 premise preparation
Before installing Nebula Graph Studio, you need to ensure that Node.js with version v10.16.0 + or above is installed.
# Download and unzip the Node compressed package
wget https://nodejs.org/dist/v16.13.0/node-v16.13.0-linux-x64.tar.xz
tar -xzvf node-v16.13.0-linux-x64.tar.xz

# `The node 'and' npm 'commands need to be installed in the ` / usr/bin /' directory to prevent the node command from being found during RPM installation. You can use the following commands to establish a soft connection.
ln -s /root/node-v16.13.0-linux-x64/bin/node  /usr/bin/node
ln -s  /root/node-v16.13.0-linux-x64/bin/npm /usr/bin/npm
7.2 deploying Nebula Graph Studio
Download the RPM installation package.
wget https://oss-cdn.nebula-graph.com.cn/nebula-graph-studio/3.1.0/nebula-graph-studio-3.1.0.x86_64.rpm
Use the sudo rpm -ivh command to install the RPM package.
sudo rpm -ivh nebula-graph-studio-3.1.0.x86_64.rpm
When the screen returns the following information, PRM Studio has been successfully started.
egg started on http://0.0.0.0:7001 nohup: append output to "nohup.out"
7.3 accessing Nebula Graph Studio
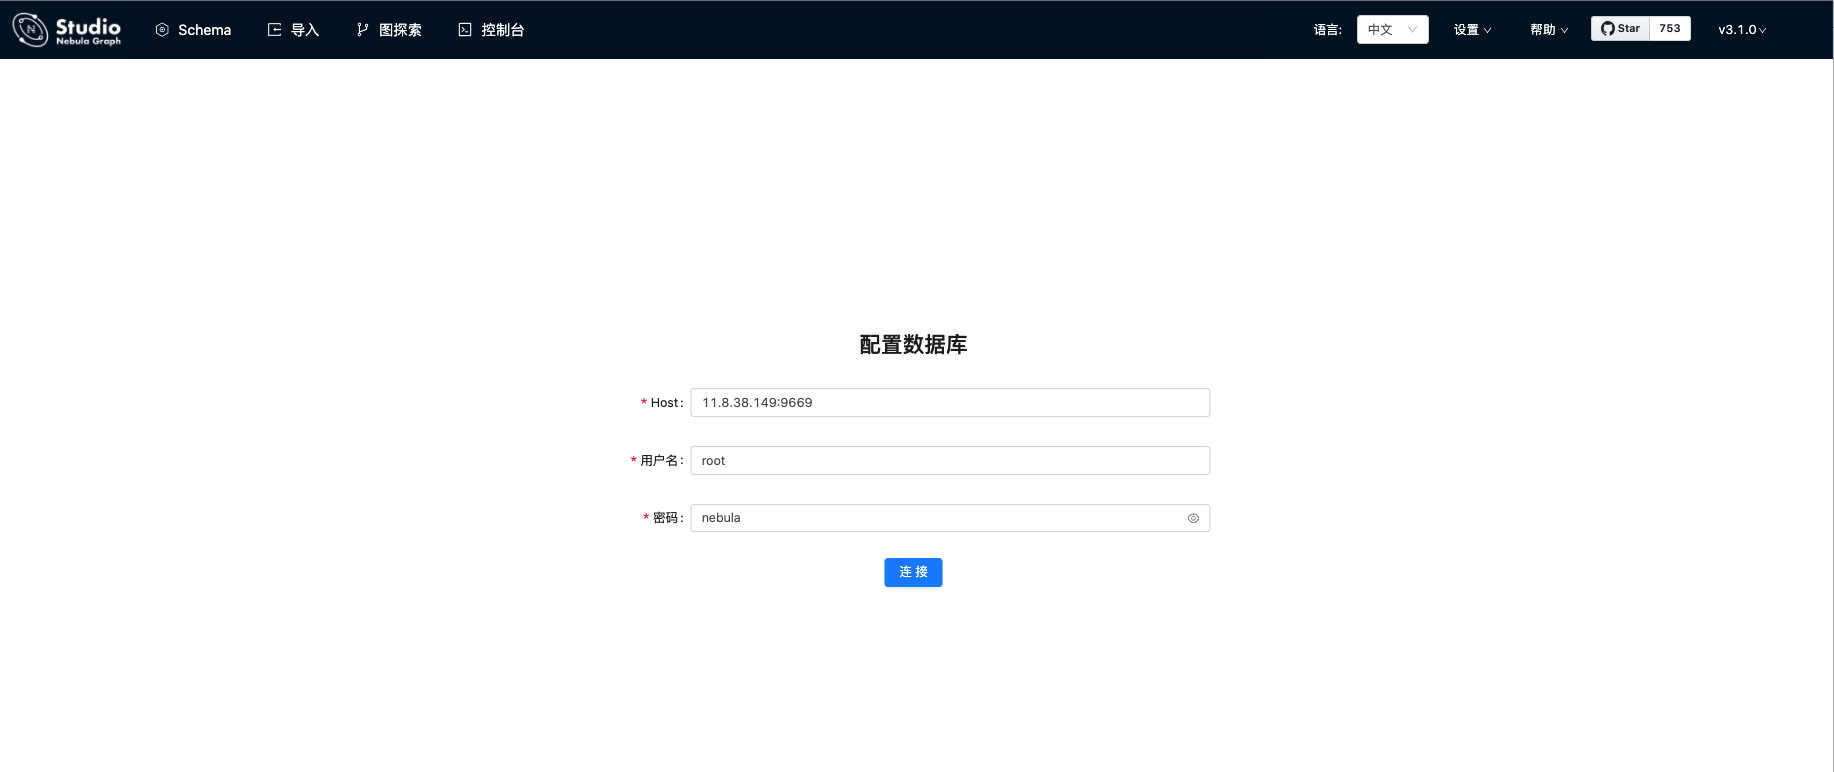
Enter in the browser address bar http://11.8.38.149:7001 Access the Nebula Graph Studio interface, fill in the connection information of the Nebula Graph database, and click the connect button.
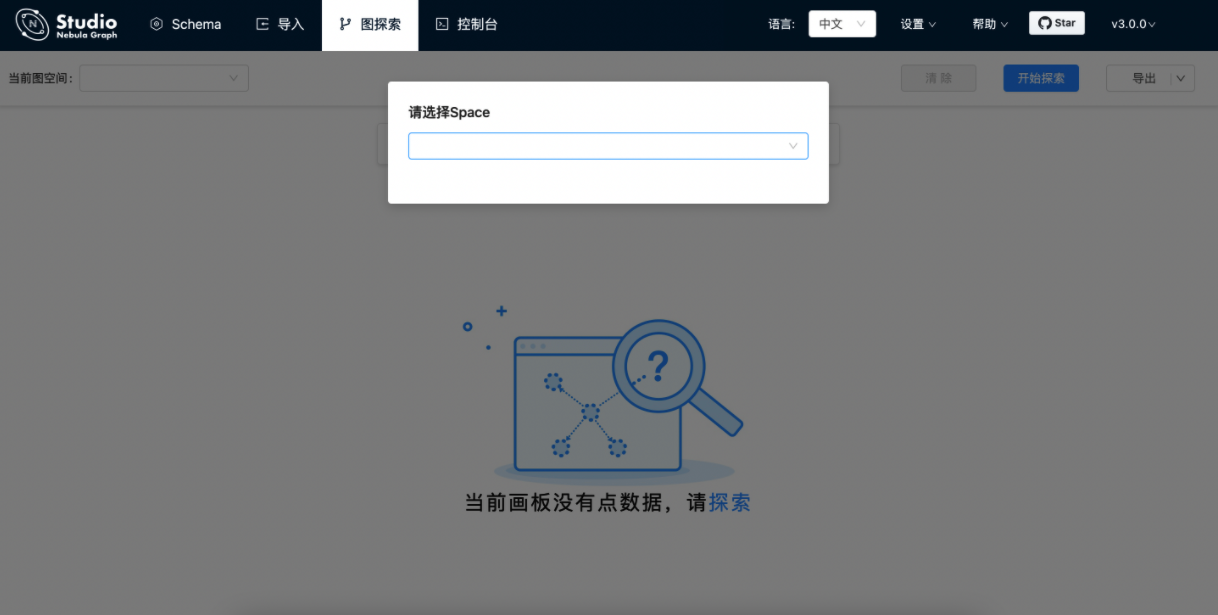
If you can see the interface shown in the figure below, it indicates that you have successfully connected to the Nebula Graph database.
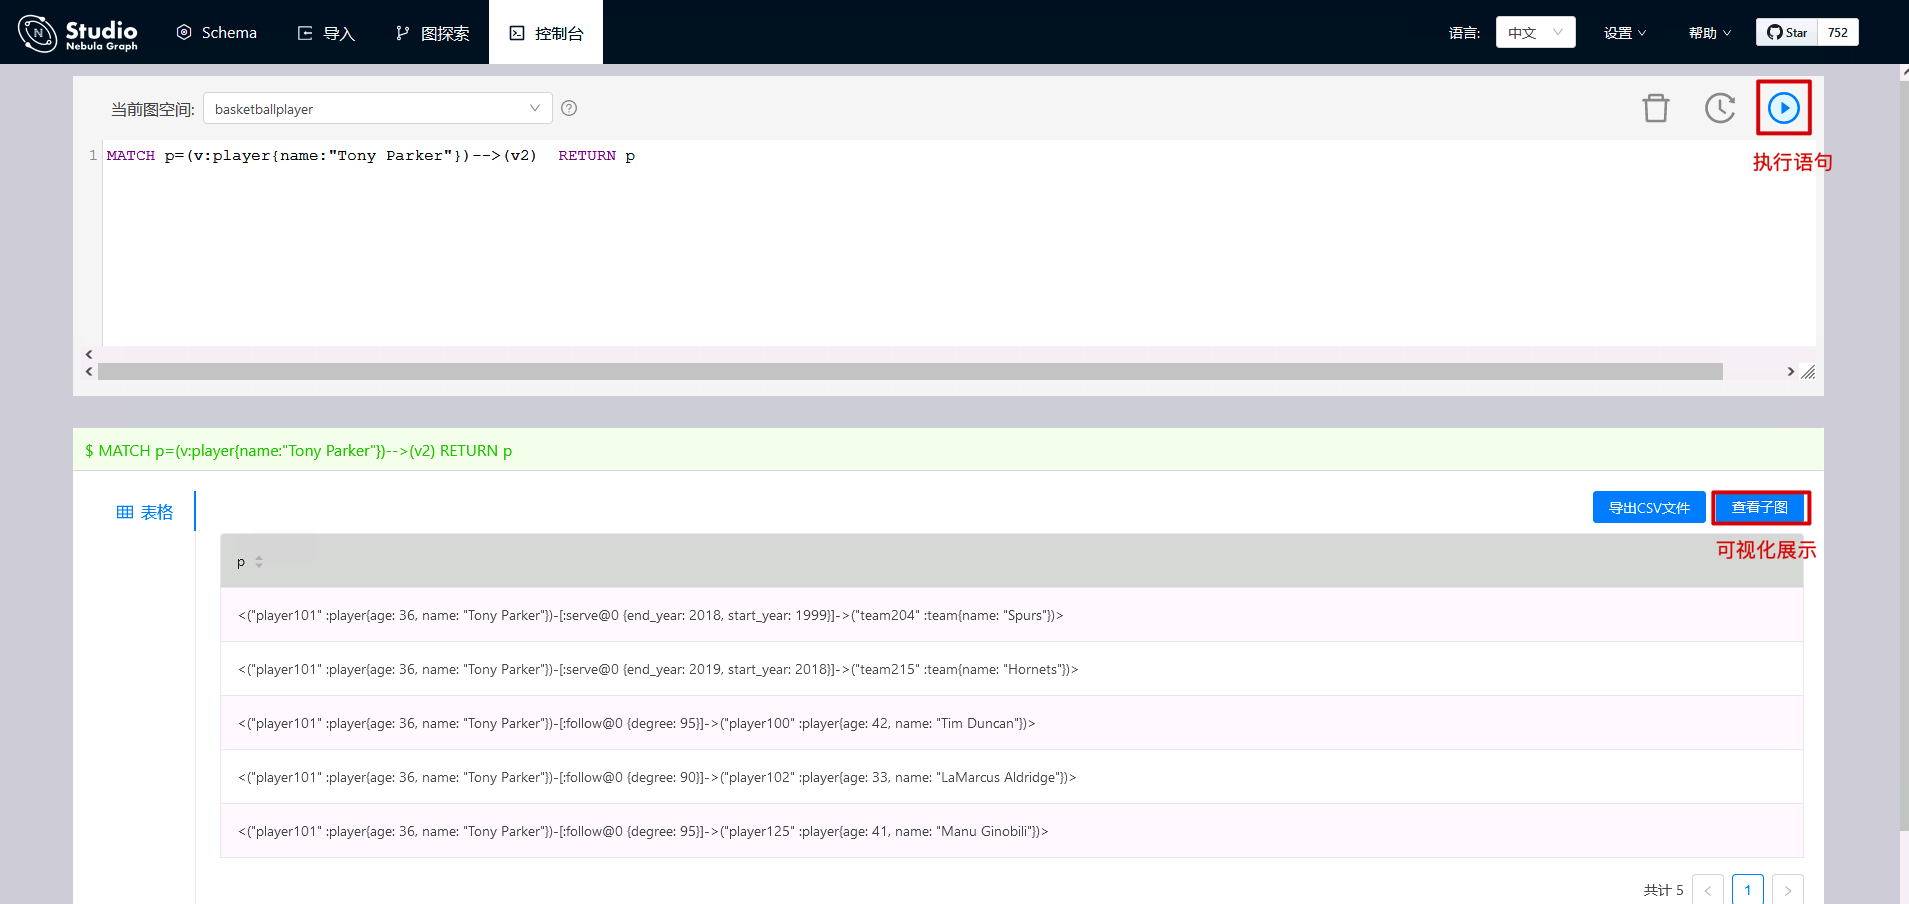
We can execute nGQL statements in the console.
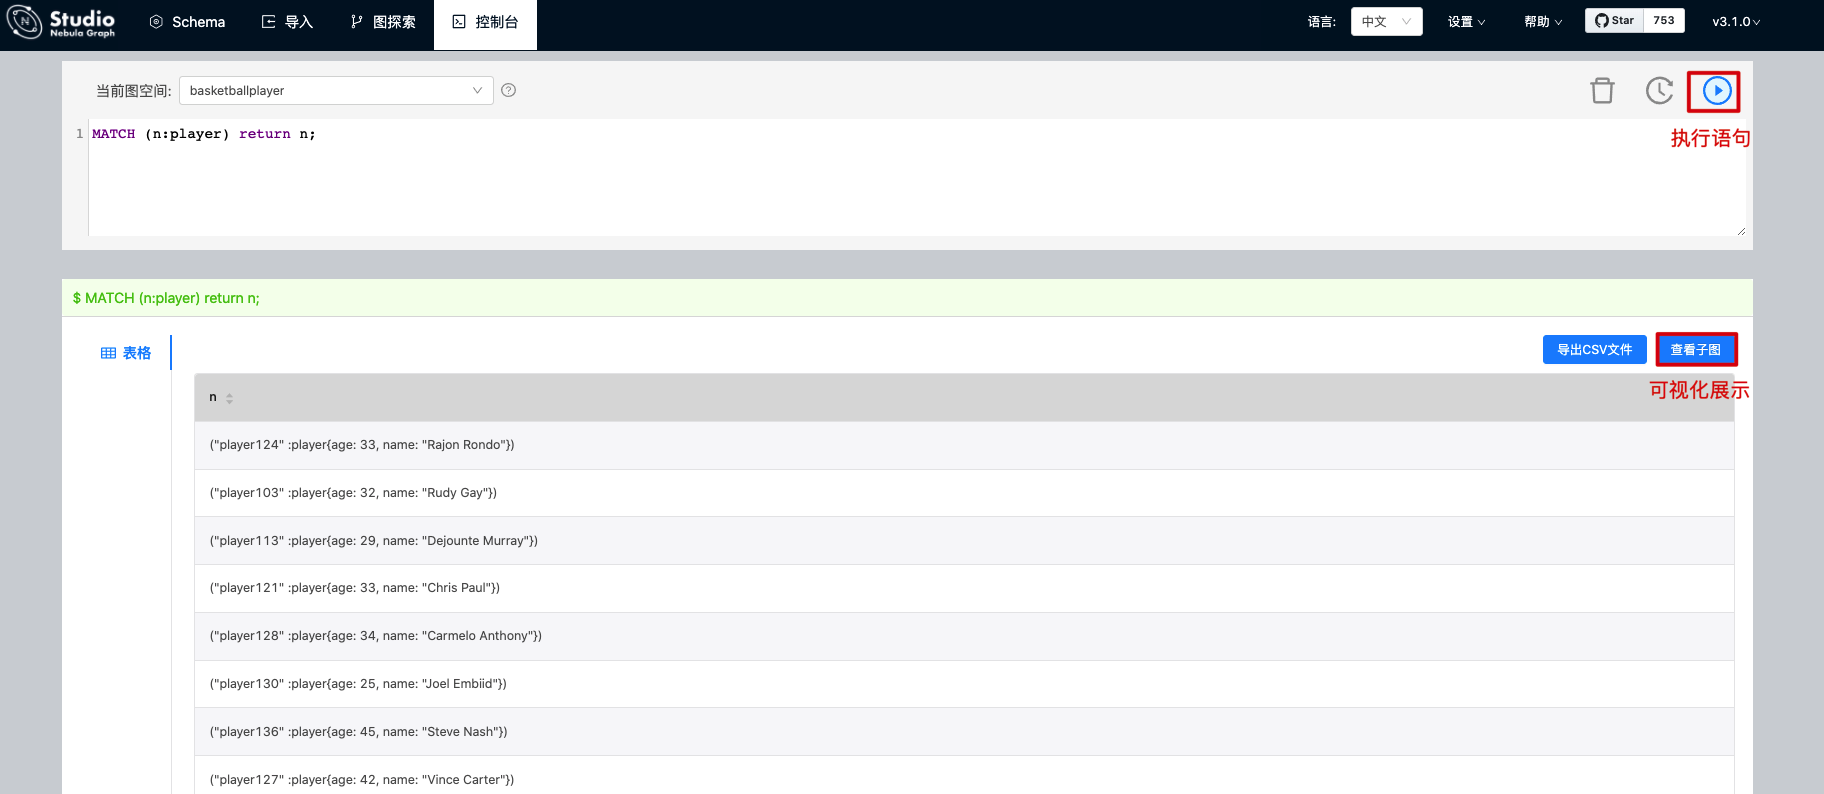
The results of executing commands can be displayed visually.
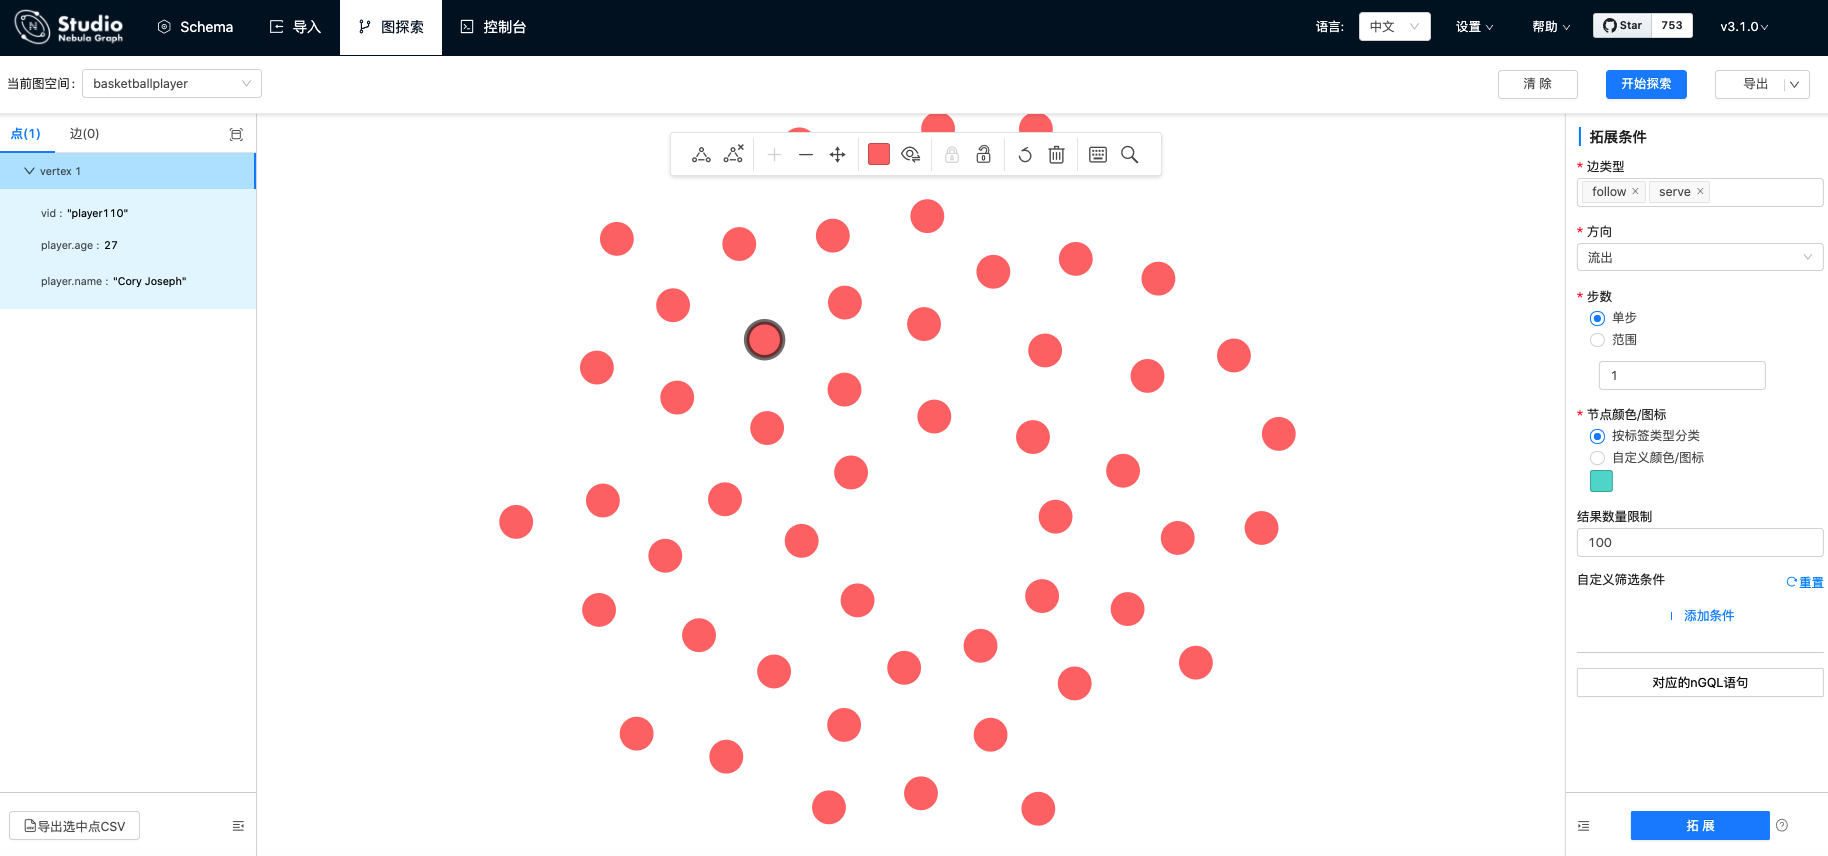
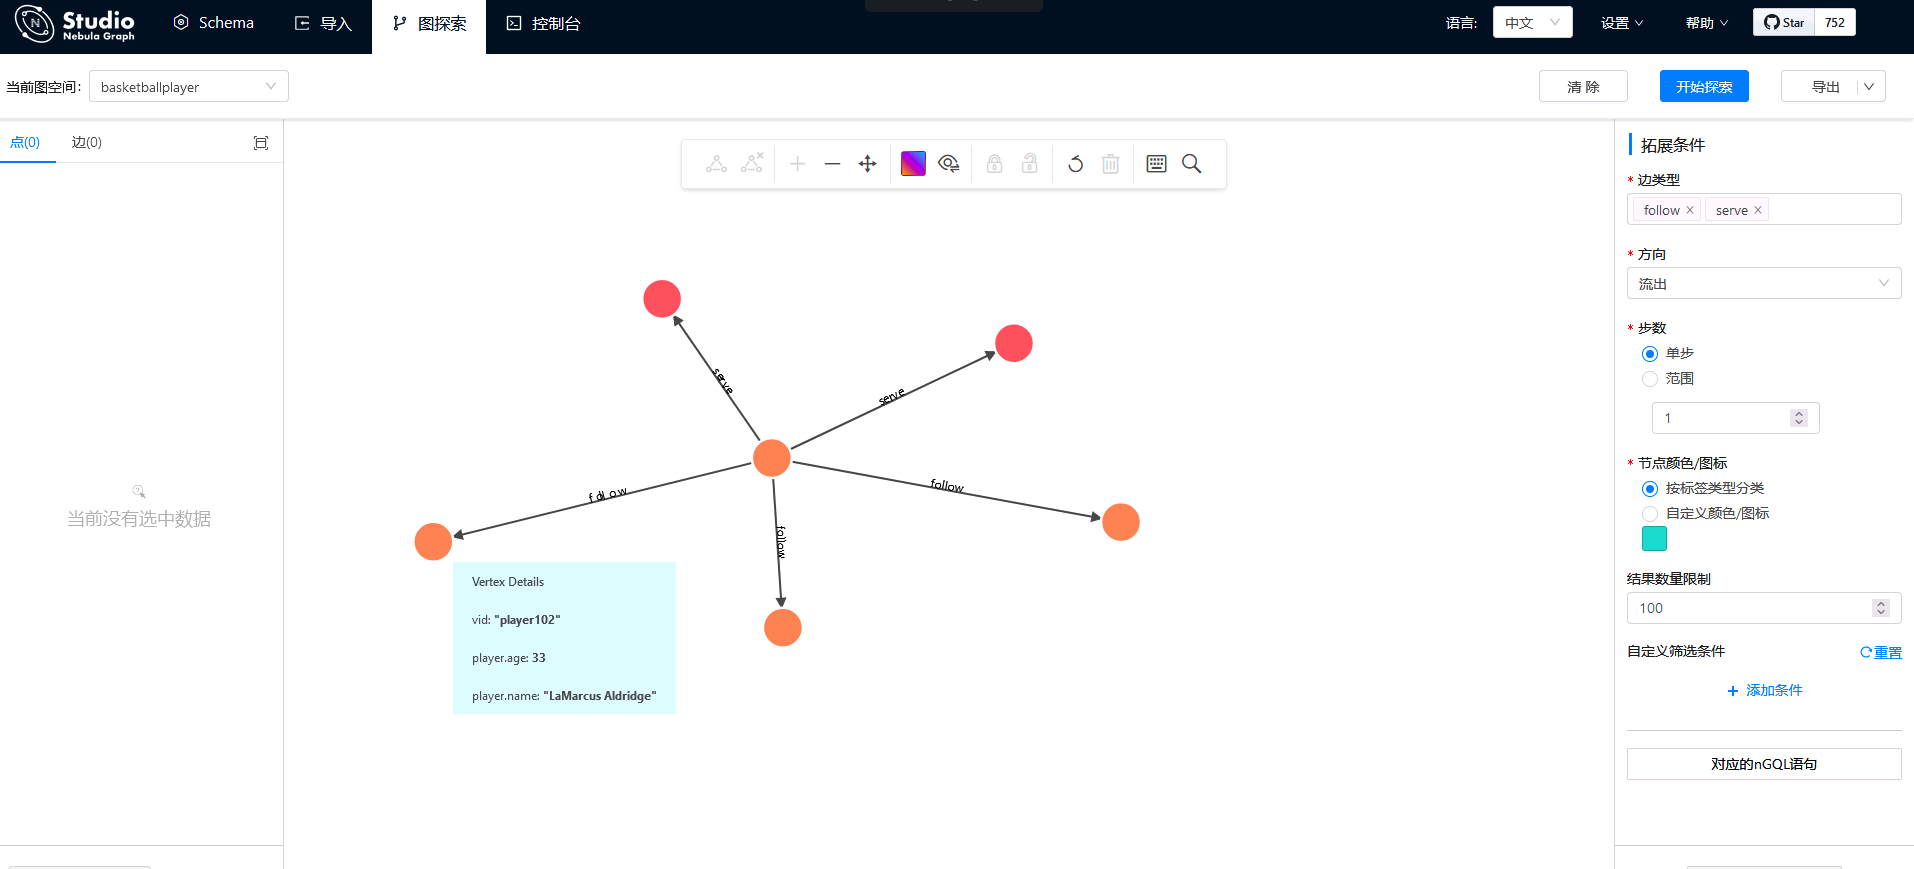
Next, by querying the players related to Tony Parker, the results can also be displayed visually.
8 import data through Nebula Exchange
Nebula Exchange is an Apache Spark application, which is used to batch migrate data from clusters to Nebula Graph in a distributed environment. It can support the migration of batch and streaming data in a variety of different formats (CSV,JSON,Parquet,Neo4j, MySQL, etc.).
Next, we will use an example to illustrate how to import CSV file data stored in HDFS or local into Nebula Graph using Nebula Exchange. For local CSV import, you can also use Nebula Import. For details, see Using the Nebula Importer.
8.1 downloading sample data
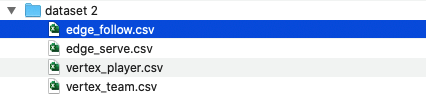
download Basketball player dataset.
After decompression, you can see that there are four tables. The data structure is the same as that described in the chapter on getting started with Nebula. There are two tags, player and team, and two edge types, follow and serve.
8.2 creating Schema in Nebula Graph
Use the Nebula Console to create a graph space basketball layer and a Schema, as shown below.
## Create a graph space
nebula> CREATE SPACE basketballplayer \
(partition_num = 10, \
replica_factor = 1, \
vid_type = FIXED_STRING(30));

## Select the graph space basketball layer
nebula> USE basketballplayer;

## Create Tag player
nebula> CREATE TAG player(name string, age int);

## Create Tag team
nebula> CREATE TAG team(name string);

## Create Edge type follow
nebula> CREATE EDGE follow(degree int);

## Create Edge type serve
nebula> CREATE EDGE serve(start_year int, end_year int);
8.3 modifying the Nebula Exchange configuration file
In / root/csv_application.conf create the Nebula Exchange configuration file and set the CVS data source related configuration. The local and HDFS import CSV configurations are the same except that the path paths are different. If you are using a basketball player dataset, you only need to modify the connection information and CSV path of Nebula.
{
  # Spark related configuration
  spark: {
    app: {
      name: Nebula Exchange 2.6.0
    }
    driver: {
      cores: 1
      maxResultSize: 1G
    }
    executor: {
        memory:1G
    }

    cores {
      max: 16
    }
  }

  # Nebula Graph related configuration
  nebula: {
    address:{
      # Specify the IP address and port of the Graph service and all Meta services.
      # If there are multiple servers, the addresses are separated by English commas (,).
      # Format: "ip1:port","ip2:port","ip3:port"
      graph:["11.8.38.149:9669","11.8.38.150:9669","11.8.38.151:9669"]
      meta:["11.8.38.149:9559","11.8.38.150:9559","11.8.38.151:9559"]
    }

    # Specify a user name and password that has write permission to Nepal graph.
    user: root
    pswd: nebula

    # Specify a diagram space name.
    space: basketballplayer
    connection {
      timeout: 3000
      retry: 3
    }
    execution {
      retry: 3
    }
    error: {
      max: 32
      output: /tmp/errors
    }
    rate: {
      limit: 1024
      timeout: 1000
    }
  }

  # Processing point
  tags: [
    # Set Tag player related information.
    {
      # Specifies the Tag name defined in the Nebula Graph.
      name: player
      type: {
        # Specify the data source and use CSV.
        source: csv

        # Specify how to import point data into the Nebula Graph: Client or SST.
        sink: client
      }

      # Specifies the path to the CSV file.
      # If the file is stored on HDFS, enclose the path in double quotation marks, starting with HDFS: / /, for example“ hdfs://ip:port/xx/xx ".
      # If the file is stored locally, enclose the path in double quotation marks, starting with file: / /, for example“ file:///tmp/xx.csv ".
      #path: "hdfs://192.168.*.*:9000/data/vertex_player.csv"
      path: "/root/dataset/vertex_player.csv"

      # If the CSV file has no header, use [_c0, _c1, _c2,..., _cn] to represent its header, and indicate the column as the source of attribute value.
      # If the CSV file has a header, the actual column name is used.
      fields: [_c1, _c2]

      # Specifies the name of the attribute defined in the Nebula Graph.
      # The order of fields and nebula.fields must correspond one by one.
      nebula.fields: [age, name]

      # Specify a column as the source of the VID.
      # The value of vertex must be consistent with the column names in fields or csv.fields above.
      # Currently, Nepal graph 2.6.1 only supports vids of string or integer types.
      vertex: {
        field:_c0
        # policy:hash
      }

      # The specified delimiter. The default value is English comma (,).
      separator: ","

      # If the CSV file has a header, set the header to true.
      # If the CSV file does not have a header, set the header to false. The default value is false.
      header: false

      # Specifies the maximum number of points written to the Nebula Graph in a single batch.
      batch: 256

      # Specifies the number of Spark tiles.
      partition: 32
    }

    # Set Tag team related information.
    {
      # Specifies the Tag name defined in the Nebula Graph.
      name: team
      type: {
        # Specify the data source and use CSV.
        source: csv

        # Specify how to import point data into the Nebula Graph: Client or SST.
        sink: client
      }

      # Specifies the path to the CSV file.
      # If the file is stored on HDFS, enclose the path in double quotation marks, starting with HDFS: / /, for example“ hdfs://ip:port/xx/xx ".
      # If the file is stored locally, enclose the path in double quotation marks, starting with file: / /, for example“ file:///tmp/xx.csv ".
      # path: "hdfs://192.168.*.*:9000/data/vertex_team.csv"
      path: "/root/dataset/vertex_team.csv"

      # If the CSV file has no header, use [_c0, _c1, _c2,..., _cn] to represent its header, and indicate the column as the source of attribute value.
      # If the CSV file has a header, the actual column name is used.
      fields: [_c1]

      # Specifies the name of the attribute defined in the Nebula Graph.
      # The order of fields and nebula.fields must correspond one by one.
      nebula.fields: [name]

      # Specify a column as the source of the VID.
      # The value of vertex must be consistent with the column names in fields or csv.fields above.
      # Currently, Nepal graph 2.6.1 only supports vids of string or integer types.
      vertex: {
        field:_c0
        # policy:hash
      }

      # The specified delimiter. The default value is English comma (,).
      separator: ","

      # If the CSV file has a header, set the header to true.
      # If the CSV file does not have a header, set the header to false. The default value is false.
      header: false

      # Specifies the maximum number of points written to the Nebula Graph in a single batch.
      batch: 256

      # Specifies the number of Spark tiles.
      partition: 32
    }


    # If you need to add more points, please refer to the previous configuration.
  ]
  # Processing edge
  edges: [
    # Set information about Edge type follow.
    {
      # Specifies the Edge type name defined in the Nebula Graph.
      name: follow
      type: {
        # Specify the data source and use CSV.
        source: csv

        # Specify how to import point data into the Nebula Graph: Client or SST.
        sink: client
      }

      # Specifies the path to the CSV file.
      # If the file is stored on HDFS, enclose the path in double quotation marks, starting with HDFS: / /, for example“ hdfs://ip:port/xx/xx ".
      # If the file is stored locally, enclose the path in double quotation marks, starting with file: / /, for example“ file:///tmp/xx.csv ".
      # path: "hdfs://192.168.*.*:9000/data/edge_follow.csv"
      path: "/root/dataset/edge_follow.csv"

      # If the CSV file has no header, use [_c0, _c1, _c2,..., _cn] to represent its header, and indicate the column as the source of attribute value.
      # If the CSV file has a header, the actual column name is used.
      fields: [_c2]

      # Specifies the name of the attribute defined in the Nebula Graph.
      # The order of fields and nebula.fields must correspond one by one.
      nebula.fields: [degree]

      # Specify a column as the source for the start and destination points.
      # The value of vertex must be consistent with the column names in fields or csv.fields above.
      # Currently, Nepal graph 2.6.1 only supports vids of string or integer types.
      source: {
        field: _c0
      }
      target: {
        field: _c1
      }

      # The specified delimiter. The default value is English comma (,).
      separator: ","

      # Optionally, specify a column as the source of the rank.

      #ranking: rank

      # If the CSV file has a header, set the header to true.
      # If the CSV file does not have a header, set the header to false. The default value is false.
      header: false

      # Specifies the maximum number of edges written to the Nepal graph in a single batch.
      batch: 256

      # Specifies the number of Spark tiles.
      partition: 32
    }

    # Set information about Edge type serve.
    {
      # Specifies the Edge type name defined in the Nebula Graph.
      name: serve
      type: {
        # Specify the data source and use CSV.
        source: csv

        # Specify how to import point data into the Nebula Graph: Client or SST.
        sink: client
      }

      # Specifies the path to the CSV file.
      # If the file is stored on HDFS, enclose the path in double quotation marks, starting with HDFS: / /, for example“ hdfs://ip:port/xx/xx ".
      # If the file is stored locally, enclose the path in double quotation marks, starting with file: / /, for example“ file:///tmp/xx.csv ".
      # path: "hdfs://192.168.*.*:9000/data/edge_serve.csv"
      path: "/root/dataset/edge_serve.csv"

      # If the CSV file has no header, use [_c0, _c1, _c2,..., _cn] to represent its header, and indicate the column as the source of attribute value.
      # If the CSV file has a header, the actual column name is used.
      fields: [_c2,_c3]

      # Specifies the name of the attribute defined in the Nebula Graph.
      # The order of fields and nebula.fields must correspond one by one.
      nebula.fields: [start_year, end_year]

      # Specify a column as the source for the start and destination points.
      # The value of vertex must be consistent with the column names in fields or csv.fields above.
      # Currently, Nepal graph 2.6.1 only supports vids of string or integer types.
      source: {
        field: _c0
      }
      target: {
        field: _c1
      }

      # The specified delimiter. The default value is English comma (,).
      separator: ","

      # Optionally, specify a column as the source of the rank.
      #ranking: _c5

      # If the CSV file has a header, set the header to true.
      # If the CSV file does not have a header, set the header to false. The default value is false.
      header: false

      # Specifies the maximum number of edges written to the Nepal graph in a single batch.
      batch: 256

      # Specifies the number of Spark tiles.
      partition: 32
    }

  ]
  # If you need to add more edges, please refer to the previous configuration.
}
8.4 importing data to Nebula Graph
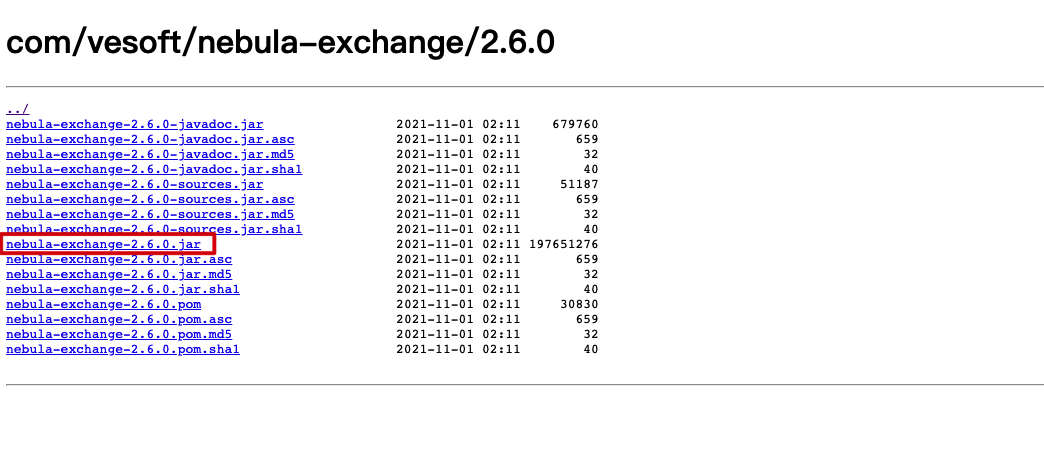
adopt This connection Download the compiled Nebula Exchange jar package.
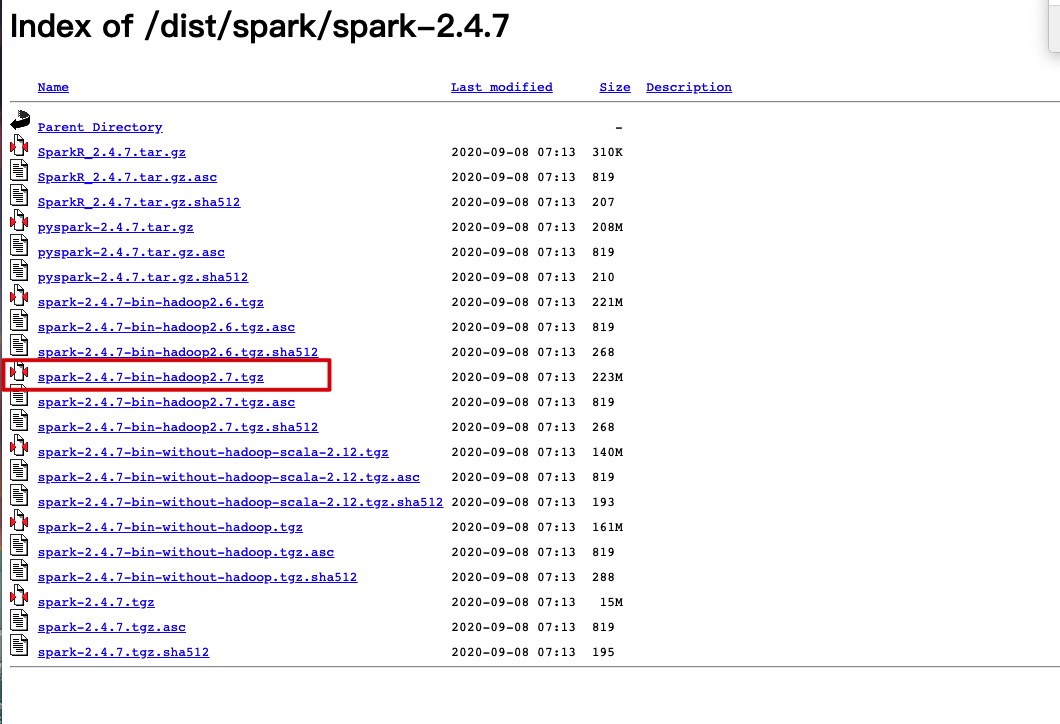
stay Spark official download page Download the Spark 2.4.7 package.
Run Spark submit and run Spark local ly to import CSV file data into Nebula Graph.
/root/spark-2.4.7-bin-hadoop2.7/bin/spark-submit \
--master "local" \
--class com.vesoft.nebula.exchange.Exchange \
/root/nebula-exchange-2.6.0.jar \
-c /root/csv_application.conf