In this tutorial, we will learn how to develop Solana chain program, including creating Solana account, obtaining free SOL from the test chain, compiling, deploying and testing process, and developing a simple Solana chain program. A link to download the complete source code is provided at the end of the tutorial.
Learn Ethereum development in a familiar language: Java | Php | Python | .Net / C# | Golang | Node.JS | Flutter / Dart
Before delving into this tutorial, make sure you have followed This tutorial The steps in set up the environment and install the tool kit.
You can view it here Solana RPC API documentation.
1. Connect to Solana development network
Don't worry if you don't have your own node. Solana provides DEVNET with the same configuration as the main network. So here, let's first set the API endpoint as the development chain- https://devnet.solana.com :
ubuntu@VM-0-12-ubuntu:~$ solana config set --url https://devnet.solana.com
Config File: /home/ubuntu/.config/solana/cli/config.yml
RPC URL: https://devnet.solana.com
WebSocket URL: wss://devnet.solana.com/ (computed)
2. Prepare Solana account
Each program in the chain is actually an Account, but it is marked "Executable: true", which means that it is an executable file. In order to store this file, we need to create another Solana Account that can pay:
solana-keygen new
After entering the password and confirming it, the new account is saved in / home / Ubuntu / Config / Solana / id.json as our default key. You can check the public key by running the following command:
ubuntu@VM-0-12-ubuntu:~$ solana-keygen pubkey /home/ubuntu/.config/solana/id.json
7FqW6xXE4sMmZSeVxFsoTr83He4MhhePvA1vRAv9zgQf
On the Solana test chain, you can run the following commands to obtain some free sols for subsequent operations:
ubuntu@VM-0-12-ubuntu:~$ solana airdrop 10 7FqW6xXE4sMmZSeVxFsoTr83He4MhhePvA1vRAv9zgQf
Requesting airdrop of 10 SOL from 34.82.57.86:9900
10 SOL
Let's check our balance:
ubuntu@VM-0-12-ubuntu:~$ solana balance 7FqW6xXE4sMmZSeVxFsoTr83He4MhhePvA1vRAv9zgQf
10 SOL
Wow, money. 💰
Then we create another account to store program files:
solana-keygen new -o solana_memo_program.json
Here, we use the - o option to output the new key pair to the new file solana_memo_program.json .
3. Compiler
From 1.4 Starting from version x (released on October 22, 2020), Solana provides tools such as cargo build BPF and cargo test BPF to help us compile cargo projects into BPF format files.
You can try this using the memo program provided by Solana's official team. First clone the repository:
git clone https://github.com/solana-labs/solana-program-library.git
Then jump to the folder Solana program library / memo / program / and run:
cargo build-bpf
This is the wrapper of the program cargo build BPF we mentioned above. If you see the following error:
= note: /usr/bin/ld: cannot find Scrt1.o: No such file or directory
      /usr/bin/ld: cannot find crti.o: No such file or directory
      collect2: error: ld returned 1 exit status
That's because you lack some 32-bit dependency packages. Let's fix them through installation:
sudo apt install gcc-multilib
Then we compile again and get:
To deploy this program:
$ solana deploy /home/ubuntu/solana/solana-program-library/target/deploy/spl_memo.so
OK, you can deploy it. Here we deploy it to the account we created and export it to the file solana_memo_program.json,
Let's get the key first:
solana-keygen pubkey ~/solana_memo_program.json
D8Cnv1UcThay2WijWP4SQ8G683UuVsKPaZEU7TNVKW1j
Then run the deployment:
solana deploy /home/ubuntu/solana/solana-program-library/target/deploy/spl_memo.so ~/solana_memo_program.json
{"programId":"D8Cnv1UcThay2WijWP4SQ8G683UuVsKPaZEU7TNVKW1j"}
Now we have successfully deployed a program to the test company. The program address is D8Cnv1UcThay2WijWP4SQ8G683UuVsKPaZEU7TNVKW1j
To verify the results of the command line, check our program on Solana explorer and go to https://explorer.solana.com/ Change the network to Devnet and enter the program address. You may see:
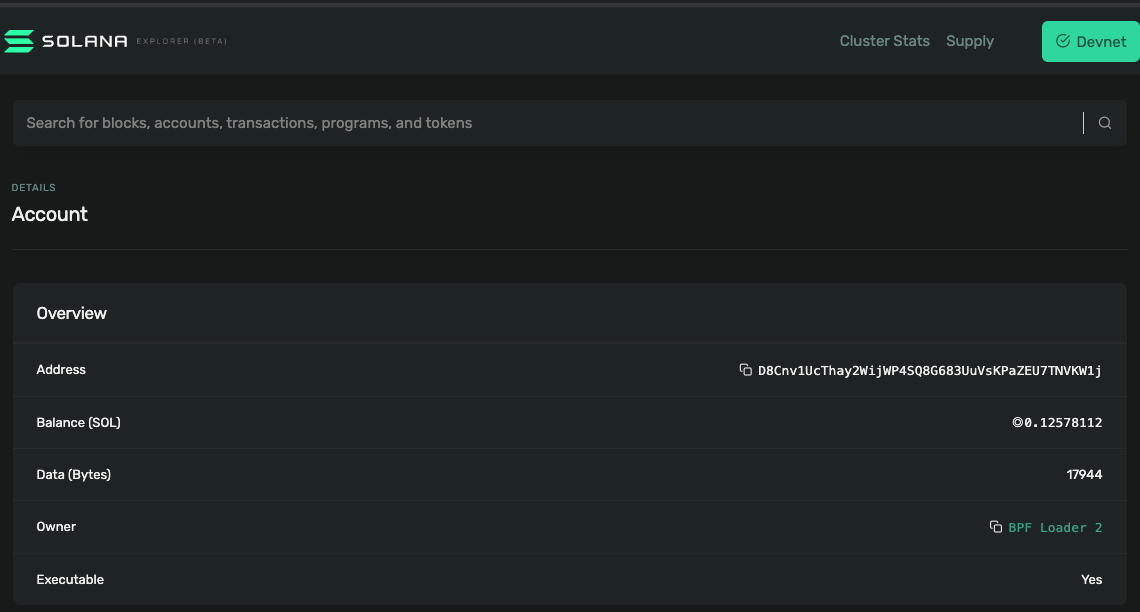
Yes, our program is right there!
4. Test Solana program
In order to interact with our chain program, we need our old friend @ Solana / Web3 js. Let's create a new JS project and add the package @ Solana / Web3 js:
yarn init
yarn add @solana/web3.js
Then create a similar index in the root folder and test code js entry file:
var solana_web3 = require('@solana/web3.js');
function testMemo(connection, account){
    const instruction = new solana_web3.TransactionInstruction({
        keys: [],
        programId:new solana_web3.PublicKey('D8Cnv1UcThay2WijWP4SQ8G683UuVsKPaZEU7TNVKW1j'),
        data: Buffer.from('cztest'),
    });
    console.log("account:", account.publicKey.toBase58())
    solana_web3.sendAndConfirmTransaction(
        connection,
        new solana_web3.Transaction().add(instruction),
        [account],
        {
            skipPreflight: true,
            commitment: "singleGossip",
        },
    ).then(()=>{console.log("done")}).catch((e)=>{console.log("error",e)});
}function main() {
    connection = new solana_web3.Connection("https://devnet.solana.com", 'singleGossip');
    const account = new solana_web3.Account()
    const lamports = 10*1000000000
    connection.requestAirdrop(account.publicKey, lamports).then(()=>{
        console.log("airdrop done")
        testMemo(connection, account)
    });
}
main()
Let's see what's going on here.
First connect to the devnet endpoint, and then we use Solana_ Solana provided by Web3_ web3. The account() function creates a new account that will be used to interact with our program later.
Then we get some free SOL from devnet, and then call the testMemo function. This function sends a transaction to our program, and the parameter is passed in as the data stream (here we pass a string "cztest").
Now let's check our Solana program again using Explorer:
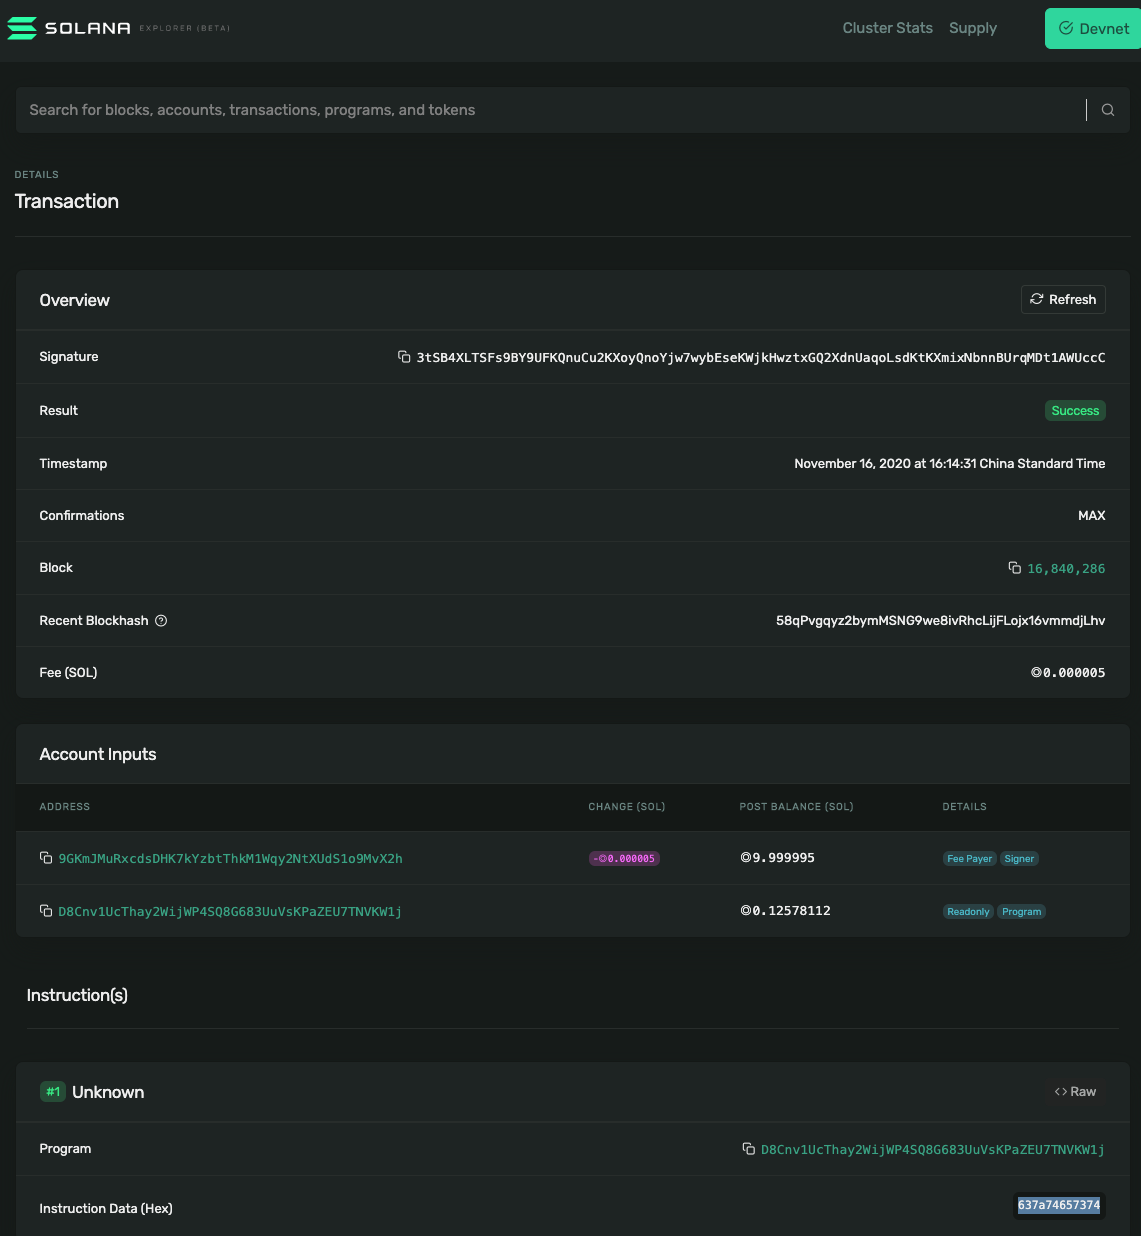
For the transactions shown above, we can see the data in hexadecimal format, which can be decoded by tools such as binassii:
>>> import binascii
>>> binascii.a2b_hex('637a74657374')
b'cztest'
Here we can see that the result is the same as the string we sent to the program 🎊
5. Write your own Solana program
We just tried a program extracted from Solana's official repo, so what should we do to write it from scratch
What about a Solana chain program? As an ordinary Rust project, Solana chain program is also managed by cargo.
First, let's start our new project with cargo:
cargo new onchain_program
Then open onchain with your favorite editor_ program/Cargo. Toml and add some basic information to the project:
[dependencies]
arrayref = "0.3.6"
num-derive = "0.3"
num-traits = "0.2"
num_enum = "0.5.1"
solana-program = "1.4.8"
thiserror = "1.0"[dev-dependencies]
solana-sdk = "1.4.8"[lib]
crate-type = ["cdylib", "lib"][package.metadata.docs.rs]
targets = ["x86_64-unknown-linux-gnu"]
We also added an xargo Toml file, which is used to support cross platform when compiling bpf files.
Then it's time to do it yourself. Let's write some Rust code. First, let's start with Src / lib Add an entry point to Rs:
#![deny(missing_docs)]//! A simple program that return success.#[cfg(not(feature = "no-entrypoint"))]
mod entrypoint;// Export current sdk types for downstream users building with a different sdk version
pub use solana_program;
Then in the entry file entrypoint Add some code to Rs:
//! Program entrypointuse solana_program::{
    account_info::AccountInfo, entrypoint, entrypoint::ProgramResult, program_error::ProgramError,
    pubkey::Pubkey,
};
use std::str::from_utf8;entrypoint!(process_instruction);
fn process_instruction(
    _program_id: &Pubkey,
    _accounts: &[AccountInfo],
    instruction_data: &[u8],
) -> ProgramResult {
    Ok(())
}
This is a very simple program. We didn't do anything here, just returned success 😎
Function process_instruction is the entire entry function we pass in the instruction structure. It contains all the information required to execute the instruction:_ program_id means program_ Accounts indicates all accounts required in the instruction_data represents the serialized data stream we use to pass other parameters. When the program runs well, we use Ok(()) to return success, or Err(error) to return failure.
If you are ready, you can deploy the program as you did before:
cargo build-bpf...To deploy this program:
$ solana deploy /home/ubuntu/solana/memo_test/onchain_program/target/deploy/onchain_program.so
6. Conclusion
With all the tools and SDK s provided by Solana, we can easily obtain the target files using cargo. Once you understand the whole process, you will find that it is just a Rust project. It uses the LLVM provided by rustrc to compile into BPF format files, and then we deploy it on the chain. I would like to mention that not all Rust features can be used when developing Solana chain programs. For details, please refer to here Found. If you use 1.3 X version of the tool suite, you also need xargo build sh.
The tutorial code can be downloaded here: example-helloworld,solana-program-library,cargo-build-bpf
Original link: Introduction to program development on Solana chain - BimAnt