Write in front
this series is written by myself word by word, including examples and experimental screenshots. Due to the complexity of the system kernel, there may be errors or incompleteness. If there are errors, criticism and correction are welcome. This tutorial will be updated for a long time. If you have any good suggestions, you are welcome to give feedback. Code words are not easy. If this article is helpful to you, if you have spare money, you can reward and support my creation. If you want to reprint, please attach my reprint information to the back of the article and state my personal information and my blog address, but you must notify me in advance.
If you look from the middle, please read it carefully Yu Xia's view of Win system kernel -- a brief introduction , easy to learn this tutorial.
before reading this tutorial, ask a few questions. Have you prepared the basic knowledge? Have you learned the protection mode? Have you finished your exercise? If not, don't continue.
🔒 Gorgeous dividing line 🔒
summary
when learning how to implement the minimum VT framework, let's take a look at the flow chart:

in this article, we will introduce the content before entering the virtual machine mode, and we will continue the rest in the next article.
the following are some clearer processes. In the future, we will focus on the following figure:

the above implementation must have the permission of 0 ring. Of course, the most convenient is to implement it in the driver. I won't repeat how to write the driver. I'll review it later. The following is the basic framework of our driver code:
#include <ntddk.h>
#include <intrin.h>

#define DbgPrintLine(X) DbgPrint(X##"\n")

NTSTATUS UnloadDriver(PDRIVER_OBJECT DriverObject)
{
    DbgPrintLine("Unloaded Successfully!");
    return STATUS_SUCCESS;
}

NTSTATUS DriverEntry(PDRIVER_OBJECT DriverObject, PUNICODE_STRING RegistryPath)
{
    DriverObject->DriverUnload = UnloadDriver;
    DbgPrintLine("Loaded Successfully!");
    return STATUS_SUCCESS;
}
intrin. I won't talk about the role of the header file h, but let's say in advance that not all instructions are packaged in 32 bits. These instructions are inline functions. Some packaged instructions can only be used in 64 bits, such as__ vmx_on and other functions that need to pass QWORD parameters need to be implemented by ourselves. Microsoft did not help us to implement this function. Of course, in the case of 64 bits, we can use more instructions. Since we are 32 bits, we can implement it ourselves, although it is a little troublesome.
I didn't say much and began to get to the point.
VT supports enabling detection
in the previous old CPU, it does not support vt. Now the new CPU supporting VT also has a switch. If VT is enabled, we need to explain in detail whether VT can be used for subsequent detection. If VT is disabled, we need to explain in detail whether it can be used for subsequent detection:
BOOLEAN CheckVTEnabled()
{
    //This internal function stores the supported functions and CPU information returned by the instruction in cpuInfo,
    // cpuInfo is an array of four 32-bit integers filled with the values of EAX, EBX, ECX, and EDX registers.

    int CPUInfo[4];
    __cpuid(CPUInfo, 1);    //Calling CPUID requires a parameter, which is 1. The index of ECX value is VMX
    int Info = CPUInfo[2];

    if (!(Info & VMXBit))
    {
        DbgPrintLine("Error : CPUID");
        return FALSE;
    }

    ULONGLONG  CONTROL_MSR = __readmsr(IA32_FEATURE_CONTROL_MSR);
    if (!(CONTROL_MSR & IA32_FEATURE_CONTROL_MSR_Lock))
    {
        DbgPrintLine("Error : FEATURE CONTROL MSR");
        return FALSE;
    }

    ULONG cr0 = __readcr0();
    if (!((cr0 & CR0_PE) && (cr0 & CR0_NE) && (cr0 & CR0_PG)))
    {
        DbgPrintLine("Error : CR0");
        return FALSE;
    }

    ULONG cr4 = __readcr4();
    if (cr4 & CR4_VMXE)
    {
        DbgPrintLine("VT Has Been Occupied!");
        return FALSE;
    }

    return TRUE;
}
__ CPUID is the encapsulation of CPUID assembly instructions. Let's first see how Intel explains this function:
CPUID returns processor identification and feature information in the EAX, EBX, ECX, and EDX registers. The instruction's output is dependent on the contents of the EAX register upon execution (in some cases, ECX as well).
If the CPU can detect the ef8121 bit index, it can be assured that if it does not support the following:
The ID flag (bit 21) in the EFLAGS register indicates support for the CPUID instruction. If a software procedure can set and clear this flag, the processor executing the procedure supports the CPUID instruction.
here I think all CPUs used now support CPUID instruction. This instruction is a very complex instruction. For details, please refer to page 764 of the white paper. For the meaning of each value of eax parameter, please refer to page 765 of the white paper. The parameter we use is 1. We can see its content:
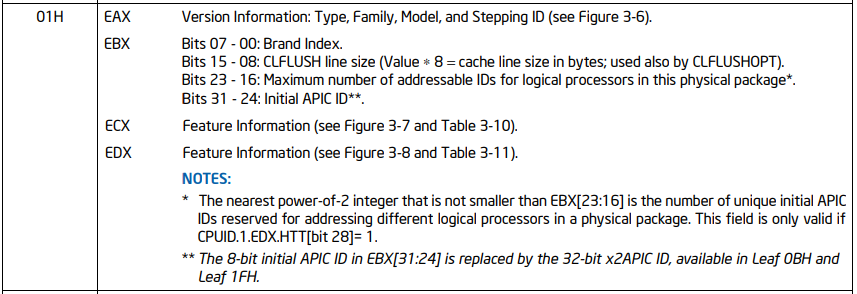
code comment I clearly state that ecx is used. Let's see why:
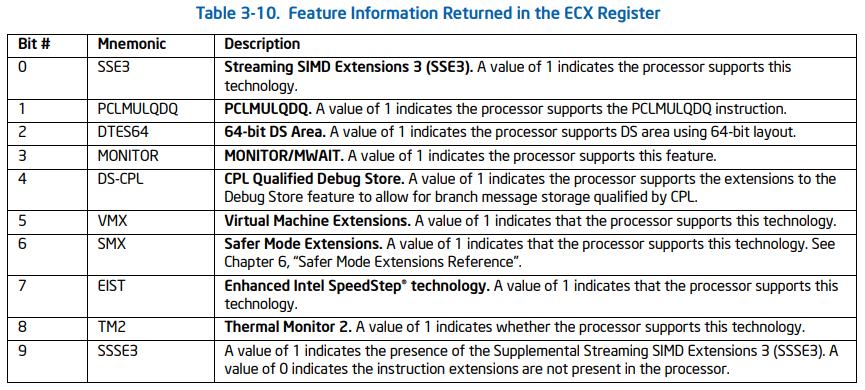
this is only part of the form, but what is useful to us is enough. Note that our VMX bit is in this one. Through this CPUID instruction, we only judge whether the CPU supports VT, but there are some prerequisites for enabling VT through vmxon instruction.
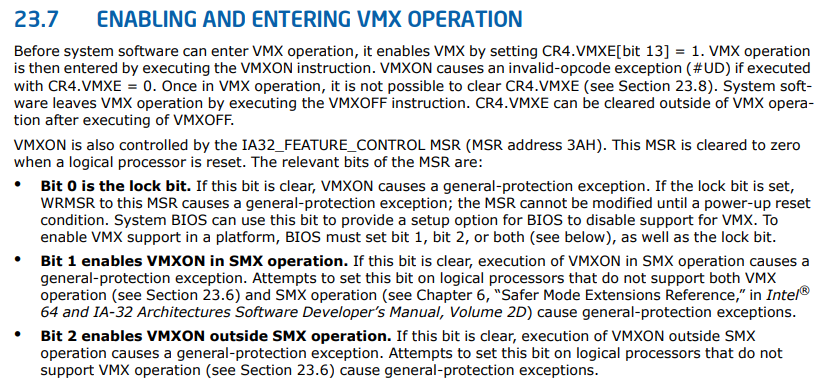
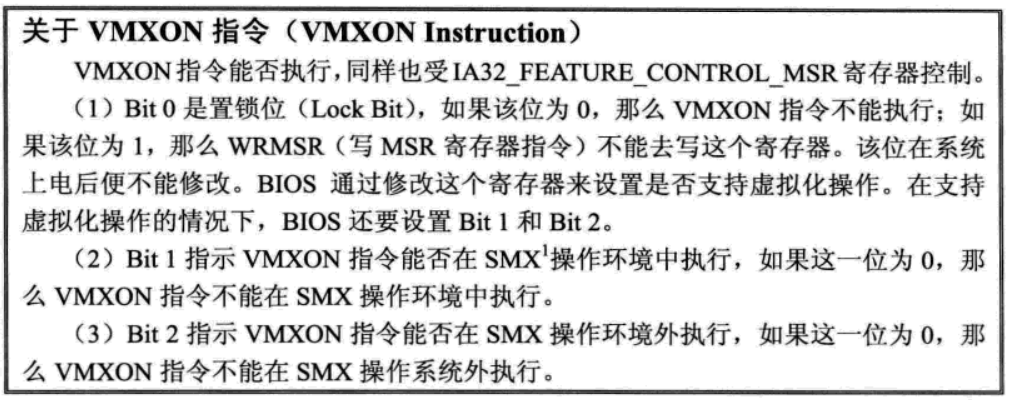
at the beginning of the white paper, it is said that the VMXE bit of our CR4 needs to be set to 1 and in the MSR of MSR_ IA32_ FEATURE_ The index 0 bit of the control member must be 1, otherwise using the vmxon instruction to enable VT will trigger a general protection exception. This can only be set in BIOS, otherwise it will be triggered. Through this, we can judge whether VT is disabled. The following is the relevant Chinese Description:
Of course, these conditions are far from enough. The following is the description of the white paper:
The first processors to support VMX operation require that the following bits be 1 in VMX operation: CR0.PE, CR0.NE, CR0.PG, and CR4.VMXE. The restrictions on CR0.PE and CR0.PG imply that VMX operation is supported only in paged protected mode (including IA-32e mode). Therefore, guest software cannot be run in unpaged protected mode or in real-address mode.
in other words, VT can be used normally only in the protected mode with paging. In order to simplify processing, we do not use virtual machine nesting, so Cr4 If the vmxe bit is 1, it means that if I enable it again, it is a taowa. I won't set it with you.
the above is all the details of the function I wrote. Let's do an experiment. Before the experiment, our driver entry code is modified as follows:
NTSTATUS DriverEntry(PDRIVER_OBJECT DriverObject, PUNICODE_STRING RegistryPath)
{
    DriverObject->DriverUnload = UnloadDriver;

    DbgPrintLine("Loaded Successfully!");

    if (CheckVTEnabled())
    {
        DbgPrintLine("MiniVT : VT Support!");
    }

    return STATUS_SUCCESS;
}
then compile and drag it to the virtual machine for loading. Through DbgView, we can get the following results, indicating success:

VMXON
above, we implemented the detection function of whether VT supports enabling. Next, we implemented two more functions to enable and disable VT technology. Its function prototype is as follows:
BOOLEAN StartVT();
BOOLEAN StopVT();
due to__ vmx_on Microsoft didn't package it for us in 32-bit, so we need to implement it ourselves. The functions are as follows:
BOOLEAN __vmx_on(DWORD32 LVMXONRegionPA, DWORD32 HVMXONRegionPA)
{
    _asm
    {
        push[HVMXONRegionPA];
        push[LVMXONRegionPA];
        _emit 0xF3;
        _emit 0x0F;
        _emit 0xC7;
        _emit 0x34;
        _emit 0x24;    // vmxon qword ptr [esp]
        add esp, 8;
    }

    UINT32 eflags = __readeflags();
    if (eflags & EFLAG_CF)
    {
        return FALSE;
    }
    return TRUE;
}
use_ emit is because the compiler does not support vmxon compilation, so it can only be embedded. The vmxon instruction does not necessarily succeed. If it fails, it will be placed in the CF bit of EFLAG. 0 indicates success. The following is the description of the white paper:
Execute VMXON with the physical address of the VMXON region as the operand. Check successful execution of VMXON by checking if EFLAGS.CF = 0.
OK, let's start to implement the code to enable VT. the specific code is as follows:
BOOLEAN StartVT()
{
    if (CheckVTEnabled())
    {
        DbgPrintLine("MiniVT : VT Support!");

        __writecr4(__readcr4() | CR4_VMXE);

        PVOID pVMXONRegion = ExAllocatePoolWithTag(NonPagedPool, 0x1000, 'vmx');
        if (!pVMXONRegion)
        {
            DbgPrintLine("Error : vmx Alloc Error");
            return FALSE;
        }
        RtlZeroMemory(pVMXONRegion, 0x1000);
        *(UINT32*)pVMXONRegion = (UINT32)__readmsr(MSR_IA32_VMX_BASIC)&0x7FFFFFFF;
        g_VMXCPU.pVMXONRegion = pVMXONRegion;
        g_VMXCPU.pVMXONRegion_PA = MmGetPhysicalAddress(pVMXONRegion);
        return __vmx_on(g_VMXCPU.pVMXONRegion_PA.LowPart, g_VMXCPU.pVMXONRegion_PA.HighPart);
    }
    return FALSE;
}
before we explain, let's take a look at what the white paper says:

we have finished the first two black spots. Let's continue. It allows us to apply for a 4KB aligned VMXON Region. How big is it? We need to check IA32_VMX_BASIC_MSR is a register. The information of this register is described as follows:
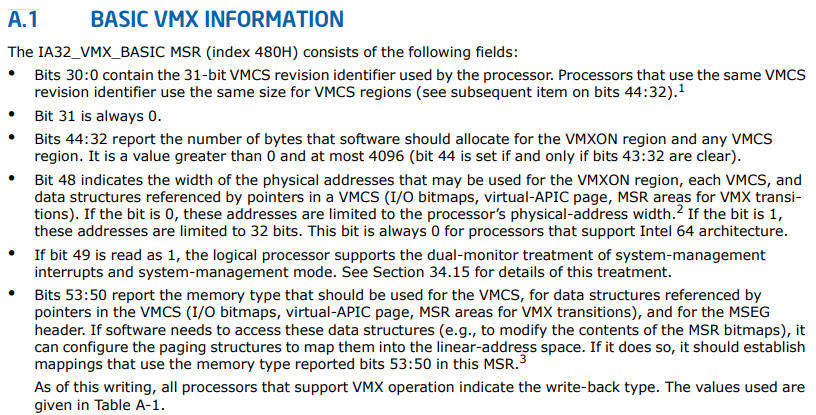
then we noticed this sentence:
Bits 44:32 report the number of bytes that software should allocate for the VMXON region and any VMCS region. It is a value greater than 0 and at most 4096 (bit 44 is set if and only if bits 43:32 are clear).
if you want 4KB alignment and the maximum is 4KB, can I apply directly for such a large size?
Initialize the version identifier in the VMXON region (the first 31 bits) with the VMCS revision identifier reported by capability MSRs. Clear bit 31 of the first 4 bytes of the VMXON region.
the above sentences explain the version number of the first four bytes to let the CPU process VT. this is also in IA32_ VMX_ BASIC_ The first 31 bits of the MSR register are the version number. For the remaining bytes, clear 0.
Execute VMXON with the physical address of the VMXON region as the operand.
We need to use the vmxon command is its physical address, rather than a linear address, so we need to transform it, and finally call the package we encapsulated. vmx_on function, VT is turned on.
since it is enabled, we have to close it. The following is the code for closing VT. it is not difficult to implement, so we won't elaborate.
BOOLEAN StopVT()
{
    __vmx_off();
    __writecr4(__readcr4() & ~CR4_VMXE);
    ExFreePool(g_VMXCPU.pVMXONRegion);

    return TRUE;
}
up to now, we need to slightly modify the loading and unloading function code of the driver to verify the success of the experiment. The specific code is as follows:
NTSTATUS UnloadDriver(PDRIVER_OBJECT DriverObject)
{
    DbgPrintLine("Unloaded Successfully!");
    return StopVT() ? STATUS_SUCCESS : STATUS_UNSUCCESSFUL;
}

NTSTATUS DriverEntry(PDRIVER_OBJECT DriverObject, PUNICODE_STRING RegistryPath)
{
    DriverObject->DriverUnload = UnloadDriver;

    DbgPrintLine("Loaded Successfully!");
    return  StartVT() ? STATUS_SUCCESS : STATUS_UNSUCCESSFUL;
}
if successful, its output is the same as the debugging output of VT supporting enable detection, and the driver loading is successful without blue screen. For the later part, the next article continues.
Next
introduction to vt -- Minimum VT implementation (Part 2)