1. Local disk IO - "click" to read
1.1 create FileReader object
The FileReader object is used for read operations in IO operations
let fd = new FileReader()
1.2 using FileReader object to read files
-
fd.readAsArrayBuffer() reads a file asynchronously and returns ArrayBuffer
-
fd.readAsBinaryString() reads a file asynchronously and returns binary form
-
fd.readAsDataURL() reads a file asynchronously and returns Base64 encoding
-
fd.readAsText() reads a file asynchronously and returns the text form
1.3 setting the attribute of input tag
Click the input tab to open the file manager
-
The type attribute is set to file, indicating that the input tag is used to read the file
-
The multiple attribute can be optionally set to multiple, indicating whether multiple files are allowed to be read
-
Listen for change events
<input type="file" multiple="multiple" onchange="handleChanged()">
<script>
    function handleChanged() {
        // Traverse all open files
        Array.prototype.forEach.call(event.target.files, (file => {
            let fd = new FileReader()
            // Using ArrayBuffer storage
            fd.readAsArrayBuffer(file)
            fd.onload = function(event) {
                console.log(event.target.result)
            }
        }))
    }
</script>
1.4 click read of special style
In actual use, we usually do not directly use the input tag, because the style often does not meet the requirements, which can be solved in the following ways.
-
Set the display property to hide the input tag
-
Create a click upload button and set the desired style on the button
-
Set that clicking this button will trigger the click event of the input tag
<div style="width: 100px; height: 100px; background: blue;" onclick="handleClick()"></div>
<input type="file" style="display: none;" onchange="handleChanged()" id="input">
<script>
    let input = document.querySelector("#input");

    function handleClick() {
        input.click()
    }

    function handleChanged() {
        // Suppose only one file is allowed to be read
        let fd = new FileReader(), file = event.target.files[0]
        fd.readAsDataURL(file)
        fd.onload = function(event) {
            console.log(event.target.result)
        }
    }
</script>
2. Local disk IO - "drag" read
2.1 basic drag and drop event learning
[the external chain picture transfer fails. The source station may have an anti-theft chain mechanism. It is recommended to save the picture and upload it directly (img-oqxqwtud-1642742310) (. / assets / dragevent. PNG)]
draggable = true indicates that the element is allowed to be dragged
- The ondragstart drag start event is registered on the container for status judgment and drag information carrying
- The ondragener drag into the container event is registered on the container for status judgment
- The ondragover event is dragged into the container and registered on the container. The default event needs to be disabled. The default event is prohibited from being dragged into the container
- The ondragleave drag and drop event is registered on the container for status judgment
- The ondrop drag mouse release event is registered on the container. The default event needs to be disabled to read drag information and place drag elements
- Ondragenddrag end event, used to judge the status
2.2 basic drag event demonstration
<div style="border: 1px solid black; width: 200px; height: 100px;"
     ondragstart="handleDragStart()"
     ondrop="handleDrop()"
     ondragover="handleDragOver()"
     ondragenter="handleDragEnter()"
     ondragleave="handleDragLeave()"
     ondragend="handleDragEnd()">
    <p draggable="true" id="p">Danny</p>
</div>

<div style="border: 1px solid black; width: 200px; height: 100px; margin-top: 44px;"
     ondragstart="handleDragStart()"
     ondrop="handleDrop()"
     ondragover="handleDragOver()"
     ondragenter="handleDragEnter()"
     ondragleave="handleDragLeave()"
     ondragend="handleDragEnd()"></div>
<script>

    // ondragstart
    // Triggered when drag starts
    function handleDragStart() {
        // Add the id of the drag element to the attribute of the drag event. When the drag is over, the drag element can be found
        event.dataTransfer.setData("Danny", event.target.id)
    }

    // ondragenter
    // Triggered when an element is dragged into the container
    function handleDragEnter() {
        console.log("Enter container", event.target)
    }

    // ondragleave
    // Triggered when an element is dragged out of the container
    function handleDragLeave() {
        console.log("Leave container", event.target)
    }

    // ondragend
    // Triggered when the drag is complete
    function handleDragEnd() {
        console.log("Drag and drop complete")
    }

    // ondrop
    // Triggered when the mouse is released while dragging
    function handleDrop() {
        // Native events cannot be dragged into other places
        event.preventDefault()
        // Place the dragged element into the current element
        event.target.append(document.querySelector(`#${event.dataTransfer.getData("Danny")}`))
    }

    // ondragover
    // Triggered when an element is dragged into a container
    function handleDragOver() {
        // Native events cannot be dragged into other places
        event.preventDefault()
    }
</script>
2.3 drag read
-
Register the ondrop event for the container, prohibit native events, and use FileReader to read
-
Register the ondragover event for the container and prohibit native events
<div style="width: 200px; height: 100px; border: 1px solid black;" ondrop="handleDrop()" ondragover="handleDragOver()"></div>
<script>
    function handleDragOver() {
        event.preventDefault()
    }

    function handleDrop() {
        event.preventDefault()
        // By default, only one file is dragged and uploaded here
        let file = event.dataTransfer.files[0]
        let fd = new FileReader()
        fd.readAsArrayBuffer(file)
        fd.onload = function(event) {
            console.log(event.target.result)
        }
    }
</script>
2.4 read progress issues
The instantiated object of FileReader, which can monitor the reading progress
fd.onprogress = function(event) {
    console.log(event.loaded)
}
3. Local disk IO - write
3.1 object URL and Blob
-
Blob represents a binary large object. In the IO of client JavaScript, blob object and File object are in the same position (but actually File is a subclass of BLOB), both of which represent a large binary File.
-
Object URL is different from blob and File. Blob and File are understood as the whole binary large File, and the object URL is understood as the URL pointing to the File, excluding the File itself. URL. Can be used to generate object URL Createobjecturl (), and the parameter can be File or blob.
3.2 a label writing
-
Set the href attribute of the a tag to the URL of the corresponding resource. If there is no URL, you can obtain the file and generate the URL through the object URL
-
Set the download attribute of the a tag to the name of the file you want to download
3.3 special style a label writing
It is also similar to the problem of using input flexibly mentioned above
-
Set the display attribute of a tag to none to hide it
-
Set a new Click to download element, and set its click event as the click event that triggers the a tag
4. Network IO ---- Download
4.1 readable stream learning of client JavaScript
-
Readable stream object: ReadableStream
-
Controllable readable flow: pass in the parameter {start(control) {}} in the constructor to represent the readable flow control parameters
-
Encapsulation of controllable readable stream: in the start function, through control Enqueue writes data to the readable stream. When the data is written, use control Close closes the readable stream
-
Read of controllable readable stream: through readablestream GetReader () obtains the read lock s, which can be read safely. After that, we call the read lock S.read() to read the data. read() is actually the next() method that calls the asynchronous iterator. For details, see "JavaScript asynchronous programming" blog.
<script>
    // Create an asynchronous iterator, which is implemented by the generator
    let asyncIter = (function* asyncMaker() {
        for (let i = 0; i < 5; i++)
            yield new Promise(res => setTimeout(res.bind(globalThis, i), 1000))
    })();

    // Create a readable stream to encapsulate the underlying data
    let stream = new ReadableStream({
        async start(control) {
            // Traverse the asynchronous iterator and load the data into a readable stream
            for await(let value of asyncIter)
                control.enqueue(value)
            // After writing data, the readable stream is closed
            control.close()
        }
    });

    // Get read lock of readable stream
    let readLock = stream.getReader();

    // Read the readable stream automatically, here in recursive form
    (function () {
        let that = arguments.callee
        readLock.read().then(res => {
            if (!res.done) {
                console.log(res.value)
                that()
            }
        })
    })();
</script>
4.2 fetchAPI to realize network IO download progress bar
By getting the readable stream response getReader(). Read() to get the current download progress
Web code
<p>Downloading</p>
<progress id="progress" value="0"></progress>
<script>
    // The actual time is: data flow transmission time in the network + data flow into binary objects + local disk IO time (only three time-consuming delays are listed)
    // The time displayed in the progress bar is the data flow transmission time in the network
    // This problem is also true in XHR. Large files can be downloaded directly with the a tag, but you can't customize the style to display the progress

    let progress = document.querySelector("#progress")

    fetch("test.mp4")
        .then(res => {
            let size = res.headers.get("Content-Length")
            let readLock = res.body.getReader()
            let sum = 0
            // Set progress bar capacity
            progress.max = size

            let stream = new ReadableStream({
                async start(control) {
                    while(true) {
                        let { done, value } = await readLock.read()
                        if(done) {
                            control.close()
                            break
                        }
                        sum += value.length
                        progress.value = sum

                        // Put the data block into a new stream. After reading, the readLock stream has ended. If you want to give it to a tag for download, you need a new stream from scratch
                        control.enqueue(value)
                    }
                }
            })
            return new Response(stream)
        })
        .then(res => res.blob())
        .then(blob => {
            let a = document.createElement("a")
            a.style.display = "none"
            a.href = URL.createObjectURL(blob)
            a.download = "video.mp4"
            document.body.prepend(a)
            a.click()
            // Reclaiming URL memory and removing the a tag is equivalent to reducing a reference to the file
            URL.revokeObjectURL(a.href)
            document.body.firstElementChild.remove()
        })
</script>
Proxy server code
Video test mp4 (the following code is in mp4 format) is placed in the current directory. Although it is placed locally, in fact, during the local loop test, the data will pass the loop test network card, and there will be network delay.
let fs = require("fs").promises
require("http").createServer((req, res) => {
    if(req.url.includes("html")) {
        fs.readFile("." + req.url).then(data => {
            res.writeHead(200, {
                "Content-Type": "text/html"
            })
            res.write(data)
            res.end()
        })
    } else if(req.url.includes("mp4")) {
        fs.readFile("." + req.url).then(data => {
            res.writeHead(200, {
                "Content-Type": "video/mp4",
                "Content-Length": data.length
            })
            res.write(data)
            res.end()
        })
    }
}).listen(3000)
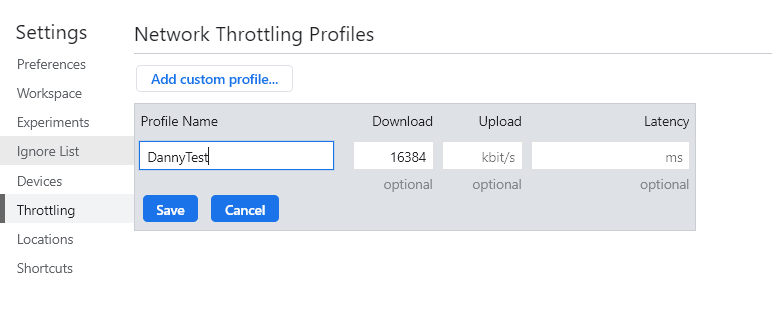
If the download speed is too fast, you can set the download speed limit in the debugging platform to more clearly display the progress of the progress bar. The following is the settings in Google browser. The download speed is set to 2MB per second. The unit in the figure is bit/s.

4.3 XHR realizes network IO download progress bar
By listening to XHR Use the onprogress event to get the download progress
Note: pay attention to setting responseType, otherwise garbled code will be received
Web code
<p>Downloading</p>
<progress id="progress" value="0"></progress>
<script>
    let progress = document.querySelector("#progress")

    let xhr = new XMLHttpRequest()
    xhr.open("get", "test.mp4")
    xhr.responseType = "blob"
    xhr.send(null)

    xhr.onload = function() {
        if(xhr.readyState === 4 && xhr.status === 200)
            xhrCallback(xhr.response)
    }

    xhr.onprogress = function(event) {
        progress.max = event.total
        progress.value = event.loaded
    }

    function xhrCallback(res) {
        console.log(res)
        let a = document.createElement("a")
        a.href = URL.createObjectURL(res)
        a.download = "video.mp4"
        a.style.display = "none"
        document.body.append(a)
        a.click()
        URL.revokeObjectURL(a.href)
        document.body.lastElementChild.remove()
    }
</script>
The proxy server code is the same as above
5. Network IO - Upload
5.1 FormData serialization and JSON serialization
The upload operation uses the post method to carry the payload by default, which is the body part of the HTTP request. When the client sends a request, the body needs to be serialized before it can be correctly received by the server.
-
JSON serialization: JSON serialization is structured cloning, but it has defects. Some special reference types cannot be structured cloning (see another blog "deep copy and shallow copy of JavaScript data" for details)
-
FormData serialization: it is a little more troublesome than JSON, but it can solve binary file transmission. The transmission can be of string or Blob type. If you want to transfer Blob objects, JSON serialization cannot structurally clone them, but FormData can be transferred normally.
5.1.1 presentation of formdata
Web code
<script>
    let fd = new FormData()
    fd.append("name", "Danny")
    fd.append("age", "20")
    fd.append("gender", "man")

    fetch("/Vanghua", {
        method: "post",
        body: fd
    }).then(res => res.text()).then(console.log)
</script>
Server code
let fs = require("fs").promises
require("http").createServer((req, res) => {
    if(req.url.includes("html")) {
        fs.readFile("." + req.url).then(data => {
            res.writeHead(200, {
                "Content-Type": "text/html"
            })
            res.write(data)
            res.end()
        })
    } else if(req.url.includes("Vanghua")) {
        req.on("data", function(chunk) {
            console.log(chunk.toString())
        })
        res.writeHead(200)
        res.write("success")
        res.end()
    }
}).listen(3000)
Server output
"------- WebKitFormBoundaryqd9O7Vy6pSDqNKIq" is the field separator. The boundary field is automatically added in the content type, and the field value is this separator.
------WebKitFormBoundaryqd9O7Vy6pSDqNKIq
Content-Disposition: form-data; name="name"
Danny
------WebKitFormBoundaryqd9O7Vy6pSDqNKIq
Content-Disposition: form-data; name="age"
20
------WebKitFormBoundaryqd9O7Vy6pSDqNKIq
Content-Disposition: form-data; name="gender"
man
------WebKitFormBoundaryqd9O7Vy6pSDqNKIq–
5.1.2 division of formdata field
Web code
<script>
    let fd = new FormData()
    fd.append("name", "Danny")
    fd.append("age", "20")
    fd.append("gender", "man")
    fd.append("school", JSON.stringify({
        name: "SDU",
        age: 120
    }))

    fetch("/Vanghua", {
        method: "post",
        body: fd
    }).then(res => res.text()).then(console.log)
</script>
Server code
Note: the following cutting code is only applicable to cutting ordinary transmission strings, not media transmission
let fs = require("fs").promises
require("http").createServer((req, res) => {
    if(req.url.includes("html")) {
        fs.readFile("." + req.url).then(data => {
            res.writeHead(200, {
                "Content-Type": "text/html"
            })
            res.write(data)
            res.end()
        })
    } else if(req.url.includes("Vanghua")) {
        let ct = req.headers["content-type"]
        let boundary = ct.slice(ct.indexOf("boundary") + 9)
        let data = ""

        req.on("data", function(chunk) {
            // The received chunk is Buffer type data and stream data. It is spliced with data and converted into string form
            data += chunk
        })

        req.on("end", function() {
            // Give the spliced data blocks to the segmentation function to process the separator to obtain the final result object
            let res = getData(data, boundary)
            console.log(res)
        })

        res.writeHead(200)
        res.write("success")
        res.end()
    }
}).listen(3000)

// Split data for FormData
function getData(str, boundary) {
    let res = {}
    // When the separator is actually applied, there are two "--" in front of it
    boundary = "--" + boundary
    while(str.length) {
        // Each separator is followed by a carriage return + line feed, so 2 additional separators are cut off
        str = str.slice(str.indexOf(boundary) + boundary.length + 2)
        // There will also be a separator at the end of the last field. So far, after cutting, there will be a carriage return + line feed left. Avoid assigning an empty key and value to res and exit directly
        if(str.length === 2)
            break

        let keyStart = str.indexOf("name") + 6
        // End position of key: after the key is enter + line feed. Find the carriage return position, and then - 1 arrive at the "position. Since the slice is closed on the left and opened on the right, it can arrive"
        let keyEnd = str.indexOf("\r") - 1

        // Start position of value: the first line feed is at the end of the key, and the end of the key is enter + line feed. There is a blank line under the key, which is enter + line feed. Below the blank line is the value, so add 3
        let valueStart = str.indexOf("\n") + 3
        // Minus 2 is minus carriage return + line feed
        let valueEnd = str.indexOf(boundary) - 2

        let key = str.slice(keyStart, keyEnd)
        let value = str.slice(valueStart, valueEnd)

        res[key] = value
    }
    return res
}
Server output
{
name: 'Danny',
age: '20',
gender: 'man',
school: '{"name":"SDU","age":120}'
}
5.1.3 use Multiparty package to solve the cutting of FormData
npm install Multiparty to install and transfer the package processing FormData
The following demonstrates the basic usage:
-
For ordinary fields, the function of getData function implemented in 5.1.2 can be realized, and ordinary fields can be accessed through fields. (the field form is key: [value])
-
For Blob type, you can access it through files. The following code demonstrates the code that the server receives the uploaded video from the client and saves it.
let fs = require("fs").promises
let fss = require("fs")
let multiparty = require("multiparty")
require("http").createServer((req, res) => {
    if(req.url.includes("html")) {
        fs.readFile("." + req.url).then(data => {
            res.writeHead(200, {
                "Content-Type": "text/html"
            })
            res.write(data)
            res.end()
        })
    } else if(req.url.includes("Vanghua")) {
        // Use multiparty to parse the passed FormData
        let form = new multiparty.Form()
        form.parse(req, function(err, fields, files) {
            // Save common data in fields and file data in files (Blob type passed)
            if(files.video[0]) {
                // file.path is the current video cache address. multiparty parses the file in FormData and saves it to the cache
                let file = files.video[0]
                // Read and write the video in the cache to the specified location
                let readStream = fss.createReadStream(file.path)
                let writeStream = fss.createWriteStream("./Danny.mp4")
                readStream.pipe(writeStream)
                // Listen for the status of the stream
                writeStream.on("finish", function() {
                    console.log("Write complete")
                })
                // Clear the video in the C disk cache
                fss.unlinkSync(file.path)
            }
            res.writeHead(200)
            res.write("success")
            res.end()
        })
    }
}).listen(3000)
5.1.4 precautions for using formdata
When the client uses FormData, pay attention to the content type in the Headers of the HTTP request. FormData will automatically add it to the boundary, and will automatically generate the content type according to the content you transmit. It's easy to make mistakes in writing content type by yourself. Many blog posts on online blogs report that the content type they think is correct is wrong. Therefore, the content type setting in the request can be ignored.
5.2 upload and display progress bar
The upload progress bar can only be completed by XHR by listening to the onprogress event of XHR's upload. The fetch can receive the data stream during downloading, but cannot obtain the data stream of the fetch during uploading, so there is no way to start monitoring the progress.
Web code
The following code demonstration still takes the video as an example
<input style="display: none;" type="file" accept="video/*" id="input" onchange="handleChanged()"/>
<button onclick="handleClick()">Select upload file</button>
<p>Uploading</p>
<progress id="progress" value="0"></progress>
<video id="video" style="display: block;" controls></video>
<script>
    let progress = document.querySelector("#progress")
    let input = document.querySelector("#input")

    function handleClick() {
        input.click()
    }

    function handleChanged() {
        // Realize video preview
        video.src = URL.createObjectURL(event.target.files[0])

        let xhr = new XMLHttpRequest()
        xhr.open("post", "/Vanghua")

        // Monitor progress
        xhr.upload.onprogress = function(event) {
            progress.max = event.total
            progress.value = event.loaded
        }

        // Receive server reply
        xhr.onload = function() {
            console.log(xhr.responseText)
        }

        // Mount through FormData introduced in 5.1
        let fd = new FormData()
        fd.append("video", event.target.files[0])
        xhr.send(fd)
    }
</script>