Introduction to the author
- Author: Lucifer Liu, member of China DBA Alliance (ACDU).
- At present, he is engaged in Oracle DBA and has been engaged in Oracle database development, mainly serving manufacturing, automotive finance and other industries.
- Now it has Oracle OCP and OceanBase OBCA certification, and is good at Oracle database operation and maintenance development, backup and recovery, installation and migration, Linux automatic operation and maintenance script writing, etc.

preface
As an IT person, I believe everyone has more or less contacted and used Oracle database, but few people have installed Oracle database, because this kind of work is generally done by DBA s, such as bloggers 😬. So, if you want to install a set of Oracle database for testing, how to install it?
- First, to successfully install a set of Oracle databases, you need to meet at least the following conditions:
- Understand the basic hardware resource configuration: hard disk, memory, CPU, etc
- Familiar with how to install Linux system, including the use of a variety of virtual machines
- Familiar with Linux common commands and system services
- Familiar with the overall installation process of Oracle database, please refer to the official documents
- For specific steps, refer to:
- Installing the Linux operating system
- Configure storage, network
- Configure operating system services and parameters, etc
- Configure Oracle related user directories, etc
- Upload and unzip installation media
- Installing Oracle Software
- Create database instance

- Reference documents:
- How Windows hosts play with virtual machine Linux Installation
- Teach you three steps to install Linux on MacOS
- Teach you how to install Oracle database on Linux
- Step by step to teach you how to install Oracle RAC for Linux 7
If this article is just like this, it will inevitably be too headline party. As the saying goes, throw away and quote jade. Next, let's introduce the protagonist of this article:
- Oracle one click installation script, only one line of command is needed to build the database, a cup of tea, and don't forget to keep healthy while typing the code.

1, Introduction
As the saying goes: "lazy people" promote the development of the world. Since you can solve things with scripts, why bother so much? It's over.
1 function introduction
- What are the functions of this script? What versions are supported? What are the parameters? No hurry, there are too many functions. Let me talk slowly:
- Oracle versions supported: 11GR2, 12C, 18C, 19C
- Supported Linux versions (x86_64): 6, 7, 8
- Supported installation modes: single machine, single machine cluster, RAC
- Help command view parameters
- Installation logging
- Configure operating system
- Install Grid software
- Installing Oracle Software
- Install PSU & & Ru patch
- Create database
2 parameter introduction
- This script pre configures script commands through parameters. You can view the parameters through the help command:
Execution/ OracleShellInstall --help can view parameters:
-i,		--PUBLICIP					PUBLICIP NETWORK ADDRESS
-n,		--HOSTNAME					HOSTNAME(orcl)
-o,		--ORACLE_SID				ORACLE_SID(orcl)
-c,		--ISCDB						IS CDB OR NOT(TRUE|FALSE)
-pb,	--PDBNAME					PDBNAME
-op,	--ORAPASSWD					ORACLE USER PASSWORD(oracle)
-b,		--ENV_BASE_DIR				ORACLE BASE DIR(/u01/app)
-s,		--CHARACTERSET				ORACLE CHARACTERSET(ZHS16GBK|AL32UTF8)
-rs,	--ROOTPASSWD				ROOT USER PASSWORD
-gp,	--GRIDPASSWD				GRID USER PASSWORD(oracle)
-pb1,	--RAC1PUBLICIP				RAC NODE ONE PUBLIC IP
-pb2,	--RAC2PUBLICIP				RAC NODE SECONED PUBLIC IP
-vi1,	--RAC1VIP					RAC NODE ONE VIRTUAL IP
-vi2,	--RAC2VIP					RAC NODE SECOND VIRTUAL IP
-pi1,	--RAC1PRIVIP				RAC NODE ONE PRIVATE IP
-pi2,	--RAC2PRIVIP				RAC NODE SECOND PRIVATE IP
-pi3,	--RAC1PRIVIP1				RAC NODE ONE PRIVATE IP
-pi4,	--RAC2PRIVIP1				RAC NODE SECOND PRIVATE IP
-puf,	--RACPUBLICFCNAME	        RAC PUBLIC FC NAME
-prf,	--RACPRIVFCNAME				RAC PRIVATE FC NAME
-prf1,	--RACPRIVFCNAME1			RAC PRIVATE FC NAME
-si,	--RACSCANIP					RAC SCAN IP
-dn,	--ASMDATANAME				RAC ASM DATADISKGROUP NAME(DATA)
-on,	--ASMOCRNAME				RAC ASM OCRDISKGROUP NAME(OCR)
-dd,	--DATA_BASEDISK				RAC DATADISK DISKNAME
-od,	--OCRP_BASEDISK				RAC OCRDISK DISKNAME
-or,	--OCRREDUN					RAC OCR REDUNDANCY(EXTERNAL|NORMAL|HIGH)
-dr,	--DATAREDUN					RAC DATA REDUNDANCY(EXTERNAL|NORMAL|HIGH)
-tsi,   --TIMESERVERIP              RAC TIME SERVER IP
-txh    --TuXingHua                 Tu Xing Hua Install
-udev   --UDEV                      Whether Auto Set UDEV
-dns    --DNS                       RAC CONFIGURE DNS(Y|N)
-dnss   --DNSSERVER                 RAC CONFIGURE DNSSERVER LOCAL(Y|N)
-dnsn   --DNSNAME                   RAC DNSNAME(orcl.com)
-dnsi   --DNSIP                     RAC DNS IP
-m,		--ONLYCONFIGOS				ONLY CONFIG SYSTEM PARAMETER(Y|N)
-g,		--ONLYINSTALLGRID 			ONLY INSTALL GRID SOFTWARE(Y|N)
-w,		--ONLYINSTALLORACLE 		ONLY INSTALL ORACLE SOFTWARE(Y|N)
-ocd,	--ONLYCREATEDB		        ONLY CREATE DATABASE(Y|N)
-gpa,	--GRID RELEASE UPDATE		GRID RELEASE UPDATE(32072711)
-opa,	--ORACLE RELEASE UPDATE		ORACLE RELEASE UPDATE(32072711)
Seeing the above parameters, do you think there are too many parameters, but these parameters are useful. Let me talk slowly one by one:
- -i full name PUBLICIP: the IP used by the current host to access; required parameter.
Usage: -i 10.211.55.100
- -n full name HOSTNAME: the HOSTNAME of the current host. The default value is orcl.
Usage: - n orcl
If the rac mode is selected, the host names of nodes 1 and 2 are automatically taken as orcl01 and orcl02.

- -o full name ORACLE_SID: Oracle instance name. The default value is orcl.
Usage: - o orcl
- -c full name ISCDB: judge whether it is CDB mode. 11GR2 does not support this parameter, and the default value is FALSE.
Usage: - c TRUE
- -pb full name PDBNAME: the name of the created PDB. 11GR2 does not support this parameter.
Usage: - pb pdb01
- -op full name ORAPASSWD: the password of oracle user. The default value is oracle.
Usage: - op oracle
- -b full name ENV_BASE_DIR: Oracle basic installation directory. The default value is / u01/app.
Usage: - b /u01/app
- -s full name CHARACTERSET: Oracle database character set. The default value is AL32UTF8.
Usage: - s AL32UTF8
The following parameters are installed in RAC mode:
- -rs full name ROOTPASSWD: the password of root user. The default value is oracle.
Usage: - rs oracle
- -gp full name: GRIDPASSWD: the password of grid user. The default value is oracle.
Usage: - gp oracle
- -pb1 full name RAC1PUBLICIP: the host access IP of node 1. Required parameter.
Usage: -pb1 10.211.55.100
- -pb2 full name RAC2PUBLICIP: the host access IP of node 2. Required parameter.
Usage: -pb2 10.211.55.101
- -vi1 full name RAC1VIP: the host virtual IP of node 1, which is a required parameter and must be the same as the host access IP network segment.
Usage: -vi1 10.211.55.102
- -vi2 full name RAC2VIP: the host virtual IP of node 2, a required parameter, which must be the same as the host access IP network segment.
Usage: -vi2 10.211.55.103
- -pi1 full name: RAC1PRIVIP, host private IP of node 1, required parameter, can be customized according to preferences.
Usage: -pi1 10.10.1.1
- -pi2 full name: RAC2PRIVIP, host private IP of node 2, required parameter, can be customized according to preferences.
Usage: -pi2 10.10.1.2
- -pi3 full name: RAC1PRIVIP1, the private IP of the second host of node 1, optional parameters, which can be customized according to preferences.
Usage: -pi3 1.1.1.1
- -pi4 full name: RAC2PRIVIP1, the private IP of the second host of node 2, optional parameters, which can be customized according to preferences.
Usage: -pi4 1.1.1.2
- -puf full name: RACPUBLICFCNAME, the network card name corresponding to the access IP of the host, a required parameter, and the names of nodes 1 and 2 must be the same.
Usage: - puf eth0
- -Full name of prf RACPRIVFCNAME: the network card name corresponding to the private IP of the host. It is a required parameter. The names of nodes 1 and 2 must be the same.
Usage: - prf eth1
- -prf1 full name RACPRIVFCNAME1: the network card name corresponding to the second private IP of the host. Optional parameters. The names of nodes 1 and 2 must be the same.
Usage: - prf1 eth2
- -si full name RACSCANIP: SCANIP of the host. Required parameter. It must be the same as the IP network segment accessed by the host. When configuring DNS resolution, you can fill in up to 3 IPS separated by commas.
Usage: - si 10.211.55.104,10.211.55.105,10.211.55.106
- -dn full name ASMDATANAME: ASM DATA disk name. The default value is DATA.
Usage: - dn DATA
- -on full name ASMOCRNAME: the name of ASM arbitration panel. The default value is OCR.
Usage: - on OCR
- -dd full name DATA_BASEDISK: the disk name corresponding to the data disk; required parameter. Multiple disks are supported, separated by commas.
Usage: - dd /dev/sdb,/dev/sdc,/dev/sdd
- -Full name: OCR_BASEDISK: the name of the disk corresponding to the arbitration disk; required parameter. Multiple disks are supported, separated by commas.
Usage: - od /dev/sde,/dev/sdf
- -or full name OCRREDUN: the redundancy option of the arbitration panel. The default value is EXTERNAL. The minimum number of disks corresponding to the redundancy options EXTERNAL, NORMAL and HIGH is 1, 3 and 5.
Usage: - or EXTERNAL
- -dr full name OCRREDUN: redundancy option of the arbitration panel. The default value is EXTERNAL. The minimum number of disks corresponding to the redundancy options EXTERNAL, NORMAL and HIGH is 1, 2 and 3.
Usage: - dr EXTERNAL
- -tsi full name: TIMESERVERIP: time synchronization server IP, optional parameter, filled in according to the actual situation.
Usage: - tsi 10.211.55.200
- -txh full name TuXingHua: graphical interface installation. The default value is N. Selecting Y installs the dependencies required for the graphical interface.
Usage: -txh Y
- -UDEV full name UDEV: automatically configure multipath+UDEV binding disk. The default value is Y.
Usage: - udev Y
The following parameters configure DNS resolution for:
- -DNS full name: configure DNS resolution. The default value is N.
Usage: - dns N
- -dnss full name DNSSERVER: the current host is configured as a DNS server. The default value is N. If - dns Y takes effect.
Usage: - dnss N
- -dnsn full name DNSNAME: the resolved name of the DNS server, provided that - dns Y takes effect.
Usage: - dnsn orcl com
- -dnsi full name DNSIP: the IP address of the DNS server, provided that - dns Y takes effect.
Usage: - dnsi 10.211.55.200
- -m full name: ONLYCONFIGOS: only operating system parameters are configured, and the default value is N. When the value is Y, the script will end only after the operating system configuration is completed, and will not be installed. It is usually used for the initialization of graphical installation.
Usage: - m Y
- -g full name: ONLYINSTALLGRID: only Grid software is installed, and the default value is N.
Usage: - g Y
- -w full name: ONLYINSTALLORACLE: only Oracle Software is installed. The default value is N.
Usage: - w Y
- -ocd full name: ONLYCREATEDB: only Oracle database instances are created. The default value is N.
Usage: - ocd Y
- -gpa full name GRID RELEASE UPDATE: the patch number of PSU or RU patch of Grid software.
Usage: - gpa 32072711
- -opa full name ORACLE RELEASE UPDATE: the patch number of PSU or RU patch of Oracle Software.
Usage: - opa 32072711
Through the introduction of the above parameters, I believe you have a glance at the functions of the script, which can be said to be very powerful. Is it better to take action and try to install it? Next, I'll show you how to use scripts.
2, Use
Now that you know the functions and parameters of the script, the next step is to understand how to use the script.

Direct command:/ OracleShellInstall.sh -i 10.211.55.100
Notes: the most convenient installation method. The default parameters are not set. Just add the host IP to install the Oracle database with one click.
Note: the script download address is shown at the end of the text
1 create a software directory, for example: / soft
mkdir /soft
2 mount Linux Installation image
## 1. Mount via cdrom
mount /dev/cdrom /mnt
## 2. Mount by installing the image source
mount -o loop /soft/rhel-server-7.9-x86_64-dvd.iso /mnt

3 upload the installation media and script to the software directory
## One click installation shell script
140K	OracleShellInstall.sh
## oracle 11GR2 official installation package
1.3G	p13390677_112040_Linux-x86-64_1of7.zip
1.1G	p13390677_112040_Linux-x86-64_2of7.zip
## Authorize script execution permissions
chmod +x OracleShellInstall.sh

4. Perform installation:
./OracleShellInstall.sh -i 10.211.55.100
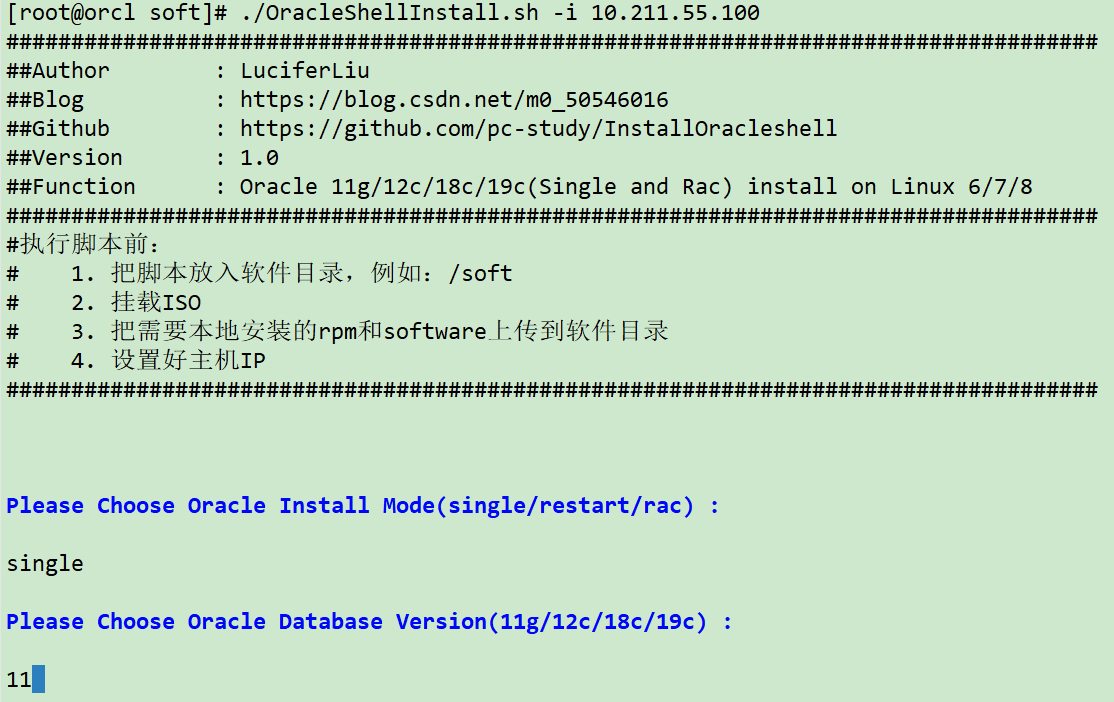
Wait for about 5-10 minutes and the installation is successful.

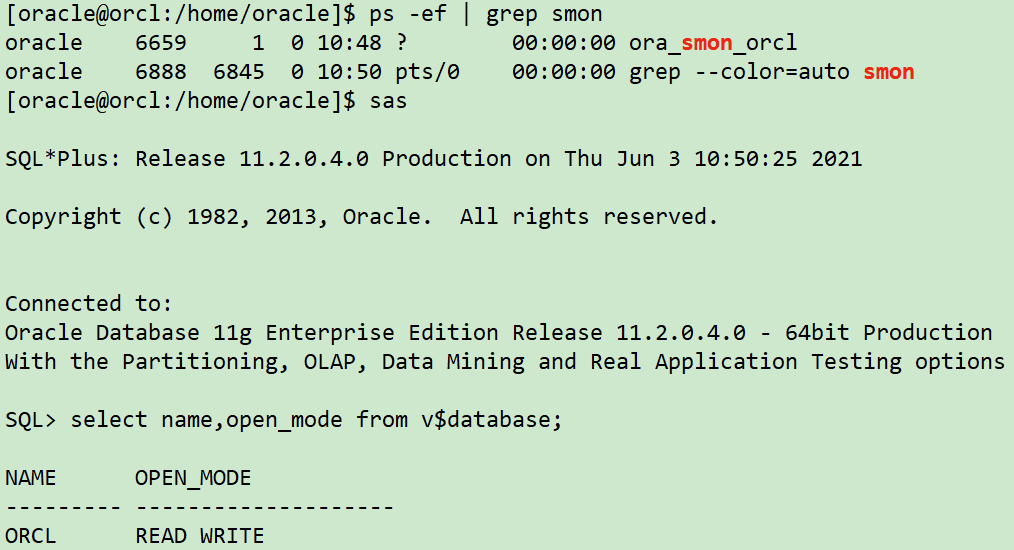
5 database connection usage
Students who do not know how to install PLSQL can refer to: How does zero foundation play PL/SQL DEVELOPER?
- To create a connected user:
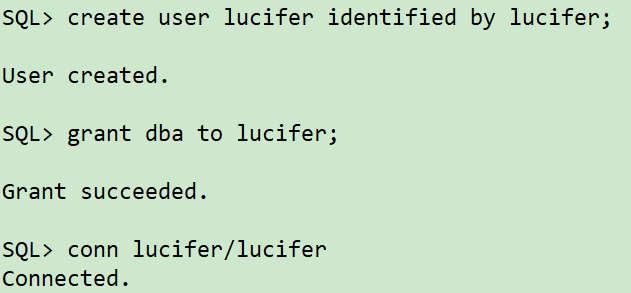
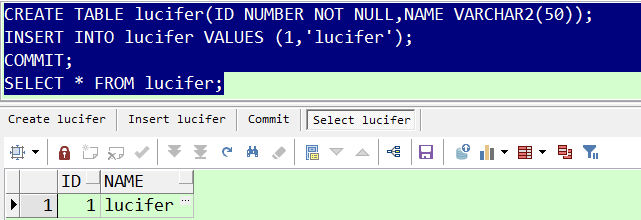
- plsql connection:

Through the above simple tutorial, Oracle database can be easily installed, greatly reducing labor and time costs.
3, Example
1. Single instance installation
./OracleShellInstall.sh -i 10.211.55.100 `#Public ip`\
-n orcl `# hostname`\
-o orcl `# oraclesid`\
-op oracle `# oracle user password`\
-b /u01/app `# install basedir`\
-s AL32UTF8 `# characterset`\
-opa 31537677 `# oracle psu number`
2 RAC installation
./OracleShellInstall.sh -i 10.211.55.100 `#Public ip`\
-n rac `# hostname`\
-rs oracle `# root password`\
-op oracle `# oracle password`\
-gp oracle `# grid password`\
-b /u01/app `# install basedir`\
-o orcl `# oraclesid`\
-s AL32UTF8 `# characterset`\
-pb1 10.211.55.100 -pb2 10.211.55.101 `# node public ip`\
-vi1 10.211.55.102 -vi2 10.211.55.103 `# node virtual ip`\
-pi1 10.10.1.1 -pi2 10.10.1.2 `# node private ip`\
-puf eth0 -prf eth1 `# network fcname`\
-si 10.211.55.105 `# scan ip`\
-dd /dev/sde,/dev/sdf `# asm data disk`\
-od /dev/sdb,/dev/sdc,/dev/sdd `# asm ocr disk`\
-or EXTERNAL `# asm ocr redundancy`\
-dr EXTERNAL `# asm data redundancy`\
-on OCR `# asm ocr diskgroupname`\
-dn DATA `# asm data diskgroupname`\
-gpa 32580003 `# GRID PATCH`
If you can use this script reasonably, you can easily install Oracle database on Linux system and release your hands. Tapping code is not a dream!!!
For more detailed script usage, you can subscribe to the column: Oracle one click installation script.
15 minutes! One click deployment of Oracle 12CR2 stand-alone CDB+PDB
20 minutes! One click deployment of Oracle 18C stand-alone CDB+PDB
25 Minutes! One click deployment of Oracle 11GR2 HA stand-alone cluster
30 Minutes! One click deployment of Oracle 19C stand-alone CDB+PDB
1.5 hours! One click deployment of Oracle 11GR2 RAC cluster
Script acquisition method:
- GitHub Keep updating 🔥
- CSDN resource download
- WeChat official account: Lucifer think twice before you act.
This sharing is over~
If you think the article is helpful to you, official account, collection, attention, comment, one key and four links support, your support is the biggest driving force for my creation.