Official tutorial: Getting Started
preparation:
Before installing istio, you need to run the Kubernetes cluster. We can use the cloud service k8s cluster provided by the service provider. The official website also provides documents on how to prepare these Kubernetes platforms for reference Platform installation , which also includes Alibaba cloud.
Of course, we can also use minicube to build local k8s clusters, which is also the way I use here. For the whole building steps, please refer to my previous blog: Creating k8s local single node clusters using minicube.
1, Install istio
1. Download istio
Can go Istio publishing page Download directly, or use the following command to download and decompress automatically.
#download
curl -L https://istio.io/downloadIstio | sh -
#Download, specify version, platform and architecture
curl -L https://istio.io/downloadIstio | ISTIO_VERSION=1.6.8 TARGET_ARCH=x86_64 sh -

#Add the istioctl client to the environment variable (the version downloaded here is 19.5)
cd istio-1.9.5
export PATH=$PWD/bin:$PATH
2. Install istio
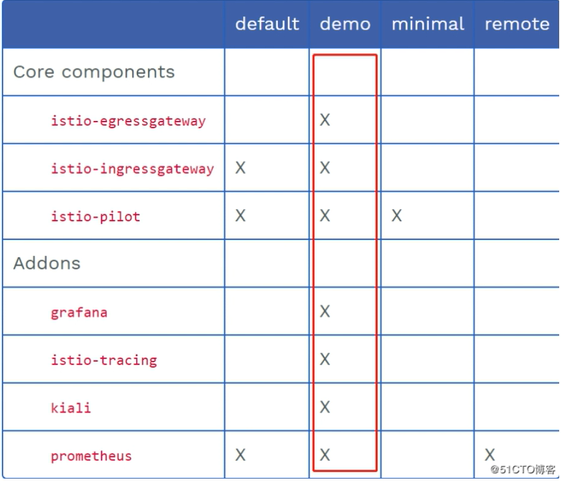
For the purpose of learning and testing, the profile profile here uses the demo. There are other profile profiles for production environment and performance testing.
$ istioctl install --set profile=demo -y
✔ Istio core installed
✔ Istiod installed
✔ Egress gateways installed
✔ Ingress gateways installed
✔ Installation complete
Note: select different profiles during installation, and the installed components are different from plug-ins. In production, it is recommended to install default profile for performance reasons. Generally, skilled veterans will use empty profile, and then open components and plug-ins according to requirements, List of different profile installation components and plug-ins (where x represents installation):

3. Label the default namespace istio injection = enabled. Istio By default, the side car is automatically injected.
$ kubectl label namespace default istio-injection=enabled
namespace/default labeled
2, Deploy application
Official documents: Istio / Bookinfo app
1. Start application service
The sample case is provided in the istio installation package.
1) Use kubectl Deploy application
$ kubectl apply -f samples/bookinfo/platform/kube/bookinfo.yaml
service/details created
serviceaccount/bookinfo-details created
deployment.apps/details-v1 created
service/ratings created
serviceaccount/bookinfo-ratings created
deployment.apps/ratings-v1 created
service/reviews created
serviceaccount/bookinfo-reviews created
deployment.apps/reviews-v1 created
deployment.apps/reviews-v2 created
deployment.apps/reviews-v3 created
service/productpage created
serviceaccount/bookinfo-productpage created
deployment.apps/productpage-v1 created
The above command will start all four services, including three versions of the reviews service (v1, v2 and v3)
2) Confirm that all services and pods have been correctly defined and started:
$ kubectl get services
NAME          TYPE        CLUSTER-IP       EXTERNAL-IP   PORT(S)    AGE
details       ClusterIP   10.104.222.167   <none>        9080/TCP   2m21s
kubernetes    ClusterIP   10.96.0.1        <none>        443/TCP    5h20m
productpage   ClusterIP   10.102.235.10    <none>        9080/TCP   2m20s
ratings       ClusterIP   10.107.206.19    <none>        9080/TCP   2m21s
reviews       ClusterIP   10.109.70.255    <none>        9080/TCP   2m20s
also:
$ kubectl get pods
NAME                              READY   STATUS            RESTARTS   AGE
details-v1-79f774bdb9-m7k57       0/2     PodInitializing   0          2m44s
productpage-v1-6b746f74dc-v9zbn   0/2     PodInitializing   0          2m42s
ratings-v1-b6994bb9-s4ln5         0/2     PodInitializing   0          2m44s
reviews-v1-545db77b95-hqrj6       0/2     PodInitializing   0          2m44s
reviews-v2-7bf8c9648f-pnf6f       0/2     PodInitializing   0          2m44s
reviews-v3-84779c7bbc-zkhpx       0/2     PodInitializing   0          2m43s
3) To confirm whether the Bookinfo app is running, use the curl Command to send a request to an application, for example ratings:
$ kubectl exec -it $(kubectl get pod -l app=ratings -o jsonpath='{.items[0].metadata.name}') -c ratings -- curl productpage:9080/productpage | grep -o "<title>.*</title>"
<title>Simple Bookstore App</title>
2. Determine the IP and port of Ingress
Now that the Bookinfo service is up and running, you need to enable the application to access the Kubernetes cluster from outside, such as using a browser Istio Gateway To achieve this goal.
1) Define an Ingress gateway for your application:
kubectl apply -f samples/bookinfo/networking/bookinfo-gateway.yaml
2) Confirm that the gateway creation is complete:
$ kubectl get gateway
NAME               AGE
bookinfo-gateway   72s
3) According to file Set access gateway INGRESS_HOST and INGRESS_PORT Variable. Confirm and set.
Here, follow the instructions in the document. Since I use the mibikube method to start the cluster, the following command is executed according to the document.
#Set INGRESS_PORT
export INGRESS_PORT=$(kubectl -n istio-system get service istio-ingressgateway -o jsonpath='{.spec.ports[?(@.name=="http2")].nodePort}')

#Set INGRESS_HOST
export INGRESS_HOST=$(minikube ip)
4) Set GATEWAY_URL:
export GATEWAY_URL=$INGRESS_HOST:$INGRESS_PORT
3. Confirm that the application can be accessed from outside the cluster
Can use curl Command to confirm that the Bookinfo application can be accessed from outside the cluster:
$ curl -s http://${GATEWAY_URL}/productpage | grep -o "<title>.*</title>"
<title>Simple Bookstore App</title>
You can also open the Web address with a browser http://$GATEWAY_URL/productpage to browse the app's Web page. If you refresh the app's page several times, you will see productpage The page will be displayed randomly reviews Effects of different versions of the service (red, black stars, or not shown). Reviews This happens because we haven't used Istio to control version routing.
3, Apply default target rule
Before using Istio to control Bookinfo version routing, you need to Target rule The available versions are defined in and named subsets .
Run the following command to create a default target rule for the Bookinfo service:
- If bidirectional TLS is not enabled, execute the following command
$ kubectl apply -f samples/bookinfo/networking/destination-rule-all.yaml
destinationrule.networking.istio.io/productpage created
destinationrule.networking.istio.io/reviews created
destinationrule.networking.istio.io/ratings created
destinationrule.networking.istio.io/details created
- If bidirectional TLS is enabled, execute the following command:
kubectl apply -f samples/bookinfo/networking/destination-rule-all-mtls.yaml
Wait a few seconds for the target rule to take effect.
You can view the target rule using the following command:
kubectl get destinationrules -o yaml