❤️❤️❤️ c3d is a free and powerful 3D image processing tool. It can play an unparalleled productivity especially in the research and application of deep learning medical images 😷
Taking Pancreas CT dataset and its tags as an example, I will briefly introduce the common functions of c3d processing dicom format 3D images (dicom into nii) and Nifti format 3D images
Download and install c3d and ITK snap
Official website download address: http://www.itksnap.org/pmwiki/pmwiki.php?n=Downloads.C3D
Remember to add the c3d command to the environment variable for easy calling.
data
-
Pancreas-CT(raw dicom files):
https://wiki.cancerimagingarchive.net/display/Public/Pancreas-CT
-
Labels(Nifiti files)
https://zenodo.org/record/1169361/files/label_tciapancreasct_multiorgan.tar.gz?download=1
Processing dicom Images
dicom image is a folder composed of a series of. dcm format files. Yes, a dicom image is a folder.
Next, we use c3d to convert a dicom picture (PANCREAS_0001) to Nifti (. nii.gz) format:
-
Enter the parent directory of Pancreas-99667 in dicom picture folder
$ cd \Pancreas-CT\PANCREAS_0001\11-24-2015-PANCREAS0001-Pancreas-18957
-
Use the command C3d - DICOM series list to obtain the dicom series id
$ c3d -dicom-series-list Pancreas-99667

output:
SeriesNumber	Dimensions	NumImages	SeriesDescription	SeriesID
512x512x240	    240	        Pancreas	                    1.2.826.0.1.3680043.2.1125.1.68878959984837726447916707551399667.512512
The long sequence is dicom series id.
-
Use the command C3d - dicom series read to read the dicom file and save it in. nii.gz format
$ c3d -dicom-series-read Pancreas-99667 1.2.826.0.1.3680043.2.1125.1.64196995986655345161142945283707267.512512 -o PANCREAS_0001.nii.gz
Soon, the Nifty image converted from dicom format is generated under the current folder.
It should be noted that the dicom series id obtained by running the C3d - DICOM series list command is different each time. You must obtain the ID immediately and copy the ID immediately to read the picture. Using the wrong dicom series id will report an error that series dicom files cannot be found.
Process nii pictures
c3d provides many optional parameters to process 3D images in. nii.gz format, such as: - info, - region, - resample, - type, - thresh, - voxel sum, etc., which brings a lot of convenience to the data preprocessing of deep learning medical images.
-
Enter label_tcia_multiorgan folder
$ cd label_tcia_multiorgan
-
Use the c3d label0002.nii.gz -info command to view the label information
$ c3d label0002.nii.gz -info Output: Image #1: dim = [512, 512, 195]; bb = {[0 0 0], [460 460 195]}; vox = [0.898438, 0.898438, 1]; range = [0, 14]; orient = RPS -
Use the following command cropped 3D label and resample to the specified resolution
$ c3d label0002.nii.gz -region 84x153x0vox 378x279x169vox -resample 144x144x144 -type short -o label_processed.nii.gz
Of which:
-
-Region vrigin vSize: the first parameter vrigin is the position of the starting point of clipping (xyz), and the second parameter vSize (xyz) is the size to be clipped from the starting point. The format of the parameter is as shown in the command above, in which the multiplier x is the letter X.
-
-Resample < dimensions >: the set resolution is achieved by changing the number of voxels of the image without changing the image size.
-
-Type: Specifies the pixel value type of the output image. The default is float. Here, the pixel value of the segmented label of the label image is integer, so it is specified as short.
Here I have to mention how to find the clipping starting point and clipping size of - region: open the label image using ITK-SNAP software:
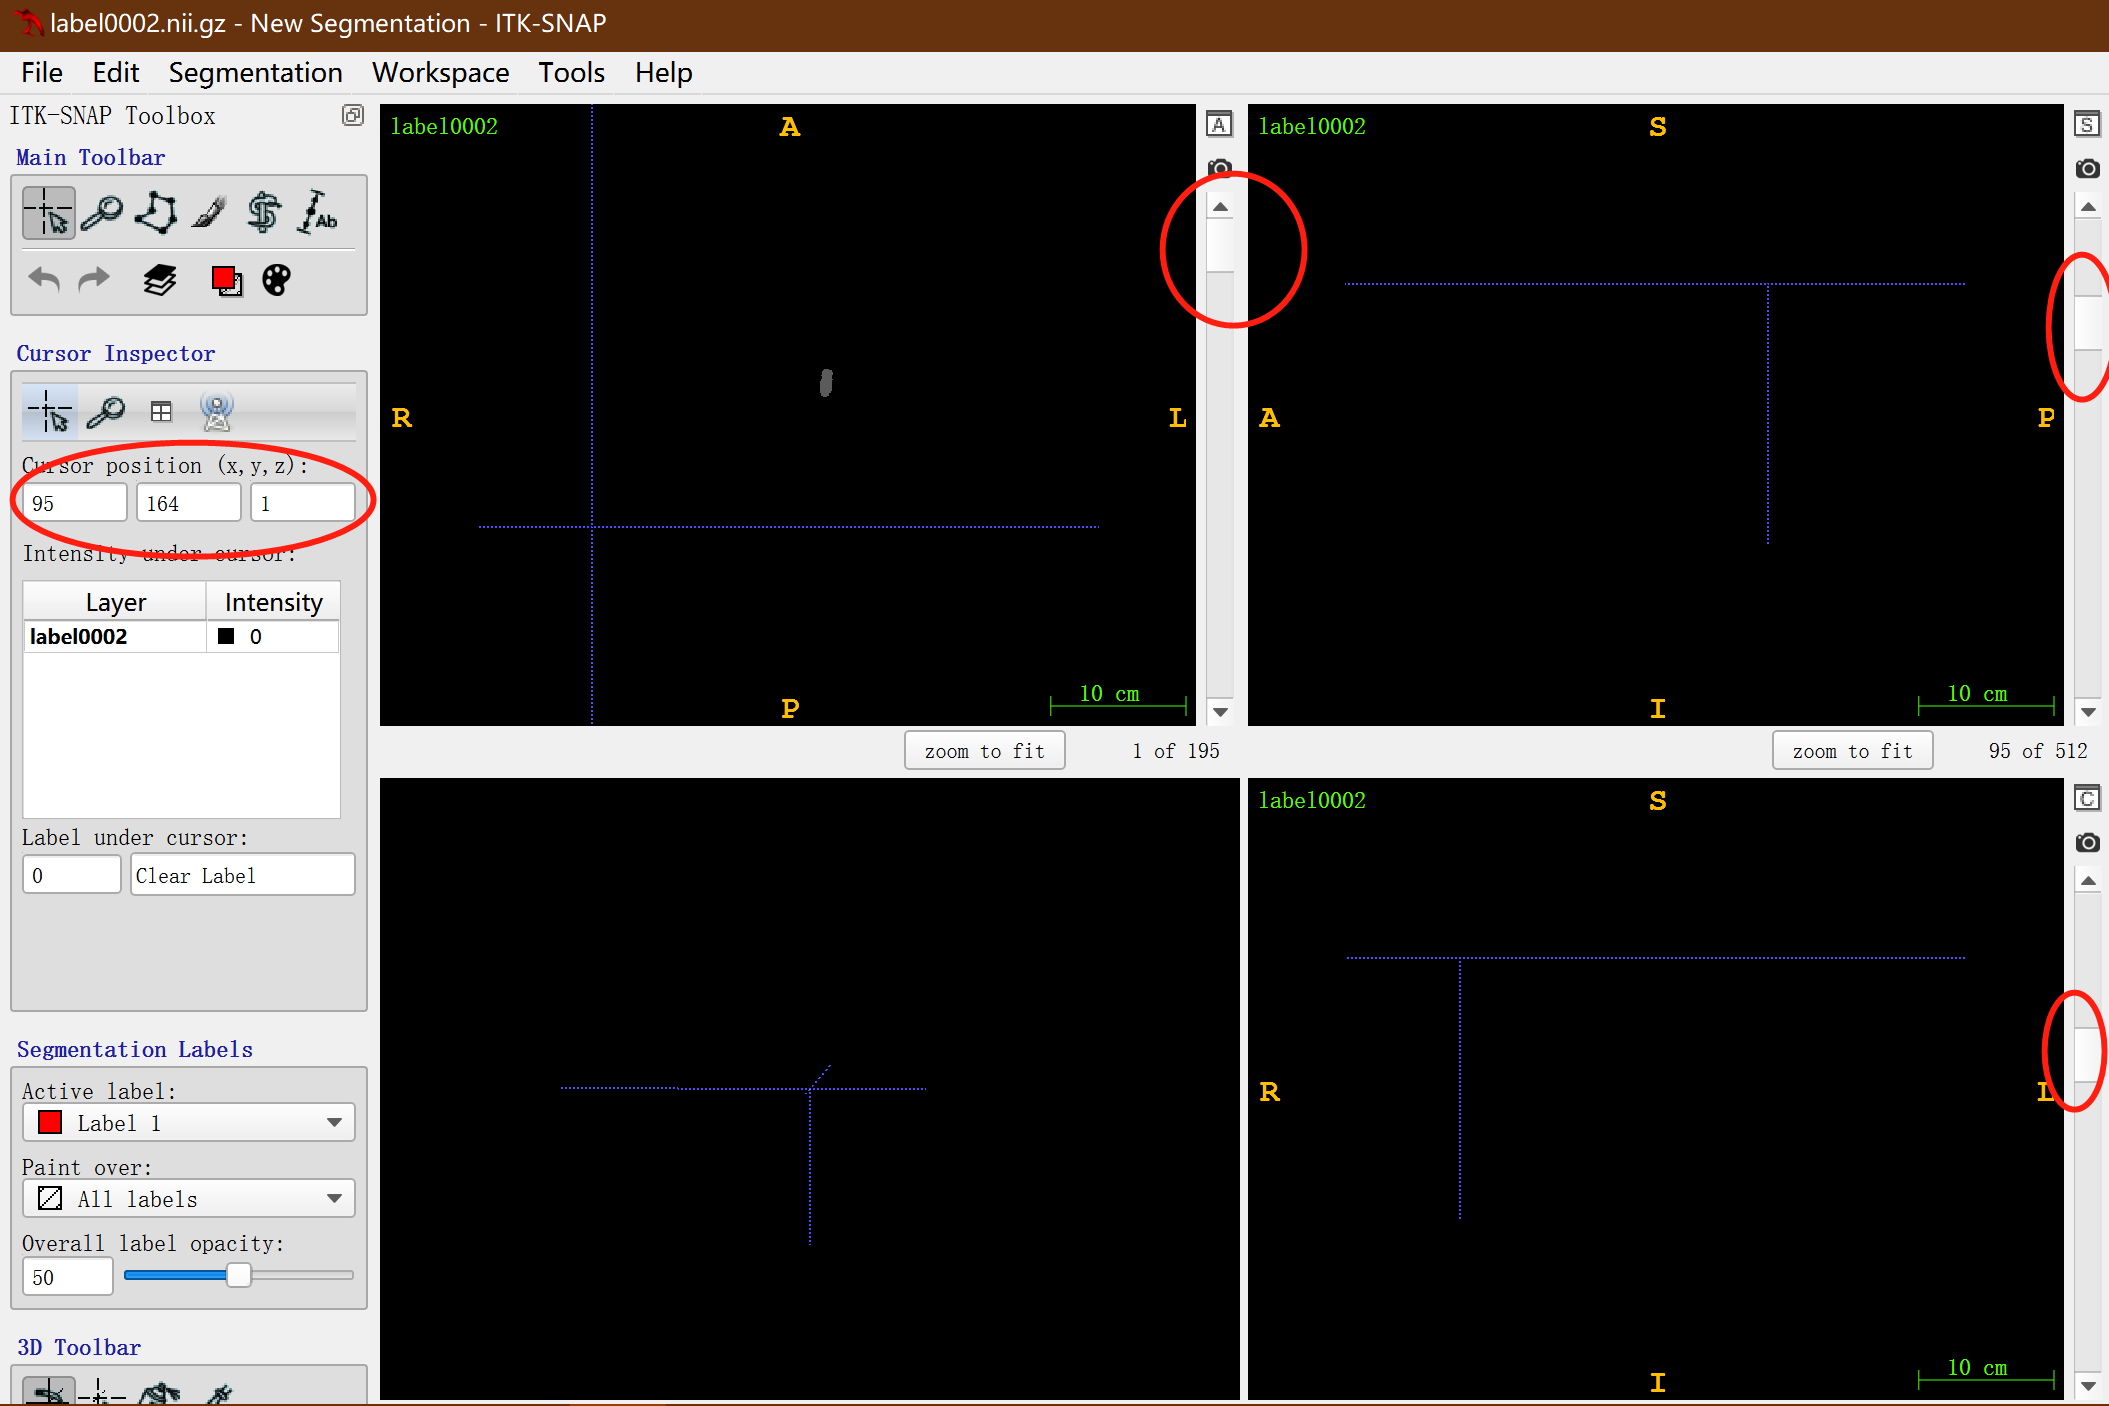
- Slide the slider in the red circle upward successively in the three views so that the colored labels in the figure can not be seen, and then record the coordinate value (95164, 1) of xyz in the large red circle on the left as the cutting starting point;
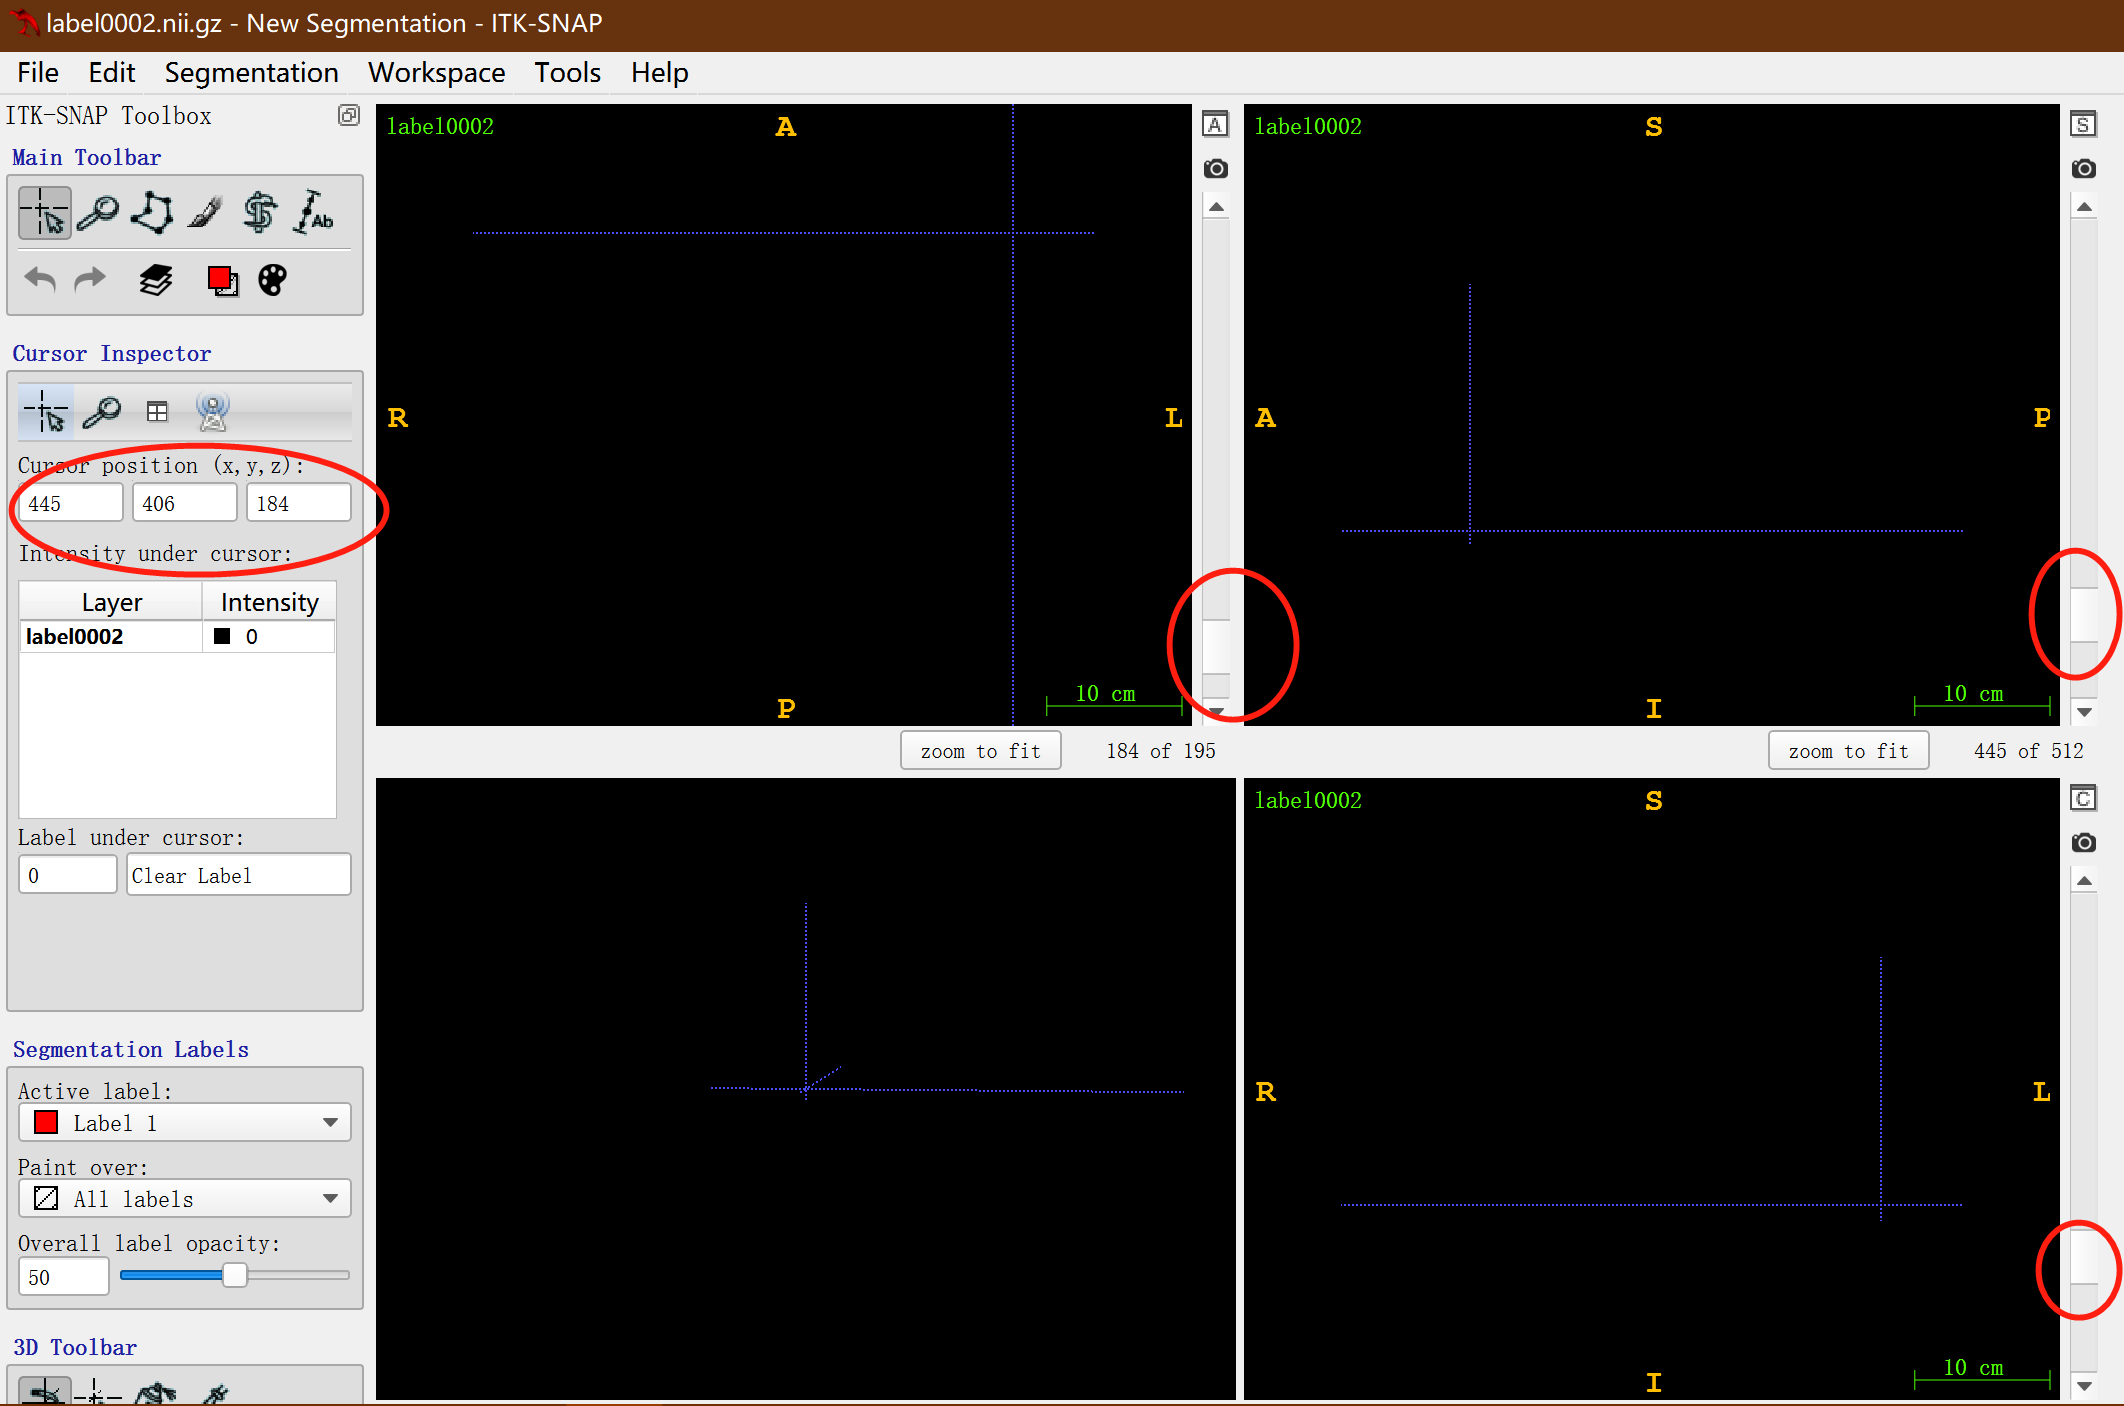
- Slide the slider in the red circle down successively in three views so that the colored labels in the figure are just invisible, and then record the coordinate value of xyz in the big red circle on the left (445406184), which is the end point of clipping;
The clipping size vSize can be obtained by subtracting the above two coordinates: (445406184) - (95164, 1) = (350242183), that is, vSize = 350x242x183vox, vrigin = 95x146x1vox.
-
-
Use the same command to process 3D Pancreas CT.
Similarly, Pancreas CT images use the same clipping coordinates.
Batch processing using python
- Convert dicom to nii
import os
import subprocess

# from subprocess import call

list_of_labels = [2, 3, 4, 5, 6, 7, 8, 9, 10, 11, 12, 13, 14, 16, 17, 18, 19, 20, 21, 22, 24, 26, 27, 28, 29, 30, 31, 32, 33, 34, 35, 38, 39, 40, 41, 42, 43, 44, 45, 46, 47, 48, 49]

root = '~/pancreas_ct/'  # Original Pancreas CT dataset folder
saved_dir = root + "preprocess/Pancreas_CT/"  # nii.gz save path after conversion
if not os.path.exists(saved_dir):
    os.mkdir(saved_dir)

for i in range(len(list_of_labels)):
    name = 'PANCREAS_' + str(list_of_labels[i]).zfill(4)
    print('name:', name)
    dict0 = root + 'Pancreas-CT/' + name
    dict1 = next(os.walk(dict0))[1][0]

    dict1 = os.path.join(dict0, dict1)
    dict2 = next(os.walk(dict1))[1][0]
    dict2 = os.path.join(dict1, dict2).replace("\\", "/")  # Use \ to splice paths under windows, which will make an error
    print("dict2:", dict2)

    # First, get the dicom series id
    list_command = 'c3d -dicom-series-list ' + dict2
    proc = subprocess.Popen(list_command, stdout=subprocess.PIPE, shell=True)
    out, err = proc.communicate()  # out is the output of the command, type=bytes
    p_status = proc.wait()  # Wait for the child process to end

    line = out.splitlines()[1].decode()  # Decode the bytes
    series_id = line.split()[-1]
    print('reading series_id:', series_id)

    # Use dicom read to read dicom and convert format
    # saved_name = saved_dir + name + '.nii.gz'
    read_command = 'c3d -dicom-series-read ' + dict2 + ' ' + series_id + ' -o ' + name + '.nii.gz'
    proc = subprocess.Popen(read_command, stdout=subprocess.PIPE, shell=True)
    p_status = proc.wait()

    # subprocess.call(read_command)
    print("err:", err)
    print("out:", out)
    print(f'{name} has been converted to nii.gz')

    # View the number of voxels with a value of 0
    count_command = 'c3d ' + name + '.nii.gz -thresh 0 0 1 0 -voxel-sum'
    proc = subprocess.Popen(count_command, stdout=subprocess.PIPE, shell=True)
    out, err = proc.communicate()
    p_status = proc.wait()

    print('out check:', out.decode())
C3d label.nii.gz - thresh 0 0 01 0 - voxel sum means: set voxels between range(0, 0) to 1, set other voxels to 0, - voxel sum calculates the sum of voxel values of the whole image. Here, the number of voxels with a value of 0 is calculated.
- Crop nii image
import os
import subprocess
# from subprocess import call
import pandas

label_path = r"~\label_tcia_multiorgan"  # Label dataset folder
ct_path = r"~\preprocess\Pancreas_CT"  # Pancreas CT image folder in nii.gz format after conversion

df1 = pandas.read_csv('cropping.csv')  # Clipping.csv the clipping coordinates recorded by the above method, and you can record them in your way
print(len(df1))
for i in range(1, 43 + 1, 1):  # len(list_of_labels)):

    # Image #1: dim = [512, 512, 210];  bb = {[0 0 0], [439.296 439.296 210]};  vox = [0.858, 0.858, 1];  range = [
    # -2048, 1371];  orient = RPS

    list_id = int(df1.loc[i - 1, :]['original_id'])
    new_id = int(df1.loc[i - 1, :]['id'])

    name_ct = 'PANCREAS_' + str(list_id).zfill(4)
    name_label = 'label' + str(list_id).zfill(4)
    name_ct_path = os.path.join(ct_path, name_ct).replace("\\", "/")
    name_label_path = os.path.join(label_path, name_label).replace("\\", "/")
    print('name', name_ct, 'label', name_label)

    info_command = 'c3d ' + name_label_path + ' -info'
    proc = subprocess.Popen(info_command, stdout=subprocess.PIPE, shell=True)
    line, err = proc.communicate()
    p_status = proc.wait()

    print("line:", line.decode().split())
    dim_z = int(line.decode().split()[6][:-2])
    print('dimension_z_str', dim_z)

    print(df1.loc[i - 1, :])
    # print(df1.loc[i-1,:]['extent_ant'])

    A1 = int(df1.loc[i - 1, :]['extent_ant'])
    A2 = int(df1.loc[i - 1, :]['extent_post'])
    A3 = int(df1.loc[i - 1, :]['extent_left'])
    A4 = int(df1.loc[i - 1, :]['extent_right'])
    A5 = int(df1.loc[i - 1, :]['extent_inf'])
    A6 = int(df1.loc[i - 1, :]['extent_sup'])

    # Read clipping coordinates
    region1 = str(A3) + 'x' + str(512 - A2) + 'x' + str(dim_z - A6) + 'vox ' + str(A4 - A3) + 'x' + str(
        A2 - A1) + 'x' + str(A6 - A5) + 'vox'
    print('region', region1)  # vOrigin: 84x153x0vox vSize: 378x279x169vox

    # Crop label
    label_command = 'c3d ' + name_label_path + '.nii.gz -region ' + region1 + \
                    ' -int 0 -resample 144x144x144 -type short -o label_ct' + str(new_id) + '.nii.gz'
    proc = subprocess.Popen(label_command, stdout=subprocess.PIPE, shell=True)
    out, err = proc.communicate()
    p_status = proc.wait()

    print("out:", out.decode())

    # Cut the CT with the same coordinates
    scan_command = 'c3d ' + name_ct_path + '.nii.gz -type float -region ' + region1 + \
                   ' -resample 144x144x144 -o pancreas_ct' + str(new_id) + '.nii.gz'

    proc = subprocess.Popen(scan_command, stdout=subprocess.PIPE, shell=True)
    out, err = proc.communicate()
    p_status = proc.wait()

    print("out:", out.decode())

    print('pancreas_ct' + str(new_id) + '.nii.gz')

    # View the number of voxels with a value of 0
    count_command = 'c3d pancreas_ct' + str(new_id) + '.nii.gz -thresh 0 0 1 0 -voxel-sum'
    proc = subprocess.Popen(count_command, stdout=subprocess.PIPE, shell=True)
    out, err = proc.communicate()
    p_status = proc.wait()

    print("out:", out.decode())

    # line = (out.splitlines()[1])
    # series_id = str.split(line)[-1]
    # print('reading series_id',series_id)