Java graphical interface calculator
Project creation
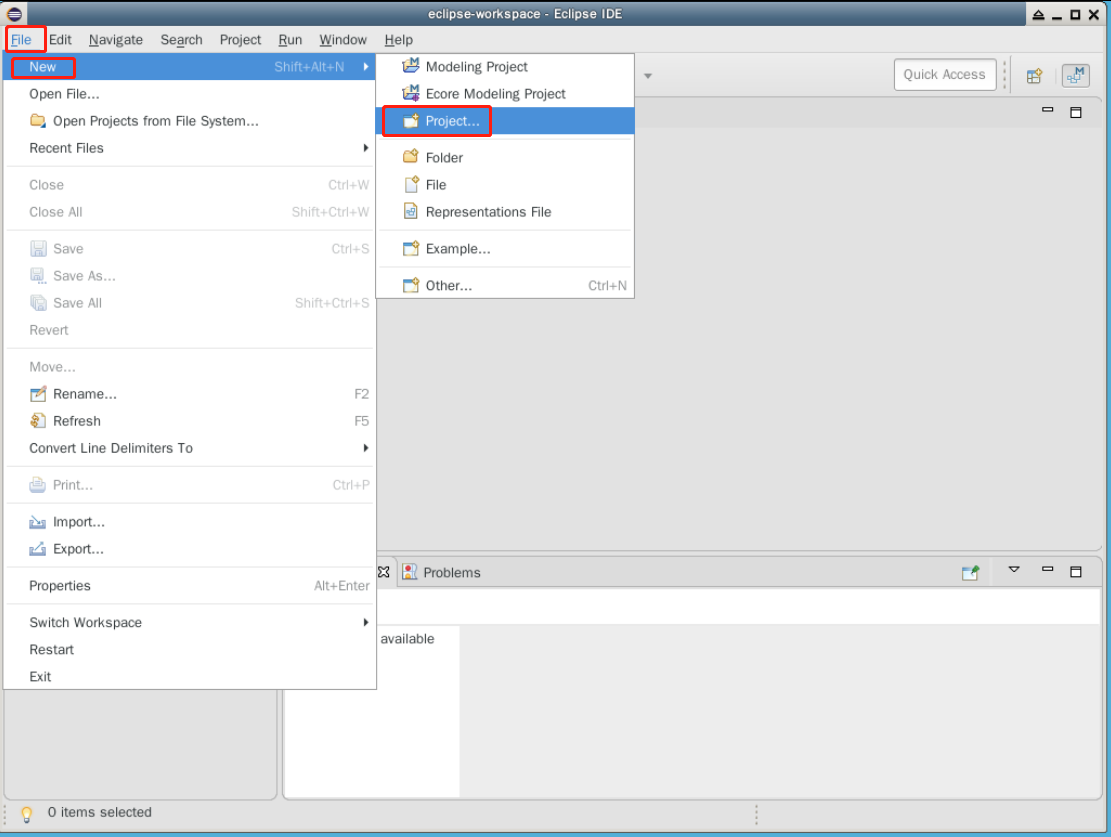
(1) Select new - > project from the File menu to create a project.
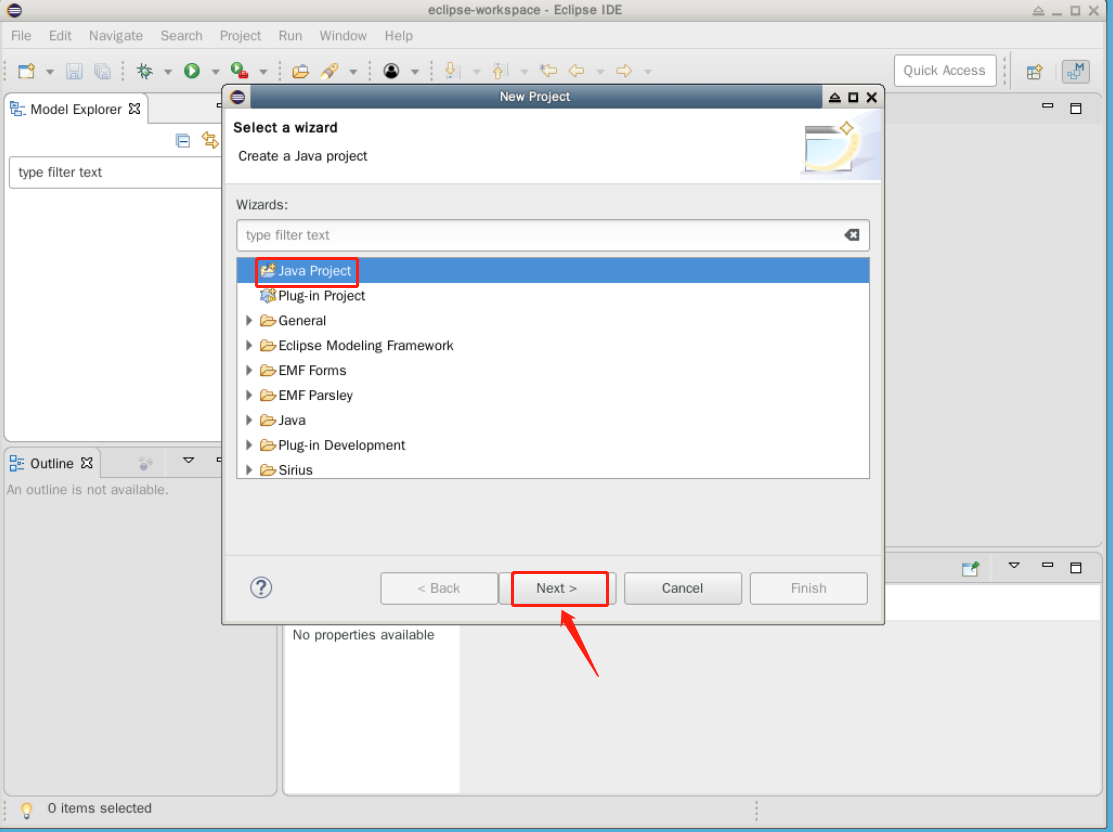
(2) Select Java Project in the pop-up New Project dialog box, and click Next to enter the Next step.
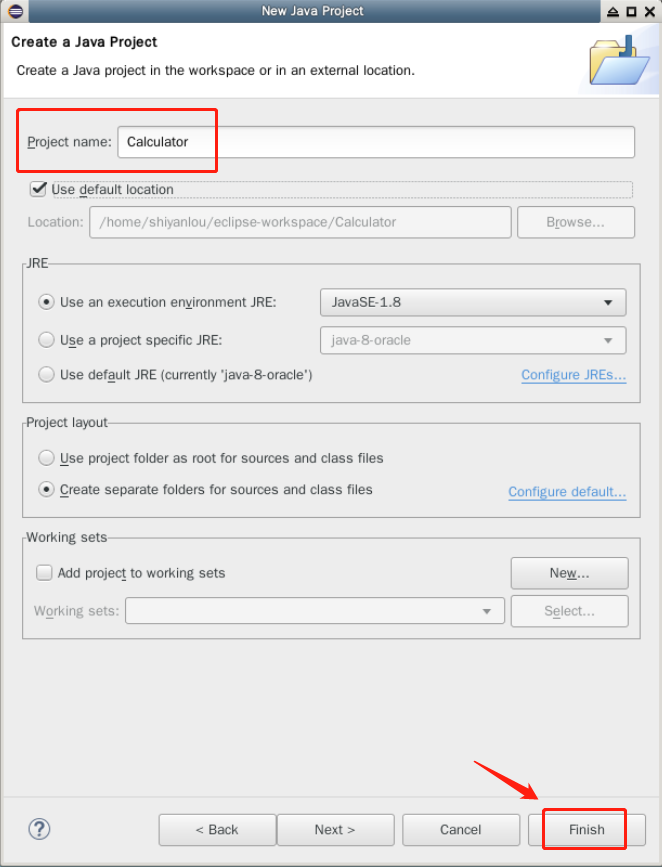
(3) Fill in the Project name Calculator in the Project name column, and click Finish to complete the creation.
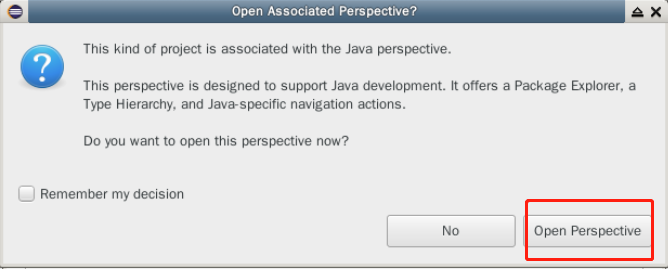
(4) If you encounter the dialog box shown in the figure below, click the Open Perspective button to confirm.
(5) Right click the created project directory src and select new - > class in the right-click menu to create a class.
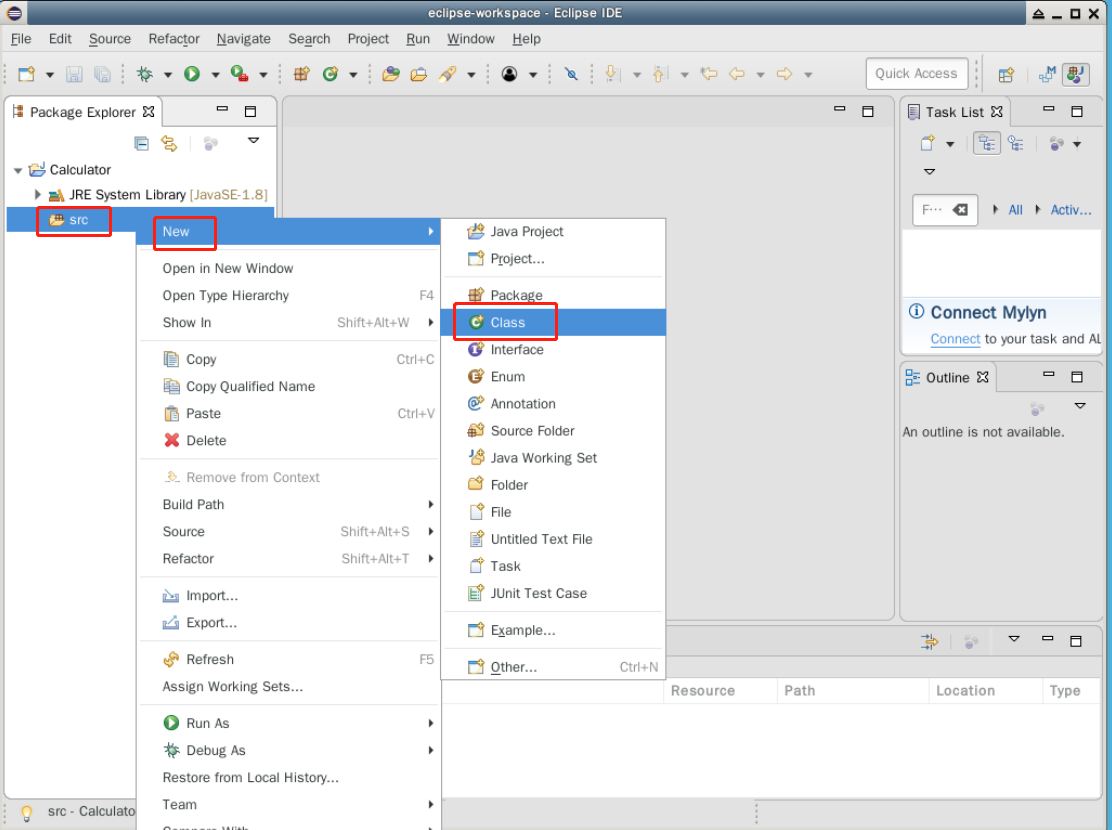
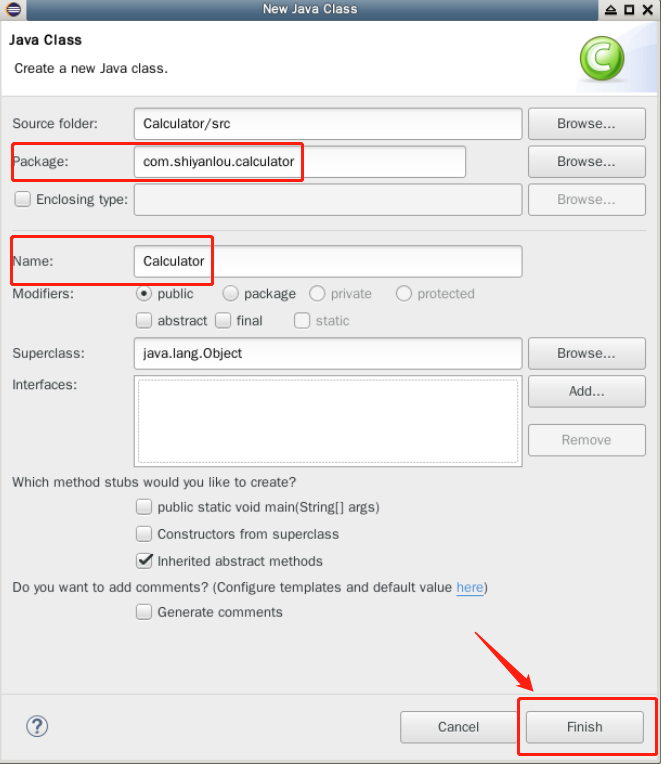
(6) Fill in the package name com.shiyanlou.calculator and class name Calculator (initial capital) in the new class dialog box. Click the Finish button to complete the creation.
UI component creation and initialization
First, we need to declare the UI components to be used in the interface as member variables of the Calculator class at the beginning. Before reading the code, you can think about which UI components are used, where the code should be written, and so on.
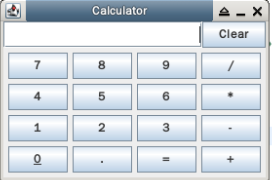
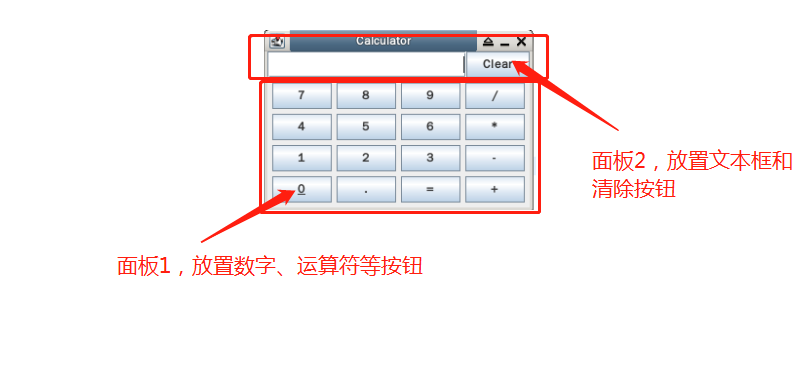
A calculator interface includes at least windows, buttons and display text boxes. As shown in the figure below, this is the effect we want to achieve.
(1) Window creation
To create a window, you need to use the JFrame class. In this experiment, we create a JFrame instance and call the method of the instance to add components (the effect is the same as that of writing a JFrmae subclass before).
// Create a JFrame object and initialize it. JFrame can be understood as the main form of the program.
JFrame frame = new JFrame("Calculator");

// Sets where the main window appears on the screen
frame.setLocation(300, 200);

// Sets that the form cannot be resized
frame.setResizable(false);
Here, we do not set the size of the window first. After we add all the components to the form, we call the pack() method to allow the form to resize itself (in the 3.3 (4) form to add panel 1 and panel 2).
(2) Required components
- Display calculation results
// Create a JTextField object and initialize it. JTextField is a text box used to display operation and calculation results.
// Parameter 20 indicates that the text content of 20 columns can be displayed
JTextField result_TextField = new JTextField(result, 20);
The result here is a String object that will be created later. It records the calculation results. We give it the initial value "" (empty String).
- Clear button
// Clear button
JButton clear_Button = new JButton("Clear");
- Number button
// Numeric keys 0 to 9
JButton button0 = new JButton("0");
JButton button1 = new JButton("1");
JButton button2 = new JButton("2");
JButton button3 = new JButton("3");
JButton button4 = new JButton("4");
JButton button5 = new JButton("5");
JButton button6 = new JButton("6");
JButton button7 = new JButton("7");
JButton button8 = new JButton("8");
JButton button9 = new JButton("9");
- Operator button
// Calculation command button, addition, subtraction, multiplication and division, decimal point, etc
JButton button_Dian = new JButton(".");
JButton button_jia = new JButton("+");
JButton button_jian = new JButton("-");
JButton button_cheng = new JButton("*");
JButton button_chu = new JButton("/");
- Equal button (press to calculate)
// Calculate button
JButton button_dy = new JButton("=");
Add UI components to a form
(1) Panel
This calculator has two jpanels.
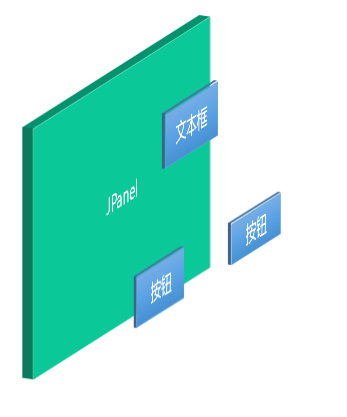
What is JPanel: JPanel is a general lightweight container. As shown in the figure above, you can understand it as a "basket" for other UI components. JPanel is located in javax.swing package. It is a panel container. It can be added to JFrame. It is a container itself. It can also add other components (components) to JPanel, such as JButton, JTextArea, JTextField, etc.
In this project, two jpanels correspond to the calculator keys except "Clear", and the other panel is the output bar and "Clear", as shown in the figure below.
Similarly, when writing this code, you should think about where it should be placed. If you are not clear, you can go back to the code structure above.
(2) Panel for placing numeric keys, etc
For panel 1, the codes for reference are as follows:
First initialize a panel object pan.
// Create a Jpanel object and initialize it
JPanel pan = new JPanel();
Set the layout of pan to grid layout GridLayout. For specific usage, please refer to Class GridLayout - Official Document . In this program, the GridLayout constructor we use passes in four parameters, which means to create a grid with 4 rows (the first parameter) and 4 columns (the second parameter). Each grid has a width of 5 (the third parameter) and a height of 5 (the fourth parameter).
// Set the layout of the container to four rows and four columns with a margin of 5 pixels
pan.setLayout(new GridLayout(4, 4, 5, 5));
As shown in the following figure, when we add pan, the components will be filled in the order of 1, 2, 3.
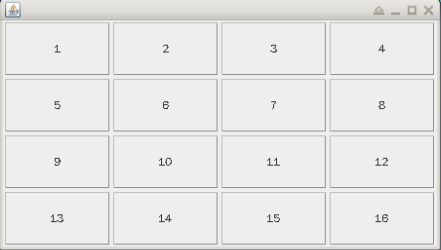
Compared with the previous renderings, we should perform the add operation in the following order.
// Add a button for calculation to the container
pan.add(button7);
pan.add(button8);
pan.add(button9);
pan.add(button_chu);
pan.add(button4);
pan.add(button5);
pan.add(button6);
pan.add(button_cheng);
pan.add(button1);
pan.add(button2);
pan.add(button3);
pan.add(button_jian);
pan.add(button0);
pan.add(button_Dian);
pan.add(button_dy);
pan.add(button_jia);
For better looking, we can set the margin for the pan object.
// Sets the margin of the pan object
pan.setBorder(BorderFactory.createEmptyBorder(5, 5, 5, 5));
(3) Panel for placing clearing boxes, etc
For panel 2, the codes for reference are as follows:
First initialize a panel object pan2.
// Set the second JPanel in the same way
JPanel pan2 = new JPanel();
Set its layout as boundary layout. The boundary layout manager divides the layout of containers into five locations: CENTER, EAST, WEST, NORTH and SOUTH. They correspond to: NORTH, SOUTH, WEST, EAST and CENTER. As shown in the figure below:
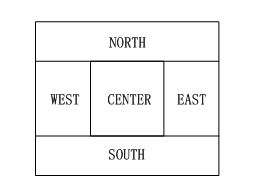
pan2.setLayout(new BorderLayout());
pan2.add(result_TextField, BorderLayout.WEST);
pan2.add(clear_Button, BorderLayout.EAST);
Here we only set WEST and EAST, and nothing is added to other parts (the part not added is equivalent to blank).
(4) Add panel 1 and panel 2 to the form
JPanel can be placed in the form, which refers to panel 1 and panel 2 we just created. The added code is as follows:
frame.getContentPane().setLayout(new BorderLayout());
frame.getContentPane().add(pan2, BorderLayout.NORTH);
frame.getContentPane().add(pan, BorderLayout.CENTER);
Here, for frame.getContentPane() (which returns the default JPanel in JFrame), we set the layout to BorderLayout.
When we add a form
frame.pack();
frame.setVisible(true);
After the layout, it is the difficulty of the calculator: the event handler.
Variables required to respond to events
For the calculator, the event response logic involved mainly includes: number key, addition, subtraction, multiplication and division, decimal point processing, equal to and clear.
Here, we define some member variables to facilitate the logical implementation of response.
First, you need to define and store the operands and operators currently pressed, and result stores the results of the operation.
// Operand 1. For the safety of the program, the initial value must be set. Here we set it to 0.
String str1 = "0";

// Operand 2
String str2 = "0";

// operator
String signal = "+";

// Operation result
String result = "";
Next, we also define five state switches (five int variables), and their meanings are explained in the notes.
// The following k1 to k5 are status switches

// Switch 1 is used to select the input direction to be written to str1 or str2
// str1 is written when it is 1, and str2 is written when it is 2
int k1 = 1;

// Switch 2 is used to record the number of symbol keys
// If K2 > 1, the multi symbol operation of 2 + 3-9 + 8 is performed
int k2 = 1;

// Switch 3 is used to identify whether str1 can be cleared to 0
// It can be cleared when it is equal to 1 and cannot be cleared when it is not equal to 1
int k3 = 1;

// Switch 4 is used to identify whether str2 can be cleared
// It can be cleared when it is equal to 1 and cannot be cleared when it is not equal to 1
int k4 = 1;

// Switch 5 is used to control whether the decimal point can be entered
// When it is equal to 1, it is allowed. When it is not 1, the entered decimal point will be lost
int k5 = 1;
Here we define an additional JButton variable to store the pressed symbol key.
// The function of store is similar to that of register, which is used to record whether the symbol key is pressed continuously
JButton store;
vt stores the previously entered operator.
@SuppressWarnings("rawtypes")
Vector vt = new Vector(20, 10);
Numeric key response
Note that all actionlisteners defined later are written in the constructor, that is, they are defined as local internal classes.
The number key response is mainly to process the number and store it in the corresponding variable (the first operand is stored in str1 and the second operand is stored in str2).
The local internal class we define here is called Listener, which inherits the ActionListener interface. After inheritance, we need to override the actionPerformed method of the interface definition.
class Listener implements ActionListener {
    @Override
    public void actionPerformed(ActionEvent e) {

    }
}
Through the input parameter ActionEvent e of the actionPerformed method above, we can obtain the event source, as follows:
// Get the event source and get the input data from the event source
String ss = ((JButton) e.getSource()).getText();
Next, read in the stored symbol key and add it to vt.
// Read in stored symbol keys
store = (JButton) e.getSource();
vt.add(store);
Remember the k1 switch we defined before? When k1 is 1, the number we enter is part of operand 1; When k1 is 2, the number we enter is part of operand 2. Therefore, there will be the following logic:
if( k1 == 1) {
    // The input is part of operand 1
} else if( k1 == 2) {
    // The input is part of operand 2
}
- When input is part of operand 1
We need to judge whether operand 1 can be cleared (judged by the value of k3). If it can (the stored content is the last operation), clear it first and then write it; If zero clearing is not possible (a part of operand 1 has been input previously, such as entering number 34, pressing 3 last time and reading 4 this time), in this case, the input needs to be appended to the previous input
if (k3 == 1) {
    str1 = "";

    // Restore switch k5 status
    k5 = 1;
}
str1 = str1 + ss;
Here, we input a number, so we can input a decimal point at any time. In order to prevent errors, we assign a value to k5.
When the input is completed, we need to add 1 to the value of k3 to ensure that the operand 1 will not be cleared. You also need to print operand 1 to the result column.
k3 = k3 + 1;

// Display results
result_TextField.setText(str1);
- When input is part of operand 2
The logic of this part is exactly the same as operand 1. The only difference is that the operand becomes str2 (that is, operand 2).
if (k4 == 1) {
    str2 = "";

    // Restore switch k5 status
    k5 = 1;
}
str2 = str2 + ss;
k4 = k4 + 1;
result_TextField.setText(str2);
The complete code is as follows:
// Numeric key
class Listener implements ActionListener {
    @SuppressWarnings("unchecked")
    public void actionPerformed(ActionEvent e) {
        // Get the event source and get the input data from the event source
        String ss = ((JButton) e.getSource()).getText();

        store = (JButton) e.getSource();
        vt.add(store);

        if (k1 == 1) {
            if (k3 == 1) {
                str1 = "";

                // Restore switch k5 status
                k5 = 1;
            }
            str1 = str1 + ss;

            k3 = k3 + 1;

            // Display results
            result_TextField.setText(str1);

        } else if (k1 == 2) {
            if (k4 == 1) {
                str2 = "";

                // Restore switch k5 status
                k5 = 1;
            }
            str2 = str2 + ss;
            k4 = k4 + 1;
            result_TextField.setText(str2);
        }

    }
}
Response to decimal point
Note that the response of the decimal point is also defined as a local internal class, which is the same as the response class of the number key. The local inner class command is Listener_xiaos, inherit ActionListener interface.
The first is to get the response source and add it to the vt.
store = (JButton) e.getSource();
vt.add(store);
The decimal point can only be entered when k5 is 1, otherwise the decimal point will be lost.
if( k5 == 1) {
    // Add processing for decimal points
}
Next, we write the statement block in the if statement above.
First, get the input:
String ss2 = ((JButton) e.getSource()).getText();
The input decimal point may be str1 or str2. The logic of this part is similar to that of numbers.
if (k1 == 1) {
    if (k3 == 1) {
        str1 = "";
        // Restore switch k5 status
        k5 = 1;
    }
    str1 = str1 + ss2;

    k3 = k3 + 1;

    // Display results
    result_TextField.setText(str1);

} else if (k1 == 2) {
    if (k4 == 1) {
        str2 = "";
        // Restore the status of the switch k5
        k5 = 1;
    }
    str2 = str2 + ss2;

    k4 = k4 + 1;

    result_TextField.setText(str2);
}
Finally, in order to prevent the decimal point from being entered again after entering the decimal point, k5 = k5 + 1 is required; Operation of.
The complete code is as follows:
// Processing of decimal point
class Listener_xiaos implements ActionListener {
    @SuppressWarnings("unchecked")
    public void actionPerformed(ActionEvent e) {
        store = (JButton) e.getSource();
        vt.add(store);
        if (k5 == 1) {
            String ss2 = ((JButton) e.getSource()).getText();
            if (k1 == 1) {
                if (k3 == 1) {
                    str1 = "";
                    // Restore switch k5 status
                    k5 = 1;
                }
                str1 = str1 + ss2;

                k3 = k3 + 1;

                // Display results
                result_TextField.setText(str1);

            } else if (k1 == 2) {
                if (k4 == 1) {
                    str2 = "";
                    // Restore the status of the switch k5
                    k5 = 1;
                }
                str2 = str2 + ss2;

                k4 = k4 + 1;

                result_TextField.setText(str2);
            }
        }

        k5 = k5 + 1;
    }
}
Response of operation symbols
Note that the response of the operator is defined as a local inner class, which is the same as the response class of the numeric key. The local inner class command is Listener_signal, inheriting ActionListener interface.
Get the source of the response event, read the content, and store the response source in vt.
String ss2 = ((JButton) e.getSource()).getText();
store = (JButton) e.getSource();
vt.add(store);
The handling of operators needs to be discussed by case. When the k2 variable is 1, it indicates that this is a common operation (for example, 2 + 3, enter 2 first, then + and then 3); If k2 > 1, it means that a multi symbol operation such as 2 + 3-9 + 8 is performed (2 + 3 has been input, and then - and 9 have been input), that is, the last operation result is stored in str1, and the number to be input after symbol input is str2.
- General operation
When k2 is 1, we only need to set the k1 switch to 2, that is, the next input number is str2. The second operand cannot start with. So set k5 to 1. k2 increases by 1. If there is a symbol input later, it corresponds to the second case.
if (k2 == 1) {
    // When switch k1 is 1, write the input value to direction 1, and when switch k1 is 2, write the input value to direction 2.
    k1 = 2;
    k5 = 1;
    signal = ss2;
    k2 = k2 + 1;// Number of times to press the symbol key
} else {
    // ...
}
- Continuous operation
The else section corresponds to this situation. First, read in the last input (the vt.size()-2 element in VT). If this input is not one of +, -, *, /, it indicates that continuous operation is required.
Logically, it can also prevent the continuous input of operators.
At this time, call calc() to perform the operation (this method is an operation defined by ourselves and implemented in 3.9), and store the result in str1.
After this symbol is the input operand 2, so k1 is set to 2; You cannot enter a decimal point before entering a number, so k5 is set to 1; For continuous operations, str2 should be cleared before input, so k4 is set to 1.
singal stores the symbols entered this time.
Finally, k2 plus 1 increases the number of symbols that have been entered.
if (k2 == 1) {
    // ...
} else {
    int a = vt.size();
    JButton c = (JButton) vt.get(a - 2);

    if (!(c.getText().equals("+"))
            && !(c.getText().equals("-"))
            && !(c.getText().equals("*"))
            && !(c.getText().equals("/")))

    {
        cal();
        str1 = result;
        // When the switch k1 is 1, write the value to the number 1, and when it is 2, write to the number 2
        k1 = 2;
        k5 = 1;
        k4 = 1;
        signal = ss2;
    }
    k2 = k2 + 1;
}
The complete code is as follows:
// Processing of input operation symbols
class Listener_signal implements ActionListener {
    @SuppressWarnings("unchecked")
    public void actionPerformed(ActionEvent e) {
        String ss2 = ((JButton) e.getSource()).getText();
        store = (JButton) e.getSource();
        vt.add(store);

        if (k2 == 1) {
            // When switch k1 is 1, write the input value to direction 1, and when switch k1 is 2, write the input value to direction 2.
            k1 = 2;
            k5 = 1;
            signal = ss2;
            k2 = k2 + 1;// Number of times to press the symbol key
        } else {
            int a = vt.size();
            JButton c = (JButton) vt.get(a - 2);

            if (!(c.getText().equals("+"))
                    && !(c.getText().equals("-"))
                    && !(c.getText().equals("*"))
                    && !(c.getText().equals("/")))

            {
                cal();
                str1 = result;
                // When the switch k1 is 1, write the value to the number 1, and when it is 2, write to the number 2
                k1 = 2;
                k5 = 1;
                k4 = 1;
                signal = ss2;
            }
            k2 = k2 + 1;

        }

    }
}
Response equal to
Note that the response equal to is also defined as a local internal class, which is the same as the response class of the number key. The local inner class command is Listener_dy, inherit ActionListener interface.
When the key is pressed, calc() is called to restore the value of the switch.
Finally, an operation str1 = result;, To deal with the situation of 7 + 5 = 12 + 5 = 17. The result of the last operation is the first operand by default in the next operation.
// Equal to the logic of the key, that is, the calculation starts after the input is completed
class Listener_dy implements ActionListener {
    @SuppressWarnings("unchecked")
    public void actionPerformed(ActionEvent e) {

        store = (JButton) e.getSource();
        vt.add(store);
        cal();

        // Restore switch k1 status
        k1 = 1;

        // Restore switch k2 status
        k2 = 1;

        // Restore switch k3 status
        k3 = 1;

        // Restore switch k4 status
        k4 = 1;

        // Prepare for the calculation of 7 + 5 = 12 + 5 = 17
        str1 = result;
    }
}
Implementation of computing logic
The calculation logic should operate on operands according to different input operators, and also consider the unreasonable algorithm of dividing by 0.
For computational logic, we write it in a member function called calc().
First, convert the operand to double. a2 and b2 are defined in the code to store operand 1 and operand 2.
// Operand 1
double a2;
// Operand 2
double b2;

//...

// Manually enter only one decimal point
if (str1.equals("."))
    str1 = "0.0";
if (str2.equals("."))
    str2 = "0.0";

// Convert string to double
a2 = Double.valueOf(str1).doubleValue();
b2 = Double.valueOf(str2).doubleValue();
You also need to define a value that stores the results of intermediate operations
// Operation result
double result2 = 0;
For operation symbols, we use a String c to store them.
// operator
String c = signal;

if (c.equals("")) {
    // The symbol has not been entered and cannot be calculated
    result_TextField.setText("Please input operator");
} else {
    // Can be calculated

    // Manually enter only one decimal point
    if (str1.equals("."))
        str1 = "0.0";
    if (str2.equals("."))
        str2 = "0.0";

    // Convert string to double
    a2 = Double.valueOf(str1).doubleValue();
    b2 = Double.valueOf(str2).doubleValue();

    //...
}
When the above operator judgment and operand conversion are completed, you can perform addition, subtraction, multiplication and division. It should be noted that during multiplication, in order to ensure accuracy, double can be stored in a large floating-point number class BigDecimal.
if (c.equals("")) {
    // The symbol has not been entered and cannot be calculated
    result_TextField.setText("Please input operator");
} else {

    //...

    if (c.equals("+")) {
        result2 = a2 + b2;
    }
    if (c.equals("-")) {
        result2 = a2 - b2;
    }
    if (c.equals("*")) {
        BigDecimal m1 = new BigDecimal(Double.toString(a2));
        BigDecimal m2 = new BigDecimal(Double.toString(b2));
        result2 = m1.multiply(m2).doubleValue();
    }
    if (c.equals("/")) {
        if (b2 == 0) {
            result2 = 0;
        } else {
            result2 = a2 / b2;
        }
    }
}
Finally, output the results
if (c.equals("")) {
    // The symbol has not been entered and cannot be calculated
    result_TextField.setText("Please input operator");
} else {

    //...

    result = ((new Double(result2)).toString());
    result_TextField.setText(result);
}

``

The complete code is as follows:

```java
// Computational logic
public void cal() {
    // Operand 1
    double a2;
    // Operand 2
    double b2;
    // operator
    String c = signal;
    // Operation result
    double result2 = 0;

    if (c.equals("")) {
        result_TextField.setText("Please input operator");
    } else {
        // Handle the decimal point manually
        if (str1.equals("."))
            str1 = "0.0";
        if (str2.equals("."))
            str2 = "0.0";
        a2 = Double.valueOf(str1).doubleValue();
        b2 = Double.valueOf(str2).doubleValue();

        if (c.equals("+")) {
            result2 = a2 + b2;
        }
        if (c.equals("-")) {
            result2 = a2 - b2;
        }
        if (c.equals("*")) {
            BigDecimal m1 = new BigDecimal(Double.toString(a2));
            BigDecimal m2 = new BigDecimal(Double.toString(b2));
            result2 = m1.multiply(m2).doubleValue();
        }
        if (c.equals("/")) {
            if (b2 == 0) {
                result2 = 0;
            } else {
                result2 = a2 / b2;
            }

        }

        result = ((new Double(result2)).toString());
        result_TextField.setText(result);
    }
}
Clear response
The logic of clearing is very simple. Clear or set the values of all variables as initial values.
Its code is as follows:
// Clear key logic (clear)
class Listener_clear implements ActionListener {
    @SuppressWarnings("unchecked")
    public void actionPerformed(ActionEvent e) {
        store = (JButton) e.getSource();
        vt.add(store);
        k5 = 1;
        k2 = 1;
        k1 = 1;
        k3 = 1;
        k4 = 1;
        str1 = "0";
        str2 = "0";
        signal = "";
        result = "";
        result_TextField.setText(result);
        vt.clear();
    }
}
Register listener
Register each listener, that is, bind the event response logic to each UI component:
// Monitor equals key
Listener_dy jt_dy = new Listener_dy();
button_dy.addActionListener(jt_dy);
// Monitor numeric key
Listener jt = new Listener();
button0.addActionListener(jt);
button1.addActionListener(jt);
button2.addActionListener(jt);
button3.addActionListener(jt);
button4.addActionListener(jt);
button5.addActionListener(jt);
button6.addActionListener(jt);
button7.addActionListener(jt);
button8.addActionListener(jt);
button9.addActionListener(jt);

```java
// Monitor symbol key
Listener_signal jt_signal = new Listener_signal();
button_jia.addActionListener(jt_signal);
button_jian.addActionListener(jt_signal);
button_cheng.addActionListener(jt_signal);
button_chu.addActionListener(jt_signal);
// Monitor clear key
Listener_clear jt_c = new Listener_clear();
clear_Button.addActionListener(jt_c);
// Monitor decimal key
Listener_xiaos jt_xs = new Listener_xiaos();
button_Dian.addActionListener(jt_xs);
In addition to the response time of binding UI, we also bind an event to the window.
// Responder for form close event
frame.addWindowListener(new WindowAdapter() {
    public void windowClosing(WindowEvent e) {
        System.exit(0);
    }
});
So far, the main logic of the whole calculator has been explained. Please supplement other details by yourself.
After completion, please click the run - > Run option in the menu or click the run button at the top of the toolbar to compile and run the project.
If no errors are encountered, the calculator window will pop up.

You can try it.
Source code:
package com.shiyanlou.calculator;
Import java.awt.*;
Import java.awt.event.*;
Import javax.swing.*;
Import java.util.Vector;
Import java.math.BigDecimal;
Common class calculator{
// Operation efficiency 1: according to the safety requirements of the process, a certain setting between the chains will not be closed or closed
character string str1 = "0";
// Operation number 2
character string str2 = "0";
//Cable
String signal = "+";
//Cable results
String result = "";
// From k1 to 2
//If switch 1 is selected to enter a new direction, switch tr1 or tr2 will be turned on
int k1 = 1;
//Switch 2 is based on the number of recorded pins. If K2 > 1, the number of pins is 2 + 3-9 + 8
int k2 = 1;
// The switch 3 is powered by "str1" and can be attacked by each other. If 0, it can be controlled only by "str1"
integer k3 = 1;
// The switch 4 is powered by str2 and can be scanned 0
int k4 = 1;
// Voltage 5 is controlled by у The number of hours will be a number of hours, and the number of hours will be a number of hours. It's possible for people to get into the country. The first hour of the riverside is an hour. It's an hour for people to be a man. It's an hour. It's an hour. The number of people making a number of hours. The number of people can be seen. The number of people in the city can be an entry for the people. The number of people in the city can be an entry. The number of people in the city is an hour. The number of people in the city is a big city. The number of people in the city is a city. The number of people in the city is a city. The number of people in the city is a city. The number of people in the city is a city. The number of people in the city is a city. The city. The number of people in the city is a city. It is a city. It is a city. It is a city. It is a city. It is a city. It is a city. One. The number control
int k5 = 1;
//The operation of the storefront is based on the storage, and the record is based on the following information. Press the key
JButton Shop;
@SuppressWarnings("rawtypes")
Vector vt = new Vector(20, 10);
//Description of the UI components of the components and the interface of the UI components
JFrame frame = new JFrame("Calculator");
JTextField result_TextField = new JTextField(result, 20);
JButton clear_Button = new JButton("Clear");
JButton button0 = new JButton("0");
JButton button1 = new JButton("1");
JButton button2 = new JButton("2");
JButton button3 = new JButton("3");
JButton button4 = new JButton("4");
JButton button5 = new JButton("5");
JButton button6 = new JButton("6");
JButton button7 = new JButton("7");
JButton button8 = new JButton("8");
JButton button9 = new JButton("9");
JButton button_Dian = new JButton(".");
JButton button_jia = new JButton("+");
JButton button_jian = new JButton("-");
JButton button_cheng = new JButton("*");
JButton button_chu = new JButton("/");
JButton button_dy = new JButton("=");
// Machine for calculating the speed of the machine
Public calculator (){
// The infinite button key sets the key number, which can be adjusted by the corresponding key button
button0.setMnemonic(KeyEvent.VK_0);
// All valid keys may not be valid ˉ Auxiliary number
// The setup document document is displayed for the location, delivery, and interface.
result_TextField.setHorizontalAlignment(JTextField.RIGHT);
//Add an assembly to the Creator
JPanel pan = new JPanel();
pan.setLayout(new GridLayout(4, 4, 5, 5));
pan.add(button7);
pan.add(button8);
pan.add(button9);
pan.add(button_chu);
pan.add(button4);
pan.add(button5);
pan.add(button6);
pan.add(button_cheng);
pan.add(button1);
pan.add(button2);
pan.add(button3);
pan.add(button_jian);
pan.add(button0);
pan.add(button_Dian);
pan.add(button_dy);
pan.add(button_jia);
pan.setBorder(BorderFactory.createEmptyBorder(5, 5, 5, 5));
JPanel pan2 = new JPanel();
pan2.setLayout(new BorderLayout());
pan2.add(result_TextField, BorderLayout.WEST);
pan2.add(clear_Button, BorderLayout.EAST);
// The set boundary can e display the Kawasaki boundary displayed on the screen
frame.setLocation(300, 200);
// Set the guide size not to be too large
frame.setResizable(false);
frame.getContentPane().setLayout(new BorderLayout());
frame.getContentPane().add(pan2, BorderLayout.NORTH);
frame.getContentPane().add(pan, BorderLayout.CENTER);
frame.pack();
frame.setVisible(true);
// Event handler
// Digital key
class Listener realization ActionListener {
@SuppressWarnings("Unchecked ")
public void actionPerformed(ActionEvent e) {
String ss = ((JButton) e.getSource()).getText();
store = (JButton) e.getSource();
vt.add(store);
If( k1 == 1){
If( k3 == 1){
str1 = "";
// This switch is open for 5 minutes
k5 = 1;
}
str1 = str1 + ss;
k3 = k3 + 1;
// Are the results
result_TextField.setText(str1);
} else if (k1 == 2) {
If( k4 == 1){
str2 = "";
// This switch is open for 5 minutes
k5 = 1;
}
str2 = str2 + ss;
k4 = k4 + 1;
result_TextField.setText(str2);
}
}
}
//Processing of the entered running character
class Listener_signal realization ActionListener {
@SuppressWarnings("Unchecked ")
public void actionPerformed(ActionEvent e) {
String ss2 = ((JButton) e.getSource()).getText();
store = (JButton) e.getSource();
vt.add(store);
If( k2 == 1){
//Turn k1 to 1 and turn K2 to 2
k1 = 2;
k5 = 1;
signal = ss2;
k2 = k2 + 1;// Number of keystrokes
} other {
int a = vt.size();
JButton c = (JButton) vt.get(a - 2);
If (!(c.getText().equals("+"))
&& !(c.getText().equals("-"))
&& !(c.getText().equals("*"))
&& !(c.getText().equals("/")))
{
Calibration ();
str1 = result;
//When the switch k1 is turned on, the number is within 1 and the number is within 2
k1 = 2;
k5 = 1;
k4 = 1;
signal = ss2;
}
k2 = k2 + 1;
}
}
}
// Edit of clearing key (clear)
class Listener_clear realization ActionListener {
@SuppressWarnings("Unchecked ")
public void actionPerformed(ActionEvent e) {
store = (JButton) e.getSource();
vt.add(store);
k5 = 1;
k2 = 1;
k1 = 1;
k3 = 1;
k4 = 1;
str1 = "0";
str2 = "0";
signal = "";
result = "";
result_TextField.setText(result);
vt.clear();
}
}
// Selected edits with keys checked
class Listener_dy realization ActionListener {
@SuppressWarnings("Unchecked ")
public void actionPerformed(ActionEvent e) {
store = (JButton) e.getSource();
vt.add(store);
Calibration ();
//This is the position of the asset switch
k1 = 1;
k2 = 1;
k3 = 1;
k4 = 1;
str1 = result;
}
}
// Processing of hours
class Listener_xiaos realization ActionListener {
@SuppressWarnings("Unchecked ")
public void actionPerformed(ActionEvent e) {
store = (JButton) e.getSource();
vt.add(store);
If( k5 == 1){
String ss2 = ((JButton) e.getSource()).getText();
If( k1 == 1){
If( k3 == 1){
str1 = "";
// This switch is open for 5 minutes
k5 = 1;
}
str1 = str1 + ss2;
k3 = k3 + 1;
// Are the results
result_TextField.setText(str1);
} else if (k1 == 2) {
If( k4 == 1){
str2 = "";
// This is the function of switch 5.
k5 = 1;
}
str2 = str2 + ss2;
k4 = k4 + 1;
result_TextField.setText(str2);
}
}
k5 = k5 + 1;
}
}
//The legal assembly and the disk assembly (sliding and fixing) can be edited into each I-assembly from the operation valve
Listener_dy jt_dy = new Listener_dy();
// Number of digits
monitor jt = New listener();
// No more messages
Listener_signal jt_signal = new Listener_signal();
// Complete troubleshooting
Listener_clear jt_c = new Listener_clear();
//Key to complete count
Listener_xiaos jt_xs = new Listener_xiaos();
button7.addActionListener(jt);
button8.addActionListener(jt);
button9.addActionListener(jt);
button_chu.addActionListener(jt_signal);
button4.addActionListener(jt);
button5.addActionListener(jt);
button6.addActionListener(jt);
button_cheng.addActionListener(jt_signal);
button1.addActionListener(jt);
button2.addActionListener(jt);
button3.addActionListener(jt);
button_jian.addActionListener(jt_signal);
button0.addActionListener(jt);
button_Dian.addActionListener(jt_xs);
button_dy.addActionListener(jt_dy);
button_jia.addActionListener(jt_signal);
clear_Button.addActionListener(jt_c);
// Guide the operation procedures for closing the event
frame.addWindowListener(new WindowAdapter() {
Public invalid window closed( WindowEvent e){
System.exit(0);
}
});
}
// Account dispatch edit
Common invalid calibration (){
// Operation number 1
double a2;
// Operation number 2
double b2;
//Cable
character string c = Signal;
//Cable results
Double result 2 = 0;
If( c.equals("")){
result_TextField.setText("Please enter an operator");
} other {
// The number of hours of trouble will be processed manually
If (str1.equals("."))
str1 = "0.0";
If (str2.equals("."))
str2 = "0.0";
a2 = Double.valueOf(str1).doubleValue();
b2 = Double.valueOf(str2).doubleValue();
If( c.equals("+")){
Result 2 = a2 + b2;
}
If( c.equals("-")){
Result 2 = a2 - b2;
}
If( c.equals("*")){
BigDecimal m1 = new BigDecimal(Double.toString(a2));
BigDecimal m2 = new BigDecimal(Double.toString(b2));
result2 = m1.multiply(m2).doubleValue();
}
If( c.equals("/")){
If( b2 == 0){
Result 2 = 0;
} other {
Result 2 = a2 / b2;
}
}
result = ((new Double(result2)).toString());
result_TextField.setText(result);
}
}
@SuppressWarnings("not used")
Public static invalid primary (string) [] args){
// The setup procedure is an external air supply standard that can be removed by mutual trust
attempt {
UIManager.setLookAndFeel("javax.swing.plaf.metal.MetalLookAndFeel");
} Catch (exception) e){
e.printStackTrace();
}
Calculator cal = new Calculator();
}
}