preface
In our daily APP or website, we often need to access data. For example, in wechat, we need to store a series of information such as our user name, mobile phone number, user password, etc. Relying on the Java related knowledge learned before can no longer meet this demand. Now the most basic and widely used application program is relational database, such as MySQL. In order to realize the communication with relational database in Java language, a standard access interface, namely JDBC (Java Database Connectivity), is formulated. This article mainly introduces the relevant knowledge of using JDBC in Java. The main contents are as follows:
- Introduction to JDBC
- Data addition, deletion, modification and query
- affair
- Connection pool
Introduction to JDBC
JDBC (Java Database Connectivity), that is, Java Database Connectivity. It is an application program interface used in Java language to standardize how the client program accesses the database. It is oriented to relational database and provides a method to query and update the data in the database.
This article uses Mysql to demonstrate how to use JDBC, so you need to prepare MySQL on your machine in advance, and it's best to understand the use of MySQL.
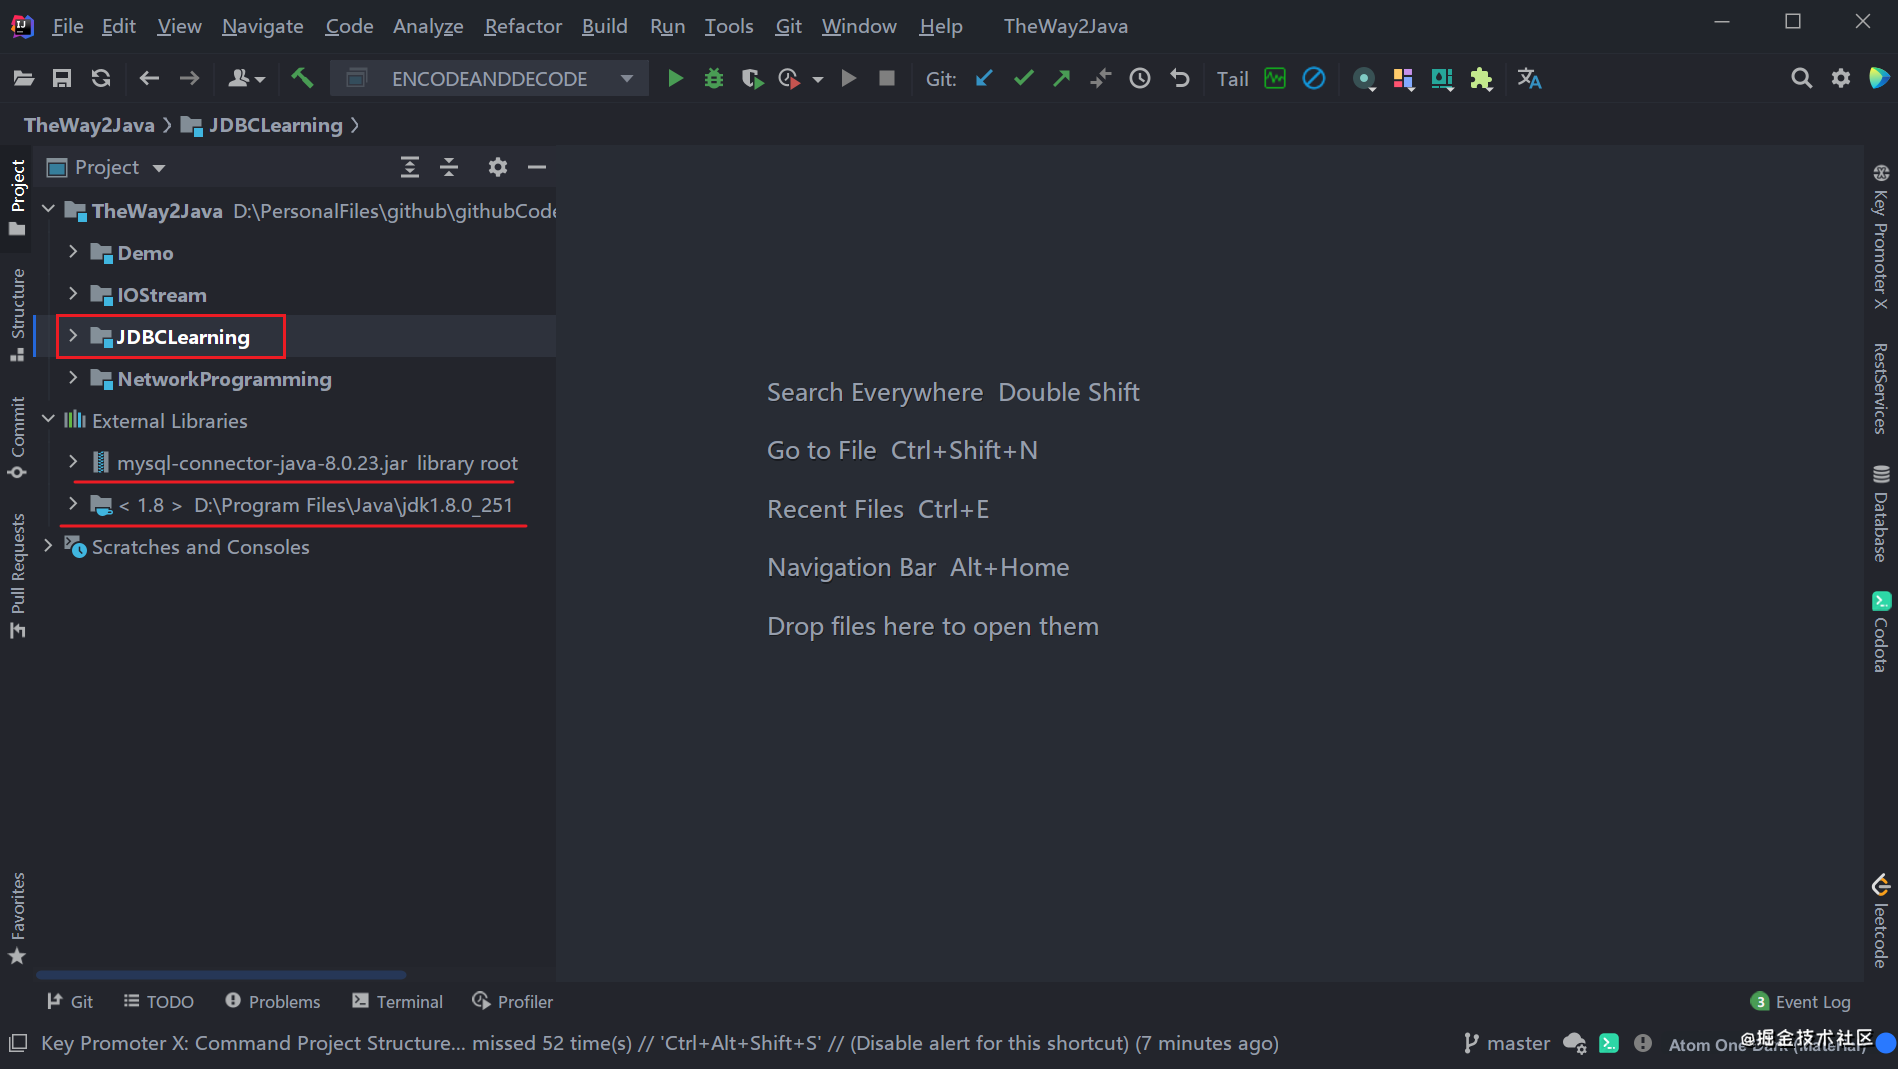
First of all, we need to establish the connection between MySQL and Java programs, so we need to prepare the third-party package MySQL connector Java in advance. Download address: https://downloads.mysql.com/archives/c-j/
Import driver package
Take importing jar package in IDEA as an example. After we have established the project, the process of importing package is as follows:
- First, open file - > project structure - > modules - > dependencies;
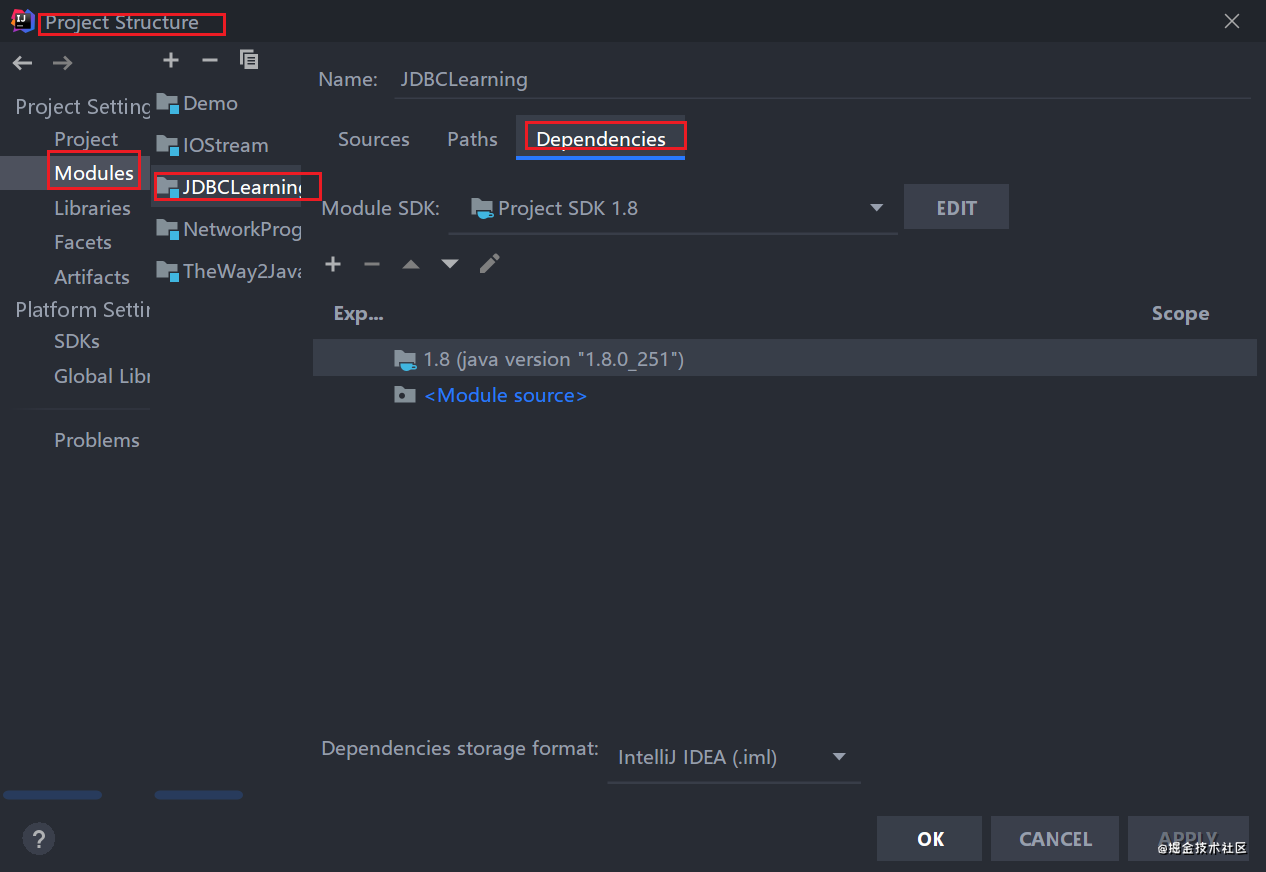
- Then click the + sign, select 1 JARs or Directories, and find the jar package you downloaded to import;

- Import successfully, click OK;

Initialize and establish connection
After importing our jar package, we need to initialize it. Create a new class to initialize and connect. First load the driver class into the JVM. During the loading process, the static initialization block will be executed to complete the initialization of the driver. Then establish the connection between the database and the program. At this time, you need to provide the IP address, port number, database name, coding method, user name, user password and other information of the database.
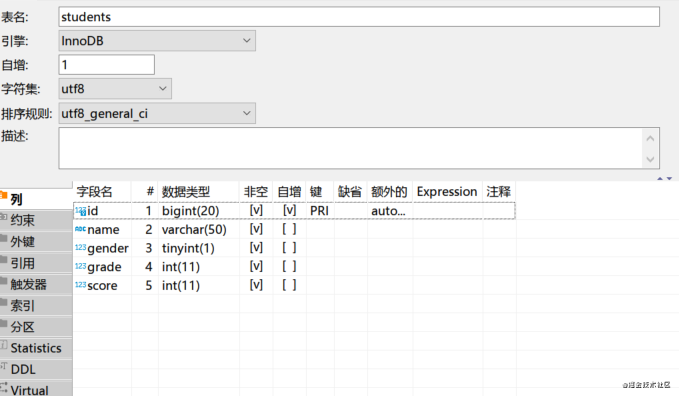
First, we create a table student in the database. The table creation statement is as follows for subsequent practice.
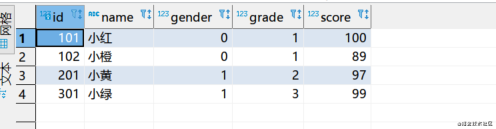
-- Create database javalearning
CREATE DATABASE if not exists javalearning;
-- Create table students
USE javalearning;
CREATE TABLE students (
  id BIGINT AUTO_INCREMENT NOT NULL, -- Student number
  name VARCHAR(50) NOT NULL, -- full name
  gender TINYINT(1) NOT NULL, -- Gender
  grade INT NOT NULL, -- grade
  score INT NOT NULL, -- fraction
  PRIMARY KEY(id) -- Primary key
) Engine=INNODB DEFAULT CHARSET=UTF8;

-- Insert partial data
INSERT INTO students (id, name, gender, grade, score) VALUES (101,'Xiao Hong', 0, 1, 100);
INSERT INTO students (id, name, gender, grade, score) VALUES (102,'Naranjito ', 0, 1, 89);
INSERT INTO students (id, name, gender, grade, score) VALUES (201,'Xiao Huang', 1, 2, 97);
INSERT INTO students (id, name, gender, grade, score) VALUES (301,'Little green', 1, 3, 99);
After creating the database and tables, we can initialize and connect. The steps here are mainly divided into the following steps:
- First, you need to load the driver, mainly using class Load the forname () class into the JVM driver;
- Establish the Connection between the program and the database, mainly creating the Connection object;
- Next, create a Statement object for executing SQL statements;
- Finally, close the Connection to release resources. First close the Statement, and then close the Connection;
import java.sql.Connection;
import java.sql.DriverManager;
import java.sql.SQLException;
import java.sql.Statement;

/**
 * @author : cunyu
 * @version : 1.0
 * @className : InitJDBC
 * @date : 2021/4/23 10:56
 * @description : Initialize and establish connection
 */

public class InitJDBC {
    public static void main(String[] args) {
        Connection connection = null;
        Statement statement = null;
        try {
//            Initialize, register driver
            Class.forName("com.mysql.cj.jdbc.Driver");
//            Establish connection
            connection = DriverManager.getConnection("jdbc:mysql://localhost/javalearning?characterEncoding=UTF-8", "root", "12345");
            System.out.println("Connection succeeded!");
//            Create Statement to execute SQL Statement
            statement = connection.createStatement();
            System.out.println("Statement Object:" + statement);
        } catch (ClassNotFoundException | SQLException e) {
            e.printStackTrace();
        } finally {
            try {
                if (statement != null) {
                    statement.close();
                }
            } catch (SQLException throwables) {
                throwables.printStackTrace();
            }
            try {

                if (connection != null) {
                    connection.close();
                }
            } catch (SQLException throwables) {
                throwables.printStackTrace();
            }
        }
    }
}

The above method of closing Connection and Statement may be slightly cumbersome. In order to further simplify, you can use the try with source method to automatically close. The simplified code is as follows;
import java.sql.Connection;
import java.sql.DriverManager;
import java.sql.SQLException;
import java.sql.Statement;

/**
 * @author : cunyu
 * @version : 1.0
 * @className : InitJDBC2
 * @date : 2021/4/23 13:53
 * @description : Initialization and connection
 */

public class InitJDBC2 {
    public static void main(String[] args) {
        try {
            Class.forName("com.mysql.cj.jdbc.Driver");
        } catch (ClassNotFoundException e) {
            e.printStackTrace();
        }

        try (Connection connection = DriverManager.getConnection("jdbc:mysql://localhost:3306/javalearning?characterEncoding=UTF-8", "root", "12345"); Statement statement = connection.createStatement();) {
            System.out.println("Connection successful");
            System.out.println("State Object:" + statement);
        } catch (SQLException throwables) {
            throwables.printStackTrace();
        }
    }
}
JDBC addition, deletion, modification and query
After we initialize and establish a JDBC connection, we can perform CRUD (add, query, update, delete) and other operations on the database.
Before we officially start CRUD, we'd better understand the data types in MySQL and the corresponding data types in Java for subsequent data operation. Generally speaking, the corresponding relationship between the two data types is shown in the following table.
| Data types in SQL | Corresponding Java data type |
|---|---|
| BIT,BOOL | boolean |
| INTEGER | int |
| BIGINT | long |
| REAL | float |
| FLOAT, DOUBLE | double |
| CHAR, VARCHAR | String |
| DECIMAL | BigDecimal |
| DATE | java.sql.Date,LocalDate |
| TIME | java.sql.Time, LocalTime |
In addition, although we use Statement to create an object and use it for subsequent operations during initialization and connection establishment in the introduction of JDBC, in the actual use process, SQL parameters are basically passed in from method parameters. At this time, using Statement is ten times easy to cause SQL injection. In order to solve this problem, Daniel proposed the following two methods:
- Escape the parameters in the string, and then operate with the escaped parameters. But escape is very troublesome, and as soon as we use SQL, we must add escape code.
- Using PreparedStatement, it uses? As a placeholder, the data is transferred to the database by connecting the SQL itself, so as to ensure that the SQL statements transmitted to the database are consistent every time, and only the data in the placeholder is different every time. By using PreparedStatement, we can completely avoid SQL injection problems.
For the subsequent process of using JDBC to operate the database, in order to avoid the problem of SQL injection as much as possible, we give priority to PreparedStatement instead of Statement
Query data
First, let's query. When querying, you can summarize the following steps:
- Establish a Connection by creating a Connection object;
- Then use the prepareStatement() method to create a PreparedStatement object and pass in the SQL statement to execute the query operation;
- Then execute the executeQuery() method provided by the PreparedStatement object to obtain the query result and return it to a ResultSet result set;
- Finally, we use the next() method of the ResultSet object to read the results returned by our query;
Points needing attention:
- If you don't use try with source, you must remember to release resources after using the connection;
- In the ResultSet of the result set, the index position starts from 1 instead of 0, which should be paid special attention to!
import java.sql.*;
/**
* @author : cunyu
* @version : 1.0
* @className : QueryTest
* @date : 2021/4/23 14:01
* @description : query
*/
public class QueryTest {
public static void main(String[] args) {
try {
Class.forName("com.mysql.cj.jdbc.Driver");
} catch (ClassNotFoundException e) {
e.printStackTrace();
}
String url = "jdbc:mysql://localhost:3306/javalearning?characterEncoding=UTF-8";
String username = "root";
String password = "0908";
String queryString = "SELECT * FROM students";
try (Connection connection = DriverManager.getConnection(url, username, password); PreparedStatement preparedStatement = connection.prepareStatement(queryString); ResultSet resultSet = preparedStatement.executeQuery();) {
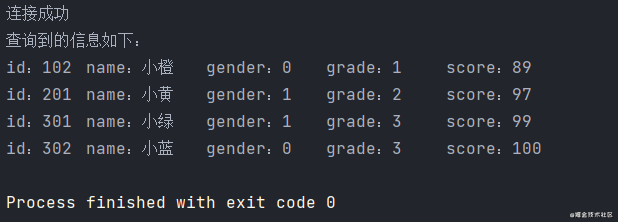
System.out.println("Connection successful");
System.out.println("The information found is as follows:");
while (resultSet.next()) {
// The query result index starts from 1
System.out.println("id: " + resultSet.getLong(1) + "\tname: " + resultSet.getString(2) + "\tgender: " + resultSet.getInt(3) + "\tgrade: " + resultSet.getLong(4) + "\tscore: " + resultSet.getLong(5));
}
} catch (SQLException throwables) {
throwables.printStackTrace();
}
}
}

Add data
That is, insert a new record, which is very similar to the query statement, but the difference is that the PreparedStatement object does not execute executeQuery(), but executeUpdate() The steps for inserting records are summarized as follows:
- Create a Connection object to establish a Connection;
- Use the prepareStatement() method to create a PreparedStatement object and pass in the SQL statement to execute the insertion operation;
- Then set the value represented by the placeholder in turn;
- Execute the executeUpdate() method provided by the PreparedStatement object. At this time, the number returned is an int type number, indicating the number of records inserted;
import java.sql.Connection;
import java.sql.DriverManager;
import java.sql.PreparedStatement;
import java.sql.SQLException;

/**
 * @author : cunyu
 * @version : 1.0
 * @className : InsertTest
 * @date : 2021/4/23 15:04
 * @description : New data
 */

public class InsertTest {
    public static void main(String[] args) {
        try {
            Class.forName("com.mysql.cj.jdbc.Driver");
        } catch (ClassNotFoundException e) {
            e.printStackTrace();
        }

        String url = "jdbc:mysql://localhost:3306/javalearning?characterEncoding=UTF-8";
        String username = "root";
        String password = "110120";
        String insertString = "INSERT INTO students VALUES (?,?,?,?,?)";

        try (Connection connection = DriverManager.getConnection(url, username, password); PreparedStatement preparedStatement = connection.prepareStatement(insertString);) {
            System.out.println("Connection successful");
            //            Insert data in sequence
            preparedStatement.setLong(1, 302);
            preparedStatement.setString(2, "Blue ");
            preparedStatement.setInt(3, 0);
            preparedStatement.setLong(4, 3);
            preparedStatement.setLong(5, 100);
            System.out.println("Insert data successfully");
            preparedStatement.executeUpdate();
        } catch (SQLException throwables) {
            throwables.printStackTrace();
        }
    }
}
After adding new data, then query the data and get the following results. You can see that our newly inserted data has been successfully added to the database!

Delete data
The method of deleting data is basically the same as that of adding data. The biggest difference between the two is the difference of SQL statements. The DELETE operation uses the DELETE statement, which can DELETE several columns at one time.
import java.sql.Connection;
import java.sql.DriverManager;
import java.sql.PreparedStatement;
import java.sql.SQLException;

/**
 * @author : cunyu
 * @version : 1.0
 * @className : DeleteTest
 * @date : 2021/4/23 15:23
 * @description : Delete data
 */

public class DeleteTest {
    public static void main(String[] args) {
        try {
            Class.forName("com.mysql.cj.jdbc.Driver");
        } catch (ClassNotFoundException e) {
            e.printStackTrace();
        }

        String url = "jdbc:mysql://localhost:3306/javalearning?charactersetEncoding=UTF-8";
        String username = "root";
        String password = "0908";
        String deleteString = "DELETE FROM students WHERE id = ?";
        try (Connection connection = DriverManager.getConnection(url, username, password); PreparedStatement preparedStatement = connection.prepareStatement(deleteString);) {
            System.out.println("Connection successful");
            preparedStatement.setLong(1, 101);
            preparedStatement.executeUpdate();
            System.out.println("Deleted successfully");
        } catch (SQLException throwables) {
            throwables.printStackTrace();
        }
    }
}
After deleting the data, query the data and get the following results. You can see that the data column with id = 101 has been deleted, indicating that we have successfully deleted the data!
Modify data
The method of modifying data is basically the same as that of deleting data and adding data. The biggest difference lies in the difference of SQL statements. The modification operation uses the UPDATE statement, which can UPDATE several columns at a time.
import java.sql.Connection;
import java.sql.DriverManager;
import java.sql.PreparedStatement;
import java.sql.SQLException;
/**
* @author : cunyu
* @version : 1.0
* @className : UpdateTest
* @date : 2021/4/23 15:23
* @description : Update data
*/
public class UpdateTest {
public static void main(String[] args) {
try {
Class.forName("com.mysql.cj.jdbc.Driver");
} catch (ClassNotFoundException e) {
e.printStackTrace();
}
String url = "jdbc:mysql://localhost:3306/javalearning?charactersetEncoding=UTF-8";
String username = "root";
String password = "0908";
String updateString = "UPDATE students SET name = ? WHERE id = ?";
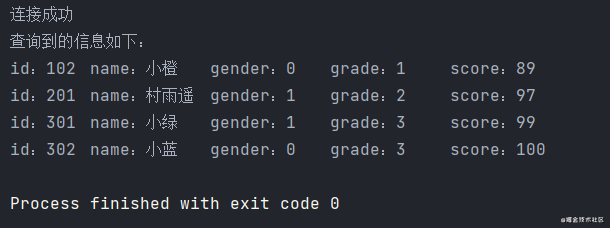
try (Connection connection = DriverManager.getConnection(url, username, password); PreparedStatement preparedStatement = connection.prepareStatement(updateString);) {
System.out.println("Connection successful");
preparedStatement.setString(1, "Village Yuyao");
preparedStatement.setLong(2, 201);
preparedStatement.executeUpdate();
System.out.println("Update successful");
} catch (SQLException throwables) {
throwables.printStackTrace();
}
}
}
After modifying the data, then query the data and get the following results. You can see that in the data column corresponding to id = 201, name has changed from Xiaohuang to cunyuyao, indicating that the data update is successful.
be careful
When the self adding primary key is set for our database table, it will be automatically updated without specifying the primary key when adding data. However, when obtaining the value of self incrementing primary key, you cannot insert it first and then query it, otherwise it may lead to conflict. To correctly obtain the self incrementing primary key, you need to specify a flag bit return when creating the PreparedStatement_ GENERATED_ Keys, used to indicate that the JDBC driver must return the inserted self incrementing primary key.
Suppose we set the self growth key when creating the table:
CREATE TABLE students(
	id int(11) AUTO_INCREMENT,
    ...
);
At this time, neither executeQuery() nor executeupdate () will return this self growing ID, so you need to add the statement when creating the PreparedStatement object RETURN_ GENERATED_ The keys parameter to ensure that the self growing ID will be returned, and then get the field through getGeneratedKeys;
import java.sql.*;

/**
 * @author : cunyu
 * @version : 1.0
 * @className : QueryTest
 * @date : 2021/4/23 18:01
 * @description : Auto increment PK query
 */

public class QueryTest {
    public static void main(String[] args) {
        try {
            Class.forName("com.mysql.cj.jdbc.Driver");
        } catch (ClassNotFoundException e) {
            e.printStackTrace();
        }

        String url = "jdbc:mysql://localhost:3306/javalearning?characterEncoding=UTF-8";
        String username = "root";
        String password = "12345";
        String queryString = "INSET INTO students VALUES(null,?,......)";
        try (Connection connection = DriverManager.getConnection(url, username, password); PreparedStatement preparedStatement = connection.prepareStatement(queryString, Statement.RETURN_GENERATED_KEYS); ResultSet resultSet = preparedStatement.getGeneratedKeys();) {
            System.out.println("Connection successful");
            preparedStatement.setString(1, "Village Yuyao");
            ......
            preparedStatement.executeUpdate();
            System.out.println("The information found is as follows:");
            while (resultSet.next()) {
//                The query result index starts from 1
                System.out.println("id: " + resultSet.getLong(1));
            }
        } catch (SQLException throwables) {
            throwables.printStackTrace();
        }
    }
}
JDBC tool class
Observing the above code, we can notice that each time we need to register drivers, pass parameters, close connections and other operations. In order to improve the universality of the tool, we use the configuration file to configure the database related information, and then create a JDBC tool class to simplify the above operations.
- First, create a configuration file JDBC Properties, and fill in the relevant information of the database;
url=jdbc:mysql://localhost/demo?characterEncoding=UTF-8
user=root
password="12345"
driver=com.mysql.jdbc.cj.Driver
- Create tool class
import java.io.FileReader;
import java.io.IOException;
import java.net.URL;
import java.sql.*;
import java.util.Properties;

/**
 * @author : cunyu
 * @version : 1.0
 * @className : JDBCUtils
 * @date : 2021/4/24 15:10
 * @description : JDBC Tool class
 */

public class JDBCUtils {
    //    Parameters in the configuration file
    private static String url;
    private static String user;
    private static String password;
    private static String driver;

    //    Static code block
    static {
        try {
//        Read the configuration file and get the parameter value
//        Create collection class
            Properties properties = new Properties();

//        Get the location of the configuration file
            ClassLoader classLoader = JDBCUtils.class.getClassLoader();
            URL resource = classLoader.getResource("jdbc.properties");
            String path = resource.getPath();
            System.out.println("Location of configuration file");
//        Load profile
            properties.load(new FileReader(path));

//            Get the value of the parameter and assign a value
            url = properties.getProperty("url");
            user = properties.getProperty("user");
            password = properties.getProperty("password");
            driver = properties.getProperty("driver");

//            Register driver
            Class.forName(driver);
        } catch (IOException | ClassNotFoundException e) {
            e.printStackTrace();
        }
    }

    /**
     * @param
     * @return Connection object
     * @description Get connection
     * @date 2021/4/24 15:24
     * @author cunyu1943
     * @version 1.0
     */
    public static Connection getConnection() {
        try {
            return DriverManager.getConnection(url, user, password);
        } catch (SQLException throwables) {
            throwables.printStackTrace();
        }
        return null;
    }

    /**
     * @param preparedStatement Pre declaration
     * @param connection        Connection object
     * @return
     * @description Close connection
     * @date 2021/4/24 15:27
     * @author cunyu1943
     * @version 1.0
     */
    public static void close(PreparedStatement preparedStatement, Connection connection) {
        if (preparedStatement != null) {
            try {
                preparedStatement.close();
            } catch (SQLException throwables) {
                throwables.printStackTrace();
            }
        }

        if (connection != null) {
            try {
                connection.close();
            } catch (SQLException throwables) {
                throwables.printStackTrace();
            }
        }
    }


    /**
     * @param resultSet         Result set
     * @param preparedStatement Pre declared object
     * @param connection        Connection object
     * @return
     * @description Close connection
     * @date 2021/4/24 15:28
     * @author cunyu1943
     * @version 1.0
     */
    public static void close(ResultSet resultSet, PreparedStatement preparedStatement, Connection connection) {
        if (resultSet != null) {
            try {
                resultSet.close();
            } catch (SQLException throwables) {
                throwables.printStackTrace();
            }
        }

        if (preparedStatement != null) {
            try {
                preparedStatement.close();
            } catch (SQLException throwables) {
                throwables.printStackTrace();
            }
        }

        if (connection != null) {
            try {
                connection.close();
            } catch (SQLException throwables) {
                throwables.printStackTrace();
            }
        }
    }
}
JDBC transaction
Four features of transaction
Transaction is an inseparable sequence of database operations and the basic unit of database concurrency control. Its execution result must switch the database from one consistency state to another consistency state. A transaction is a logical set of operations that are either executed or not executed. Transactions can ensure that either all changes are saved or none are saved when the database commits work. That is, a transaction is a logical set of operations, either all or none.
- Atomicity
Atomicity is an inseparable work unit in the whole database transaction. Only when all database operations in the transaction are executed successfully can it represent the success of the whole transaction. If the execution of any link fails, even the successfully executed SQL statement must be revoked and rolled back to the state before the transaction is executed. That is, atomicity can ensure that the action is either completely completed or completely ineffective. That is, the transaction is the smallest execution unit and cannot be divided.
- Consistency
It refers to the task of changing the database from one consistency state to another. Before and after the start of the transaction, the integrity constraints of the database are not broken. Before and after the transaction is executed, the data can be consistent, and the results of multiple transactions reading unified data are the same.
- Isolation
When accessing the database concurrently, isolation requires that each read-write transaction can be separated from the operation objects of other transactions, that is, a user's transaction is not disturbed by other transactions, and the database between concurrent transactions is independent;
- Durability
Indicates that once a transaction is committed, the result is permanent, and its changes to the data in the database are lasting. Even if the database fails, it should not be affected;
Dirty reading, unreal reading & non repeatable reading
Before understanding the transaction isolation level, let's take a look at these concepts:
- Dirty Read
Indicates that a transaction has updated a copy of data, and another transaction has read the same copy of data at this time. After the current transaction is revoked, the data read by the latter transaction will be incorrect.
- Phantom Read
In the two queries of a transaction, the amount of data is inconsistent. If one transaction queries several columns of data and another transaction queries new data at this time, the query transaction will find that the data is richer than the initial query data in the subsequent query.
- Non repeatable read
The data of two queries in a transaction is inconsistent, which may be because a transaction updating the original data is inserted during the two queries.
Note: the difference between non repeatable reading and unreal reading is:
The key point of non repeatable reading is to modify. For example, when reading a record for many times, it is found that the values of some columns have been modified, while the key point of phantom reading is to add or delete. For example, when reading a record for many times, it is found that the number of records has increased or decreased.
Isolation level
The SQL standard defines four isolation levels, from low to high:
- Read uncommitted
The lowest isolation level, which allows reading uncommitted data changes, which may lead to dirty reading, unreal reading or non repeatable reading.
- Read committed
It allows reading the committed data of concurrent transactions, which can prevent dirty reading, but may lead to unreal reading or non repeatable reading.
- REPEATABLE-READ
The results of multiple reads of the same field are consistent, unless the data is modified by its own transaction, which can prevent dirty reads and non repeatable reads, but may lead to unreal reads.
- SERIALIZABLE
The highest isolation level is completely subject to the isolation level of ACID, and all transactions are executed one by one, so that there is no interference between transactions, and dirty reading, phantom reading and non repeatable reading can be prevented.
The following is the relationship between SQL isolation level and various reads:
| Isolation level | Dirty reading | Non repeatable reading | Unreal reading |
|---|---|---|---|
| READ-UNCOMMITTED | ✔ | ✔ | ✔ |
| READ-COMMITTED | ❌ | ✔ | ✔ |
| REPEATABLE-READ | ❌ | ❌ | ✔ |
| SERIALIZABLE | ❌ | ❌ | ❌ |
example
Rollback mainly involves Connection objects. The three common methods are as follows:
| Return value | method | describe |
|---|---|---|
| void | setAutoCommit(boolean autoCommit) | Set the automatic submission mode of the connection. true means automatic submission and false means manual submission |
| void | commit() | Make all changes made since the last commit / rollback permanent and release all database locks currently held by this Connection object |
| void | rollback() | Undo all changes made in the current session and release all database locks currently held by this Connection object |
The following is a rollback example. When we insert a piece of data for the first time, because it is new data, we will not report an error. However, if we execute the program again after executing it once, it will report an error. Because the inserted data is repeated, we can easily solve this problem by using transactions, We set that if the insertion error occurs, it will be rolled back to the state before the error occurs, so as to ensure that the inserted data will not report an error.
import java.sql.Connection;
import java.sql.DriverManager;
import java.sql.PreparedStatement;
import java.sql.SQLException;

/**
 * @author : cunyu
 * @version : 1.0
 * @className : AffairTest
 * @date : 2021/4/23 22:35
 * @description : affair
 */

public class AffairTest {
    public static void main(String[] args) {
        try {
            Class.forName("com.mysql.cj.jdbc.Driver");
        } catch (ClassNotFoundException e) {
            e.printStackTrace();
        }

        String url = "jdbc:mysql://localhost:3306/javalearning?characterEncoding=UTF-8";
        String username = "root";
        String password = "12345";
        String insertString = "INSERT INTO students VALUES (?,?,?,?,?)";
        Connection connection = null;
        PreparedStatement preparedStatement = null;

        try {
            connection = DriverManager.getConnection(url, username, password);
//            Turn off auto submit
            connection.setAutoCommit(false);
            preparedStatement = connection.prepareStatement(insertString);
            System.out.println("Connection successful");
//            Insert data in sequence
            preparedStatement.setLong(1, 401);
            preparedStatement.setString(2, "Little purple");
            preparedStatement.setInt(3, 0);
            preparedStatement.setLong(4, 4);
            preparedStatement.setLong(5, 88);
            preparedStatement.executeUpdate();
//            If there are no errors, commit the transaction
            connection.commit();
            System.out.println("Insert data successfully");

        } catch (SQLException throwables) {
//            Once an error occurs, the transaction is rolled back
            try {
                connection.rollback();
            } catch (SQLException e) {
                e.printStackTrace();
            }
        } finally {
//            Finally, close the connection
            if (connection != null) {
                try {
                    connection.close();
                } catch (SQLException throwables) {
                    throwables.printStackTrace();
                }
            }
            if (preparedStatement != null) {
                try {
                    preparedStatement.close();
                } catch (SQLException throwables) {
                    throwables.printStackTrace();
                }
            }
        }
    }
}
In addition to the above rollback methods, JDBC also supports the method of setting savepoints. We can use transaction rollback to the specified savepoints. The main methods involved are as follows:
- setSavepoint(String savePointName): create a new SavePoint and return a SavePoint object;
- rollback(String savePointName): rollback to the specified savepoint;
Connection pool
brief introduction
When we use multithreading, if each thread needs to connect to the database to execute SQL statements, each thread must create a connection and then close it after use. This process of creating and closing connections is very time-consuming. Once multiple threads are concurrent, it is easy to cause the system to get stuck. To solve this problem, a database connection pool is proposed. Database connection pool is actually equivalent to a collection. It is a container for storing database connections. When our system is initialized, the collection will be created. Some connection objects will be applied in the collection. When the user accesses the database, the connection objects will be obtained from the collection. Once the user accesses the database, the connection objects will be returned to the container.
The advantages of using database connection pool: one is to save resources, and the other is to improve the efficiency of user access.
Common database connection pool
C3P0
- Guide Package
First, you need to import the package. First, download the jar package of C3P0 object. Download address: https://sourceforge.net/projects/c3p0/ And then import the following two packages:;

- Define profile
Create the configuration file corresponding to C3P0. Note: the configuration file is generally placed in the src path, and the file name must be one of the following:
- c3p0.properties
- c3p0-config.xml
<c3p0-config>
    <!-- Read the connection pool object using the default configuration -->
    <default-config>
        <!--  Connection parameters -->
        <property name="driverClass">com.mysql.cj.jdbc.Driver</property>
        <property name="jdbcUrl">jdbc:mysql://localhost:3306/javalearning?characterEncoding=UTF-8</property>
        <property name="user">root</property>
        <property name="password">0908</property>

        <!-- Connection pool parameters -->
        <!--    Number of connections requested for initialization-->
        <property name="initialPoolSize">5</property>
        <!--        maximum connection-->
        <property name="maxPoolSize">10</property>
        <!--      Timeout-->
        <property name="checkoutTimeout">3000</property>
    </default-config>
</c3p0-config>
-
Create connection pool object
-
Get connection object
import com.mchange.v2.c3p0.ComboPooledDataSource;

import javax.sql.DataSource;
import java.sql.Connection;
import java.sql.SQLException;

/**
 * @author : cunyu
 * @version : 1.0
 * @className : C3POTest
 * @date : 2021/4/24 16:01
 * @description : C3PO Connection pool
 */

public class C3POTest {
    public static void main(String[] args) {
//        Create database connection pool object
        DataSource dataSource = new ComboPooledDataSource();
//        Get connection object
        try {
            Connection connection = dataSource.getConnection();
            System.out.println(connection);
        } catch (SQLException throwables) {
            throwables.printStackTrace();
        }
    }
}

Druid
- Guide Package
Import Druid's jar package, download address: https://repo1.maven.org/maven2/com/alibaba/druid/
- Define profile
There is no requirement for the name of the configuration file, but the suffix is properties, and can be stored in any directory;
driver=com.mysql.cj.jdbc.Driver
url=jdbc:mysql://localhost:3306/javalearning?characterEncoding=UTF-8
username=root
password=12345
initialSize=5
maxActive=10
maxWait=3000
- Load profile
- Create connection pool object
- Get connection object
import com.alibaba.druid.pool.DruidDataSourceFactory;
import javax.sql.DataSource;
import java.io.InputStream;
import java.sql.Connection;
import java.util.Properties;
/**
* @author : cunyu
* @version : 1.0
* @className : DruidTest
* @date : 2021/4/24 19:56
* @description : Druid Connection pool
*/
public class DruidTest {
public static void main(String[] args) {
try {
// Load profile
Properties properties = new Properties();
InputStream resourceAsStream = DruidTest.class.getClassLoader().getResourceAsStream("druid.properties");
properties.load(resourceAsStream);
// Get connection pool object
DataSource dataSource = DruidDataSourceFactory.createDataSource(properties);
// Get connection
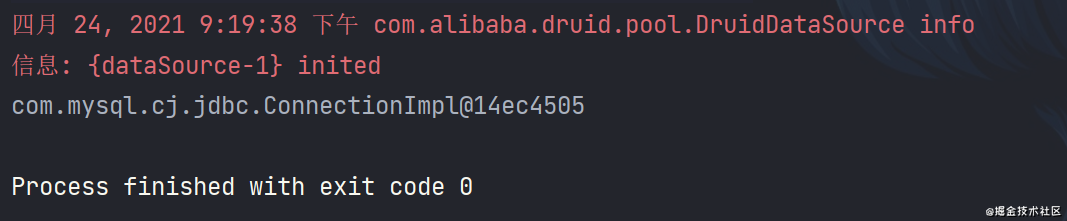
Connection connection = dataSource.getConnection();
System.out.println(connection);
} catch (Exception e) {
e.printStackTrace();
}
}
}
summary
That's the end of today's content. Old rules, praise and pay attention to a wave 🧐.
For the mistakes or omissions in the article, please point them out in the comment area. I'm Murakami Yuyao, a novice programmer whose technology stack is mainly Java. Pay attention to me and learn and grow together!