preface
This article is completely free!!!
This article is completely free!!!
This article is completely free!!!
Important things are said three times. All articles are paid for in their own research. Even if they are free, they only say general or a little, which is really disgusting.
This article is mainly about the installation and deployment environment, and does not involve specific development. The cases are mainly official and online.
Another: this method does not need to install openCV and other software, and should not be confused with the online joint deployment mode.
At present, I have just started research, and I will modify it from time to time according to my own research.
Required documents and download / reference locations
Currently known jar packages require:
- javaCV.jar and its related jar packages:
a. Download my jar package: Click to jump: This is my own jar. If you want to follow it again, I suggest it
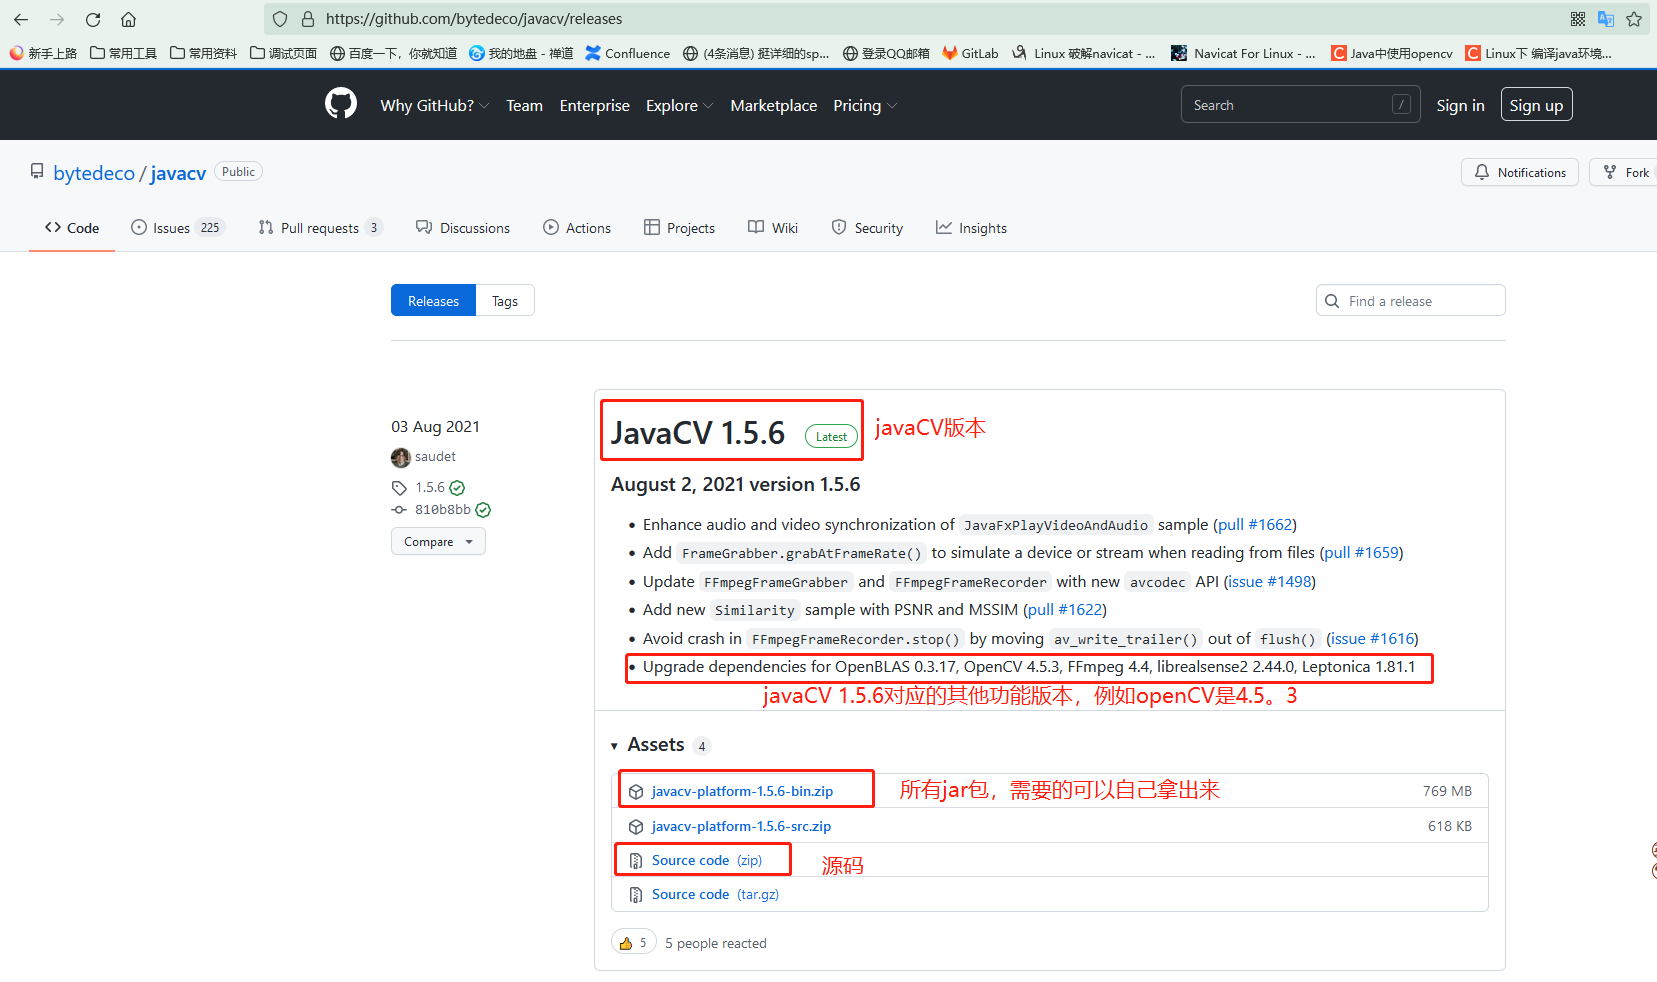
b. Official free jar package download: Click jump : there are subsequent delivery and download methods, jar package differentiation of corresponding version and case download
jar package download instructions
-
Download instructions:
Lower versions can be pulled down, and each version has a corresponding detailed description
-
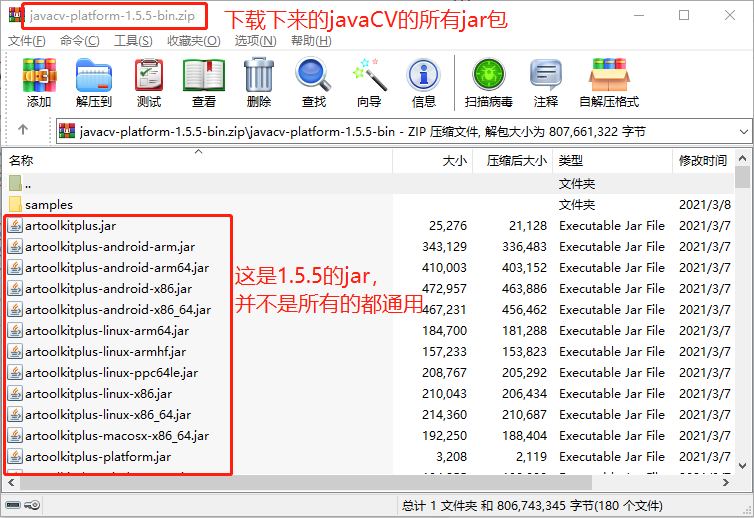
Version Description:
Each version of jar looks the same, but, but!!! It's as like as two peas. It's also a big pit I encountered. The jar just like that on the Internet is not enough. The compilation of the same batch is successful.
-
Official website case: Click jump
Later, we will introduce where to look at detailed cases of functions, including code implementation
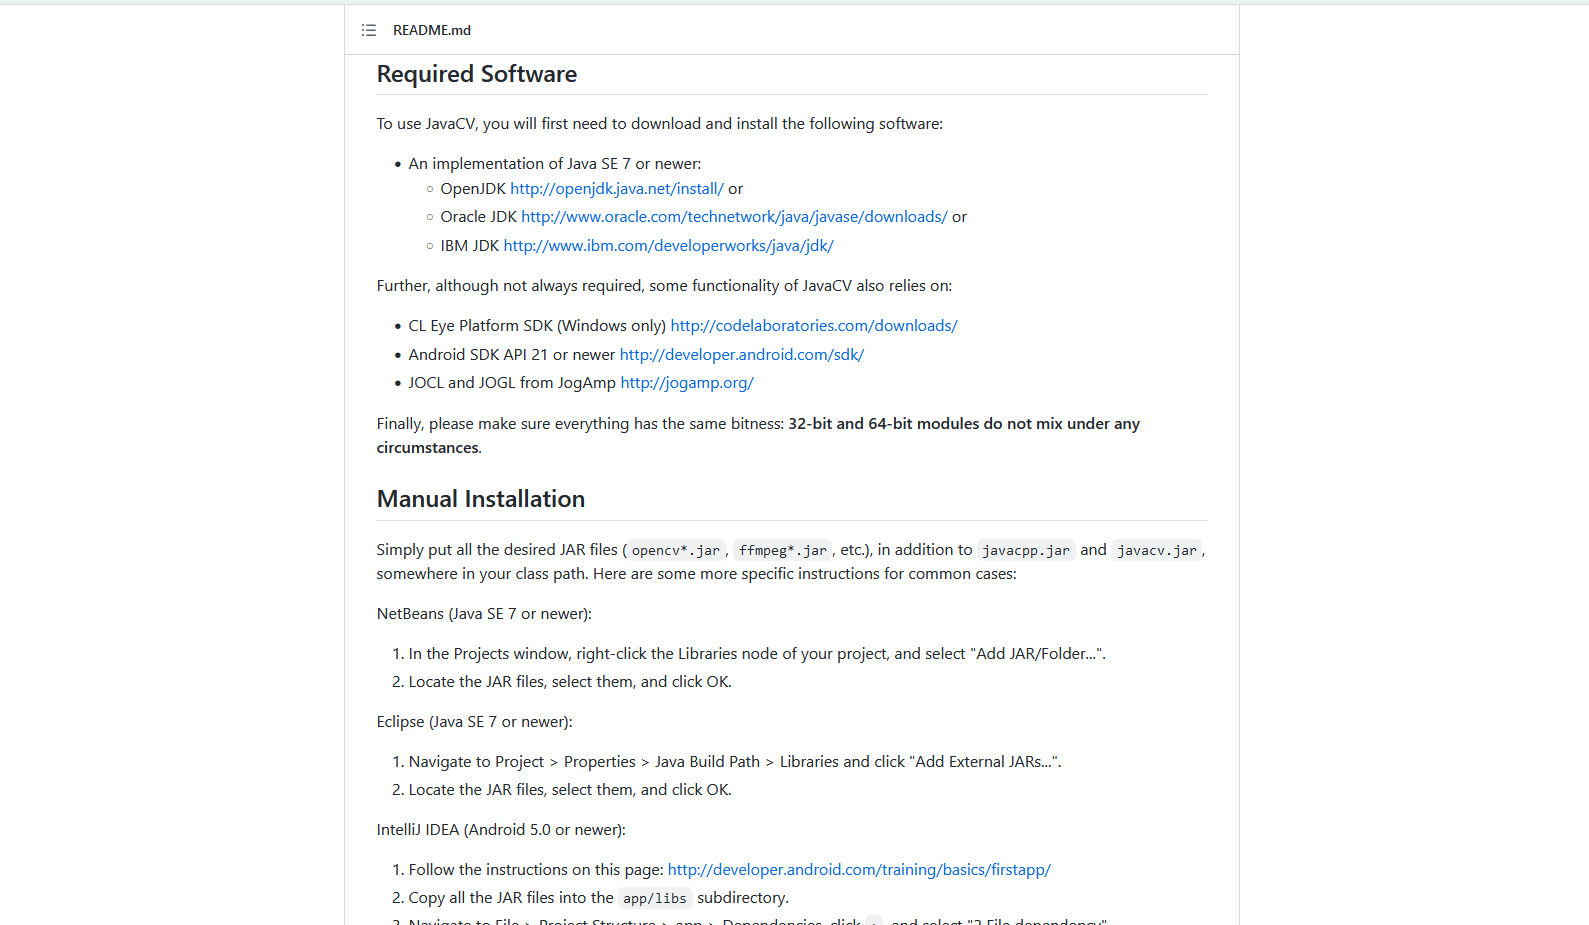
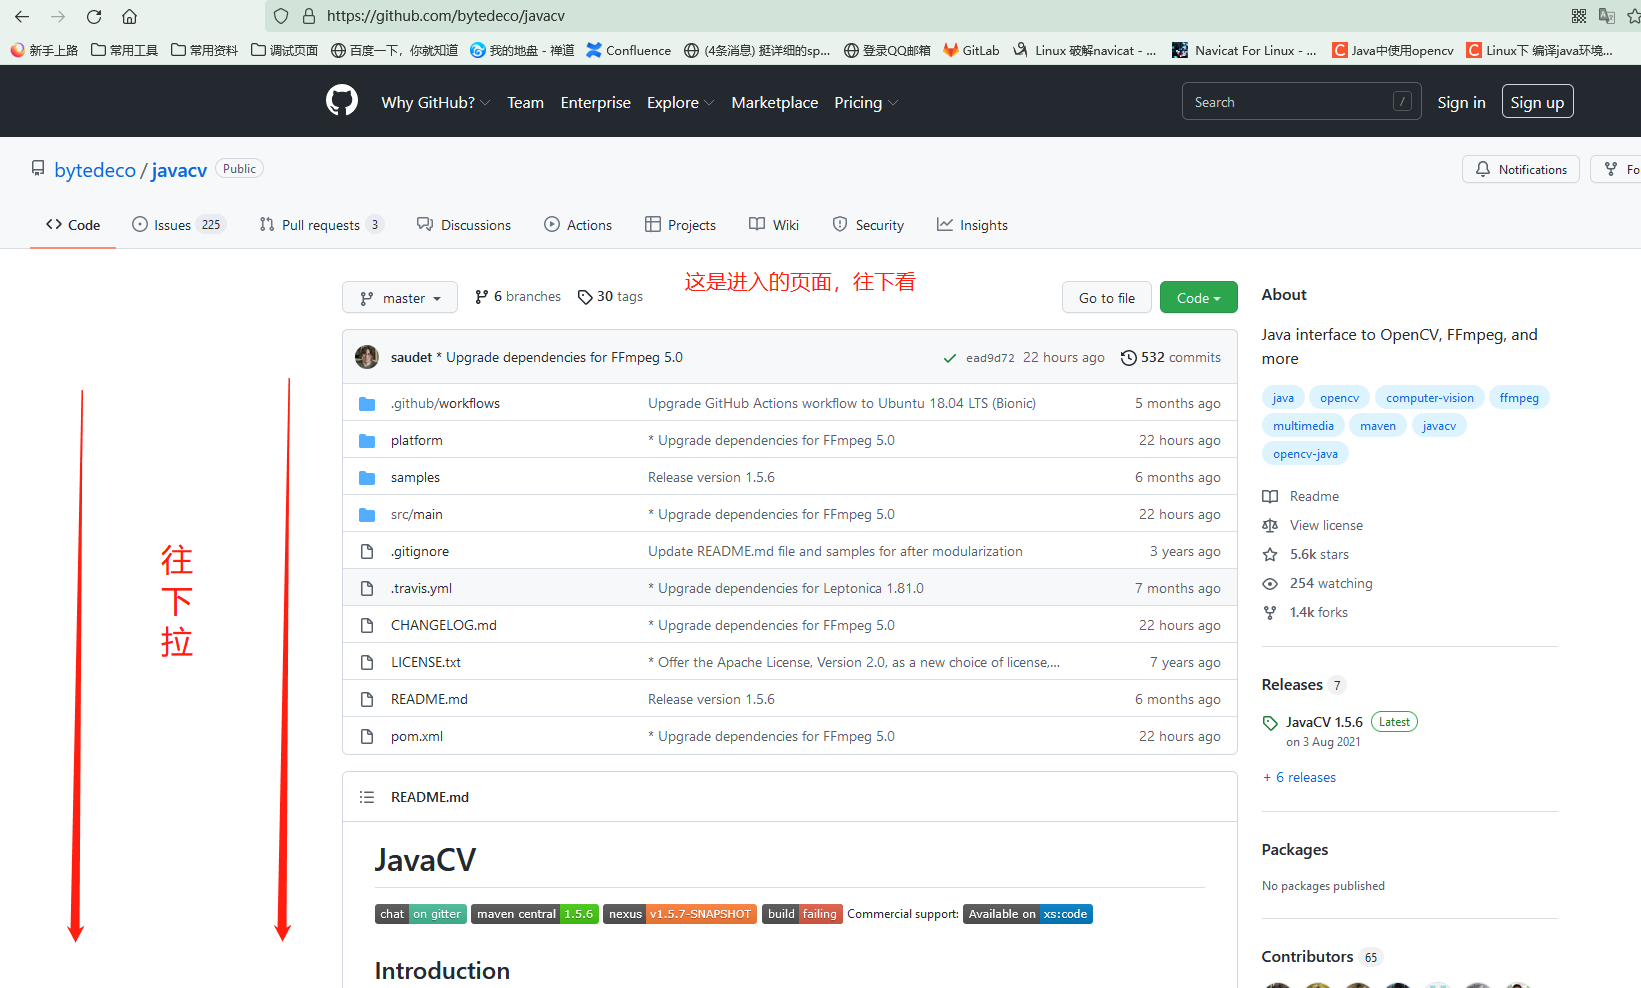 The following is a random cut. There are many jump and instructions of other documents in it. It is not very detailed, but it can basically find out a general idea. You can also study it slowly
Can't understand English, use the translation plug-in, ha ha
I use Firefox "translation web page", which is easy to use!!!

-
Precautions for network cases:
Different javaCV versions have different jar package reference paths, and even different methods and method names. Please be careful
Install and configure the required software
I mainly deal with pictures here, so it's openCV. If you deal with other processing, please configure it according to the actual situation
jar package configuration description
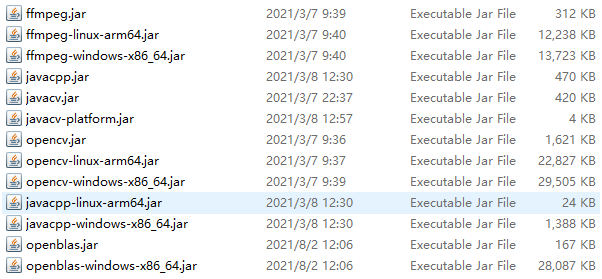
- Core jar: javacv jar,javacpp.jar, these two jars must have
- Function jar: OpenCV jar,ffmpeg.jar, etc. if you want to use the corresponding function, this kind of non suffix name must also have
- Environment jar: ffmpeg-linux-arm64 jar,ffmpeg-windows-x86_64.jar,opencv-linux-arm64.jar and opencv windows x86_ 64. Jar and other jar packages with system environment suffix. These jar packages are corresponding dll and so and other third-party library files. This package additionally introduces jar packages related to environment configuration according to its own running environment
- Other jar packages: openblas jar,openblas-windows-x86_64.jar, etc. I'm not very clear about these, but it's necessary according to DeBug, otherwise an error will be reported. According to different functions, it may be necessary to import other jars. For details, you can go to · jar package troubleshooting · check the missing package troubleshooting process
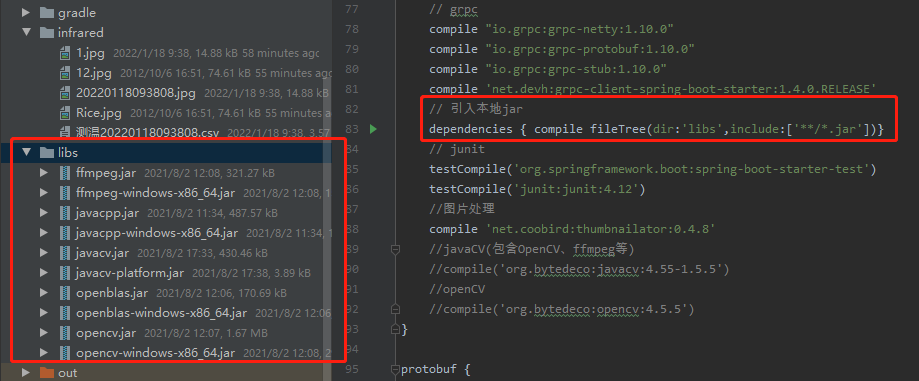
gradle introduction description
Directly introduce all jar packages, and maven is the same. It won't take good remedial courses. There are many online tutorials, so I won't introduce them in detail
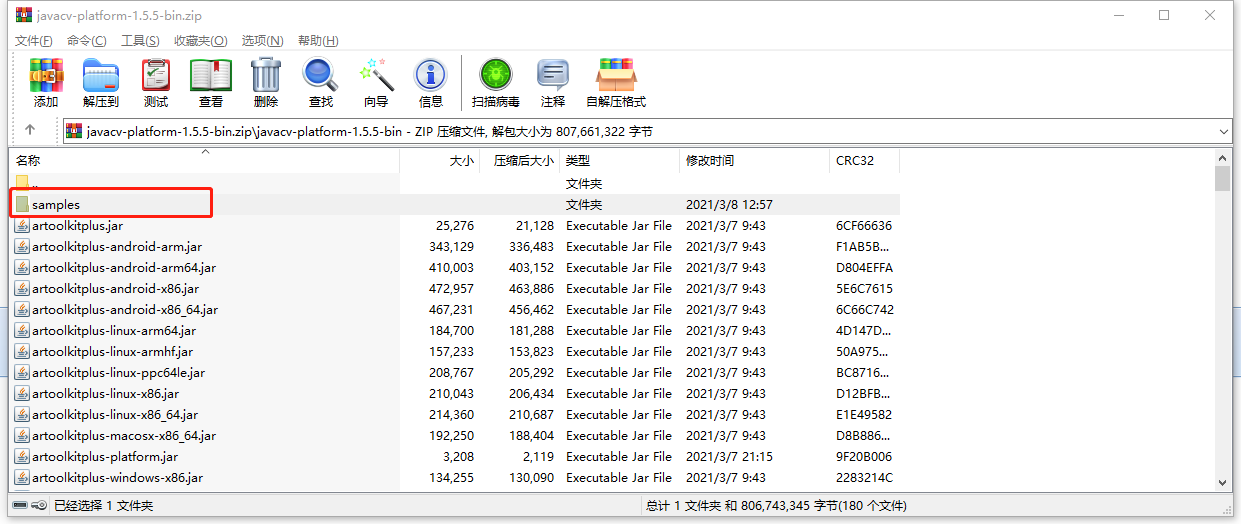
Introduction of cases (official case location)
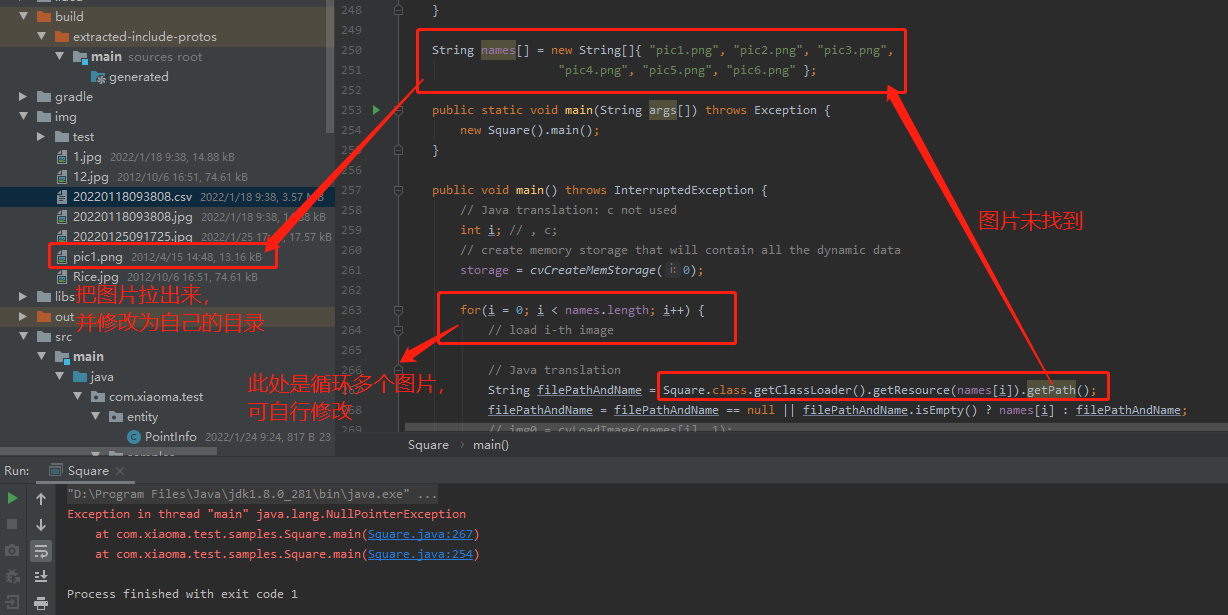
In the downloaded jar package, there is the samples folder. The following are all cases. You can directly drag them out to run the test. During the test, you need to see clearly the calling picture and the location of the modified picture. Many cases are thrown together directly. You can distinguish them manually
Error reporting processing will be introduced in the next item
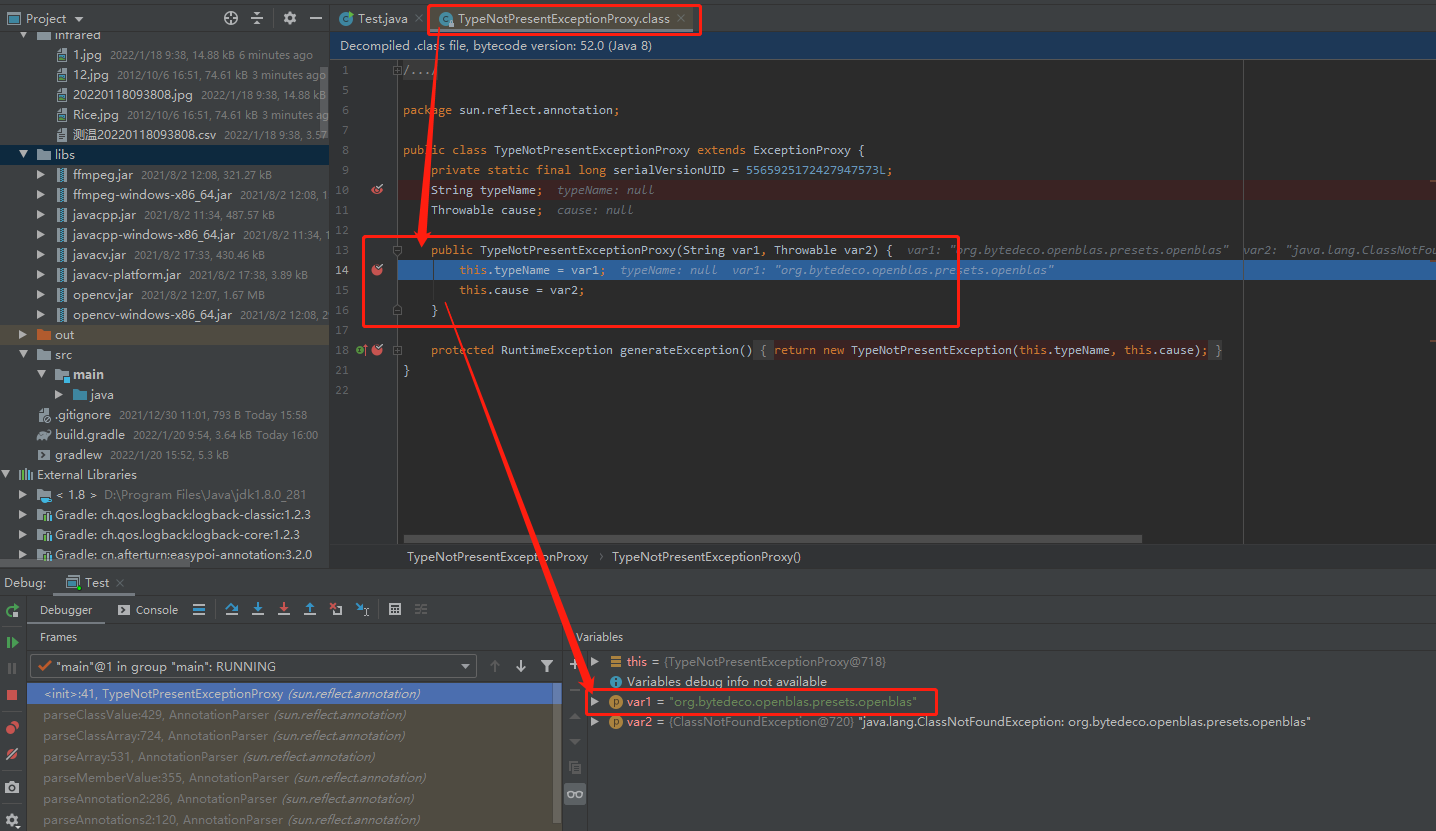
jar package troubleshooting method
There are various errors reported during runtime, the most important of which is caused by the conflict or lack of jar packages. It is recommended to directly remove all jar packages and only introduce javacv Jar and javacpp Jar, and then run it. Generally, an error will be reported and the error reporting method will be entered (most of them are "TypeNotPresentExceptionProxy"). The entry method of idea: press Shift twice in a row, then enter "TypeNotPresentExceptionProxy", select "Class", click enter, click breakpoint, and then run to check the package path exception, and then import or adjust the jar package
I put the exception of the network case at the end
Case description
Here I use "Square.java" as an example (I won't continue to explain the problem of package Guide)
- Process picture path
- Handling specific functions
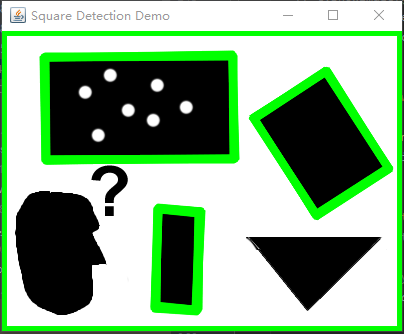
– scan and draw squares

- I'm afraid some students still can't find it. I put the code directly here
package com.xiaoma.test.samples;

import java.awt.event.KeyEvent;

import org.bytedeco.javacpp.*;
import org.bytedeco.javacv.*;

import org.bytedeco.opencv.opencv_core.*;
import org.bytedeco.opencv.opencv_imgproc.*;
import static org.bytedeco.opencv.global.opencv_core.*;
import static org.bytedeco.opencv.global.opencv_imgproc.*;
import static org.bytedeco.opencv.global.opencv_imgcodecs.*;

/**
 * I was unable to find the OpenCV squares.c translated into JavaCV, so this
 * is a line-by-line translation of the C source.
 * The squares.c source used, found here:
 *      https://code.ros.org/trac/opencv/browser/trunk/opencv/samples/c/squares.c?rev=1429
 *
 * This is a demo class for finding squares/rectangles in an image, using JavaCV.
 *
 * All individual imports are kept as is; if you are like me,
 * you probably dislike the catch all .* import when trying to understand stuff.
 *
 * The major headache of the C code was figuring out the
 * "drawLines" method, and what parameters "cvPolyLine" is supposed to use.
 *
 * @author geir.ruud@digitalinferno.com
 */
public class Square {

    int thresh = 50;
    IplImage img = null;
    IplImage img0 = null;
    CvMemStorage storage = null;
    String wndname = "Square Detection Demo";

    // Java spesific
    CanvasFrame canvas = null;
    OpenCVFrameConverter.ToIplImage converter = new OpenCVFrameConverter.ToIplImage();

    // helper function:
    // finds a cosine of angle between vectors
    // from pt0->pt1 and from pt0->pt2
    double angle(CvPoint pt1, CvPoint pt2, CvPoint pt0) {
        double dx1 = pt1.x() - pt0.x();
        double dy1 = pt1.y() - pt0.y();
        double dx2 = pt2.x() - pt0.x();
        double dy2 = pt2.y() - pt0.y();

        return (dx1*dx2 + dy1*dy2) / Math.sqrt((dx1*dx1 + dy1*dy1) * (dx2*dx2 + dy2*dy2) + 1e-10);
    }

    // returns sequence of squares detected on the image.
    // the sequence is stored in the specified memory storage
    CvSeq findSquares4(IplImage img, CvMemStorage storage) {
        // Java translation: moved into loop
        // CvSeq contours = new CvSeq();
        int i, c, l, N = 11;
        CvSize sz = cvSize(img.width() & -2, img.height() & -2);
        IplImage timg = cvCloneImage(img); // make a copy of input image
        IplImage gray = cvCreateImage(sz, 8, 1);
        IplImage pyr = cvCreateImage(cvSize(sz.width()/2, sz.height()/2), 8, 3);
        IplImage tgray = null;
        // Java translation: moved into loop
        // CvSeq result = null;
        // double s = 0.0, t = 0.0;

        // create empty sequence that will contain points -
        // 4 points per square (the square's vertices)
        CvSeq squares = cvCreateSeq(0, Loader.sizeof(CvSeq.class), Loader.sizeof(CvPoint.class), storage);

        // select the maximum ROI in the image
        // with the width and height divisible by 2
        cvSetImageROI(timg, cvRect(0, 0, sz.width(), sz.height()));

        // down-scale and upscale the image to filter out the noise
        cvPyrDown(timg, pyr, 7);
        cvPyrUp(pyr, timg, 7);
        tgray = cvCreateImage(sz, 8, 1);

        // find squares in every color plane of the image
        for (c = 0; c < 3; c++) {
            // extract the c-th color plane
            cvSetImageCOI(timg, c+1);
            cvCopy(timg, tgray);

            // try several threshold levels
            for (l = 0; l < N; l++) {
                // hack: use Canny instead of zero threshold level.
                // Canny helps to catch squares with gradient shading
                if (l == 0) {
                    // apply Canny. Take the upper threshold from slider
                    // and set the lower to 0 (which forces edges merging)
                    cvCanny(tgray, gray, 0, thresh, 5);
                    // dilate canny output to remove potential
                    // holes between edge segments
                    cvDilate(gray, gray, null, 1);
                } else {
                    // apply threshold if l!=0:
                    //     tgray(x,y) = gray(x,y) < (l+1)*255/N ? 255 : 0
                    cvThreshold(tgray, gray, (l+1)*255/N, 255, CV_THRESH_BINARY);
                }

                // find contours and store them all as a list
                // Java translation: moved into the loop
                CvSeq contours = new CvSeq();
                cvFindContours(gray, storage, contours, Loader.sizeof(CvContour.class), CV_RETR_LIST, CV_CHAIN_APPROX_SIMPLE, cvPoint(0,0));

                // test each contour
                while (contours != null && !contours.isNull()) {
                    // approximate contour with accuracy proportional
                    // to the contour perimeter
                    // Java translation: moved into the loop
                    CvSeq result = cvApproxPoly(contours, Loader.sizeof(CvContour.class), storage, CV_POLY_APPROX_DP, cvContourPerimeter(contours)*0.02, 0);
                    // square contours should have 4 vertices after approximation
                    // relatively large area (to filter out noisy contours)
                    // and be convex.
                    // Note: absolute value of an area is used because
                    // area may be positive or negative - in accordance with the
                    // contour orientation
                    if(result.total() == 4 && Math.abs(cvContourArea(result, CV_WHOLE_SEQ, 0)) > 1000 && cvCheckContourConvexity(result) != 0) {

                        // Java translation: moved into loop
                        double s = 0.0, t = 0.0;

                        for( i = 0; i < 5; i++ ) {
                            // find minimum angle between joint
                            // edges (maximum of cosine)
                            if( i >= 2 ) {
                                //      Java translation:
                                //          Comment from the HoughLines.java sample code:
                                //          "    Based on JavaCPP, the equivalent of the C code:
                                //                  CvPoint* line = (CvPoint*)cvGetSeqElem(lines,i);
                                //                  CvPoint first=line[0];
                                //                  CvPoint second=line[1];
                                //          is:
                                //                  Pointer line = cvGetSeqElem(lines, i);
                                //                  CvPoint first = new CvPoint(line).position(0);
                                //                  CvPoint second = new CvPoint(line).position(1);
                                //          "
                                //          ... so after some trial and error this seem to work
//                                t = fabs(angle(
//                                        (CvPoint*)cvGetSeqElem( result, i ),
//                                        (CvPoint*)cvGetSeqElem( result, i-2 ),
//                                        (CvPoint*)cvGetSeqElem( result, i-1 )));
                                t = Math.abs(angle(new CvPoint(cvGetSeqElem(result, i)),
                                        new CvPoint(cvGetSeqElem(result, i-2)),
                                        new CvPoint(cvGetSeqElem(result, i-1))));
                                s = s > t ? s : t;
                            }
                        }

                        // if cosines of all angles are small
                        // (all angles are ~90 degree) then write quandrange
                        // vertices to resultant sequence
                        if (s < 0.3)
                            for( i = 0; i < 4; i++ ) {
                                cvSeqPush(squares, cvGetSeqElem(result, i));
                            }
                    }

                    // take the next contour
                    contours = contours.h_next();
                }
            }
        }

        // release all the temporary images
        cvReleaseImage(gray);
        cvReleaseImage(pyr);
        cvReleaseImage(tgray);
        cvReleaseImage(timg);

        return squares;
    }

    // the function draws all the squares in the image
    void drawSquares(IplImage img, CvSeq squares) {

        //      Java translation: Here the code is somewhat different from the C version.
        //      I was unable to get straight forward CvPoint[] arrays
        //      working with "reader" and the "CV_READ_SEQ_ELEM".

//        CvSeqReader reader = new CvSeqReader();

        IplImage cpy = cvCloneImage(img);
        int i = 0;

        // Used by attempt 3
        // Create a "super"-slice, consisting of the entire sequence of squares
        CvSlice slice = new CvSlice(squares);

        // initialize reader of the sequence
//        cvStartReadSeq(squares, reader, 0);

         // read 4 sequence elements at a time (all vertices of a square)
         for(i = 0; i < squares.total(); i += 4) {

//              // Attempt 1:
//              // This does not work, uses the "reader"
//              CvPoint pt[] = new CvPoint[]{new CvPoint(1), new CvPoint(1), new CvPoint(1), new CvPoint(1)};
//              PointerPointer rect = new PointerPointer(pt);
//              int count[] = new int[]{4};
//
//              CV_READ_SEQ_ELEM(pt[0], reader);
//              CV_READ_SEQ_ELEM(pt[1], reader);
//              CV_READ_SEQ_ELEM(pt[2], reader);
//              CV_READ_SEQ_ELEM(pt[3], reader);

//              // Attempt 2:
//              // This works, somewhat similar to the C code, somewhat messy, does not use the "reader"
//              CvPoint pt[] = new CvPoint[]{
//                      new CvPoint(cvGetSeqElem(squares, i)),
//                      new CvPoint(cvGetSeqElem(squares, i + 1)),
//                      new CvPoint(cvGetSeqElem(squares, i + 2)),
//                      new CvPoint(cvGetSeqElem(squares, i + 3))};
//              PointerPointer rect = new PointerPointer(pt);
//              int count[] = new int[]{4};

              // Attempt 3:
              // This works, may be the "cleanest" solution, does not use the "reader"
             CvPoint rect = new CvPoint(4);
             IntPointer count = new IntPointer(1).put(4);
             // get the 4 corner slice from the "super"-slice
             cvCvtSeqToArray(squares, rect, slice.start_index(i).end_index(i + 4));

//             // Attempt 4:
//             // This works, and look the most like the original C code, uses the "reader"
//             CvPoint rect = new CvPoint(4);
//             int count[] = new int[]{4};
//
//             // read 4 vertices
//             CV_READ_SEQ_ELEM(rect.position(0), reader);
//             CV_READ_SEQ_ELEM(rect.position(1), reader);
//             CV_READ_SEQ_ELEM(rect.position(2), reader);
//             CV_READ_SEQ_ELEM(rect.position(3), reader);

             // draw the square as a closed polyline
             // Java translation: gotcha (re-)setting the opening "position" of the CvPoint sequence thing
             cvPolyLine(cpy, rect.position(0), count, 1, 1, CV_RGB(0,255,0), 3, CV_AA, 0);
         }

        // show the resultant image
        // cvShowImage(wndname, cpy);
        canvas.showImage(converter.convert(cpy));
        cvReleaseImage(cpy);
    }

    String names[] = new String[]{ "pic1.png", "pic2.png", "pic3.png",
                      "pic4.png", "pic5.png", "pic6.png" };

    public static void main(String args[]) throws Exception {
        new Square().main();
    }

    public void main() throws InterruptedException {
        // Java translation: c not used
        int i; // , c;
        // create memory storage that will contain all the dynamic data
        storage = cvCreateMemStorage(0);

        for(i = 0; i < names.length; i++) {
            // load i-th image

            // Java translation
            String filePathAndName = Square.class.getClassLoader().getResource(names[i]).getPath();
            filePathAndName = filePathAndName == null || filePathAndName.isEmpty() ? names[i] : filePathAndName;
            // img0 = cvLoadImage(names[i], 1);
            img0 = cvLoadImage(filePathAndName, 1);
            if (img0 == null) {
                System.err.println("Couldn't load " + names[i]);
                continue;
            }
            img = cvCloneImage(img0);

            // create window and a trackbar (slider) with parent "image" and set callback
            // (the slider regulates upper threshold, passed to Canny edge detector)
            // Java translation
            canvas = new CanvasFrame(wndname, 1);
            canvas.setDefaultCloseOperation(javax.swing.JFrame.EXIT_ON_CLOSE);
            // cvNamedWindow( wndname, 1 );

            // find and draw the squares
            drawSquares(img, findSquares4(img, storage));

            // wait for key.
            // Also the function cvWaitKey takes care of event processing
            // Java translation
            KeyEvent key = canvas.waitKey(0);
            // c = cvWaitKey(0);

            // release both images
            cvReleaseImage(img);
            cvReleaseImage(img0);
            // clear memory storage - reset free space position
            cvClearMemStorage(storage);

            if (key.getKeyCode() == 27) {
                break;
            }
        }
        // cvDestroyWindow( wndname );
        if (canvas != null) {
            canvas.dispose();
        }
    }

}
Realization effect
Various other functions
Here refer to the statistics of other articles. There are many online. Just refer to the specific methods
- Image drawing: Click jump
- Audio and video development: Click jump
Troubleshooting instructions for network cases
In fact, most online cases report errors, which are caused by inconsistent jar packages or abnormal method calls
-
Mat, mat and IplImage are confused
– there are two kinds of Mat references. If the two references are inconsistent, all the later methods are different. It is easy to understand that although they are written in the same way, they are two sets of things

-
IplImage and Mat are also different
– in some cases, both IplImage and Mat can directly use the image address to obtain files, just like the IplImage used in this article. At the same time, they can sometimes pass parameter values as an object
– but they are not one object. Try not to use them at the same time. Of course, it may be a miracle to change them when testing or debugging code -
Troubleshooting method
– just turn to the original code here. Please detour for specific leaders. Just for those who can't teach below
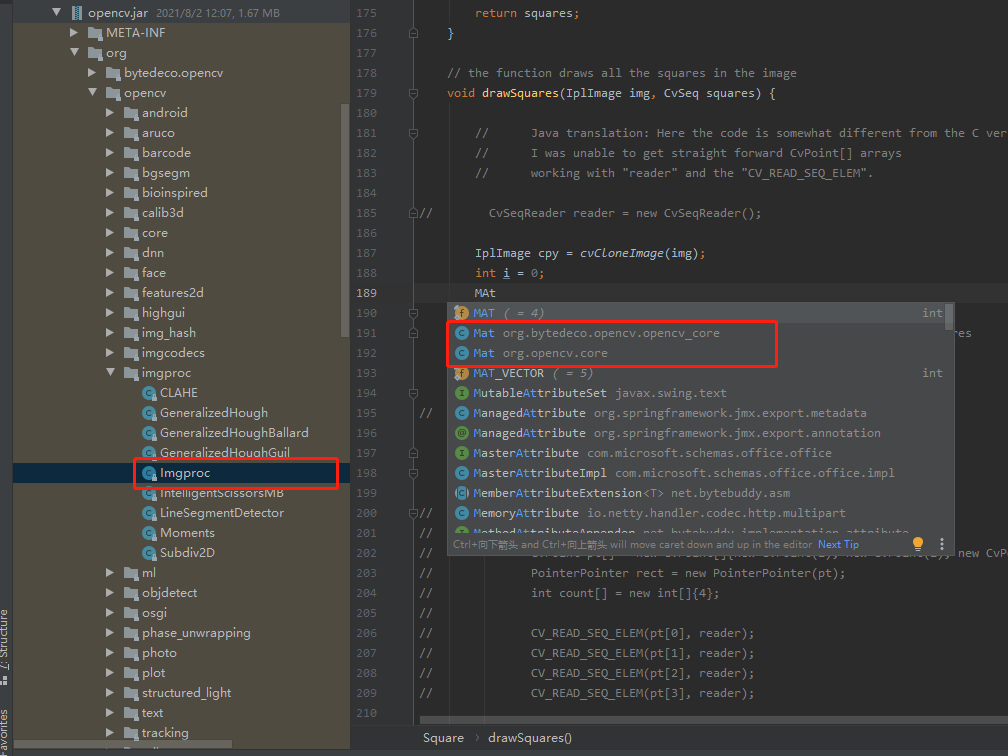
– for example, if you want to import Imgproc, but according to the package imported on the Internet, it shows that it does not exist. What should you do?

There are generally two situations:
1. The way of referencing packages has been changed or omitted
Similar to opencv in this case_ Imgproc and opencv_ The core cannot find the package
 In fact, the processing method is very simple. Just delete it, just like the following

2. Position changed:
Enter a common type: for example, Mat, then press Ctrl + Click to enter the code, and click the upper left corner Find the location of the code page. The directory on the left is the package it calls, and then look for it according to the previous path clues
That's it
This is the end. I hope you can solve the problem smoothly after reading my article, and then wish you a happy new year in advance!!!