Welcome to my GitHub
https://github.com/zq2599/blog_demos
Content: classification and summary of all original articles and supporting source code, involving Java, Docker, Kubernetes, DevOPS, etc;
Welcome to my GitHub
Here we classify and summarize all the original works of Xinchen (including supporting source code): https://github.com/zq2599/blog_demos
Overview of this article
- How can more people play their own mp4 files remotely? As shown in the figure below:
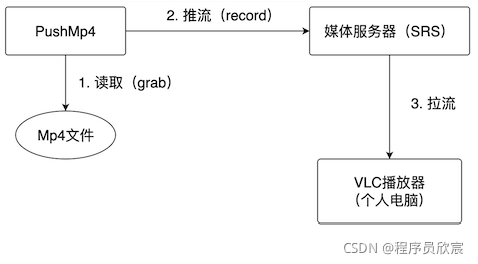
- Here is a brief explanation of the functions shown in the figure above:
- Deploy open source streaming media server < font color = "blue" > SRS < / font >
- Develop a java application named < font color = "blue" > pushmp4 < / font >, which will read Mp4 files on the local disk, read each frame and push it to SRS
- Everyone who wants to watch the video will connect SRS with streaming media playing software (such as VLC) on their computer to play the video pushed by PushMp4
- Today, let's finish the actual combat in the figure above. The whole process is divided into the following steps:
- environmental information
- Prepare MP4 files
- Deploying SRS with docker
- java application development and running
- VLC playback
environmental information
- The environmental information involved in this actual battle is as follows for your reference:
- Operating system: macOS Monterey
- JDK: 1.8.0_211
- JavaCV: 1.5.6
- SRS: 3
Prepare MP4 files
- Just prepare an ordinary MP4 video file. I downloaded the bear rabbit video commonly used in video development online. The address is:
https://www.learningcontainer...
Deploying SRS with docker
SRS is a famous open source media server. The streams pushed here can be played online by the media player. For simplicity, I complete the deployment with one line of command in the docker environment:
docker run -p 1935:1935 -p 1985:1985 -p 8080:8080 ossrs/srs:3
- At the moment, the SRS service is running and can be pushed up
Developing Java CV applications
- Next, enter the most important coding stage and create a maven project named < font color = "blue" > Simple grab push < / font >, POM The XML is as follows (the parent project named < font color = "blue" > javacv tutorials < / font > actually has no effect. I'm just here to facilitate the management of multiple project codes. You can delete this parent project node):
<?xml version="1.0" encoding="UTF-8"?>
<project xmlns="http://maven.apache.org/POM/4.0.0"
         xmlns:xsi="http://www.w3.org/2001/XMLSchema-instance"
         xsi:schemaLocation="http://maven.apache.org/POM/4.0.0 http://maven.apache.org/xsd/maven-4.0.0.xsd">
    <parent>
        <artifactId>javacv-tutorials</artifactId>
        <groupId>com.bolingcavalry</groupId>
        <version>1.0-SNAPSHOT</version>
    </parent>
    <modelVersion>4.0.0</modelVersion>
    <groupId>com.bolingcavalry</groupId>
    <version>1.0-SNAPSHOT</version>
    <artifactId>simple-grab-push</artifactId>
    <packaging>jar</packaging>

    <properties>
        <!-- javacpp current version -->
        <javacpp.version>1.5.6</javacpp.version>
    </properties>

    <dependencies>
        <dependency>
            <groupId>org.projectlombok</groupId>
            <artifactId>lombok</artifactId>
        </dependency>
        <dependency>
            <groupId>ch.qos.logback</groupId>
            <artifactId>logback-classic</artifactId>
            <version>1.2.3</version>
        </dependency>
        <dependency>
            <groupId>org.apache.logging.log4j</groupId>
            <artifactId>log4j-to-slf4j</artifactId>
            <version>2.13.3</version>
        </dependency>

        <!-- javacv Related dependencies, one is enough -->
        <dependency>
            <groupId>org.bytedeco</groupId>
            <artifactId>javacv-platform</artifactId>
            <version>${javacpp.version}</version>
        </dependency>
    </dependencies>
</project>- It can be seen from the above files that there is only one < font color = "blue" > JavaCV platform < / font >, which is very concise
- Next, start coding. Before coding, draw the whole process, so that the coding is much clearer:
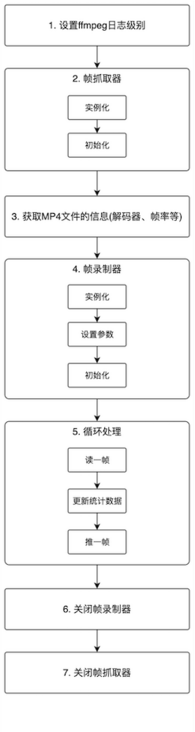
- As can be seen from the above figure, the process is very simple. Here, all the code is written in a java class:
package com.bolingcavalry.grabpush;
import lombok.extern.slf4j.Slf4j;
import org.bytedeco.ffmpeg.avcodec.AVCodecParameters;
import org.bytedeco.ffmpeg.avformat.AVFormatContext;
import org.bytedeco.ffmpeg.avformat.AVStream;
import org.bytedeco.ffmpeg.global.avcodec;
import org.bytedeco.ffmpeg.global.avutil;
import org.bytedeco.javacv.FFmpegFrameGrabber;
import org.bytedeco.javacv.FFmpegFrameRecorder;
import org.bytedeco.javacv.FFmpegLogCallback;
import org.bytedeco.javacv.Frame;
/**
* @author willzhao
* @version 1.0
* @description Read the specified mp4 file and push it to the SRS server
* @date 2021/11/19 8:49
*/
@Slf4j
public class PushMp4 {
/**
* Full path of local MP4 file (two minutes and five seconds of video)
*/
private static final String MP4_FILE_PATH = "/Users/zhaoqin/temp/202111/20/sample-mp4-file.mp4";
/**
* SRS Streaming address of
*/
private static final String SRS_PUSH_ADDRESS = "rtmp://192.168.50.43:11935/live/livestream";
/**
* Read the specified mp4 file and push it to the SRS server
* @param sourceFilePath Absolute path of video file
* @param PUSH_ADDRESS Streaming address
* @throws Exception
*/
private static void grabAndPush(String sourceFilePath, String PUSH_ADDRESS) throws Exception {
// ffmepg log level
avutil.av_log_set_level(avutil.AV_LOG_ERROR);
FFmpegLogCallback.set();
// Instantiate the frame grabber object and pass in the file path
FFmpegFrameGrabber grabber = new FFmpegFrameGrabber(MP4_FILE_PATH);
long startTime = System.currentTimeMillis();
log.info("Start initializing frame grabber");
// Initialize the frame grabber, such as data structure (timestamp, encoder context, frame object, etc.),
// If the input parameter is equal to true, avformat is also called_ find_ stream_ The info method obtains the information of the stream and puts it into the member variable oc of AVFormatContext type
grabber.start(true);
log.info("The initialization of frame grabber is completed, which takes a long time[{}]millisecond", System.currentTimeMillis()-startTime);
// grabber. In the start method, the initialized decoder information exists in the member variable oc of grabber
AVFormatContext avFormatContext = grabber.getFormatContext();
// There are several media streams in the file (generally video stream + audio stream)
int streamNum = avFormatContext.nb_streams();
// You don't have to continue without media streaming
if (streamNum<1) {
log.error("There is no media stream in the file");
return;
}
// Gets the frame rate of the video
int frameRate = (int)grabber.getVideoFrameRate();
log.info("Video frame rate[{}],Video duration[{}]Second, number of media streams[{}]",
frameRate,
avFormatContext.duration()/1000000,
avFormatContext.nb_streams());
// Traverse each stream and check its type
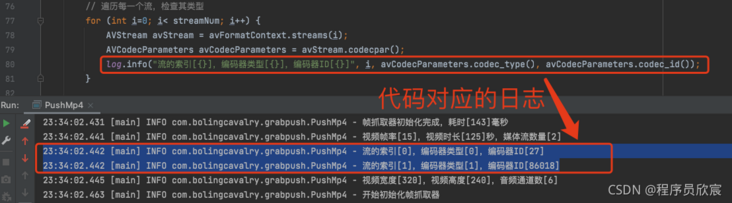
for (int i=0; i< streamNum; i++) {
AVStream avStream = avFormatContext.streams(i);
AVCodecParameters avCodecParameters = avStream.codecpar();
log.info("Index of the stream[{}],Speed fbk sel [{}],encoder ID[{}]", i, avCodecParameters.codec_type(), avCodecParameters.codec_id());
}
// Video width
int frameWidth = grabber.getImageWidth();
// Video height
int frameHeight = grabber.getImageHeight();
// Number of audio channels
int audioChannels = grabber.getAudioChannels();
log.info("Video width[{}],Video height[{}],Number of audio channels[{}]",
frameWidth,
frameHeight,
audioChannels);
// Instantiate FFmpegFrameRecorder and pass in the SRS push address
FFmpegFrameRecorder recorder = new FFmpegFrameRecorder(SRS_PUSH_ADDRESS,
frameWidth,
frameHeight,
audioChannels);
// Set encoding format
recorder.setVideoCodec(avcodec.AV_CODEC_ID_H264);
// Format encapsulation
recorder.setFormat("flv");
// Frames per second
recorder.setFrameRate(frameRate);
// The number of frames between two keyframes
recorder.setGopSize(frameRate);
// Set the number of audio channels equal to the number of channels of the video source
recorder.setAudioChannels(grabber.getAudioChannels());
startTime = System.currentTimeMillis();
log.info("Start initializing frame grabber");
// Initializing a frame recorder, such as a data structure (audio stream, video stream pointer, encoder),
// Call av_guess_format method to determine the packaging method for video output,
// Memory allocation for media context objects,
// Various parameter settings of encoder
recorder.start();
log.info("Frame recording initialization completed, time consuming[{}]millisecond", System.currentTimeMillis()-startTime);
Frame frame;
startTime = System.currentTimeMillis();
log.info("Start streaming");
long videoTS = 0;
int videoFrameNum = 0;
int audioFrameNum = 0;
int dataFrameNum = 0;
// Assuming 15 frames per second, the interval between two frames is (1000 / 15) milliseconds
int interVal = 1000/frameRate;
// The sleep time after sending a frame cannot be completely equal to (1000/frameRate), otherwise it will get stuck,
// To be smaller, take one eighth here
interVal/=8;
// Continuous frame fetching from video source
while (null!=(frame=grabber.grab())) {
videoTS = 1000 * (System.currentTimeMillis() - startTime);
// time stamp
recorder.setTimestamp(videoTS);
// If there is an image, add one to the video frame
if (null!=frame.image) {
videoFrameNum++;
}
// If there is a sound, add one to the audio frame
if (null!=frame.samples) {
audioFrameNum++;
}
// If there is data, add one to the data frame
if (null!=frame.data) {
dataFrameNum++;
}
// Each frame taken out is pushed to SRS
recorder.record(frame);
// Pause and push
Thread.sleep(interVal);
}
log.info("Push complete, video frame[{}],Audio frame[{}],Data frame[{}],time consuming[{}]second",
videoFrameNum,
audioFrameNum,
dataFrameNum,
(System.currentTimeMillis()-startTime)/1000);
// Turn off the frame recorder
recorder.close();
// Turn off the frame grabber
grabber.close();
}
public static void main(String[] args) throws Exception {
grabAndPush(MP4_FILE_PATH, SRS_PUSH_ADDRESS);
}
}- Each line of the above code has detailed comments, so I won't go into details. Only the following four key points need attention:
- <font color="blue">MP4_ FILE_ Path < / font > is the place where local MP4 files are stored. Please change the location where MP4 files are stored on your computer
- <font color="blue">SRS_ PUSH_ Address < / font > is the streaming address of SRS service. Please change it to your own SRS service deployment address
- <font color="blue">grabber. When the start (true) < / font > method is executed, the internal initialization process of the frame grabber will obtain the relevant information of the MP4 file
- <font color="blue">recorder. When the record (frame) < / font > method is executed, the frame will be pushed to the SRS server
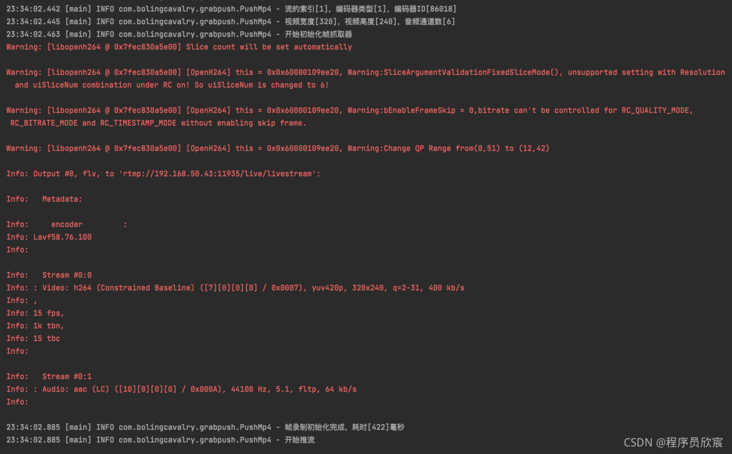
- After encoding, run this class. The console log is as follows. It can be seen that the frame rate, duration, decoder, media stream and other information of MP4 file are successfully obtained, and then the streaming starts:
23:21:48.107 [main] INFO com.bolingcavalry.grabpush.PushMp4 - Start initializing frame grabber
23:21:48.267 [main] INFO com.bolingcavalry.grabpush.PushMp4 - The initialization of frame grabber is completed, which takes a long time[163]millisecond
23:21:48.277 [main] INFO com.bolingcavalry.grabpush.PushMp4 - Video frame rate[15],Video duration[125]Second, number of media streams[2]
23:21:48.277 [main] INFO com.bolingcavalry.grabpush.PushMp4 - Index of the stream[0],Speed fbk sel [0],encoder ID[27]
23:21:48.277 [main] INFO com.bolingcavalry.grabpush.PushMp4 - Index of the stream[1],Speed fbk sel [1],encoder ID[86018]
23:21:48.279 [main] INFO com.bolingcavalry.grabpush.PushMp4 - Video width[320],Video height[240],Number of audio channels[6]
23:21:48.294 [main] INFO com.bolingcavalry.grabpush.PushMp4 - Start initializing frame grabber
23:21:48.727 [main] INFO com.bolingcavalry.grabpush.PushMp4 - Frame recording initialization completed, time consuming[433]millisecond
23:21:48.727 [main] INFO com.bolingcavalry.grabpush.PushMp4 - Start streaming
- Next, try to pull the stream
Play with VLC
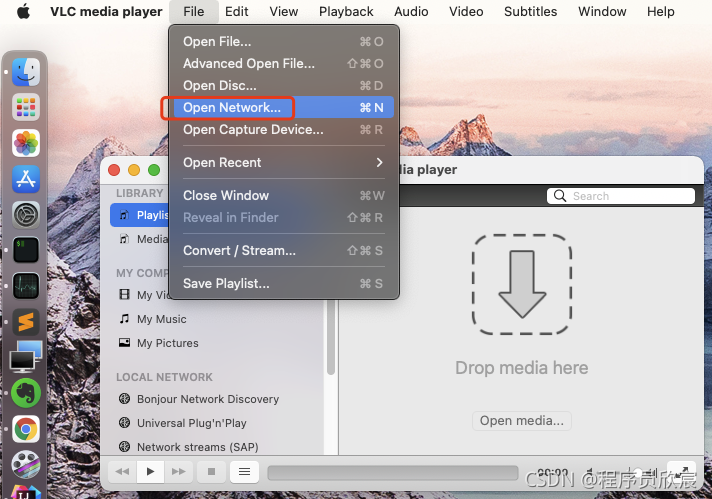
- Please install VLC software and open
- As shown in the red box below, click < font color = "blue" > Open Network</ Font >, and then enter the streaming address written in the previous code (here I am < font color = "red" > rtmp://192.168.50.43:11935/live/livestream </font>):
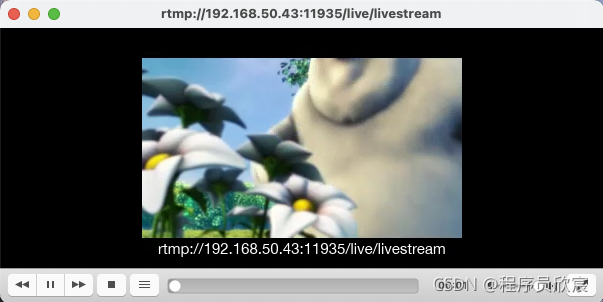
- As shown in the following figure, it plays successfully and the sound is normal:
Additional knowledge points
- After the above actual combat, we are familiar with the basic operation of playing and streaming, and master the acquisition of conventional information and parameter setting. In addition to the knowledge in the code, the following hidden knowledge points are also worthy of attention
- The code for setting the ffmpeg log level is < font color = "blue" > avutil av_ log_ set_ Level (avutil. Av_log_error) < / font >, change the parameter to < font color = "red" > avutil AV_ LOG_ After info < / font >, you can see more abundant logs on the console, as shown in the red area below, which shows the details of MP4 files, such as two media streams (audio stream and video stream):
- The second knowledge point is about encoder type and encoder ID. as shown in the figure below, the encoder types of two media streams (avstreams) are < font color = "red" > 0 < / font > and < font color = "red" > 1 < / font >, and the two encoder IDs are < font color = "red" > 27 < / font > and < font color = "red" > 86018 < / font >, what do these four numbers represent respectively?
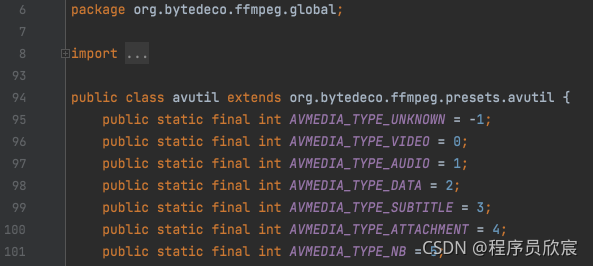
- First look at the encoder type and use the decompile function of IDEA to open < font color = "blue" > avutil Class < / font >, as shown in the following figure, if the encoder type is equal to 0, it means video, and if the encoder type is equal to 1, it means AUDIO:
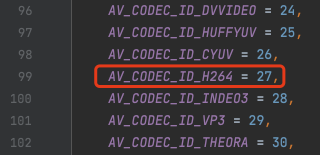
- Look at the encoder ID and open < font color = "blue" > avcodec Java < / font >, see that the encoder ID is < font color = "red" > 27 < / font >, indicating H264:
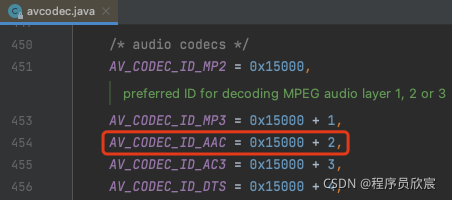
- The hex of the encoder ID value < font color = "red" > 86018 < / font > is < font color = "red" > 0x15002 < / font >, and the corresponding encoder is shown in the red box below:
- So far, the JavaCV streaming practice (MP4 file) has been completed. I hope that through this article, we can be familiar with the general operation of JavaCV processing streaming;
https://github.com/zq2599/blog_demos