JavaScript advanced day 01 notes
1. Process oriented and object-oriented
1.1 process oriented
- Process oriented is to analyze the steps needed to solve the problem, and then use functions to realize these steps step by step. When using, you can call them one by one.
1.2 object oriented
- Object oriented is to decompose transactions into objects, and then divide and cooperate among objects.
1.3 comparison between process oriented and object-oriented
| Process oriented | object-oriented | |
|---|---|---|
| advantage | Performance is higher than object-oriented, suitable for things closely related to hardware, such as process oriented programming adopted by single chip microcomputer. | It is easy to maintain, reuse and expand. Because object-oriented has the characteristics of encapsulation, inheritance and polymorphism, it can design a low coupling system to make the system more flexible and easier to maintain |
| shortcoming | Difficult to maintain, reuse and expand | Lower performance than process oriented |
2. Objects and classes
2.1 object
Object is composed of attributes and methods: it is a collection of unordered key value pairs, which refers to a specific thing
- Attribute: the characteristic of a thing, which is represented by an attribute in an object (a common noun)
- Method: the behavior of things is expressed by method in the object (commonly used verb)
2.1.1 creating objects
//The following code is a review of the object
//Literal creation object
var ldh = {
    name: 'Lau Andy',
    age: 18
}
console.log(ldh);

//Constructor to create an object
  function Star(name, age) {
    this.name = name;
    this.age = age;
 }
var ldh = new Star('Lau Andy', 18)//Instantiate object
console.log(ldh);
The running result of the above two lines of code is:
Type 2.2
- The concept of class is newly added in ES6. You can use the class keyword to declare a class, and then instantiate the object with this class. Class abstracts the common part of an object. It generally refers to a large class object, especially a class, and instantiates a specific object through a class
2.2.1 create class
- Syntax:
//Step 1 use the class keyword
class name {
  // class body
}
//Step 2 create an instance using the defined class. Pay attention to the new keyword
var xx = new name();
- Example
 // 1. Create a star class
 class Star {
   // The common properties of the class are placed in the constructor
   constructor(name, age) {
   this.name = name;
   this.age = age;
   }
 }
   // 2. Create new object with class
   var ldh = new Star('Lau Andy', 18);
   console.log(ldh);
Operation results of the above code:

From the results, we can see that the running result is the same as using the constructor
2.2.2 creating and adding attributes and methods for classes
 // 1. Create a class class
class Star {
    // The common attributes of the class are placed in the constructor, which is the constructor or constructor
    constructor(uname, age) {
      this.uname = uname;
      this.age = age;
    }//------------------------------------------->Note that there is no need to add commas between methods
    sing(song) {
      console.log(this.uname + 'sing' + song);
    }
}
// 2. Create new object with class
var ldh = new Star('Lau Andy', 18);
console.log(ldh); // Star {uname: "Andy Lau", age: 18}
ldh.sing('Ice rain'); // Andy Lau sings ice rain
Operation results of the above code:

Attention:
- Create a class through the class keyword. We still habitually define the initial capitalization of the class name
- Class has a constructor function, which can accept the passed parameters and return the instance object at the same time
- constructor function will automatically call this function as long as new generates an instance. If we don't write this function, the class will automatically generate this function
- There is no need to add comma separation between multiple function methods
- The generated instance new cannot be omitted
- Syntax specification: do not add parentheses after the class name of the created class, parentheses after the class name of the generated instance, and function is not required for the constructor
2.2.3 inheritance of class
- grammar
// Parent class
class Father{
}

// The subclass inherits the parent class
class  Son  extends Father {
}
- Example
class Father {
      constructor(surname) {
        this.surname= surname;
      }
      say() {
        console.log('What's your last name' + this.surname);
       }
}

class Son extends Father{  // In this way, the subclass inherits the properties and methods of the parent class
}
var damao= new Son('Liu');
damao.say();      //The result is that your last name is Liu
Operation results of the above code:

-
Subclasses use the super keyword to access the methods of the parent class
//Parent class defined
class Father {
   constructor(x, y) {
   this.x = x;
   this.y = y;
   }
   sum() {
   console.log(this.x + this.y);
	}
 }
//The child element inherits the parent class
    class Son extends Father {
   		 constructor(x, y) {
    		super(x, y); //The constructor in the parent class was called with super
    	}
    }
    var son = new Son(1, 2);
    son.sum(); //The result is 3
be careful:
-
In inheritance, if you instantiate a subclass to output a method, first see whether the subclass has this method. If so, execute the subclass first
-
In inheritance, if there is no method in the subclass, check whether the parent class has this method. If so, execute the method of the parent class (proximity principle)
-
If the subclass wants to inherit the method of the parent class while extending its own method internally, calling the constructor of the parent class by super, super must be called before the subclass this.
 // The parent class has an addition method
 class Father {
   constructor(x, y) {
   this.x = x;
   this.y = y;
   }
   sum() {
   console.log(this.x + this.y);
   }
 }
 // The subclass inherits the addition method of the parent class and extends the subtraction method at the same time
 class Son extends Father {
   constructor(x, y) {
   // Using super to call the parent class, the constructor super must be called before subclass this, and will report error after this.
   super(x, y);
   this.x = x;
   this.y = y;

  }
  subtract() {
  console.log(this.x - this.y);
  }
}
var son = new Son(5, 3);
son.subtract(); //2
son.sum();//8
The running result of the above code is:

-
Always pay attention to the direction of this. The common properties and methods in the class must be used with this
- this in the constructor refers to the instance object from new
- Custom methods generally also point to the instance object of new
- After the event is bound, this points to the event source that triggered the event
-
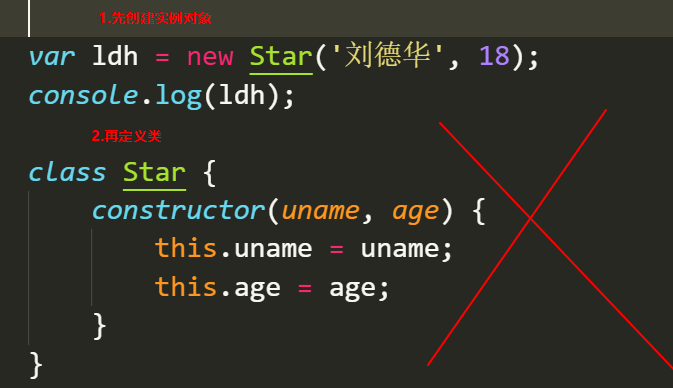
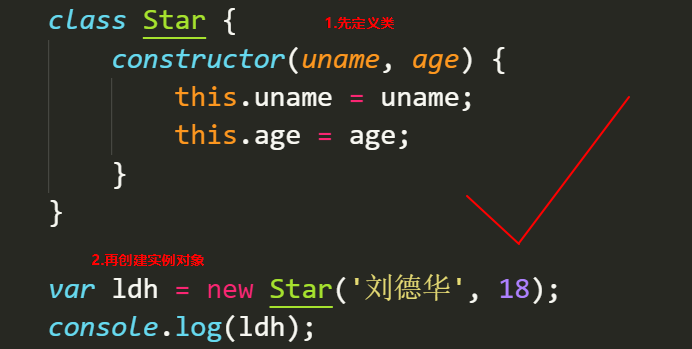
In ES6, classes do not have variable promotion, so you must define classes before you can instantiate objects through classes
-
3. Object oriented tab bar switching
3.1 functional requirements
- Click the tab bar to switch the effect
- Click the + sign to add tab items and content items
- Click the x sign to delete the current tab item and content item
- Double click the text of tab item or content item to modify the text content
3.2 case preparation
- Get Title element
- Get content element
- Get the x number of the deleted small button
- Create a new js file, define classes, and add required attributes and methods (switch, delete, add, modify)
- Always pay attention to the direction of this
3.3 switching
-
Bind the click event to the obtained title, display the corresponding content area, and store the corresponding index
 this.lis[i].index = i;
 this.lis[i].onclick = this.toggleTab;
-
Use exclusivity to realize the display of only one element
 toggleTab() {
   //Remove all title and content class styles
     for (var i = 0; i < this.lis.length; i++) {
     this.lis[i].className = '';
     this.sections[i].className = '';
     }
   //Adds the active style for the current title
     this.className = 'liactive';
    //Adds the active style to the current content
     that.sections[this.index].className = 'conactive';
  }
3.4 add
-
Add button + bind click event for
this.add.onclick = this.addTab;
-
Realize the addition of title and content, and do a good job in exclusive treatment
addTab() {
    that.clearClass();
    // (1) Create li element and section element
    var random = Math.random();
    var li = '<li class="liactive"><span>new tab </span><span class="iconfont icon-guanbi">				</span></li>';
    var section = '<section class="conactive">test ' + random + '</section>';
    // (2) Append these two elements to the corresponding parent element
    that.ul.insertAdjacentHTML('beforeend', li);
    that.fsection.insertAdjacentHTML('beforeend', section);
    that.init();
    }
3.5 deletion
-
Bind click event for delete button x of element
this.remove[i].onclick = this.removeTab;
-
Get all of the parent element of the clicked delete button, and delete the corresponding title and content
 removeTab(e) {
     e.stopPropagation(); // Prevent bubbling and trigger switching click events of li
     var index = this.parentNode.index;
     console.log(index);
     // Delete the corresponding li and section remove() methods according to the index number to directly delete the specified element
     that.lis[index].remove();
     that.sections[index].remove();
     that.init();
     // When we delete a li that is not in the selected state, the original selected li remains unchanged
     if (document.querySelector('.liactive')) return;
     // When we delete the selected li, the previous li will be selected
     index--;
     // Manually invoking our click event does not need to be triggered by the mouse
     that.lis[index] && that.lis[index].click();
 }
3.6 editing
-
Bind double-click events for elements (title and content)
 this.spans[i].ondblclick = this.editTab;
 this.sections[i].ondblclick = this.editTab;
-
In the selected state of double-click event processing text, modify the internal DOM node to realize the transmission of old and new value values
editTab() {
    var str = this.innerHTML;
    // Double click to suppress the selected text
    window.getSelection ? window.getSelection().removeAllRanges() : 				    document.selection.empty();
    // alert(11);
      this.innerHTML = '<input type="text" />';
      var input = this.children[0];
      input.value = str;
      input.select(); // The text in the text box is selected
      // When we leave the text box, we give the value in the text box to span
      input.onblur = function() {
      this.parentNode.innerHTML = this.value;
      };
      // Press enter to return the value in the text box to span
      input.onkeyup = function(e) {
      if (e.keyCode === 13) {
      // Manually invoking the form loss of focus event does not require the mouse to leave the operation
      this.blur();
      }
    }
}