Chapter 14: DOM
Document Object Model is the programming interface of HTML and XML documents; That is, developers can add, delete and modify various parts of the page through JavaScript programming;
14.1 node level
Any HTML\XML document can be represented as a hierarchy of nodes.
<html>
    <head>
        <title>Sample Page</title>
    </head>
    <body>
        <p>Hello World!</p>
    </body>
</html>
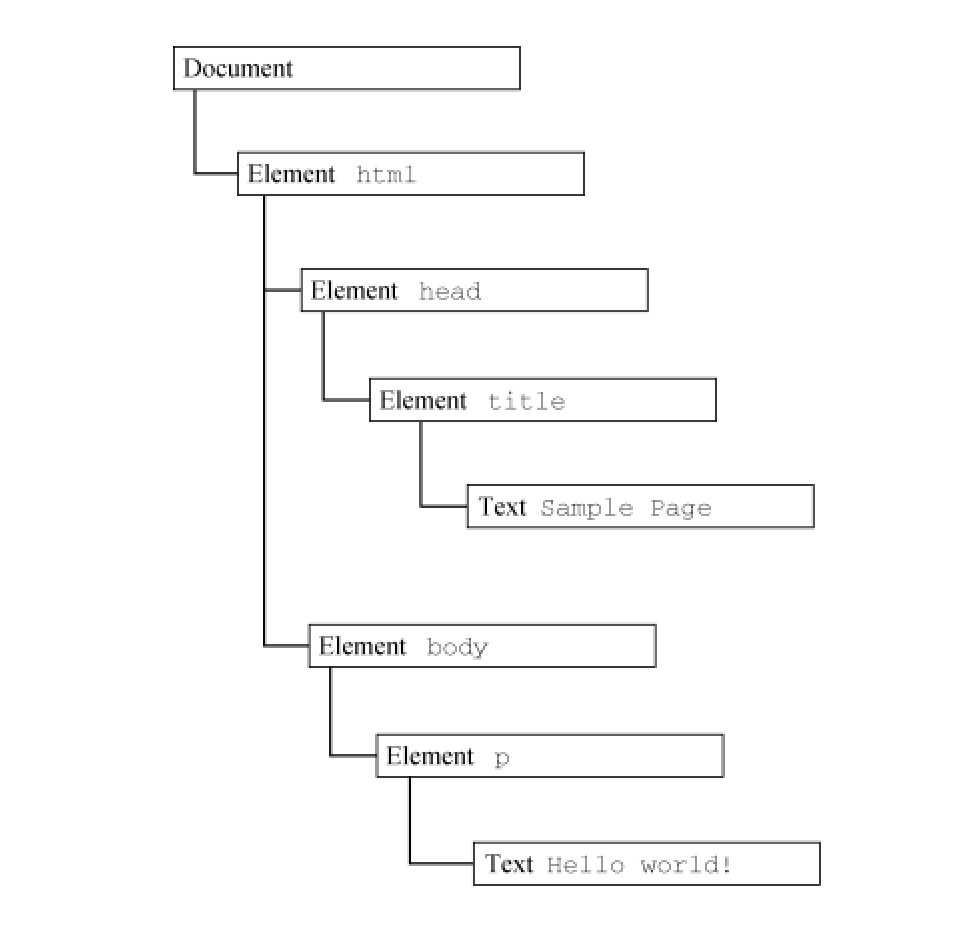
In HTML, each document can only have one document element, and it is the outermost element, which has and has only one direct child element < HTML >
14.1.1 Node type
DOM Level 1 describes the interface of Node, which must be implemented by all DOM Node types;
The Node interface is implemented as a Node type in JavaScript.
In JavaScript, all Node types inherit the Node type. There are 12 types and are represented by 12 constants
(numbers can also be used instead):
-
Node.ELEMENT_NODE(1)
-
Node.ATTRIBUTE_NODE(2)
-
Node.TEXT_NODE(3)
-
Node.CDATA_SECTION_NODE(4)
-
Node.ENTITY_REFERENCE_NODE(5)
-
Node.ENTITY_NODE(6)
-
Node.PROCESSING_INSTRUCTION_NODE(7)
-
Node.COMMENT_NODE(8)
-
Node.DOCUMENT_NODE(9)
-
Node.DOCUMENT_TYPE_NODE(10)
-
Node.DOCUMENT_FRAGMENT_NODE(11)
-
Node.NOTATION_NODE(12)
Node information
- nodeName: stores the name of the node, such as div and img
- nodeValue: stores the value of the node. If it is a label, the value is null
- nodeType: stores node types, corresponding to the above 12 types
Node relationship
Each node in the document has a relationship, which is equivalent to a genealogy. There are two differences: parent element and child element;
- childNodes: each node has this attribute, which contains an instance of NodeList. It is an array like object that orderly stores all the direct child nodes of the node. The NodeList instance is a real-time active object, which means that the DOM tree and NodeList will change, and vice versa;
- Because it is an array like object, you can access its elements through [];
- You can also obtain the number of child elements through the length attribute.
- parentNode: points to the parent node
- Previous sibling: points to the previous sibling node, childNodes [0] previousSibling is null
- nextSibling: points to the next sibling node, childNodes [childNodes. Length-1] nextSibling is null
- firstChild/lastChild: points to the first child node and the last child node
- hasChildNodes(): returns true, indicating one or more nodes;
- ownerDocument: points to the only document node in the document.
Manipulation node
Add node:
-
appendChild(): append a node to the tail; Receive a parameter:
- Nodes to be added
-
insertBefore(): insert a node before the reference node; Receive two parameters:
- Nodes to be added;
- Reference node;
If the reference node is null, the effect is the same as appendChild();
-
replaceChild(): replace the target node; Receive two parameters:
- Node to insert
- Node to replace
The replaced node will completely disappear in the DOM tree.
Delete node:
-
removeChild(): deletes a node; Receive a parameter:
- Node to delete
The deleted node will be returned
Clone node:
-
cloneNode(): clone a node and receive a parameter:
- Boolean value indicating whether to deep clone; If true, clone the node and its children.
Return the cloned node; If the cloned node does not specify a parent node, it is called an orphan node.
Note that this cloning method will not clone JavaScript attributes of nodes, such as time handlers, but only copy HTML attributes.
14.1.2 Document type
Represents the document node type in JavaScript. In the browser, document is an instance of HTMLDocument, representing the whole page;
The document object is read-only, and there are generally no methods such as appendChild()
Document type has the following characteristics:
- nodeType equals 9;
- nodeName value is "#document";
- nodeValue value is null;
- parentNode value is null;
- The ownerDocument value is null;
- The child node can be of DocumentType (at most one), Element (at most one), ProcessingInstruction or Comment type.
Document child node:
document provides three shortcuts to access child nodes:
- document.documentElement: always points to < HTML > elements
- document.body: always point to < body > elements
- document.doctype: always point to <! DOCTYPE > element
document information
document provides information about the web page loaded by the browser
- document.title: get the content of < title > tag, which can be modified and will be rendered to the web page.
- document.URL: get the URL of the current page
- document.domain: get the domain name of the current page
- document. Refer: get the current page source
be careful:
-
URL and domain are related. If the URL is https://www.baidu.com/search=xxxx , then the domain name is www.baidu.com com;
-
Of the last three properties, only domain is settable. For security reasons, domain can only be set as a subset of the URL:
// The current URL is: www.p2p.com baidu. com
document.domain = 'p2p.baidu';	// success
document.domain = 'baidu.com';	// success
document.domain = 'hahaha.net';	// fail
-
Setting the domain is useful when a page contains panes (< frame >) or embedded panes (< iframe >) from different subdomains. Because there are potential safety hazards in cross source communication; Therefore, you can set the domain on each page to the same value to access each other's JavaScript objects.
-
Once the domain attribute is tightened, it can no longer be relaxed
// The current URL is: www.p2p.com baidu. com
document.domain = 'p2p.baidu.com';	// Relax and succeed
document.domain = 'baidu.com';		// Continue to relax and succeed
document.domain = 'p2p.baidu.com';	// Tighten again, wrong!
Positioning element
document provides a way to locate elements
- getElementById(): get the node according to the id attribute. Because the id is unique, the first one found is returned.
- getElementsByClassName(): get the node according to the class attribute.
- getElementsByTagName(): get the node according to the tag name.
- getElementsByName(): get the node according to the name attribute.
Except for the first method, all the others return an HTMLCollection object; This object is also a class array object.
Special set
- document.anchors include all < a > elements with name attribute in the document;
- document.forms contains all < form > elements in the document;
- document.images contains all < img > elements in the document;
- document.links contains all < a > elements with href attributes in the document.
Document writing
- write(): input information to the document and receive a parameter: input content
- writeln(): the former is the same, but the line feed will be added automatically
be careful:
-
These two methods can only be used in the page renderer. If they are called after rendering, the content will cover the whole page
-
When using this method to dynamically write external resources, you should pay attention to:
<html>
<head>
    <title>document.write() Example</title>
</head>
<body>
    <script type="text/javascript">
        document.write("<script type=\"text/javascript\" src=\"file.js\">" +
            "<\/script>");</script>
</body>
</html>
The escape character must be added before the second script of the output content, otherwise there will be a matching error;
14.1.3 Element type
In addition to Document type, Element type is the most commonly used type in Web development; Elment represents HTML elements and exposes the ability to access Element tag names, child nodes and attributes.
Element type has the following characteristics:
- nodeType equals 1;
- nodeName value is the tag name of the element;
- nodeValue value is null;
- The parentNode value is a Document or Element object; Child nodes can be Element, Text, Comment, ProcessingInstruction, CDATASection types.
feature extraction
- The nodeName or tagName attribute can obtain the tag name of the element, and in HTML, the tag name of the element is always expressed in all uppercase;
To prevent confusion of case when extracting tag names, the following operations are recommended:
if(element.tagName.toLowerCase() == 'div'){
    // do something
}
HTML Element
All HTML elements are identified by HTMLElement type, including direct instances and indirect instances;
HTMLElement directly inherits from Element and adds some standard attributes:
- id, the unique identifier of the element in the document;
- title, which contains additional information of elements, usually displayed in the form of prompt bar;
- lang, language code of element content (rarely used);
- dir, the writing direction of the language ("ltr" means from left to right, "rtl" means from right to left, which is also rarely used);
- className, equivalent to the class attribute, is used to specify the CSS class of the element (because class is ECMAScript keyword, it cannot be used directly).
These values can be obtained and modified directly:
// <div id='myDiv' class='myClass' title='hello world'>
let div = document.getElementById('myDiv');
console.log(div.class);	// myClass
div.class = 'myLess';
console.log(div.class);	// myLess
Modifying these properties will have an impact on the page.
Operation properties
Each element has zero or more attributes. We can operate attributes in the following three ways:
- getAttribute(): get the attribute and receive a parameter: attribute name
- setAttribute(): sets an attribute and receives two parameters: attribute name and attribute value
- removeAttribute(): remove the attribute and receive a parameter: attribute name
Note: the above three methods of operating attributes:
- You can operate standard attributes (also known as recognized attributes) or user-defined attributes;
- Property names are not case sensitive
- In the HTML5 specification, user-defined attributes need to be prefixed with data - to facilitate verification;
- Custom attributes will not be called DOM object attributes, that is, they will not be called recognized attributes or standard attributes;
- You can obtain not only general attributes, but also event attributes, such as onclick;
- If getAttribute() is used to obtain the event attribute value, the source code is returned in the form of string; Usually directly access the event attribute: element Onclick, a function is returned;
- Developers generally use getAttribute() to access custom attributes, while recognized attributes can be accessed directly: element id
attributes attribute
The attributes attribute is similar to the childNodes attribute and is also a real-time collection similar to the NodeList. Each attribute is represented as an attrib node and saved in the NamedNodeMap object. It contains the following methods:
- getNamedItem(name), return the node whose nodeName attribute is equal to name;
- removeNamedItem(name), delete the node whose nodeName attribute is equal to name;
- setNamedItem(node), add a node node to the list and take its nodeName as the index;
- item(pos), which returns the node at the index position pos.
Generally, developers use three methods to operate attributes, and the application scenario of attributes attribute is mainly when all attributes on the element need to be iterated
function outputAttributes(element) {
    let pairs = [];
    for(let i=0 , len = element.attributes.length ; i < len ; ++i){
        const attribute = element.attributes[i];
        pairs.push(`${attribute.nodeName}=${attribute.nodeValue}`);
    }
    return pairs.join(" ");
}
//<div id='myDiv' class='myClass' title='hello world'>
let div = document.getElementById('myDiv');
console.log(outputAttributes(div)); // id=myDiv class=myClass title=hello world
Create element
Through document CreateElement (tagName) to create elements. In HTML, tag names are case insensitive;
be careful:
- The created elements can be defined and modified through three methods of attribute operation, or directly operate recognized attributes;
- The created element can only be inserted into the DOM tree through methods such as appendChild();
- When the created element is added to the DOM tree, the browser will render it immediately. If the element is modified, it will also be reflected in the browser immediately.
Element offspring
An element can have any number of child elements, and the childNodes attribute contains all the direct child nodes of the element; These child nodes can be other elements, text nodes, comments or processing instructions;
Note: there are seven sub nodes under < UL >, which are three < li > and four empty Text nodes
<ul id="myList"> An empty
 An empty	<li>Item 1</li> Two empty
 Two empty	<li>Item 2</li>	Three empty
 Three empty	<li>Item 3</li> Four empty
</ul>
<ul id="myList"><li>Item 1</li><li>Item 2</li><li>Item 3</li></ul> <!-->Three child nodes<--!>
14.1.4 Text type
Text node, including plain text and transferred HTML characters; It has the following characteristics:
- nodeType equals 3;
- nodeName value is "#text";
- nodeValue is the text contained in the node;
- The parentNode value is the Element object;
- Child nodes are not supported.
Text node, which can directly access text content through nodeValue or data; The number of text characters can be obtained through the length attribute; The following methods are also exposed:
- appendData(text), add text to the end of the node;
- deleteData(offset, count): delete count characters from position offset;
- insertData(offset, text), insert text at position offset;
- replaceData(offset, count, text), replace the text from position offset to offset + count with text;
- splitText(offset), which splits the current text node into two text nodes at offset;
- substringData(offset, count) to extract text from position offset to offset + count.
be careful:
-
If the node is in the DOM tree, if it is modified, it will be immediately reflected in the browser;
-
HTML code will be converted to entity code, i.e. less than sign, greater than sign and quotation mark will be escaped:
// Lt & strong; / gt; other output
div.firstChild.nodeValue = "Some <strong>other</strong> message";
Create text node
Through document Createtextnode(); After the text is created, its ownerDocument property will be set to document
Normalized text node
One text node is enough to express a text string. It is obviously inappropriate to have two text nodes in the element;
We can call normalize() on the parent node to merge:
let element = document.createElement('div');
let text1 = document.createTextNode('Hello,');
let text2 = document.createTextNode('world!');
element.appendChild(text1);
element.appendChild(text2);
console.log(element.length);	// 2
element.normalize();
console.log(element.length);	// 1
Split text node
Obviously, if there is a merge, there will be a split. splitText() is used to split text nodes;
It receives a parameter: where to start splitting.
14.1.5 Comment type
The DOM annotation is the Comment type; It has the following characteristics:
- nodeType equals 8;
- nodeName value is "#comment";
- nodeValue is the content of the comment;
- The parentNode value is a Document or Element object;
- Child nodes are not supported.
It is similar to Text, but Comment is not commonly used, so I won't explain it here
14.1.6 DocumentType
DocumentType contains the information of the document and has the following characteristics:
- nodeType equals 10;
- The nodeName value is the name of the document type;
- nodeValue value is null;
- The parentNode value is the Document object;
- Child nodes are not supported.
DocumentType node, generally only the name attribute is useful, which contains the name of the document type;
14.1.7 DocumentFragment type
Of all node types, DocumentFragment type is the only type that does not have a representation for in the tag. DOM defines document fragments as lightweight documents, which can contain and operate nodes without additional consumption of complete documents; It has the following characteristics:
- nodeType equals 10;
- The nodeName value is the name of the document type;
- nodeValue value is null;
- The parentNode value is the Document object;
- Child nodes are not supported.
Usefulness of document fragments
Document fragments act as repositories for other nodes added to the document tree.
Because every time a node is added to the DOM tree, the DOM tree will be re rendered. If there are multiple addition operations, it will be re rendered many times, reducing performance and efficiency;
We can add the nodes that need to be added to the document fragment first, and then add the document fragment to the DOM tree. In this way, we only need to render it again, and the document fragment itself will not be rendered to the DOM tree;
We can use createDocumentFragment() to create document fragments;
14.1.8 Attr type
The attributes attribute is a node of type attrib, which has the following characteristics:
- nodeType equals 2;
- nodeName value is the attribute name;
- nodeValue is the attribute value;
- parentNode value is null;
- Child nodes are not supported in HTML;
- In XML, the child node can be Text or EntityReference.
Although Attr node is also a node of DOM tree, it is rarely used because developers like to use getAttribute and other methods;
14.2 DOM programming
DOM operation can be done in HTML or JavaScript;
14.2.1 dynamic script
Insert a script by inserting a < script > element into the web page.
14.2.2 dynamic style
Similar to 14.2.1, the style is inserted by inserting < style > elements into the web page.
Whether it is dynamic loading script or dynamic loading style; Is an asynchronous process.
14.2.3 operation form
Table is a complex structure in HTML,
<table border="1" width="100%">
    <tbody>
        <tr>
            <td>Cell 1,1</td>
            <td>Cell 2,1</td>
        </tr>
        <tr>
            <td>Cell 1,2</td>
            <td>Cell 2,2</td>
        </tr>
    </tbody>
</table>
It is troublesome to create tables through DOM;
// Create table
let table = document.createElement("table");
table.border = 1;
table.width = "100%";
// Create table body
let tbody = document.createElement("tbody");
table.appendChild(tbody);
// Create first row
let row1 = document.createElement("tr");
tbody.appendChild(row1);
let cell1_1 = document.createElement("td");
cell1_1.appendChild(document.createTextNode("Cell 1,1"));
row1.appendChild(cell1_1);
let cell2_1 = document.createElement("td");
cell2_1.appendChild(document.createTextNode("Cell 2,1"));
row1.appendChild(cell2_1);
// Create second row
let row2 = document.createElement("tr");
tbody.appendChild(row2);
let cell1_2 = document.createElement("td");
cell1_2.appendChild(document.createTextNode("Cell 1,2"));
row2.appendChild(cell1_2);
let cell2_2= document.createElement("td");
cell2_2.appendChild(document.createTextNode("Cell 2,2"));
row2.appendChild(cell2_2);
// Add table to body of document
document.body.appendChild(table);
However, DOM adds some attributes and methods to < Table >, < tbody >, < tr > elements to improve the efficiency of creation:
The < Table > element adds the following attributes and methods:
- Caption, pointer to < caption > element (if any);
- tBodies, HTMLCollection containing < tbody > elements;
- TFoot, pointing to the < tFoot > element (if present);
- tHead, pointing to the < tHead > element (if present);
- Rows, including HTMLCollection representing all rows;
- Createhead(), create the < thead > element, put it into the table and return the reference; createTFoot(), create the < tFoot > element, put it in the table and return the reference;
- createCaption(), create the < caption > element, put it in the table and return the reference;
- Deletethread(), delete the < thead > element;
- deleteTFoot(), delete the < tFoot > element;
- deleteCaption(), delete the < caption > element;
- deleteRow(pos), delete the row at a given position;
- insertRow(pos), inserts a row at a given position in the row set.
The < tbody > element adds the following attributes and methods:
- Rows, HTMLCollection containing all rows in the < tbody > element;
- deleteRow(pos), delete the row at a given position;
- insertRow(pos), which inserts a row at a given position in the row set and returns the reference of the row.
The < tr > element adds the following attributes and methods:
- cells, HTMLCollection containing all table elements of < tr > element;
- deleteCell(pos) to delete the table element at a given location;
- insertCell(pos) inserts a table element at a given position in the table element set and returns the reference of the table element.
After rewriting through methods and attributes:
// Create table
let table = document.createElement("table");
table.border = 1;
table.width = "100%";
// Create table body
let tbody = document.createElement("tbody");
table.appendChild(tbody);
// Create first row
tbody.insertRow(0);
tbody.rows[0].insertCell(0);
tbody.rows[0].cells[0].appendChild(document.createTextNode("Cell 1,1"));
tbody.rows[0].insertCell(1);
tbody.rows[0].cells[1].appendChild(document.createTextNode("Cell 2,1"));
// Create second row
tbody.insertRow(1);
tbody.rows[1].insertCell(0);
tbody.rows[1].cells[0].appendChild(document.createTextNode("Cell 1,2"));
tbody.rows[1].insertCell(1);
tbody.rows[1].cells[1].appendChild(document.createTextNode("Cell 2,2"));
// Add table to body of document
document.body.appendChild(table);
14.2.4 using NodeList
NodeList objects, related NameNodeMap and HTMLCollection are * * "real-time" collections! This means that the changes of document structure will be reflected in them in real time * *;
Don't do this: because it will cycle indefinitely!
let divs = document.getElementsByTagNmae('div');
for(let i = 0 ; i < divs.length ; i++ ) {
    let div = document.createElement('div');
    document.body.appendChild(div);
}
Because each query will search the entire document, it is best to limit the number of operations of NodeList, or you can choose to cache NodeList for use;
14.3 MutationObserver interface
The MutationObserver interface can asynchronously execute the callback function when the DOM is modified;
So that the MutationObserver can observe the whole file, part of the DOM tree, an element, or even an attribute, child node, text, etc;
14.3.1 basic usage
- Create instance:
The MutationObserver instance needs to be created through the constructor, and a callback execution function needs to be passed in;
let observer = new MutationObserver( () => {
    console.log('something changed!');
})
The newly created MutationObserver instance is not associated with DOM objects, but needs to be associated through the observe() method;
It receives two required parameters
- DOM object to observe
- MutationObserverInit object
let observer = new MutationObserver( () => {
    console.log('attribute was changed!');
})

observer.observe(document.body, { attributes:true } );	// It means to observe the attribute change of body

document.body.className = 'foo';
console.log('Changed body class');

// Changed body class
// attribute was changed!
In the above example, the descendant of body or other non attribute modification will not trigger the callback;
Also, callbacks are not synchronized with actual DOM changes!
- Callback function:
Each callback will receive an array of MutationRecord instances; The instance array contains:
- What has changed
- Some parts of DOM have been affected
let observer = new MutationObserver( (mutationRecords) => {
    console.log(mutationRecords);
})
observer.observe(document.body,{ attributes:true });

document.body.setAttribute('foo','bar');
/* Here is an element of a mutationRecords instance
addedNodes: NodeList []
attributeName: "foo"
attributeNamespace: null
nextSibling: null
oldValue: null
previousSibling: null
removedNodes: NodeList []
target: body
type: "attributes"
*/
Before the callback is executed, multiple events that meet the observation conditions may occur, so the array of MutationRecord instances will be arranged in the queue order.
The properties of the MutationRecords instance are as follows:
| attribute | explain |
|---|---|
| target | Target node affected by modification |
| type | String indicating the type of change: "attributes", "characterData" or "childList" |
| oldValue | If enabled in the MutationObserverInit object (attributeOldValue or characterData OldValue is true), the change event of "attributes" or "characterData" will set this attribute to the replaced value. For changes of type "childList", this attribute will always be set to null |
| attributeName | For "attributes" type changes, the name of the modified attribute is saved here. Other change events will set this attribute to null |
| attributeNamespace | For the change of "attributes" type using namespace, the name of the modified attribute is saved here. Other change events will set this attribute to null |
| addedNodes | For the change of "childList" type, return the NodeList containing the nodes added in the change. The default is empty NodeList |
| removedNodes | For the change of "childList" type, return the NodeList containing the nodes deleted in the change. The default is empty NodeList |
| previousSibling | For the change of "childList" type, the previous sibling Node of the change Node is returned, which is null by default |
| nextSibling | For changes of "childList" type, the next sibling Node of the returned change Node is null by default |
The callback will also receive the second parameter: the instance of MutationObserver observing the change:
let observer = new MutationObserver( (mutationRecords,mutationObserver) => {
    console.log(mutationRecords);
    console.log(mutationObserver);		// MutationObserver {}
})
observer.observe(document.body,{ attributes:true });

document.body.setAttribute('foo','bar');
- Cancel observation
By default, as long as the observed object is not garbage collected, the callback of MutationObserver will respond to DOM change events;
If you need to terminate the execution in advance, you can use the disconnect() method; This method will not only stop the observation, but also discard the callback that has been added to the task queue to be executed asynchronously;
let observer = new MutationObserver( (mutationRecords,mutationObserver) => {
    console.log(mutationRecords);
})
observer.observe(document.body,{ attributes:true });

document.body.setAttribute('foo','bar');
observer.disconnect();	// After disconnection, the console has no output;
If you need to stop observation and don't want to abandon the callback that has entered the task queue; You can do this:
let observer = new MutationObserver( (mutationRecords,mutationObserver) => {
    console.log(mutationRecords);
})
observer.observe(document.body,{ attributes:true });

document.body.setAttribute('foo','bar');
setTimeout(()=>{
    observer.disconnect();
},0);	// The link is broken, but the console has an output
The above code changes the disconnect() that should be executed synchronously into the code that is executed asynchronously, and also adds it to the task queue. You need to wait for the callback in front of the queue to execute before executing disconnect()
- Reuse MutationObserver instance
By calling the observe() method multiple times, you can reuse the same MutationObserver instance and observe multiple different target nodes;
At this time, the target attribute of MutationRecord can identify the target node of the change event;
let observer = new MutationObserver( (mutationRecords,mutationObserver) => {
    console.log(mutationRecords.map( (item) => {
        return item.target
    }));
})

let childA = document.createElement('div');
let childB = document.createElement('span');

document.body.appendChild(childA);
document.body.appendChild(childB);

// Reuse observer
observer.observe(childA , { attributes:true });
observer.observe(childB , { attributes:true });

childA.setAttribute('foo','bar');
childB.setAttribute('foo','bar');
// output
// [div, span]
- Reuse the MutationObserver instance
Calling disconnect() does not end the life of the MutationObserver. You can reuse the observer.
14.3.2 observation range of mutationobserveinit
The MutationObserveInit object controls the range of observation by means of key pair values. It has the following properties:
| attribute | explain |
|---|---|
| subtree | Boolean value, indicating whether to observe the subtree (descendants) of the target node except the target node. If false, only the changes of the target node will be observed; If true, the default value of the observation target node and its entire subtree is false |
| attributes | Boolean value, indicating whether to observe the attribute change of the target node. The default is false |
| attributeFilter | String array, indicating which attributes to observe. Setting this value to true will also convert the value of attributes to true. By default, all attributes are observed |
| attributeOldValue | Boolean value, indicating whether the MutationRecord records the attribute value before the change. Setting this value to true will also convert the value of attributes to true, which is false by default |
| characterData | Boolean value indicating whether the change event is triggered when modifying character data. The default value is false |
| characterDataOldValue | Boolean value, indicating whether the MutationRecord records the character data before the change. Setting this value to true will also convert the value of characterData to true, which is assumed to be false by default |
| childList | Boolean value, indicating whether the child node of the modified target node triggers a change event. The default value is false |
Note: when calling observe(), there must be a value in the MutationObserveInit object, otherwise an error will be reported because there is no change event to trigger the callback!
-
Observation attribute
By setting attribute:true, you can observe the addition, deletion and modification of attributes:
let observer = new MutationObserver( (mutationRecords,mutationObserver) => {
    console.log(mutationRecords);
})
observer.observe(document.body,{ attributes:true });

document.body.setAttribute('foo','bar');
If you only want to observe some values, you can set the white list through the attributeFilter attribute;
let observer = new MutationObserver( (mutationRecords,mutationObserver) => {
    console.log(mutationRecords);
})
observer.observe(document.body,{ attributeFilter:['foo','title'] });

document.body.setAttribute('foo','bar');	// A callback is triggered
document.body.setAttribute('title','this is a body');	// A callback is triggered
document.body.setAttribute('class','bodyClass');	// No callback will be triggered
The above operations have no memory, that is, we don't know what the previous value was before the change;
If you want to get the old value, you can set attributeOldValue:true.
let observer = new MutationObserver( (mutationRecords,mutationObserver) => { console.log(mutationRecords.map( (item) =>{ return item.oldValue; })); }) observer.observe(document.body,{ attributeOldValue:true }); document.body.setAttribute('title','hello'); document.body.setAttribute('title','world'); document.body.setAttribute('title','!'); // Console output: [null, 'hello', 'world'] -
Observe character data
You can observe text nodes by setting characterDate:true
Similar to the observation attribute, the old value can also be obtained by setting;
-
Observe child nodes
By setting childList:true;
It should be noted that reordering the child nodes will trigger two event changes, one is to remove and the other is to add;
-
Observation subtree
By setting subtree:true;
// Empty body
document.body.innerHTML = '';let observer = new MutationObserver(
(mutationRecords) => console.log(mutationRecords));
// Create a descendant
document.body.appendChild(document.createElement('div'));
// Observe the < body > element and its subtree
observer.observe(document.body, { attributes: true, subtree: true });
// Modify the subtree of < body > element
document.body.firstChild.setAttribute('foo', 'bar');
// The event of subtree change is recorded
// [
// {
// addedNodes: NodeList[],
// attributeName: "foo",
// attributeNamespace: null,
// oldValue: null,
// nextSibling: null,
// previousSibling: null,
// removedNodes: NodeList[],
// target: div,
// type: "attributes",
// }
// ]
Interestingly, the nodes of the observed subtree can still trigger change events after removing the subtree
// Empty body
document.body.innerHTML = '';
let observer = new MutationObserver(
	(mutationRecords) => console.log(mutationRecords)
);
let subtreeRoot = document.createElement('div'),
subtreeLeaf = document.createElement('span');
// Create a subtree with two levels
document.body.appendChild(subtreeRoot);
subtreeRoot.appendChild(subtreeLeaf);
// Observation subtree
observer.observe(subtreeRoot, { attributes: true, subtree: true });
// Transfer nodes to other subtrees
document.body.insertBefore(subtreeLeaf, subtreeRoot);
subtreeLeaf.setAttribute('foo', 'bar');
// The removed node still triggers the change event
// [MutationRecord]
14.3.3 asynchronous callback and record queue
The MutationObserver interface is designed for performance. Its core is asynchronous callback and record queue model.
In order not to affect performance when a large number of change events occur. Each change of information (* information set by the MutationObserverInit object) * will be saved in the MutationRecord instance and then added to the record queue.
This queue is unique to each MutationRecord instance and is an ordered list of DOM change events.
-
Record queue
Every time the MutationRecord is added to the record queue of the MutationObserver, the callback registered by the observer (passed in when initializing the MutationObserver) will be scheduled to the task queue as a micro task only if there is no scheduled micro task callback before * (the length of the micro task in the queue is 0) *. This ensures that the contents of the record queue will not be processed twice by the callback.
However, during the asynchronous execution of the callback micro task, more change events may be triggered. Therefore, the called callback will receive an array of MutationRecord instances in the order they enter the giant deer queue. The callback needs to handle the instance array, because these instances will not exist after the function exits.
-
takeRecords() method
Call the takeRecords() method of the MutationObserver instance to clear the record queue, take out and return all the MutationRecord instances.
let observer = new MutationObserver(
	(mutationRecords) => console.log(mutationRecords)
);
observer.observe(document.body, { attributes: true });
document.body.className = 'foo';
document.body.className = 'bar';
2document.body.className = 'baz';
console.log(observer.takeRecords());
console.log(observer.takeRecords());
// [MutationRecord, MutationRecord, MutationRecord]
// []
*This is especially useful when you want to stop observing (disconnect()) * and also need to deal with the MutationRecord instance in the record queue discarded by disconnect().
14.3.4 performance, memory and garbage collection
Delegating the change callback to the micro task can ensure the synchronous triggering of events and avoid the subsequent confusion. The record queue implemented for MutationObserver can ensure that even if the change event is triggered explosively, it will not significantly slow down the browser.
There are also costs when using MutationObserver, so you need to pay attention to the following points:
-
The reference relationship between the MutationObserver instance and the target node is asymmetric. MutationObserver has a weak reference to the target node to be observed. Because it is a weak reference, it does not prevent the garbage collector from collecting the target node.
However, the target node has a strong reference to MutationObserver. If the target node is removed from the DOM and then garbage collected, the closed MutationObserver will also be garbage collected
-
Each MutationRecord instance in the record queue contains at least one reference to an existing DOM node. If the change is of childList type, it will contain references to multiple nodes. The default behavior of the record queue and callback processing is to exhaust the queue, process each MutationRecord, and then make them out of scope and garbage collected.
Sometimes it may be necessary to keep a complete change record of an observer. Saving these MutationRecord instances will also save the nodes they refer to, which will prevent these nodes from being recycled.
If you need to free up memory as soon as possible, it is recommended to extract the most useful information from each MutationRecord, save it to a new object, and finally discard the MutationRecord.