catalogue
Form validation is one of JavaScript's advanced options.
The form data verified by JavaScript include:
2, Common functions and events of form verification
1, Concept of form validation
-
Form validation is one of JavaScript's advanced options.
JavaScript can be used to validate these input data in HTML forms before the data is sent to the server.
-
The form data verified by JavaScript include:
1. Whether the user fills in the form without filling in items
2. Is the email address entered by the user legal?
3. Do users enter their own legal date?
4. Has the user filled in the text in the data field?
2, Common functions and events of form verification
-
Common functions
| toLowerCase() | Convert string to lowercase |
| toUpperCase() | Convert string to uppercase |
| charAt(index) | Returns the character of the specified subscript |
| Indexof (string, index) | Finds the first occurrence of a specified string value in a character |
| substring(index1,index2) | Return the characters between index and index2 (including the characters corresponding to index1, excluding the characters corresponding to indexe2) |
Code display
<!DOCTYPE html>
<html>
	<head>
		<meta charset="utf-8">
		<title>Common validation functions</title>
	</head>
	<body>
		<script type="text/javascript">
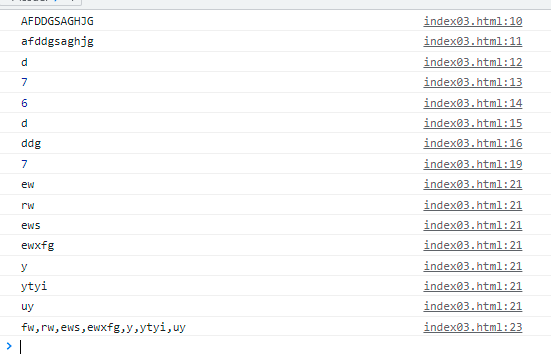
			var sum = "afddgsaGHJG";
			console.log(sum.toUpperCase()); //Convert all to uppercase
			console.log(sum.toLowerCase()); //Convert all to lowercase
			console.log(sum.charAt(3)); //Get the corresponding element according to the subscript
			console.log(sum.indexOf("G")); //Go to the subscript of the corresponding element (proximity principle). If not, it will return - 1
			console.log(sum.indexOf("a", "2")); //Find the next subscript of this element from the position with subscript 2
			console.log(sum.substring(2, 3)); //Intercept from bit 2 to bit 5, but excluding bit 5
			console.log(sum.substr(2, 3)); //Take the third element from the back
			var str = "ew,rw,ews,ewxfg,y,ytyi,uy";
			var sum = str.split(","); //Length by comma
			console.log(sum.length); //View the length of the cut
			for (var i = 0; i < sum.length; i++) {
				console.log(sum[i])//Loop through the cut elements
			}
			console.log(str.replace("e","f"));//Replace all letters e with f
		</script>
	</body>
</html>
The console interface is as follows:

-
Common events
| event | introduce |
| onclick | Mouse click event |
| onmouseover | Mouse in event |
| onmouseout | Mouse out event |
| onchange | Text box content change event |
| onselect | Event when text content is selected |
| onfocus | Get focus event |
| onblur | Loss of focus event |
| onload | Load event |
| onunload | Uninstall event |
3, Regular
-
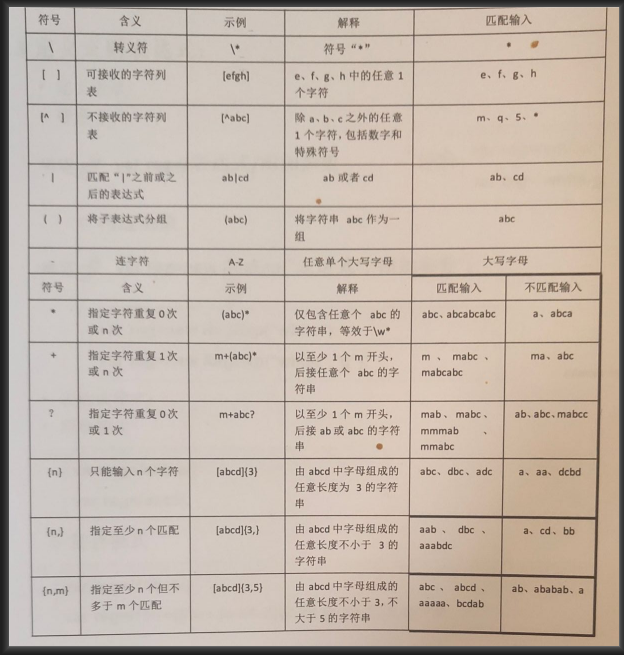
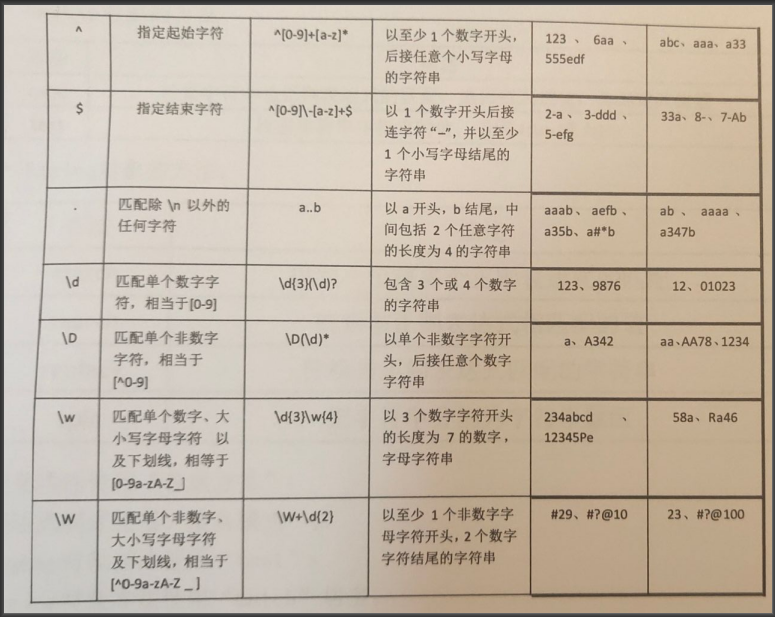
Basic regularity
Note: when writing regular, we should pay attention to whether the regular is effective. If it does not take effect, it depends on whether the external writing of the regular is wrong. The correct writing method is: / ^ $/


-
Basic case
-
Password level
Implementation principle: first define the regularity to be judged, compare the input value with the regularity in turn, and add if it is satisfied ⭐
(you can write other regular judgments according to your own needs).
<!DOCTYPE html>
<html lang="en">
	<head>
		<meta charset="UTF-8">
		<title>Password level</title>
	</head>
	<body>
		<input type="text" id="text1">
		<span id="span1"></span>
		<p>
			Password level<span id="span2"></span>
		</p>
		<script>
		//Set keyboard events for input boxes
			text1.onkeyup = function() {
				//The length must be between 6 and 10
				var str = text1.value
				if (str != "") {//If not empty
					//Define regularity
					var rule1 = /^\w{6,10}$/;//The defined length is between [6,10]
					var rule2 = /^.*[a-z].*$/;//Lowercase letters
					var rule3 = /^.*[A-Z].*$/;//capital
					var rule4 = /^.*\d.*$/;//number
					//Password level
					var pad = ""
					//Regular verification (one is added for each regular ⭐)
					if (rule1.test(str)) {//Meet 6 ~ 10 bits
						span1.textContent = "✔"
						if (rule2.test(str)) pad += "⭐";
						if (rule3.test(str)) pad += "⭐";
						if (rule4.test(str)) pad += "⭐";
						span2.textContent = pad;//Set the value of the block label to the password level
						return;
					}
					//If not, you will be prompted that the format is not satisfied
					span1.textContent = "Does not conform to format";
					return
				}//Content is empty
				span1.textContent = "Cannot be empty";
			}
		</script>
	</body>
</html>
-
Login authentication
Execution principle: set change events for each input
<!DOCTYPE html>
<html lang="en">
	<head>
		<meta charset="UTF-8">
		<title>Form Validation </title>
		<style>
			/* Edit the style of block labels */
			span {
				color: red;
				font-weight: bold;
			}
		</style>
	</head>
	<body>
		<form action="" id="myForm">
			<p>name: <input type="text" id="userName" onkeyup="checkLabel(this,/^[a-zA-Z]{3,6}$/,'The length of the name is 3-6')">
				<span><i class="error"></i></span>
			</p>
			<p>password: <input type="text" id="userPwd" onkeyup="checkLabel(this,/^\w{6,10}$/,'The length of the password is 6-10')"><span><i
						class="error"></i></span>
			</p>
			<p>mailbox: <input type="text" id="userEmail"
					onkeyup="checkLabel(this,/^\w+[.]\w+@\w+[.]\w+$/,'Mailbox must contain@')"><span><i class="error"></i></span></p>
			<p>
				<input type="button" value="Sign in" />
			</p>
		</form>
		<script>
			//Used to check the name for compliance
			function checkLabel(obj, rex, tip) { //obj refers to the tag that needs to be passed in, rex refers to the regular expression, and tip refers to the prompt
				var length = obj.value.length; //Get the length of the value in the tag
				var label = obj.parentElement.getElementsByClassName("error")[0]; //Get the first child element under the parent element whose class is error, that is, the i tag
				console.log(label)
				if (length > 0) { //Not empty
					//Compare the passed in value with the content
					if (rex.test(obj.value)) {
						label.textContent = "😊"; //Label
						return true
					}
					//If you do not pass the regular judgment, the prompt is displayed
					label.textContent = tip
					return false
				}
				//Length < = 0 indicates that there is no content
				label.textContent = "Length must be greater than 0"
				return false
			}
			//Add submit event (with return value)
			myForm.onsubmit = () => {
				var f1 = checkLabel(userName);//Boolean value returned from the name input box
				var f2 = checkLabel(userEmail);//Boolean value returned from password input box
				var f3 = checkLabel(userPwd);//Boolean value returned from mailbox input box
				return f1 && f2 && f3; //true will be returned only when the three input boxes are established together
			}
		</script>
	</body>
</html>
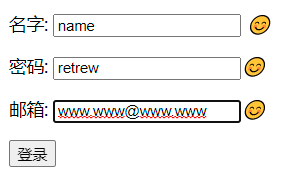
The renderings are as follows:

4, Secondary linkage
Note: one thing we must pay attention to when writing js arrays is not here. Our arrays are not limited by length and type.
<!DOCTYPE html>
<html>
	<meta content="UTF-8" />
	<title>Three level linkage</title>
	<body>
		<select name="provinces" id="1">
			<option>Please select a province</option>
		</select>
		<select name="cities" id="2">
			<option>Please select a city</option>
		</select>
		<select name="downs" id="3">
			<option>Please select a county</option>
		</select>

		<script>
			// Provincial and urban areas are written casually. Please don't care
			// Get all select ions (in array form) according to the tag
			var selects = document.getElementsByTagName("select");
			// Saved text
			var provincesStr = "<option>Please select a province</option>";
			// Drop down text
			var citiesStr;
			// County drop-down text
			var downsstr;
			// Record which province is selected (subscript)
			var provincesIndex = 0;
			// Record which city is selected (subscript)
			var citiesIndex = 0;

			// province
			var provinces = ["Guangdong Province", "Beijing Province", "Hebei Province"];
			// City (secondary array)
			var cities = [
				["Guangzhou City", "Huizhou City", "Foshan City"],
				["Beijing"],
				['Shijiazhuang City ', 'Hengshui City']
			];
			// County (secondary array)
			var downs = [
				//Guangzhou City 				 Huizhou Foshan
				[
					["Tianhe District", "Luogang District"],
					["a area", "b area", "c area"],
					["d area", "e area"]
				],
				[
					["Dongcheng District"],
					["Xicheng District"]
				],
				[
					["Chang'an District", "Qiaodong District", "Qiaoxi District"],
					["Taocheng District"]
				]
			];


			// Traverse provinces
			for (let i = 0; i < provinces.length; i++) {
				// Add option and set value to 0, 1, 2
				provincesStr += "<option value = " + i + ">" + provinces[i] + "</option>"
			};
			selects[0].innerHTML = provincesStr;//Set the value of the provincial drop-down box
			// When province is selected, the onchange event is triggered
			selects[0].onchange = function() {
				// First, reset the drop-down selection of cities, counties and districts (if it is not set, when all provinces and cities are selected,
				// Regret, change the province, and then click the market, you will find something very interesting)
				citiesStr = "<option>Please select a city</option>";
				downsstr = "<option>Please select a county</option>";
				// Get the value of the option where the selected province is located (for example, if I select Beijing Province, this.value is 1)
				provincesIndex = this.value;
				// Judge whether the provincesIndex obtained is a number (because there is - > please select the province < -)
				if (!isNaN(provincesIndex)) {
					// Get the city array corresponding to the selected province
					let citiesArr = cities[provincesIndex];
					// Traversing citiesArr
					for (let i = 0; i < citiesArr.length; i++) {
						citiesStr += "<option value = " + i + ">" + citiesArr[i] + "</option>"
					}
				}
				selects[1].innerHTML = citiesStr;//Set the value of the city drop-down box
				selects[2].innerHTML = downsstr;//Set the value of the drop-down box
			};
			// The onchange event is triggered when the market is selected
			selects[1].onchange = function() {
				downsstr = "<option>Please select a county</option>";
				citiesIndex = this.value;
				// Judge whether the obtained citiesIndex is a number (because there is - > please select the province < -)
				if (!isNaN(citiesIndex)) {
					// Get the county array corresponding to the selected city
					let downsArr = downs[provincesIndex][citiesIndex];
					// Traverse downsArr
					for (let i = 0; i < downsArr.length; i++) {
						downsstr += "<option value = " + i + ">" + downsArr[i] + "</option>"
					}
				}
				selects[2].innerHTML = downsstr;
			}
		</script>
	</body>
</html>
This is the end of today's sharing. The next issue will be updated continuously!