catalogue
3.2.1 case exercise - drop down menu
4.1 case exercise - simple message posting case
5.1 case exercise - delete message
Vi. replication node (clone node)
1, Why learn node operations
There are two ways to get elements:
1. Use the method provided by DOM to obtain elements
- document.getElementById()
- document.getElementsByTagName()
- document.quertSelector et al
- Not logical and cumbersome
2. Use node hierarchy to obtain elements
- Using parent-child sibling node relationship to obtain elements
- Strong logic, but poor compatibility
2, Node overview
All contents in the page are nodes (labels, attributes, text, comments, etc.), which are represented by nodes in DOM.
All nodes in the HTML DOM tree can be accessed through JavaScript, and all HTML elements (nodes) can be modified, created or deleted
The node has at least three basic attributes: nodeType, nodeName and nodeValue
- Element node nodeType is 1
- Attribute node nodeType is 2
- The text node nodeType is 3 (the text node contains text, spaces, line breaks, etc.)
In actual development, the main operation of node operation is element node
3, Node level
Using DOM tree, nodes can be divided into different hierarchical relationships, commonly parent-child brother hierarchical relationships
3.1 parent node
node.parentNode
- The parentNode property returns the parent node of a node, that is, the nearest parent node
- Returns null if the specified node has no parent node
3.2 child nodes
1. parentNode.childNodes (standard)
parentNode.childNodes returns a collection of child nodes containing the specified node, which is a collection of immediate updates
Note: the return value contains all child nodes, including element nodes, text nodes, etc
2. parentNode.children (non-standard)
children is a read-only attribute that returns all child element nodes. It only returns child element nodes, and other nodes do not return
Although parentnode Children is a non-standard, but it is supported by various browsers and can be used safely
3. parentNode.firstChild
firstChild returns the first child node. If it cannot be found, it returns null. Similarly, all nodes are included
4. parentNode.lastChild
lastChild returns the last child node. If it cannot be found, it returns null. Similarly, all nodes are included
5. parentNode.firstElementChild
firstElementChild returns the first child element node. If it cannot be found, it returns null
6. parentNode.lastElementChild
lastElementChild returns the last child element node. If it cannot be found, it returns null
Note: there is a compatibility problem between firstElementChild and # lastElementChild. Only IE9 and above are supported
3.2.1 case exercise - drop down menu
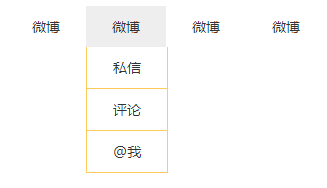
Case study:
- All li in the navigation bar must have the effect of mouse passing, so you need to register mouse events circularly
- Core principle: when the mouse passes through li, the second one is still displayed in ul. When the mouse leaves, ul is hidden
    <style>
        * {
            margin: 0;
            padding: 0;
        }

        li {
            list-style-type: none;
        }

        a {
            text-decoration: none;
            font-size: 14px;
        }

        .nav {
            margin: 100px;
        }
        .nav li {
            position: relative;
            float: left;
            width: 80px;
            height: 41px;
            text-align: center;
        }

        .nav li a {
            display: block;
            width: 100%;
            height: 100%;
            line-height: 41px;
            color: #333;
        }
        .nav li a:hover{
            background-color: #eee;
        }

        .nav ul {
            display: none;
            position: absolute;
            top: 41px;
            left: 0;
            width: 100%;
            border-left: 1px solid #FECC5B;
            border-right: 1px solid #FECC5B;
        }

        .nav ul li {
            border-bottom: 1px solid #FECC5B;
        }
    </style>
<ul class="nav">
<li>
<a href="#"> Weibo</a>
<ul>
<li><a href="#"> private letter</a></li>
<li><a href="#"> comments</a></li>
<li><a href="">@I</a></li>
</ul>
</li>
<li>
<a href="#"> Weibo</a>
<ul>
<li><a href="#"> private letter</a></li>
<li><a href="#"> comments</a></li>
<li><a href="">@I</a></li>
</ul>
</li>
<li>
<a href="#"> Weibo</a>
<ul>
<li><a href="#"> private letter</a></li>
<li><a href="#"> comments</a></li>
<li><a href="">@I</a></li>
</ul>
</li>
<li>
<a href="#"> Weibo</a>
<ul>
<li><a href="#"> private letter</a></li>
<li><a href="#"> comments</a></li>
<li><a href="">@I</a></li>
</ul>
</li>
</ul>
<script>
var nav = document.querySelector('.nav');
var lis = nav.children;
for(var i = 0; i < lis.length; i++){
lis[i].onmouseover = function(){
this.children[1].style.display = 'block';
}
lis[i].onmouseout = function(){
this.children[1].style.display = 'none';
}
}
</script>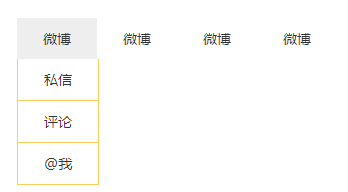
3.3 brother nodes
1. node.nextSibling
nextSibling returns the next sibling node of the current element. If it cannot be found, it returns null. Similarly, all nodes are included.
2. node.previousSibling
previousSibling returns the previous sibling node of the current element. If it cannot be found, it returns null. Similarly, all nodes are included.
3. node.nextElementSibling
Nextlementsibling returns the next sibling element node of the current element. If it cannot be found, it returns null.
4. node.previousElementSibling
previousElementSibling returns the previous sibling element node of the current element. If it cannot be found, it returns null.
Note: nexterementsibling and # nexterementsibling have compatibility problems, which are supported only when they are above IE9
4, Create and} add nodes
document.createElement('tagName')
document. The createElement () method creates the HTML element specified by tagName. Because the discount element did not exist before and was generated dynamically according to our needs, we also call it dynamic creation element node.
1. node.appendChild(child)
node. The appendChild () method adds a node to the end of the child node list of the specified parent node. Similar to the after pseudo element in css.
2. node.insertBefore(child, specify element)
node. The insertBefore () method adds a node in front of the pointing node of the parent node. It is similar to the befor pseudo element in css
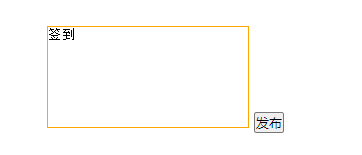
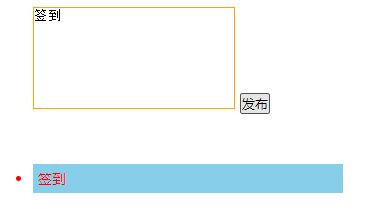
4.1 case exercise - simple message posting case
Case study:
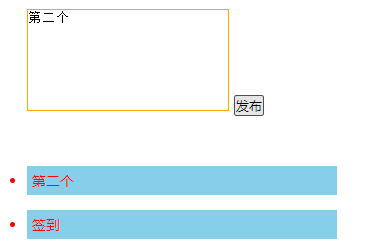
- Core idea: after clicking the button, you can dynamically create a li and add it to the ul
- While creating li, pass the value in the text field through li Inserthtml assigned to li
- If you want to display the new message at the back, use appendChild. If you want to display it at the front, use insertBefore
        * {
            margin: 0;
            padding: 0;
        }

        body {
            padding: 100px;
        }

        textarea {
            width: 200px;
            height: 100px;
            border: 1px solid orange;
            outline: none;
            resize: none;
        }

        ul {
            margin-top: 50px;
        }

        li {
            width: 300px;
            padding: 5px;
            background-color: skyblue;
            color: red;
            font-size: 14px;
            margin: 15px 0;
        }
<textarea name="" id="" cols="30" rows="10"></textarea>
<button>release</button>
<ul>
</ul>
<script>
var btn = document.querySelector('button');
var text = document.querySelector('textarea');
var ul = document.querySelector('ul');
btn.onclick = function(){
if(text.value == ''){
alert('Please enter the content');
return false;
} else {
// 1. Create element
var li = document.createElement('li');
li.innerHTML = text.value;
// ul.appendChild(li);
// Top of the latest message
ul.insertBefore(li, ul.children[0]);
}
}
</script>
5, Delete node
node.removeChild(child)
node. The removechild () method deletes a child node from the DOM and returns the deleted node
5.1 case exercise - delete message
Case study:
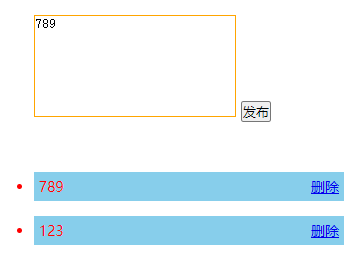
- When we assign the value in the text field to li, there is also a deleted link
- You need to say that some links are obtained. When we click the current link, we delete the li where the current link is located
- To prevent link jump, you need to add javascript:void(0); Or javascript:;
Add style code snippets based on the 4.1 case
        li a {
            float: right;
        }
Based on the case of 4.1, the script code fragment
    <script>
        var btn = document.querySelector('button');
        var text = document.querySelector('textarea');
        var ul = document.querySelector('ul');
        btn.onclick = function(){
            if(text.value == ''){
                alert('Please enter the content');
                return false;
            } else {
                // 1. Create element
                var li = document.createElement('li');
                li.innerHTML = text.value + "<a href='javascript:;'>delete</a>";
                // 2. Add element
                // ul.appendChild(li);
                // Top of the latest message
                ul.insertBefore(li, ul.children[0]);
                // 3. Delete element deletes the li of the current link
                var as = document.querySelectorAll('a');
                for(var i = 0; i < as.length; i++){
                    as[i].onclick = function(){
                        // node.removeChild(child) deletes the li where the current hyperlink is located
                        ul.removeChild(this.parentNode);
                    }
                }
            }
        }
    </script>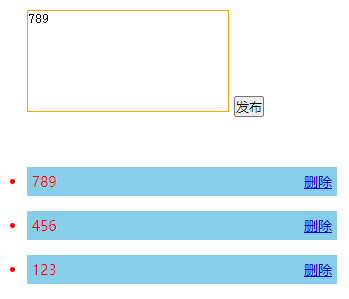
Vi. clone node
node.cloneNode()
node. The cloneNode () method returns a copy of the node calling the method, which is also a clone node / copy node
be careful:
- If the parameter in the bracket is empty or false, it is a shallow copy, that is, only the replication node itself is cloned, and the child nodes inside are not cloned
- If the parameter in the bracket is true, it is a deep copy, that is, copy the label and all child nodes inside
    <ul>
        <li>1</li>
        <li>2</li>
        <li>3</li>
    </ul>
    <script>
        var ul = document.querySelector('ul');
        var lili = ul.children[0].cloneNode(true);
        // The clone must be added before it is displayed
        ul.appendChild(lili);
    </script>