catalogue
2, Table interlaced color change
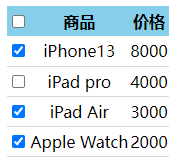
3, Select all unselect all cases in the form
4, Actions for custom attributes
4.5 case exercise - tab bar switching (key cases)
5.1 setting H5 custom attributes
1, Baidu skin changing effect
case analysis
- Register events for a set of elements
- Register click events for 4 small pictures using circular registration
- Click the picture to change the background to the current picture
- Core algorithm: get the src path of the current picture and give it to the body as the background
    <style>
        *{
            margin: 0;
            padding: 0;
        }
        body{
            background: url(img/mao1.png) no-repeat center top;
            background-size: 100%;
        }
        li{
            list-style: none;
        }
        .baidu{
            overflow: hidden;
            margin: 100px auto;
            background-color: #fff;
            width: 410px;
            padding-top: 3px;
        }
        .baidu li{
            float: left;
            margin: 0 1px;
            cursor: pointer;
        }
        .baidu img{
            width: 100px;
        }
    </style>
<ul class="baidu">
<li><img src="img/mao1.png"></li>
<li><img src="img/mao2.png"></li>
<li><img src="img/mao3.png"></li>
<li><img src="img/night.JPG"></li>
</ul>
<script>
var imgs = document.querySelector('.baidu').querySelectorAll('img');
// Circular registration event
for(var i = 0; i < imgs.length; i++){
imgs[i].onclick = function(){
// Put this Assign SCR to body
document.body.style.backgroundImage = 'url(' + this.src + ')';
}
}
</script>

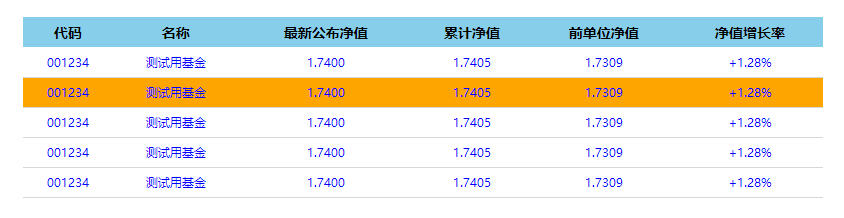
2, Table interlaced color change
Case study:
- Using the mouse event, the mouse passes through onmouseover and leaves onmouseout
- Core idea: when the mouse passes through the tr line, the background color of the current line will be changed, and when the mouse leaves, the current background color will be removed
    <style>
        table {
            width: 800px;
            margin: 100px auto;
            text-align: center;
            border-collapse: collapse;
            font-size: 14px;
        }
        thead tr {
            height: 30px;
            background-color: skyblue;
        }
        tbody tr {
            height: 30px;
        }
        tbody td {
            border-bottom: 1px solid #d7d7d7;
            font-size: 12px;
            color: blue;
        }
        .bg {
            background-color: orange;
        }
    </style>
<table>
<thead>
<tr>
<th>code</th>
<th>name</th>
<th>Latest published net worth</th>
<th>Accumulated Net </th>
<th>Net value of previous unit</th>
<th>Net worth growth rate</th>
</tr>
</thead>
<tbody>
<tr>
<td>001234</td>
<td>Testing fund</td>
<td>1.7400</td>
<td>1.7405</td>
<td>1.7309</td>
<td>+1.28%</td>
</tr>
<tr>
<td>001234</td>
<td>Testing fund</td>
<td>1.7400</td>
<td>1.7405</td>
<td>1.7309</td>
<td>+1.28%</td>
</tr>
<tr>
<td>001234</td>
<td>Testing fund</td>
<td>1.7400</td>
<td>1.7405</td>
<td>1.7309</td>
<td>+1.28%</td>
</tr>
<tr>
<td>001234</td>
<td>Testing fund</td>
<td>1.7400</td>
<td>1.7405</td>
<td>1.7309</td>
<td>+1.28%</td>
</tr>
<tr>
<td>001234</td>
<td>Testing fund</td>
<td>1.7400</td>
<td>1.7405</td>
<td>1.7309</td>
<td>+1.28%</td>
</tr>
</tbody>
</table>
<script>
var trs = document.querySelector('tbody').querySelectorAll('tr');
for(var i = 0; i < trs.length; i++){
// Mouse over event onmouseover
trs[i].onmouseover = function(){
this.className = 'bg';
}
// Mouse off event onmouseout
trs[i].onmouseout = function(){
this.className = '';
}
}
</script>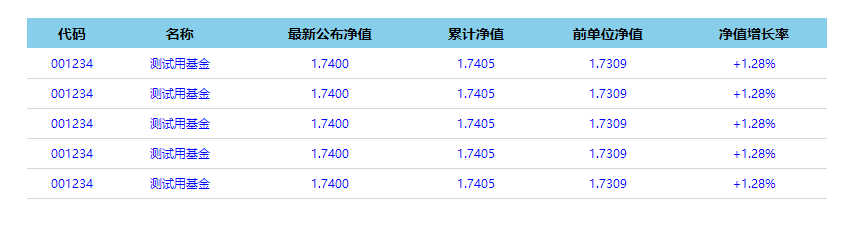
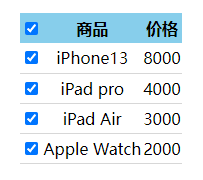
3, Select all unselect all cases in the form
case analysis
- Select all and deselect all: let the checked attribute (selected status) of all the check boxes below follow the select all button
- You need to select all the check boxes below, and select all the check boxes above to select. Bind events to all the check boxes below. Each time you click, you should cycle to check whether all the check boxes below are selected. If one is not selected, select all the check boxes above will not be selected
- You can set a variable to control whether select all is selected
    <style>
        table {
            margin: 100px auto;
            text-align: center;
            border-collapse: collapse;
        }
        thead tr {
            height: 30px;
            background-color: skyblue;
        }
        tbody tr {
            height: 30px;
        }
        tbody td {
            border-bottom: 1px solid #d7d7d7;
        }
    </style>
<div class="wrap">
<table>
<thead>
<tr>
<th>
<input type="checkbox" id="cbAll">
</th>
<th>commodity</th>
<th>Price</th>
</tr>
</thead>
<tbody id="tb">
<tr>
<td>
<input type="checkbox">
</td>
<td>iPhone13</td>
<td>8000</td>
</tr>
<tr>
<td>
<input type="checkbox">
</td>
<td>iPad pro</td>
<td>4000</td>
</tr>
<tr>
<td>
<input type="checkbox">
</td>
<td>iPad Air</td>
<td>3000</td>
</tr>
<tr>
<td>
<input type="checkbox">
</td>
<td>Apple Watch</td>
<td>2000</td>
</tr>
</tbody>
</table>
</div>
<script>
var cbAll = document.getElementById('cbAll');
var tbs = document.getElementById('tb').getElementsByTagName('input');
cbAll.onclick = function(){
for(var i = 0; i < tbs.length; i++){
tbs[i].checked = this.checked;
}
}
for(var i = 0; i < tbs.length; i++){
tbs[i].onclick = function(){
// Define a variable flag to control whether the select all button is equal to true
var flag = true;
for(var i = 0; i < tbs.length; i++){
if(!tbs[i].checked){
flag = false;
}
}
cbAll.checked = flag;
}
}
</script>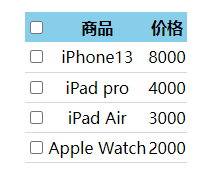
4, Actions for custom attributes
4.1 get attribute value
- element. Property get property value
- element.getAttribute('attribute ')
difference:
- element. Property to get the built-in attribute value (the attribute of the element itself)
- element.getAttribute('attribute '); Mainly get custom attributes (standard)
4.2 setting attribute values
- element. Attribute = 'value' sets the built-in attribute value
- element.setAttribute('attribute ',' value ')
difference:
- element. Property} sets the value of the built-in property
- element.setAttribute('' attribute); Mainly set custom attributes (standard)
4.3 remove attributes
- element.removeAttribute('attribute ')
4.5 case exercise - tab bar switching (key cases)
When the mouse clicks the corresponding tab above, who will change the content with
Case study:
- The Tab bar switch has two large modules
- On the module tab, click a, the current background color will be red, and the rest will remain the same (exclusive thinking) way to modify the class name
- The contents of the following modules will change with the tabs above
- Rule: the display contents of the following modules correspond to the tabs above one by one
- Core idea: give the tab above_ Add custom attributes to all small li in the list, and the attribute values are numbered from 0
     <style>
        *{
            margin: 0;
            padding: 0;
        }
        ul{
            list-style: none;
        }
        .tab {
            padding: 100px;
        }
        .tab_list{
            width: 988px;
            border-bottom: 1px solid #e4393c;
            overflow: hidden;
            background-color: rgb(230, 225, 225);
        }
        .tab_list li {
            float: left;
            height: 39px;
            line-height: 39px;
            padding: 0 20px;
            text-align: center;
            cursor: pointer;
        }

        .tab_list .current {
            background-color: #e4393c;
            color: #fff;
            cursor: default;
        }
        .item {
            display: none;
        }
    </style>
<div class="tab">
<div class="tab_list">
<ul>
<li class="current">Product introduction</li>
<li>Specification and packaging</li>
<li>After sales guarantee</li>
<li>Commodity evaluation (500)</li>
<li>Mobile community</li>
</ul>
</div>
<div class="tab_con">
<div class="item" style="display: block;">
Content of product introduction module
</div>
<div class="item">
Specification and packaging module content
</div>
<div class="item">
Content of after sales guarantee module
</div>
<div class="item">
Content of commodity evaluation (500) module
</div>
<div class="item">
Mobile community module content
</div>
</div>
</div>
<script>
var tab_list = document.querySelector('.tab_list');
var list = tab_list.querySelectorAll('li');
var items = document.querySelectorAll('.item');
for(var i = 0; i < list.length; i++){
// Set index number for 5 small li
list[i].setAttribute('index', i);
list[i].onclick = function(){
// The rest of the li class clears this class
for(var i = 0; i < list.length; i++){
list[i].className = '';
}
this.className = 'current';
var index = this.getAttribute('index');
for(var i = 0; i <items.length; i++){
items[i].style.display = 'none';
}
items[index].style.display = 'block';
}
}
</script>

5, H5 custom attributes
Custom attribute purpose: to save and use data. Some data can be saved to the page instead of the database.
The custom attribute is obtained through getAttribute('attribute ')
However, some custom attributes are easy to cause ambiguity, and it is not easy to judge whether they are built-in attributes or custom attributes of elements
H5 adds custom attributes to us:
5.1 setting H5 custom attributes
H5 specifies that the beginning of the custom attribute data is used as the attribute name and assigned value
For example: < div data index = '1' > < / div >
Or use JS settings
element.setAttribute('data-index','1');
5.2 get H5 custom attributes
- Get compatibility element getArribyte('data-index');
- H5 new element dataset. Index or element Dataset ['index '] ie 11 starts to support. You can only get the custom attributes starting with data
- Dataset is a collection containing all custom attributes starting with data; Note: if there are multiple - linked words in the custom attribute, the hump naming method shall be adopted when obtaining; For example: data list name = '1', get: element dataset['listName']