
SpringSecurity
In this chapter, we will explain the spring security framework and write the library management system from scratch.
Spring security is a very powerful permission verification framework developed based on spring. Its core functions include:
- Authentication (user login)
- Authorization (what can this user do)
- Attack protection (against identity forgery attacks)
Why do we need to use a new and more professional verification framework? Let's start with CSRF.
CSRF Cross Site Request Forgery Attack
We often receive phishing links sent by others on QQ. As long as you log in to your QQ account, it's no surprise that your number is already in the hands of others. In fact, such websites are malicious websites, which are specially used to steal other people's information, perform illegal operations, and even obtain property in other people's accounts, illegal transfers, etc. Here, we need to understand a relatively easy malicious operation and understand the whole process from the perspective of criminals.
We have learned about the mechanism of Session and Cookie in the Java Web stage. At the beginning, the server will give the browser a Cookie information called JSESSION as the unique credential of the Session. As long as the user visits our website with this Cookie, we can determine which browser this Session belongs to. Therefore, as long as the user of this Session performs the login operation, he can access personal information and other contents at will.
For example, now our server has added a transfer interface. After logging in, users only need to use POST request to carry the amount to be transferred and the transferor can access this interface to transfer:
@RequestMapping("/index")
public String index(HttpSession session){
    session.setAttribute("login", true);   //Here is the normal access. index means login
    return "index";
}
@RequestMapping(value = "/pay", method = RequestMethod.POST, produces = "text/html;charset=utf-8") //We need to set up products here, otherwise it will be garbled
@ResponseBody
public String pay(String account,
                  int amount,
                  @SessionAttribute("login") Boolean isLogin){
    if (isLogin) return "Successful transfer ¥"+amount+" To:"+account;
    else return "Transfer failed, you have not logged in!";
}
So, have you ever thought about the problem that we may accidentally visit a malicious website when searching for learning materials, and this website carries such a paragraph of content:
<!DOCTYPE html>
<html lang="en">
<head>
    <meta charset="UTF-8">
    <title>I am(evil)learn(meaning)Xi website</title>
</head>
<body>
    <div>
        <div>Sorry, you haven't recharged our learning members yet. Please recharge before watching the learning video</div>
        <form action="http://localhost:8080/mvc/pay" method="post">
            <input type="text" name="account" value="hacker" hidden>
            <input type="number" name="amount" value="666666" hidden>
            <input type="submit" value="Click my recharge member to watch the full video">
        </form>
    </div>
</body>
</html>
Note that this page is not our official page, but a malicious website built by criminals. We found that there is a form in this page, but the two input boxes in the form are hidden, and we see only one button. We don't know that this is a form or that the form will be submitted to that address. At this time, the whole page is very confusing. If we click this button, the data of the whole form will be sent to our server in the form of POST (carrying the Cookie information previously logged in to our website), but it is obvious that another website jumps. In this way, the malicious website successfully guides us to perform the transfer operation without our knowledge, When you find that you have been cheated, the money has been transferred.
This method of building malicious pages and guiding users to visit corresponding websites to perform operations is called Cross Site Request Forgery (CSRF)
Obviously, the library management system we wrote before has such a security vulnerability, and spring security solves this problem very well.
Construction of development environment
We still use the previous template to build the library management system project.
Import the following dependencies:
<!-- It is recommended to classify the dependencies. Many dependencies may be imported into our project in the later stage. Adding comments will greatly improve the reading efficiency -->
<dependencies>
    <!--  Spring Framework dependency  -->
    <dependency>
        <groupId>org.springframework.security</groupId>
        <artifactId>spring-security-web</artifactId>
        <version>5.5.3</version>
    </dependency>
  	<dependency>
        <groupId>org.springframework.security</groupId>
        <artifactId>spring-security-config</artifactId>
        <version>5.5.3</version>
    </dependency>
    <dependency>
        <groupId>org.springframework</groupId>
        <artifactId>spring-webmvc</artifactId>
        <version>5.3.14</version>
    </dependency>

    <!--  Persistence layer framework dependency  -->
		<dependency>
            <groupId>mysql</groupId>
            <artifactId>mysql-connector-java</artifactId>
            <version>8.0.27</version>
        </dependency>
        <dependency>
            <groupId>org.mybatis</groupId>
            <artifactId>mybatis-spring</artifactId>
            <version>2.0.6</version>
        </dependency>
        <dependency>
            <groupId>org.mybatis</groupId>
            <artifactId>mybatis</artifactId>
            <version>3.5.7</version>
        </dependency>
        <dependency>
            <groupId>org.springframework</groupId>
            <artifactId>spring-jdbc</artifactId>
            <version>5.3.14</version>
        </dependency>
        <dependency>
            <groupId>com.zaxxer</groupId>
            <artifactId>HikariCP</artifactId>
            <version>3.4.5</version>
        </dependency>

    <!--  Other tool frameworks rely on: Lombok,Slf4j  -->
    <dependency>
        <groupId>org.projectlombok</groupId>
        <artifactId>lombok</artifactId>
        <version>1.18.22</version>
    </dependency>
    <dependency>
        <groupId>org.slf4j</groupId>
        <artifactId>slf4j-jdk14</artifactId>
        <version>1.7.32</version>
    </dependency>

    <!--  ServletAPI  -->
    <dependency>
        <groupId>javax.servlet</groupId>
        <artifactId>javax.servlet-api</artifactId>
        <version>4.0.1</version>
        <scope>provided</scope>
    </dependency>

    <!--  JUnit rely on  -->
    <dependency>
        <groupId>org.junit.jupiter</groupId>
        <artifactId>junit-jupiter-api</artifactId>
        <version>${junit.version}</version>
        <scope>test</scope>
    </dependency>
    <dependency>
        <groupId>org.junit.jupiter</groupId>
        <artifactId>junit-jupiter-engine</artifactId>
        <version>${junit.version}</version>
        <scope>test</scope>
    </dependency>
</dependencies>
Then create an Initializer to configure the Web application:
public class MvcInitializer extends AbstractAnnotationConfigDispatcherServletInitializer {

    @Override
    protected Class<?>[] getRootConfigClasses() {
        return new Class[]{RootConfiguration.class};
    }

    @Override
    protected Class<?>[] getServletConfigClasses() {
        return new Class[]{MvcConfiguration.class};
    }

    @Override
    protected String[] getServletMappings() {
        return new String[]{"/"};
    }
}
To create an Mvc configuration class:
@ComponentScan("book.manager.controller")
@Configuration
@EnableWebMvc
public class MvcConfiguration implements WebMvcConfigurer {

    //We need to use ThymeleafViewResolver as the view parser and parse our HTML pages
    @Bean
    public ThymeleafViewResolver thymeleafViewResolver(@Autowired SpringTemplateEngine springTemplateEngine){
        ThymeleafViewResolver resolver = new ThymeleafViewResolver();
        resolver.setOrder(1);
        resolver.setCharacterEncoding("UTF-8");
        resolver.setTemplateEngine(springTemplateEngine);
        return resolver;
    }

    //Configure template parser
    @Bean
    public SpringResourceTemplateResolver templateResolver(){
        SpringResourceTemplateResolver resolver = new SpringResourceTemplateResolver();
        resolver.setSuffix(".html");
        resolver.setPrefix("/WEB-INF/template/");
        return resolver;
    }

    //Configure template engine Bean
    @Bean
    public SpringTemplateEngine springTemplateEngine(@Autowired ITemplateResolver resolver){
        SpringTemplateEngine engine = new SpringTemplateEngine();
        engine.setTemplateResolver(resolver);
        return engine;
    }

    //Enable static resource processing
    @Override
    public void configureDefaultServletHandling(DefaultServletHandlerConfigurer configurer) {
        configurer.enable();
    }

    //Static resource path configuration
    @Override
    public void addResourceHandlers(ResourceHandlerRegistry registry) {
        registry.addResourceHandler("/static/**").addResourceLocations("/WEB-INF/static/");
    }
}
To create a Root configuration class:
@Configuration
public class RootConfiguration {

}
Finally, create a Controller dedicated to the response page:
/**
 * Controller dedicated to handling page responses
 */
@Controller
public class PageController {

    @RequestMapping("/index")
    public String login(){
        return "index";
    }
}
Then we need to put the front-end page into the corresponding folder, and then open the server and successfully access it through the browser.
Next, we need to configure spring security. Like Mvc, we need an initializer:
public class SecurityInitializer extends AbstractSecurityWebApplicationInitializer {
    //Don't rewrite anything
  	//In fact, a Filter will be automatically registered here. The bottom layer of spring security depends on N filters, which we will discuss later
}
Next, we need to create another configuration class to configure spring security:
@Configuration
@EnableWebSecurity
public class SecurityConfiguration extends WebSecurityConfigurerAdapter {
		//Inherit WebSecurityConfigurerAdapter and configure it later
}
Then add this profile to the root container:
@Override
protected Class<?>[] getRootConfigClasses() {
    return new Class[]{RootConfiguration.class, SecurityConfiguration.class};
}
In this way, the configuration of spring security is completed. When we run the project again, we will find that no matter which page we visit, we will enter a default login page provided by spring security. Then we will explain how to configure it.
So far, the project environment has been built.
authentication
Direct authentication
Since our library management system requires users to log in before using it, the first thing we need to do is to realize user authentication. To realize user authentication, we need to make some configurations:
@Override
protected void configure(AuthenticationManagerBuilder auth) throws Exception {
    BCryptPasswordEncoder encoder = new BCryptPasswordEncoder();  //BCryptPasswordEncoder provided by spring security is used here
    auth
            .inMemoryAuthentication() //The direct verification method will be explained later on using database verification
            .passwordEncoder(encoder) //Cipher encryptor
            .withUser("test")   //user name
            .password(encoder.encode("123456"))   //Here you need to fill in the encrypted password
            .roles("user");   //User's role (explained later)
}
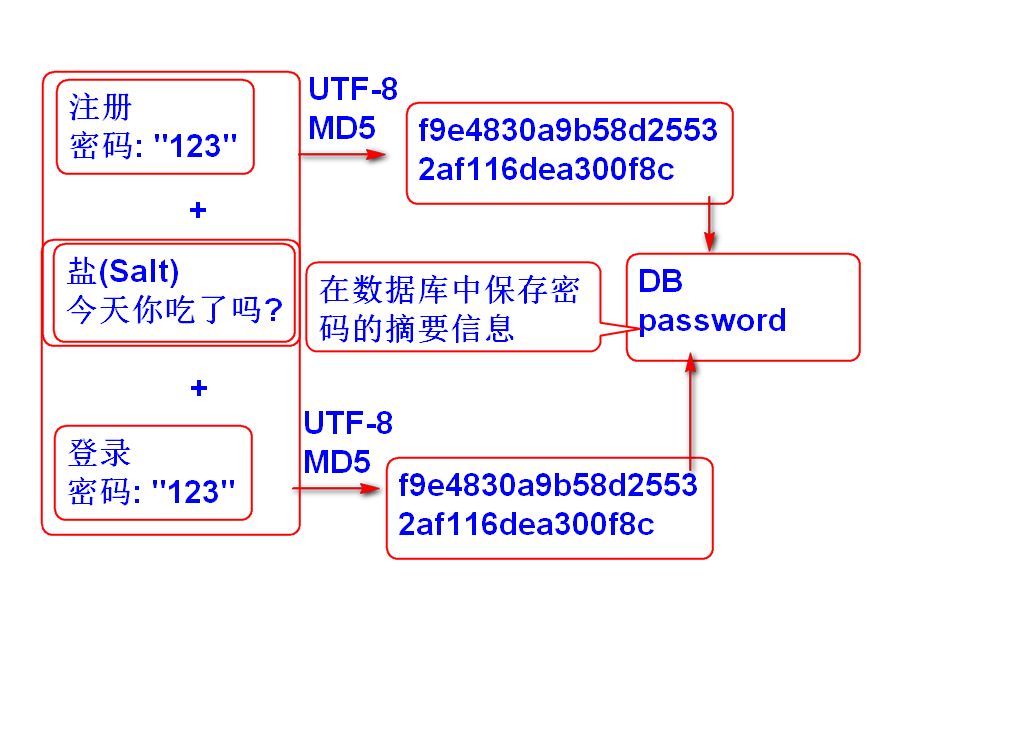
The password verification of spring security does not directly use the original text for comparison, but uses the encryption algorithm to encrypt the password (more accurately, Hash processing should be carried out. This process is irreversible and cannot be decrypted). Finally, the password provided by the user is encrypted in the same way and compared with the ciphertext. For us, the password provided by the user belongs to private information, and direct plaintext storage is not good. Moreover, if the database content is stolen, all users' passwords will be leaked, which is the result we don't want to see. We need a mechanism that can hide the user's password and complete authentication, and Hash processing is a good solution, By calculating the Hash value of the user's password, the calculated result cannot be restored to the original text. If you need to verify whether it is consistent with this password, you need to encrypt it in the same way, and then compare the two Hash values to ensure the security of the user's password.
The BCryptPasswordEncoder provided by spring security is used here. As for the encryption process, there is no in-depth explanation here.
Now, we can try to log in with this account. After logging in, we can access our website content at will.
Use database authentication
We have implemented direct authentication, so how to connect it to the database and log in the user by querying the content in the database?
First, we need to add the encrypted password to the database as the user password:
public class MainTest {

    @Test
    public void test(){
        BCryptPasswordEncoder encoder = new BCryptPasswordEncoder();
        System.out.println(encoder.encode("123456"));
    }
}
Here write a test to complete.
Then we need to create a Service implementation. The implementation is UserDetailsService, which supports us to return a UserDetails object. We only need to directly return a UserDetails containing the user name, password and other information in the database, and spring security will automatically compare it.
@Service
public class UserAuthService implements UserDetailsService {

    @Resource
    UserMapper mapper;

    @Override
    public UserDetails loadUserByUsername(String s) throws UsernameNotFoundException {
        String password = mapper.getPasswordByUsername(s);  //Get password from database based on user name
        if(password == null)
            throw new UsernameNotFoundException("Login failed, wrong user name or password!");
        return User   //Here, you need to return UserDetails, and spring security will compare according to the given information
                .withUsername(s)
                .password(password)   //Password taken directly from the database
                .roles("user")   //User role
                .build();
    }
}
Don't forget to scan the configuration class and register it as a Bean. Then we need to write a Mapper to interact with the database:
@Mapper
public interface UserMapper {

    @Select("select password from users where username = #{username}")
    String getPasswordByUsername(String username);
}
As before, configure Mybatis and data source:
@ComponentScans({
        @ComponentScan("book.manager.service")
})
@MapperScan("book.manager.mapper")
@Configuration
public class RootConfiguration {
    @Bean
    public DataSource dataSource(){
        HikariDataSource dataSource = new HikariDataSource();
        dataSource.setJdbcUrl("jdbc:mysql://localhost:3306/study");
        dataSource.setDriverClassName("com.mysql.cj.jdbc.Driver");
        dataSource.setUsername("root");
        dataSource.setPassword("123456");
        return dataSource;
    }

    @Bean
    public SqlSessionFactoryBean sqlSessionFactoryBean(@Autowired DataSource dataSource){
        SqlSessionFactoryBean bean = new SqlSessionFactoryBean();
        bean.setDataSource(dataSource);
        return bean;
    }
}
Finally, modify the Security configuration:
@Override
protected void configure(AuthenticationManagerBuilder auth) throws Exception {
    auth
      .userDetailsService(service)   //Use a custom Service implementation class for validation
      .passwordEncoder(new BCryptPasswordEncoder());   //BCryptPasswordEncoder is still used
}
In this way, the login will query from the database.
User defined login interface
We have learned how to implement database permission verification. Now let's take a look at how to modify the login page to our custom style.
First of all, we need to know how spring security performs login verification. We can observe what is in the form in the default login interface:
<div class="container">
      <form class="form-signin" method="post" action="/book_manager/login">
        <h2 class="form-signin-heading">Please sign in</h2>
        <p>
          <label for="username" class="sr-only">Username</label>
          <input type="text" id="username" name="username" class="form-control" placeholder="Username" required="" autofocus="">
        </p>
        <p>
          <label for="password" class="sr-only">Password</label>
          <input type="password" id="password" name="password" class="form-control" placeholder="Password" required="">
        </p>
<input name="_csrf" type="hidden" value="83421936-b84b-44e3-be47-58bb2c14571a">
        <button class="btn btn-lg btn-primary btn-block" type="submit">Sign in</button>
      </form>
</div>
We found that first, there is a user name input box and a password input box, in which we need to fill in the user name and password. However, we found that in addition to these two input boxes, there is an input tag, which is hidden, and it stores a series of things similar to Hash values, with the name of "_csrf". In fact, it can be seen from the name, This thing exists to prevent CSRF attacks.
Starting from Spring Security 4.0, CSRF protection will be enabled by default to prevent CSRF from attacking applications. Spring Security CSRF will protect the requests of PATCH, POST, PUT and DELETE methods (not just login requests, but any request path here), and the login form here is just a POST type request. Under the default configuration, no matter whether you log in or not, the PATCH, POST, PUT and DELETE requests will be rejected and 403 error * * (note that this is a big research pit) * *. You need to add csrfToken when requesting, that is, "83421936-b84b-44e3-be47-58bb2c14571a". It is csrfToken. If the submitted data is form type data, Then the form must contain this Token string, and the key name is "_csrf"; If it is sent in JSON data format, you need to include this Token string in the request header.
To sum up, in addition to the required user name and password, the login form we finally submitted also contains a csrfToken string for authentication to prevent attacks.
Therefore, when writing our own landing page, we need to add such an input box:
<input type="text" th:name="${_csrf.getParameterName()}" th:value="${_csrf.token}" hidden>
It can be hidden, but there must be. The key name and Token string of the Token can be obtained from the Model through Thymeleaf, and spring security will automatically add the Token information to the Model.
Then we can replace our own page with the default page. We need to rewrite another method to implement:
@Override
protected void configure(HttpSecurity http) throws Exception {
    http
            .authorizeRequests()   //First, you need to configure which requests will be intercepted, which requests must have what roles to access
            .antMatchers("/static/**").permitAll()    //Static resources, use permitAll to run anyone to access (note that it must be put in front)
            .antMatchers("/**").hasRole("user")     //All requests must log in and be accessed by the user role (excluding the above static resources)
}
First, we need to configure interception rules, that is, when the user is not logged in, which paths can be accessed and which paths can not be accessed. If not, it will be automatically redirected to the login page.
Next, we need to configure the form login and login page:
.formLogin()       //Configure Form login
.loginPage("/login")       //Landing page address (GET)
.loginProcessingUrl("/doLogin")    //form submission address (POST)
.defaultSuccessUrl("/index")    //The page to jump after successful login can also be highly customized through the Handler
.permitAll()    //The landing page also needs to be accessible to everyone
You need to configure the address of the login page and the address where the login request is sent. Here, the login page is filled in as / login, and the login request address is / doLogin. We need to write the Controller to realize the login page. The submission and processing of the login request is provided by spring security, and we only need to write the path.
@RequestMapping("/login")
public String login(){
    return "login";
}
After configuration, we also need to configure the exit login operation:
.and()
.logout()
.logoutUrl("/logout")    //Exit login request address
.logoutSuccessUrl("/login");    //Address redirected after exit
Note that the exit login request here must also be in the POST request mode (because CSFR protection is enabled, a Token needs to be added), otherwise it cannot be accessed. The main page here reads as follows:
<body>
    <form action="logout" method="post">
        <input type="text" th:name="${_csrf.getParameterName()}" th:value="${_csrf.token}" hidden>
        <button>Exit login</button>
    </form>
</body>
</html>
After successful login, click the exit login button to successfully exit and return to the login interface.
Since we can't use CSFR protection temporarily in the process of learning, we can turn it off. In this way, we can also log out by using get request directly, and there is no need to carry Token in the login request. It is recommended to turn it off, because if we don't turn it off, we may encounter a series of problems because CSRF protection is not considered:
.and()
.csrf().disable();
In this way, you can turn off this function directly, but note that this will lead to security vulnerabilities in your Web site. (in order to save trouble in the future, you need to turn off the protection, but you must remember that you need to carry a Token to access without turning it off.)
to grant authorization
After logging in, users may be divided into roles according to their current identity. For example, in our most commonly used QQ group, there are three roles: group leader, administrator and ordinary group members. The group leader has the highest permission. The group leader can manage any part of the whole group and is qualified to dissolve and upgrade the group, while the administrator has only part of the permissions of the group leader, It can only be used for daily management, while ordinary group members can only carry out the most basic chat operations.
For us, a user's operation is actually accessing the interface provided by us (the Servlet corresponding to the access path written). For example, to log in, you need to call the / login interface, and to log out, you need to call the / logout interface. In our previous library management system, all operations of adding and deleting books have corresponding servlets for processing. Therefore, from the perspective of our developers, to determine whether a user can use a function, we only need to determine whether the user can access the corresponding Servlet.
We can divide it roughly as follows:
- Group leader: / login, / logout, / chat, / edit, / delete, / upgrade
- Administrators: / login, / logout, / chat, / edit
- Common group members: / login, / logout, / chat
In other words, what we need to do is to specify which requests can be initiated by which users.
Spring security provides us with two authorization methods:
- Permission based authorization: users with certain permissions can access a path
- Role based authorization: determines whether a path can be accessed according to which role the user belongs to
The two are just different in concept. In fact, they have the same effect. Here we will first demonstrate the role-based authorization.
Role based authorization
Now we want to create two roles, ordinary users and administrators. Ordinary users can only access the index page, while administrators can access any page.
First, we need to modify the role table in the database, add a user role field, and create a new user. The role of Test user is user and the role of admin user is admin.
Next, we need to configure spring security to determine which roles can access which pages:
http
        .authorizeRequests()
        .antMatchers("/static/**").permitAll()
  			.antMatchers("/index").hasAnyRole("user", "admin")   //The index page can be accessed by user or admin
        .anyRequest().hasRole("admin")   //All contents except the above can only be accessed by admin
Next, we need to modify the authentication logic slightly. First, create an entity class to represent the user name, password and role in the database:
@Data
public class AuthUser {
    String username;
    String password;
    String role;
}
Next, modify Mapper:
@Mapper
public interface UserMapper {

    @Select("select * from users where username = #{username}")
    AuthUser getPasswordByUsername(String username);
}
Finally, modify the Service:
@Override
public UserDetails loadUserByUsername(String s) throws UsernameNotFoundException {
    AuthUser user = mapper.getPasswordByUsername(s);
    if(user == null)
        throw new UsernameNotFoundException("Login failed, wrong user name or password!");
    return User
            .withUsername(user.getUsername())
            .password(user.getPassword())
            .roles(user.getRole())
            .build();
}
Now we can try logging in and then visit the / index and / admin pages.
Permission based authorization
Permission based authorization is similar to role. It needs to be judged by hasAnyAuthority or hasAuthority:
.anyRequest().hasAnyAuthority("page:index")
@Override
public UserDetails loadUserByUsername(String s) throws UsernameNotFoundException {
    AuthUser user = mapper.getPasswordByUsername(s);
    if(user == null)
        throw new UsernameNotFoundException("Login failed, wrong user name or password!");
    return User
            .withUsername(user.getUsername())
            .password(user.getPassword())
            .authorities("page:index")
            .build();
}
Using annotations to determine permissions
In addition to direct configuration, we can also configure it directly in the form of annotations, First, you need to enable it on the configuration class (note that it is added on the configuration class of Mvc, because only the Controller is filtered here, and all controllers are registered by the Mvc configuration class. If you need to enable permission judgment for Service or other beans, you need to add it on the configuration class of Security):
@EnableGlobalMethodSecurity(prePostEnabled = true)
public class SecurityConfiguration extends WebSecurityConfigurerAdapter {
Next, we can directly add comments on the request mapping that needs to add permission verification:
@PreAuthorize("hasRole('user')")   //Judge whether it is a user role. Only this role can be accessed
@RequestMapping("/index")
public String index(){
    return "index";
}
By adding the @ PreAuthorize annotation, you can judge the permission before execution. If there is no corresponding permission or role, you will not be able to access the page.
In fact, the SpEL expression is used here, which is equivalent to executing some logic to get the result instead of directly passing the value. The official document address is: https://docs.spring.io/spring-framework/docs/5.2.13.RELEASE/spring-framework-reference/core.html#expressions , there are a lot of contents, not the key point, so I won't introduce them in detail here.
Similarly, there is the @ PostAuthorize annotation, but it is intercepted after the method is executed:
@PostAuthorize("hasRole('user')")
@RequestMapping("/index")
public String index(){
    System.out.println("Yes");
    return "index";
}
In addition to the Controller, any Bean managed by Spring can use annotations to control permissions. As long as it does not have access permissions, it cannot execute methods and will return to page 403.
@Service
public class UserService {

    @PreAuthorize("hasAnyRole('user')")
    public void test(){
        System.out.println("Successful execution");
    }
}
Note that the Service is registered by the root container, and the @ EnableGlobalMethodSecurity annotation needs to be added on the Security configuration class to take effect. @ Secure has the same function as @ Secure, but it does not support the permission representation of spiel expression, and "ROLE_" Prefix, there is no demonstration here.
We can also use @ PreFilter and @ PostFilter to filter parameters or return values of collection types.
For example:
@PreFilter("filterObject.equals('lbwnb')")   //filterObject represents each element in the collection. Only the elements that meet the conditions will be left
public void test(List<String> list){
    System.out.println("Successful execution"+list);
}
@RequestMapping("/index")
public String index(){
    List<String> list = new LinkedList<>();
    list.add("lbwnb");
    list.add("yyds");
    service.test(list);
    return "index";
}
The @ PostFilter similar to @ PreFilter will not be demonstrated here. It is used to process the return value in the same way.
When there are multiple sets, you need to use filterTarget to specify:
@PreFilter(value = "filterObject.equals('lbwnb')", filterTarget = "list2")
public void test(List<String> list, List<String> list2){
    System.out.println("Successful execution"+list);
}
Remember me
Another important function of our website is to remember me, that is, we can log in without entering the account and password again for a period of time after logging in. It is equivalent to that the server has remembered the current user and can enter without logging in again. This is a very common function.
In the Java Web stage, we used local Cookie storage to realize the remember me function, but this method is not safe and troublesome in coding. Can we have a more efficient implementation of the remember me function?
SpringSecurity provides us with an excellent implementation. It assigns a Cookie with a Token to each logged in browser, and this Cookie will be retained for 14 days by default. As long as we do not clean the browser's Cookie, the next time we visit the server with this Cookie, we will not need to log in and directly continue to use the previously logged in identity, This is obviously simpler than our previous writing. And we need to make a simple configuration to enable the remember me function:
.and()
.rememberMe()   //Enable remember me function
.rememberMeParameter("remember")  //The parameters to be carried in the login request form. If carried, this login will be remembered
.tokenRepository(new InMemoryTokenRepositoryImpl())  //The TokenRepository implementation saved directly in memory is used here
  //There are many implementations of TokenRepository. Inmemorytokenrepository impl is directly implemented based on Map. The disadvantage is that it occupies memory and the remember me function will fail after the server is restarted
  //Later, we will explain how to use the database to persist the Token information
Next, we need to modify the name of the check box at the front end, and modify the name to be consistent with the above. If there is no configuration name on the above, then "remember me" is used as the name by default:
<input type="checkbox" name="remember" class="ad-checkbox">
Now let's start the server, check the remember me check box when logging in, and observe the changes of cookies.
Although the remember me function can be realized now, there are still some defects. If the server is restarted (because all Token information exists in HashMap, that is, in memory), all recorded Token information will be lost. At this time, even if the browser carries the previous Token, it cannot restore the previous login identity.
We can store all Token information records in the database (after learning Redis, we can also put them in the Redis server). Using the persistent storage mechanism of the database, all Token information will not be lost even if the server is restarted, and configuring database storage is very simple:
@Resource
PersistentTokenRepository repository;

@Bean
public PersistentTokenRepository jdbcRepository(@Autowired DataSource dataSource){
    JdbcTokenRepositoryImpl repository = new JdbcTokenRepositoryImpl();  //Using a JDBC based implementation
    repository.setDataSource(dataSource);   //Configure data sources
  	repository.setCreateTableOnStartup(true);   //Automatically create a table for storing tokens at startup (it is recommended to delete this row after the first startup)
    return repository;
}
.and()
.rememberMe()
.rememberMeParameter("remember")
.tokenRepository(repository)
.tokenValiditySeconds(60 * 60 * 24 * 7)  //The valid time of Token (seconds) is 14 days by default
After the server starts up, we can observe the database. If it appears, it is called persistent_logins table, then prove that there is no problem with the configuration.
When we log in and check remember me, a Token record will be added to the database.
SecurityContext
After a user logs in, how to obtain the information of the currently logged in user? The SecurityContext object can be easily obtained by using the SecurityContextHolder. We can directly use the SecurityContext object to obtain the current authentication information:
@RequestMapping("/index")
    public String index(){
        SecurityContext context = SecurityContextHolder.getContext();
        Authentication authentication = context.getAuthentication();
        User user = (User) authentication.getPrincipal();
        System.out.println(user.getUsername());
        System.out.println(user.getAuthorities());
        return "index";
    }
Through SecurityContext, we can quickly obtain the name and authorization information of the current user.
In addition to this method, we can also obtain the following information directly from the Session:
@RequestMapping("/index")
public String index(@SessionAttribute("SPRING_SECURITY_CONTEXT") SecurityContext context){
    Authentication authentication = context.getAuthentication();
    User user = (User) authentication.getPrincipal();
    System.out.println(user.getUsername());
    System.out.println(user.getAuthorities());
    return "index";
}
Note that the SecurityContextHolder has a certain storage policy. The SecurityContext object in the SecurityContextHolder will be set when the request arrives at the beginning. The storage method is actually determined by the storage policy. If we write it this way, the authentication information cannot be obtained by default:
@RequestMapping("/index")
public String index(){
    new Thread(() -> {   //Create a child thread to get
        SecurityContext context = SecurityContextHolder.getContext();
        Authentication authentication = context.getAuthentication();
        User user = (User) authentication.getPrincipal();   //NPE
        System.out.println(user.getUsername());
        System.out.println(user.getAuthorities());
    });
    return "index";
}
This is because the storage policy of SecurityContextHolder is mode by default_ ThreadLocal is implemented based on ThreadLocal. The getContext() method essentially calls the method implemented by the corresponding storage policy:
public static SecurityContext getContext() {
    return strategy.getContext();
}
SecurityContextHolderStrategy has three implementation classes:
- GlobalSecurityContextHolderStrategy: global mode, not commonly used
- ThreadLocalSecurityContextHolderStrategy: Based on ThreadLocal implementation, it is visible in the thread
- InheritableThreadLocalSecurityContextHolderStrategy: Based on the implementation of InheritableThreadLocal, threads and child threads are visible
Therefore, if the above situation needs to be obtained in the child thread, you need to modify the storage policy of SecurityContextHolder and set it during initialization:
@PostConstruct
public void init(){
    SecurityContextHolder.setStrategyName(SecurityContextHolder.MODE_INHERITABLETHREADLOCAL);
}
In this way, the authentication information can also be obtained in the child thread.
Because the user's authentication information is judged based on the SecurityContext, we can directly modify the content of the SecurityContext to manually log in for the user:
@RequestMapping("/auth")
@ResponseBody
public String auth(){
    SecurityContext context = SecurityContextHolder.getContext();  //Get the SecurityContext object (the current session must not be logged in)
    UsernamePasswordAuthenticationToken token = new UsernamePasswordAuthenticationToken("Test", null,
            AuthorityUtils.commaSeparatedStringToAuthorityList("ROLE_user"));  //Manually create a UsernamePasswordAuthenticationToken object, that is, the user's authentication information. The ROLE needs to be added_ Prefix, direct write permission
    context.setAuthentication(token);  //Manually set authentication information for SecurityContext
    return "Login success!";
}
If you don't log in, you can log in manually by accessing this address. If you visit the / index page again, you can access it directly, indicating that the manual setting of authentication information is successful.
**Doubt: * * isn't the SecurityContext exclusive to the default thread? Every request is a new thread. It's reasonable to say that the SecurityContext object last time should be gone. Why can the authentication information in the SecurityContext last time still be used for another request?
Life cycle of SecurityContext: when the request arrives, it is taken from the Session and put into the SecurityContextHolder. When the request ends, it is taken from the SecurityContextHolder and put into the Session. In fact, it depends on the Session to store. Once the Session expires, the authentication information will disappear.
Spring security principles
**Note: * * the content of this section is optional, but the difficulty is much simpler than the source code of the first two chapters.
Finally, let's talk about the implementation principle of spring security. It essentially relies on N filters, that is, a complete Filter chain (note that this is a Filter, not an interceptor)
Let's start with AbstractSecurityWebApplicationInitializer. Let's see what it is configured:
//This method is called at startup
public final void onStartup(ServletContext servletContext) {
    this.beforeSpringSecurityFilterChain(servletContext);
    if (this.configurationClasses != null) {
        AnnotationConfigWebApplicationContext rootAppContext = new AnnotationConfigWebApplicationContext();
        rootAppContext.register(this.configurationClasses);
        servletContext.addListener(new ContextLoaderListener(rootAppContext));
    }

    if (this.enableHttpSessionEventPublisher()) {
        servletContext.addListener("org.springframework.security.web.session.HttpSessionEventPublisher");
    }

    servletContext.setSessionTrackingModes(this.getSessionTrackingModes());
  	//The key point is here. The key FilterChain is inserted here
    this.insertSpringSecurityFilterChain(servletContext);
    this.afterSpringSecurityFilterChain(servletContext);
}
private void insertSpringSecurityFilterChain(ServletContext servletContext) {
    String filterName = "springSecurityFilterChain";
  	//A DelegatingFilterProxy object is created, which is essentially a Filter
    DelegatingFilterProxy springSecurityFilterChain = new DelegatingFilterProxy(filterName);
    String contextAttribute = this.getWebApplicationContextAttribute();
    if (contextAttribute != null) {
        springSecurityFilterChain.setContextAttribute(contextAttribute);
    }
		//Register the DelegatingFilterProxy Filter through ServletContext
    this.registerFilter(servletContext, true, filterName, springSecurityFilterChain);
}
Let's take a look at what DelegatingFilterProxy is doing:
//This is the initialization method, which is defined by GenericFilterBean (parent class) and called in the afterpropertieset method
protected void initFilterBean() throws ServletException {
    synchronized(this.delegateMonitor) {
        if (this.delegate == null) {
            if (this.targetBeanName == null) {
                this.targetBeanName = this.getFilterName();
            }

            WebApplicationContext wac = this.findWebApplicationContext();
            if (wac != null) {
              	//Be patient, dolls are normal
                this.delegate = this.initDelegate(wac);
            }
        }

    }
}
protected Filter initDelegate(WebApplicationContext wac) throws ServletException {
    String targetBeanName = this.getTargetBeanName();
    Assert.state(targetBeanName != null, "No target bean name set");
  	//Here, a Bean is obtained through WebApplicationContext
    Filter delegate = (Filter)wac.getBean(targetBeanName, Filter.class);
    if (this.isTargetFilterLifecycle()) {
        delegate.init(this.getFilterConfig());
    }

  	//Return Filter
    return delegate;
}
Here, we need to add a breakpoint to see what Bean is obtained.
Through breakpoint debugging, we found that the object returned here is of type FilterChainProxy and its initialization method is called, but the init method or initFilterBean method is not overridden in the FilterChainProxy class.
Let's look back. After the Filter returns, a member variable delegate of DelegatingFilterProxy is assigned to the obtained Filter, that is, the FilterChainProxy object. Then let's see how DelegatingFilterProxy executes the doFilter method.
public void doFilter(ServletRequest request, ServletResponse response, FilterChain filterChain) throws ServletException, IOException {
    Filter delegateToUse = this.delegate;
    if (delegateToUse == null) {
        //Abnormal situation, omitted here
    }
		//This is the real call. Don't forget that delegateToUse is the initialized FilterChainProxy object
    this.invokeDelegate(delegateToUse, request, response, filterChain);
}
protected void invokeDelegate(Filter delegate, ServletRequest request, ServletResponse response, FilterChain filterChain) throws ServletException, IOException {
  //Finally, the doFilter method of FilterChainProxy is actually called
    delegate.doFilter(request, response, filterChain);
}
So let's go on to see what the doFilter method of FilterChainProxy is doing:
public void doFilter(ServletRequest request, ServletResponse response, FilterChain chain) throws IOException, ServletException {
    boolean clearContext = request.getAttribute(FILTER_APPLIED) == null;
    if (!clearContext) {
      	//Real filtering is performed here
        this.doFilterInternal(request, response, chain);
    } else {
        //...
    }
}
private void doFilterInternal(ServletRequest request, ServletResponse response, FilterChain chain) throws IOException, ServletException {
    FirewalledRequest firewallRequest = this.firewall.getFirewalledRequest((HttpServletRequest)request);
    HttpServletResponse firewallResponse = this.firewall.getFirewalledResponse((HttpServletResponse)response);
  	//A Filter list is obtained here. In fact, spring security is implemented by N filters. All the filters obtained here are provided by spring security
  	//However, please note that after our previous analysis, the only real registered Filter is DelegatingFilterProxy
  	//All filters in the Filter list here are not registered, but are called internally here
    List<Filter> filters = this.getFilters((HttpServletRequest)firewallRequest);
  	//As long as the Filter list is not empty, the built-in Filter is executed in turn
    if (filters != null && filters.size() != 0) {
        if (logger.isDebugEnabled()) {
            logger.debug(LogMessage.of(() -> {
                return "Securing " + requestLine(firewallRequest);
            }));
        }
				//A virtual filtering chain is created here, and the filtering process is implemented by spring security itself
        FilterChainProxy.VirtualFilterChain virtualFilterChain = new FilterChainProxy.VirtualFilterChain(firewallRequest, chain, filters);
      	//Call the doFilter of the virtual filter chain
        virtualFilterChain.doFilter(firewallRequest, firewallResponse);
    } else {
        if (logger.isTraceEnabled()) {
            logger.trace(LogMessage.of(() -> {
                return "No security for " + requestLine(firewallRequest);
            }));
        }

        firewallRequest.reset();
        chain.doFilter(firewallRequest, firewallResponse);
    }
}
Let's take a look at how the doFilter of the virtual filter chain is handled:
//It seems that there is no loop, but it is actually a loop, a recursive call
public void doFilter(ServletRequest request, ServletResponse response) throws IOException, ServletException {
  	//Judge whether all built-in filters have passed and whether the positioning is equal to the current size
    if (this.currentPosition == this.size) {
        if (FilterChainProxy.logger.isDebugEnabled()) {
            FilterChainProxy.logger.debug(LogMessage.of(() -> {
                return "Secured " + FilterChainProxy.requestLine(this.firewalledRequest);
            }));
        }

        this.firewalledRequest.reset();
      	//All built-in filters have been completed. Follow the normal process to the next Filter of DelegatingFilterProxy
      	//In other words, it has nothing to do with DelegatingFilterProxy. If it's time to go through other filters, go through the filters configured elsewhere. The filtering operation of spring security has ended
        this.originalChain.doFilter(request, response);
    } else {
      	//Positioning self increasing
        ++this.currentPosition;
      	//Get the currently located Filter
        Filter nextFilter = (Filter)this.additionalFilters.get(this.currentPosition - 1);
        if (FilterChainProxy.logger.isTraceEnabled()) {
            FilterChainProxy.logger.trace(LogMessage.format("Invoking %s (%d/%d)", nextFilter.getClass().getSimpleName(), this.currentPosition, this.size));
        }
				//Execute the doFilter method of the internal Filter and pass in the current object itself as the Filter. If the execution is successful, the doFilter method of the current object will be called again
      	//Perhaps the most incomprehensible thing is that the doFilter method of other internal filters is not executed here. How can the doFilter method of the current object be called recursively?
      	//It doesn't matter. You can understand one of the internal filters
        nextFilter.doFilter(request, response, this);
    }
}
Therefore, we have almost understood the implementation mechanism of spring security, so let's take a look at what several internal filters are doing.
For example, the login filter UsernamePasswordAuthenticationFilter inherits from AbstractAuthenticationProcessingFilter. Let's see how it filters:
public void doFilter(ServletRequest request, ServletResponse response, FilterChain chain) throws IOException, ServletException {
    this.doFilter((HttpServletRequest)request, (HttpServletResponse)response, chain);
}

private void doFilter(HttpServletRequest request, HttpServletResponse response, FilterChain chain) throws IOException, ServletException {
  	//If it is not a login request, it will not be processed at all
    if (!this.requiresAuthentication(request, response)) {
      	//Directly call the doFilter method of the passed in FilterChain
      	//The VirtualFilterChain object is passed in here
      	//Now you know why it says recursion
        chain.doFilter(request, response);
    } else {
      	//If it is a login request, the relevant logic of the login request will be executed. Note that any problem in the execution process will throw an exception
      	//For example, if the user name and password are wrong, we have tested it before, and we will get a BadCredentialsException
        try {
          	//Conduct certification
            Authentication authenticationResult = this.attemptAuthentication(request, response);
            if (authenticationResult == null) {
                return;
            }

            this.sessionStrategy.onAuthentication(authenticationResult, request, response);
            if (this.continueChainBeforeSuccessfulAuthentication) {
                chain.doFilter(request, response);
            }

          	//If the green light is all the way and no error is reported, the verification is successful and successful authentication is executed
            this.successfulAuthentication(request, response, chain, authenticationResult);
        } catch (InternalAuthenticationServiceException var5) {
            this.logger.error("An internal error occurred while trying to authenticate the user.", var5);
          	//If the authentication fails, an unsuccessfulAuthentication will be executed
            this.unsuccessfulAuthentication(request, response, var5);
        } catch (AuthenticationException var6) {
            this.unsuccessfulAuthentication(request, response, var6);
        }

    }
}
Let's take a look at what successful authentication and unsuccessful authentication do respectively:
protected void successfulAuthentication(HttpServletRequest request, HttpServletResponse response, FilterChain chain, Authentication authResult) throws IOException, ServletException {
  	//Add authentication information to the SecurityContextHolder. We can obtain the currently logged in user through the SecurityContextHolder object
    SecurityContextHolder.getContext().setAuthentication(authResult);
    if (this.logger.isDebugEnabled()) {
        this.logger.debug(LogMessage.format("Set SecurityContextHolder to %s", authResult));
    }

  	//Remember I realize
    this.rememberMeServices.loginSuccess(request, response, authResult);
    if (this.eventPublisher != null) {
        this.eventPublisher.publishEvent(new InteractiveAuthenticationSuccessEvent(authResult, this.getClass()));
    }

  	//Call the onAuthenticationSuccess method of the default or our own defined AuthenticationSuccessHandler
  	//This depends on our configuration file
  	//Here, in fact, the page has jumped directly
    this.successHandler.onAuthenticationSuccess(request, response, authResult);
}

protected void unsuccessfulAuthentication(HttpServletRequest request, HttpServletResponse response, AuthenticationException failed) throws IOException, ServletException {
  	//If the login fails, the authentication information in the SecurityContextHolder will be cleared directly
    SecurityContextHolder.clearContext();
    this.logger.trace("Failed to process authentication request", failed);
    this.logger.trace("Cleared SecurityContextHolder");
    this.logger.trace("Handling authentication failure");
  	//If the login fails, remember to handle it
    this.rememberMeServices.loginFail(request, response);
  	//As above, call the default or our own defined AuthenticationFailureHandler
    this.failureHandler.onAuthenticationFailure(request, response, failed);
}
After understanding the whole user authentication implementation process, in fact, it is easy to think of how other filters are implemented. In a sense, the spring security filter is more like a Servlet dealing with business. It does things not like interception, but more like completing its corresponding responsibilities. It is just implemented by using the filter mechanism.
SecurityContextPersistenceFilter is also a built-in Filter. You can try to read its source code to understand the operation principle of the whole SecurityContextHolder. Let's talk about the general process first. You can deduce according to the source code according to the whole process:
When the filter chain executes to the SecurityContextPersistenceFilter, it will take out the SecurityContext object from the HttpSession (it exists in the Session and disappears with the disappearance of the Session), and then put it into the SecurityContextHolder object. After the request is completed, store the SecurityContext in the HttpSession and clear the SecurityContext object in the SecurityContextHolder.
Perfect function
After understanding most of the functions of spring security, we will improve the content of the whole website. The login has been realized. We also need to realize the following functions:
- Registration function (for students only)
- The roles are divided into classmates and administrators
- The administrator is responsible for putting on the shelf, deleting and updating books, and viewing the borrowing list of all students
- Students can borrow and return books, and view their own borrowing list
Before starting, we need to configure Thymeleaf's spring security extension, which provides more additional parsing for spring security:
<dependency>
    <groupId>org.thymeleaf.extras</groupId>
    <artifactId>thymeleaf-extras-springsecurity5</artifactId>
    <version>3.0.4.RELEASE</version>
</dependency>
//Configure template engine Bean
@Bean
public SpringTemplateEngine springTemplateEngine(@Autowired ITemplateResolver resolver){
    SpringTemplateEngine engine = new SpringTemplateEngine();
    engine.setTemplateResolver(resolver);
    engine.addDialect(new SpringSecurityDialect());   //Add dialect for spring security
    return engine;
}
<html lang="en" xmlns:th="http://www.thymeleaf.org"
      xmlns:sec="http://www.thymeleaf.org/extras/spring-security">
The next chapter is the last chapter. We will go into the advanced parts of MySQL, including functions, stored procedures, locking mechanism, index and storage engine.