Jenkins deployment and continuous deployment
- jenkins official address: https://jenkins.io/zh/
Deploy jenkins
- ubuntu installation package download address: https://mirrors.tuna.tsinghua.edu.cn/jenkins/debian
- jenkins Tsinghua source download address: https://mirrors.tuna.tsinghua.edu.cn/jenkins/
- Jenkins user manual: https://jenkins.io/zh/doc/
- jenkins plug-in official website download address: https://updates.jenkins-ci.org/
Preparing the jdk environment
//Determine working directory
pwd
/usr/local/src

//Transfer the jdk installation package to the virtual machine
ls
jdk-8u241-linux-x64.tar.gz

//Unpack
tar xf jdk-8u241-linux-x64.tar.gz

//Create jdk soft connection
ln -sv /usr/local/src/jdk1.8.0_241 /usr/local/jdk

//Create java soft connection
ln -sv /usr/local/jdk/bin/java /usr/bin/
//Configure global environment variables
vim /etc/profile

...ellipsis...

export HISTTIMEFORMAT="%F %T `whoami` "
export export LANG="en_US.utf-8"
export JAVA_HOME=/usr/local/jdk
export CLASSPATH=.:$JAVA_HOME/jre/lib/rt.jar:$JAVA_HOME/lib/dt.jar:$JAVA_HOME/lib/tools.jar
export PATH=$JAVA_HOME/bin:$JAVA_HOME/jre/bin:$PATH

//Effective environment variable
source /etc/profile

//Verify java
java -version

java version "1.8.0_241"
Java(TM) SE Runtime Environment (build 1.8.0_241-b07)
Java HotSpot(TM) 64-Bit Server VM (build 25.241-b07, mixed mode)
Install jenkins through deb package
Install jenkins
//Determine working directory
pwd
/usr/local/src

//Will download the good deb installation package to virtual machine
ls
jenkins_2.204.5_all.deb

//ubuntu installation error
dpkg -i jenkins_2.204.5_all.deb

Selecting previously unselected package jenkins.
(Reading database ... 86893 files and directories currently installed.)
Preparing to unpack jenkins_2.204.5_all.deb ...
Unpacking jenkins (2.204.5) ...
dpkg: dependency problems prevent configuration of jenkins:
 jenkins depends on daemon; however:
  Package daemon is not installed.

dpkg: error processing package jenkins (--install):
 dependency problems - leaving unconfigured
Processing triggers for ureadahead (0.100.0-21) ...
Processing triggers for systemd (237-3ubuntu10.24) ...
Errors were encountered while processing:
 jenkins
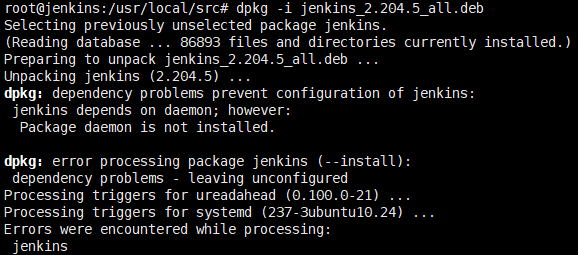
//Solve the above error reports
apt -y install daemon

//Then install
dpkg -i jenkins_2.204.5_all.deb
Launch and verify jenkins
//Reload unit file
systemctl daemon-reload

//Start jenkins
systemctl start jenkins

//Set startup and self startup
systemctl enable jenkins

//See about jenkins related processes
ps -ef | grep jenkins

jenkins   18405      1  0 21:43 ?        00:00:00 /lib/systemd/systemd --user
jenkins   18406  18405  0 21:43 ?        00:00:00 (sd-pam)
jenkins   18422      1  0 21:43 ?        00:00:00 /usr/bin/daemon --name=jenkins --inherit --env=JENKINS_HOME=/var/lib/jenkins --output=/var/log/jenkins/jenkins.log --pidfile=/var/run/jenkins/jenkins.pid -- /usr/bin/java -Djava.awt.headless=true -jar /usr/share/jenkins/jenkins.war --webroot=/var/cache/jenkins/war --httpPort=8080
jenkins   18423  18422  0 21:43 ?        00:00:09 /usr/bin/java -Djava.awt.headless=true -jar /usr/share/jenkins/jenkins.war --webroot=/var/cache/jenkins/war --httpPort=8080
root      18858    998  0 22:10 pts/0    00:00:00 grep --color=auto jenkins
Jenkins profile
//View jenkins master profile
vim /etc/default/jenkins

//View jenkins default configuration parameters
grep "^[a-Z]" /etc/default/jenkins
NAME=jenkins
JAVA_ARGS="-Djava.awt.headless=true"
PIDFILE=/var/run/$NAME/$NAME.pid
JENKINS_USER=$NAME
JENKINS_GROUP=$NAME
JENKINS_WAR=/usr/share/$NAME/$NAME.war
JENKINS_HOME=/var/lib/$NAME
RUN_STANDALONE=true
JENKINS_LOG=/var/log/$NAME/$NAME.log
JENKINS_ENABLE_ACCESS_LOG="no"
MAXOPENFILES=8192
HTTP_PORT=8080
PREFIX=/$NAME
JENKINS_ARGS="--webroot=/var/cache/$NAME/war --httpPort=$HTTP_PORT"
Verify jenkins startup log
//jenkins log file
vim /var/log/jenkins/jenkins.log

...ellipsis...

*************************************************************
*************************************************************
*************************************************************

Jenkins initial setup is required. An admin user has been created and a password generated.
Please use the following password to proceed to installation:

e93ebef28b9e4377b94b9e60b9fbb82b

This may also be found at: /var/lib/jenkins/secrets/initialAdminPassword

*************************************************************
*************************************************************
*************************************************************

2020-03-10 13:43:50.756+0000 [id=27]    INFO    hudson.model.UpdateSite#updateData: Obtained the latest update center data file for UpdateSource default
2020-03-10 13:43:51.038+0000 [id=27]    INFO    jenkins.InitReactorRunner$1#onAttained: Completed initialization
2020-03-10 13:43:51.048+0000 [id=19]    INFO    hudson.WebAppMain$3#run: Jenkins is fully up and running
Running from: /usr/share/jenkins/jenkins.war
2020-03-10 13:43:53.681+0000 [id=1] INFO    org.eclipse.jetty.util.log.Log#initialized: Logging initialized @246ms to org.eclipse.jetty.util.log.JavaUtilLog
2020-03-10 13:43:53.770+0000 [id=1] INFO    winstone.Logger#logInternal: Beginning extraction from war file
2020-03-10 13:43:53.790+0000 [id=1] WARNING o.e.j.s.handler.ContextHandler#setContextPath: Empty contextPath
2020-03-10 13:43:53.837+0000 [id=1] INFO    org.eclipse.jetty.server.Server#doStart: jetty-9.4.z-SNAPSHOT; built: 2019-05-02T00:04:53.875Z; git: e1bc35120a6617ee3df052294e433f3a25ce7097; jvm 1.8.0_241-b07
2020-03-10 13:43:54.053+0000 [id=1] INFO    o.e.j.w.StandardDescriptorProcessor#visitServlet: NO JSP Support for /, did not find org.eclipse.jetty.jsp.JettyJspServlet
2020-03-10 13:43:54.083+0000 [id=1] INFO    o.e.j.s.s.DefaultSessionIdManager#doStart: DefaultSessionIdManager workerName=node0
2020-03-10 13:43:54.083+0000 [id=1] INFO    o.e.j.s.s.DefaultSessionIdManager#doStart: No SessionScavenger set, using defaults
2020-03-10 13:43:54.086+0000 [id=1] INFO    o.e.j.server.session.HouseKeeper#startScavenging: node0 Scavenging every 660000ms
2020-03-10 13:43:54.385+0000 [id=1] INFO    hudson.WebAppMain#contextInitialized: Jenkins home directory: /var/lib/jenkins found at: EnvVars.masterEnvVars.get("JENKINS_HOME")
2020-03-10 13:43:54.504+0000 [id=1] INFO    o.e.j.s.handler.ContextHandler#doStart: Started w.@508dec2b{Jenkins v2.204.5,/,file:///var/cache/jenkins/war/,AVAILABLE}{/var/cache/jenkins/war}
2020-03-10 13:43:54.537+0000 [id=1] INFO    o.e.j.server.AbstractConnector#doStart: Started ServerConnector@21bcffb5{HTTP/1.1,[http/1.1]}{0.0.0.0:8080}
2020-03-10 13:43:54.537+0000 [id=1] INFO    org.eclipse.jetty.server.Server#doStart: Started @1103ms
2020-03-10 13:43:54.538+0000 [id=20]    INFO    winstone.Logger#logInternal: Winstone Servlet Engine v4.0 running: controlPort=disabled
2020-03-10 13:43:55.489+0000 [id=27]    INFO    jenkins.InitReactorRunner$1#onAttained: Started initialization

...ellipsis...
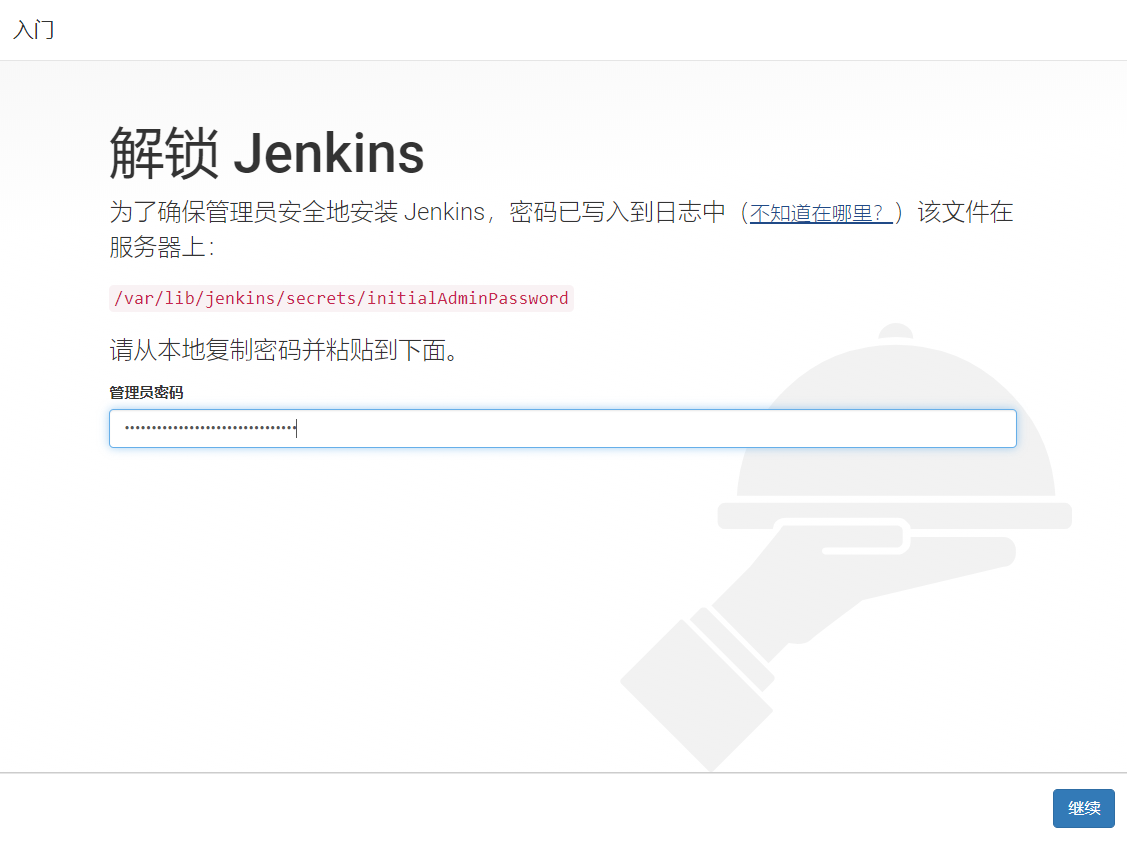
Accessing the web interface
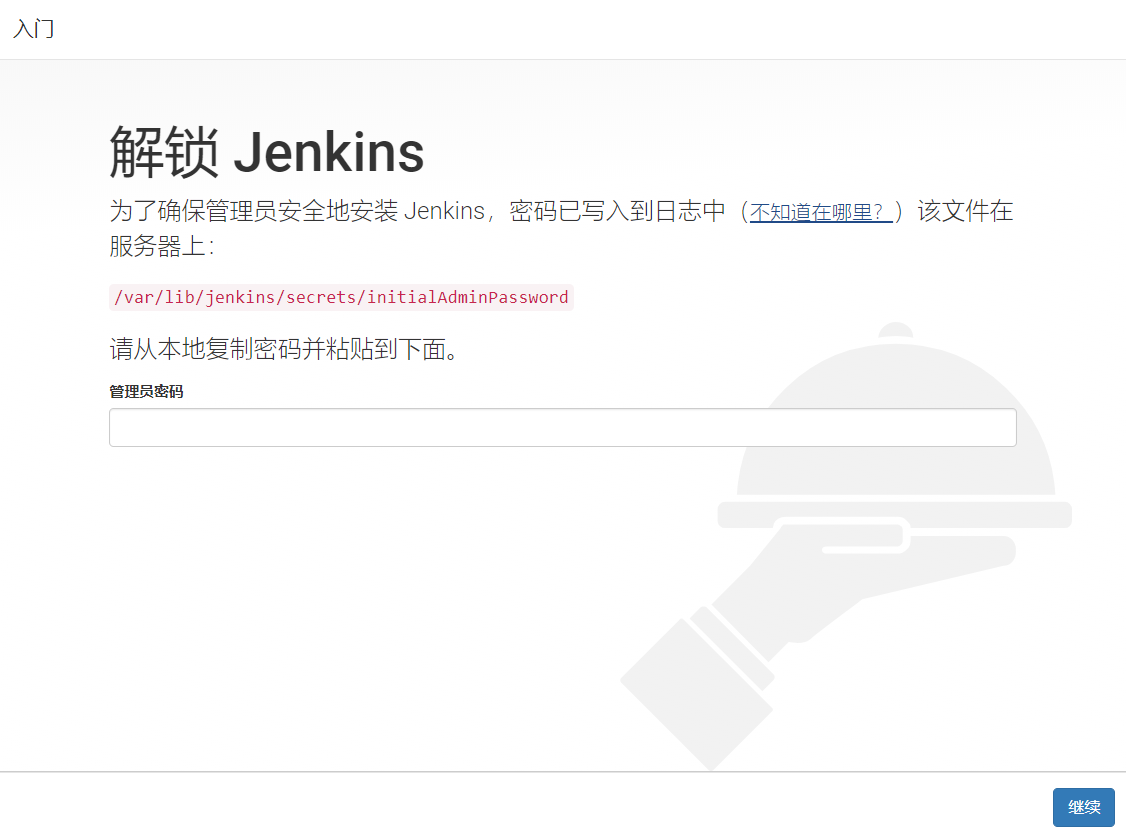
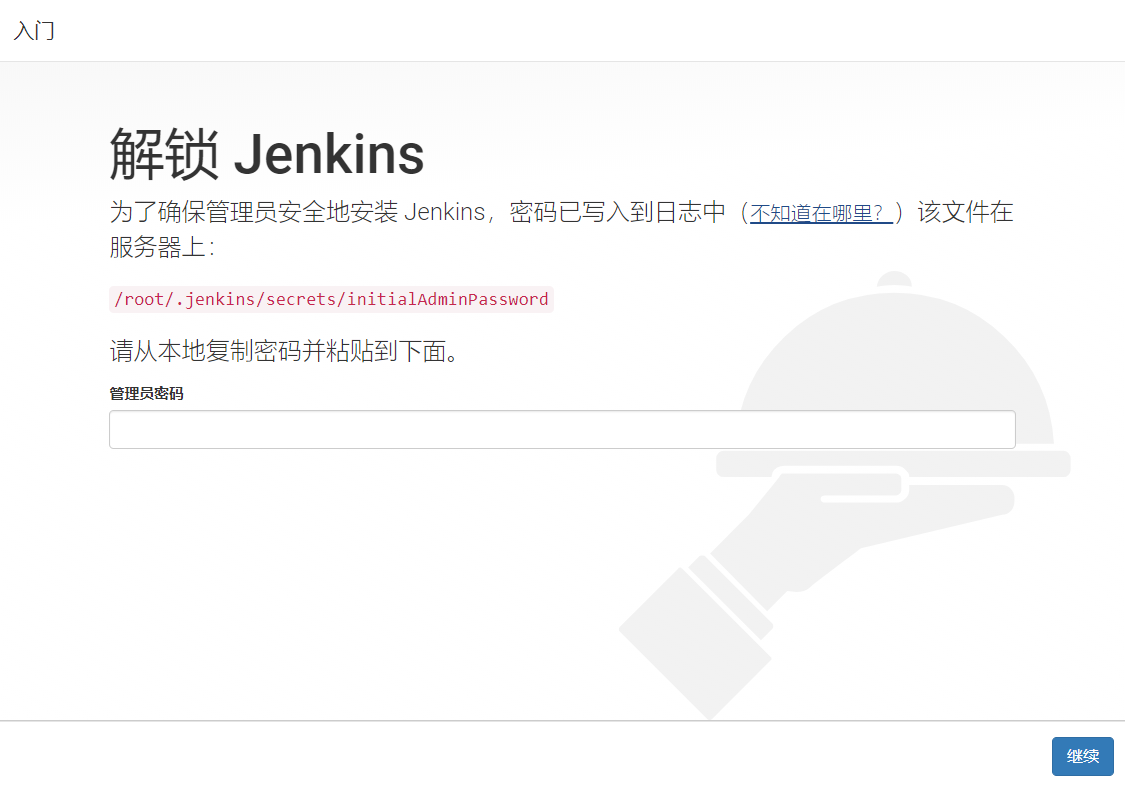
Unlock and next
//Get the password and unlock jenkins according to the prompt
cat /var/lib/jenkins/secrets/initialAdminPassword
e93ebef28b9e4377b94b9e60b9fbb82b

#Copy the password obtained above to the web page and click next to unlock jenkins
Jenkins offline problem solving
- If it shows that Jenkins is offline, change the update check address in the following file to the address of Tsinghua University in China, and then restart Jenkins: https://mirrors.tuna.tsinghua.edu.cn/jenkins/updates/update-center.json
//Modify update check address file
vim /var/lib/jenkins/hudson.model.UpdateCenter.xml

<?xml version='1.1' encoding='UTF-8'?>
<sites>
  <site>
    <id>default</id>
    <url>https://mirrors.tuna.tsinghua.edu.cn/jenkins/updates/update-center.json</url>
  </site>
</sites>

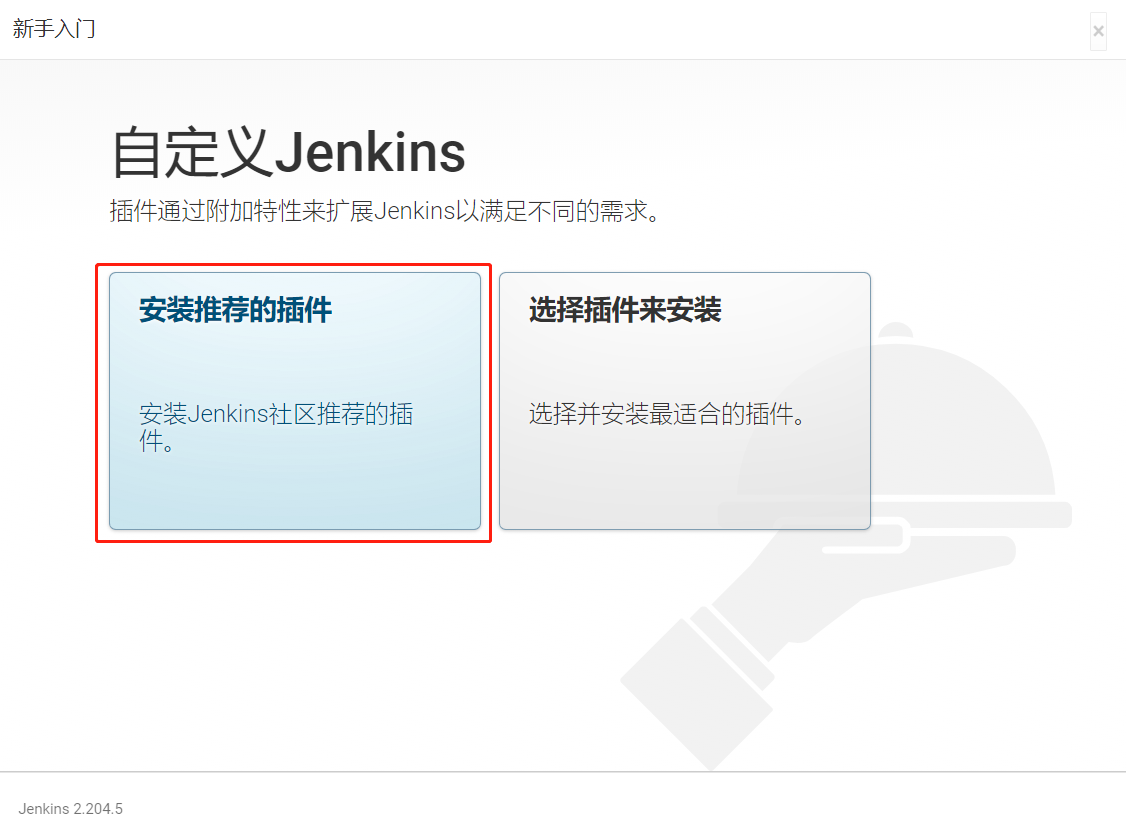
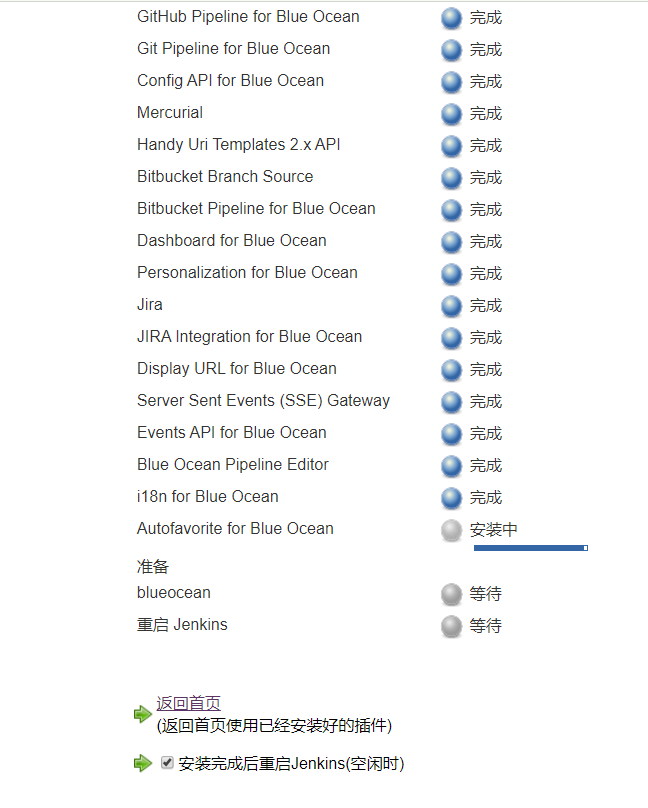
Choose to install the jenkins plug-in
- jenkins implements various functions based on plug-ins. Therefore, it is recommended to install many plug-ins. It is recommended to select "install recommended plug-ins"
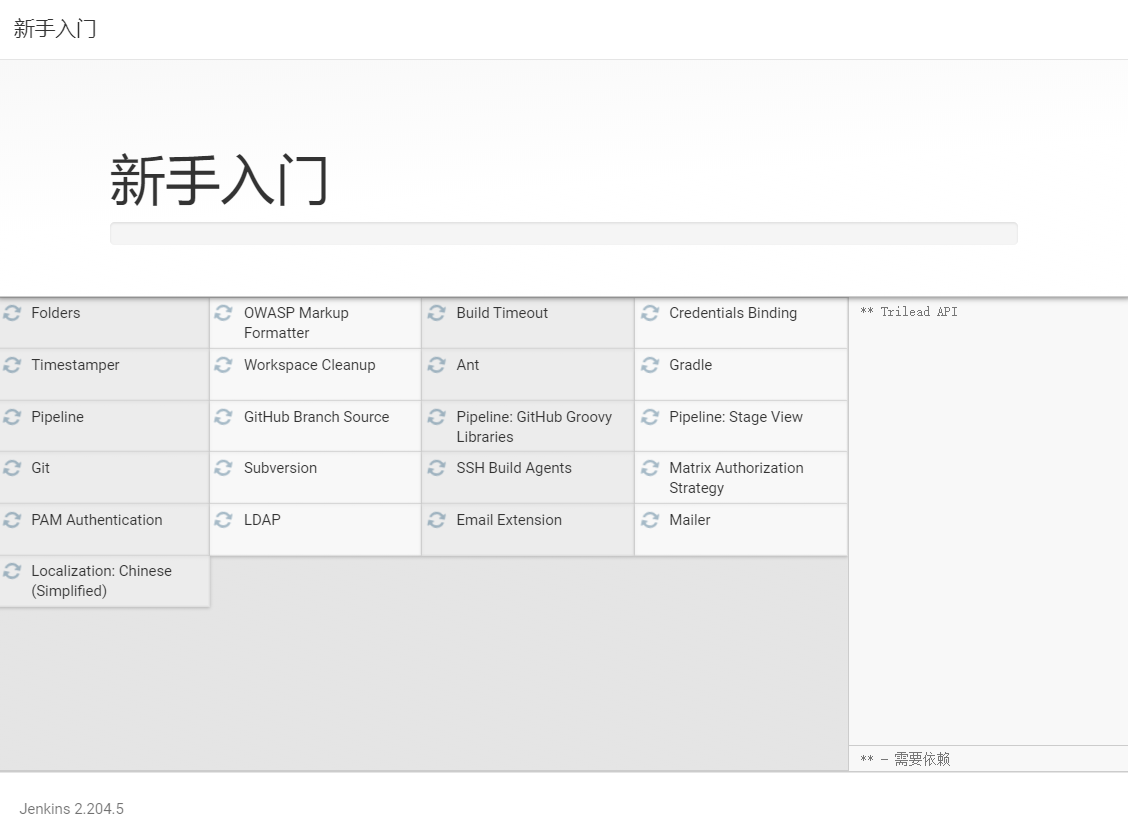
During plug-in installation
Nginx agent configuration
- At present, the jenkins official server is abroad, and the speed of installing plug-ins online from home is very slow, but you can rewrite it through Nginx and pass the request for installing plug-ins through the mirror server of Tsinghua University to accelerate the installation of plug-ins. The configuration is as follows:
//Add domain name resolution to the hosts file of jenkins server
127.0.0.1 updates.jenkins-ci.org
//Add location to the separately configured nginx server for forwarding
location /download/plugins {
	proxy_set_header Host mirrors.tuna.tsinghua.edu.cn;
	proxy_set_header X-Real-IP $remote_addr;
	proxy_set_header X-Forwarded-For $proxy_add_x_forwarded_for;
	rewrite /download/plugins(.*) /jenkins/plugins/$1 break;
	proxy_pass http://mirrors.tuna.tsinghua.edu.cn;
}
-
host is in this order of priority: the hostname in the request line, or the hostname in the "host" request header field, or the server name that matches the request.
-
Before sending the request line, the client has established a connection with the server. Therefore, there is no need for server information in the request line at this time. We use telnet to test, for example: get / index php HTTP/1.1
This is a complete HTTP request line. Although the information of the server is not required in the request line, the information of the server can still be included in the request line. For example: get www.test.com info/index. PHP http / 1.1, it is easy to understand what the host in the request line is. In the first request line, there is no host. In the second request line, there is host, which is www.test info. -
The X-Forwarded-For header field is used to indicate which servers the request passes through.
-
If the request does not contain an x-forward-for header field, set the x-forward-for header field value to the IP of the request sender or the IP of the CDN
-
If the request contains an x-forward-for header field, set the value of the x-forward-for header field to the previous value of the header field, followed by the IP of the request sender, separated by commas.

- Verify the agent information in the nginx log file
root@gateway:~# tail /apps/nginx/logs/access.log
192.168.26.54 - - [10/Mar/2020:22:37:14 +0800] "GET /download/plugins/pipeline-github-lib/1.0/pipeline-github-lib.hpi HTTP/1.1" 200 8479 "-" "Java/1.8.0_241"
192.168.26.54 - - [10/Mar/2020:22:37:15 +0800] "GET /download/plugins/mapdb-api/1.0.9.0/mapdb-api.hpi HTTP/1.1" 200 396306 "-" "Java/1.8.0_241"
192.168.26.54 - - [10/Mar/2020:22:37:20 +0800] "GET /download/plugins/subversion/2.13.1/subversion.hpi HTTP/1.1" 200 7350744 "-" "Java/1.8.0_241"
192.168.26.54 - - [10/Mar/2020:22:37:21 +0800] "GET /download/plugins/ssh-slaves/1.31.1/ssh-slaves.hpi HTTP/1.1" 200 176979 "-" "Java/1.8.0_241"
192.168.26.54 - - [10/Mar/2020:22:37:21 +0800] "GET /download/plugins/matrix-auth/2.5/matrix-auth.hpi HTTP/1.1" 200 128779 "-" "Java/1.8.0_241"
192.168.26.54 - - [10/Mar/2020:22:37:22 +0800] "GET /download/plugins/pam-auth/1.6/pam-auth.hpi HTTP/1.1" 200 1504184 "-" "Java/1.8.0_241"
192.168.26.54 - - [10/Mar/2020:22:37:22 +0800] "GET /download/plugins/ldap/1.21/ldap.hpi HTTP/1.1" 200 130445 "-" "Java/1.8.0_241"
192.168.26.54 - - [10/Mar/2020:22:37:22 +0800] "GET /download/plugins/email-ext/2.69/email-ext.hpi HTTP/1.1" 200 796304 "-" "Java/1.8.0_241"
192.168.26.54 - - [10/Mar/2020:22:37:22 +0800] "GET /download/plugins/localization-support/1.1/localization-support.hpi HTTP/1.1" 200 23848 "-" "Java/1.8.0_241"
192.168.26.54 - - [10/Mar/2020:22:37:23 +0800] "GET /download/plugins/localization-zh-cn/1.0.13/localization-zh-cn.hpi HTTP/1.1" 200 542952 "-" "Java/1.8.0_241"
Verify plug-in directory
//Plug in storage directory
ll /var/lib/jenkins/plugins/

total 64732
drwxr-xr-x 78 jenkins jenkins    4096 Mar 10 22:37 ./
drwxr-xr-x 15 jenkins jenkins    4096 Mar 10 22:56 ../
drwxr-xr-x  7 jenkins jenkins    4096 Mar 10 22:36 ace-editor/
-rw-r--r--  1 jenkins jenkins 4279042 Mar 10 22:36 ace-editor.jpi
drwxr-xr-x  4 jenkins jenkins    4096 Mar 10 22:36 ant/
drwxr-xr-x  4 jenkins jenkins    4096 Mar 10 22:36 antisamy-markup-formatter/
-rw-r--r--  1 jenkins jenkins  107210 Mar 10 22:36 antisamy-markup-formatter.jpi
-rw-r--r--  1 jenkins jenkins   82963 Mar 10 22:36 ant.jpi
drwxr-xr-x  4 jenkins jenkins    4096 Mar 10 22:36 apache-httpcomponents-client-4-api/
-rw-r--r--  1 jenkins jenkins 1761975 Mar 10 22:36 apache-httpcomponents-client-4-api.jpi
drwxr-xr-x  4 jenkins jenkins    4096 Mar 10 22:37 authentication-tokens/
-rw-r--r--  1 jenkins jenkins   14638 Mar 10 22:37 authentication-tokens.jpi
drwxr-xr-x  4 jenkins jenkins    4096 Mar 10 22:36 bouncycastle-api/
-rw-r--r--  1 jenkins jenkins 4885133 Mar 10 22:36 bouncycastle-api.jpi
drwxr-xr-x  5 jenkins jenkins    4096 Mar 10 22:37 branch-api/
-rw-r--r--  1 jenkins jenkins  308984 Mar 10 22:37 branch-api.jpi
drwxr-xr-x  4 jenkins jenkins    4096 Mar 10 22:36 build-timeout/
-rw-r--r--  1 jenkins jenkins   95589 Mar 10 22:36 build-timeout.jpi
drwxr-xr-x  5 jenkins jenkins    4096 Mar 10 22:36 cloudbees-folder/
-rw-r--r--  1 jenkins jenkins  219839 Mar 10 22:36 cloudbees-folder.jpi
drwxr-xr-x  4 jenkins jenkins    4096 Mar 10 22:36 command-launcher/
-rw-r--r--  1 jenkins jenkins   38820 Mar 10 22:36 command-launcher.jpi
Create jenkins administrator account

Jenkins instance configuration
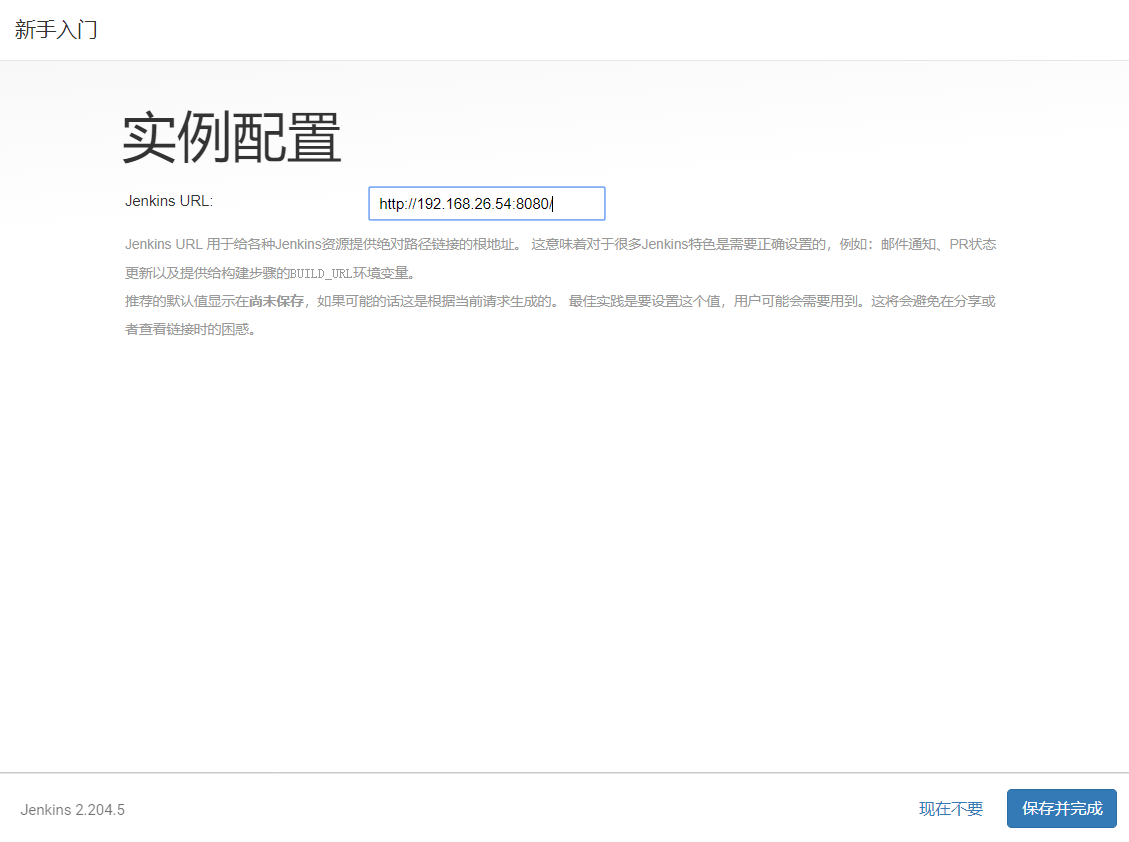
Jenkins is ready

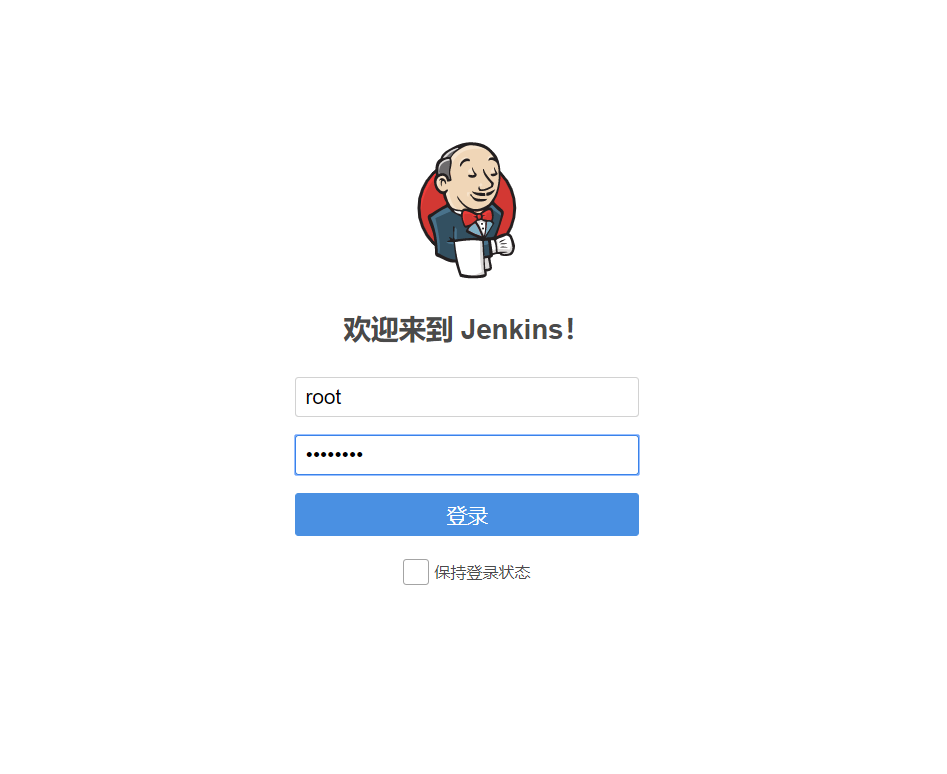
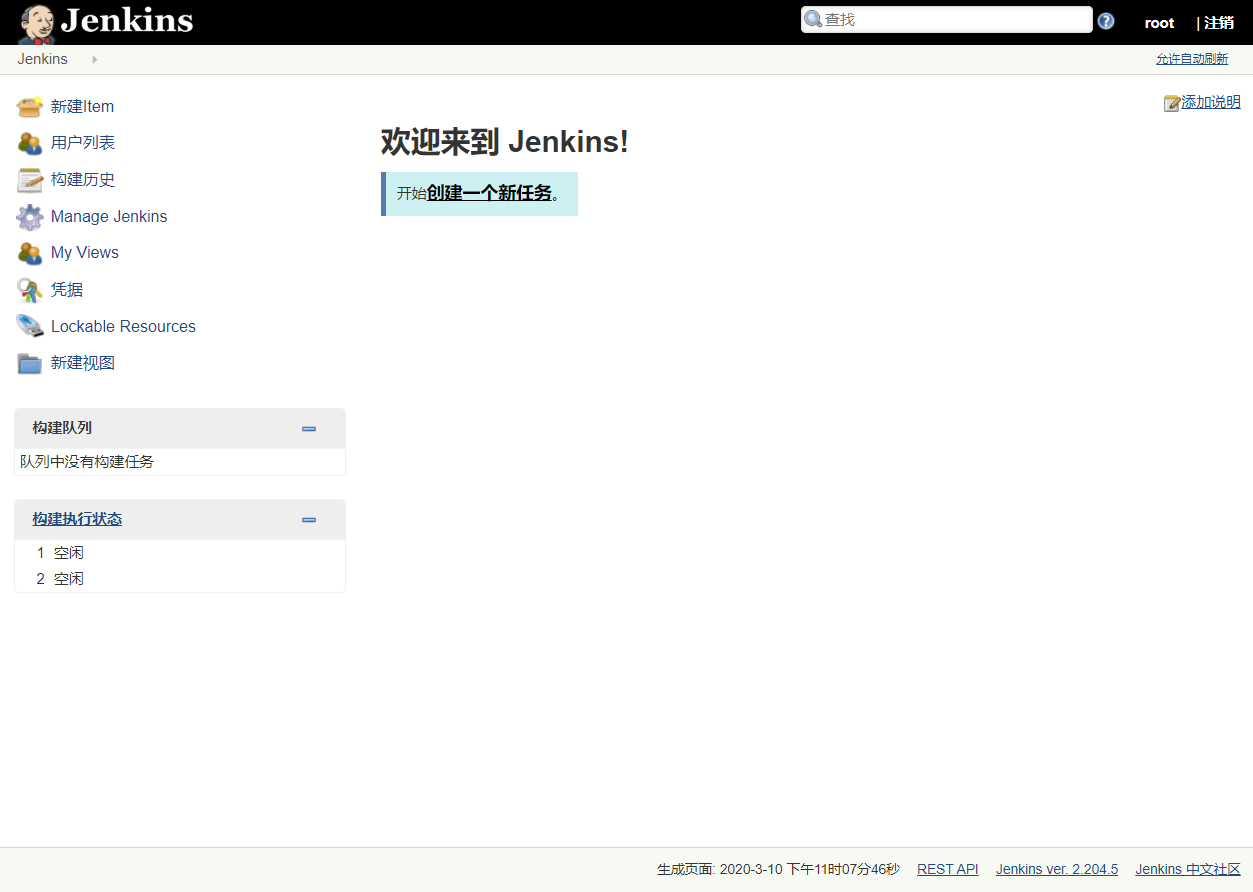
Login jenkins
Jenkins home page
Launch jenkins via tomcat
- Run Jenkins through tomcat 8.5.46_ 2.204.5
//Copy the tomcat installation package to the virtual machine
ls /usr/local/src
apache-tomcat-8.5.45.tar.gz

//Create data directory
mkdir /apps

//Determine working directory
pwd
/apps

//Copy the tomcat installation package to the data directory
cp /usr/local/src/apache-tomcat-8.5.45.tar.gz .

//Unpack
tar xf apache-tomcat-8.5.45.tar.gz

//Download Jenkins War package
wget https://mirrors.tuna.tsinghua.edu.cn/jenkins/war-stable/2.204.5/jenkins.war

//Jenkins War to tomcat default web directory
cp jenkins.war ./apache-tomcat-8.5.45/webapps

//Download dependent packages
sudo apt-get -y install libxrender-dev libxtst-dev

//Start tomcat
/apps/apache-tomcat-8.5.45/bin/catalina.sh start
- Browser access http://192.168.26.64:8080/jenkins

Validate web interface
Start jenkins directly through the war package
//Determine working directory
pwd
/usr/local/src

//Transfer the jdk installation package to the virtual machine
ls
jdk-8u241-linux-x64.tar.gz

//Unpack
tar xf jdk-8u241-linux-x64.tar.gz

//Create jdk soft connection
ln -sv /usr/local/src/jdk1.8.0_241 /usr/local/jdk

//Create java soft connection
ln -sv /usr/local/jdk/bin/java /usr/bin/
//Configure global environment variables
vim /etc/profile

...ellipsis...

export HISTTIMEFORMAT="%F %T `whoami` "
export export LANG="en_US.utf-8"
export JAVA_HOME=/usr/local/jdk
export CLASSPATH=.:$JAVA_HOME/jre/lib/rt.jar:$JAVA_HOME/lib/dt.jar:$JAVA_HOME/lib/tools.jar
export PATH=$JAVA_HOME/bin:$JAVA_HOME/jre/bin:$PATH

//Effective environment variable
source /etc/profile

//Verify java
java -version

java version "1.8.0_241"
Java(TM) SE Runtime Environment (build 1.8.0_241-b07)
Java HotSpot(TM) 64-Bit Server VM (build 25.241-b07, mixed mode)
java \
-Dcom.sun.management.jmxremote \
-Dcom.sun.management.jmxremote.port=12345 \
-Dcom.sun.management.jmxremote.authenticate=false \
-Dcom.sun.management.jmxremote.ssl=false \
-Djava.rmi.server.hostname="192.168.26.64" \
-jar jenkins.war &

#The plug-in directory of Jenkins is / root / jenkins/pligins
Jenkins plug-in management and installation
Plug in installation directory
- Plug in download address: http://updates.jenkins-ci.org/download/plugins/

Install plug-ins
-
System management - plug in management - optional plug-ins search gitlab and BlueOcean and install
-
Install gitlab plug-in


- Upload BlueOcean, the plug-in file we downloaded in advance hpi
Configure jenkins permission management
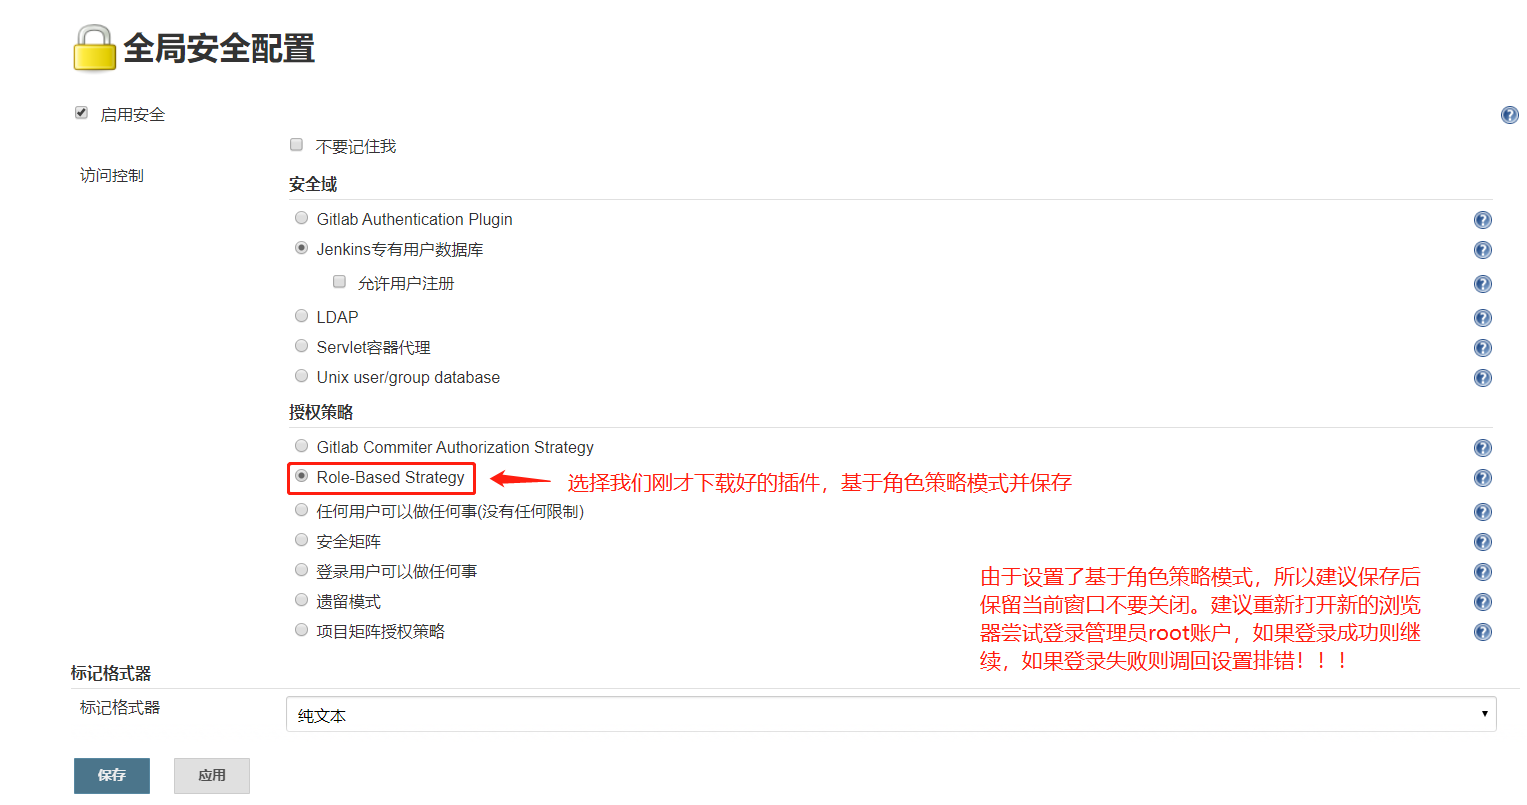
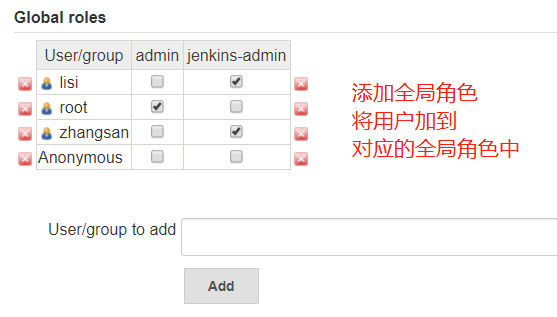
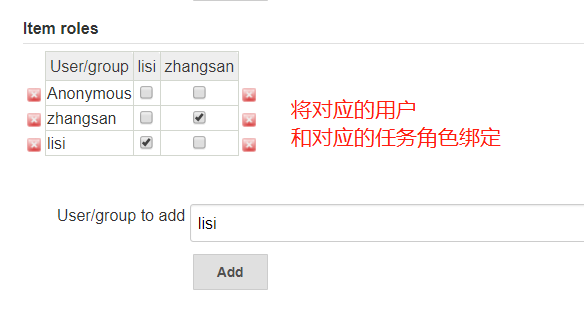
- Role based permission management first creates roles and users, authorizes roles, and then manages users to roles.
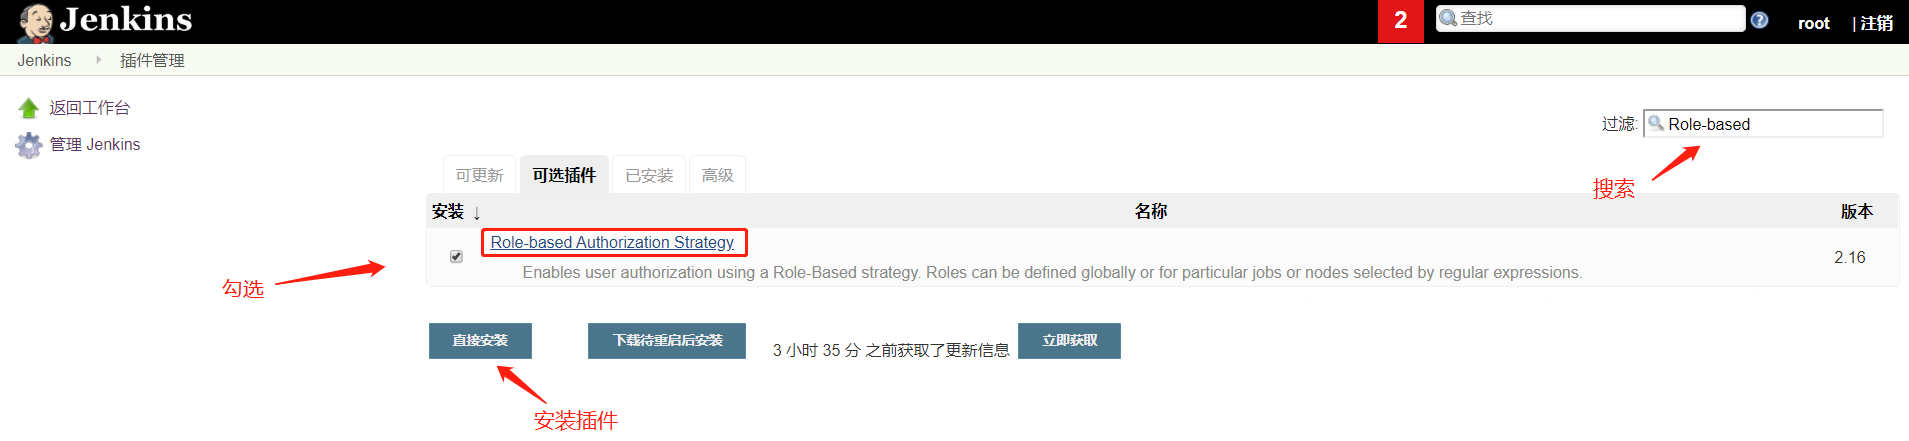
Install Role-based authentication policy
- Install the plug-in Role-based authentication policy
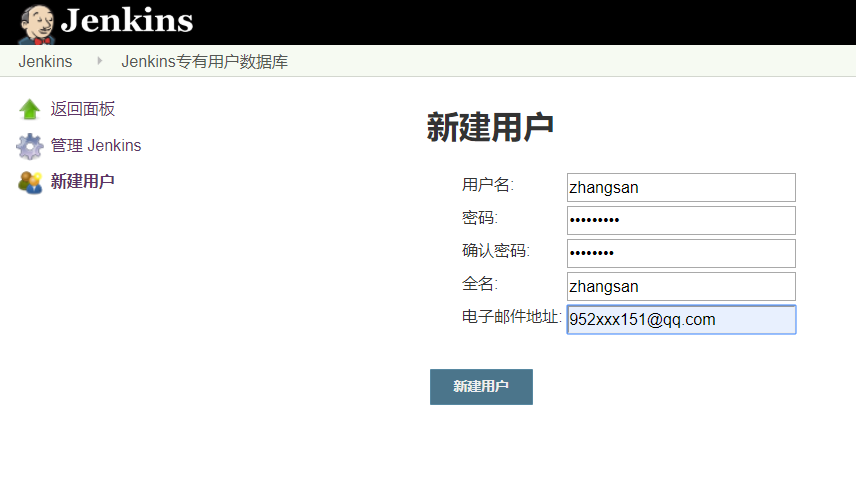
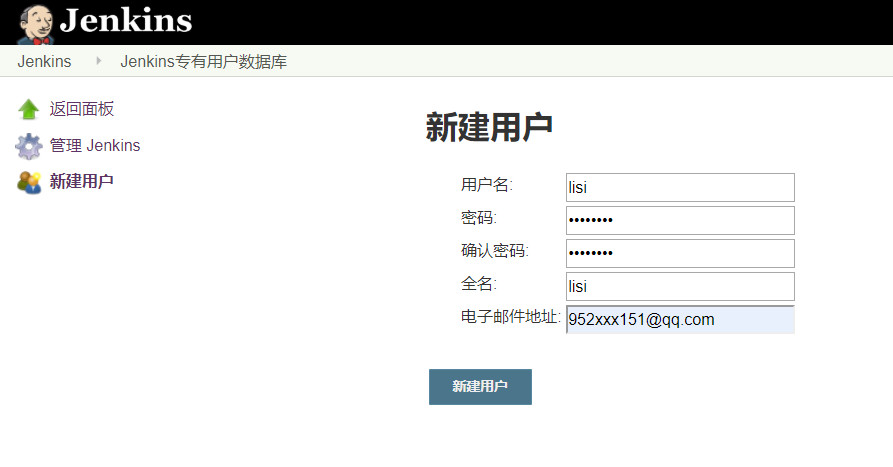
Create a new user
- Jenkins - system management - manage users - create new users
- Created by: zhangsan password: 12345678
- Created by: lisi password: 12345678
Create test project

Change authentication method
- Jenkins system management global security configuration
- Users created by default can do anything after logging in, depending on the default authentication and authorization method.
- The password of each user in jenkins is stored in config. Config in the user directory with hash value In the XML file.
- When you forget the jenkins user password, use a simple password to hash and replace the original password hash value to reset the password.

- The path is / var/lib/jenkins/users/root_5396110284457712874/config.xml
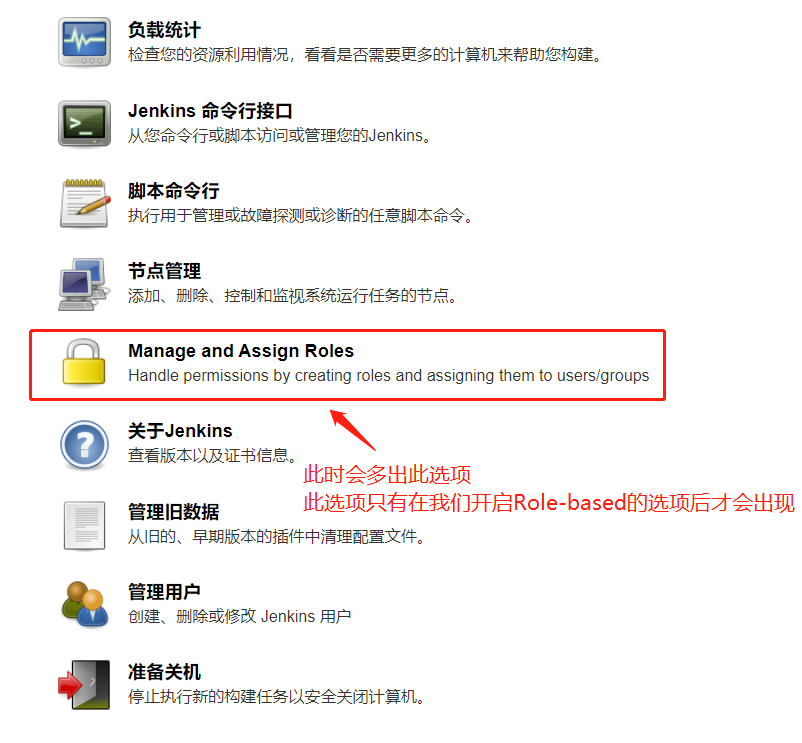
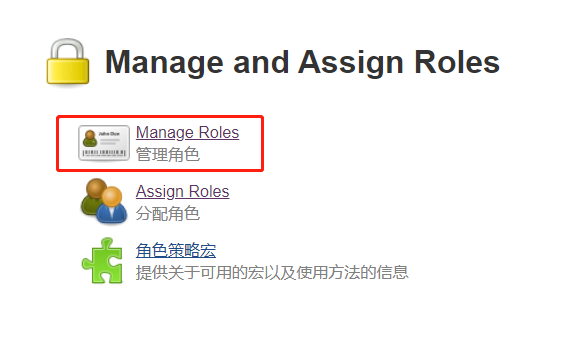
Create role
- Jenkins system management manage and assign roles Manage Roles
Add role

Assign permissions to roles

Associate users to roles

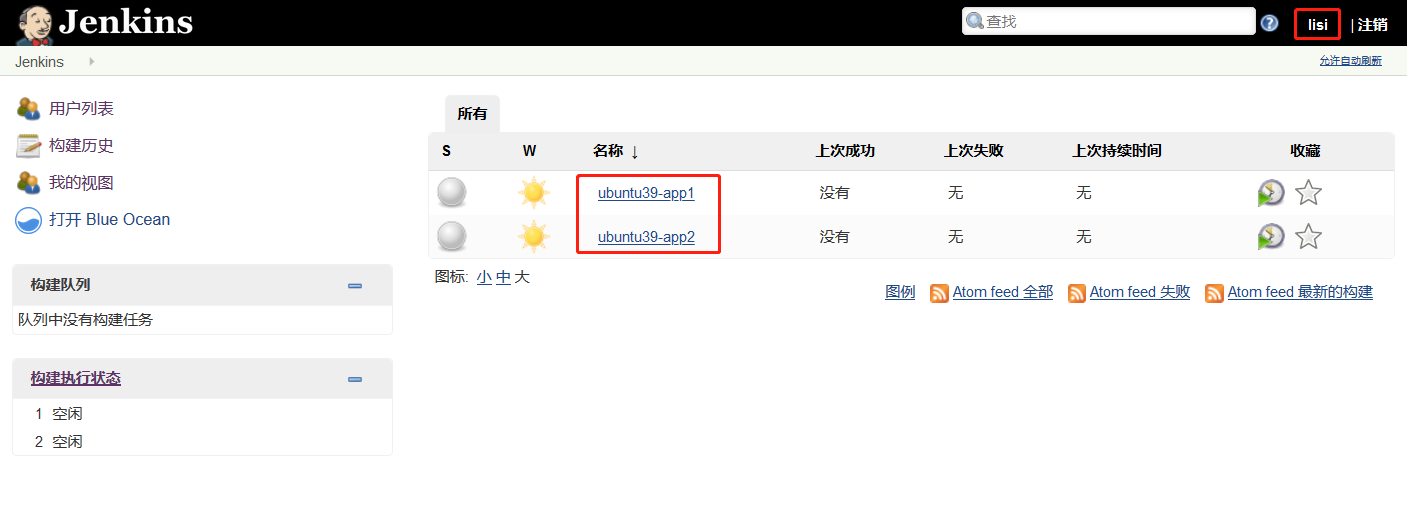
Test normal user login
- The interface after successful login has no system management permission, and can only execute authorized job s without administrator permission.

Jenkins mailbox configuration
Generate qq mailbox login authorization

Configure jenkins administrator mailbox
- Jenkins system management system configuration
- Administrator mail

Send configuration
- Jenkins system management system configuration
- Mail configuration
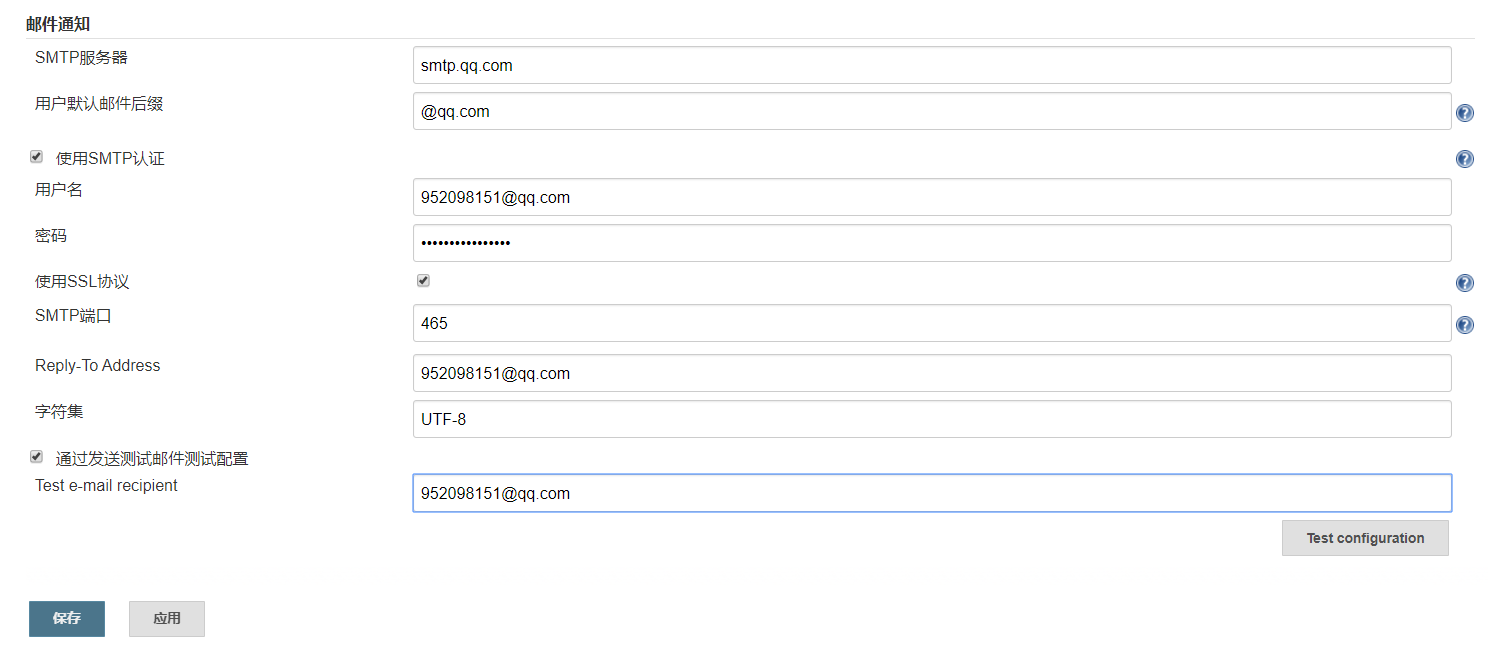
Test sending mail
- Jenkins system management system configuration
- Test mail

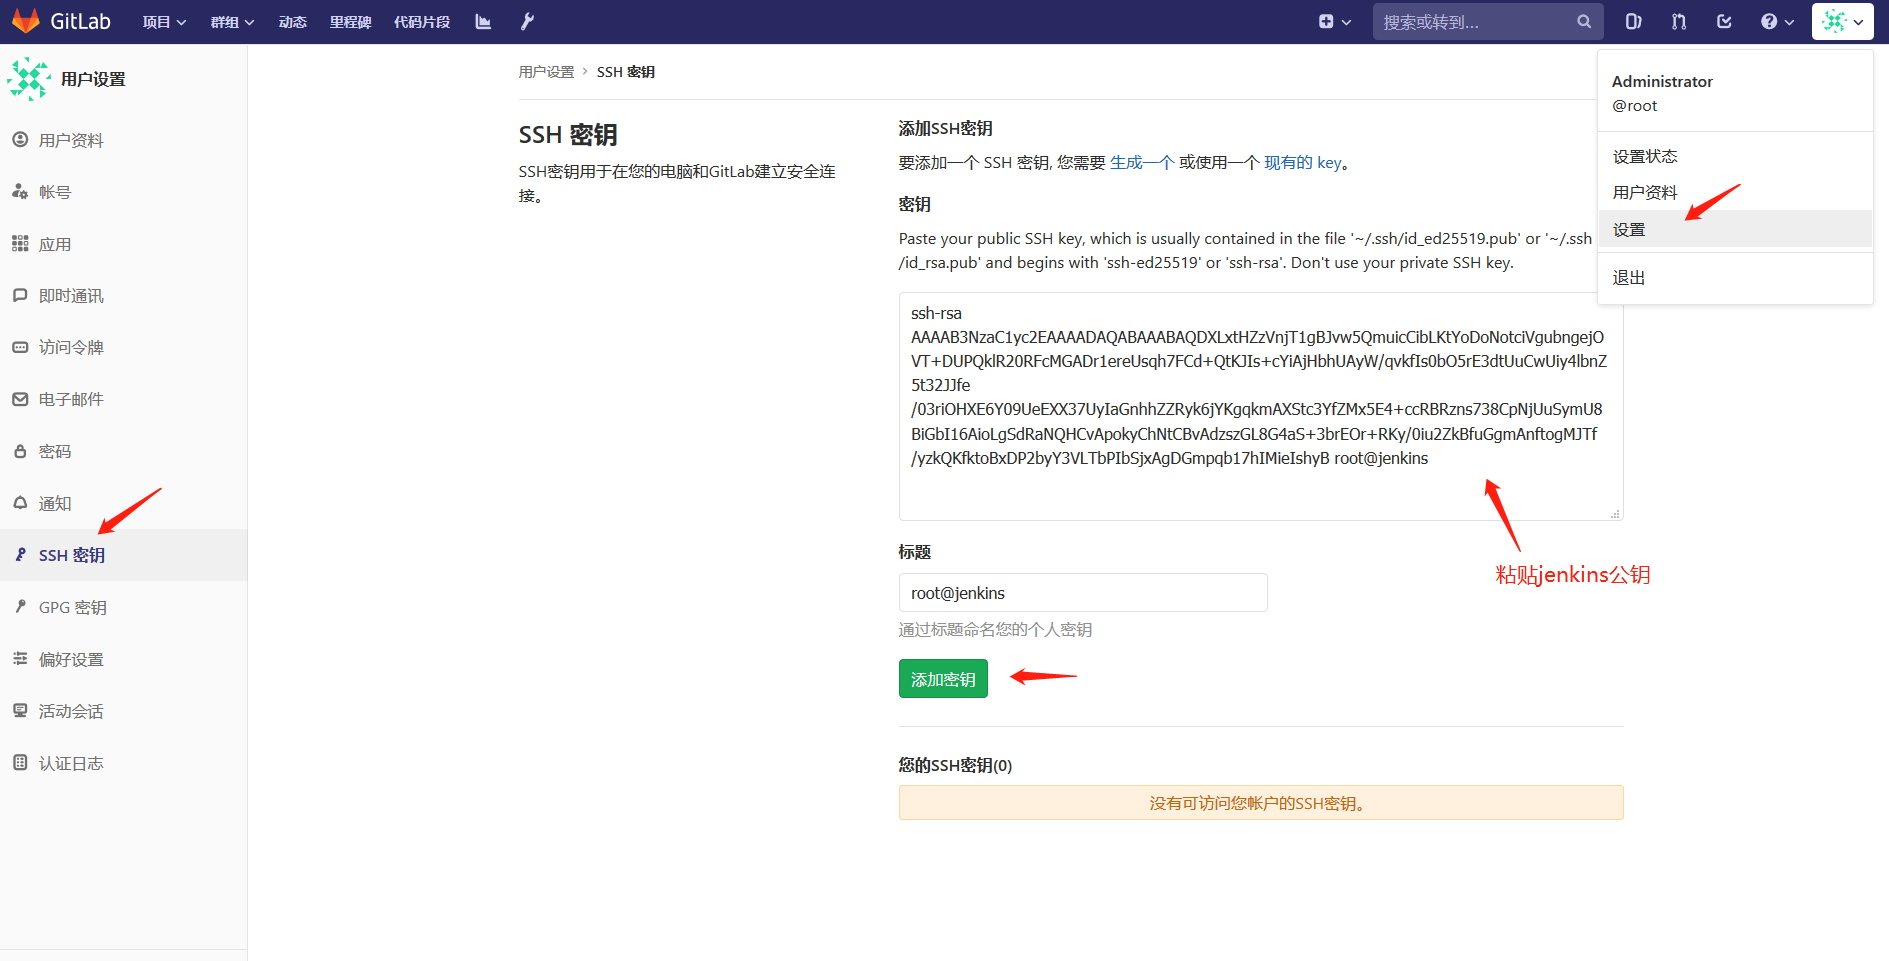
Pull code based on ssh key
Add ssh key
//Generate key pair in jenkins server
ssh-keygen

//Copy jenkins public key and add it to gitlab
cat /root/.ssh/id_rsa.pub
- Browser access to gitlab: http://192.168.26.104
Test ssh key
//Modify jenkins running user to root
vim /etc/default/jenkins

# user and group to be invoked as (default to jenkins)
JENKINS_USER=root
JENKINS_GROUP=root

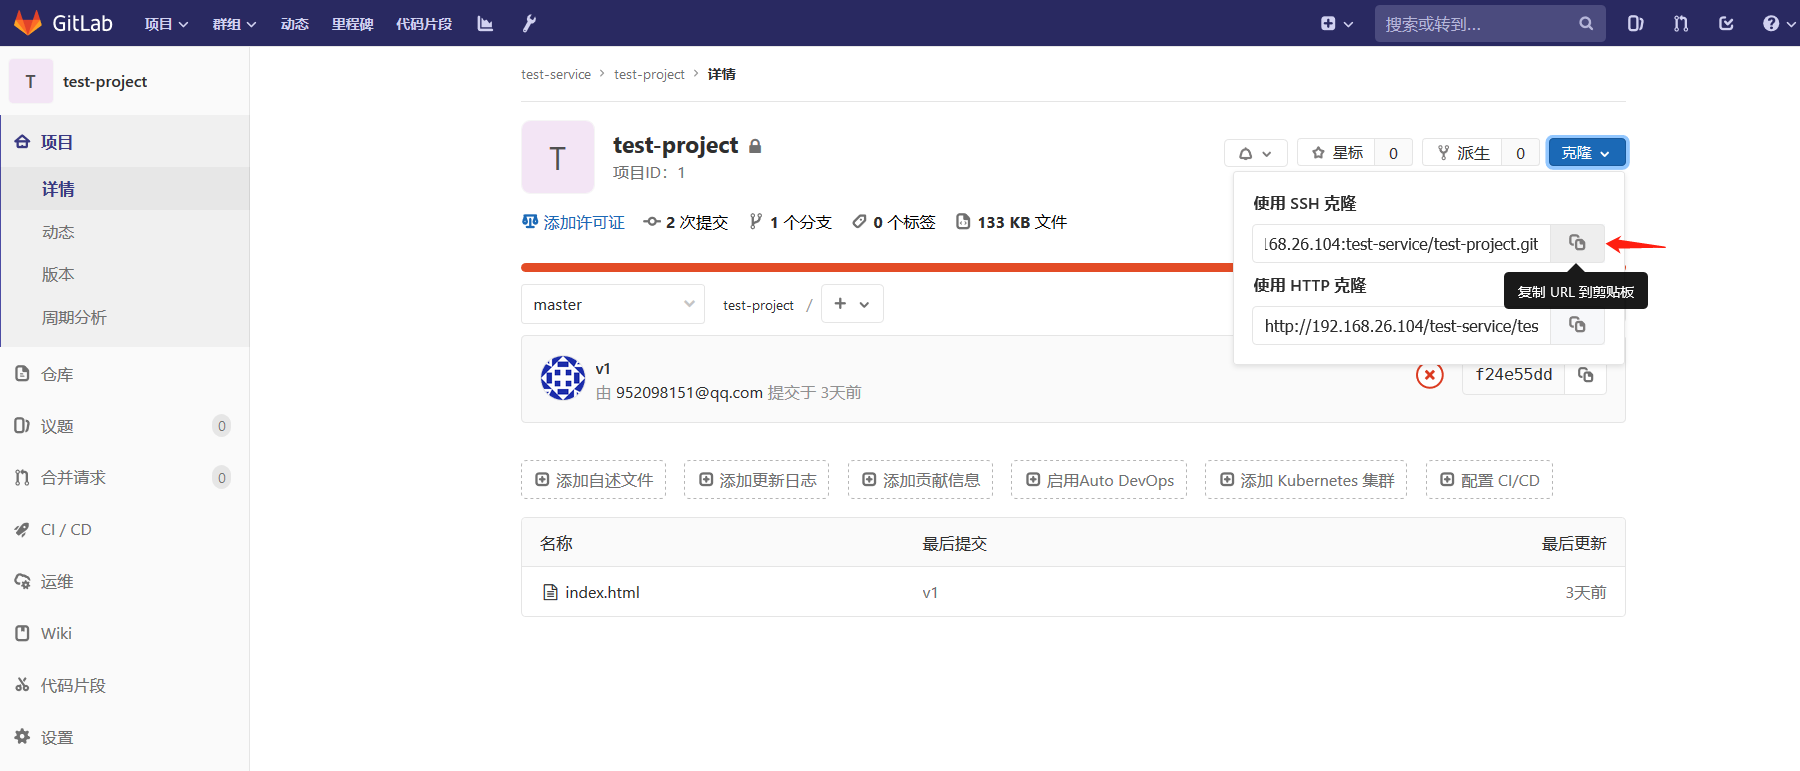
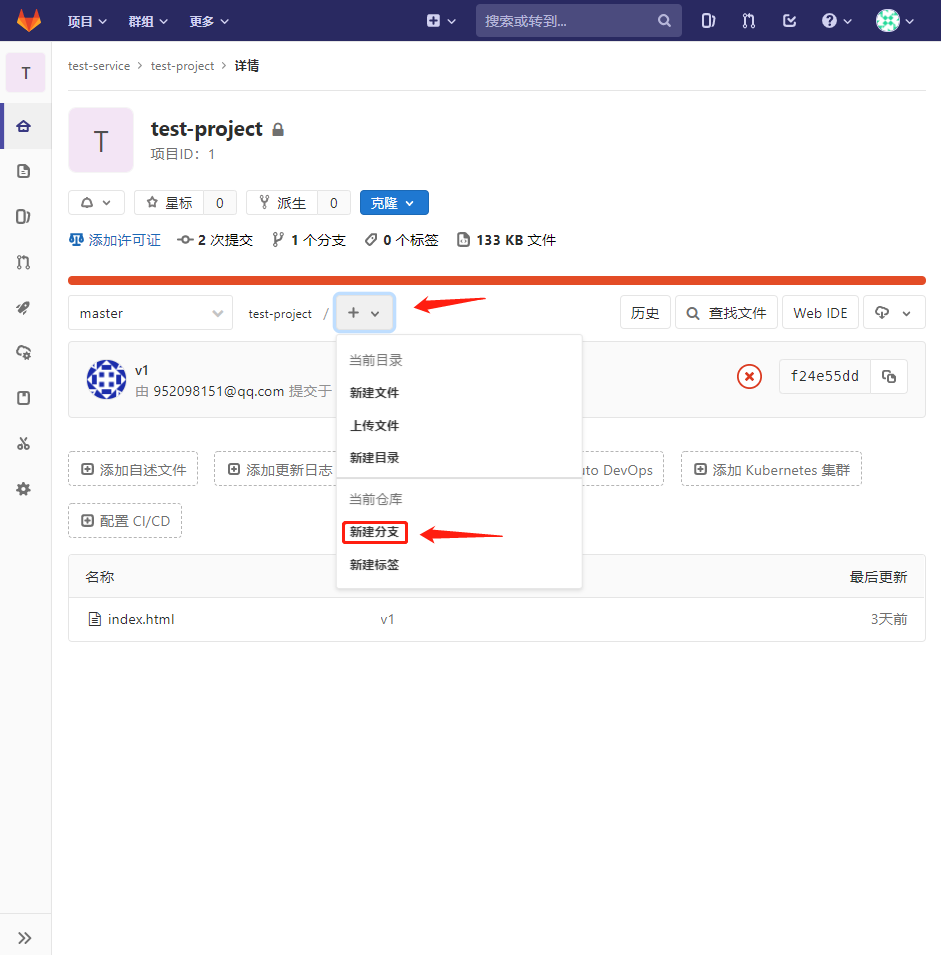
- Pull gitlab project from jenkins server
//Pull gitlab project
git clone git@192.168.26.104:test-service/test-project.git

Configure jenkins to gitlab non interactive pull code
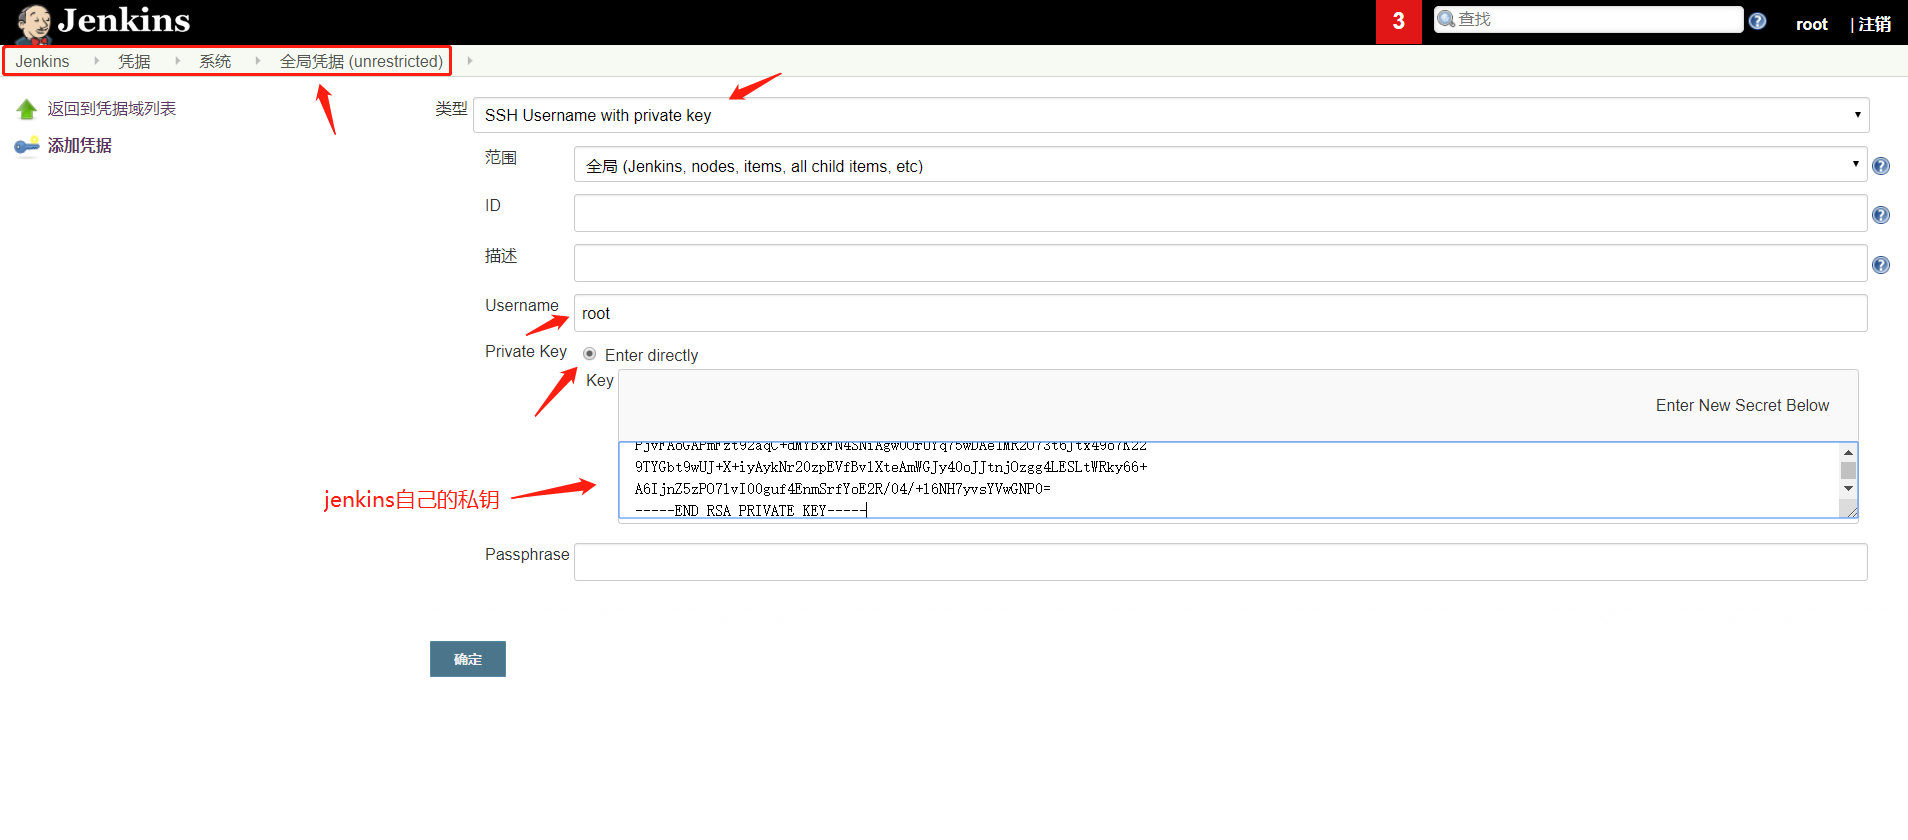
Jenkins server add certificate
- Jenkins - credentials - System - Global credentials - add credentials

JJenkins modifies the previous project settings
Configure git project address and user
- No error is reported for the added certificate, indicating that the authentication is passed

- Check delete workspace before build

Test build project
Click build now

Verify build results

Server validation data
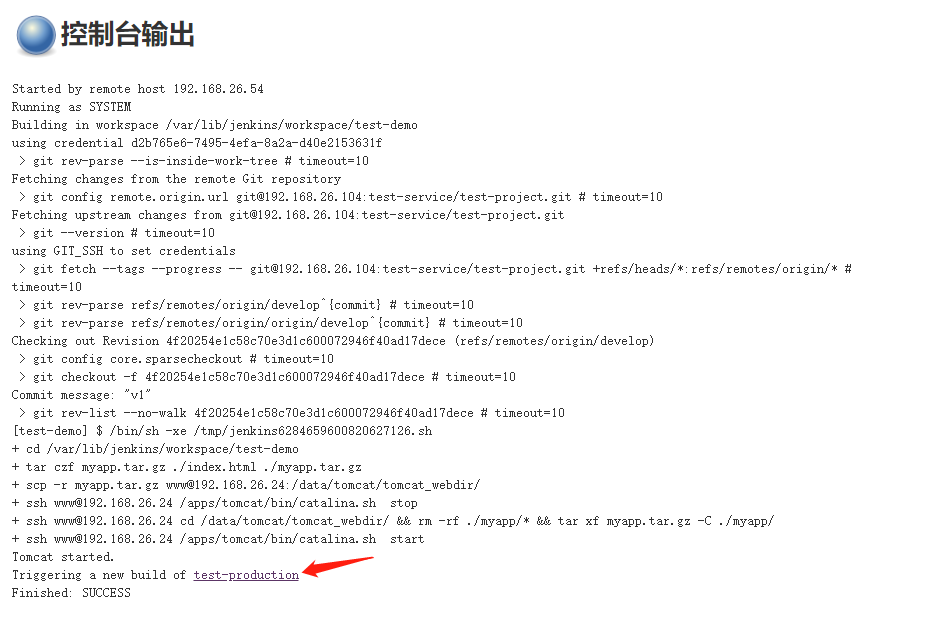
Deploy code to back-end servers
- jenkins build now
#cd /usr/local/src/ && rm -rf test-project && git clone git@192.168.26.104:test-service/test-project.git

#ssh www@192.168.26.24 "/apps/tomcat/bin/catalina.sh stop"
#ssh www@192.168.26.34 "/apps/tomcat/bin/catalina.sh stop"
#ssh www@192.168.26.44 "/apps/tomcat/bin/catalina.sh stop"


#scp -r /usr/local/src/test-project/*  www@192.168.26.24:/data/tomcat/tomcat_webapps/myapp/
#scp -r /usr/local/src/test-project/*  www@192.168.26.34:/data/tomcat/tomcat_webapps/myapp/
#scp -r /usr/local/src/test-project/*  www@192.168.26.44:/data/tomcat/tomcat_webapps/myapp/

#ssh www@192.168.26.24 "/apps/tomcat/bin/catalina.sh start"
#ssh www@192.168.26.34 "/apps/tomcat/bin/catalina.sh start"
#ssh www@192.168.26.44 "/apps/tomcat/bin/catalina.sh start"

----------------------------------------------------------------------------

cd /var/lib/jenkins/workspace/test-gitlab/ && tar czf myapp.tar.gz ./*

scp -r myapp.tar.gz www@192.168.26.24:/data/tomcat/tomcat_webdir/
scp -r myapp.tar.gz www@192.168.26.34:/data/tomcat/tomcat_webdir/
scp -r myapp.tar.gz www@192.168.26.44:/data/tomcat/tomcat_webdir/

ssh www@192.168.26.24 "/apps/tomcat/bin/catalina.sh  stop"
ssh www@192.168.26.34 "/apps/tomcat/bin/catalina.sh  stop"
ssh www@192.168.26.44 "/apps/tomcat/bin/catalina.sh  stop"


ssh www@192.168.26.24 "cd /data/tomcat/tomcat_webdir/ && rm -rf ./myapp/* && tar xf myapp.tar.gz -C ./myapp/"
ssh www@192.168.26.34 "cd /data/tomcat/tomcat_webdir/ && rm -rf ./myapp/* && tar xf myapp.tar.gz -C ./myapp/"
ssh www@192.168.26.44 "cd /data/tomcat/tomcat_webdir/ && rm -rf ./myapp/* && tar xf myapp.tar.gz -C ./myapp/"

ssh www@192.168.26.24 "/apps/tomcat/bin/catalina.sh  start"
ssh www@192.168.26.34 "/apps/tomcat/bin/catalina.sh  start"
ssh www@192.168.26.44 "/apps/tomcat/bin/catalina.sh  start"
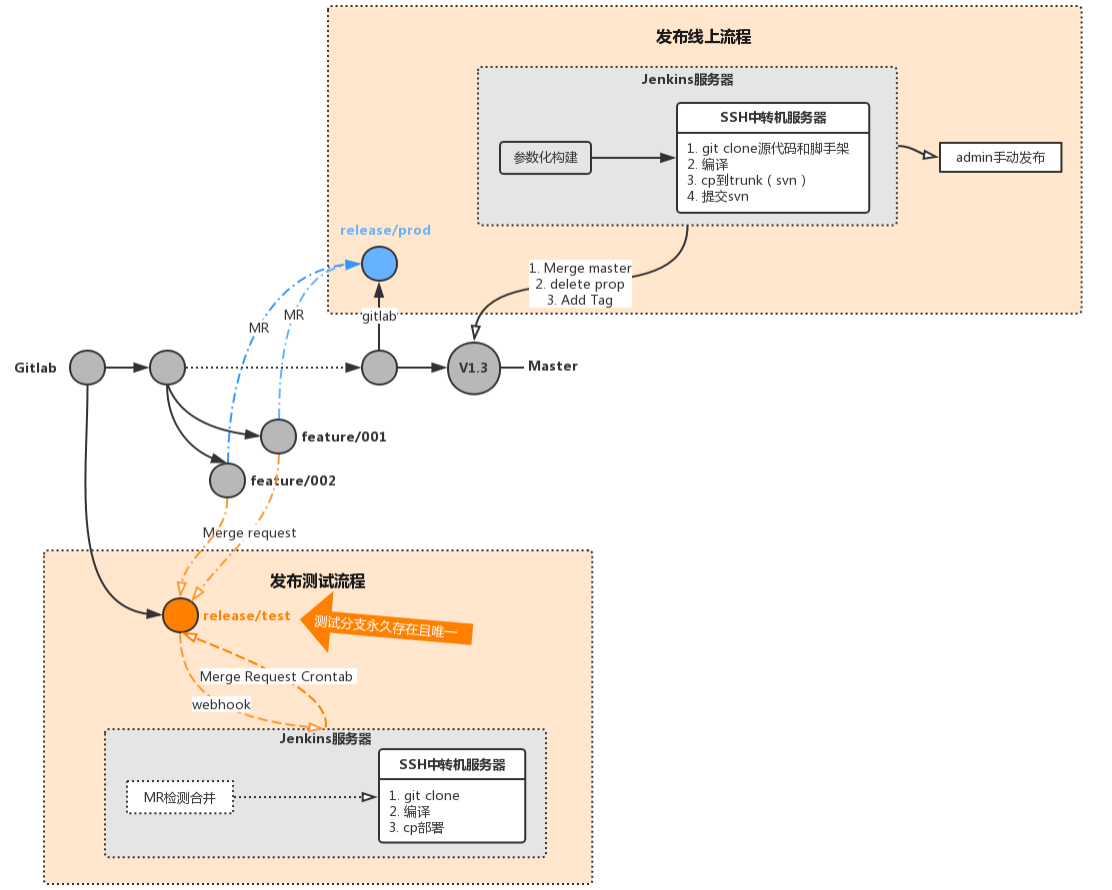
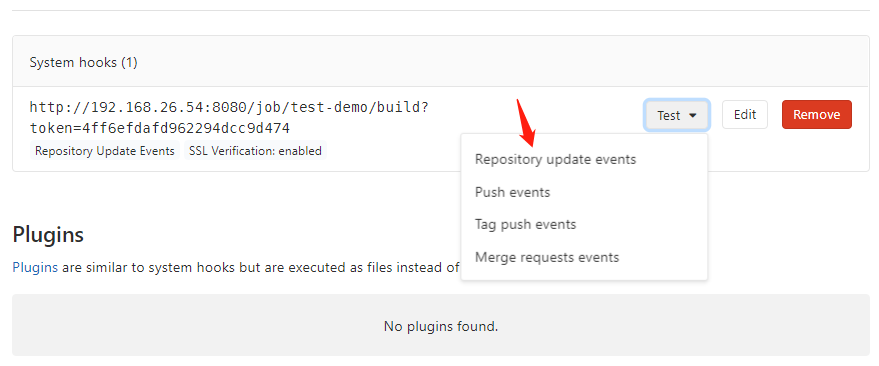
Build trigger (hook)
- The build trigger (webhook), which some people call a hook, is actually an HTTP callback. It is used by redevelopers to trigger jenkins to automatically execute code construction after submitting code to gitlab.
- The following is to create a new development branch. The code construction will be triggered only when the developer submits the code to the development branch. The code submitted to the main branch will not be built automatically. The operation and maintenance personnel need to manually deploy the code to the production environment.
192.168.26.24 #testing environment
192.168.26.34 #production environment
192.168.26.44 #production environment
Gitlab creates a new develop ment branch
Gitlab defines branch names and creates

Jenkins installation plug-in
- matters needing attention: https://jenkins.io/security/advisory/2018-05-09/#SECURITY-263
- System management - management plug-ins - optional plug-ins search and install Gitlab Hook and Gitlab Authentication

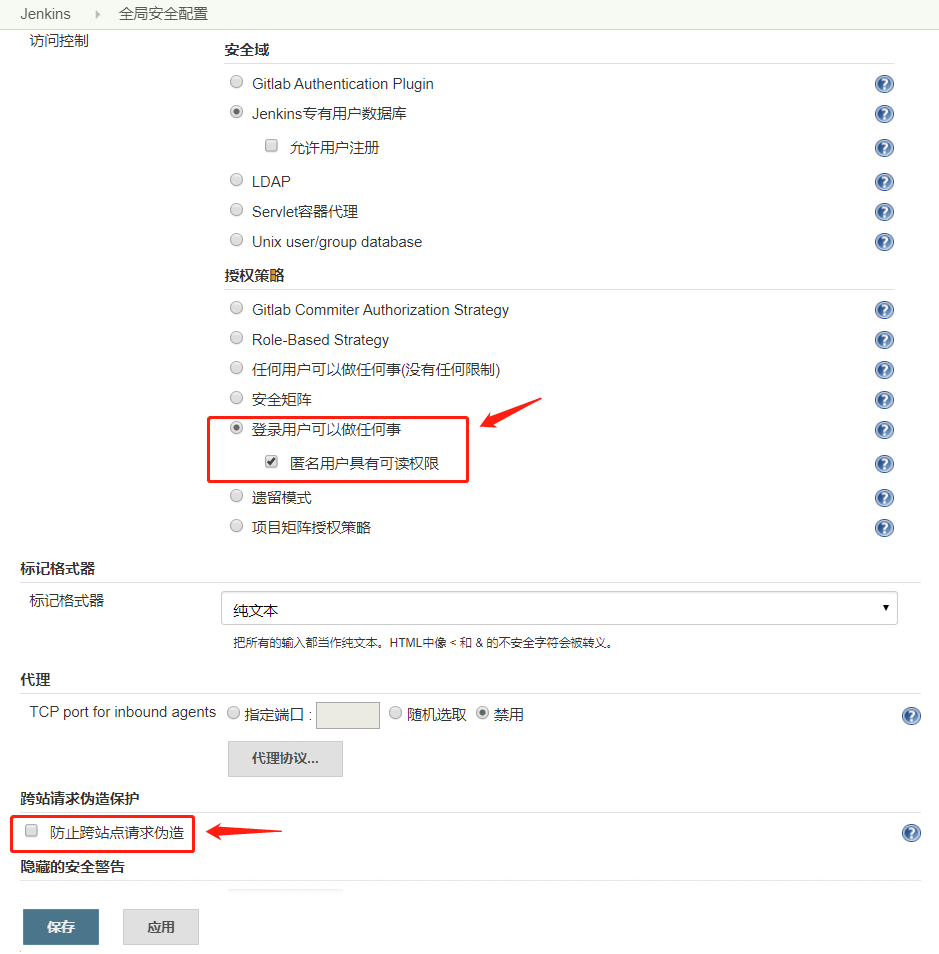
Jenkins modifies the login authentication method
- In jenkins system management - global security settings
- Modifying an authenticated user can do anything
- Uncheck the cross site request for forgery protection
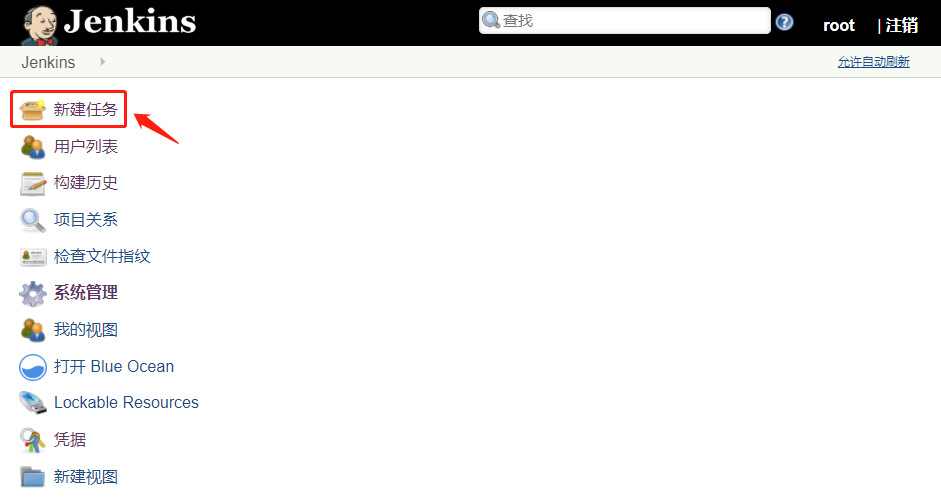
Jenkins creates a new development job

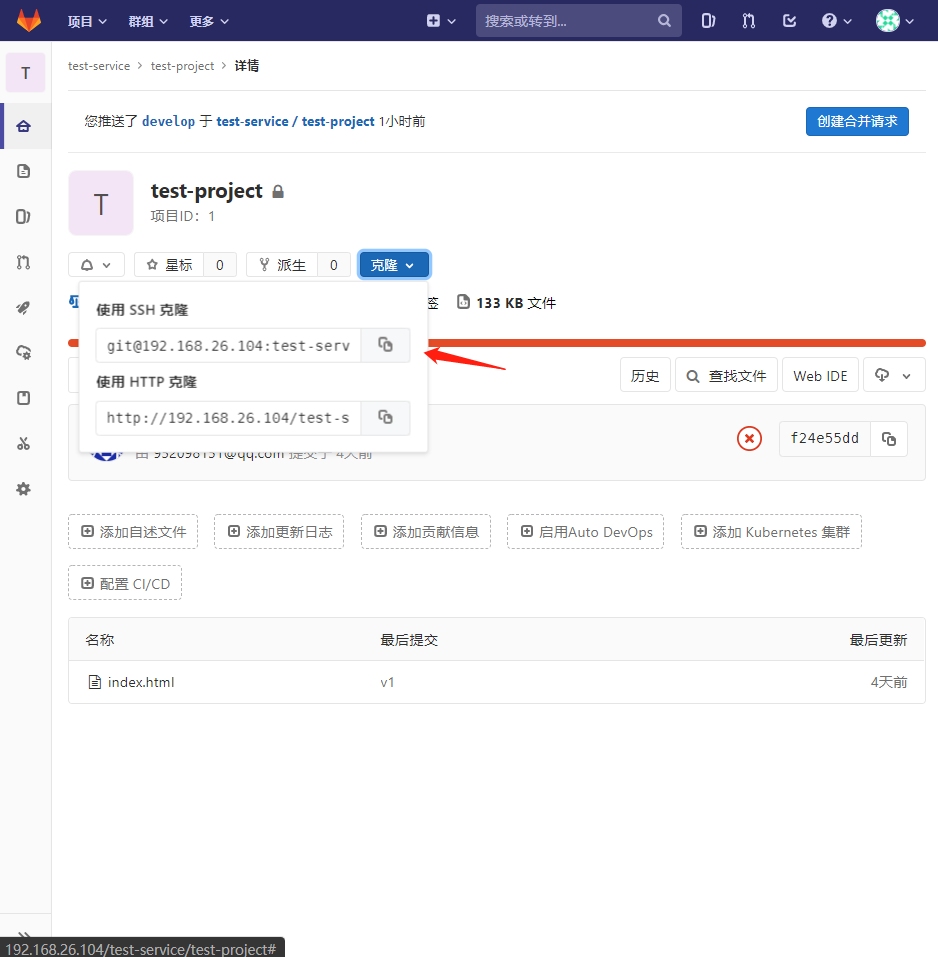
- Copy project URL Using SSH clone
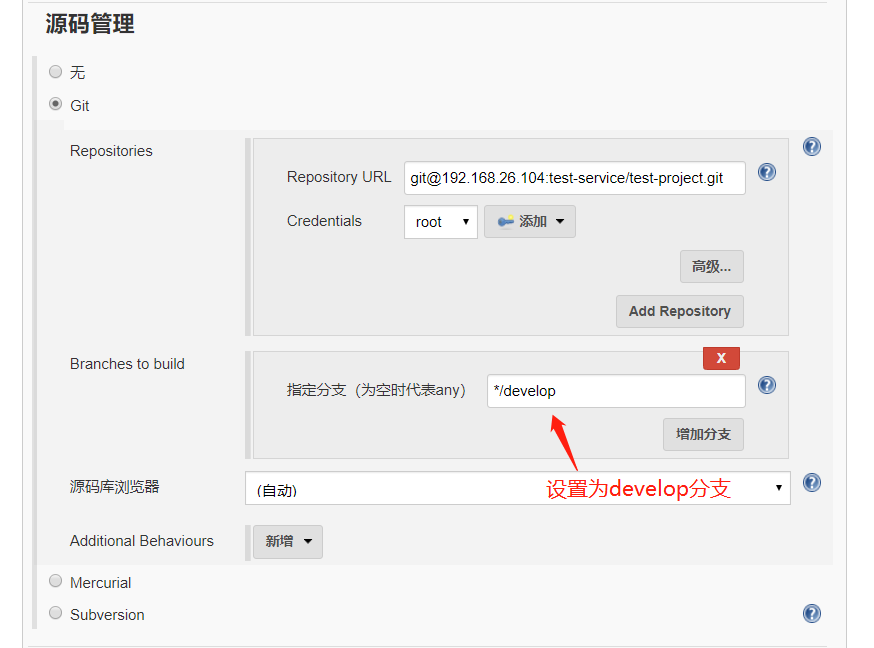
Jenkins build shell command
- The build script pulls the code from the develop ment branch to the test environment machine 192.168.26.24
cd /var/lib/jenkins/workspace/test-gitlab-develop && tar czf myapp.tar.gz ./*

scp -r myapp.tar.gz www@192.168.26.24:/data/tomcat/tomcat_webdir/

ssh www@192.168.26.24 "/apps/tomcat/bin/catalina.sh  stop"

ssh www@192.168.26.24 "cd /data/tomcat/tomcat_webdir/ && rm -rf ./myapp/* && tar xf myapp.tar.gz -C ./myapp/"

ssh www@192.168.26.24 "/apps/tomcat/bin/catalina.sh  start"
Jenkins configuration build trigger
- Use token authentication to generate random characters
//Generate random characters
openssl rand -hex 12

4ff6efdafd962294dcc9d474

Jenkins validates the branch job configuration file
//job configuration file config xml
vim /var/lib/jenkins/jobs/test-demo/config.xml

The Curl command tests the trigger and verifies the remote trigger build
- Use the browser to access the URL address directly
- Use curl command to access URL address
//Trigger webhook with curl command
http://192.168.26.54:8080/job/test-demo/build?token=4ff6efdafd962294dcc9d474
Jenkins verifies that the job is built automatically
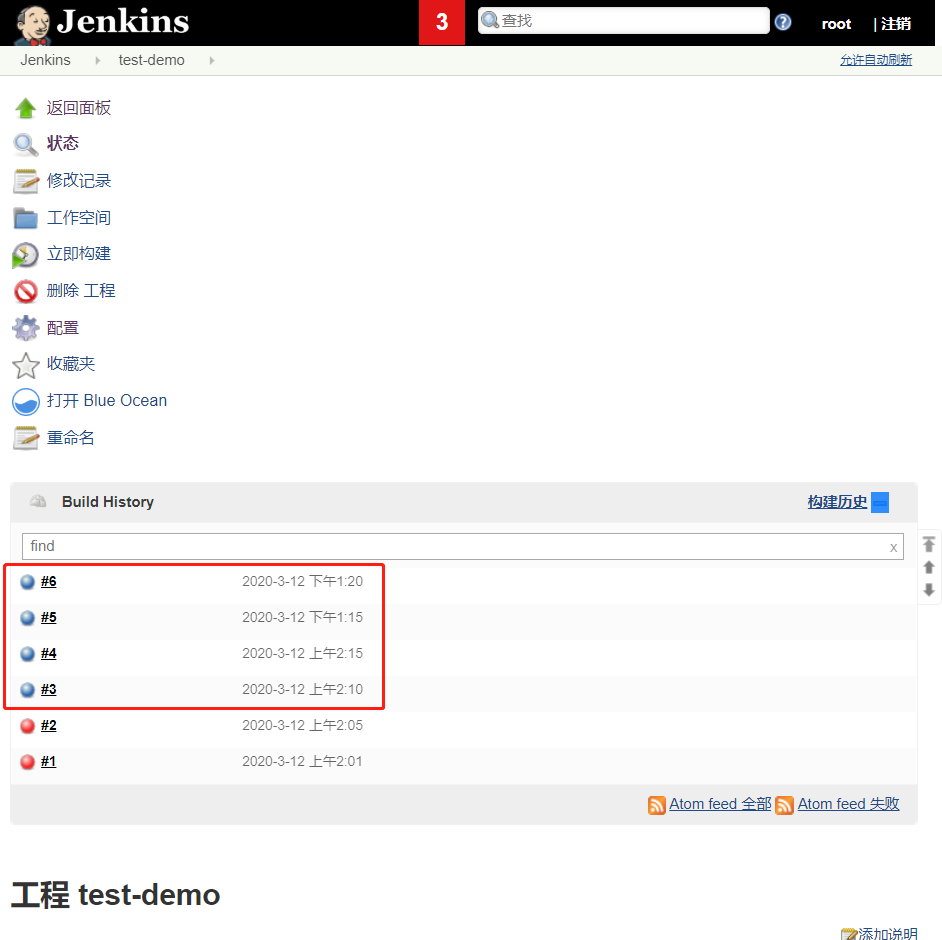
Gitlab configuring webhook

Test hook availability
- Perform test
- test result

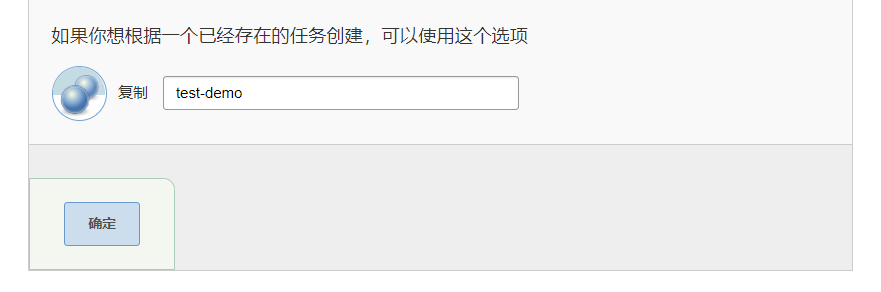
Jenkins creates a new production job
- Used to publish the completed test code of the test environment to the production environment

- Copy the job of test demo
Specify primary branch

Build environment

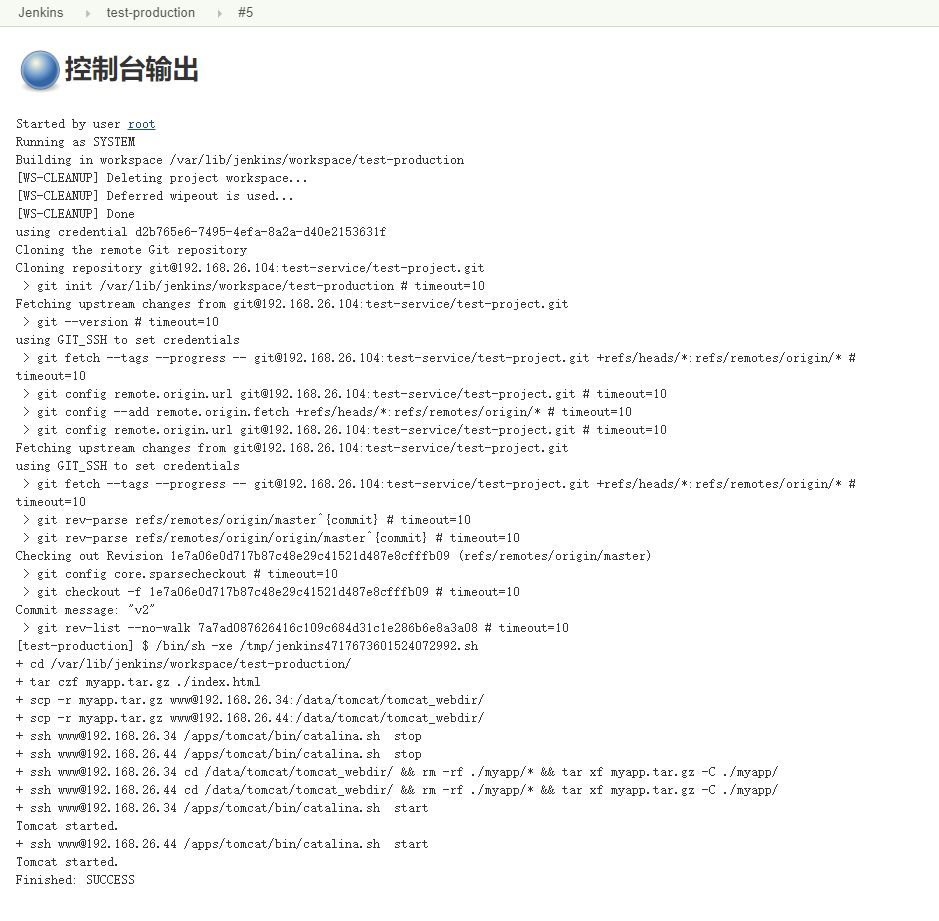
jenkins executes shell commands
- Change the execution shell command of the development branch to a formal script
cd /var/lib/jenkins/workspace/test-production/ && tar czf myapp.tar.gz ./*

scp -r myapp.tar.gz www@192.168.26.34:/data/tomcat/tomcat_webdir/
scp -r myapp.tar.gz www@192.168.26.44:/data/tomcat/tomcat_webdir/

ssh www@192.168.26.34 "/apps/tomcat/bin/catalina.sh  stop"
ssh www@192.168.26.44 "/apps/tomcat/bin/catalina.sh  stop"

ssh www@192.168.26.34 "cd /data/tomcat/tomcat_webdir/ && rm -rf ./myapp/* && tar xf myapp.tar.gz -C ./myapp/"
ssh www@192.168.26.44 "cd /data/tomcat/tomcat_webdir/ && rm -rf ./myapp/* && tar xf myapp.tar.gz -C ./myapp/"

ssh www@192.168.26.34 "/apps/tomcat/bin/catalina.sh  start"
ssh www@192.168.26.44 "/apps/tomcat/bin/catalina.sh  start"
Jenkins verifies that the development job is automatically built
Post build project Association
- For scenarios where multiple jobs are associated with each other and need to execute multiple jobs in series, you can trigger the execution of other project s by installing the plug-in Parameterized Trigger
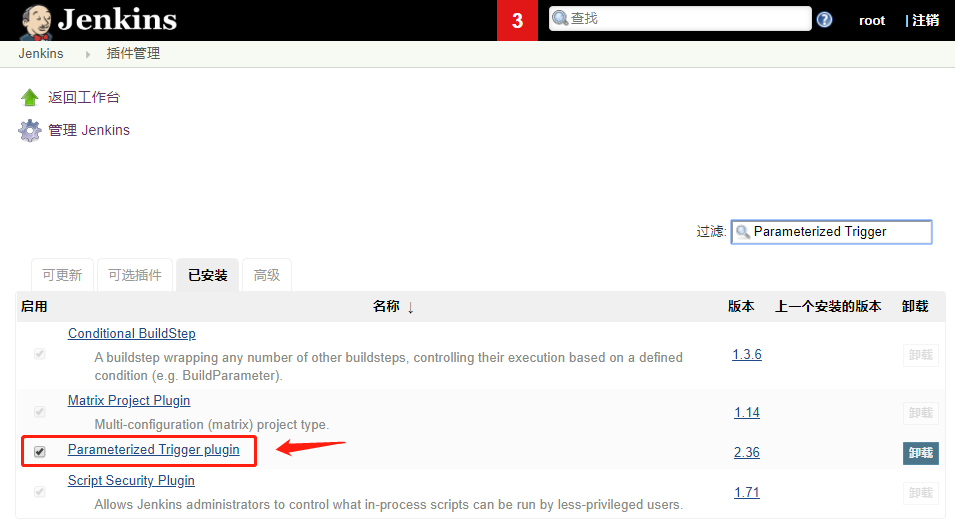
- Trigger another project after the build is completed

Configure post build actions

Verify post build actions
jenkins distributed
- In the scenario of many jobs, a single jenkins master executes code clone, compilation, packaging and construction at the same time. Its performance may have bottlenecks, which may affect the code deployment efficiency and jenkins officially provides jenkins distributed construction. Many jobs are scattered to different jenkins slave nodes, greatly improving the processing capacity of running jobs.
Configuring the slave node java environment
-
The Slave server creates a working directory. If slave needs to execute compiler job, it also needs to configure the java environment and install the same basic running environment as git, svn, maven and master. In addition, it also creates the same data directory as master, because the path invoked in the script has only one path relative to one master. This path must be consistent between the master node and each node node.
-
Prepare the Jenkins slave server and configure the host 192.168.26.74 of the jdk environment
//Determine working directory
pwd
/usr/local/src

//Transfer the jdk installation package to the virtual machine
ls
jdk-8u241-linux-x64.tar.gz

//Unpack
tar xf jdk-8u241-linux-x64.tar.gz

//Create jdk soft connection
ln -sv /usr/local/src/jdk1.8.0_241 /usr/local/jdk

//Create java soft connection
ln -sv /usr/local/jdk/bin/java /usr/bin/
//Configure global environment variables
vim /etc/profile

...ellipsis...

export HISTTIMEFORMAT="%F %T `whoami` "
export export LANG="en_US.utf-8"
export JAVA_HOME=/usr/local/jdk
export CLASSPATH=.:$JAVA_HOME/jre/lib/rt.jar:$JAVA_HOME/lib/dt.jar:$JAVA_HOME/lib/tools.jar
export PATH=$JAVA_HOME/bin:$JAVA_HOME/jre/bin:$PATH

//Effective environment variable
source /etc/profile

//Verify java
java -version

java version "1.8.0_241"
Java(TM) SE Runtime Environment (build 1.8.0_241-b07)
Java HotSpot(TM) 64-Bit Server VM (build 25.241-b07, mixed mode)

//Be sure to create the Jenkins slave data directory
mkdir /var/lib/jenkins -p
Add slave node
- Jenkins - system management - node management - new node

- Some jenkins slave information

Add login credentials based on user name and password for Jenkins slave

Jenkins slave create log

If Jenkins slave does not have a java environment, an error is reported as follows

Verify the added Jenkins slave node
- Normal state

- Time out of sync status

Verify Jenkins slave process status
Pipelinee
- Official introduction address: https://jenkins.io/2.0/
- Pipeline plays an important role in helping jenkins realize the transformation from CI to CD. It runs in jenkins 2 The core plug-in of version x, in short, pipeline is a set of workflow framework running on jenkins, which connects the tasks that originally run independently on a single or multiple nodes to realize the complex publishing process that is difficult to complete for a single task, so as to realize the complex process arrangement and task visualization that is difficult for a single task. The implementation method of pipeline is a set of Groovy DSL, Any publishing process can be expressed as a Groovy script.
Pipeline syntax
-
Stage: a pipeline can be divided into several stages. Each stage is an operation step, such as clone code, code compilation, code testing and code deployment. The stage is a logical grouping and can be executed across multiple node s.
-
Node: node. Each node is a jenkins node, which can be either a jenkins master or a jenkins agent(node). It is the specific server executing the step.
-
Step: step is the most basic operation unit of jenkins pipeline. From creating a directory on the server to building a container image, it is implemented by various jenkins plug-ins. There can be multiple steps in a step.
Pipeline advantages
- Sustainability: the restart or interruption of jenkins will not affect the pipeline job s already executed
- Support pause: pipeline can choose to stop and wait for manual input or approval before continuing
- Extensibility: an extension that makes programming easier through groovy
- Parallel execution: the groovy script can realize the parallel execution and more complex interdependence between step s and stage s
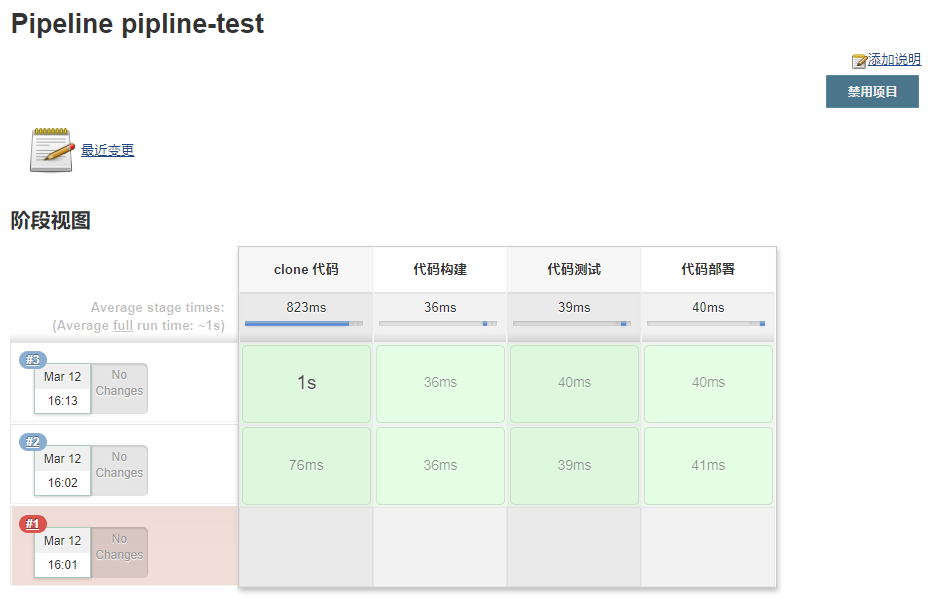
Pipeline job experiment
Create pipeline job

Testing a simple pipeline job run
- Pipeline definition Pipeline script save
- pipeline test command
node{
    stage("clone code"){
        echo "code clone"
    }
    stage("Code construction"){
        echo "Code construction"
    }
    stage("Code test"){
        echo "Code test"
    }
    stage("Code deployment"){
        echo "Code deployment"
    }
}
- Jenkins Web interface configuration

Execute pipeline job

Automatically generate pipeline script for pulling code
- Click pipeline syntax to jump to the generated script URL
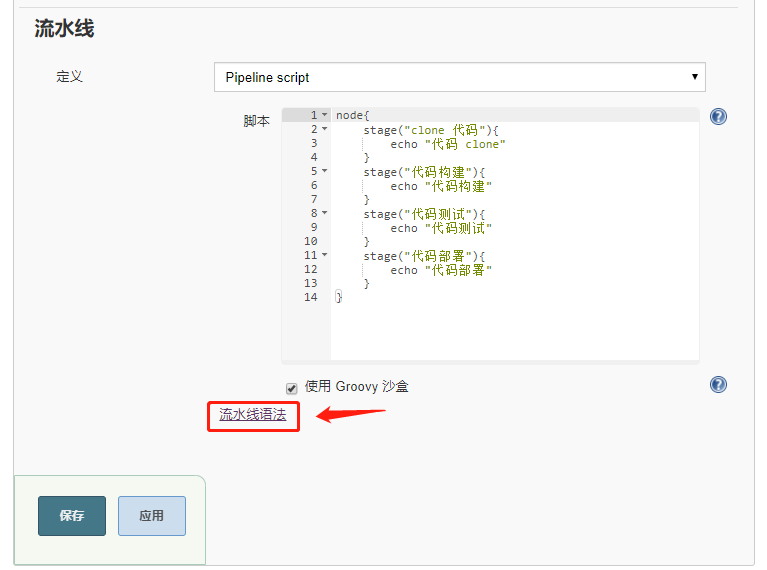
- Generate pipeline script

Change pipeline job
node{
    stage("clone code"){
       git branch: 'develop', credentialsId: 'd2b765e6-7495-4efa-8a2a-d40e2153631f', url: 'git@192.168.26.104:test-service/test-project.git'
    }
    stage("Code construction"){
        echo "Code construction"
    }
    stage("Code test"){
        echo "Code test"
    }
    stage("Code deployment"){
        echo "Code deployment"
    }
}
Execute jenkins job
Verify git clone log
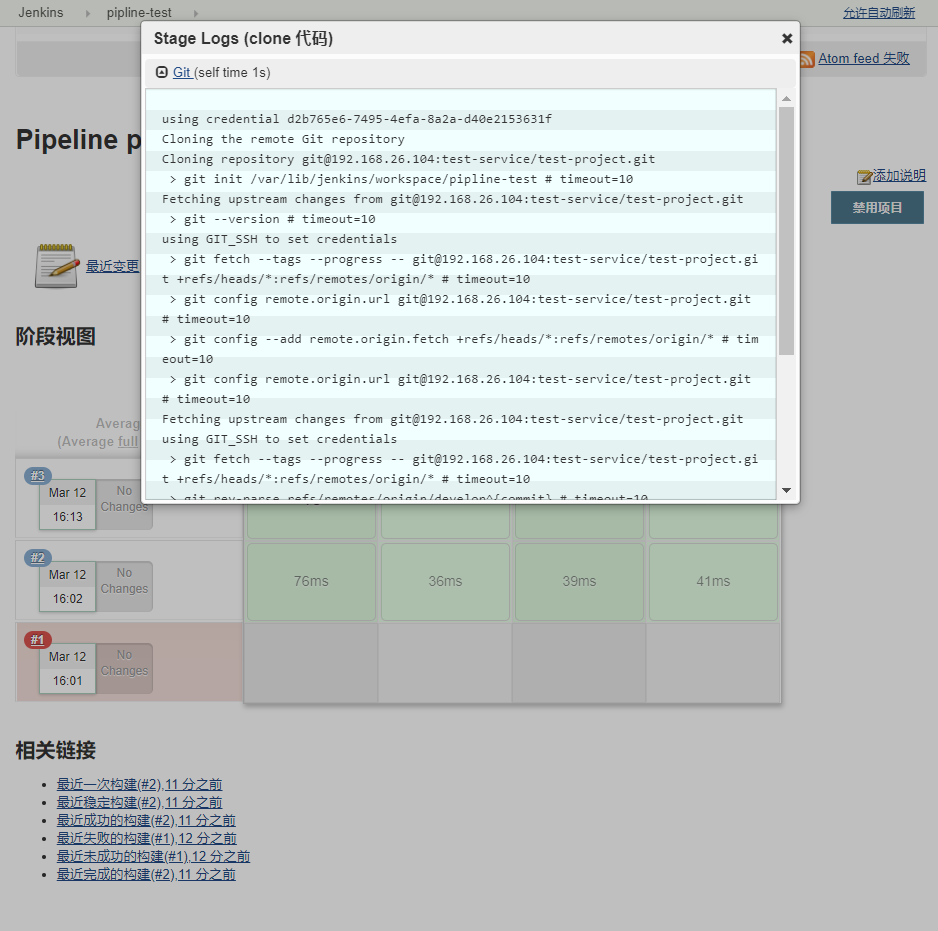
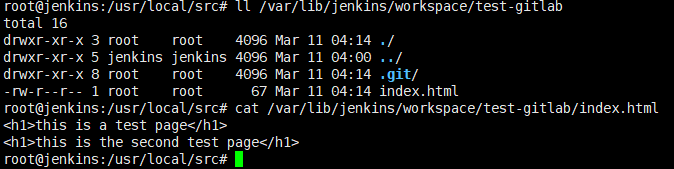
Jenkins server validates clone code data

Execute shell commands in Pipeline to package code
node{
    stage("clone code"){
      sh 'rm -rf /var/lib/jenkins/workspace/pipeline-test/*'
       git branch: 'develop', credentialsId: 'd2b765e6-7495-4efa-8a2a-d40e2153631f', url: 'git@192.168.26.104:test-service/test-project.git'
    }
    stage("Code construction"){
        sh 'cd /var/lib/jenkins/workspace/pipeline-test/ && tar czf code.tar.gz ./index.html'
    }
    stage("Code test"){
        echo "Code test"
    }
    stage("Code deployment"){
        echo "Code deployment"
    }
}
Pipeline deployment example
- Bind the corresponding Jenkins slave node to reduce the burden on the Jenkins master node
node("jenkins-node1"){  #Define here which node you want to use to run the job
    stage("clone code"){
      sh 'rm -rf /var/lib/jenkins/workspace/pipeline-test/*'
       git branch: 'develop', credentialsId: 'd2b765e6-7495-4efa-8a2a-d40e2153631f', url: 'git@192.168.26.104:test-service/test-project.git'
    }

    stage("Code construction"){
        sh 'cd /var/lib/jenkins/workspace/pipeline-test/ && tar czf code.tar.gz ./index.html'
    }

    stage("Code copy"){
        sh 'cd /var/lib/jenkins/workspace/pipeline-test/ && scp code.tar.gz www@192.168.26.34:/data/tomcat/tomcat_webdir/'

        sh 'cd /var/lib/jenkins/workspace/pipeline-test/ && scp code.tar.gz www@192.168.26.44:/data/tomcat/tomcat_webdir/'
    }

    stage("stop it tomcat service"){
        sh 'ssh www@192.168.26.34 "/apps/tomcat/bin/catalina.sh stop"'

        sh 'ssh www@192.168.26.44 "/apps/tomcat/bin/catalina.sh stop"'
    }

    stage("Code deployment"){
        sh 'ssh www@192.168.26.34 "rm -rf /var/lib/jenkins/workspace/pipeline-test/myapp/* && cd /data/tomcat/tomcat_webdir && tar xf code.tar.gz -C /data/tomcat/tomcat_webdir/myapp/"'

        sh 'ssh www@192.168.26.44 "rm -rf /var/lib/jenkins/workspace/pipeline-test/myapp/* && cd /data/tomcat/tomcat_webdir && tar xf code.tar.gz -C /data/tomcat/tomcat_webdir/myapp/"'
    }

    stage("start-up tomcat service"){
        sh 'ssh www@192.168.26.34 "/apps/tomcat/bin/catalina.sh start"'

        sh 'ssh www@192.168.26.44 "/apps/tomcat/bin/catalina.sh start"'
    }
}
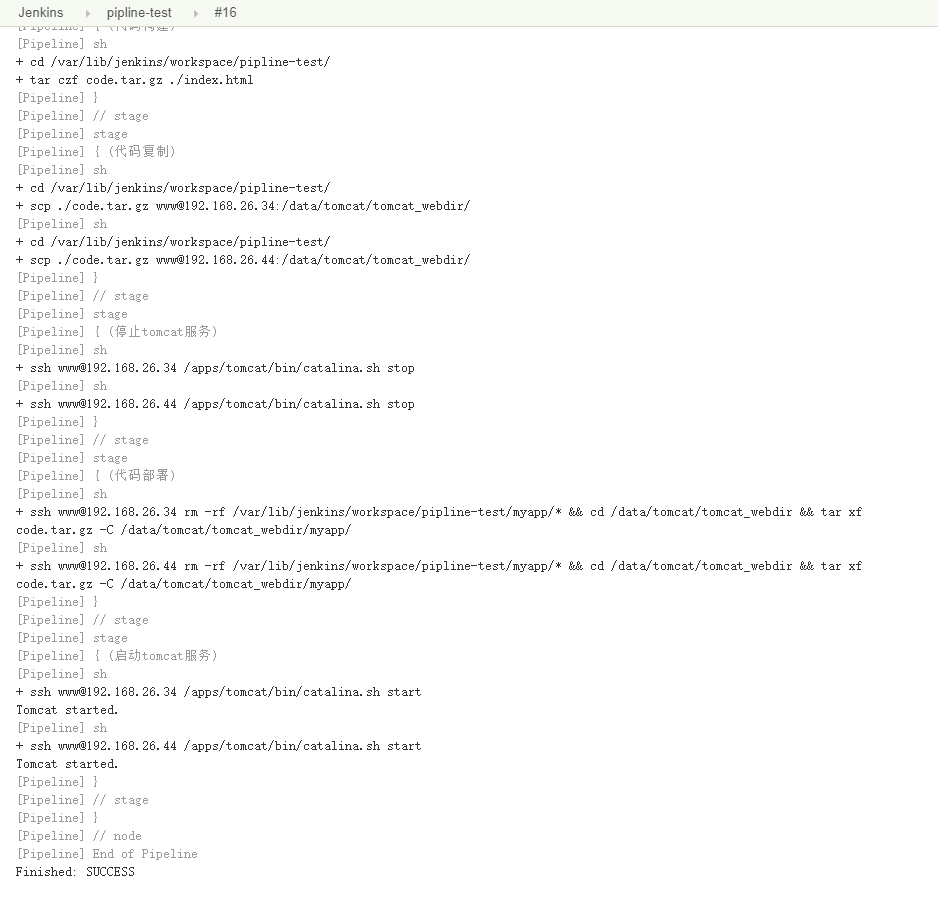
Execute and validate pipeline job
- Submit the code in gitlab, execute pipeline job and verify whether the code is finally deployed to the web server

Specify the node node to run the job
- The git command needs to be installed on the node node
//jenkins-slave-1 install git command
apt-get install git -y
- The node node needs to connect with the web server to log in without key
//Generate key
ssh-keygen

//Pass the key to realize secret free login, otherwise permission rejection will be reported when executing the job
ssh-copy-id www@192.168.26.34
ssh-copy-id www@192.168.26.44
Verify that Jenkins slave performs the build
Verify web server code version
- Gitlab resubmits the code and tests the code deployment
//Determine working directory
pwd
/var/lib/jenkins/workspace

//Log in to gitlab
git config --global user.email "952098151@qq.com"
git config --global user.name "bokebi"

//Clone project from the specified branch
git clone -b develop git@192.168.26.104:test-service/test-project.git

//Determine working directory
pwd
/var/lib/jenkins/workspace/test-project

//Modify code
vim index.html
<h1>this is a pipeline-test page</h1>

//Add to staging area
git add ./*

//Submit to local warehouse and label
git add commit -m "pipeline-test"

//Submit to remote warehouse
git push


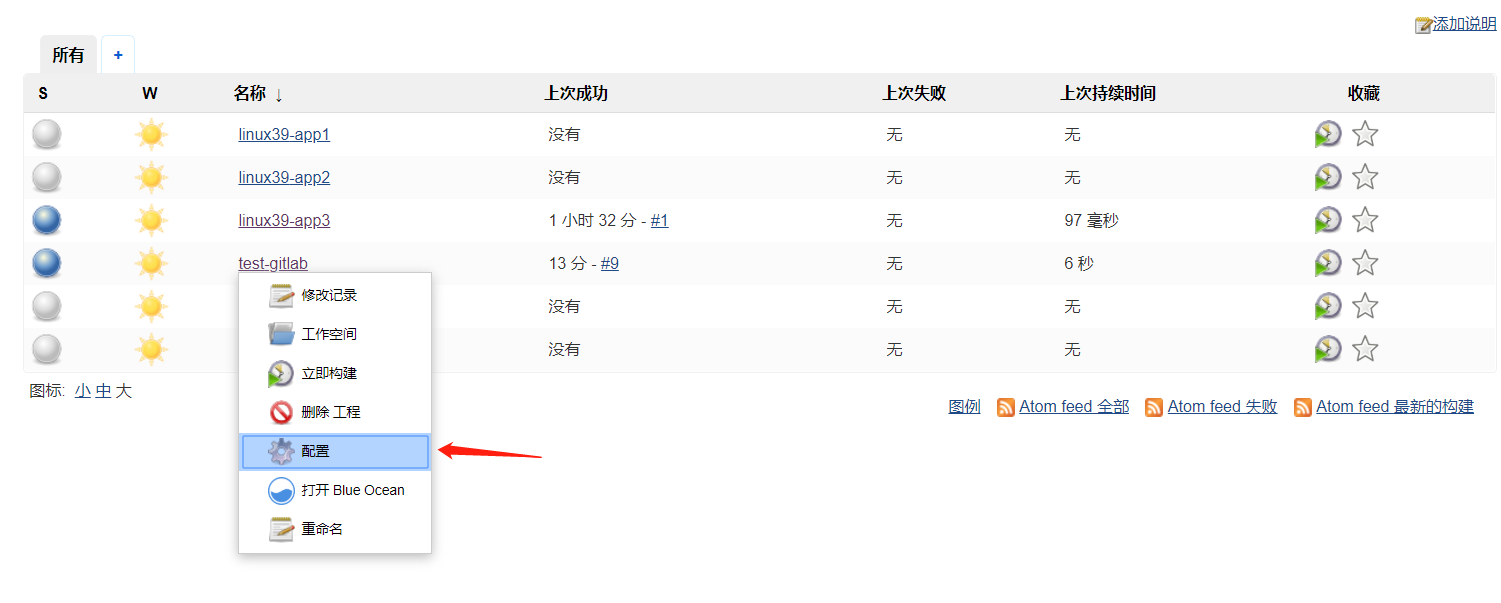
view
- Views can be used to archive job s for grouping display. For example, a business view is displayed in one view. After the build pipeline plug-in is installed, there will be a + sign for creating views.

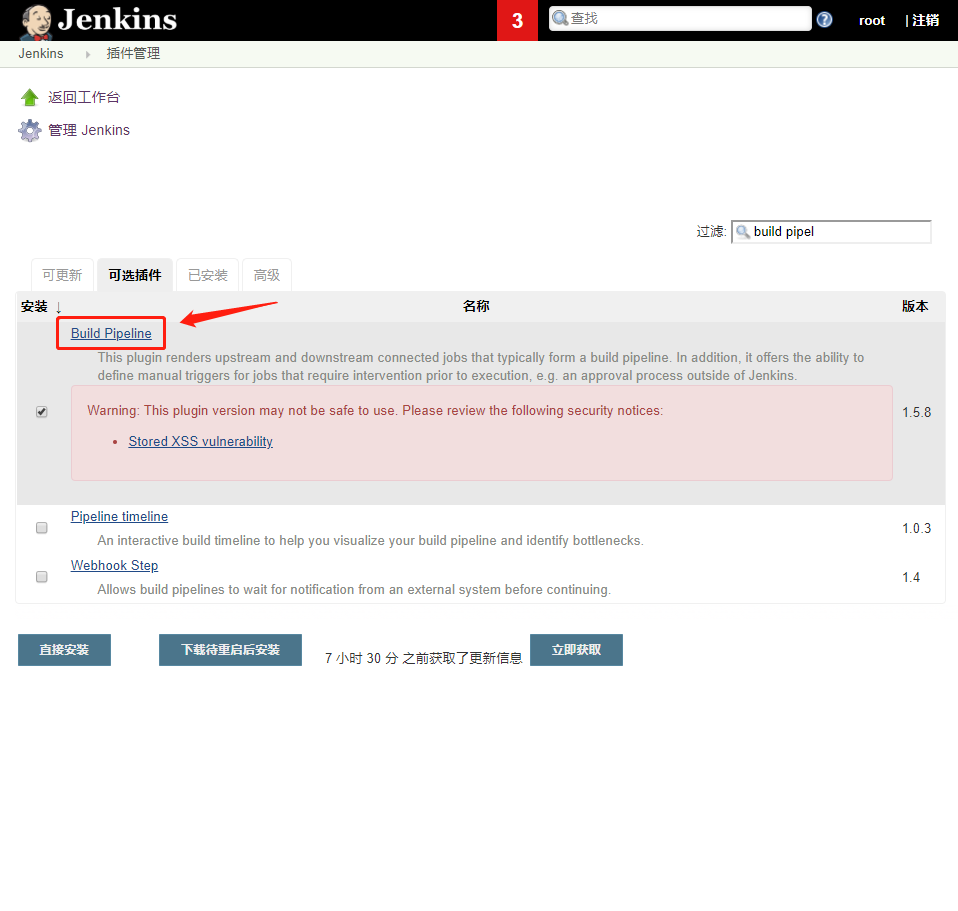
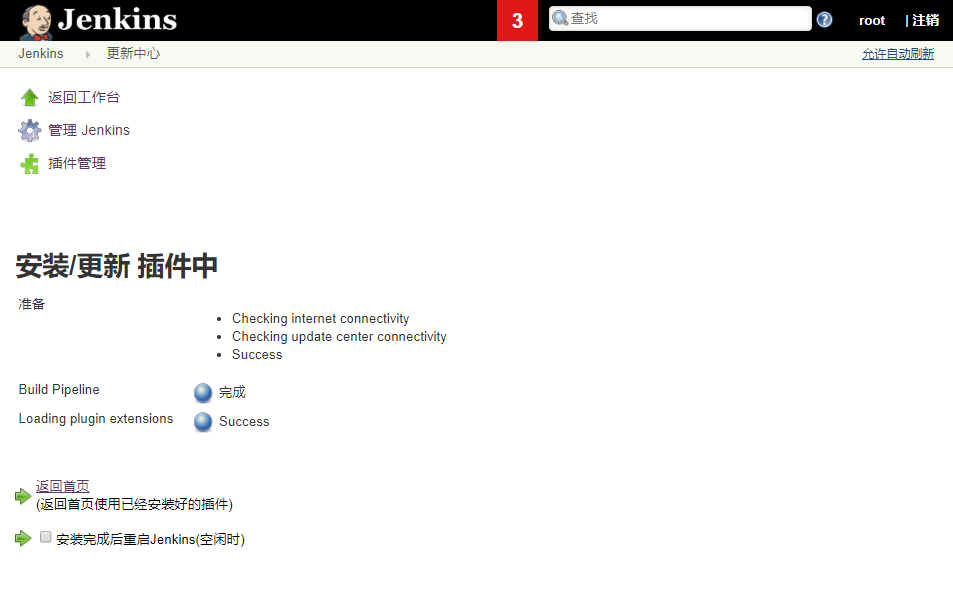
Install the build pipeline plug-in
- jenkins system management plug-in management
- Plug in installed successfully
Create a new view
Create pipeline view

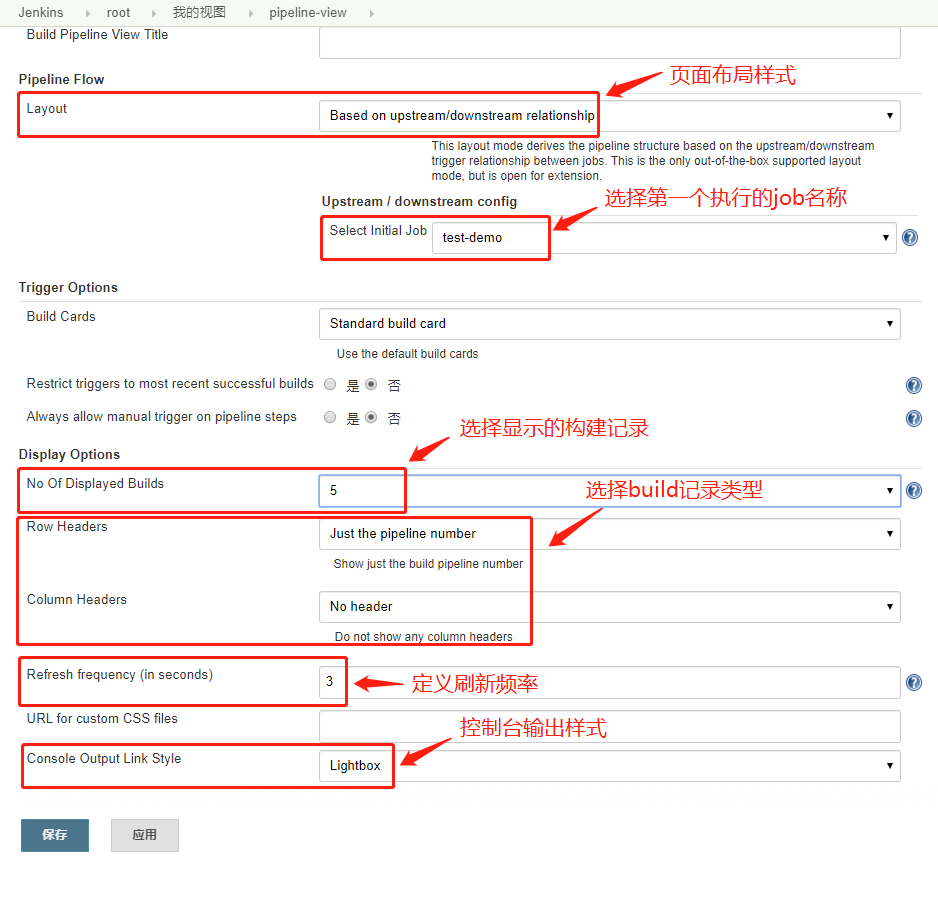
Define view configuration information
Web display interface

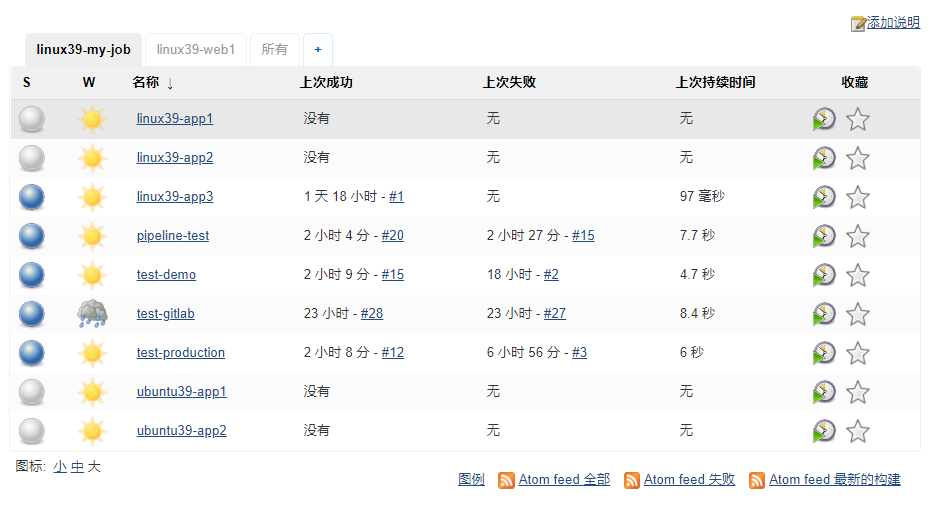
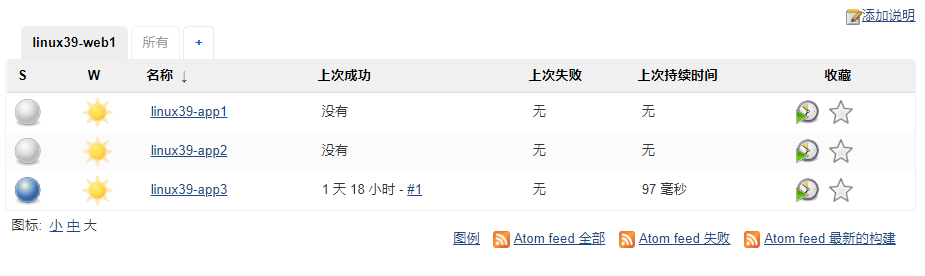
List view
- The list view has many usage scenarios. It is used to save jobs of a business to a list view for classification management, that is, jobs of different businesses are placed in different list views.
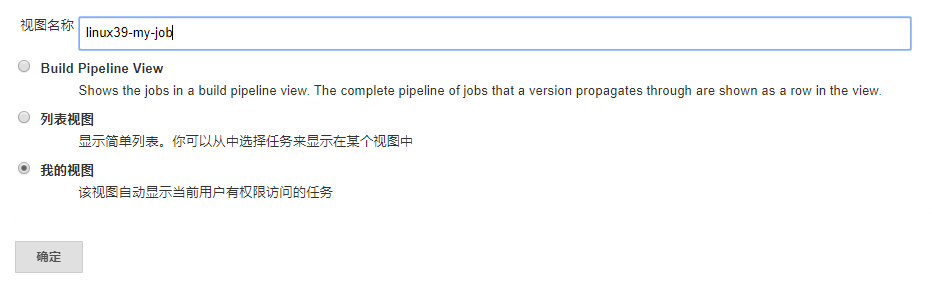
Define view name

Select task

Final state
My view
- My view will display the job s that the current account has access to, so you need to divide the number permission in advance.
Create my view
- After creation, click Save to directly see the job s for which the current account has permissions
Final state