1, Jenkins and continuous integration
1) What is Jenkins?
Jenkins is an open source software project, which aims to provide an open and easy-to-use software platform and make continuous integration of software possible. Jenkins is a continuous integration tool developed based on Java, which is used to monitor continuous and repeated work. Its functions include:
1) Continuous software release / test project;
2) Monitor the work performed by external calls;
Friends interested in Jenkins can refer to Jenkins Chinese document
2) What is continuous integration?
1) What is integration?
It refers to the process of compiling, releasing, testing and launching the code!
2) What is continuous integration?
Efficient and continuous iterative code integration!
3) How to achieve continuous integration efficiently and accurately?
We need a set of automatic and visual platform to help us!
2, Why can Jenkins help us with continuous integration?
1) Jenkins is an open source and JAVA based continuous integration system
Because of the rich plug-in support, we can easily get through all aspects of the version library, test build environment and online environment. And rich and friendly notification users and development, management personnel.
2) Simple installation and maintenance
It's not too complicated to install Jenkins. And it supports a common platform.
3) Common Java applications
In the process of enterprise software construction, JAVA application engineering is a little complex, because of complex construction and code online, and service restart. In the whole process, it takes a lot of time, but Jenkins can integrate maven's compilation method well, and use the support of automatic plug-ins and custom development scripts. So it is widely used in the continuous integration platform of JAVA engineering.
Most of the packages used next are from Tsinghua University open source image station Download!
3, Deploy and install Gitlab
1) Install gitlab
[root@jenkins ~]# yum -y install  epel-release curl openssh-server openssh-clients postfix cronie policycoreutils-python
#Installation dependency
[root@jenkins ~]# wget https://mirrors.tuna.tsinghua.edu.cn/gitlab-ce/yum/el7/gitlab-ce-12.3.5-ce.0.el7.x86_64.rpm
#Get gitlabRPM package
[root@jenkins ~]# rpm -ivh gitlab-ce-12.3.5-ce.0.el7.x86_64.rpm
#Install gitlab package
[root@jenkins ~]# vim /etc/gitlab/gitlab.rb
external_url 'http://192.168.1.10'
#Change to local IP address for easy access
[root@jenkins ~]# gitlab-ctl reconfigure
#Reconfigure gitlab. Even if you do not modify the configuration file, you need to reconfigure gitlab after installation
[root@jenkins ~]# netstat -anpt | grep -w 80
#Make sure its port 80 is listening
2) Configure gitlab
As shown in the picture: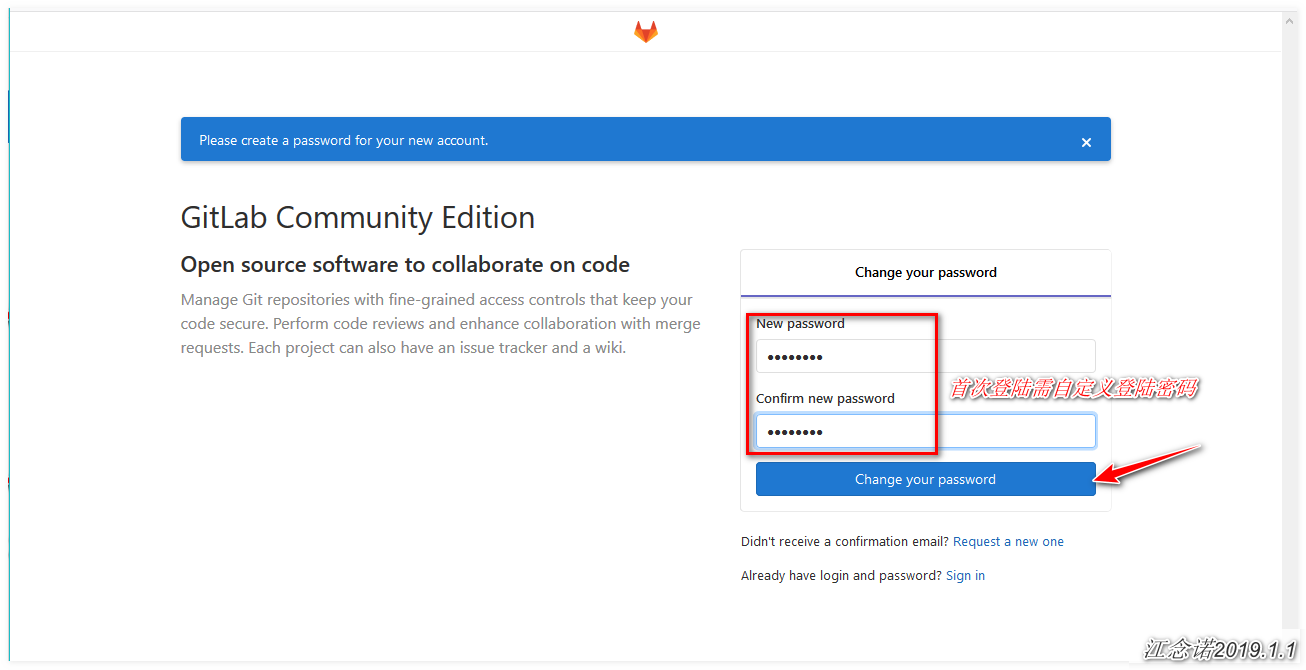
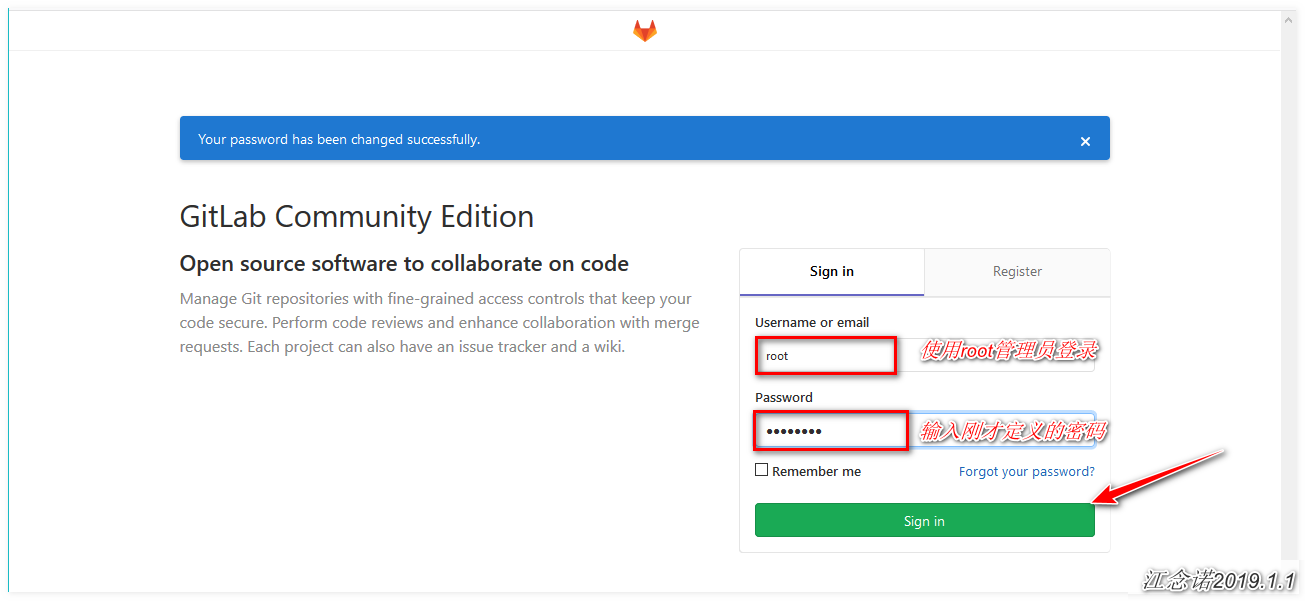
3) Generate key pair for ssh login
[root@jenkins ~]# ssh-keygen -t rsa -C "1454295320@qq.com"      #Generate key pair
[root@jenkins ~]# cat ~/.ssh/id_rsa.pub          #View public key and copy
ssh-rsa AAAAB3NzaC1yc2EAAAADAQABAAABAQDuyAYPbmf92Pi6OOfcbdi7BCxN+Fq1c5lc4YAQhM8420mwfT4WltUOSXUidxR2oT3ViXSxwzlOr+XoHJ4YJEeQ3jIeXr5aSwtU5YTNgvVA+SYk0uvPLJg11NdEuMkSIB2K8PJ9zSxvppKbAkynmLEyZ1n61j5NbbApjgMslUqdB10vWowSE/Xoo11ugooQH2y3GxVrSv/EMeaVkToMVFM7BWx0pLBLi+tMJpb6Aj0pOSyv5rBj0hA1+2qrPQ3DtJc4QGMK+FRyxw/N13slfmoLzZ+6bF9oyNQZNWa9isL5C80srZhF7JkCrscYMIo0hOCkYOLVGJDFSgxiceG9ZmYh 1454295320@qq.com
Next, you need to operate on the web page. As shown in the picture: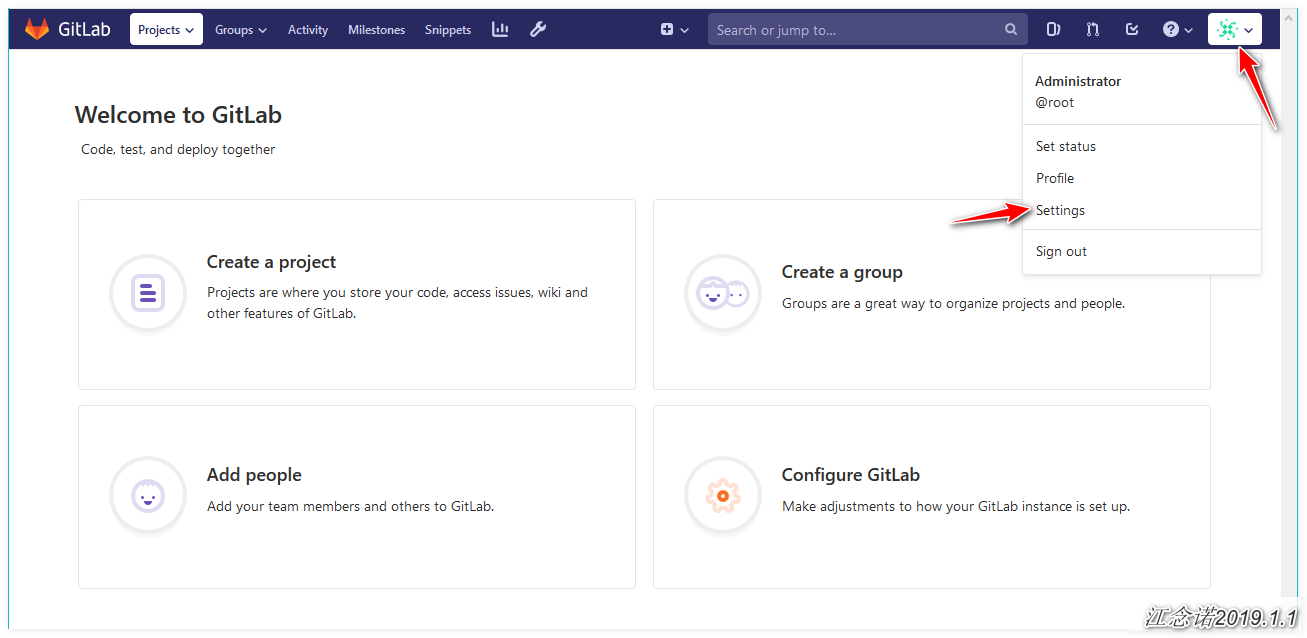
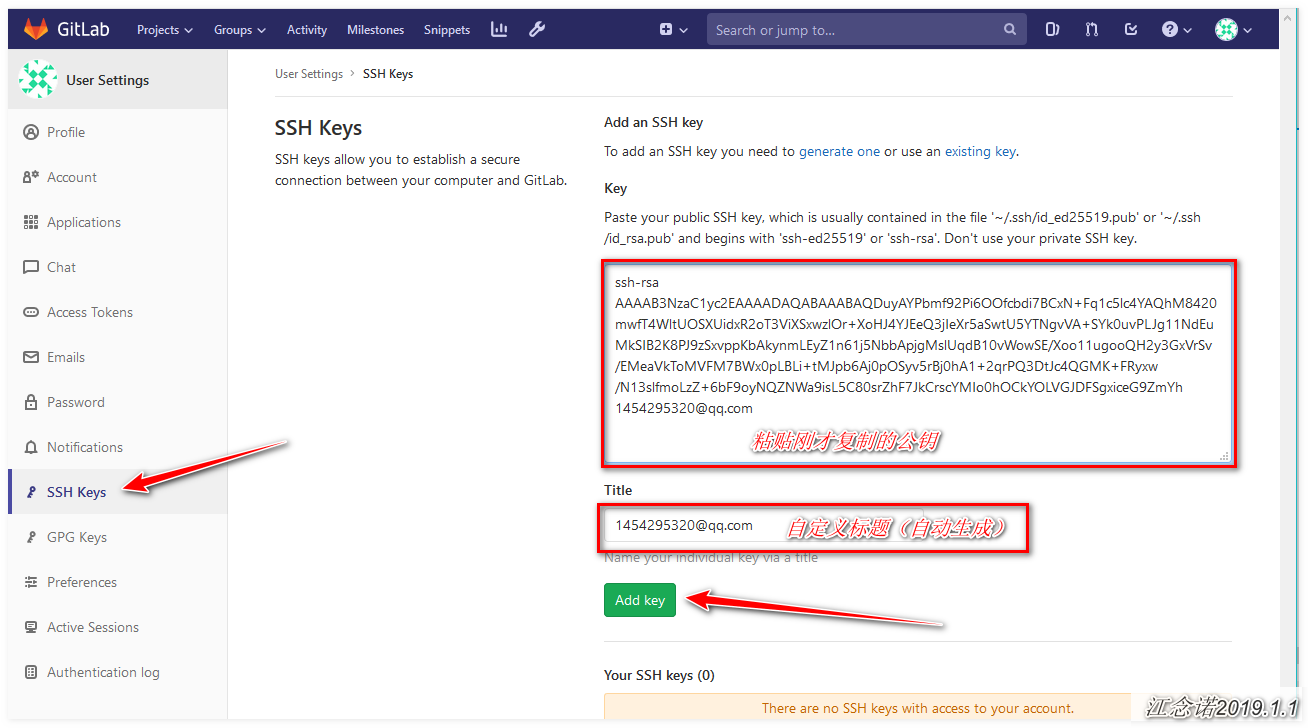
4) Create a library
As shown in the picture: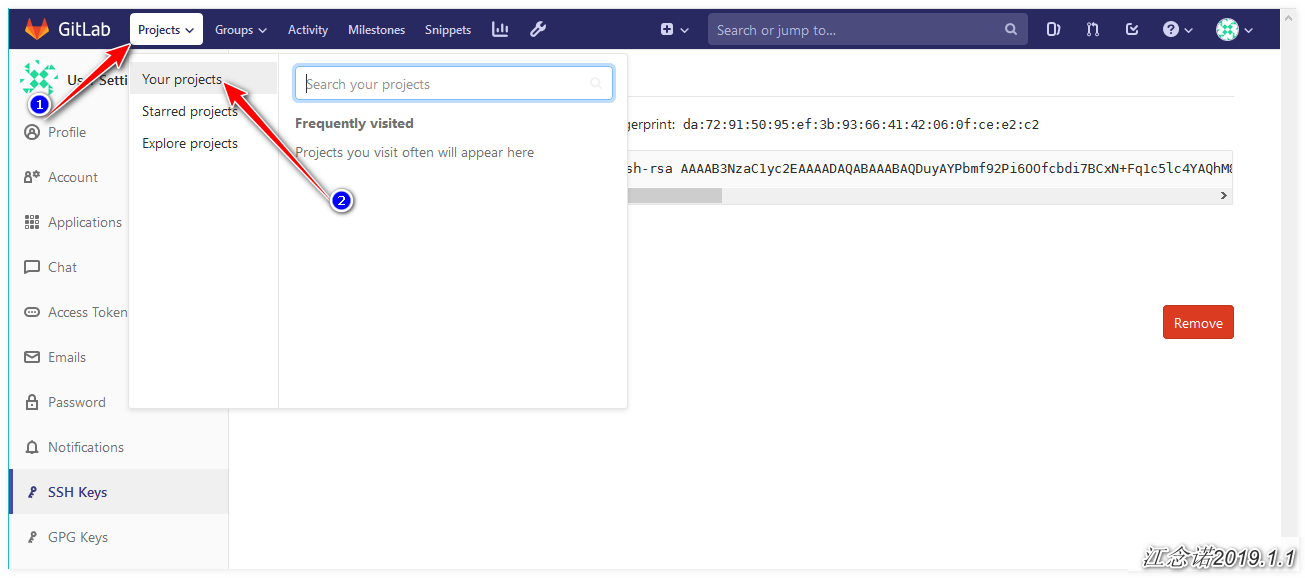
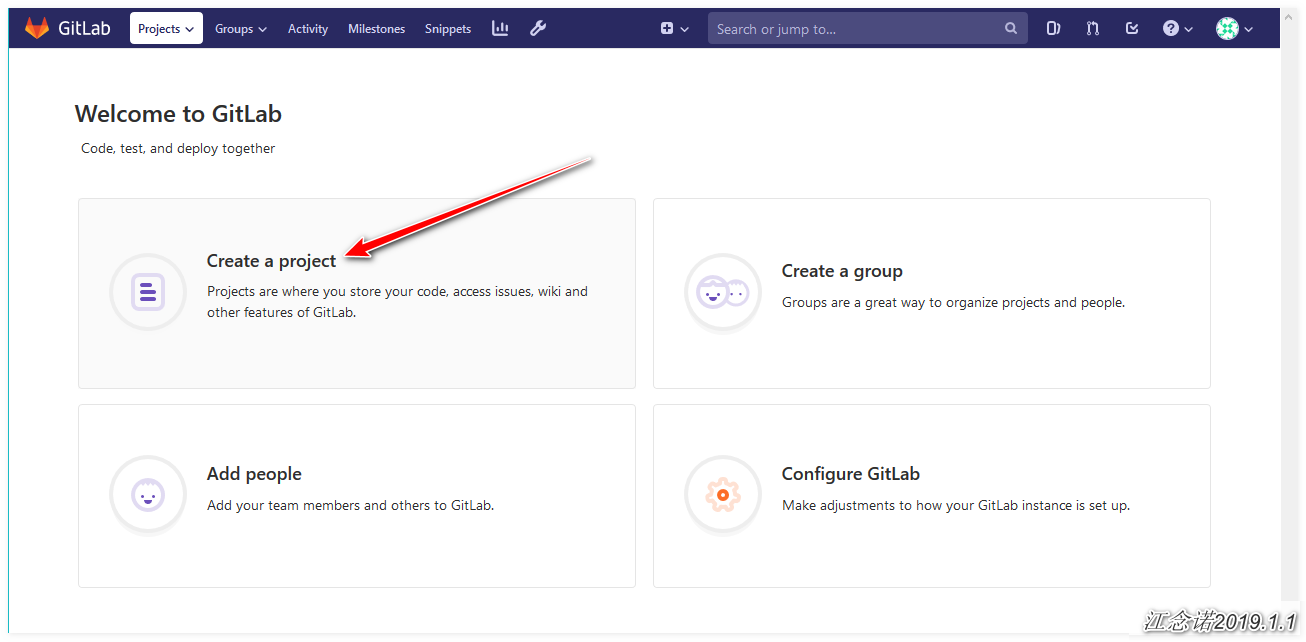
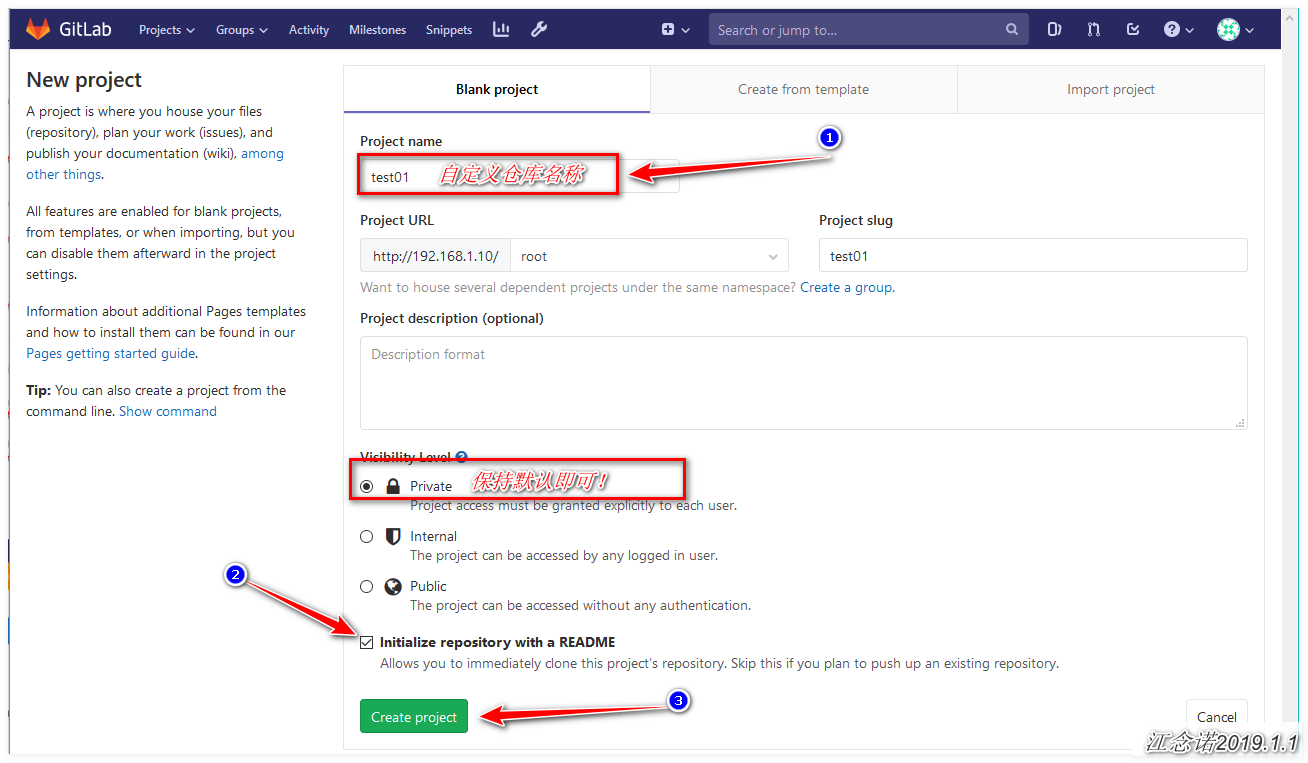
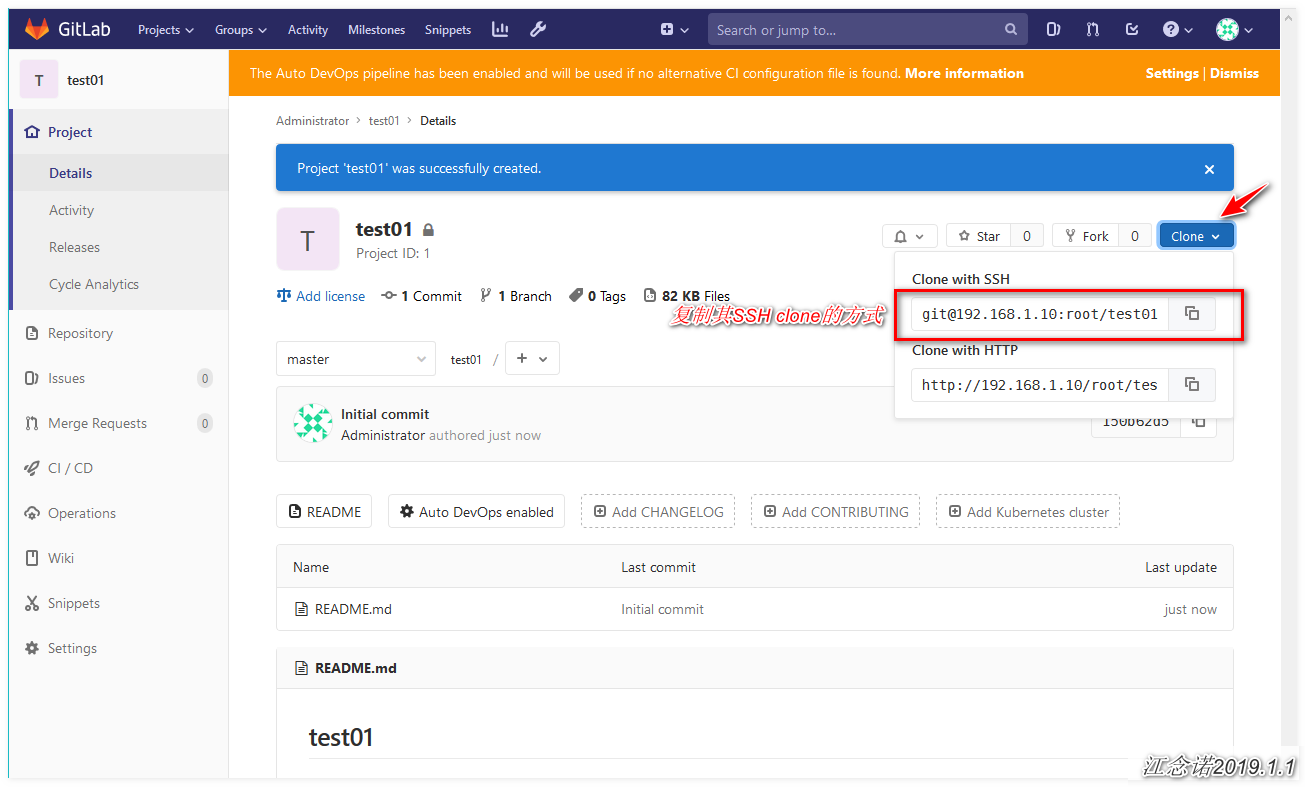
5) Test on local server
[root@jenkins ~]# git clone git@192.168.1.10:root/test01.git
#Perform the clone operation. Enter yes at the prompt for the first time!
[root@jenkins ~]# cd test01/
[root@jenkins test01]# ls
README.md
#Enter the cloned library and check whether it is consistent with the content of the library created by the web page
[root@jenkins test01]# git config --global user.name admin
[root@jenkins test01]# git config --global user.email admin@admin.com
#Self report home, simple declaration of user name and email address
[root@jenkins test01]# echo "hello world" > 123.txt
[root@jenkins test01]# git add 123.txt
[root@jenkins test01]# git commit -m "commit form local first"
#Create a file to test
[root@jenkins test01]# git push origin master
#Push the local test file to the remote (gitlab)
6) gitlab verification
After refreshing the page, as shown in the figure: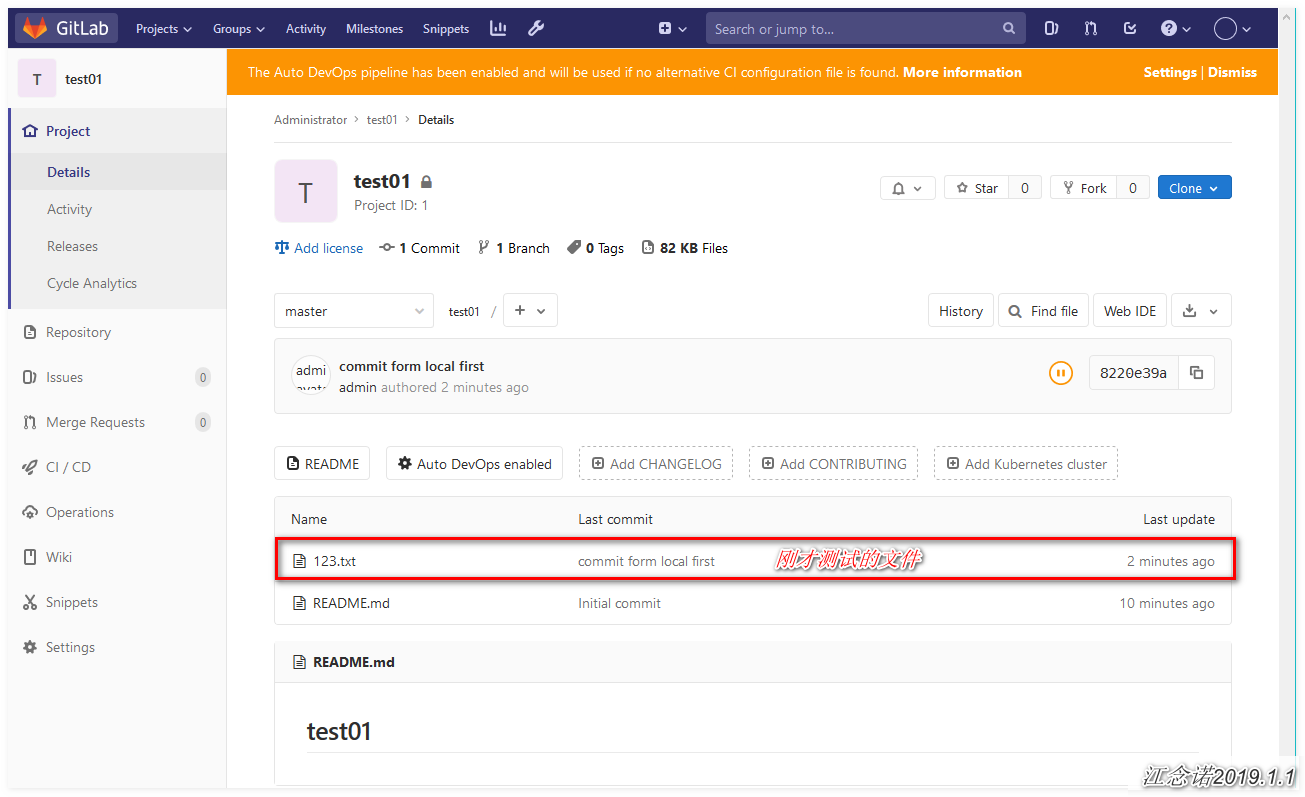
This is the end of gitlab configuration. Next, install Jenkins!
4, Deploy and install Jenkins
1) Install Jenkins
[root@jenkins ~]# wget https://mirrors-i.tuna.tsinghua.edu.cn/jenkins/redhat/jenkins-2.172-1.1.noarch.rpm
#Get Jenkins package
[root@jenkins ~]# rpm -ivh jenkins-2.172-1.1.noarch.rpm
#Install Jenkins
[root@jenkins ~]# rpm -ql jenkins               #View the location of Jenkins related files
[root@jenkins ~]# sed -i 's/JENKINS_PORT="8080"/JENKINS_PORT="8081"/g' /etc/sysconfig/jenkins
#Since the components of gitlab have occupied port 8080, you need to change the listening port
[root@jenkins ~]# /etc/init.d/jenkins start               # Start Jenkins service
[root@jenkins ~]# ss -lnt | grep 8081                 #Make sure the port is listening
LISTEN     0      50          :::8081                    :::*
2) Configuration of Jenkins web page
As shown in the picture: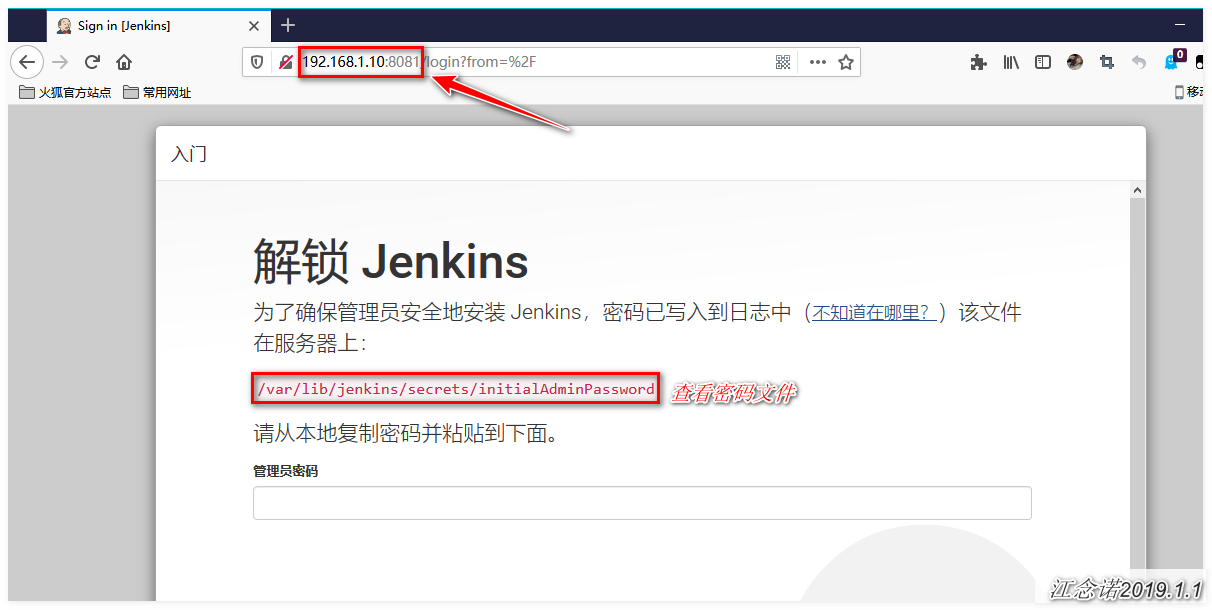
[root@jenkins ~]# cat /var/lib/jenkins/secrets/initialAdminPassword
c6e0fcde793648e9b4bad088e8896897
#View and copy password information
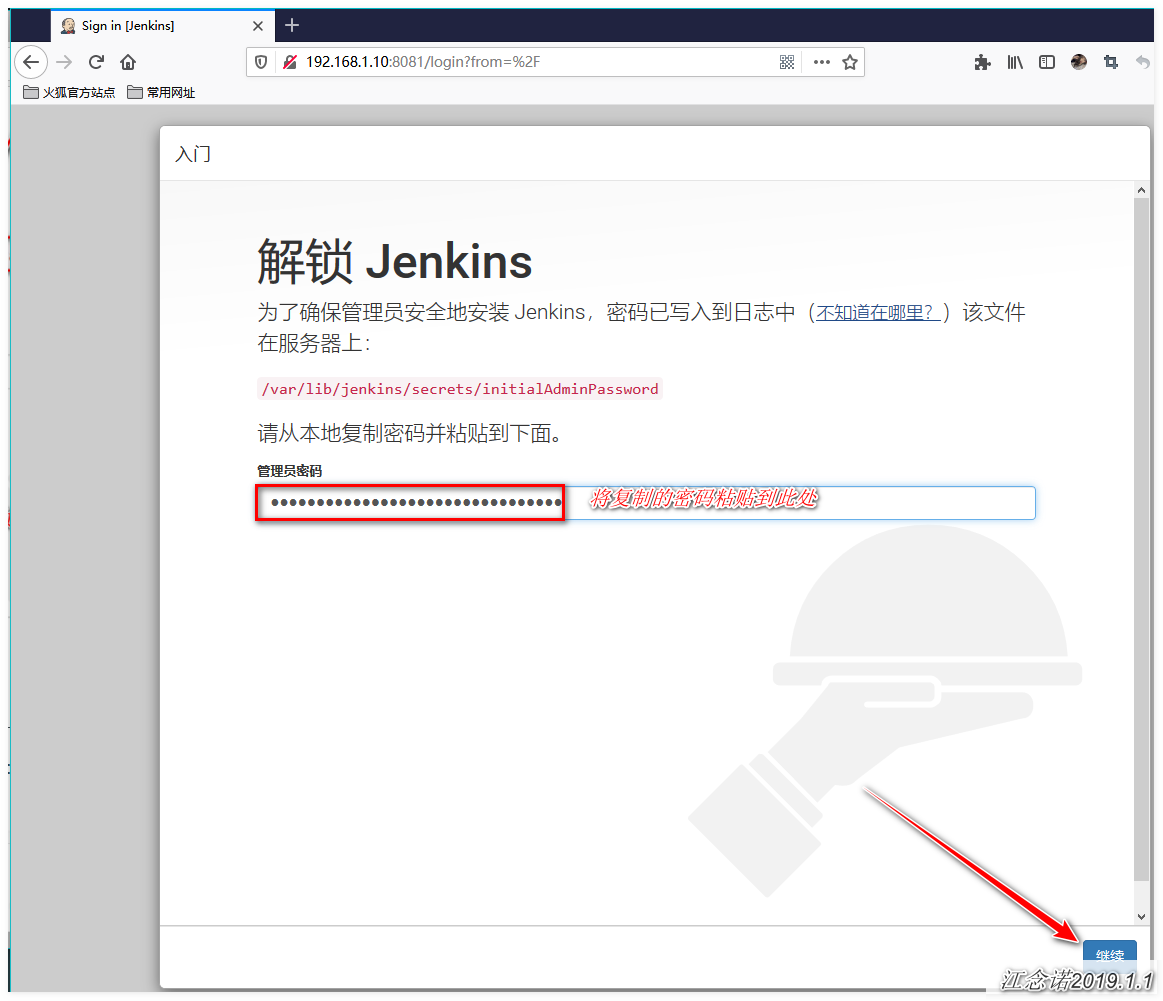
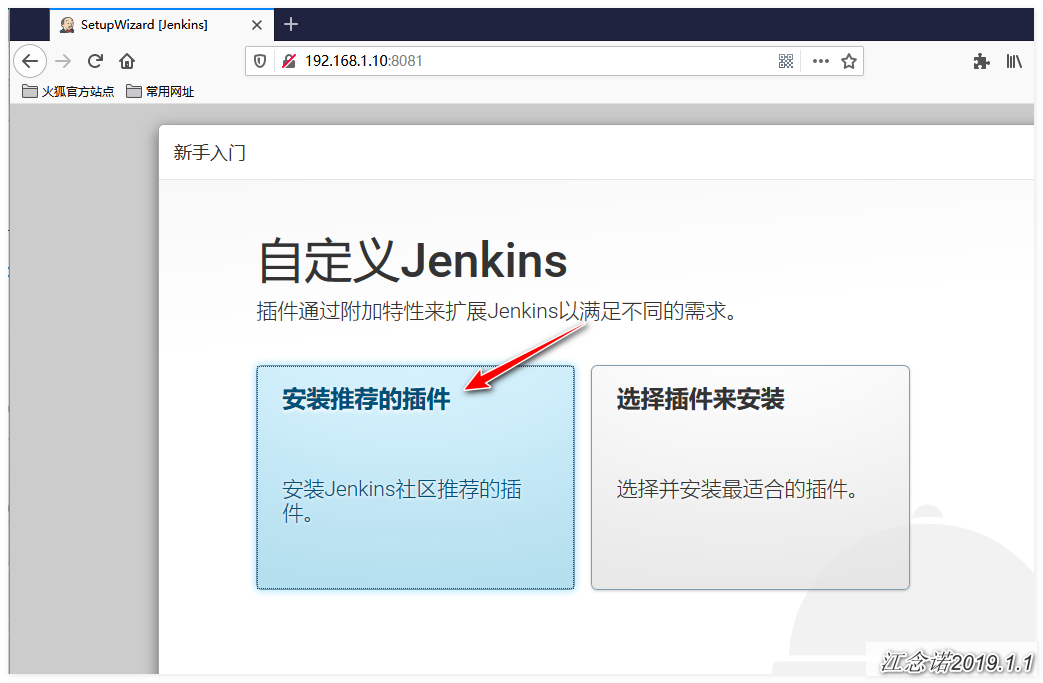
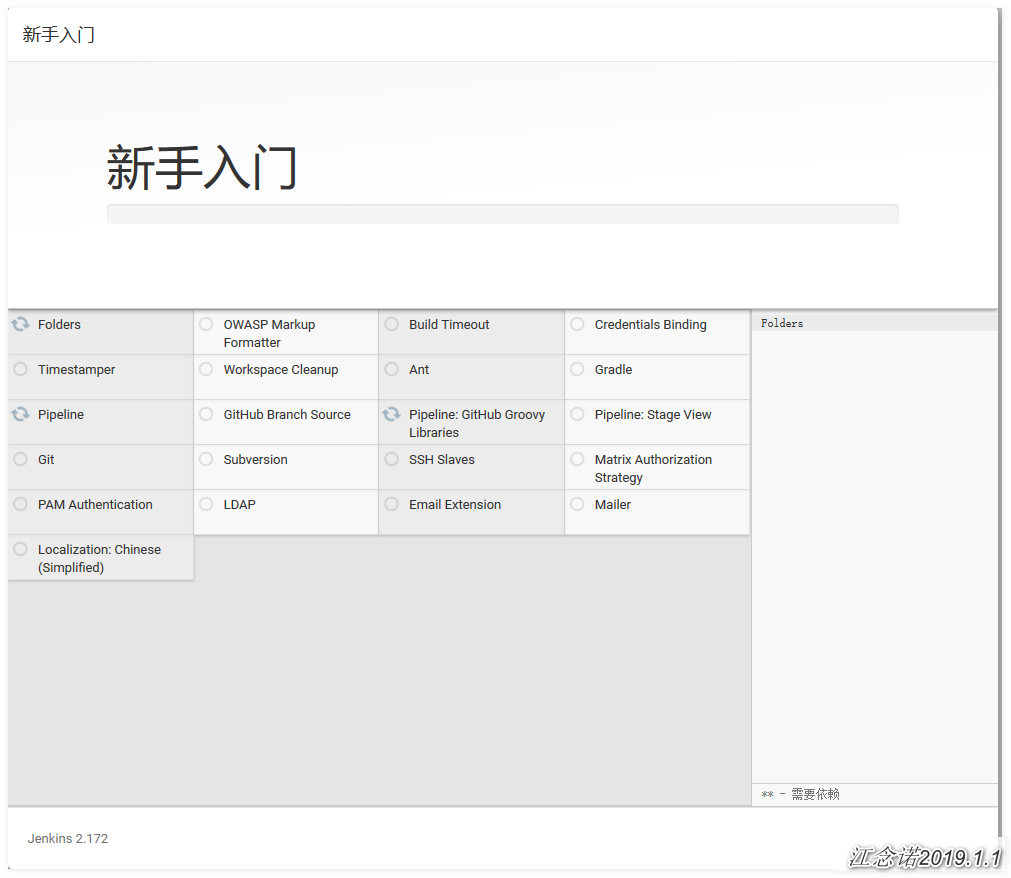
Because it takes a long time to download its plug-in, another method is adopted:
After installing a plug-in, disconnect the network! download Required software
[root@jenkins ~]#  tar zxf jenkins-plugins.tar.gz -C /var/lib/jenkins/
[root@jenkins ~]# /etc/init.d/jenkins restart
Visit the web page again, as shown in the figure: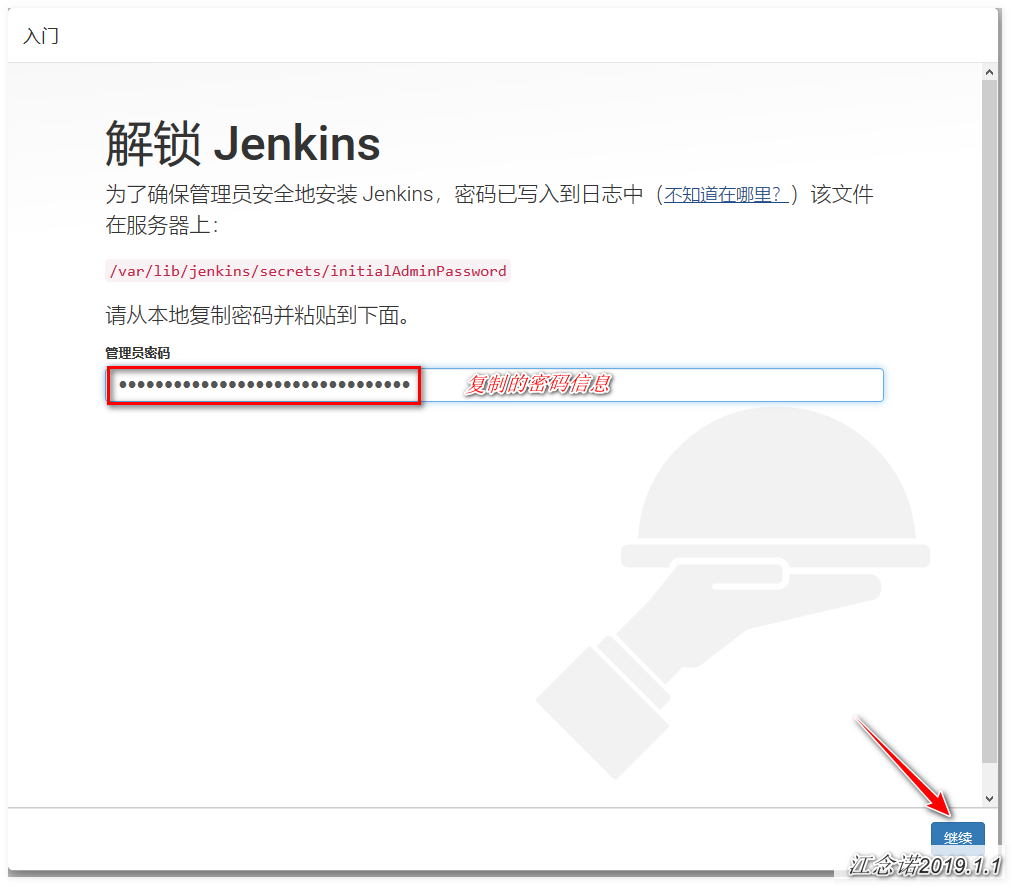
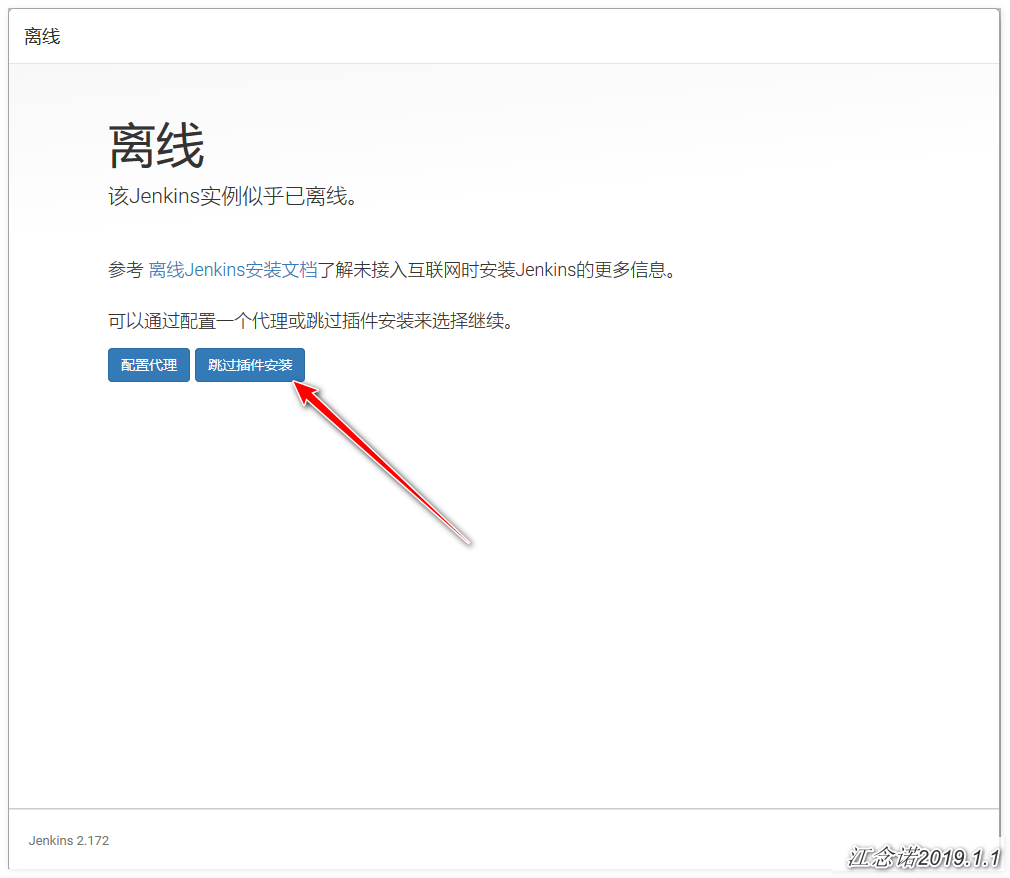
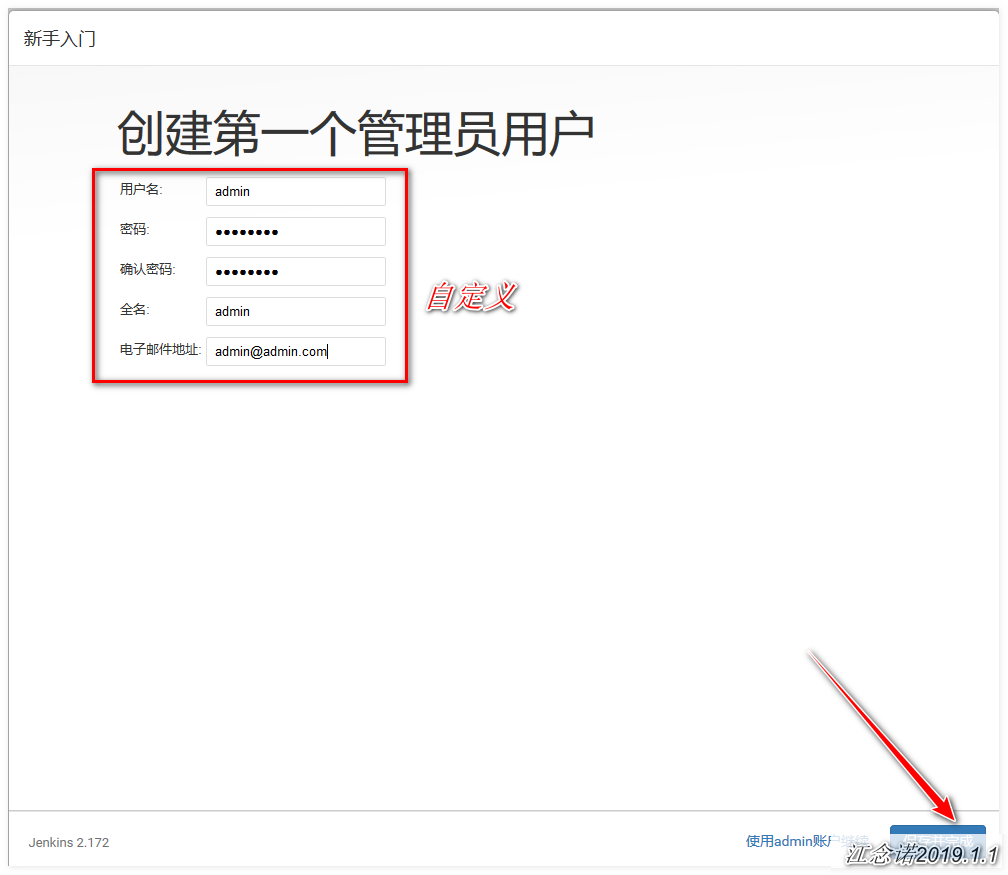
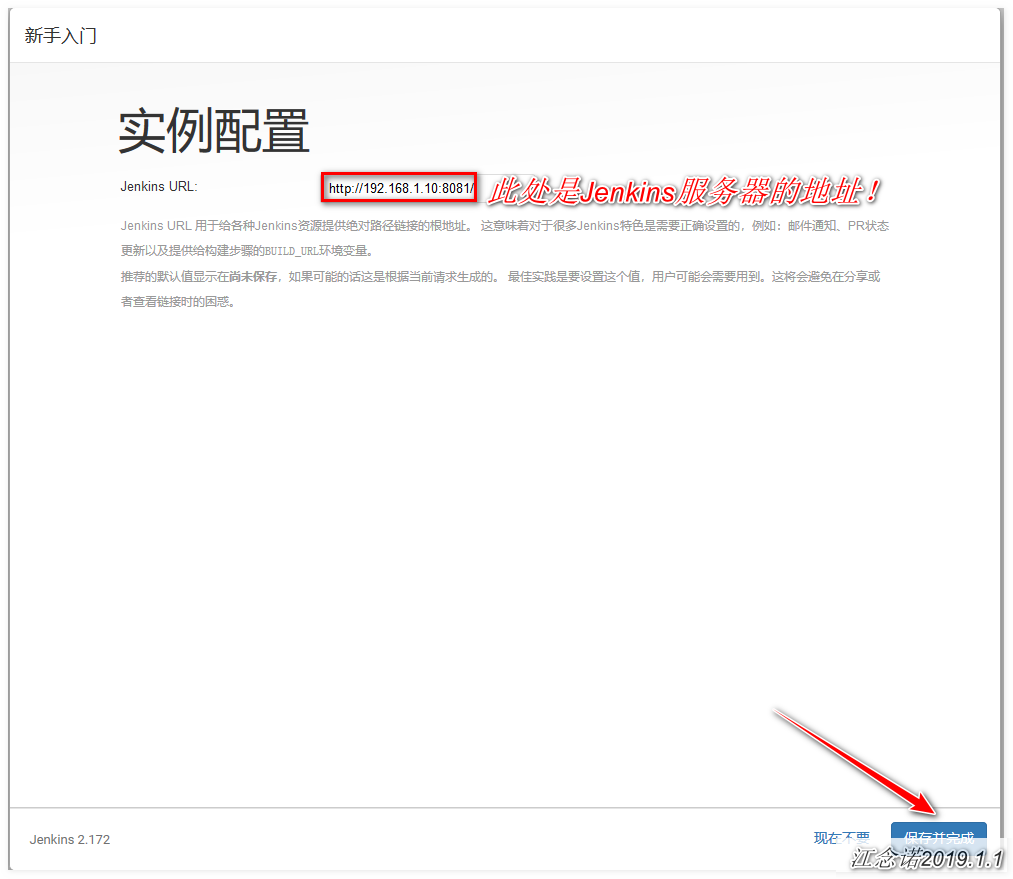
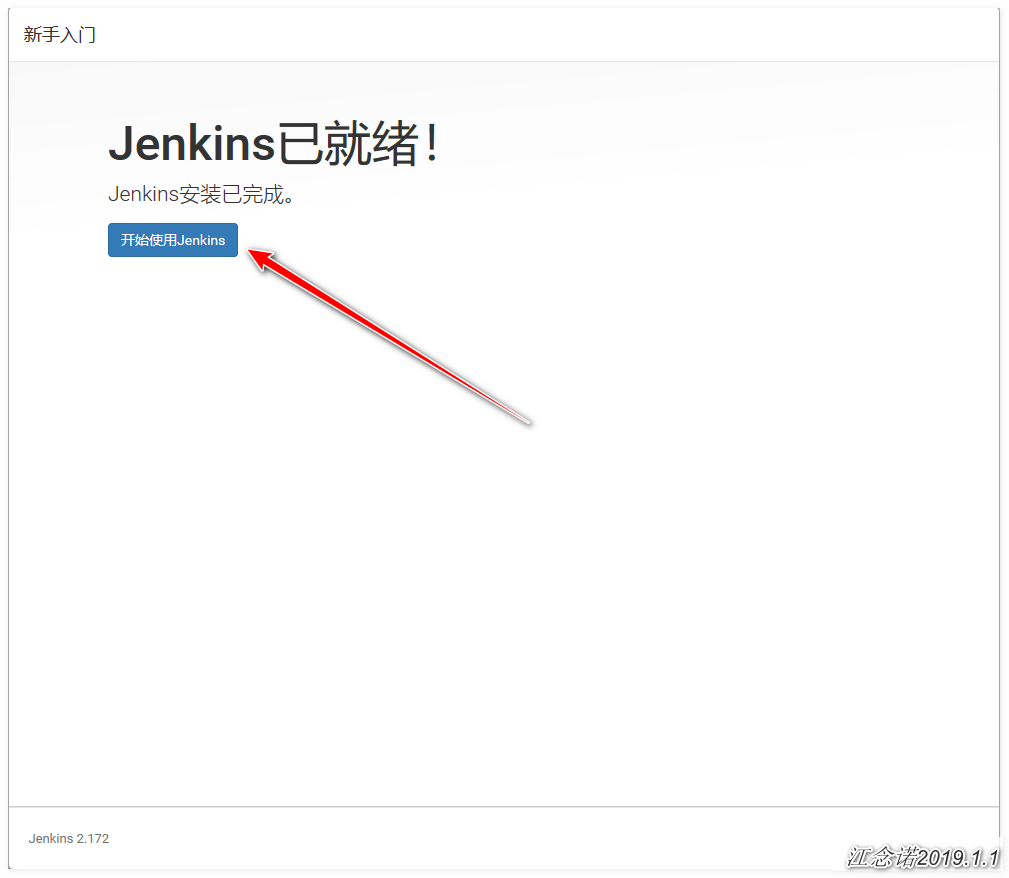
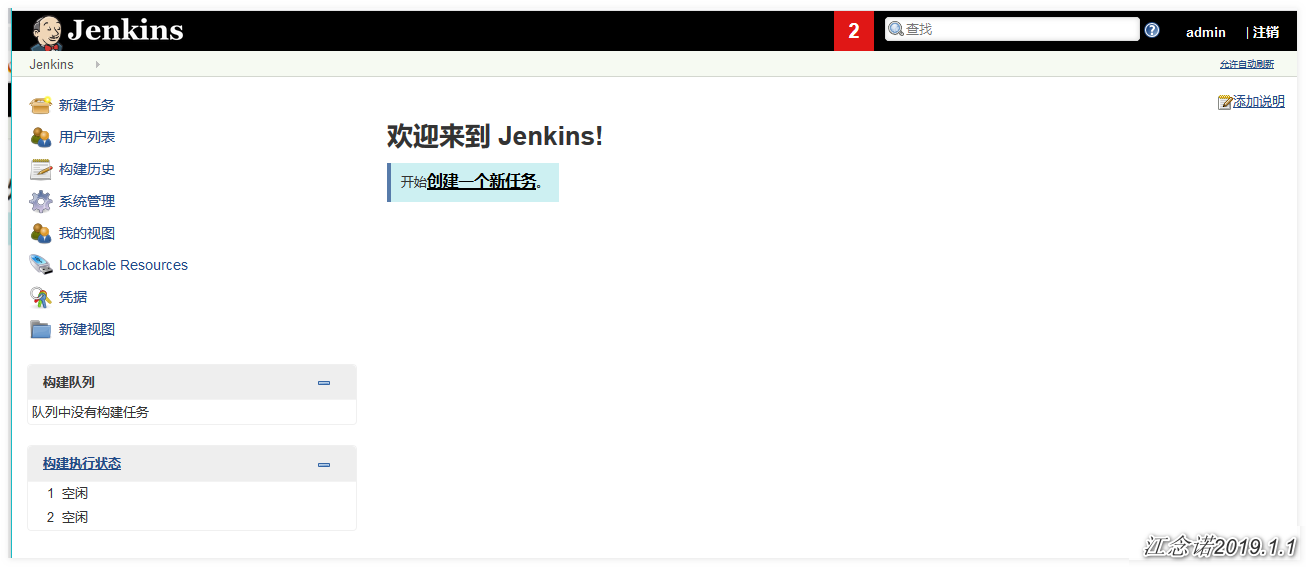
You can already see Jenkins's work page!
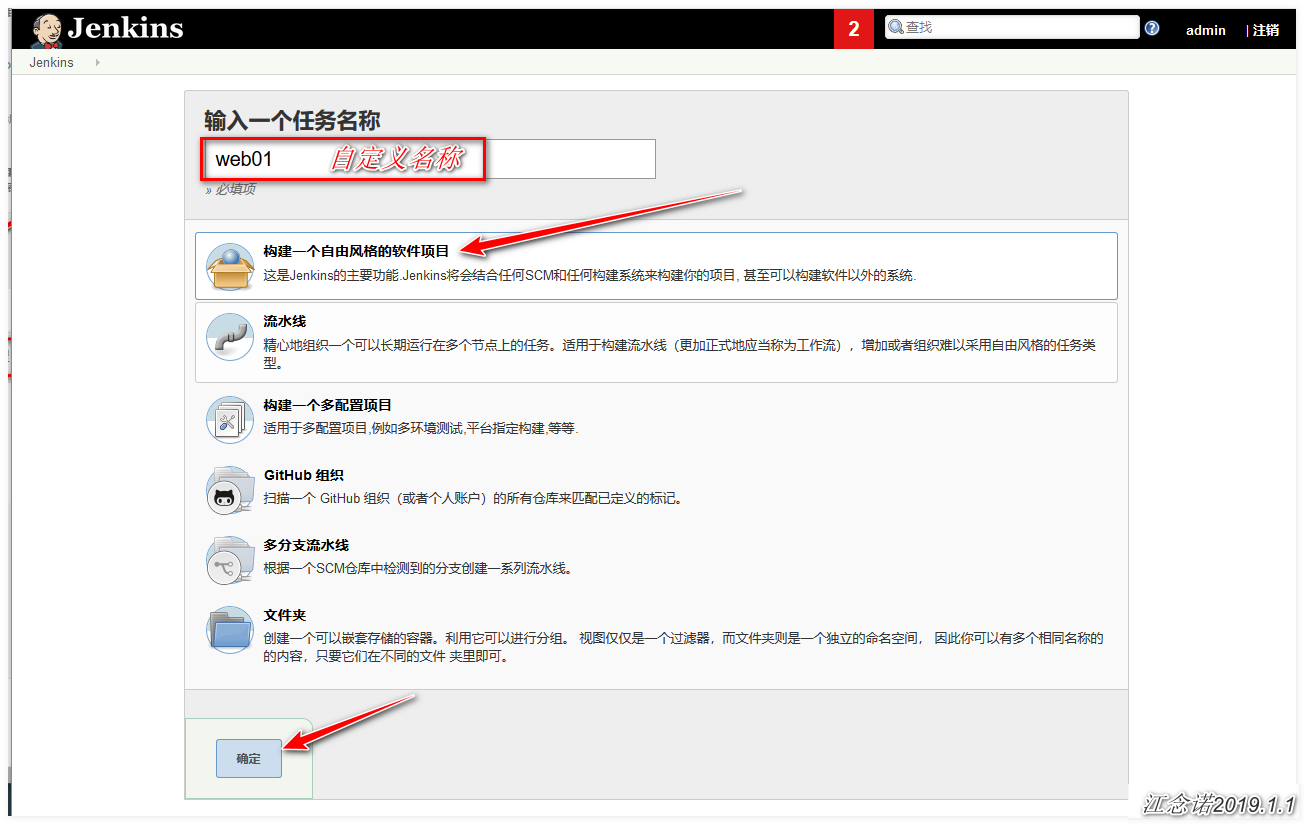
3) Configure the warehouse code of Jenkins pulling Gitlab
As shown in the picture: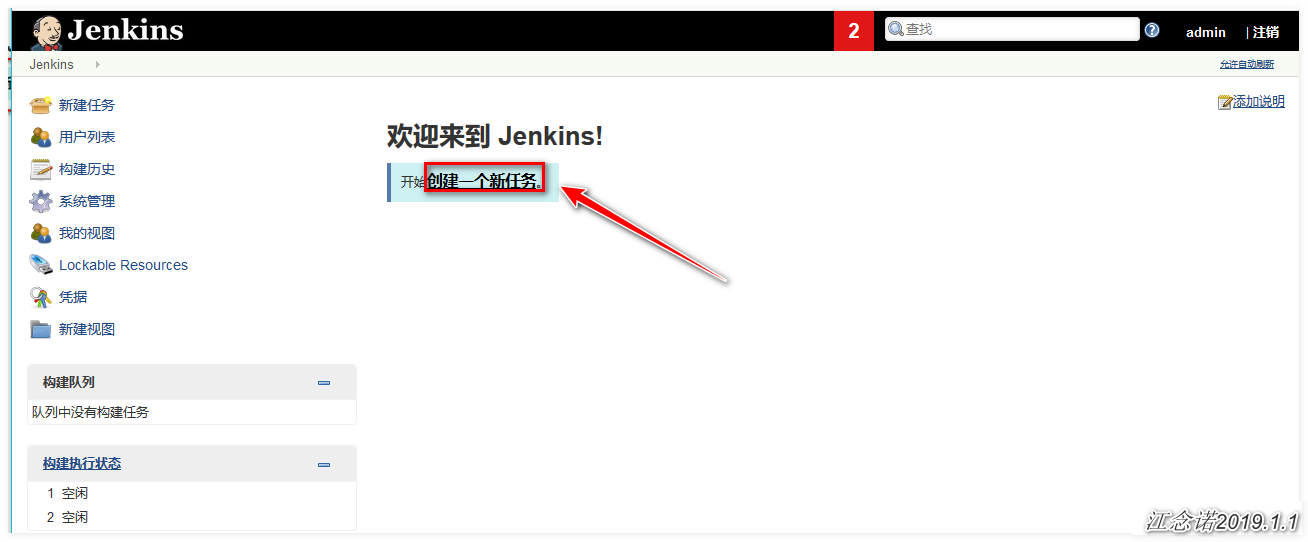
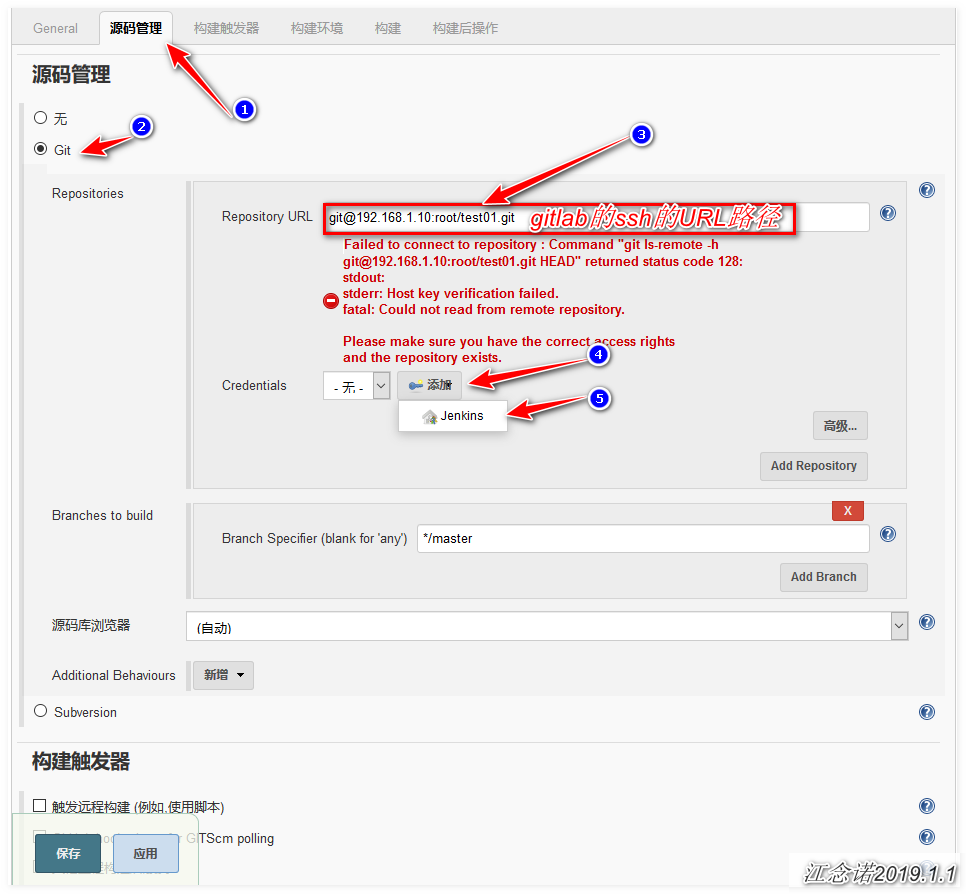
Because SSH is used to get the code, a key pair is needed. The public key has been stored on gitlab. The information in red in the figure above is that the private key cannot be found, so you need to add the private key manually next!
[root@jenkins ~]# cat ~/.ssh/id_rsa            #View private key and copy all contents
-----BEGIN RSA PRIVATE KEY-----
MIIEpAIBAAKCAQEA3uXh+36ATD8j2CQGovVpPUvIF6kFf2ei6YseQjQ6wcnpou9N
xjhWmzJ2LKinnfS0SJ9QsuM1b7i0EJal8VyOql2H1aeQ93y/awVavN5Z5+68zgKv
/PdDRDK9EDd5ANWP9YiTpeoXPL6aupF4BsAKpmYtQrY1ApEeDMc9KMI7cT33+MW7
GdSRYPxHMH0NRtamEbRasJhBQbUlrDb3HpAUz0Xax9CTQzIBxLeRE/Fpq2+pG2iD
c+LzLYEGSswX/u2QPE3uRkZFM7mit3NS/PRslzF1RuYMWNoYo9pnSCOOkWCM+Qxx
NvIMGIkbEs5RnU/m5Y9CaycD2x6RKNcO84nYPQIDAQABAoIBAQCC893zalun8AR4
DJpVjQbaOzaAKA4RzupYeSI61QKcLar0zdEMnrbLETd6f0+SrlxouiioIHKZg5NO
l6NAjRdIIhEWxg6WSBURpCCuC5gYehs0kUGhxgcf/wsyhtSxV8bvAuFzvXcPeg/f
gm1Y0eSv5CG9Kt0z99wGt9tHoe1YVm4mvvxwIDs359C3bt9SwT57xBSkC5THExdx
Xfdtn3jGiHgQpEf/D3JS1MK+nK6B5kULKTXQUeUm2BWzKodCu38jEnoZA2ARhiZa
ONKf7qgl6mV+5jT2iKd8Ams4F3NwOp9muCGjc1XXcO8JSnAZ1/P7QVVGv1FrHbNZ
r9F6dSKhAoGBAPOua5XjR8bfsRyCL5ftTwGva7ND3YuhLLK72FFiIelVuoC9e6aj
kqiC/vHnjMG/KOVG9WDDT5HE8CdaRUj5l79u+EdeQRbWn40NxhlQTNS+69x8XCYB
zo5CFP5gd4KP1FHJig+Sujc2L2LQIiDaXhbtBMWHfMbP1Dm/9tQIO1xFAoGBAOoq
fyUXuLX/x+GimMIPTh8Z8okeVo8t3jxE6d5hVCZ5jlb3xcVM0KCTr/sqB689TPLh
fIYZfVRwNeJ2NpFWf8b8EK0FHnkEdwC8iBX/mNNXZou0TOCws1LfgE6UL1MXQXzL
QuVe9RayIMM/3RjALaV6DuHsqCtolFHlLLlPx5eZAoGADnPm36H2TN5Rk95I0lr5
16C+44f/6NsrWoJ3pwQJ/NvfzujuH4kOFr6GPnS8TXV4CHk37oBHBN9IWx0ohNaA
4JLFWP5HIAKkven2OOQhWnDkblRV5s8uoBNdSWURUYYUUrGAZcIPF104XET58Tbi
Y7u1D74kcWo8LRysmBDQ7H0CgYBliPHCoquL9xGzi65TDxHfuH+K5yW/RbNETNlf
fLJhUHngyeTubSVVS1SWQp48ZQc1lYJKH0lR0Kn8vSdiE7CqFmggrcSN0trK7fTQ
HRkmIpKrZw2iq9vFxnW7HNP8YmwZ8YTbMjZxleFQ6CM1dTcVtnw3iEdPMzSE4itn
Wul/mQKBgQDa07lHrrHPvcNQl9xuLEoDjoMkde8QxUd7DtLgnE4UW6Uz/A4Y19if
WkP3yimnjFKUuwaQCsFl/mnqxsSy62onaqdiEMIw/00ouWbi9v11Nl0ulLzSylkM
QNdraUsH3BkW2fNNSKWDLAyFAr4uL5xo30SUE0oX/v6MNdaTXmZrNg==
-----END RSA PRIVATE KEY-----
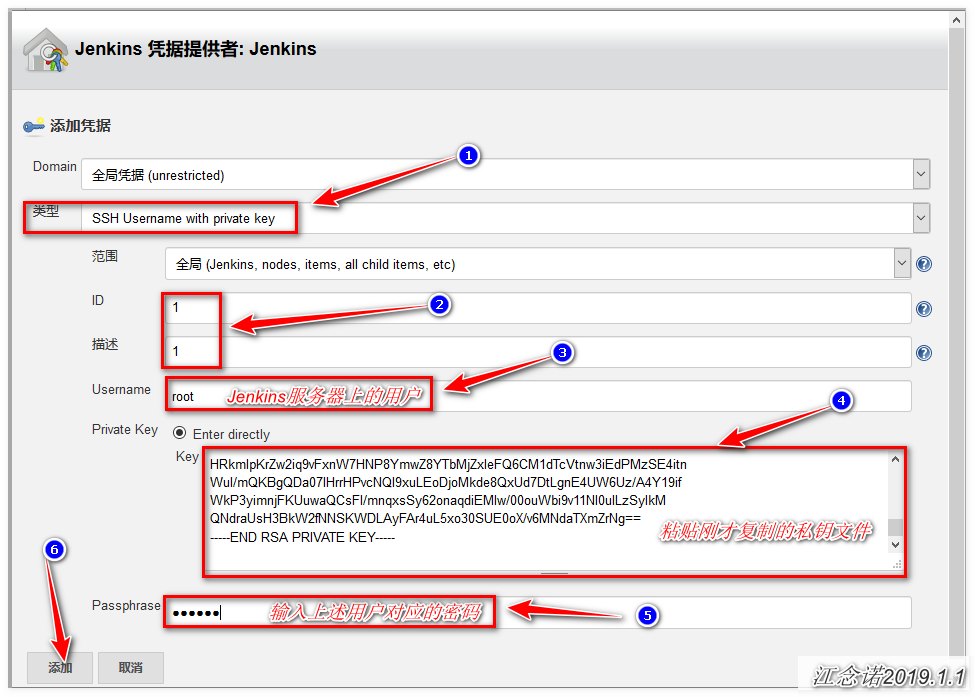
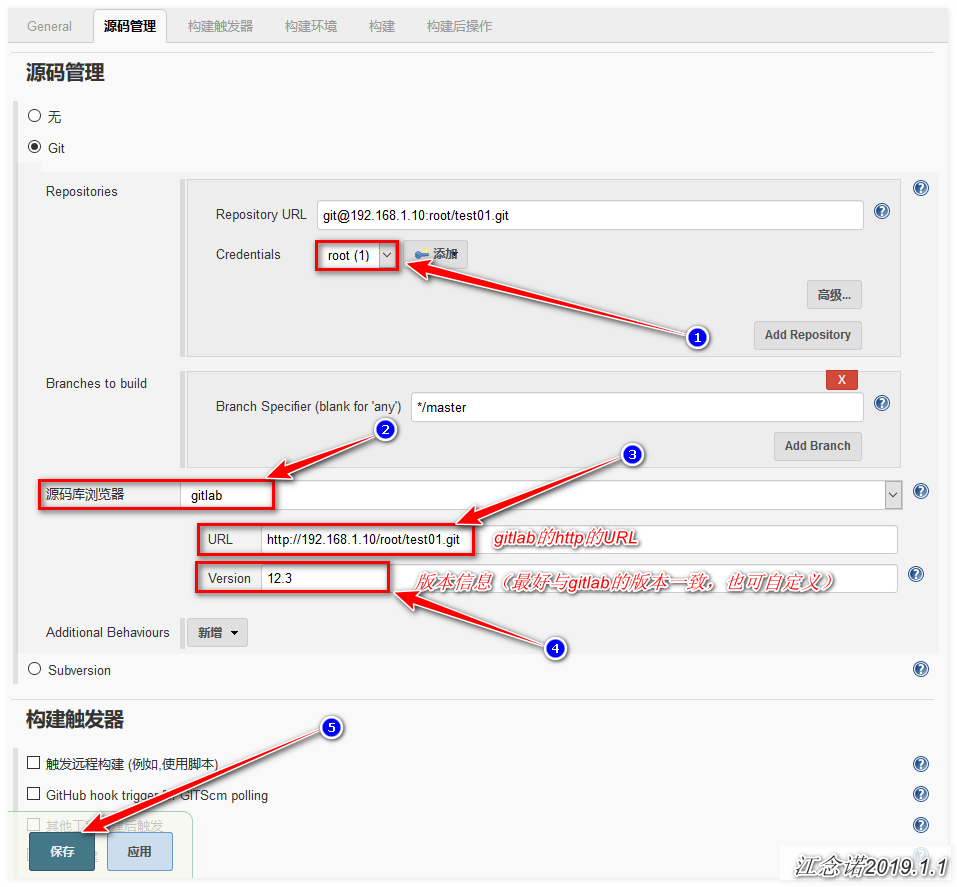
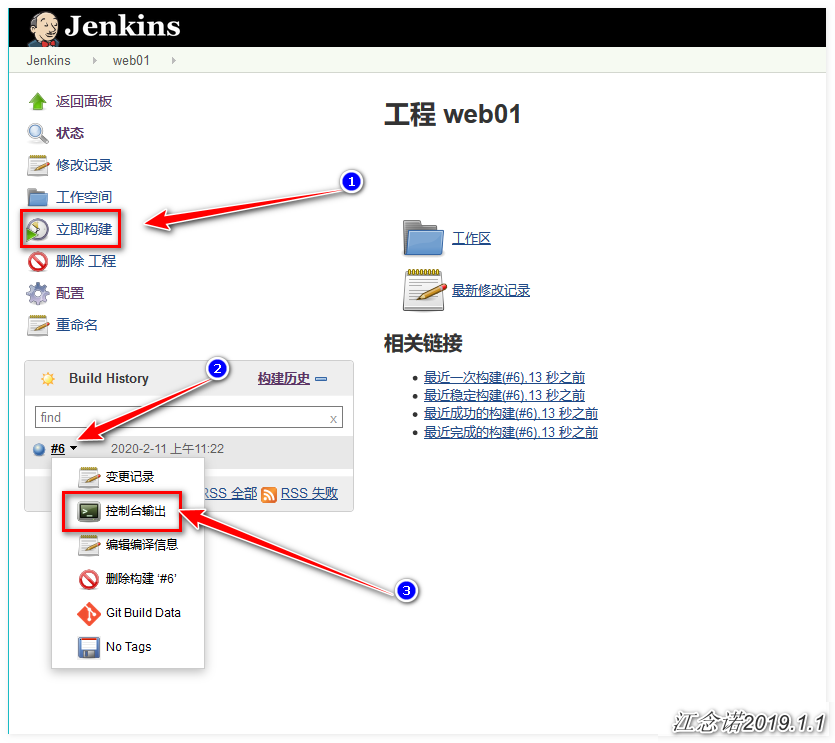
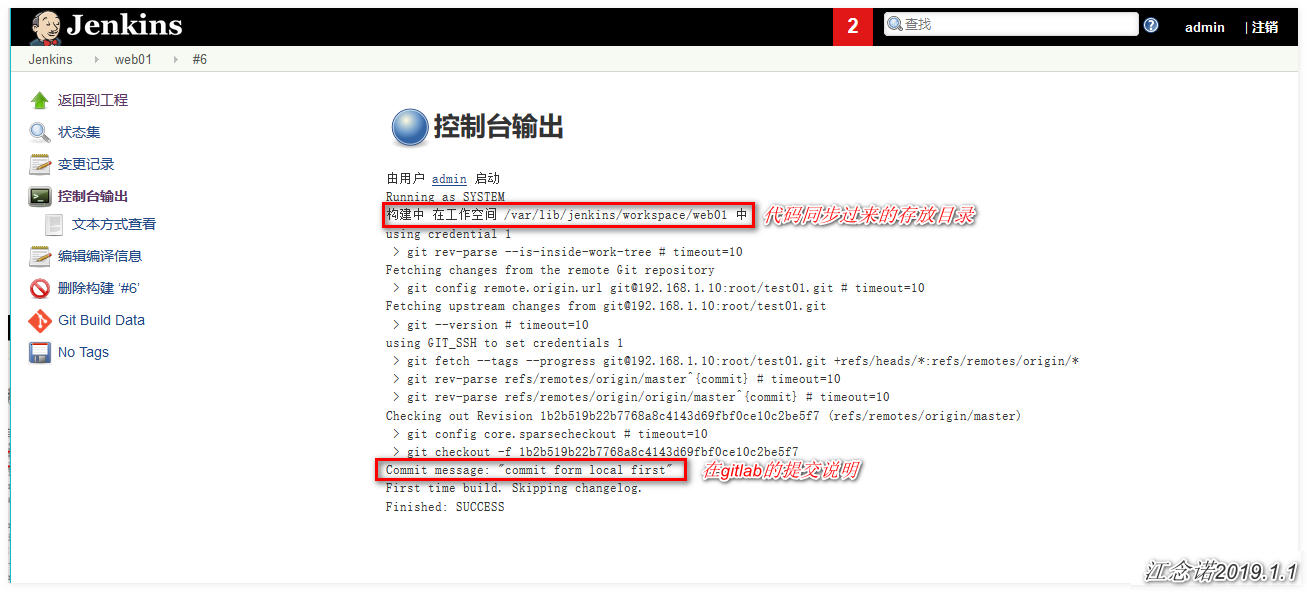
Server side detects synchronized data:
[root@jenkins ~]# ls /var/lib/jenkins/workspace/web01
123.txt  README.md
[root@jenkins ~]# cat /var/lib/jenkins/workspace/web01/123.txt
hello world
5, Configure Jenkins+gitlab for continuous integration
It is recommended to download the following configuration for speed and convenience Plug in provided by me
The configuration is as follows: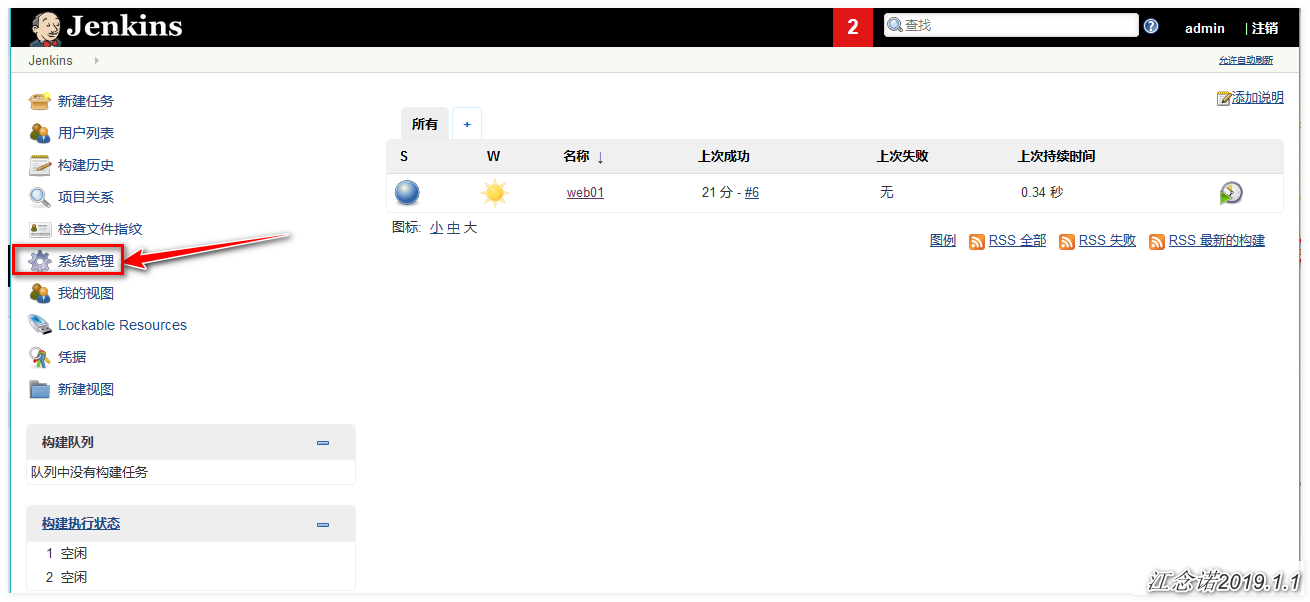
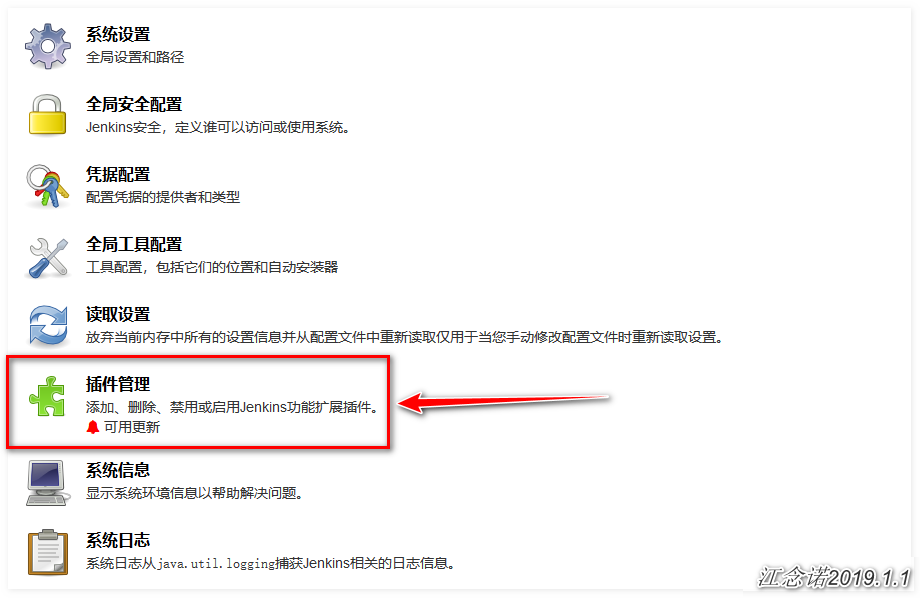
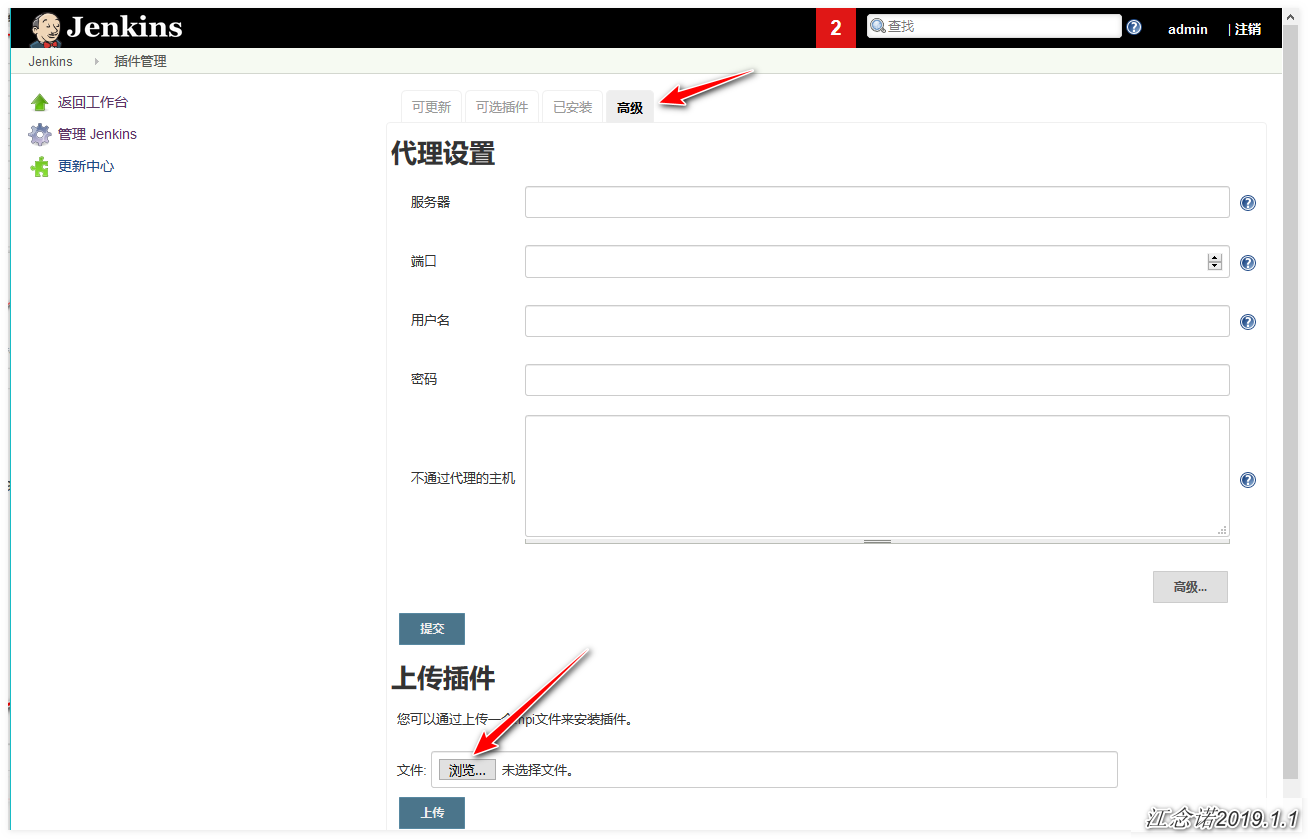
Upload the packages I provided in the following order: gitlab OAuth - > gitlab plugin - > windows slaves - > Ruby runtime - > gitlab hook!
If you want to install the plug-in online, you can change the URL of its plug-in source to the Jenkins image station of Tsinghua University, and attach a Link to changed method , change by yourself!
The amendment is as follows: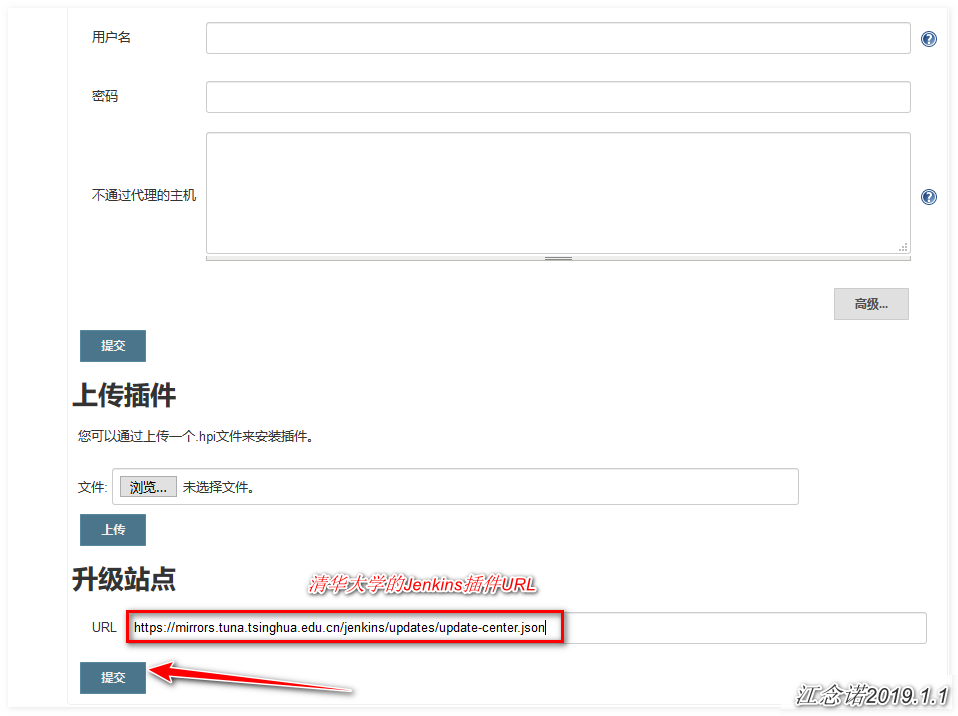
This is the end of modifying plug-in address!
Because most of the next mouse points are OK, here is only the key figure attached!
Click: system management - > global security configuration - > authorization policy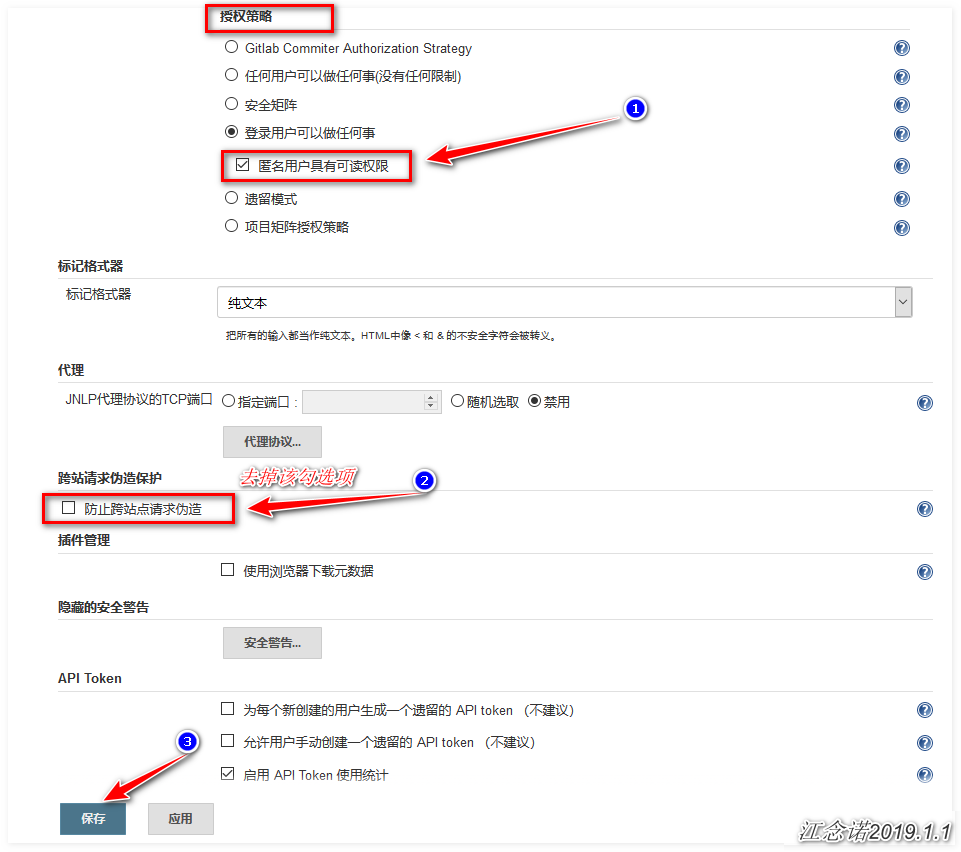
Click: system management - > system settings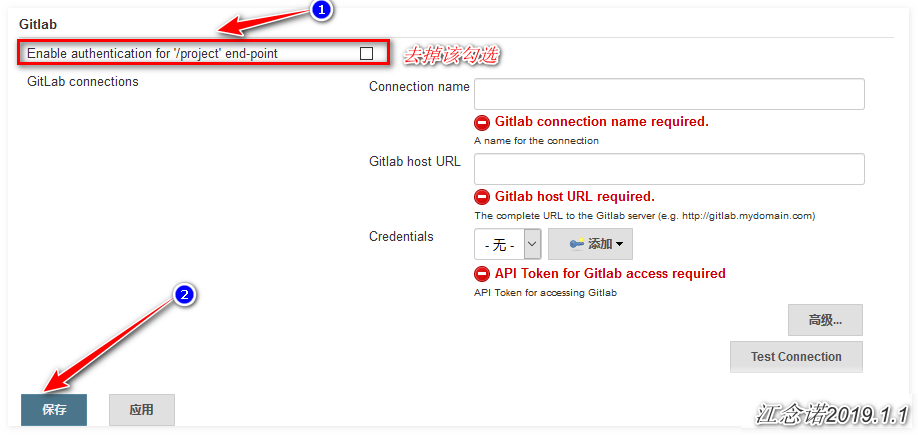
After the above operations are completed, carry out the following operations: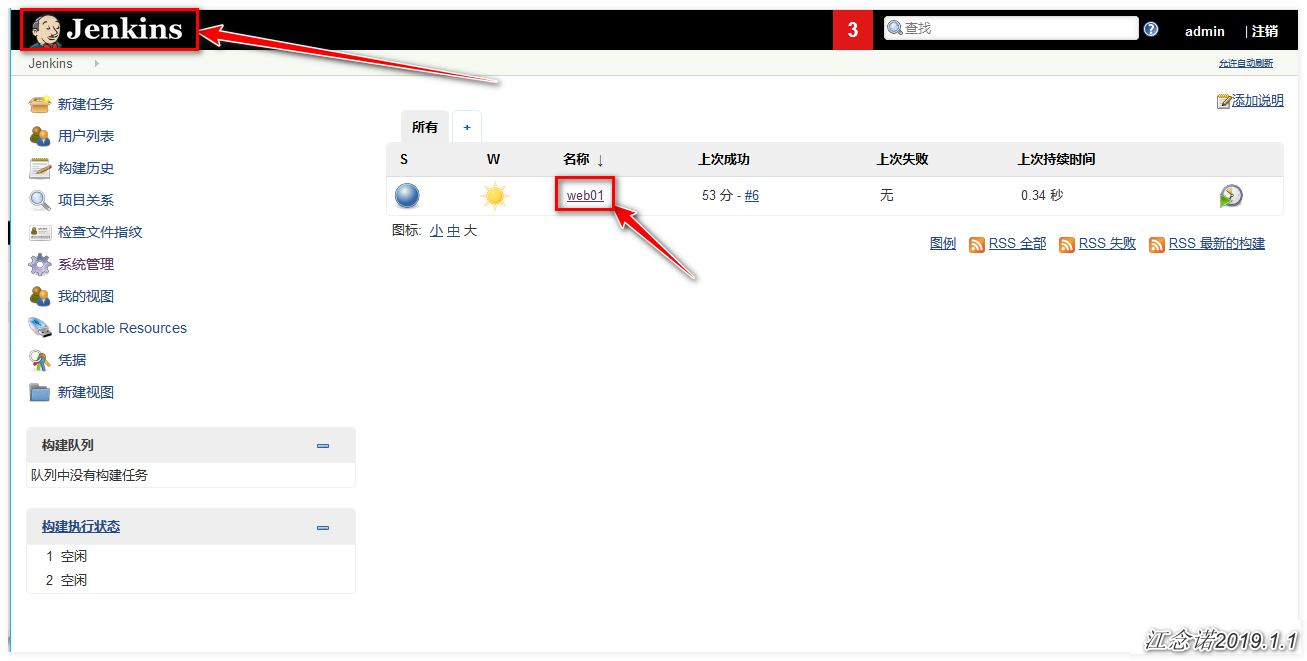
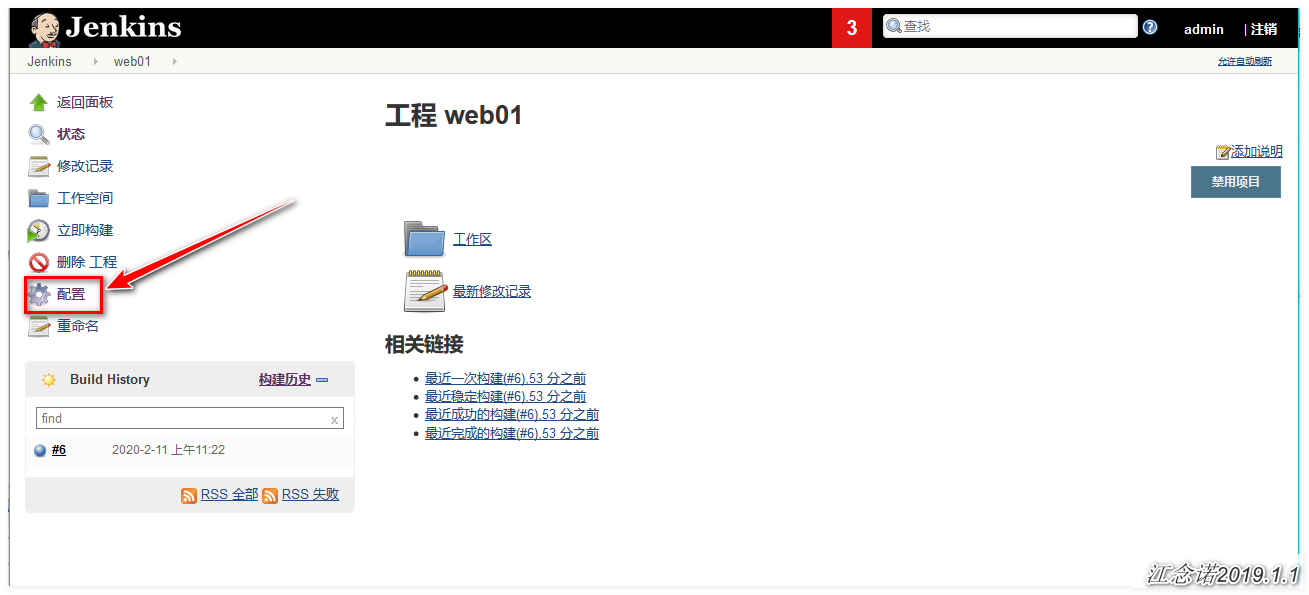
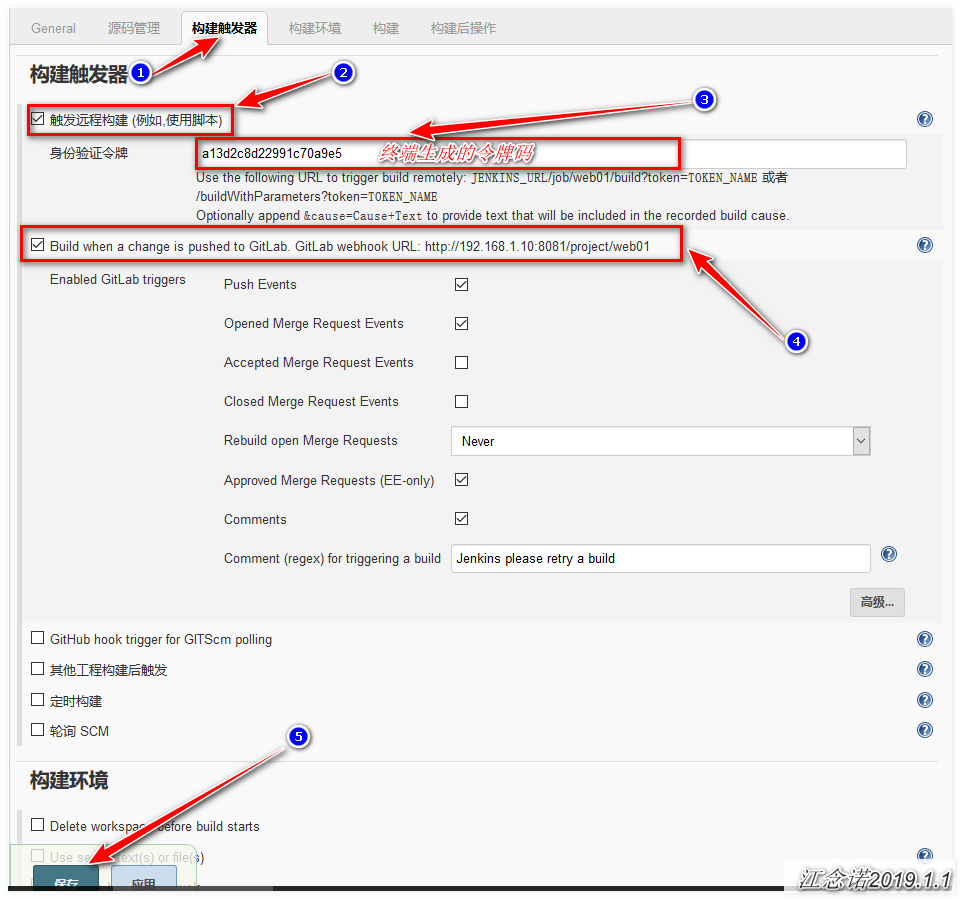
Generate token at terminal and copy:
[root@jenkins ~]# openssl rand -hex 10               #Copy the following
a13d2c8d22991c70a9e5
Go back to Gitlab's web page and do the following: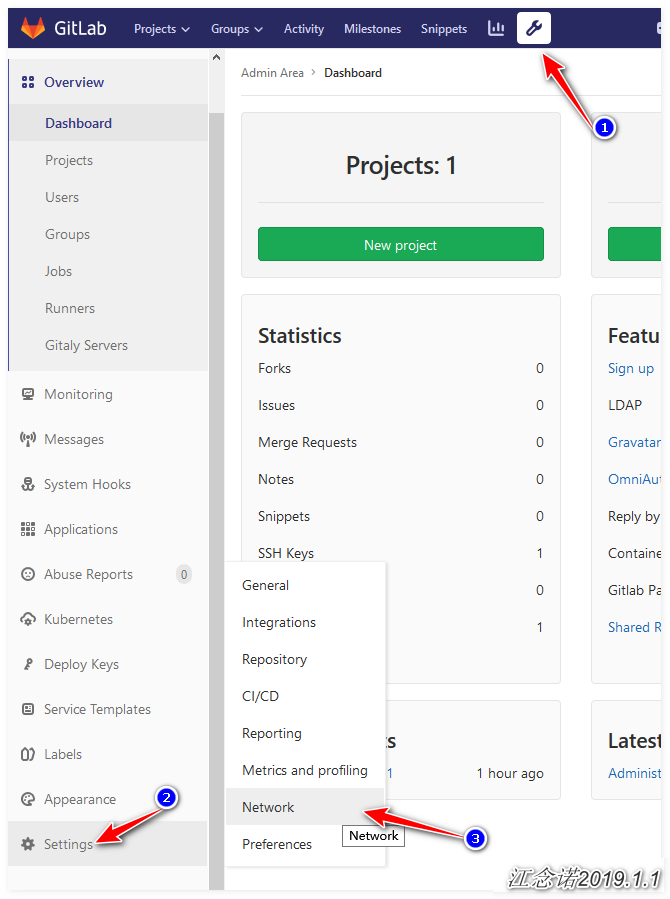
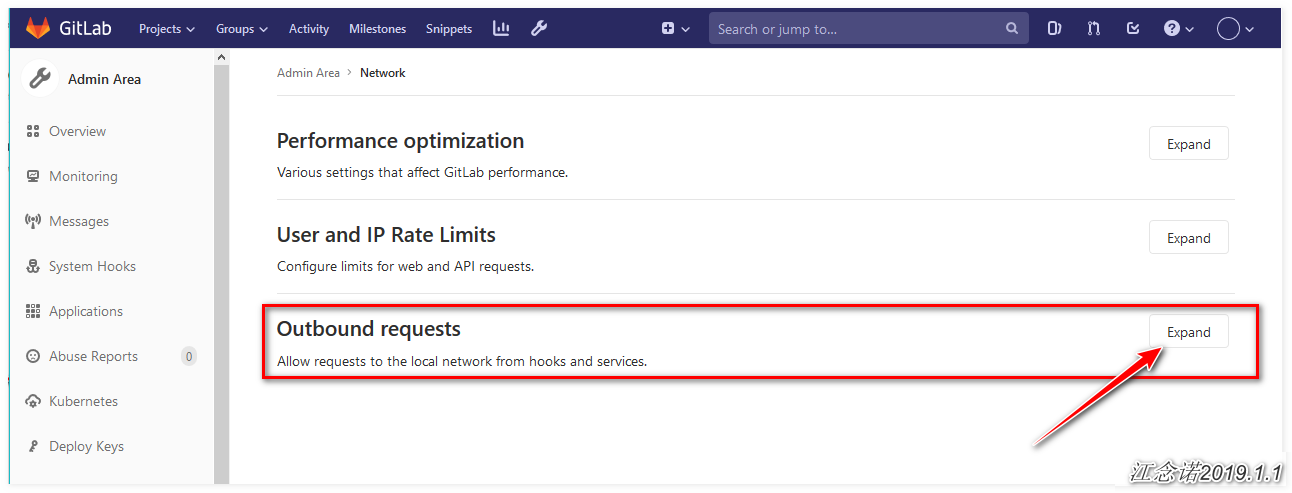
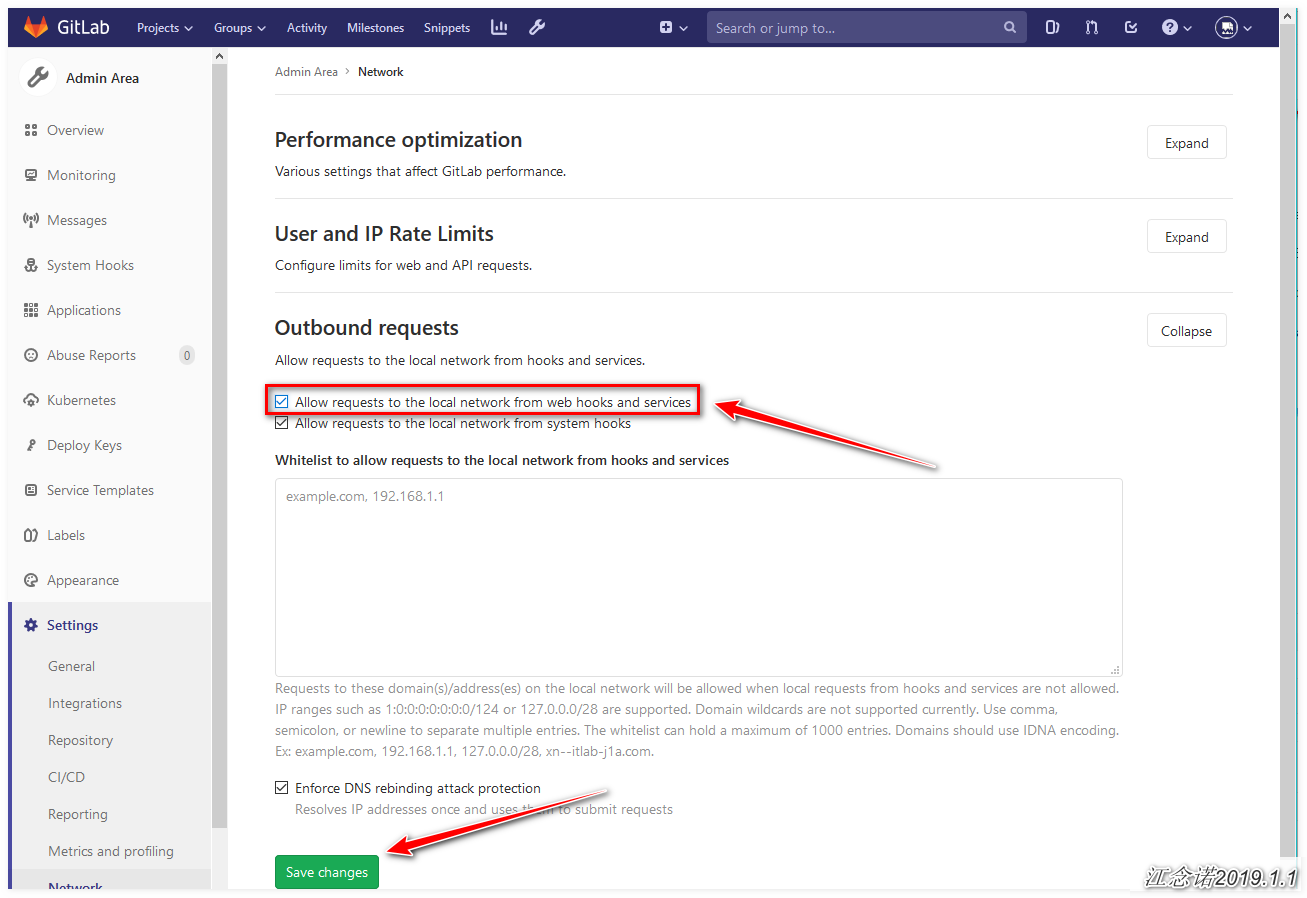
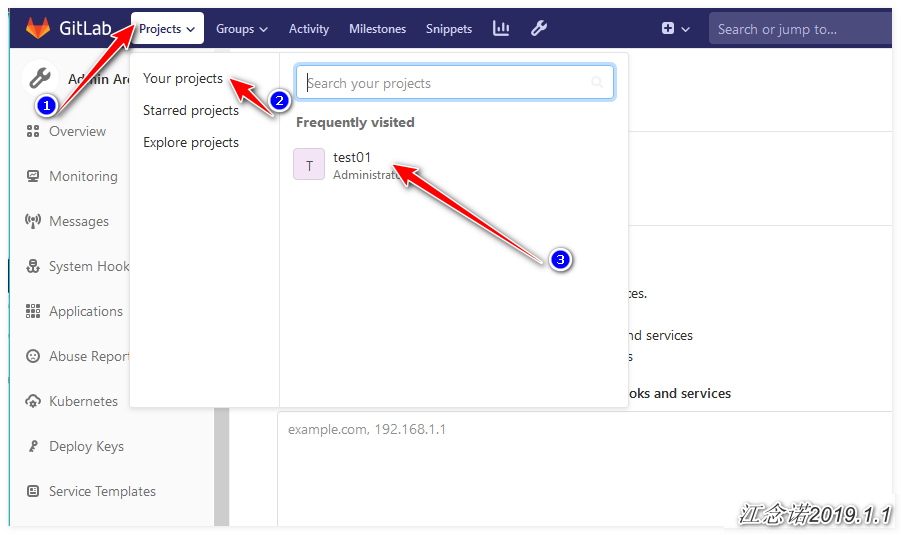
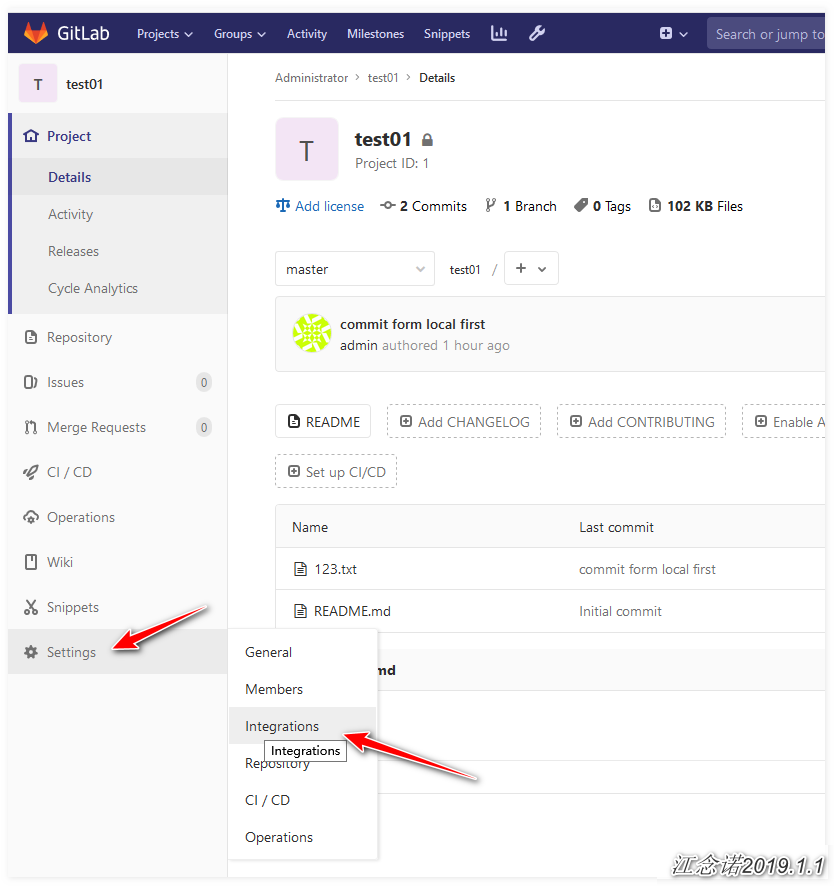
Next, you need to go to the Jenkins page to find the required URL! As follows: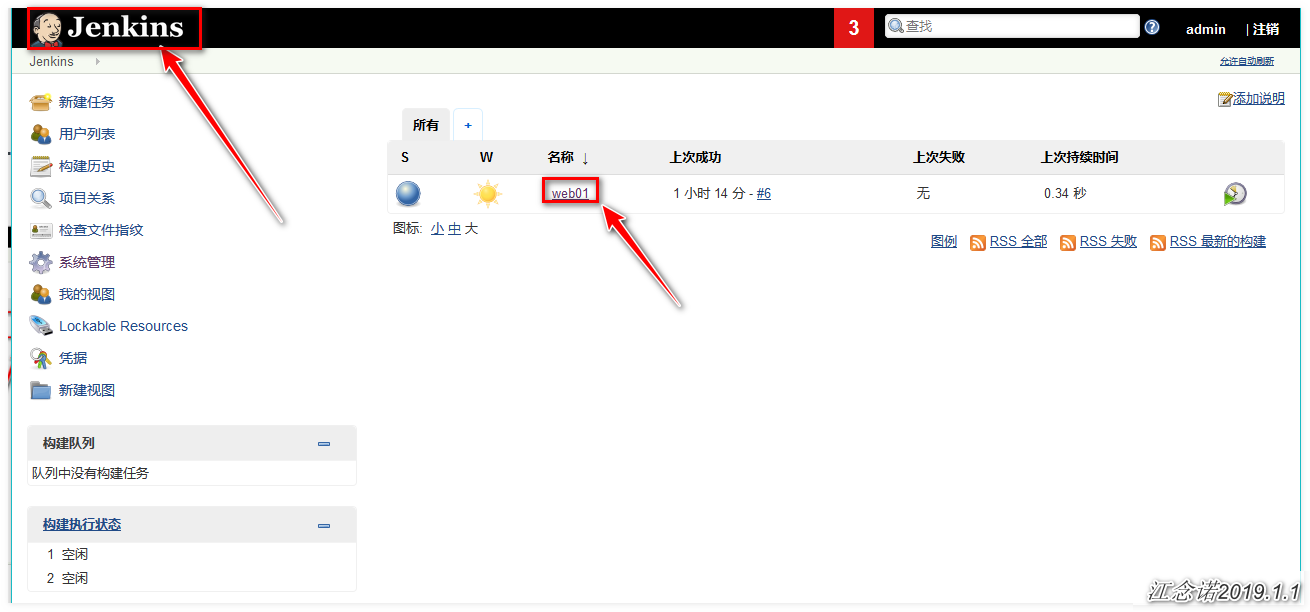
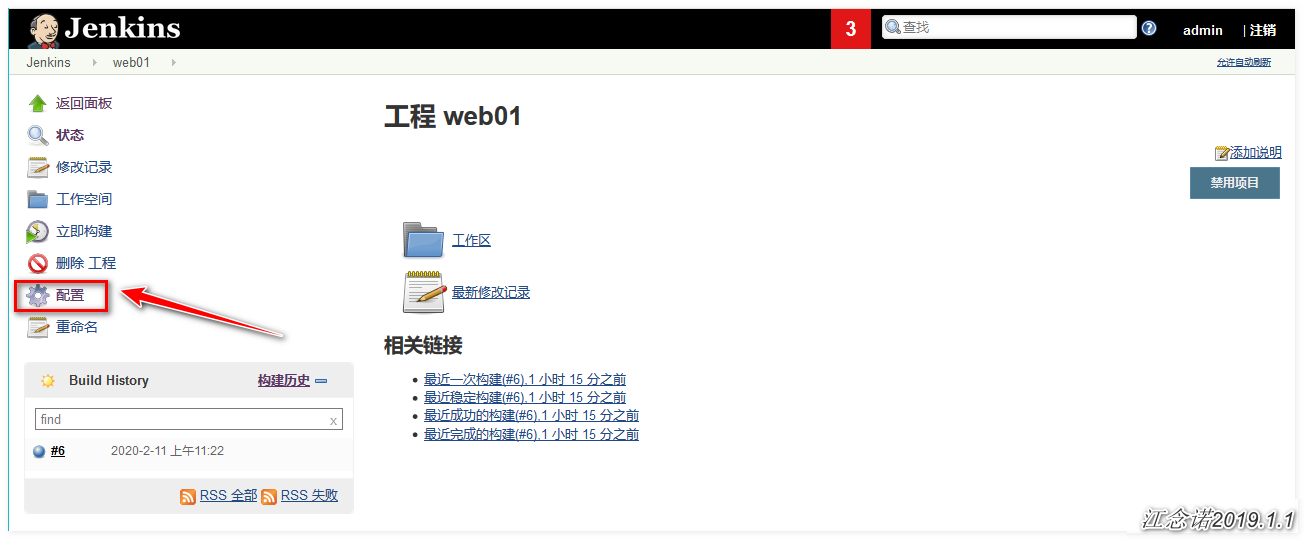
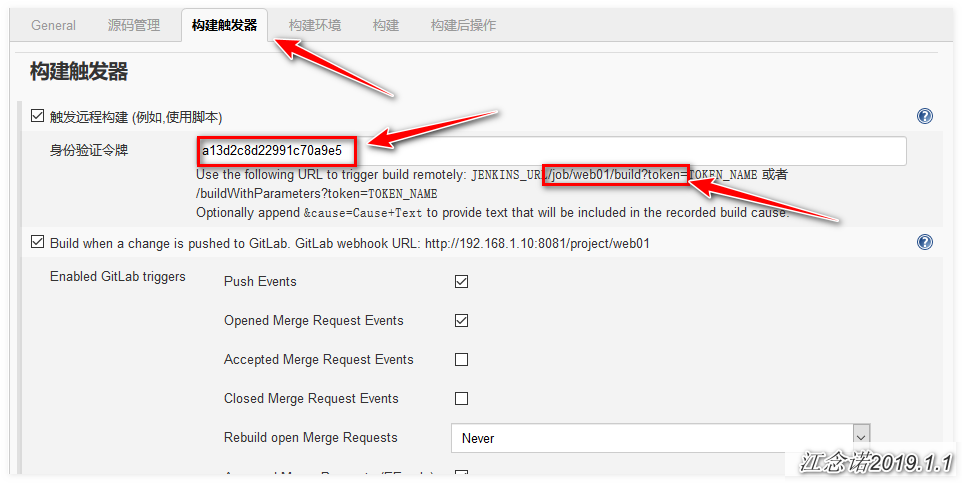
We need to splice the URL s of Jenkins, which are: Jenkins's access address + / job.... = after splicing the authentication token code: http://192.168.1.10:8081/job/web01/build?token=a13d2c8d22991c70a9e5
Then on the page to gitlab, enter the URL of Jenkins, as shown in the figure: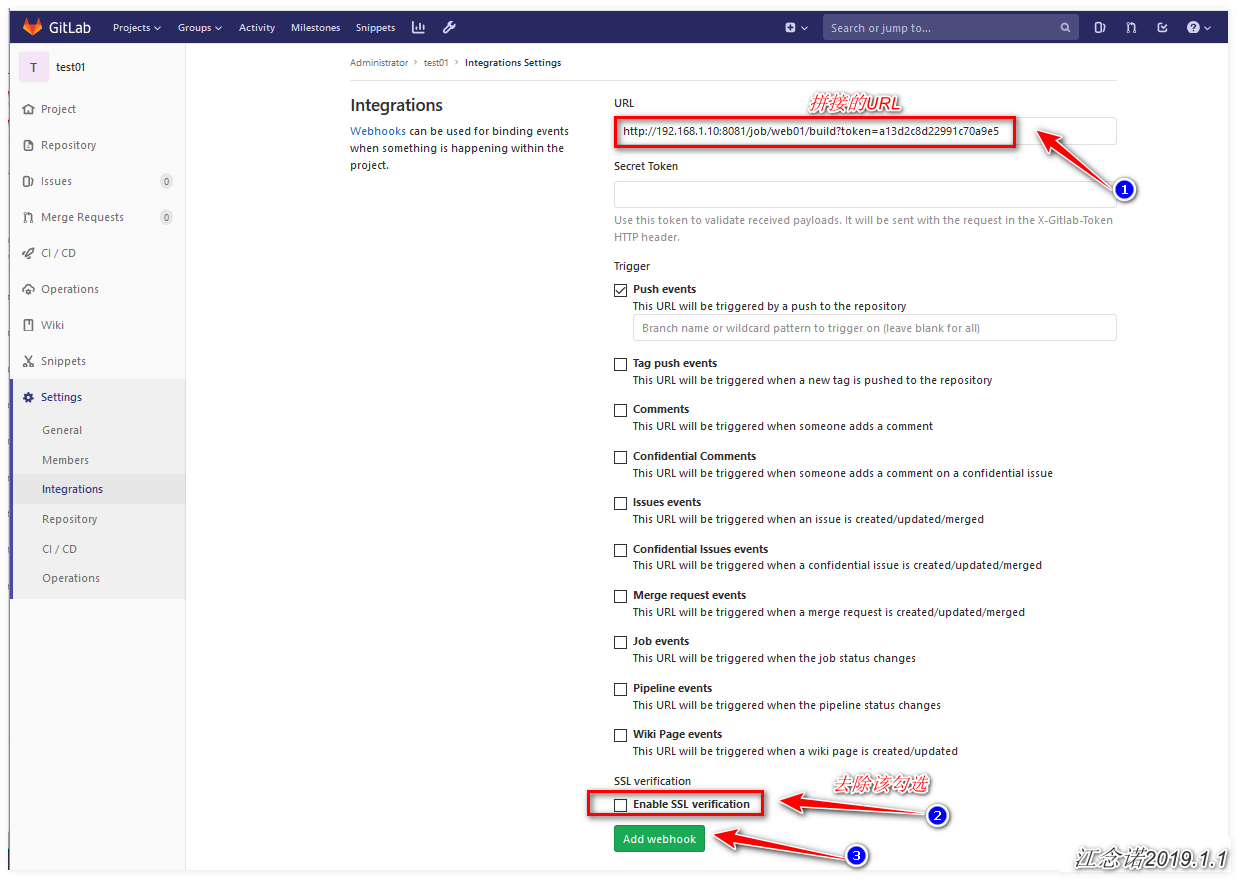
After adding, drop down the page and do the following: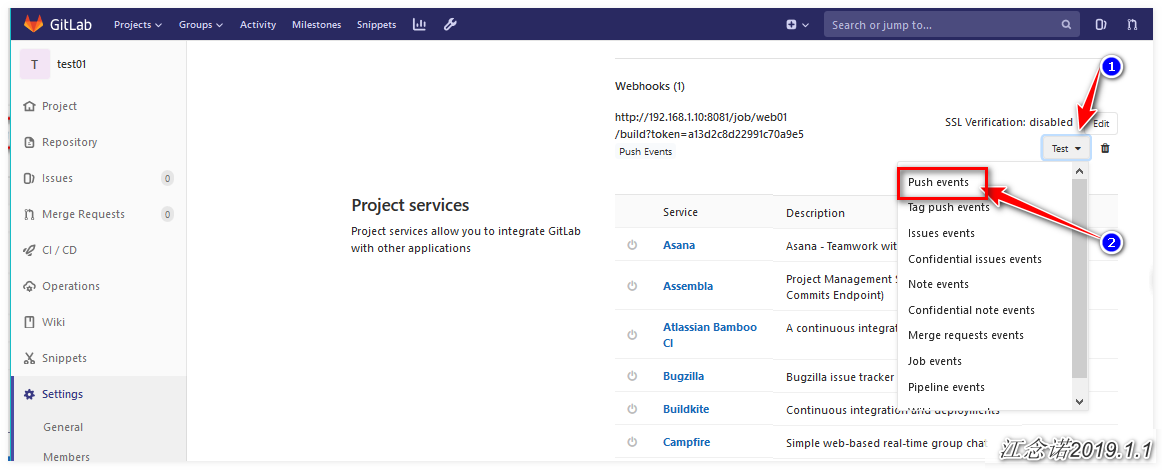

At this point, the continuous deployment is completed, and the next step is to test. Submit the code on the terminal to gitlab, and check whether Jenkins has automatic synchronization, as follows:
#Push new code to gitlab
[root@jenkins ~]# cd test01/
[root@jenkins test01]# echo "123456" > test.txt
[root@jenkins test01]# git add test.txt
[root@jenkins test01]# git commit -m "commit form local second"
[root@jenkins test01]# git push origin master
Jenkins can see the following, which shows that the continuous deployment configuration is complete!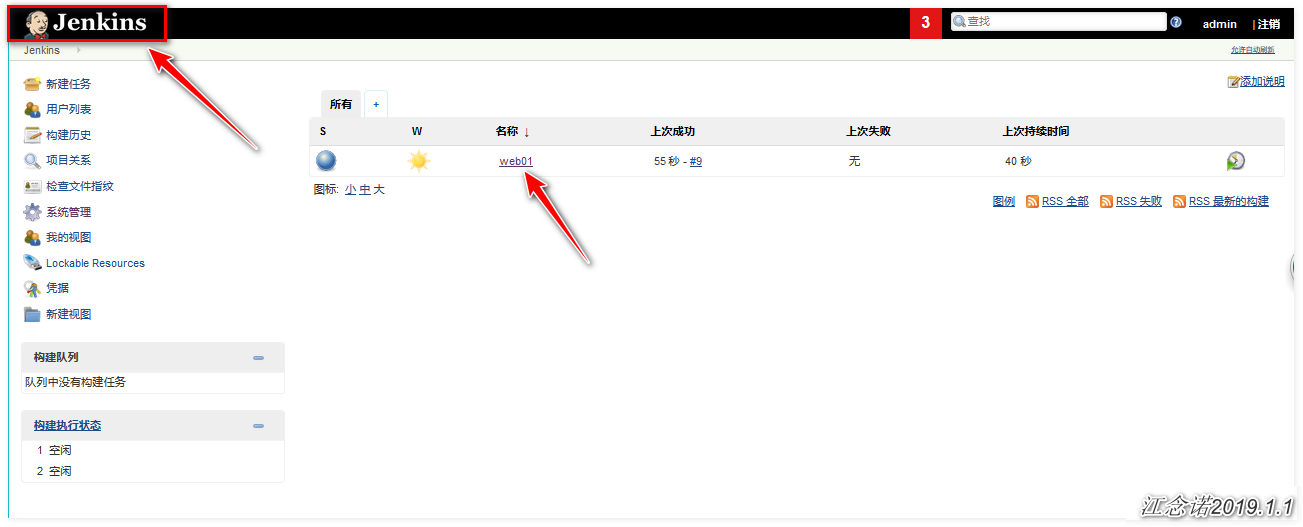
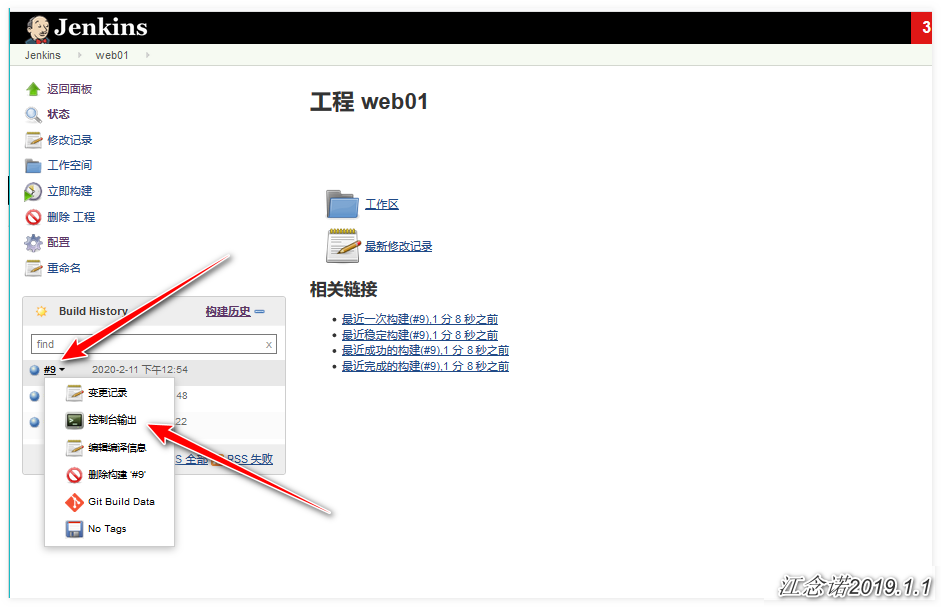
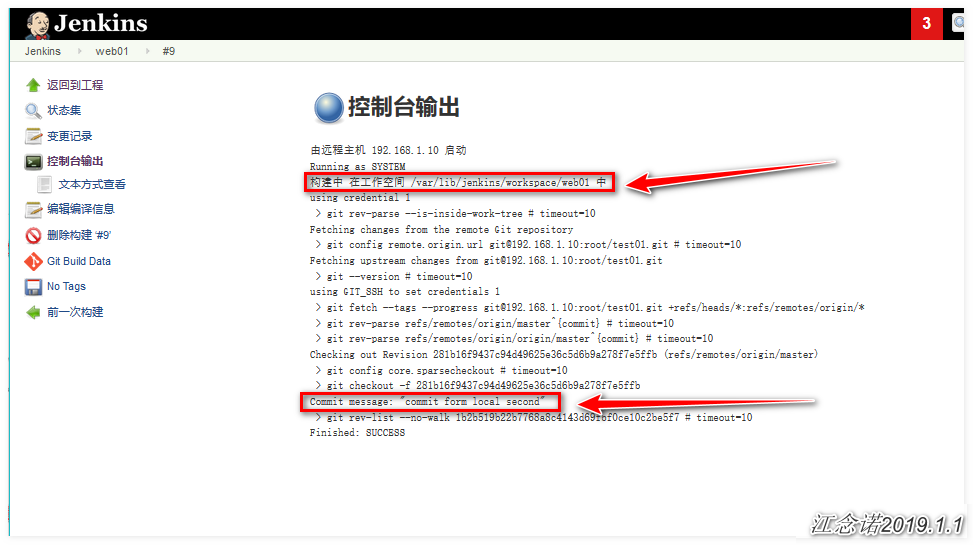
According to the information output from the console, the code has been synchronized successfully. Check it locally!
[root@jenkins ~]# cat /var/lib/jenkins/workspace/web01/test.txt
123456
#Same as the document we just submitted
————————Thank you for reading————————