1 continuous integration description

● first, developers submit code to Git warehouse every day.
● Jenkins, as a continuous integration tool, uses Git tool to pull the code from Git warehouse to the continuous integration server, and then cooperates with JDK, Maven and other software to complete the compilation, testing, review and packaging of the code. If there is an error in each step in this process, the whole process will be executed again.
● finally, Jenkins distributes the generated jar package to the test server or production server, and testers or users can access the application.
2 server list
● CentOS7 is used uniformly in virtual machines.
|
name
|
IP address
|
Installed software
|
|
Code hosting server
|
192.168.18.100
|
Gitlab-12.4.2
|
|
Continuous integration server
|
192.168.18.101
|
Jenkins-2.263,JDK11,Maven3.6.3,Git, SonarQube
|
|
Application test server
|
192.168.18.102
|
JDK11
|
3 JDK installation
3.1 premise description
● the IP addresses of the server are 192.168.18.101 and 192.168.18.102, and JDK needs to be installed.
3.2 uninstall the default JDK
● query the JDK installed in the system:
yum list installed | grep -i java

Uninstall the default JDK:
# xxx represents the content returned by the yum list installed | grep -i java command. You only need to uninstall other versions of JDK
yum remove xxx
3.3 installation of JDK11
Install JDK11:
yum -y install java-11-openjdk-devel
4 installation of gitlab code managed server
4.1 introduction to gitlab
Official website.
Gitlab is an open source project for warehouse management system. It uses Git as a code management tool and builds a web service on this basis.
Gitlab, like GitHub, is a third-party product developed based on Git. It is free and open source (based on MIT protocol). Similar to GitHub, gitlab can register users, submit their own code arbitrarily, add SSH keys, etc. The difference is that gitlab can be deployed to its own server. All information such as database is in its own hands, which is suitable for collaborative development within the team. In other words, gitlab can be regarded as a personal version of GitHub.
4.2 premise description
The IP address of the server is 192.168.18.100.
4.3 installation of gitlab
Installation related dependencies:
yum -y install policycoreutils openssh-server openssh-clients postfix
● start the ssh service and set it to start automatically:
systemctl enable sshd && systemctl start sshd
● set post "X" to start automatically and start. Post "x supports gitlab sending function:
systemctl enable postfix && systemctl start postfix
● close the firewall (this can be done during the test, not recommended in the production environment):
systemctl stop firewalld
systemctl disable firewalld
● download Gitlab package
wget https://mirrors.tuna.tsinghua.edu.cn/gitlab-ce/yum/el6/gitlab-ce-12.4.2-ce.0.el6.x86_64.rpm
rpm -i gitlab-ce-12.4.2-ce.0.el6.x86_64.rpm
● modify Gitlab configuration:
vim /etc/gitlab/gitlab.rb
# Modify the Gitlab access address and port. The default is 80. We change it to 82
external_url 'http://192.168.18.100:82'
nginx['listen_port'] = 82
● reload configuration and restart Gitlab (wait patiently for a period of time):
sudo gitlab-ctl reconfigure
sudo gitlab-ctl restart
● startup and self startup:
systemctl enable gitlab-runsvdir.service
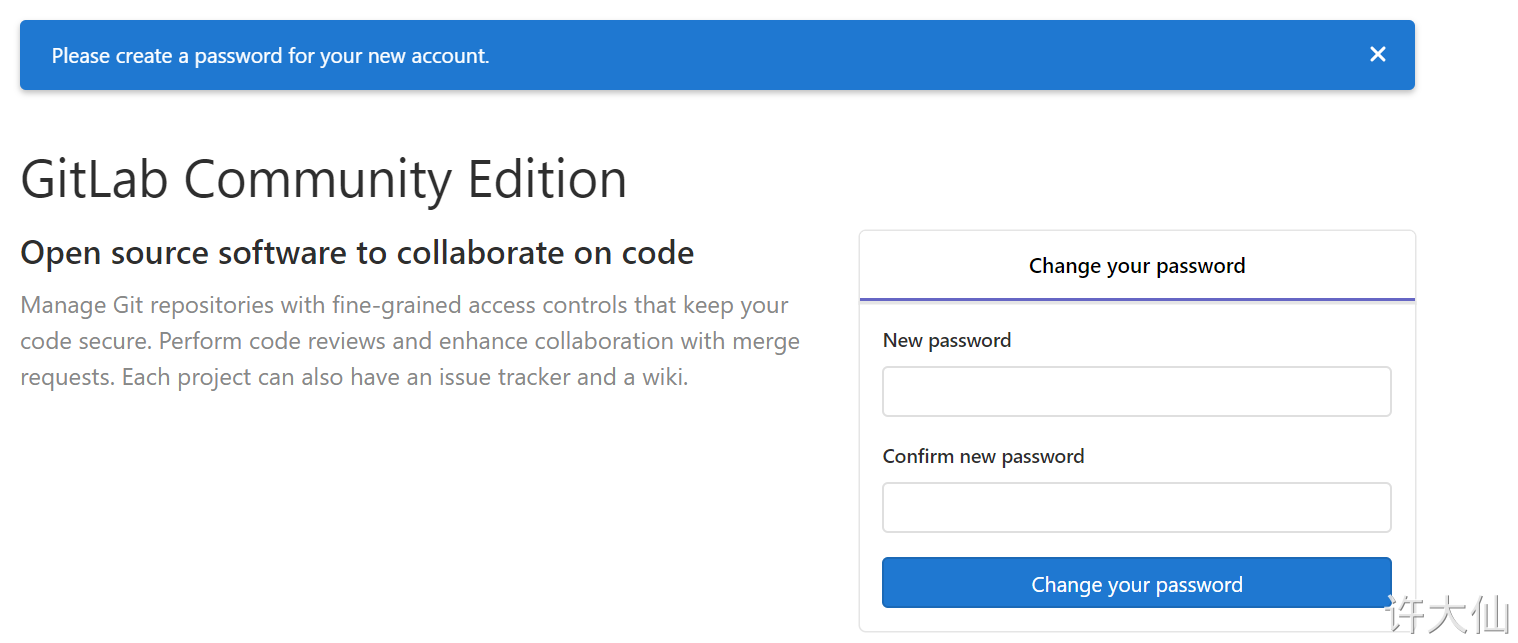
● access after successful startup http://192.168.18.100:82 , see the following page of administrator root password. After modifying the password, log in again.
4.4 Gitlab create group, user and project
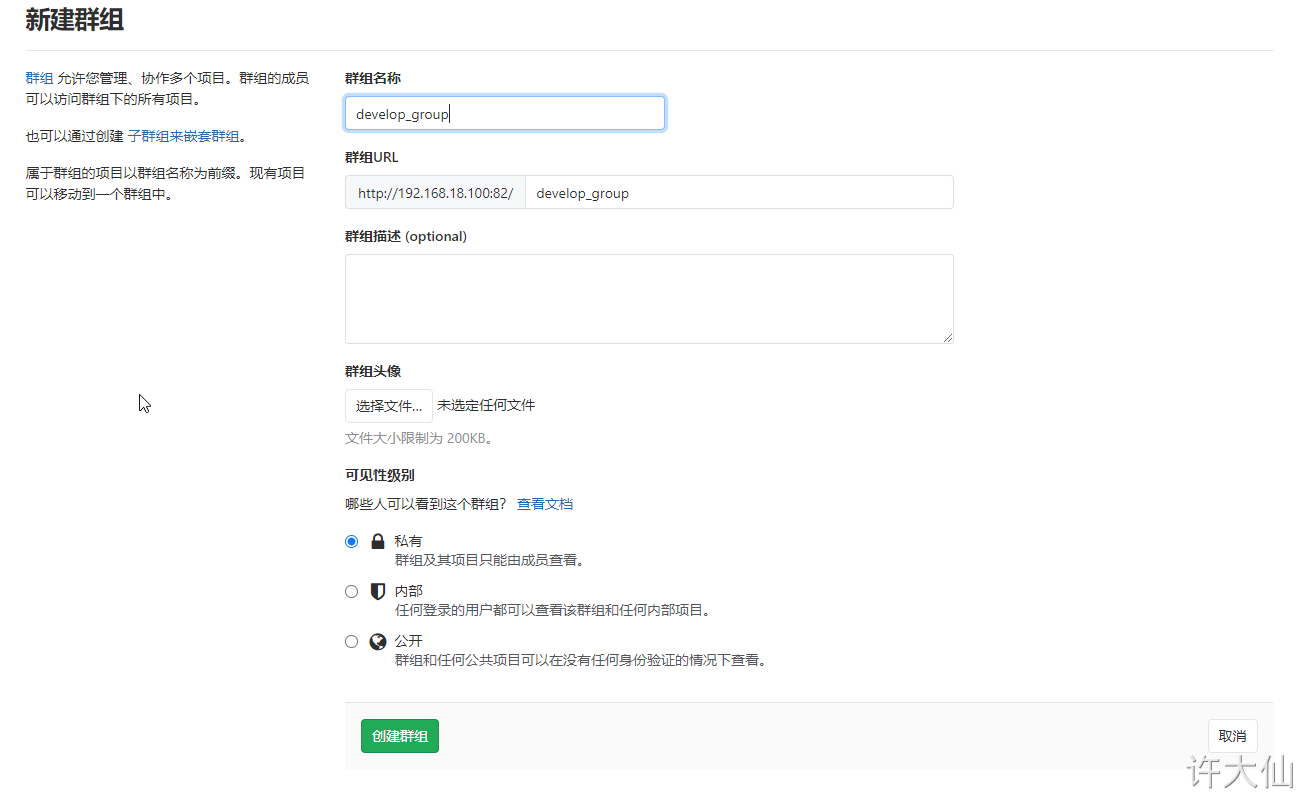
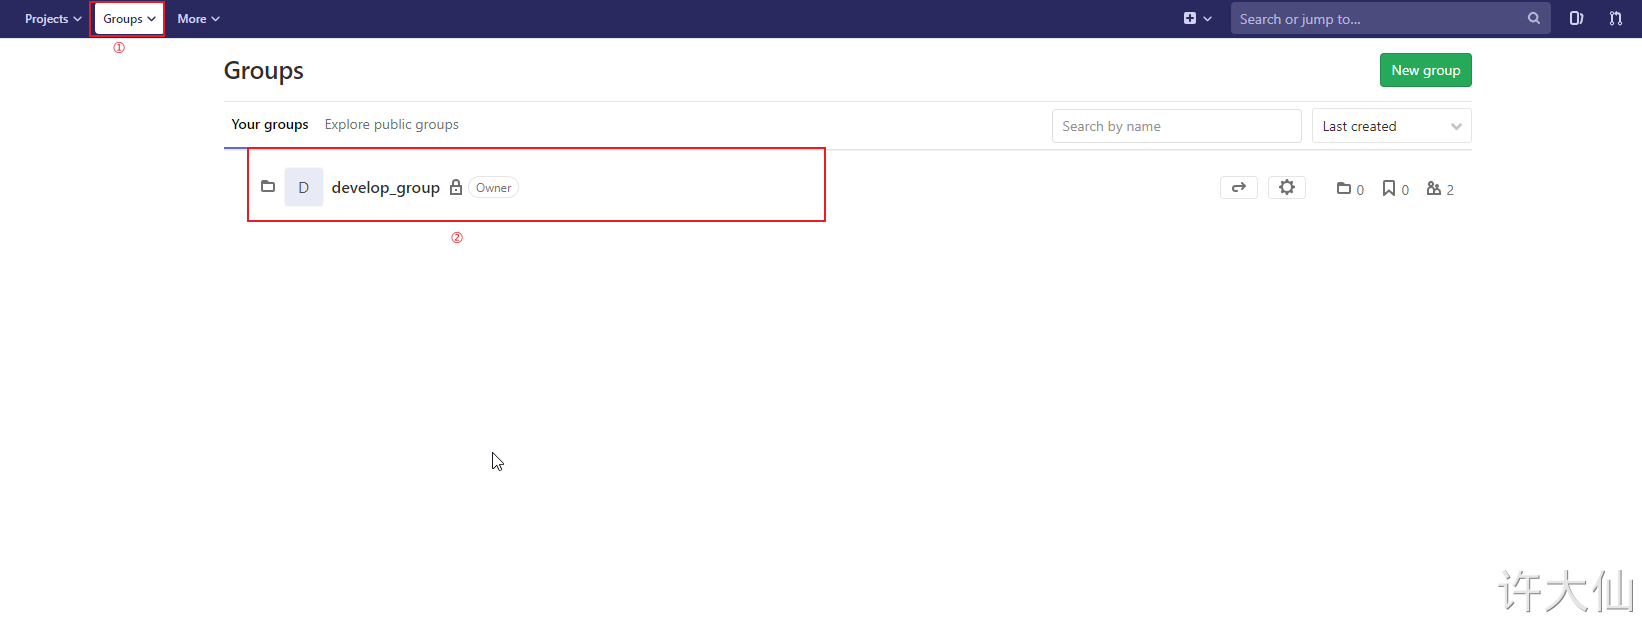
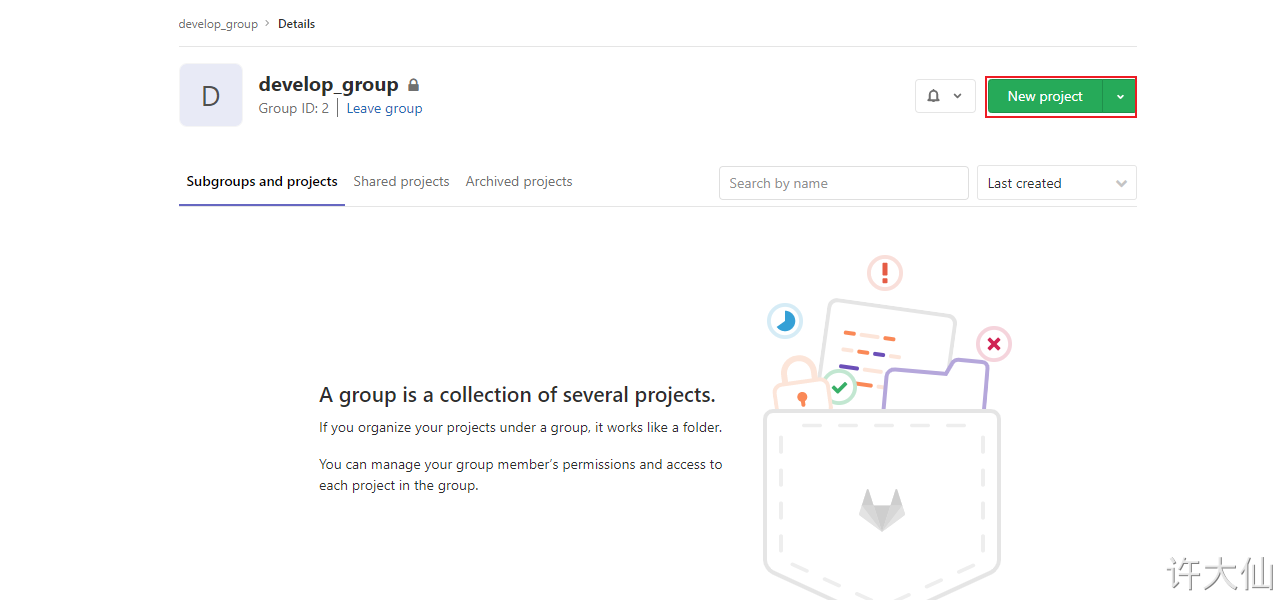
4.4.1 create group
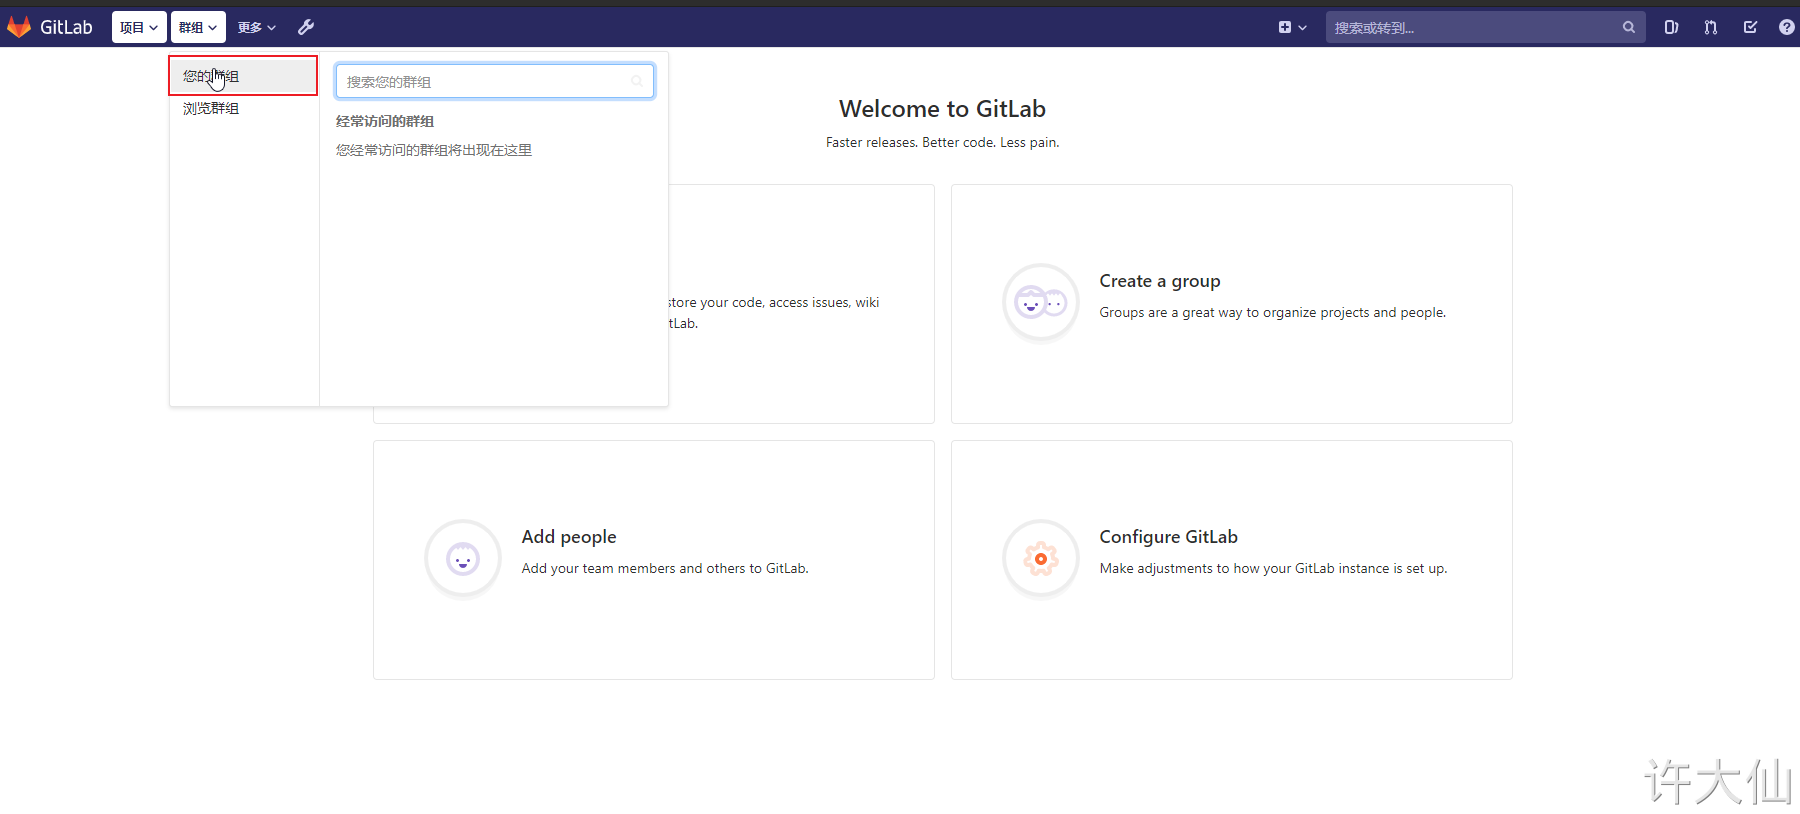
● use administrator root to create a group. There can be multiple projects in a group. You can add development to the group to set permissions. Different groups are different development projects or service modules of the company. Adding different development to different groups can realize the management of development setting permissions.

4.4.2 create user
● when creating a user, you can select Regular (ordinary user: can only access his own groups and projects) or Admin (can access all groups and projects).
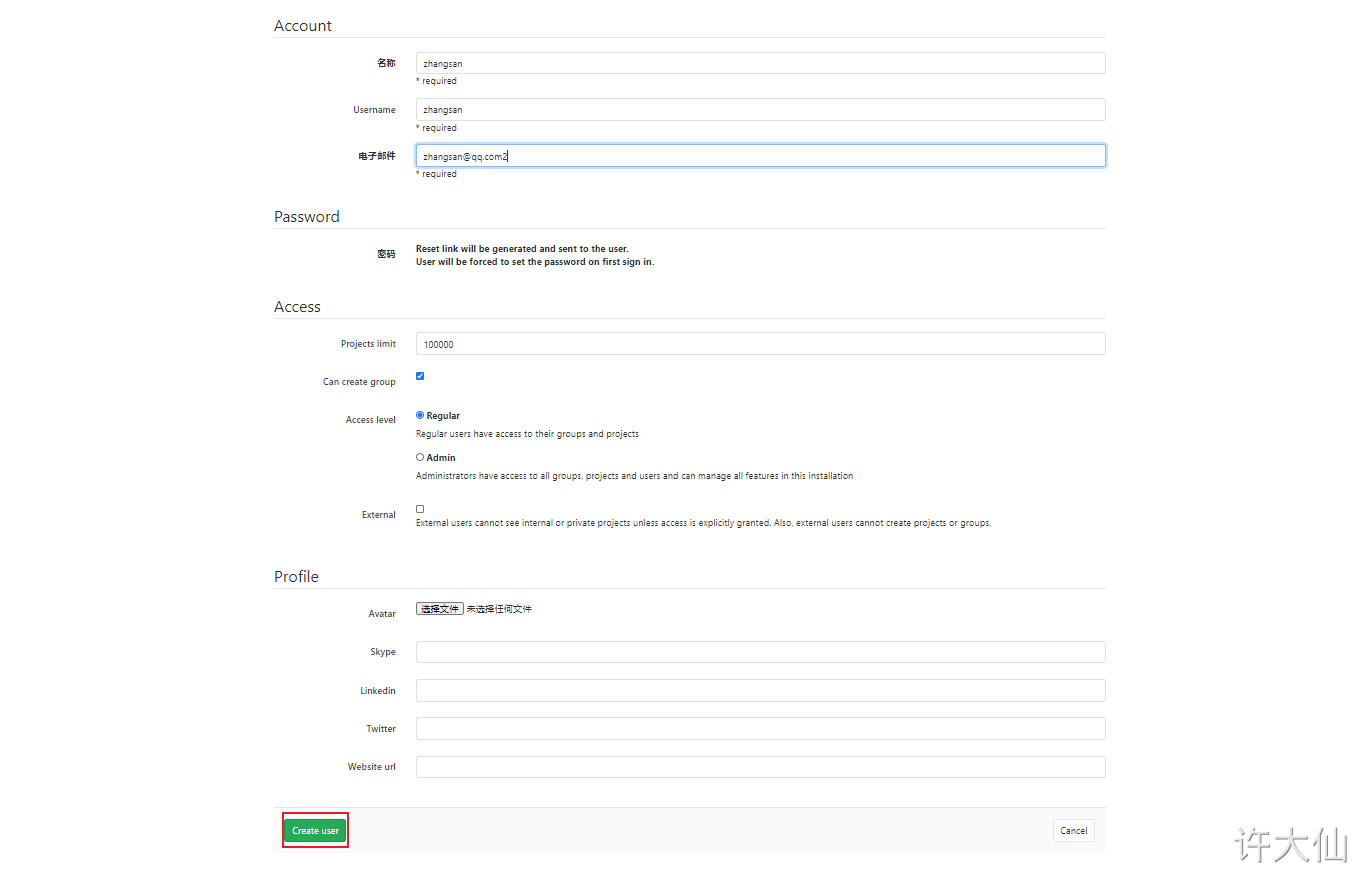
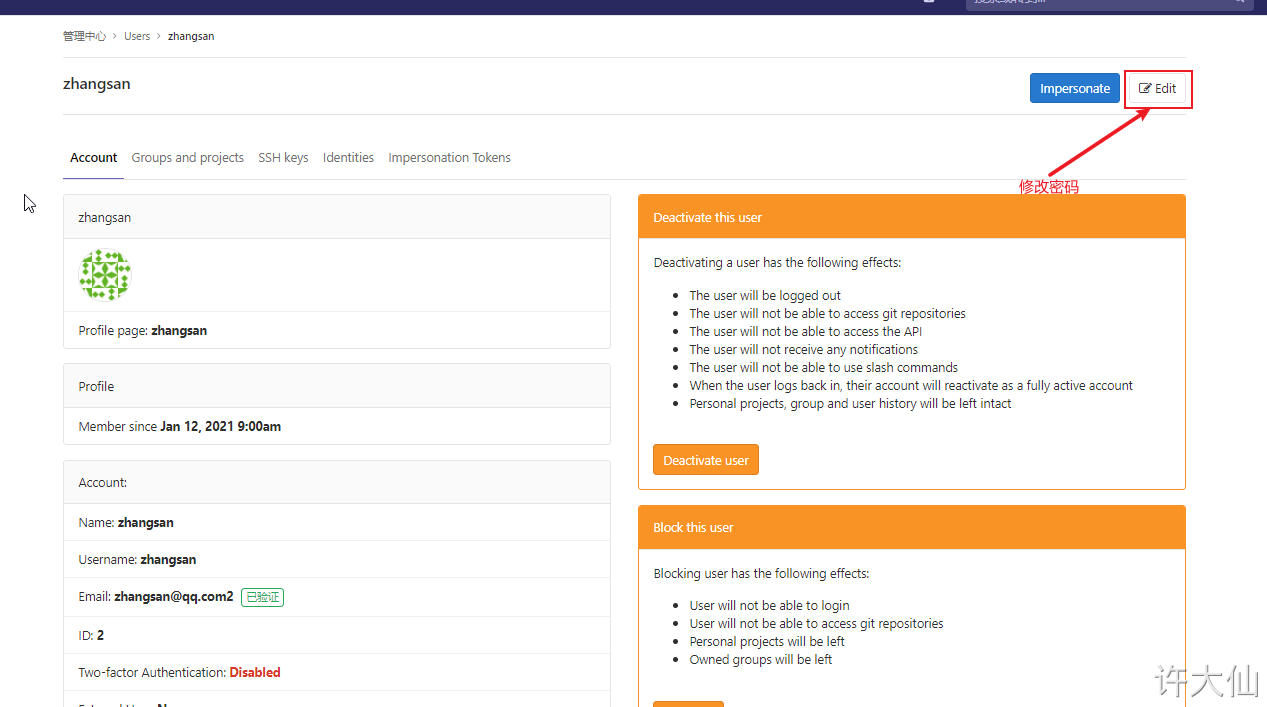
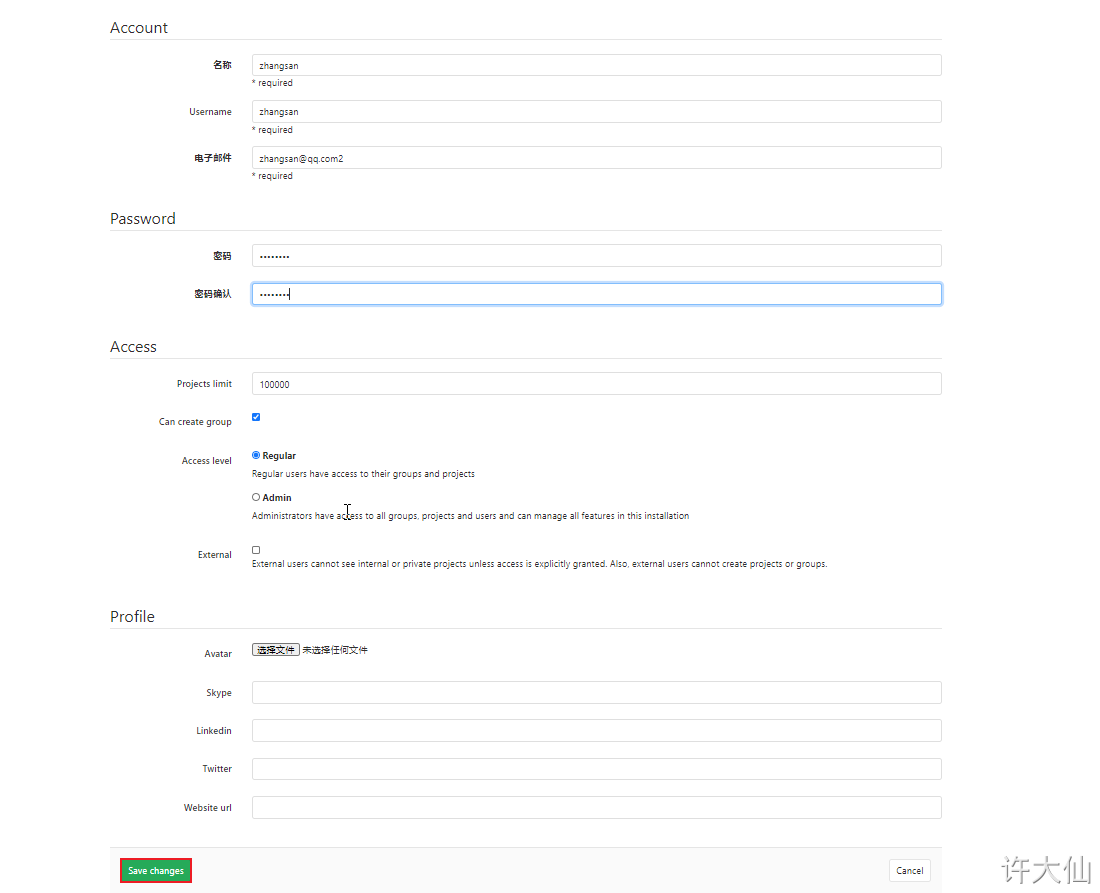
● after creating the user, change the password immediately:
The user name and password here need to be remembered and used for the jenkins login and pull code later.
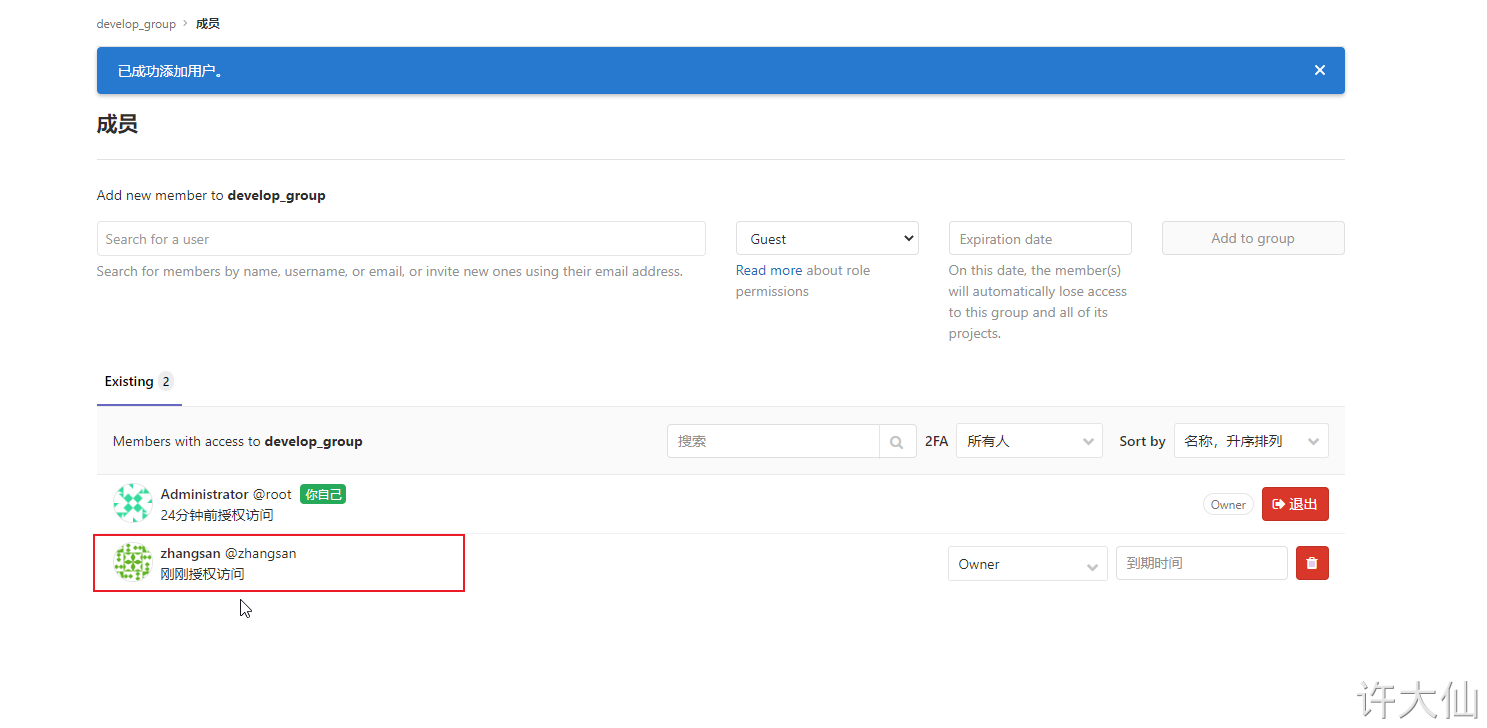
4.4.3 adding users to groups
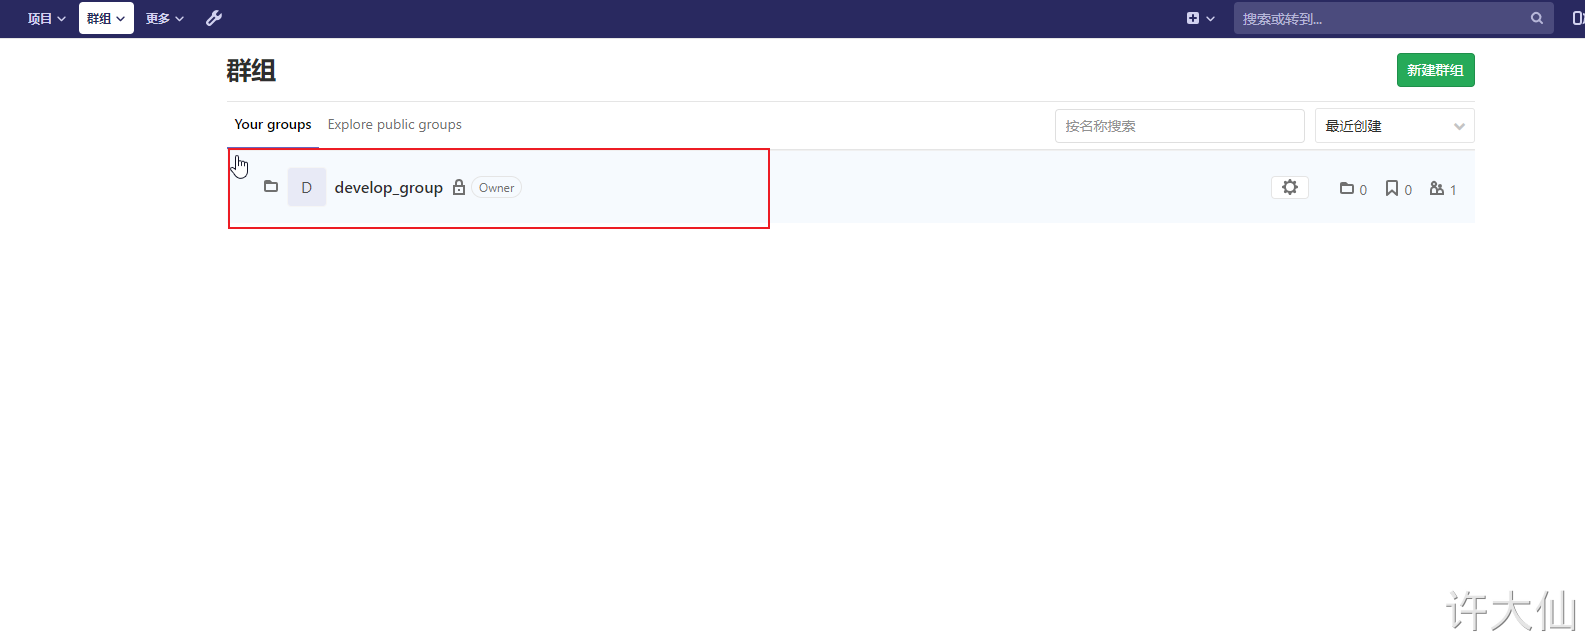
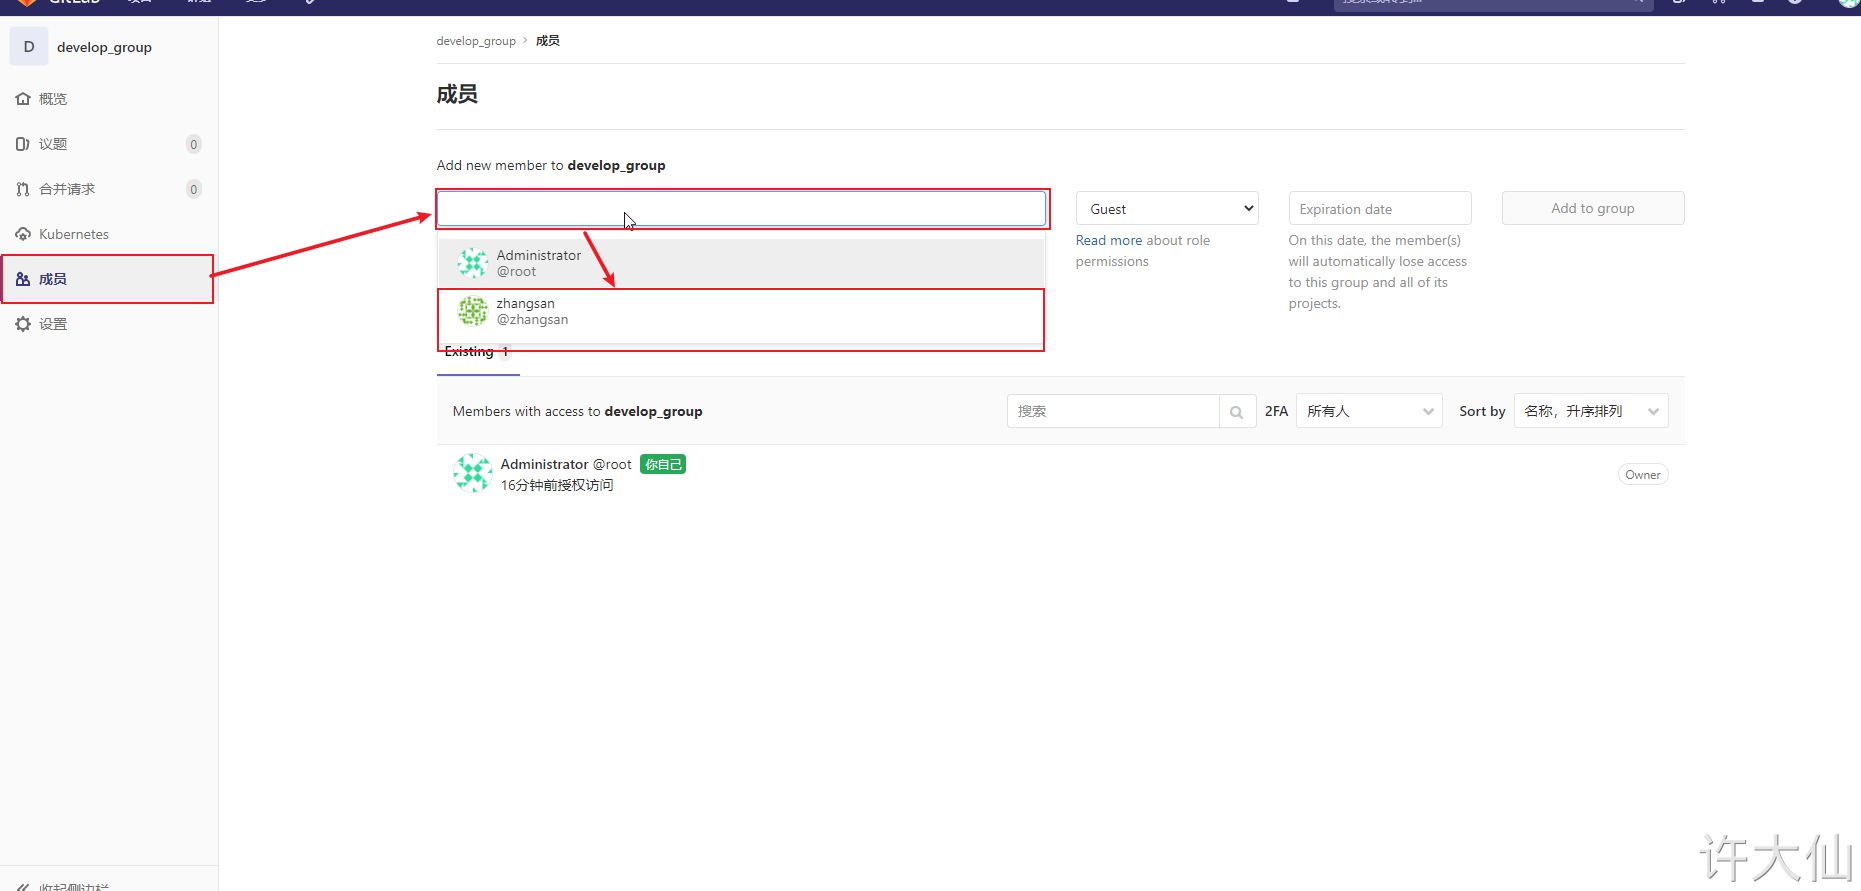
Gitlab users have five different permissions in the group.
● Guest: you can create isssue and comment, but you can't read or write the version library.
● Reporter: clone code can be used and cannot be submitted. For example, QA and PM can grant this permission.
● Developer: you can clone code, develop, submit and push. For example, this permission can be given to ordinary development.
● Maintainer: you can create projects, add tag s, protect branches, add project members and edit projects. For example, core development can be granted this permission.
● Owner: you can set project access permissions, delete projects, migrate projects, and manage team members. For example, the development team leader can grant this permission.
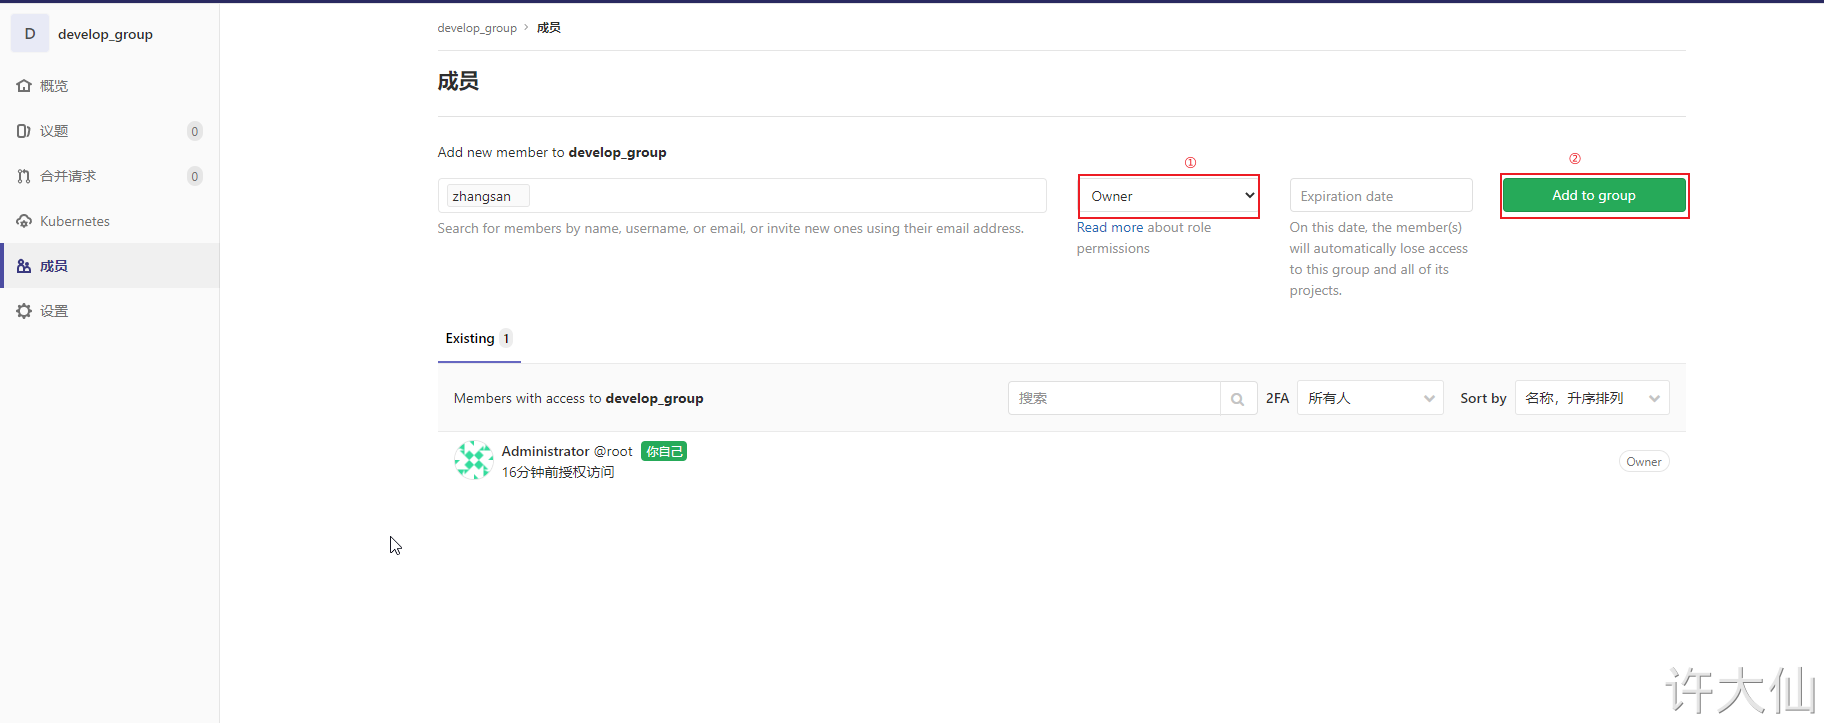
4.4.4 adding items to user groups
● you can use the root administrator to add items in the user group, or you can log in to Gitlab with the account you just created to add items (you need to reset the password, omitted).
5 upload the source code to Gitlab warehouse
5.1 premise description
The IDEA I use is version 2020.3, which is used for code development on Windows system.
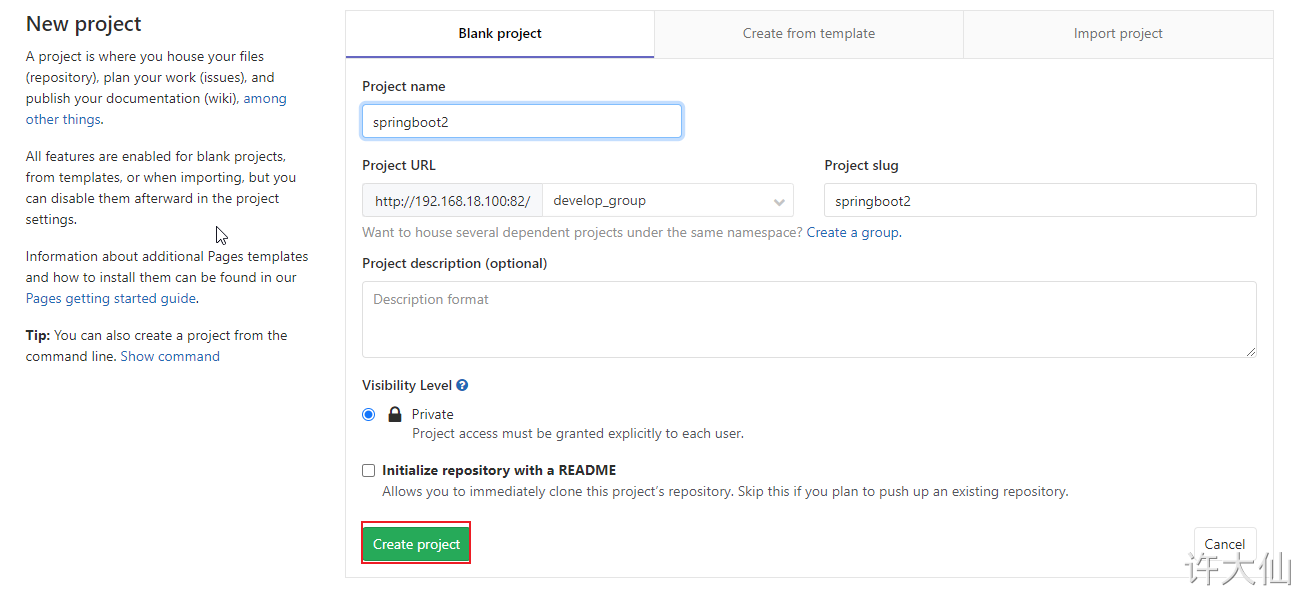
5.2 project code
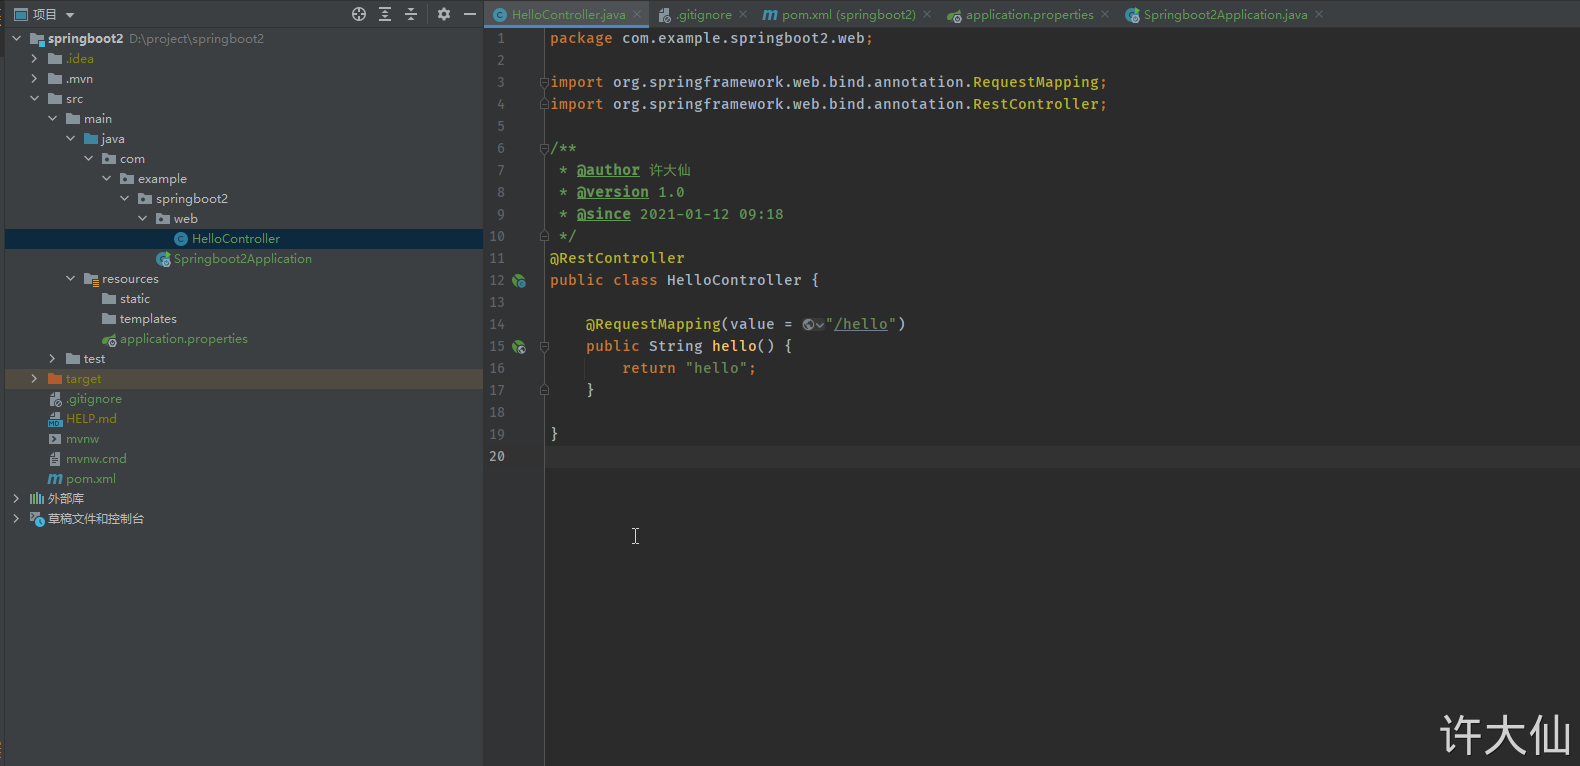
Take the SpringBoot project as an example.
pom.xml
<?xml version="1.0" encoding="UTF-8"?>
<project xmlns="http://maven.apache.org/POM/4.0.0" xmlns:xsi="http://www.w3.org/2001/XMLSchema-instance"
         xsi:schemaLocation="http://maven.apache.org/POM/4.0.0 https://maven.apache.org/xsd/maven-4.0.0.xsd">
    <modelVersion>4.0.0</modelVersion>
    <parent>
        <groupId>org.springframework.boot</groupId>
        <artifactId>spring-boot-starter-parent</artifactId>
        <version>2.3.7.RELEASE</version>
        <relativePath/> <!-- lookup parent from repository -->
    </parent>
    <groupId>com.example</groupId>
    <artifactId>springboot2</artifactId>
    <version>1.0</version>
    <name>springboot2</name>
    <description>Demo project for Spring Boot</description>

    <properties>
        <java.version>11</java.version>
    </properties>

    <dependencies>
        <dependency>
            <groupId>org.springframework.boot</groupId>
            <artifactId>spring-boot-starter-web</artifactId>
        </dependency>

        <dependency>
            <groupId>org.springframework.boot</groupId>
            <artifactId>spring-boot-starter-test</artifactId>
            <scope>test</scope>
            <exclusions>
                <exclusion>
                    <groupId>org.junit.vintage</groupId>
                    <artifactId>junit-vintage-engine</artifactId>
                </exclusion>
            </exclusions>
        </dependency>
    </dependencies>

    <build>
        <plugins>
            <plugin>
                <groupId>org.springframework.boot</groupId>
                <artifactId>spring-boot-maven-plugin</artifactId>
            </plugin>
        </plugins>
    </build>

</project>
Startup class:
package com.example.springboot2;

import org.springframework.boot.SpringApplication;
import org.springframework.boot.autoconfigure.SpringBootApplication;

@SpringBootApplication
public class Springboot2Application {

    public static void main(String[] args) {
        SpringApplication.run(Springboot2Application.class, args);
    }

}
Business class:
package com.example.springboot2.web;

import org.springframework.web.bind.annotation.RequestMapping;
import org.springframework.web.bind.annotation.RestController;

/**
 * @author Xu Daxian
 * @version 1.0
 * @since 2021-01-12 09:18
 */
@RestController
public class HelloController {

    @RequestMapping(value = "/hello")
    public String hello() {
        return "hello";
    }

}
5.3 the project structure is as follows:
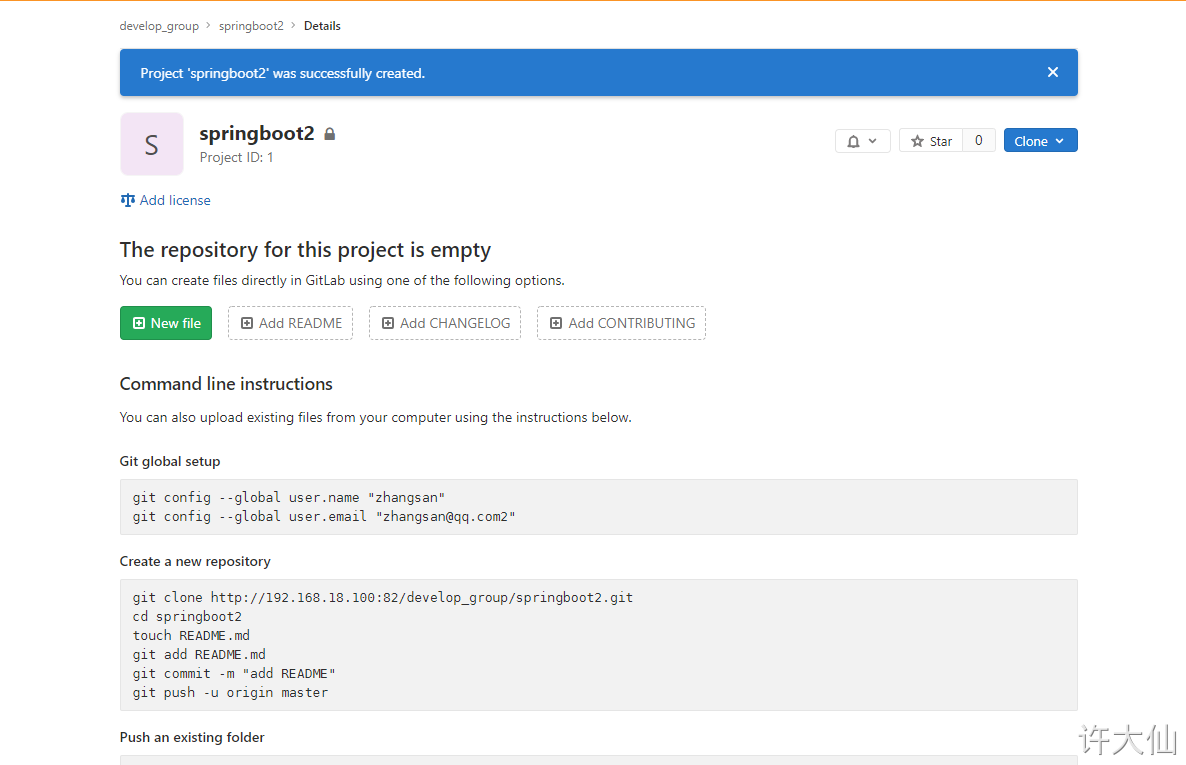
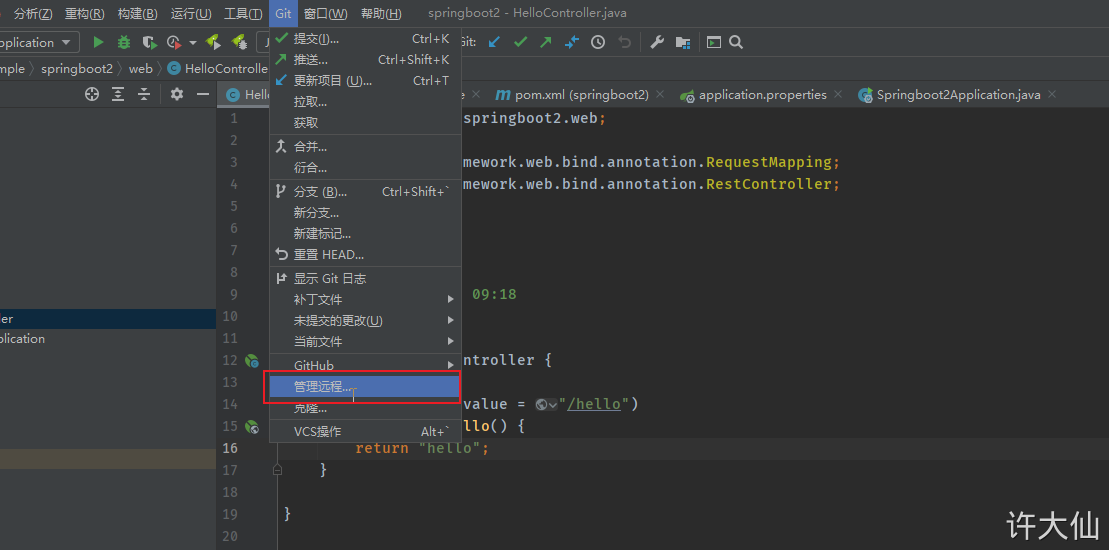
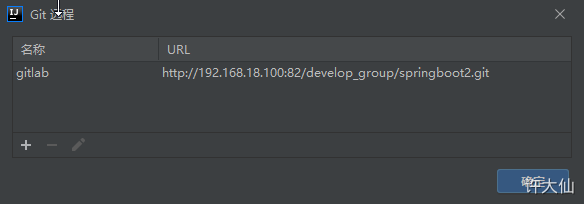
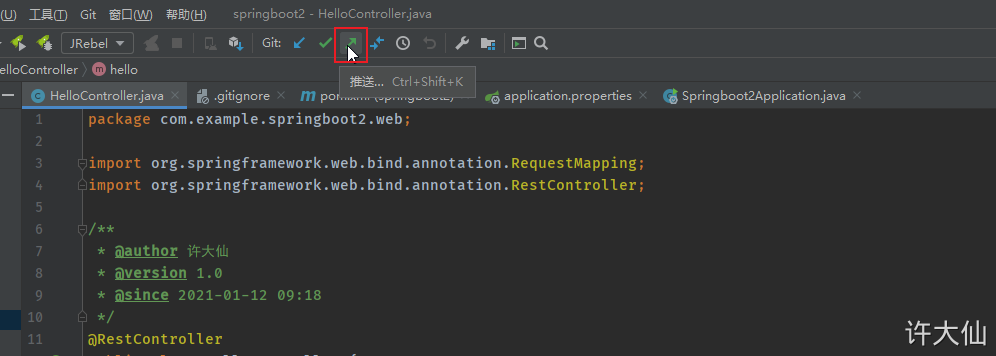
5.4 submit code to Gitlab warehouse
First add, commit, and then push.
6 Jenkins installation
6.1 premise description
● the IP address of the server is 192.168.18.101.
● the firewall has been closed.
systemctl stop firewalld
systemctl disable firewalld
6.2 installing JDK
● slightly (it has been installed above).
6.3 download Jenkins
wget http://mirrors.jenkins-ci.org/redhat/jenkins-2.263-1.1.noarch.rpm
6.4 installing Jenkins
Install Jenkins:
rpm -ivh jenkins-2.263-1.1.noarch.rpm
6.5 modify Jenkins configuration
● modify Jenkins configuration:
vim /etc/sysconfig/jenkins
JENKINS_USER="root"

JENKINS_PORT="8888"
6.6 start Jenkins
● start Jenkins:
systemctl start jenkins
● startup and self startup:
systemctl enable jenkins
6.7 open browser access
● http://192.168.18.101:8888.
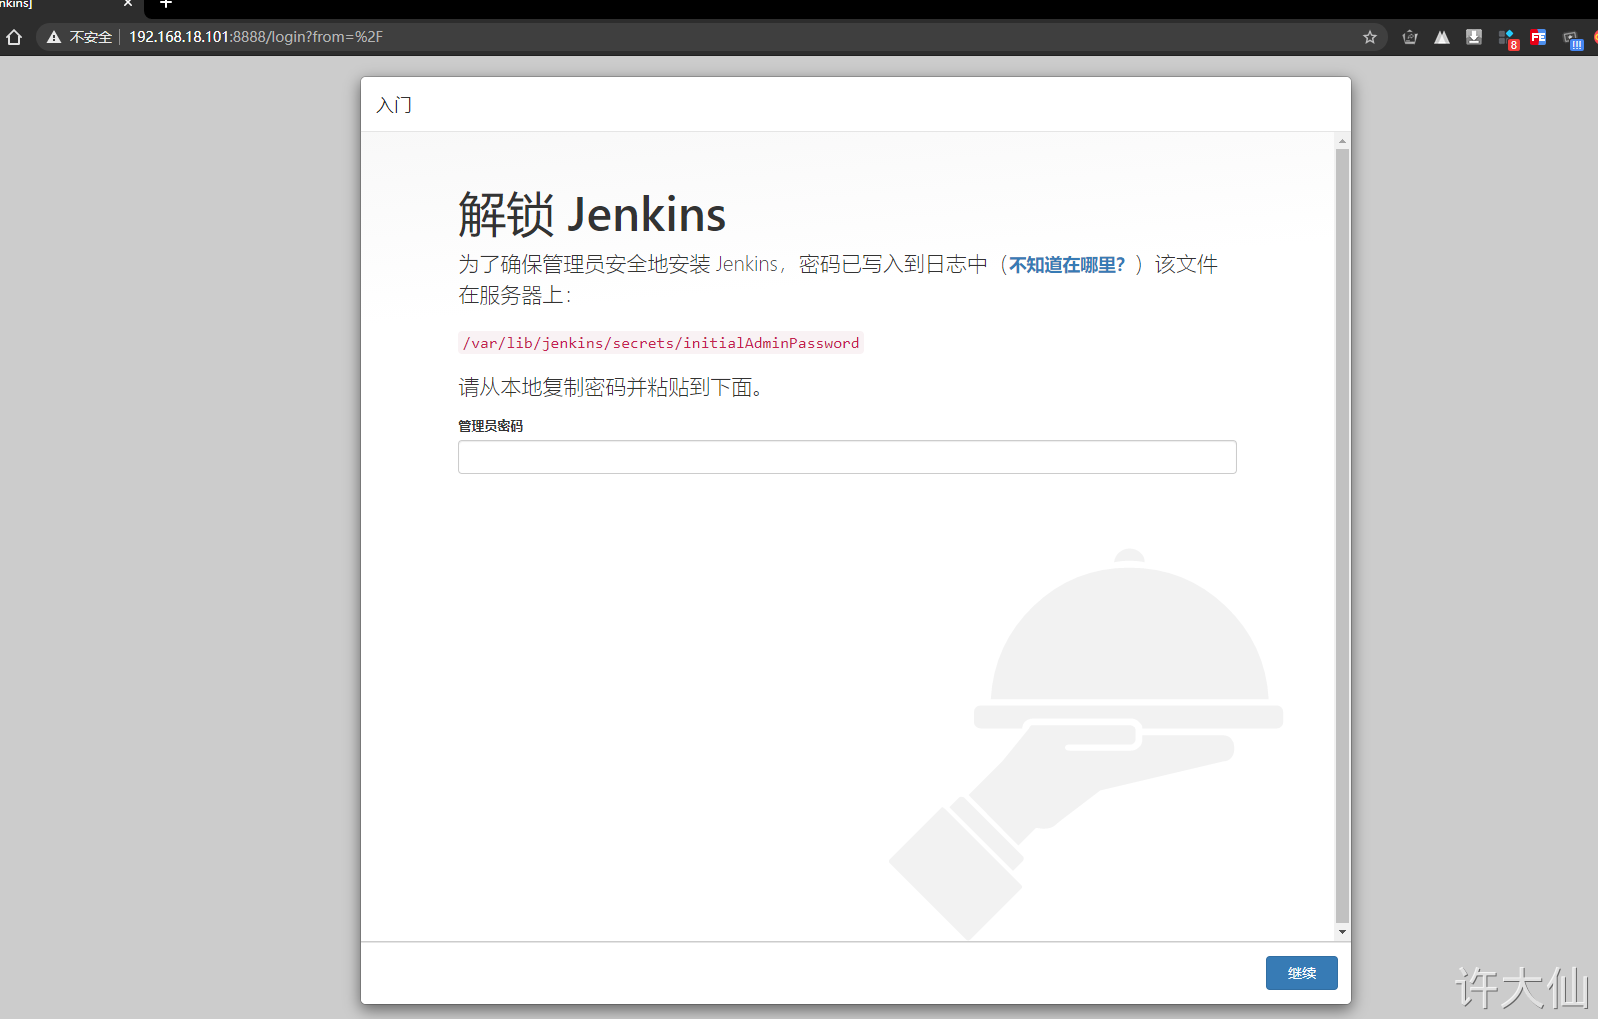
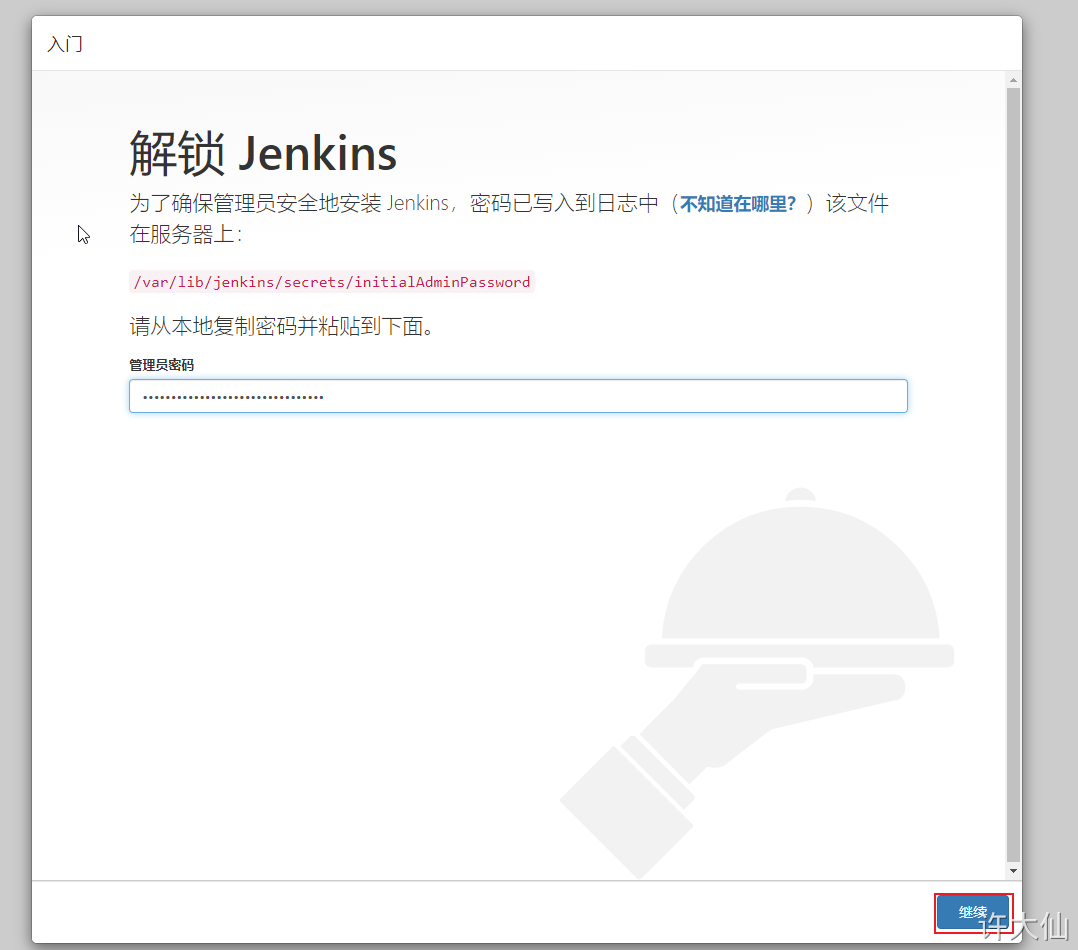
6.8 obtaining and entering a password
● obtain and enter the password:
cat /var/lib/jenkins/secrets/initialAdminPassword

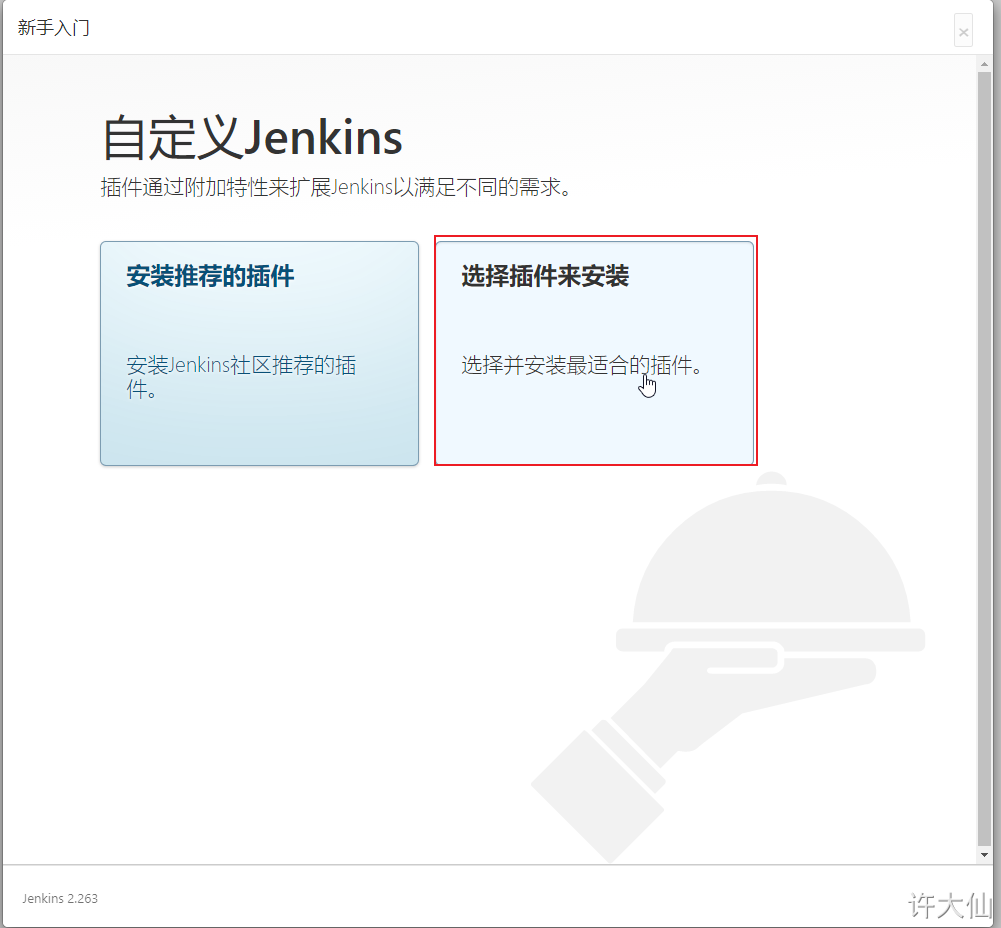
6.9 skip plug-in installation
● because the Jenkins plug-in needs to be downloaded from the official website by default, it is very slow and often fails, so you can skip the plug-in installation temporarily.
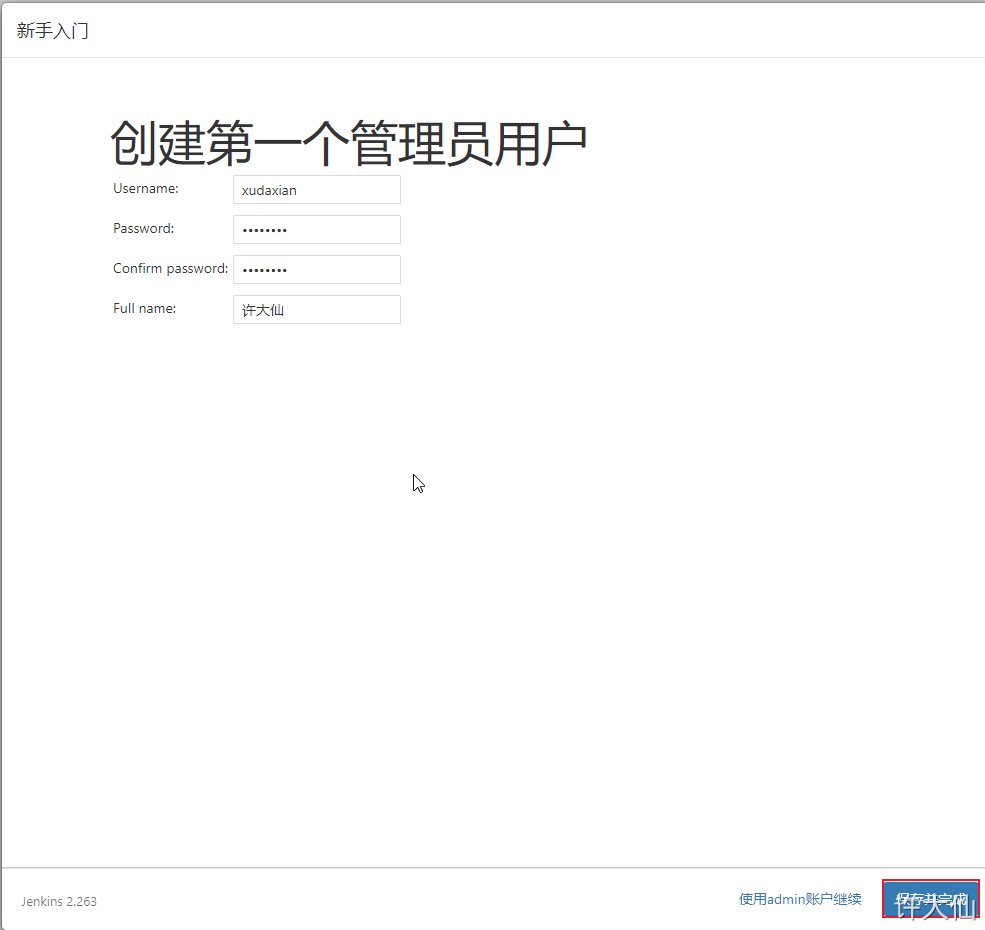
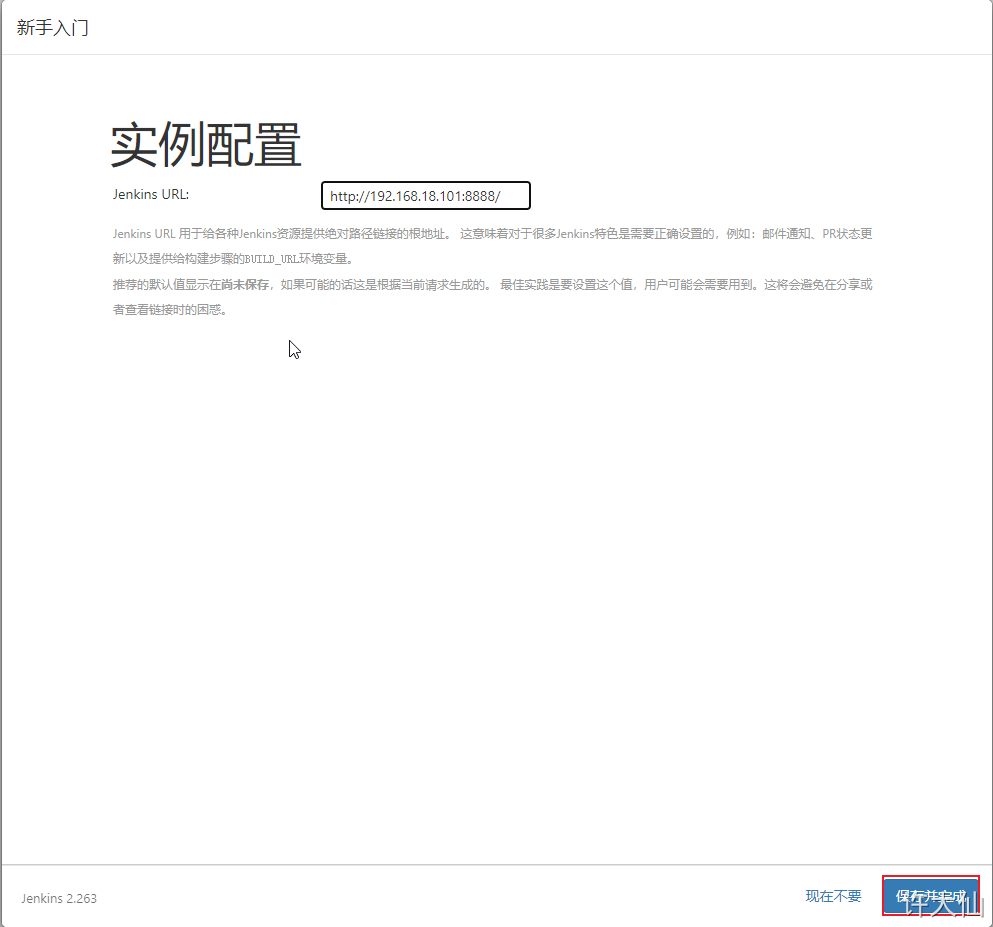
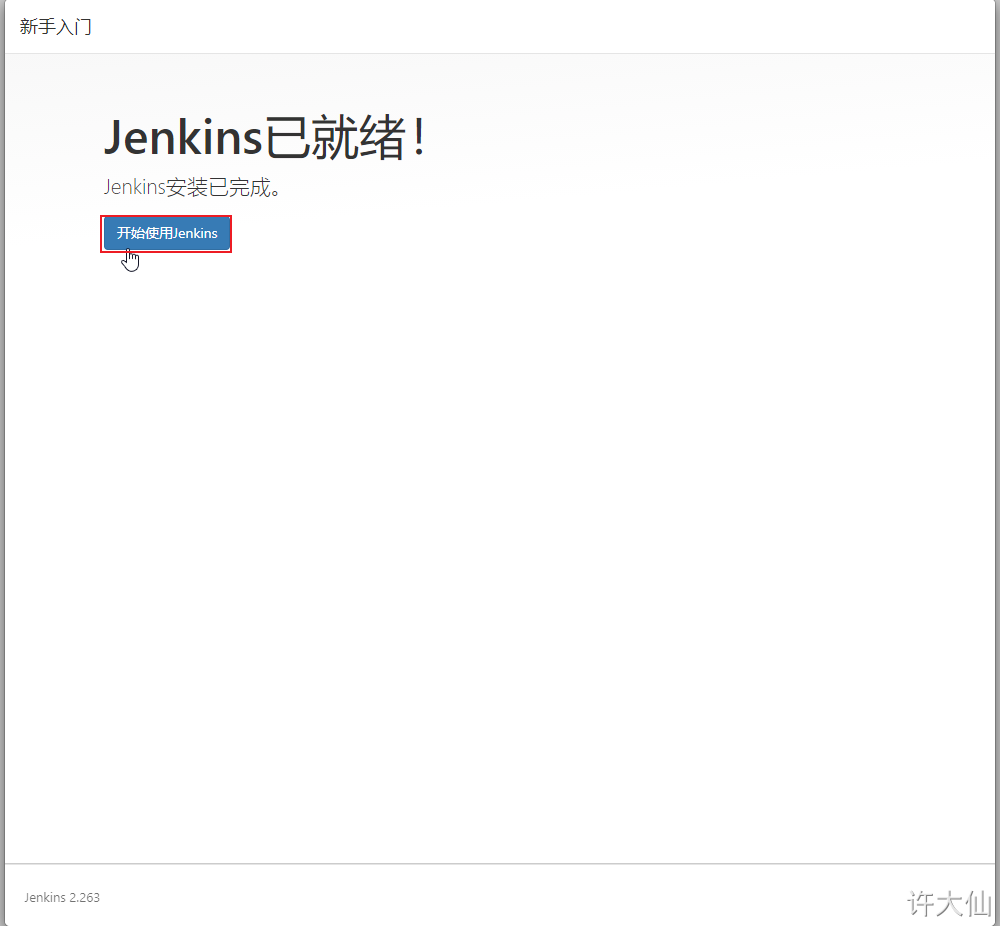
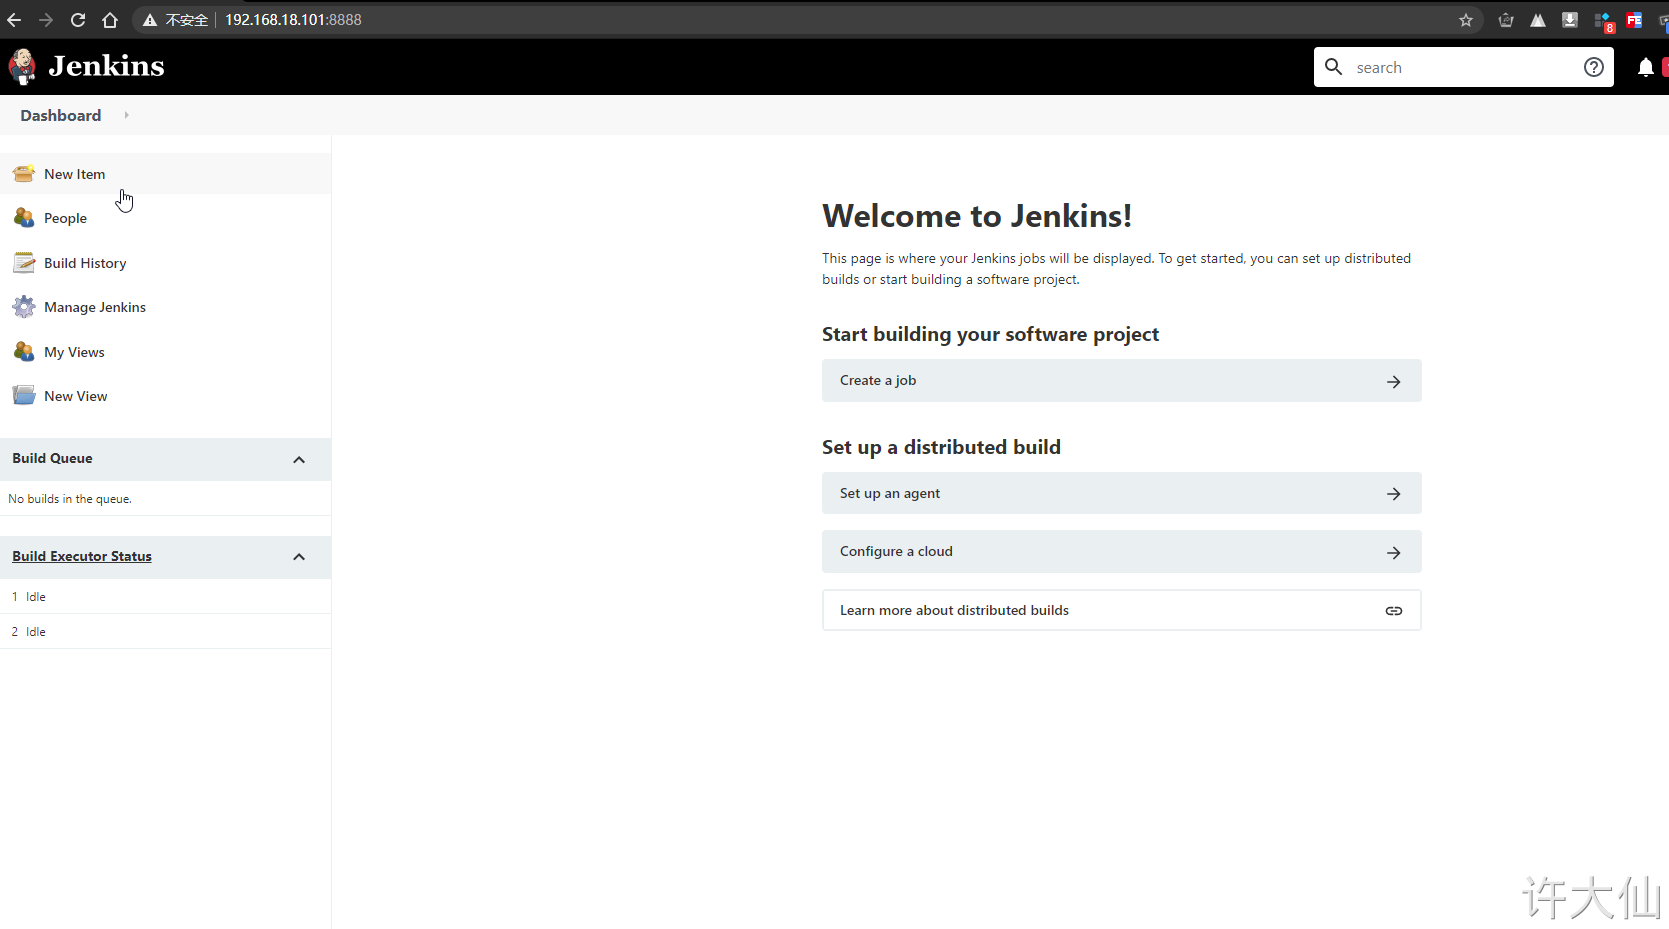
6.10 add an administrator account and enter Jenkins background
7 Jenkins plug-in management
7.1 general
● Jenkins itself does not provide many functions. We can meet our needs by using plug-ins. For example, functions such as pulling code from Gitlab and building projects using Maven need to be completed by plug-ins.
7.2 modify the download address of Jenkins plug-in
● the download speed of Jenkins foreign official plug-in address is very slow, so we need to manually modify it to the domestic plug-in address.
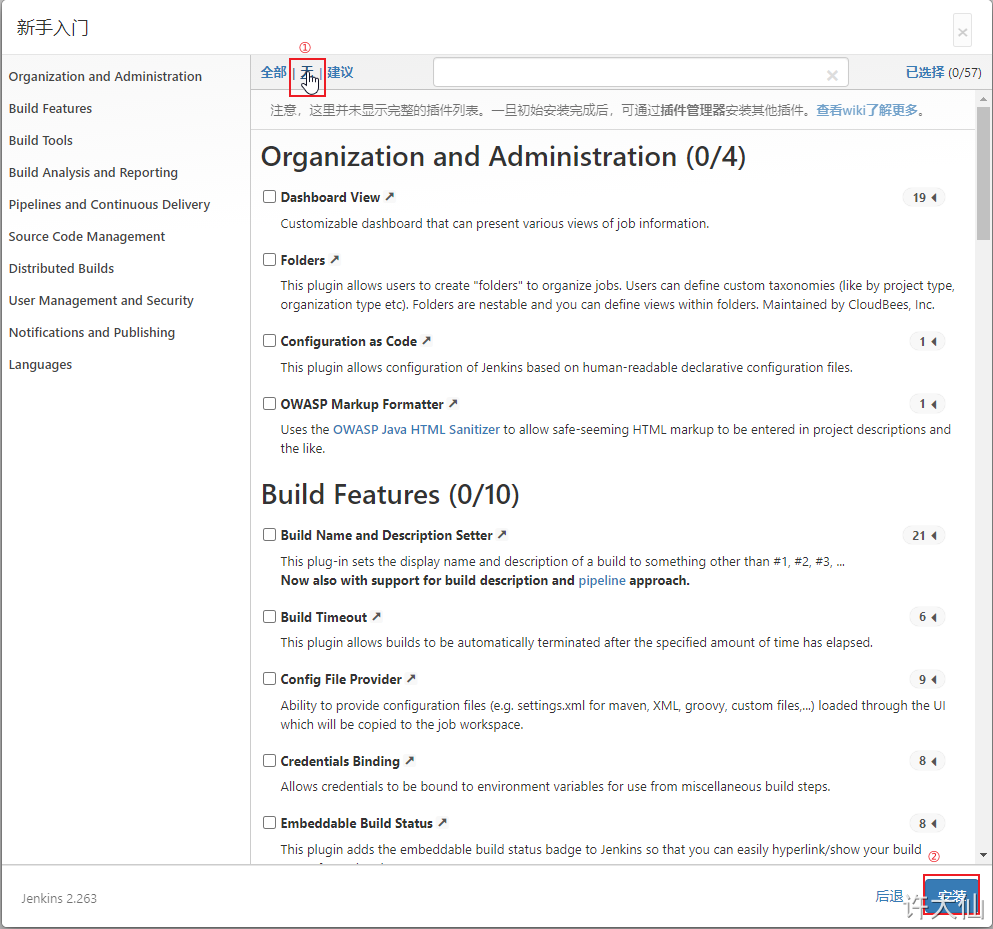
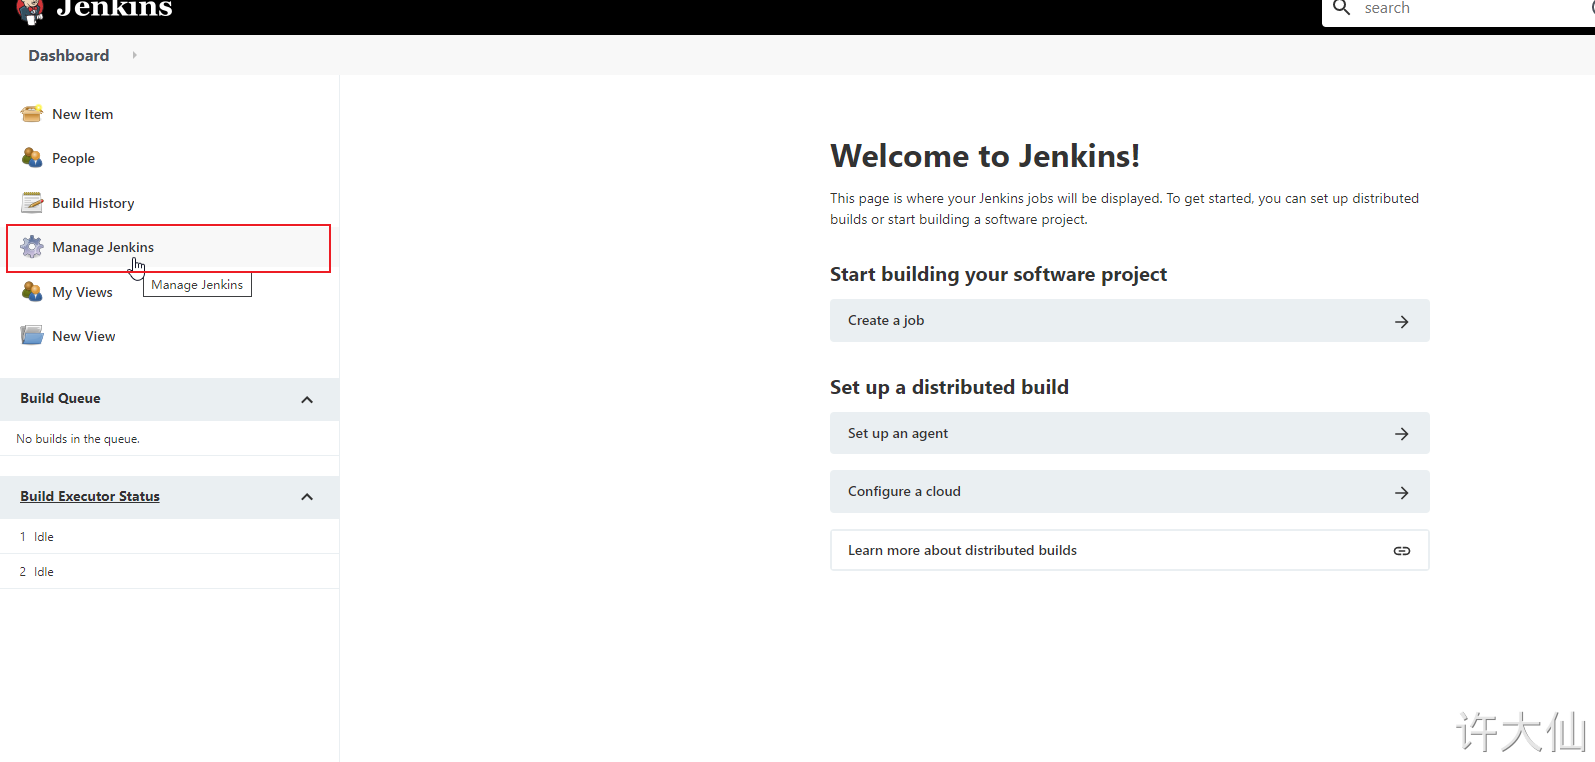
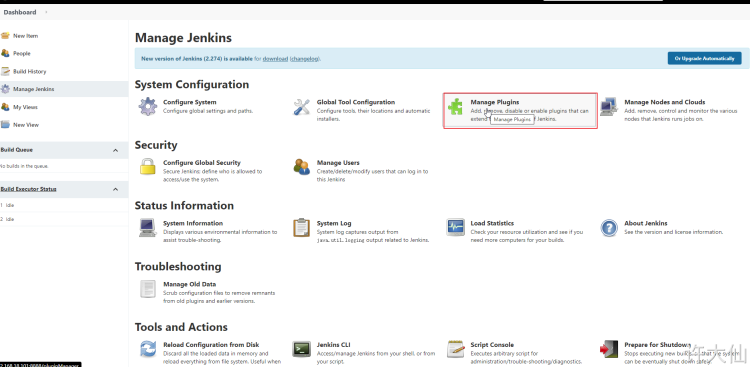
● Jenkins – > Manage Jenkins – > Manage plugins, click Available.
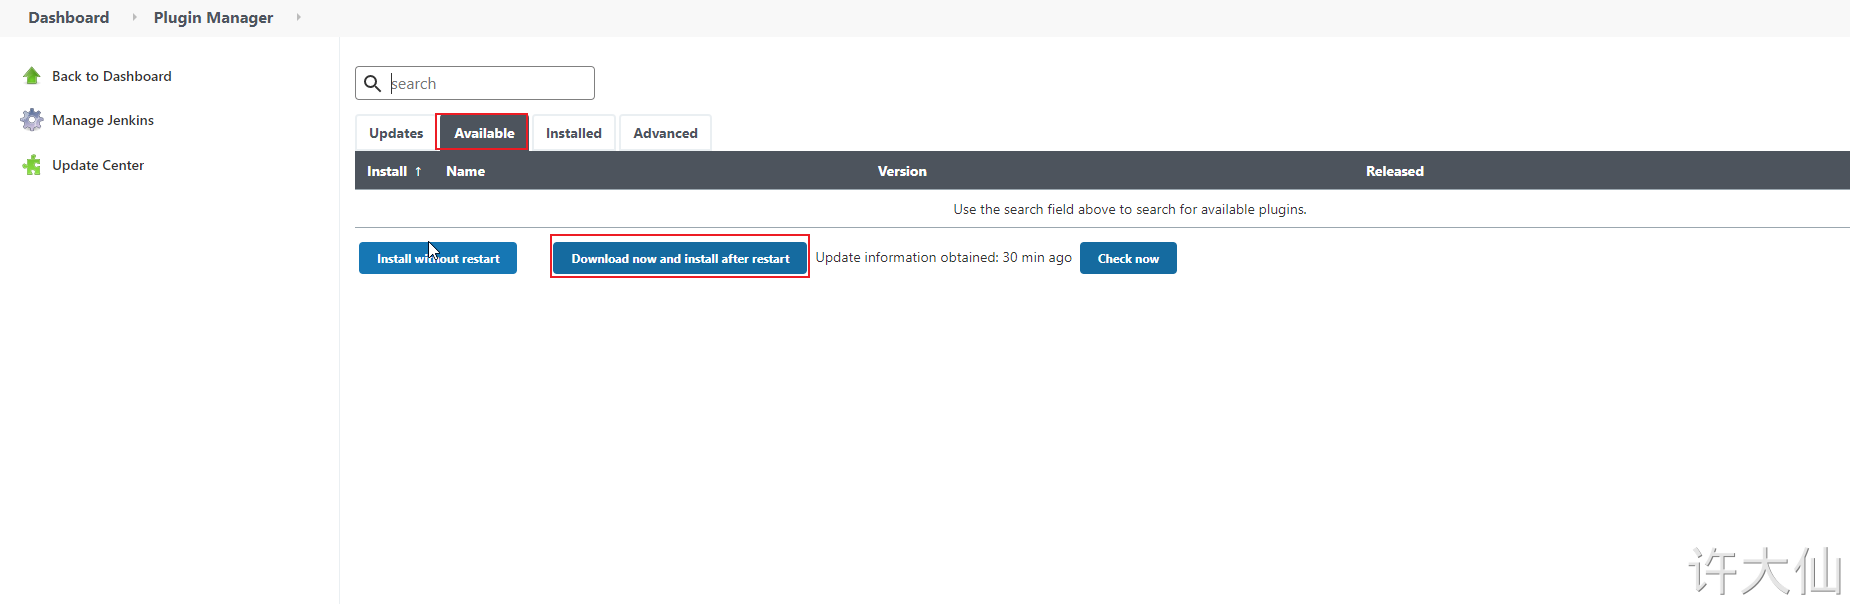
The purpose of this is to download Jenkins's official plug-in list locally.
● modify the address file and replace it with the domestic plug-in address:
cd /var/lib/jenkins/updates
sed -i 's#http:\/\/updates.jekins-ci.org\/download#https:\/\/mirrors.tuna.tsinghua.edu.cn\/jenkins#g' default.json && sed -i '#/http:\/\/www.google.com#https:\/\/www.baidu.com#g' default.json
● click Advanced in Manage Plugins to change the Update SIte to the download address of domestic plug-ins:
https://mirrors.tuna.tsinghua.edu.cn/jenkins/updates/update-center.json
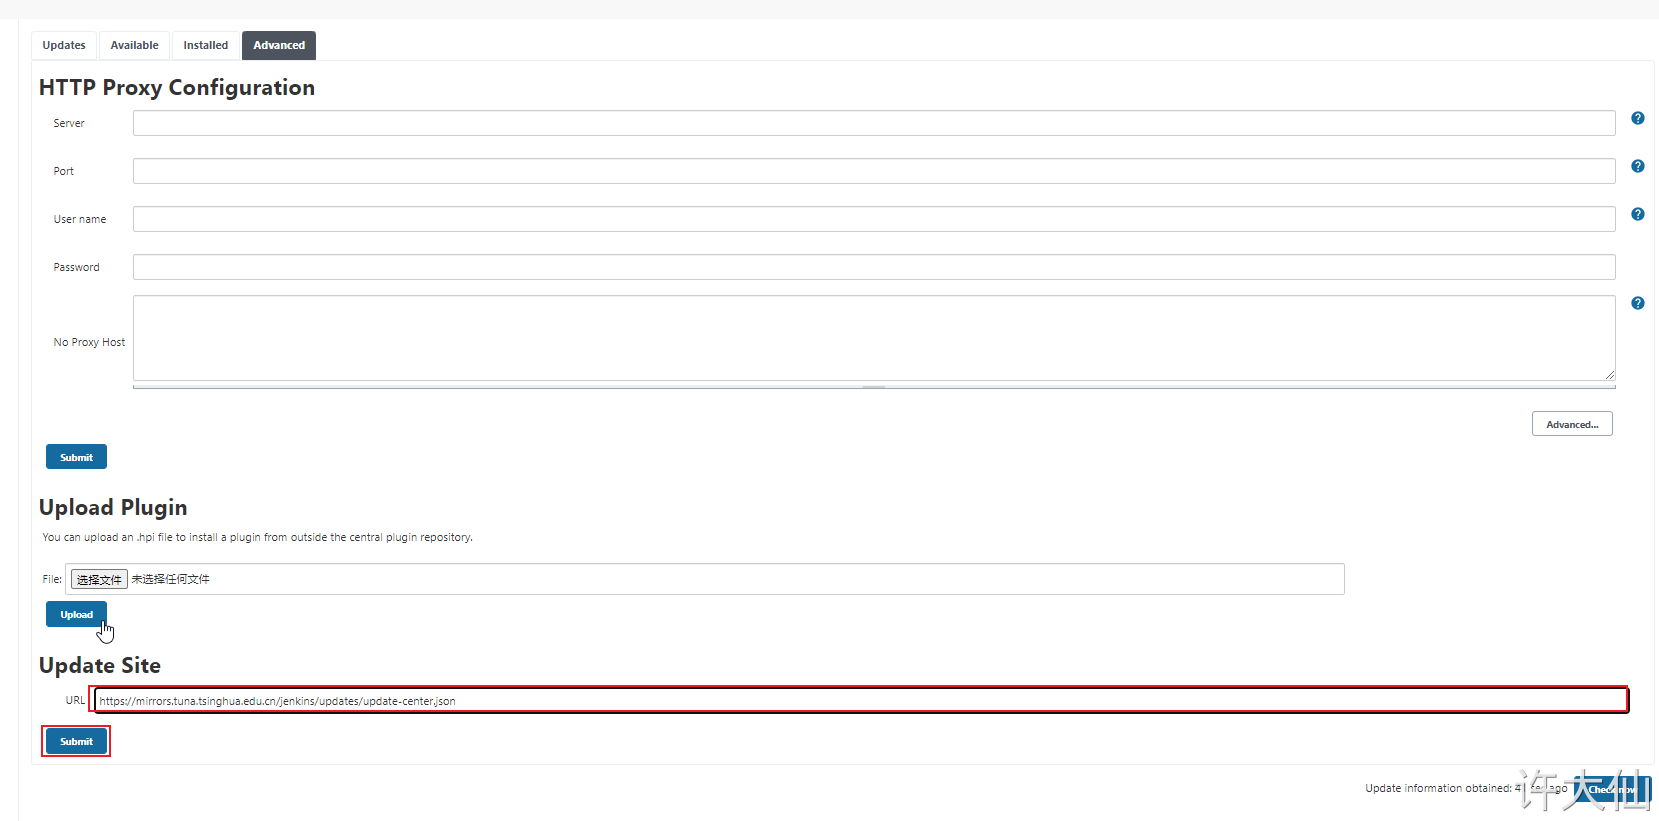
● click submit and enter in the browser http://192.168.18.101:8888/restart , restart Jenkins.
7.3 Download Chinese plugin
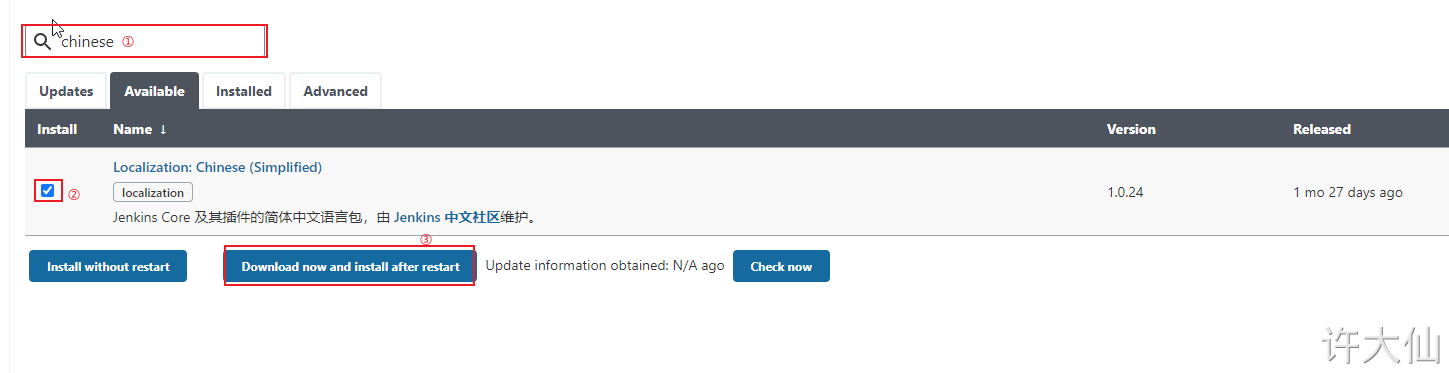
● Jenkins – > Manage Jenkins – > Manage plugins, click Available and search "Chinese".
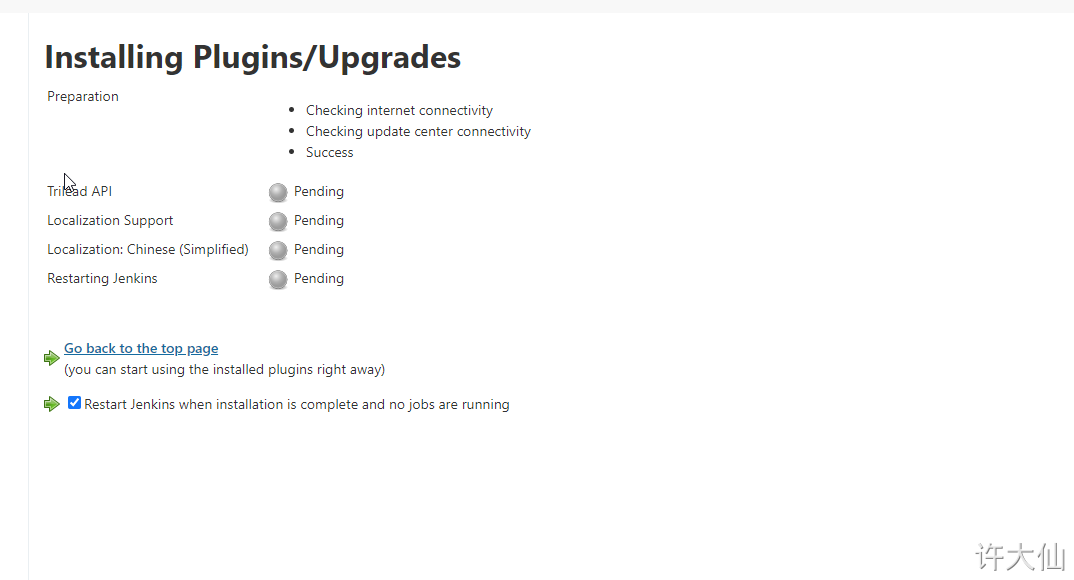
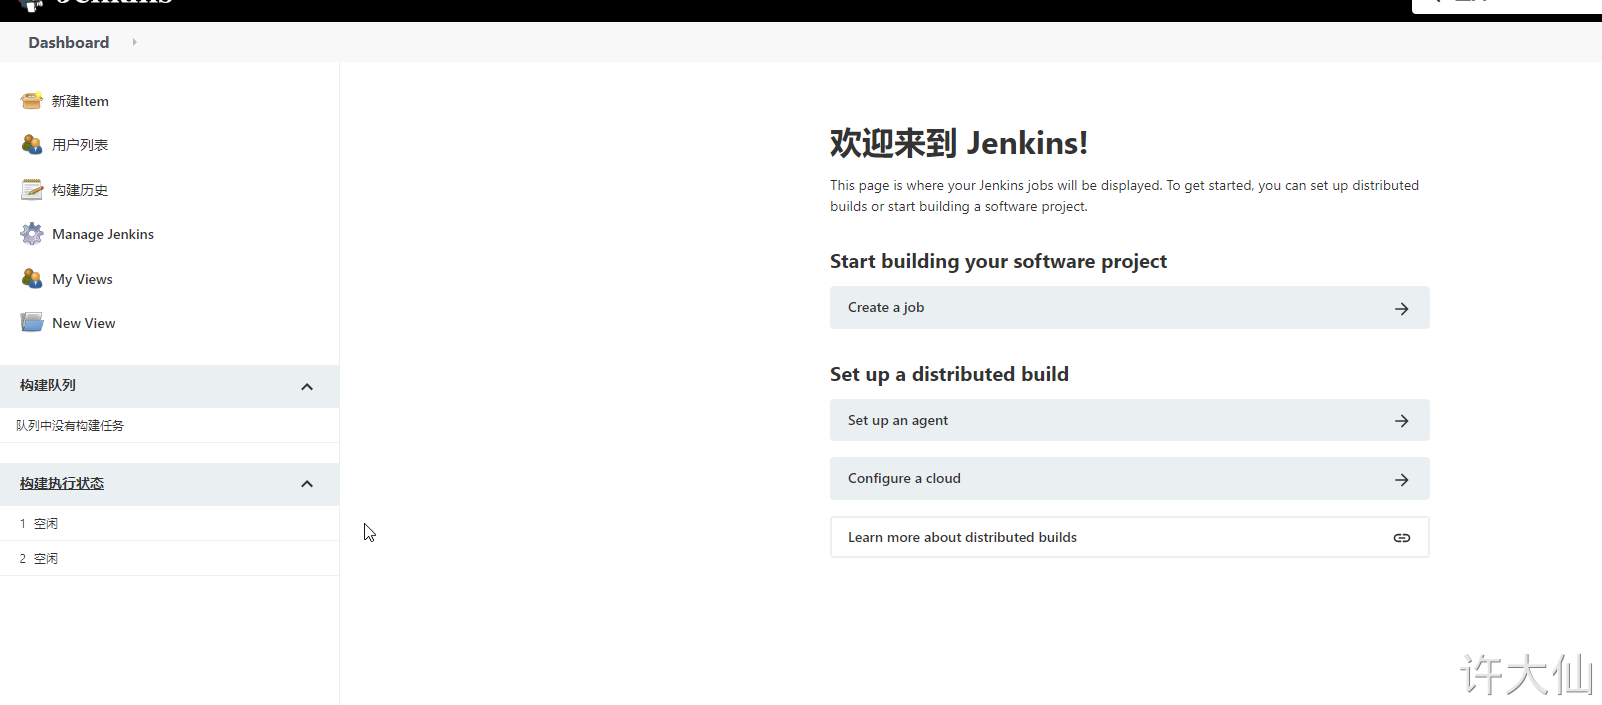
● after restarting Jenkins, you will see that Jenkins has been sinicized (however, some menu Sinicization may fail).
8 Jenkins user authority management
8.1 general
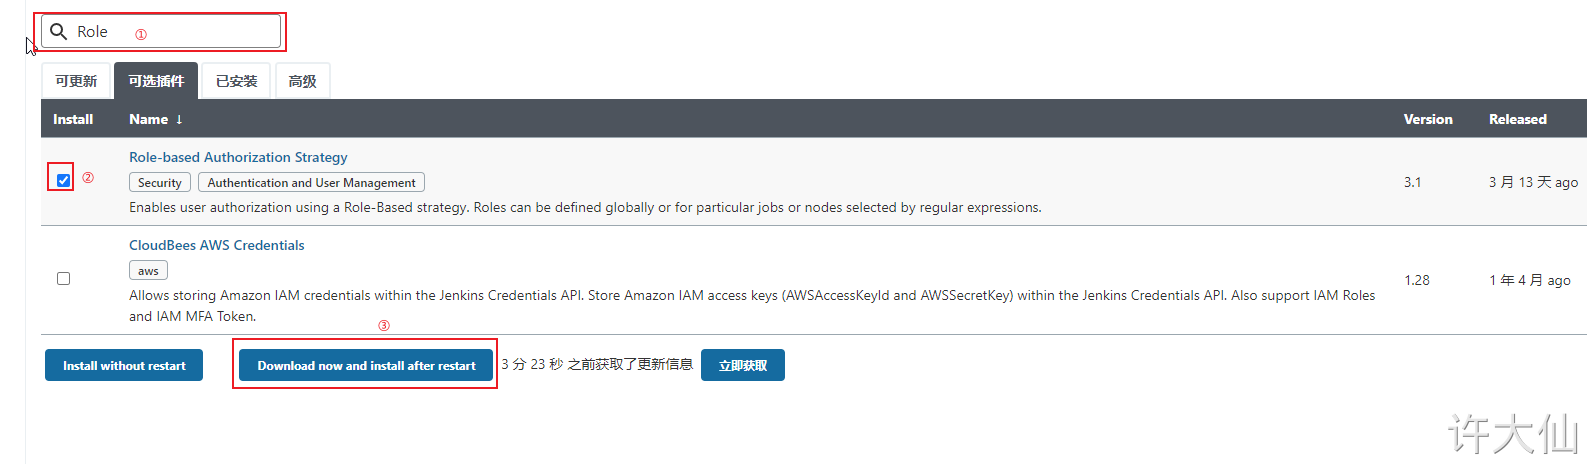
● Jenkins' authorization management is very rough. We can use the "Role-based Authorization Strategy" plug-in to manage Jenkins' user permissions.
8.2 install the Role-based Authorization Strategy plug-in
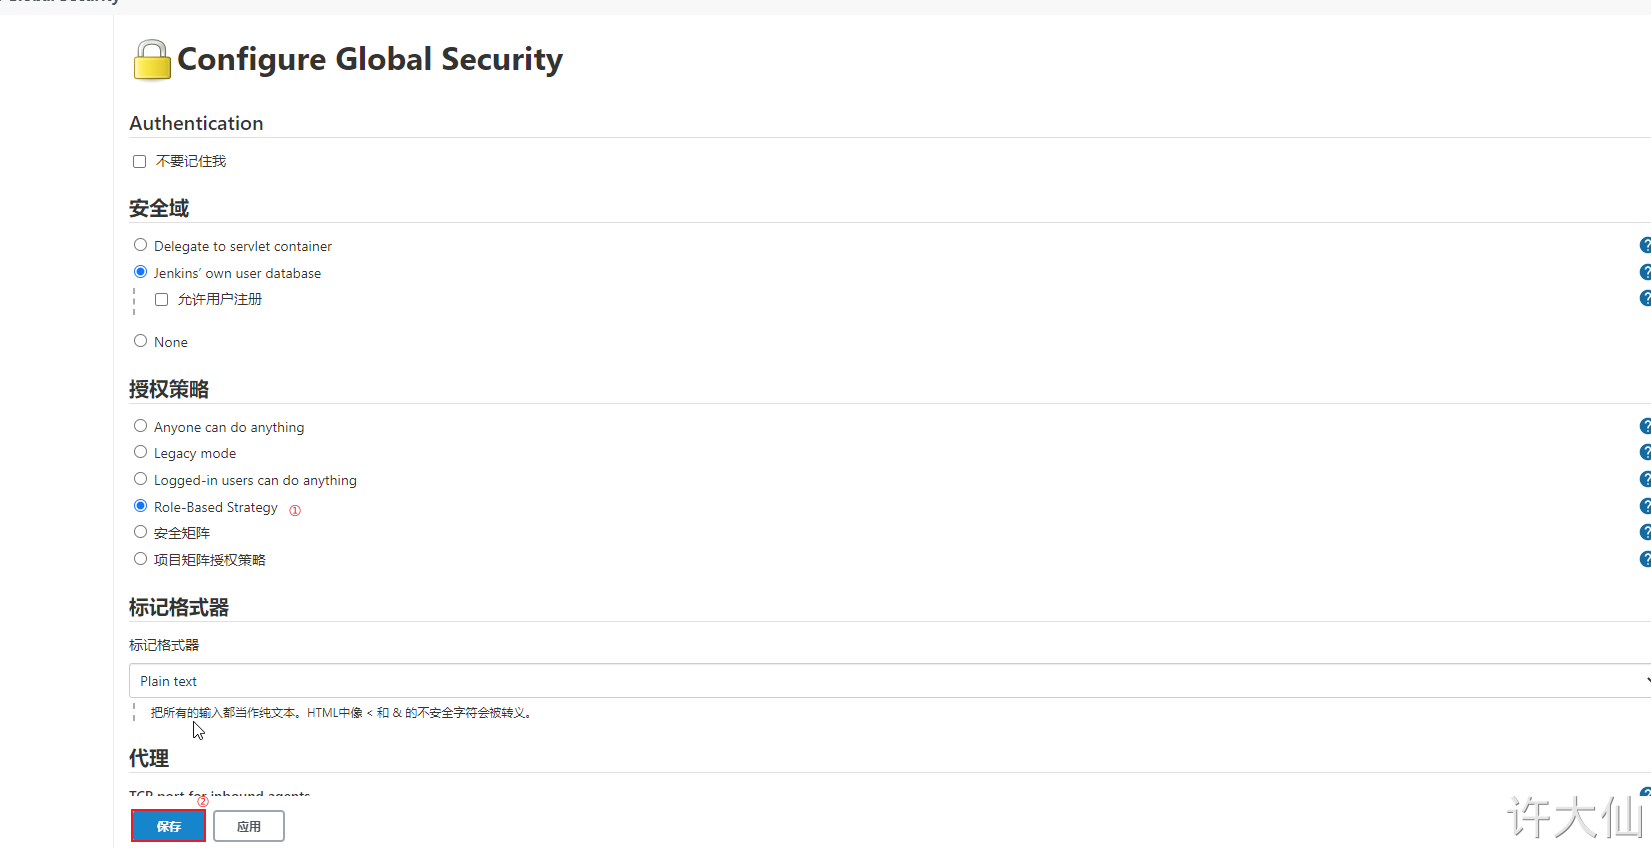
8.3 enable global security policy
● enable global security policy:
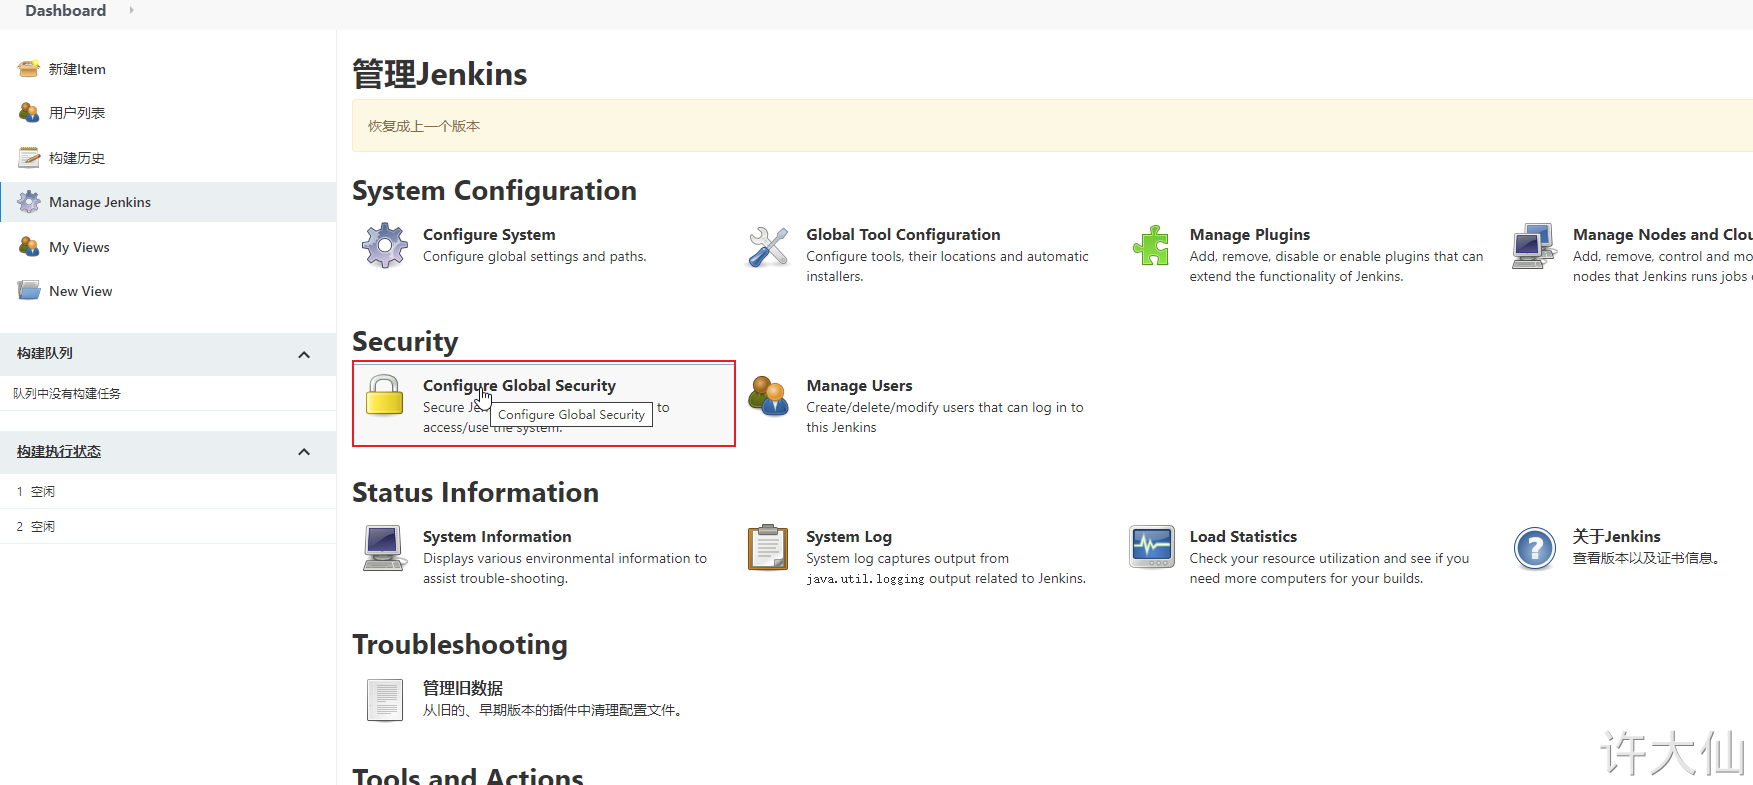
● switch the authorization policy to "role based strategy" and save it.
8.4 creating roles
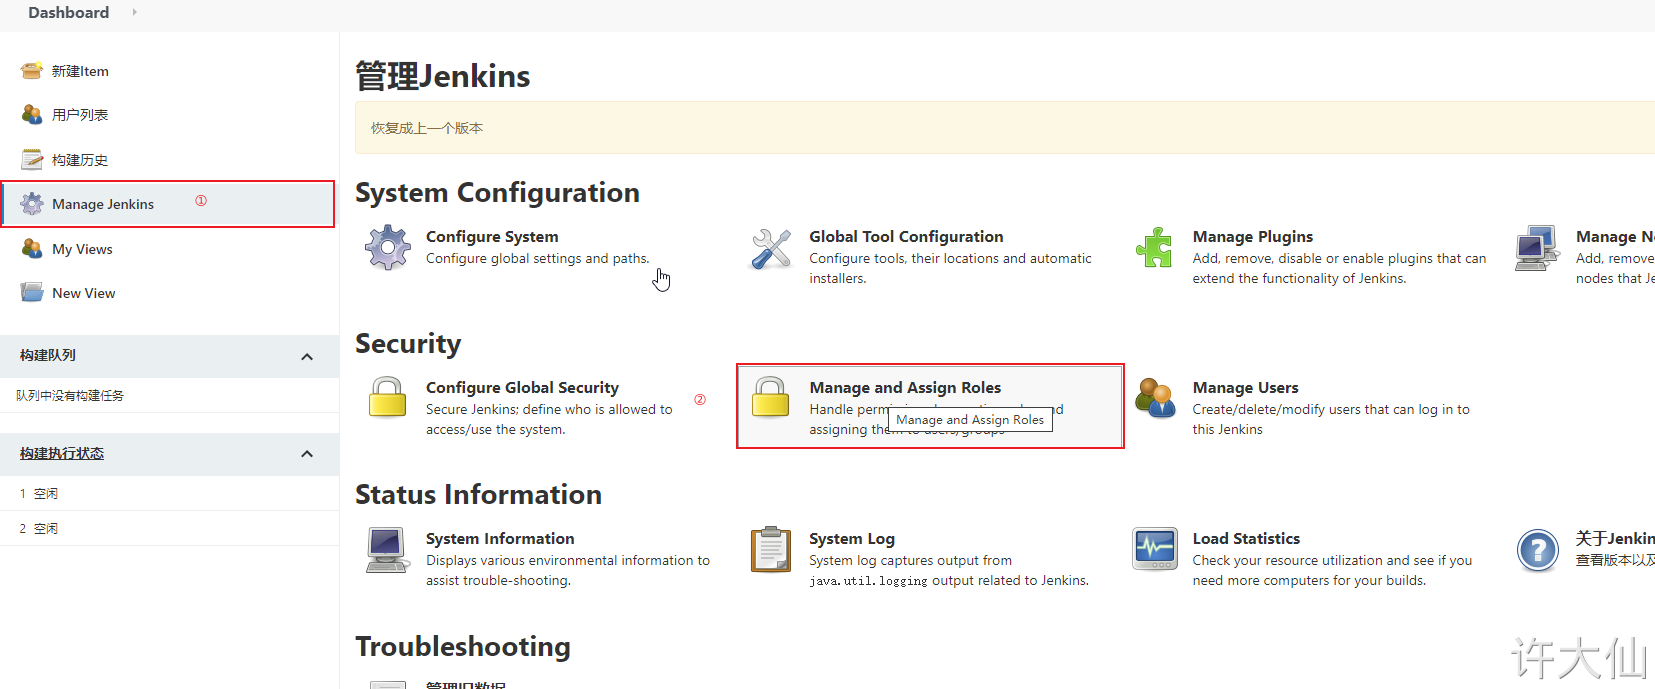
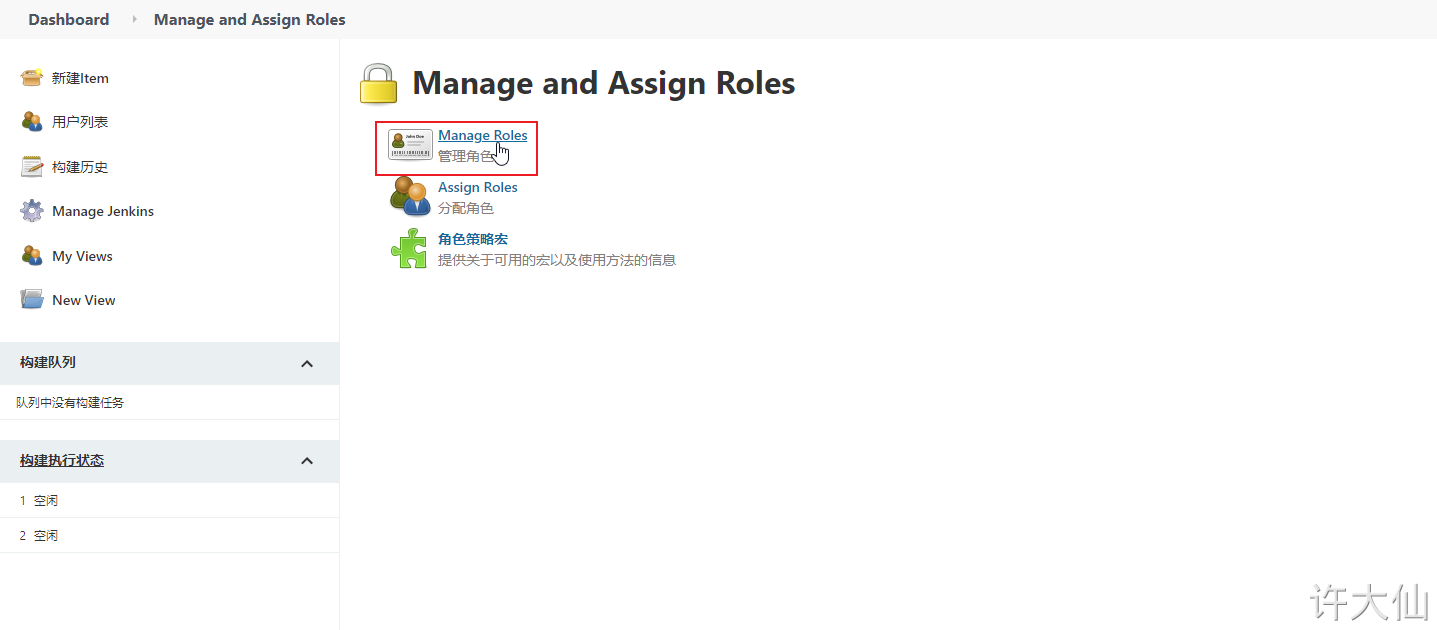
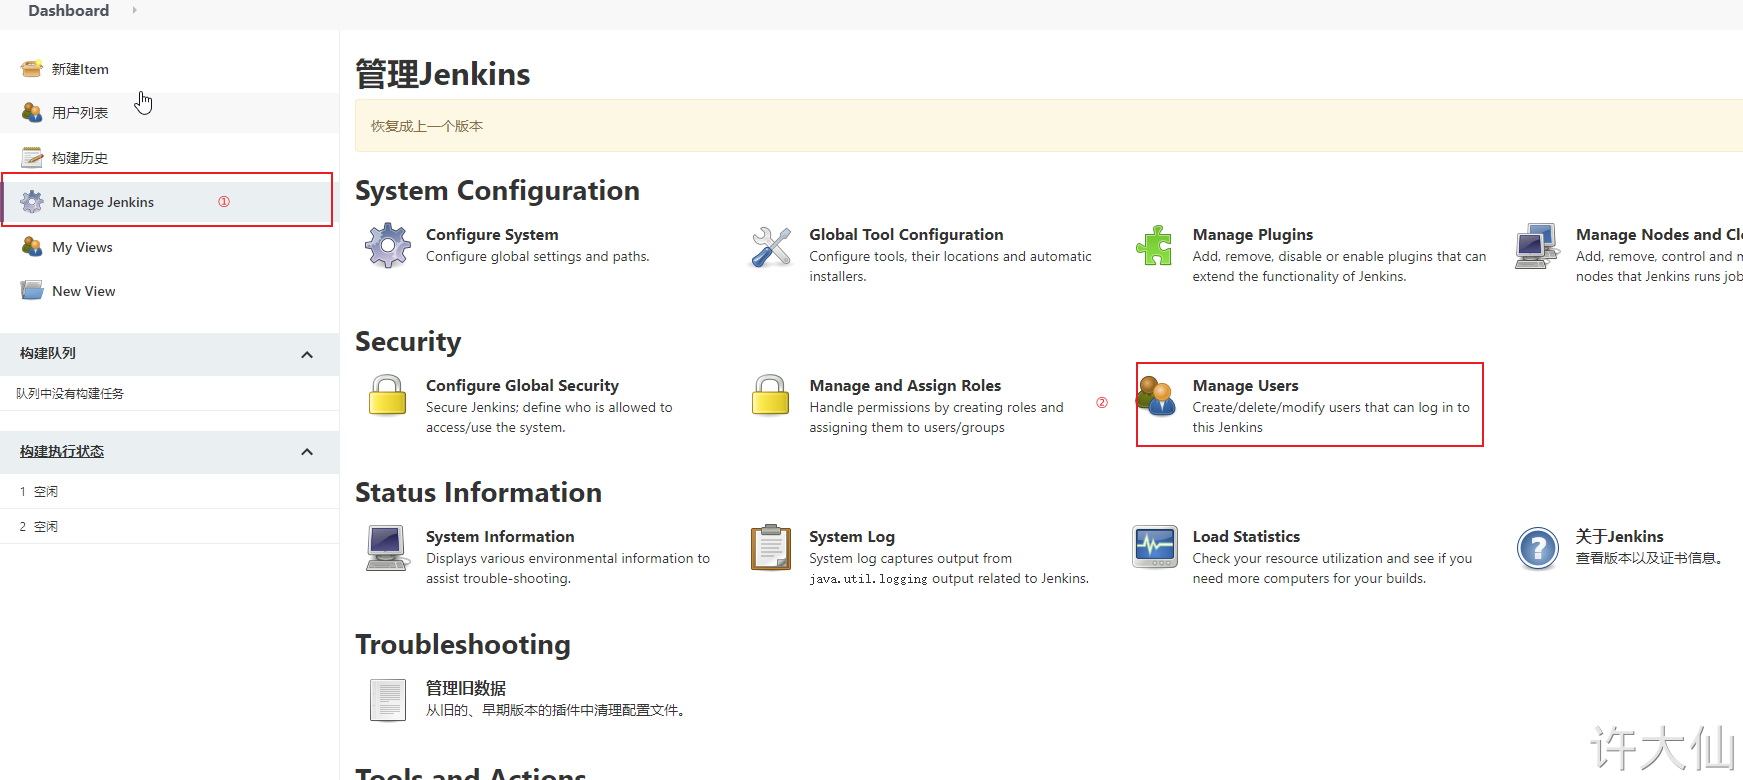
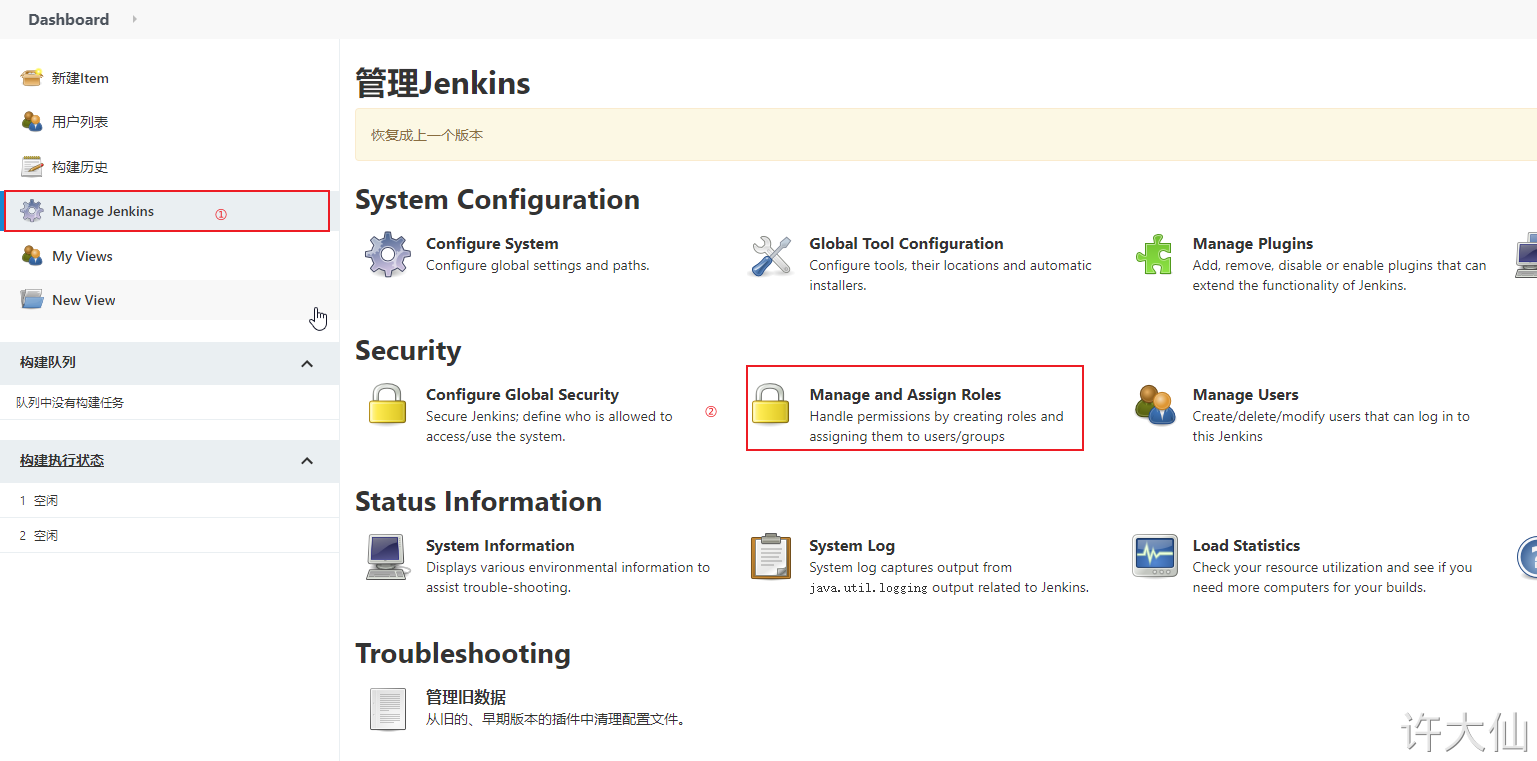
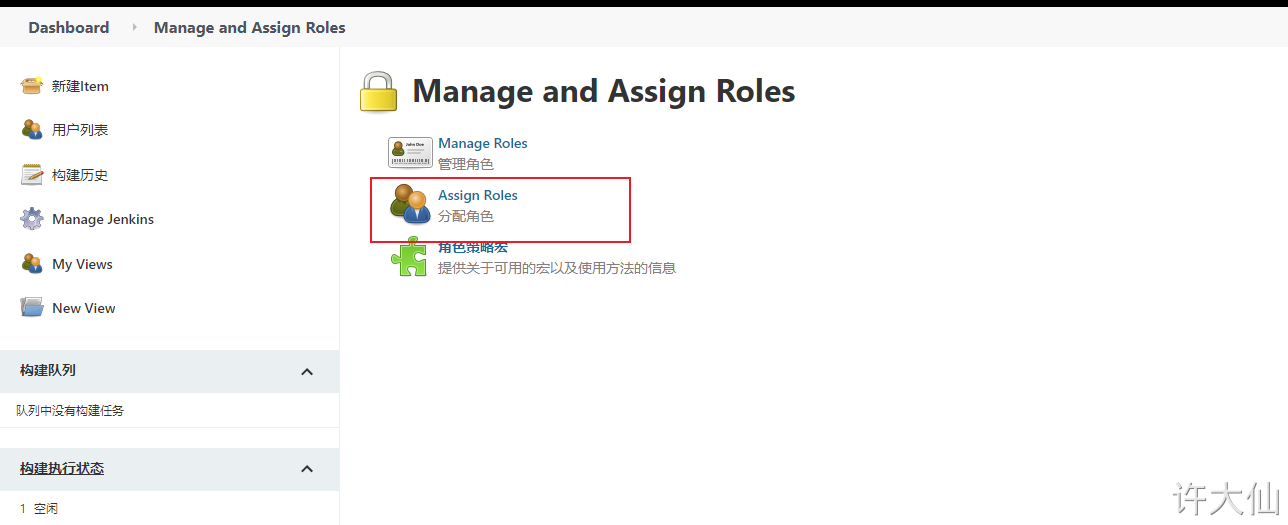
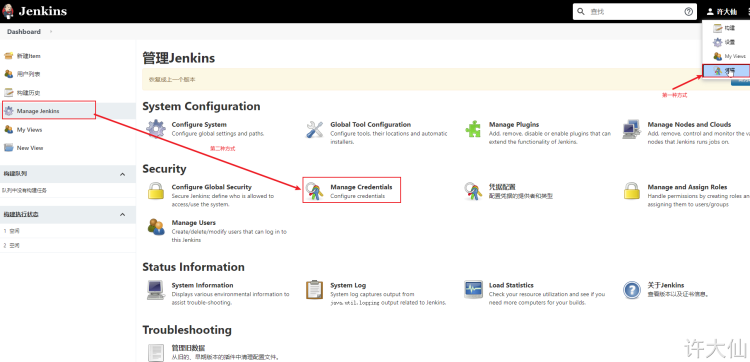
● Manage Jenkins–>Manage and Assign Roles:
Click "Manage Roles":
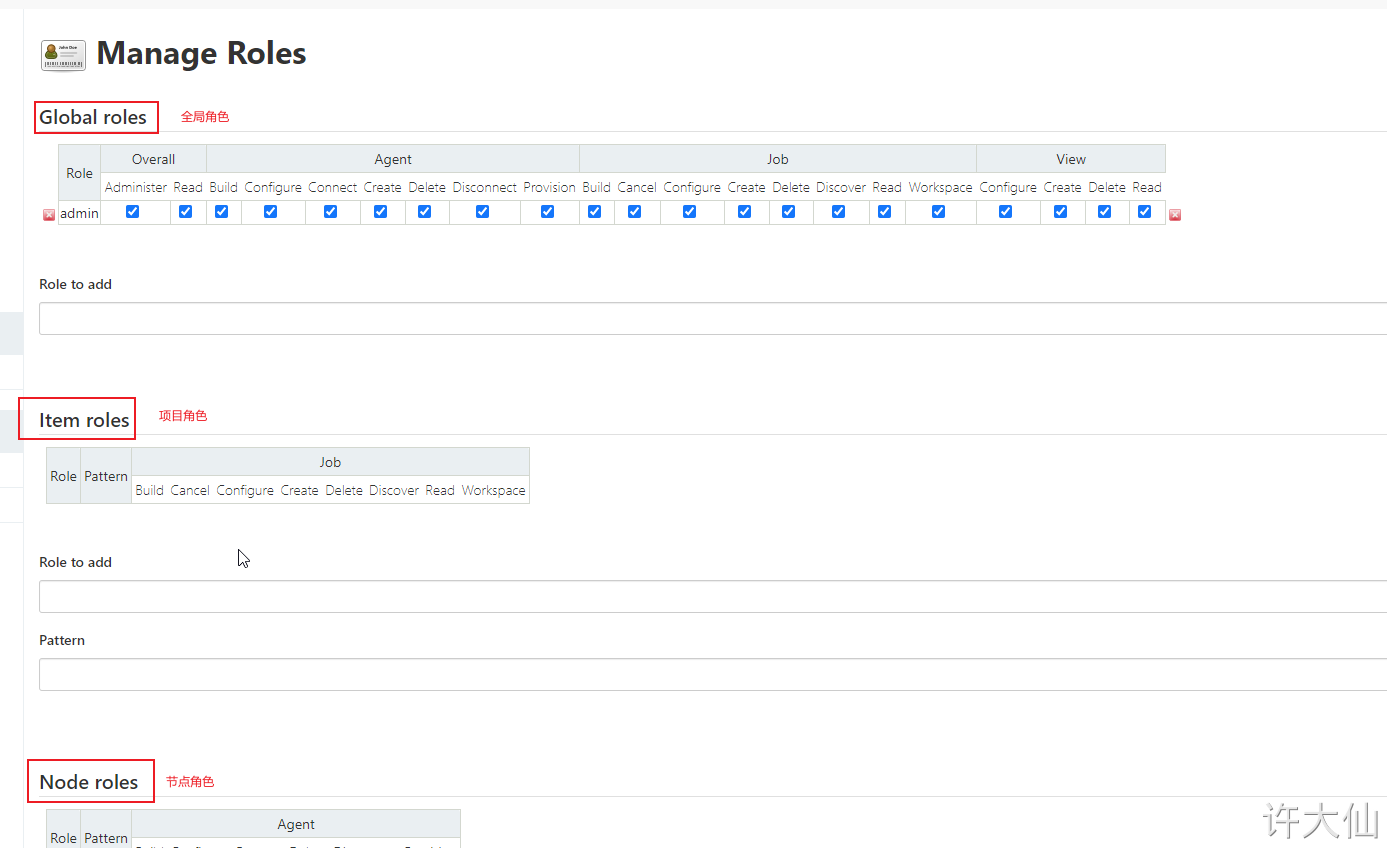
● Global roles: Global roles. Administrators and other advanced users can create global based roles.
● Item roles: project roles, roles for one or some items.
● Node roles: Node roles, roles of node related permissions.
● add the following three roles:
- ○
baseRole: this role is a global role. This role needs to bind the Read permission under Overall in order to bind the most basic Jenkins access permission to all users. Note: if this role is not bound to subsequent users, an error will be reported: user name
is missing the Overall/Read Permission. - ○ role 1: this role is a project role. Binding "spring. *" with regular expressions means that you can only manipulate items that start with spring.
- ○ role2: this role is a project role. Bind "springboot. *" with regular expression, which means that you can only operate on items beginning with springboot.

8.5 creating users
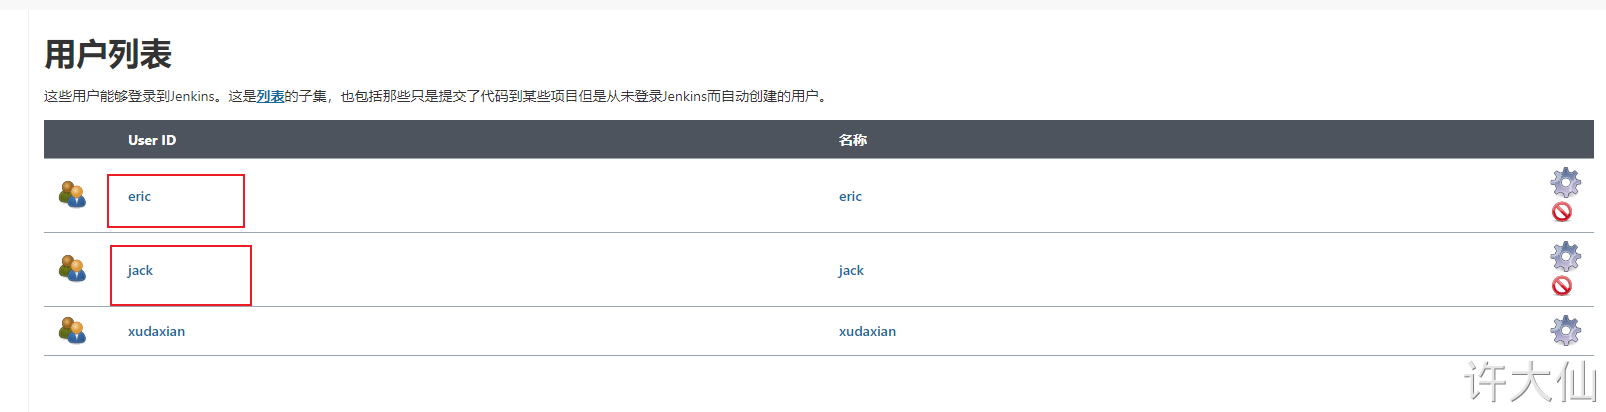
● Manage Jenkins – > manage users – > new user:
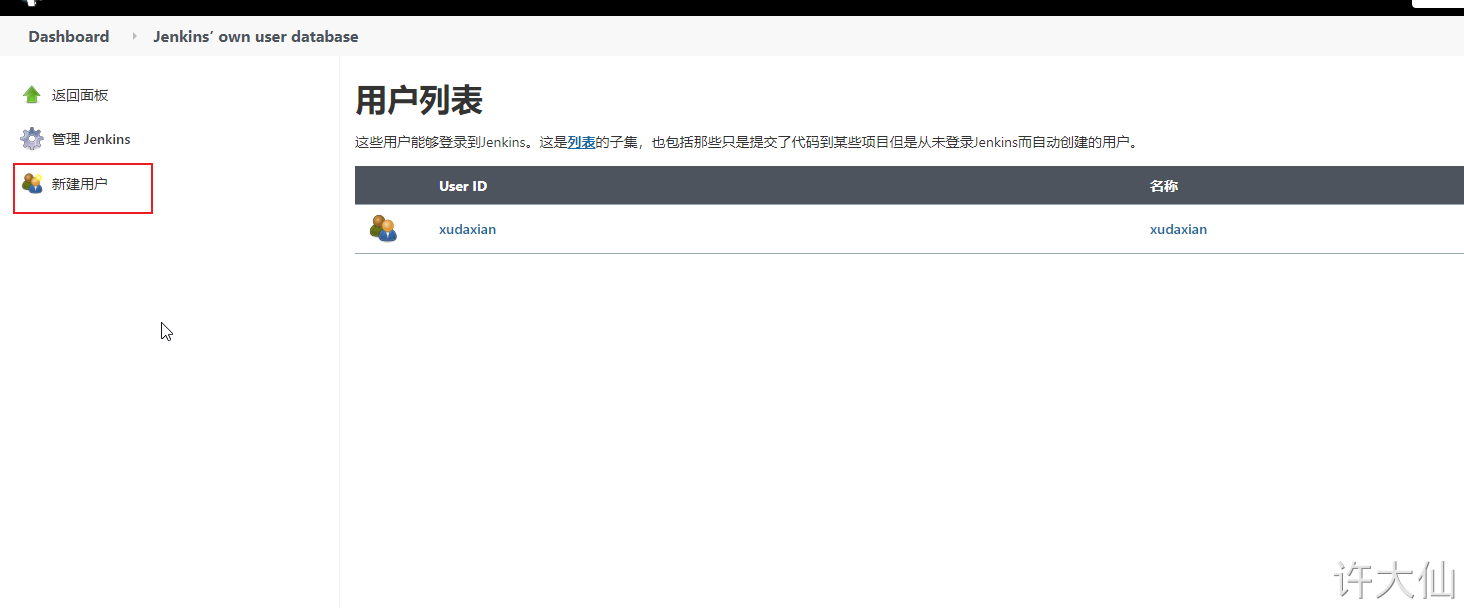
Create two users: jack and eric:
8.6 assigning permissions to users
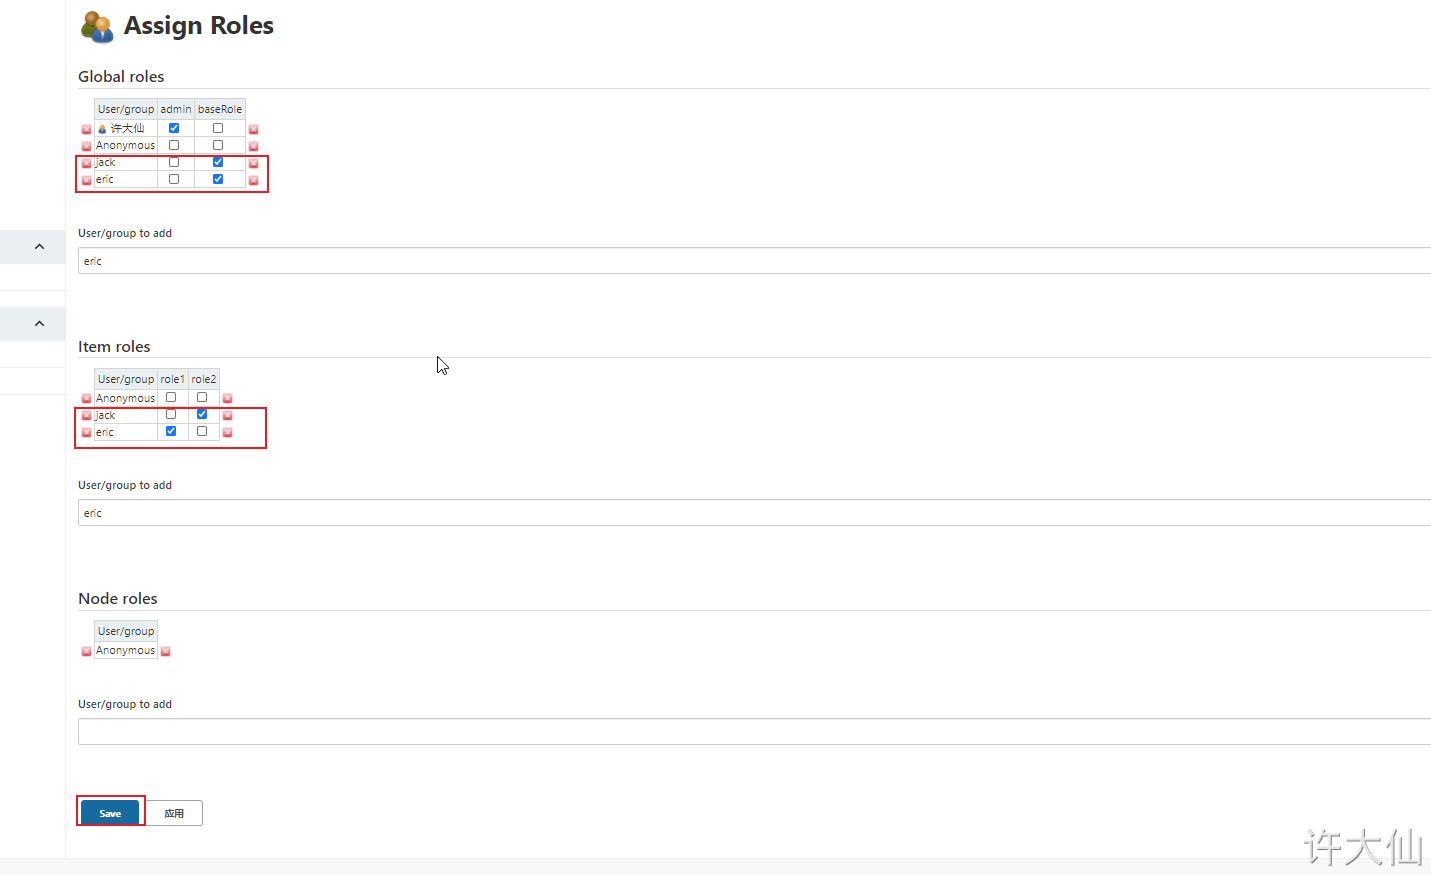
● Manage Jenkins–>Manage and Assign Roles–>Assign Roles:
● binding rules are as follows:
- ○ jack users bind baseRole and role2 roles respectively.
- ○ eric users bind baseRole and role1 roles respectively.
9. Jenkins voucher management
9.1 general
● credentials can be used to store database passwords, GitHub password information, Docker private warehouse passwords, etc. that need ciphertext protection, so that Jenkins can interact with these third-party applications.
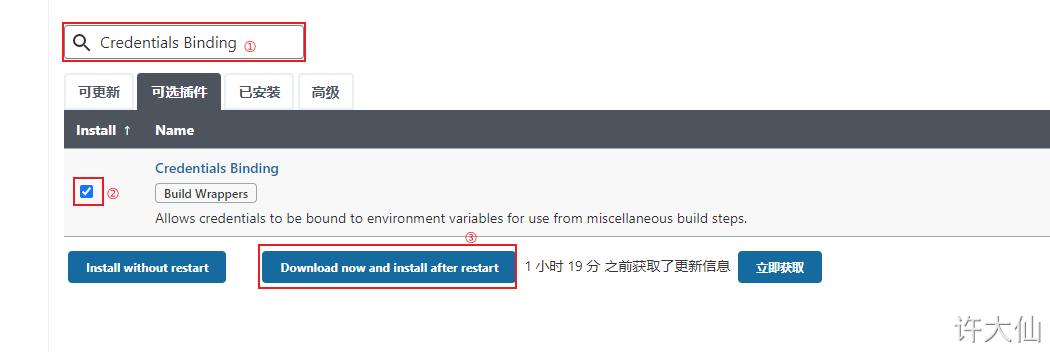
9.2 installing the Credentials Binding plug-in
● to use the credential management function in Jenkins, you need to install the Credentials Binding plug-in.
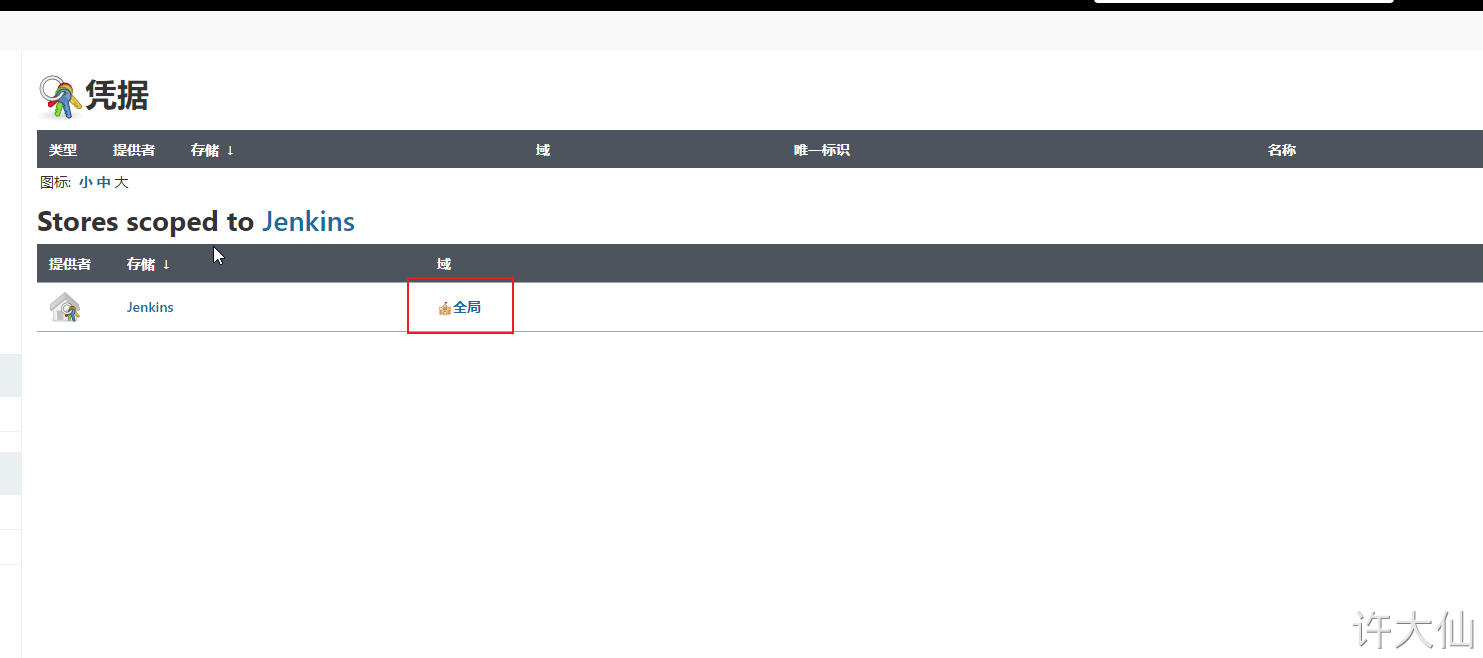
● after installing the plug-in, the menu of "manage voucher" is added to manage all voucher information here:
There are five kinds of vouchers that can be added:
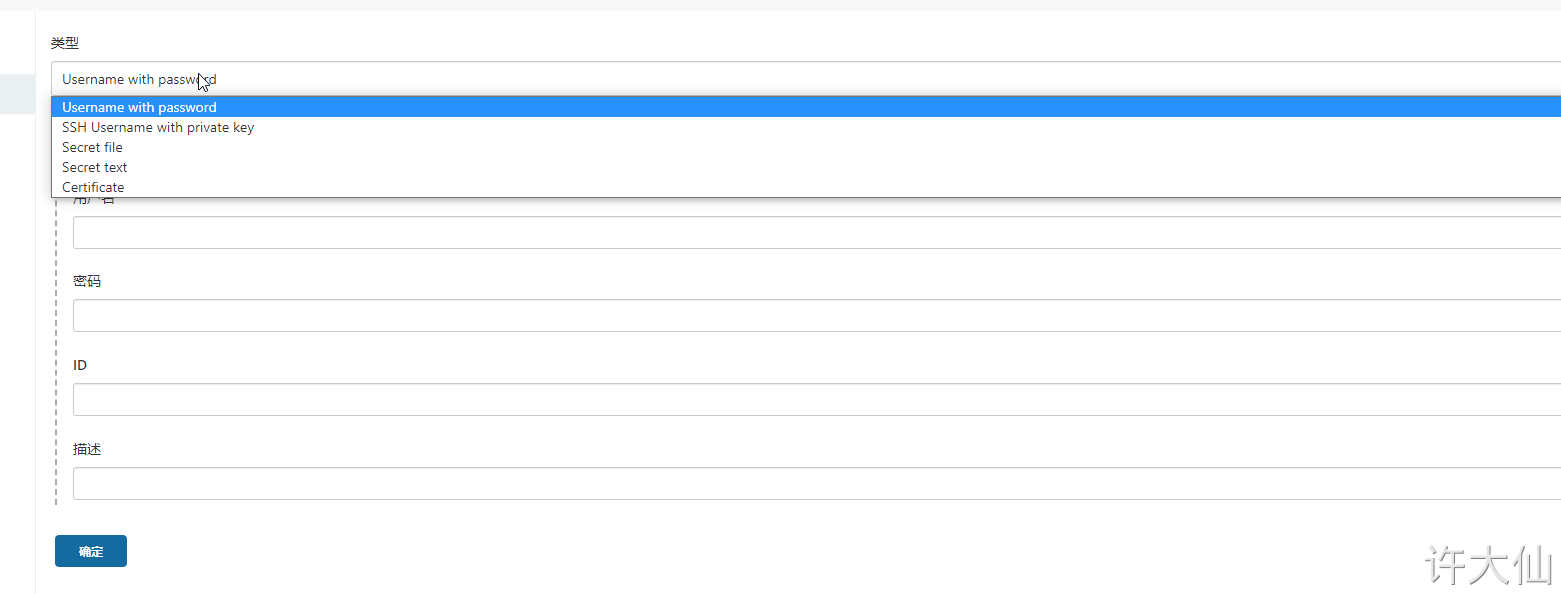
● Username with password: username and password.
● SSH Username with private key: use SSH user and key.
● Secret file: a text file that needs to be kept secret. When used, Jenkins will copy the file to a temporary directory, and then set the file path to a variable. After the construction is completed, the copied Secret file will be deleted.
● Secret text: an encrypted text string that needs to be kept secret, such as nail or api token of GitHub.
● Certificate: by uploading the Certificate file.
Common credential types are Username with password and SSH Username with private key.
9.3 installing Git plug-ins and Git tools
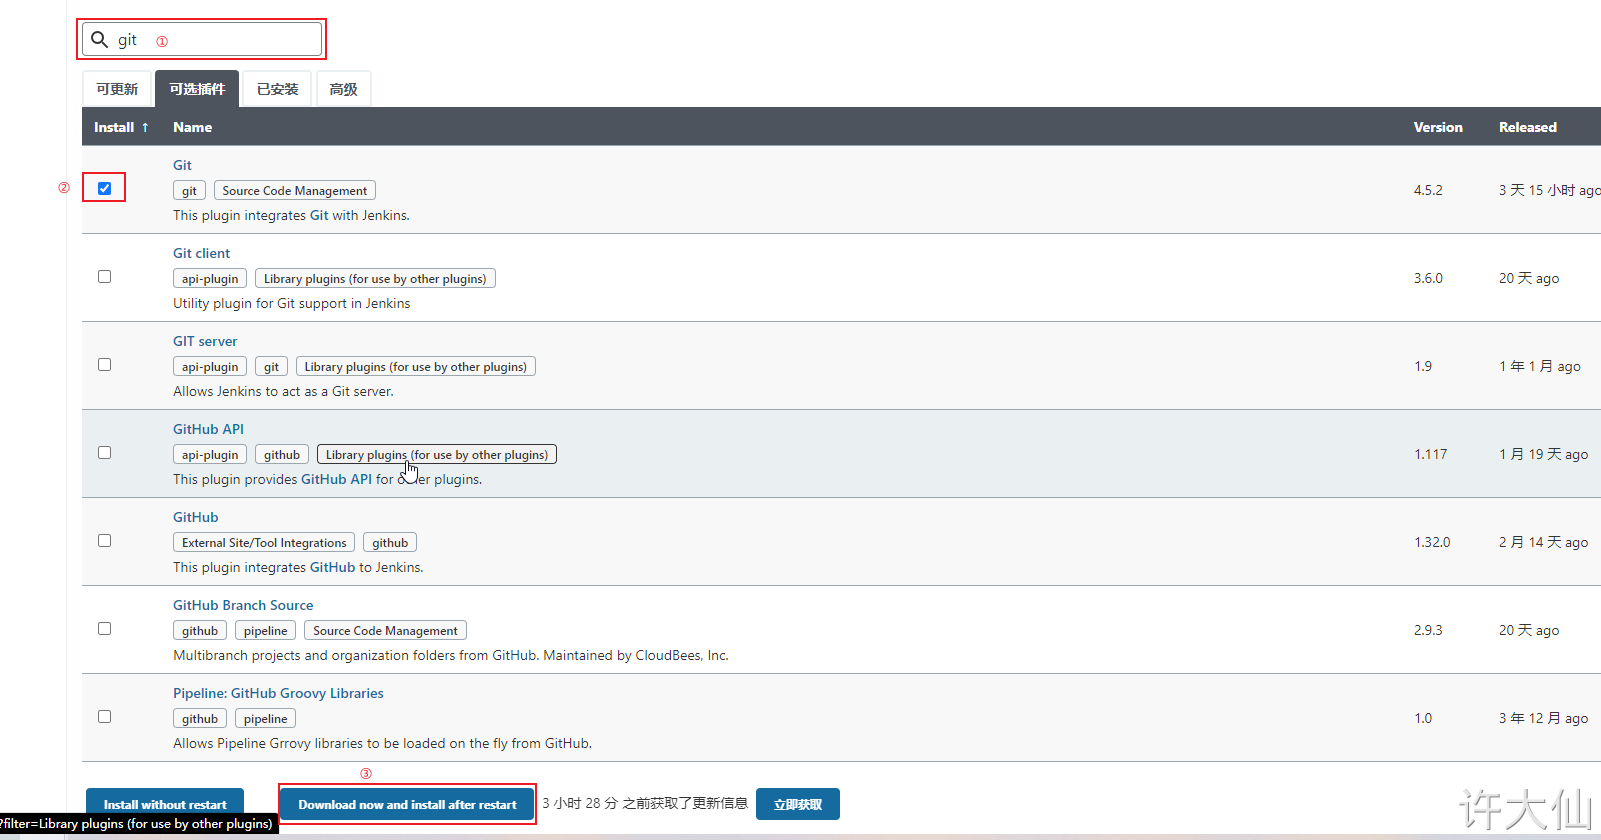
● in order for Jenkins to support pulling source code from Gitlab, you need to install Git plug-ins and Git tools on CentOS7.
● installation of Git plug-in:
● installing Git on CentOS7:
yum install -y git
git --version
9.4 user password type
9.4.1 create voucher
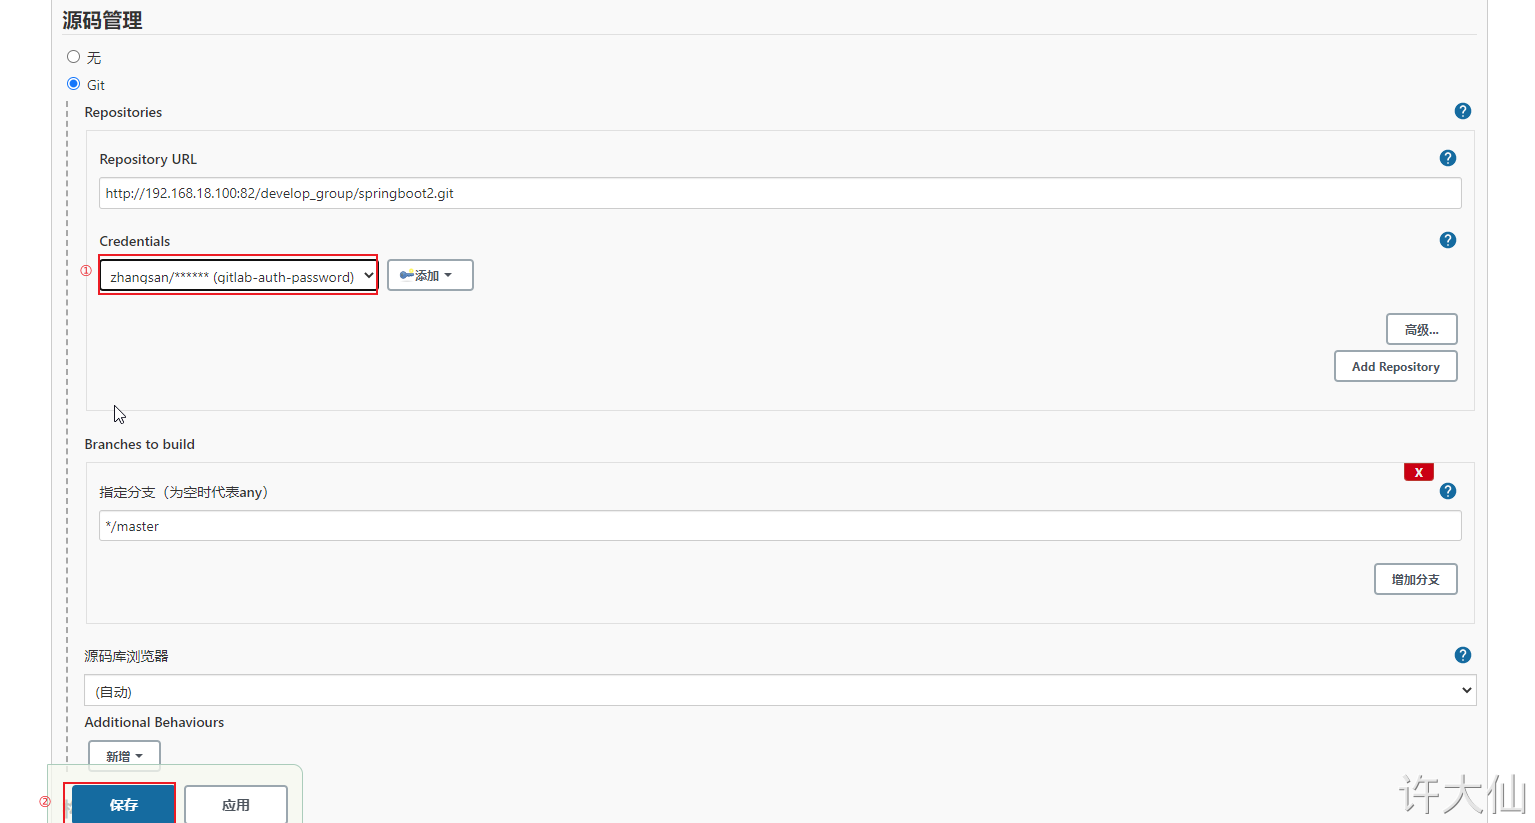
● Jenkins – > voucher – > system – > Global voucher – > Add Voucher:
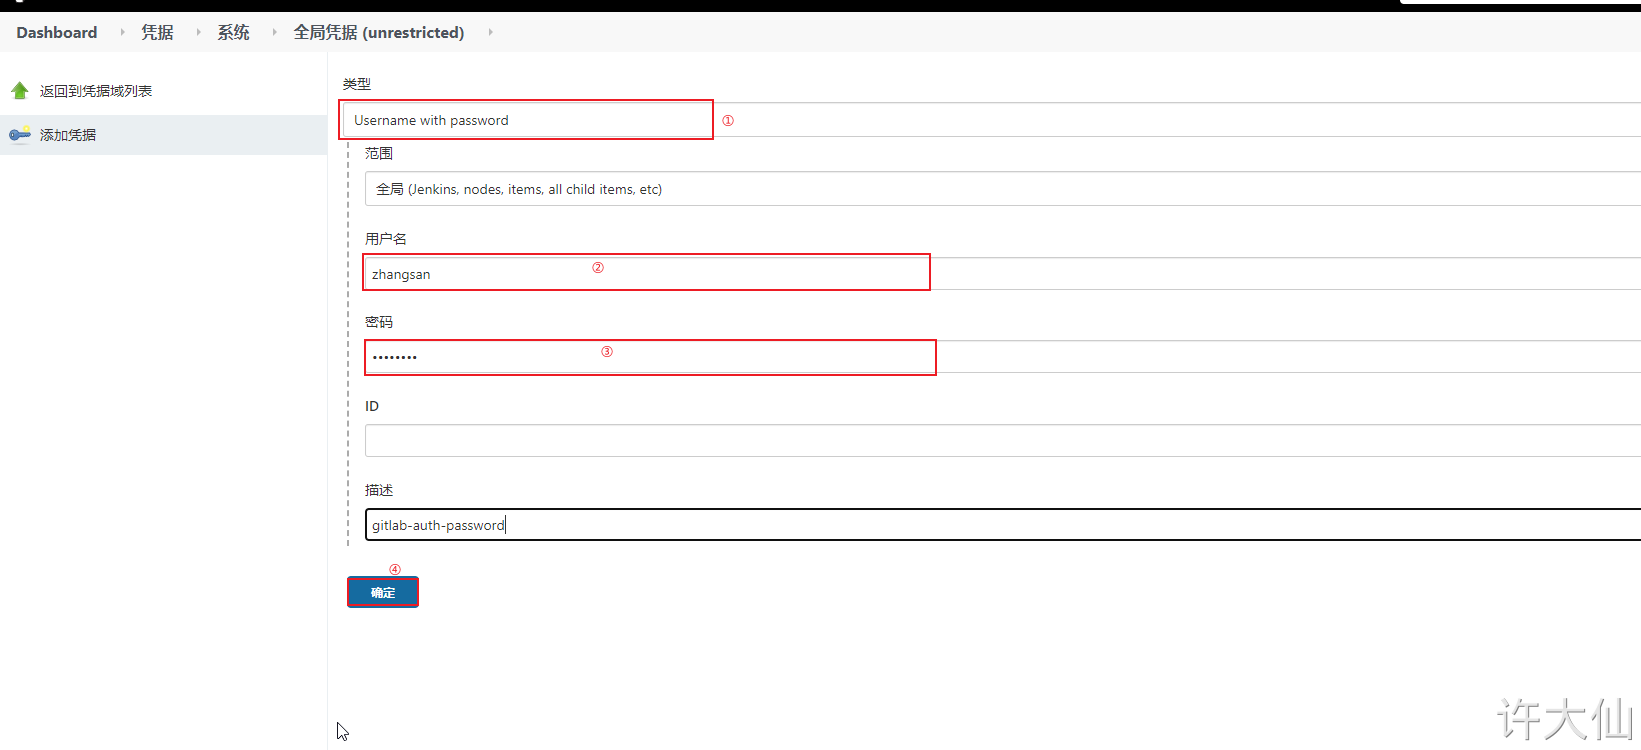

The user name and password here are not filled in randomly, but the user zhangsan created on gitlab.
9.4.2 is the test voucher available
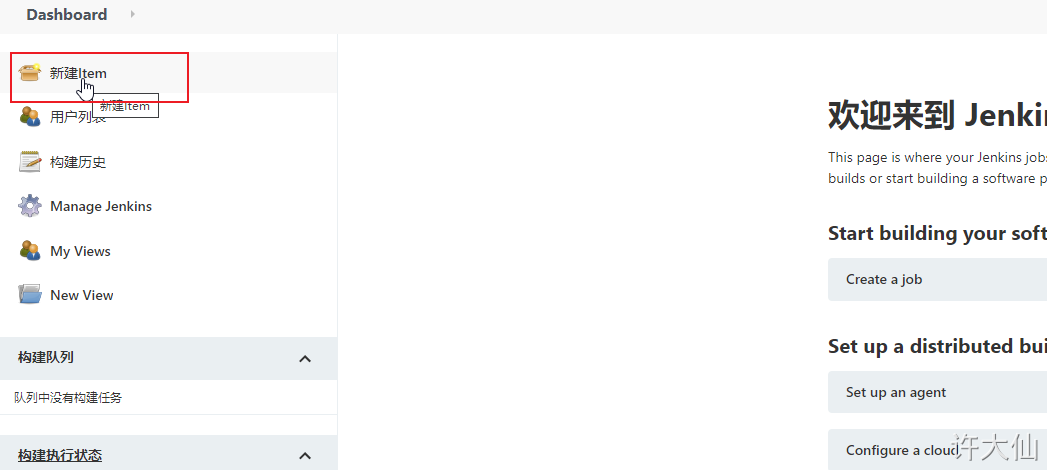
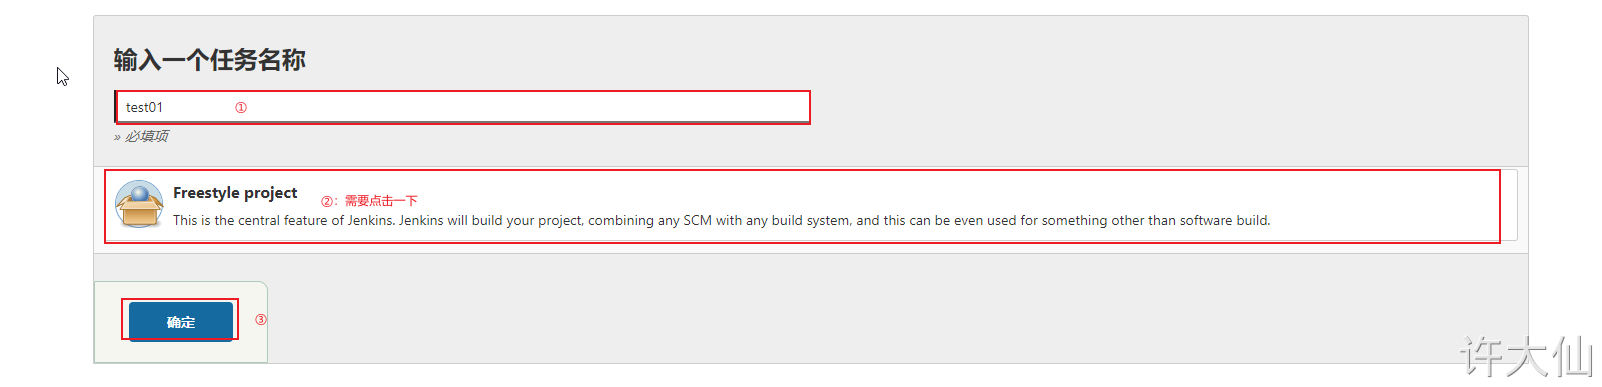
● create a free project:
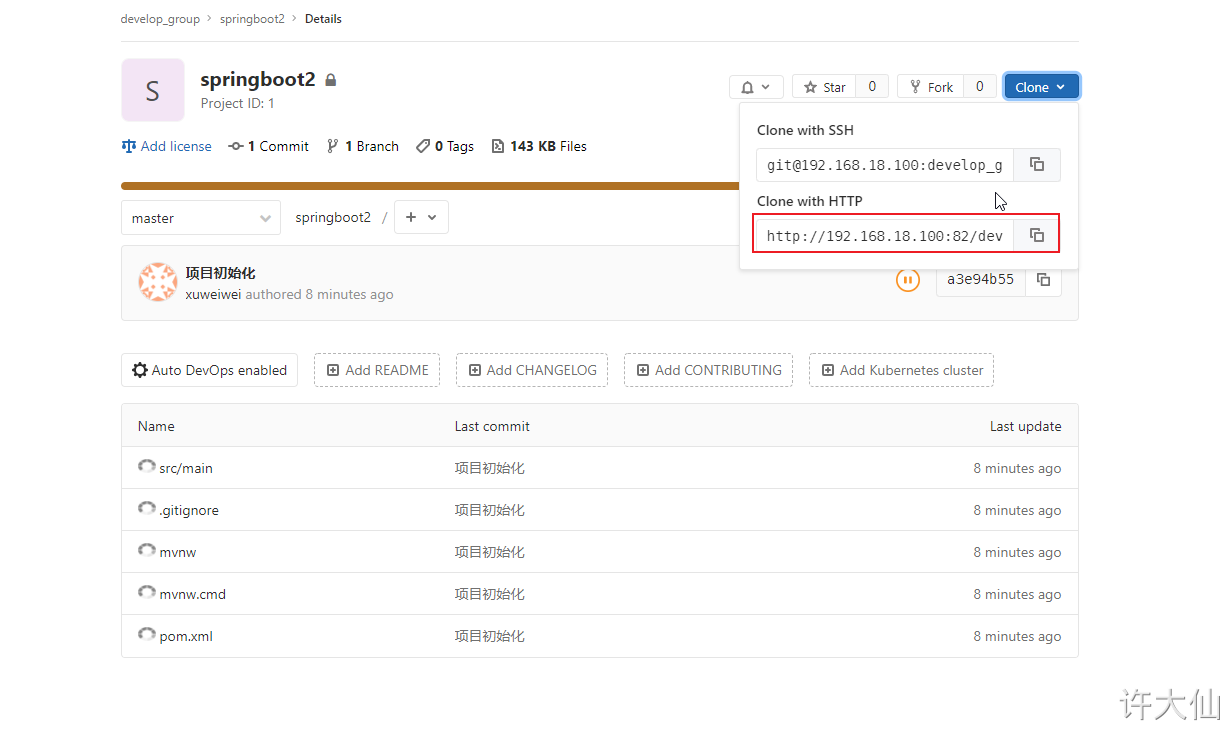
● find "source code management" – > "Git", and copy the project URL in Gitlab in the Repository URL:
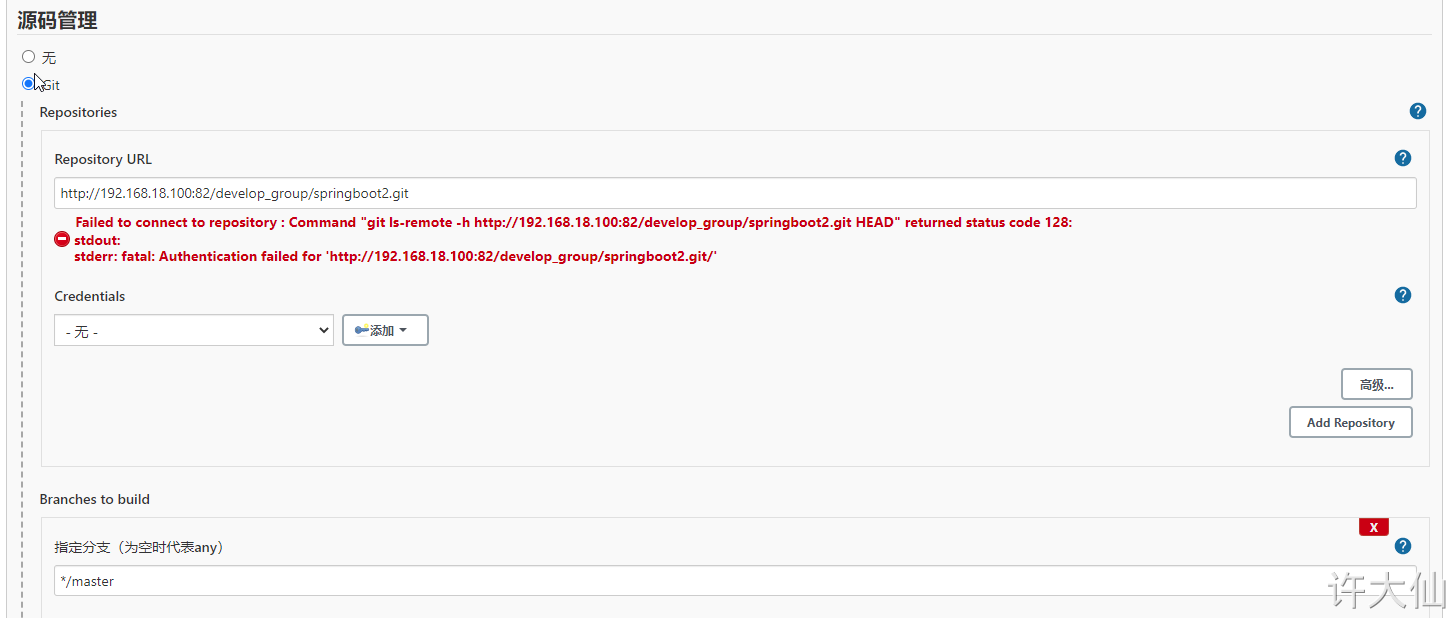
● at this time, an error will be reported that the warehouse cannot be connected because the voucher just added is not selected.
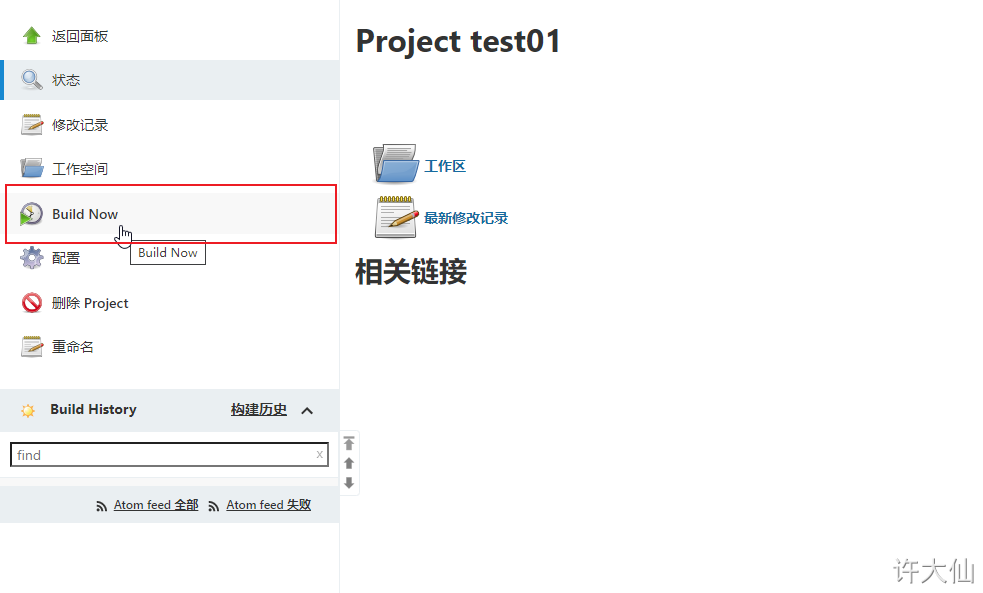
● click "Build Now" to start building the project:

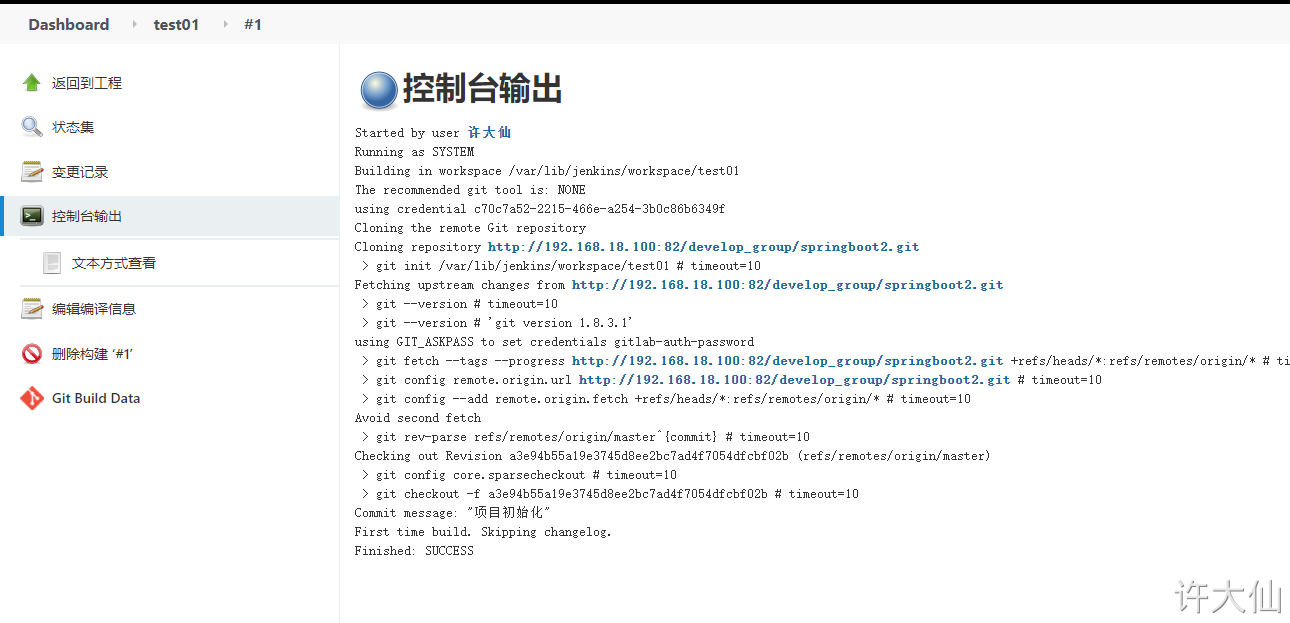
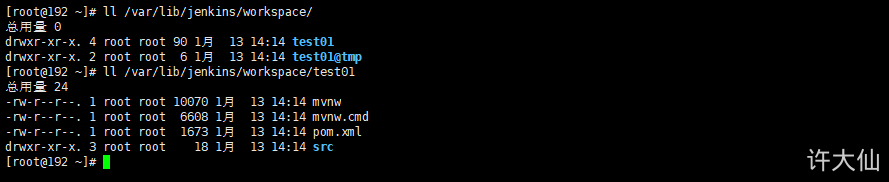
Check the / var/lib/jenkins/workspace / directory and find that the code has been successfully pulled from Gitlab to Jenkins.
9.5 SSH key type
9.5.1 SSH login free diagram

9.5.2 use root user to generate public and private keys
● use the root user to generate the public key and private key (executed on the gitlabel server):
ssh-keygen -t rsa

The default generated public and private keys are in the / root/.ssh directory, where id_rsa is the private key file, id_rsa.pub is the public key file:
ll /root/.ssh

9.5.3 put the generated public key into Gitlab
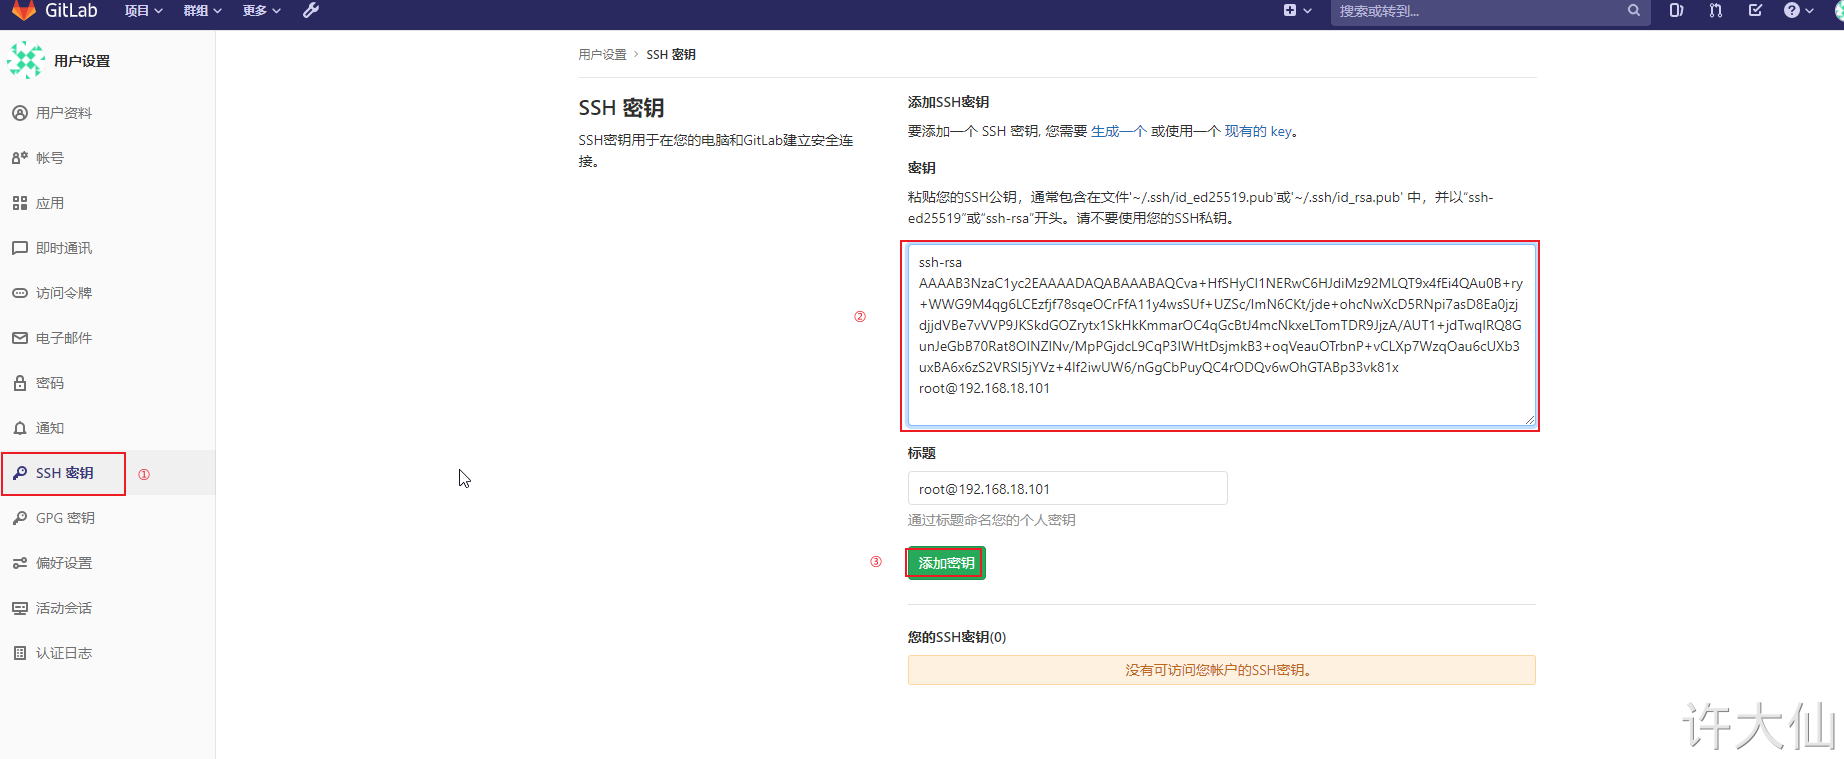
● log in as root account – > Click Avatar – > settings – > SSH keys.
● copy the id just generated_ For the content of rsa.pub file, click "Add Key":
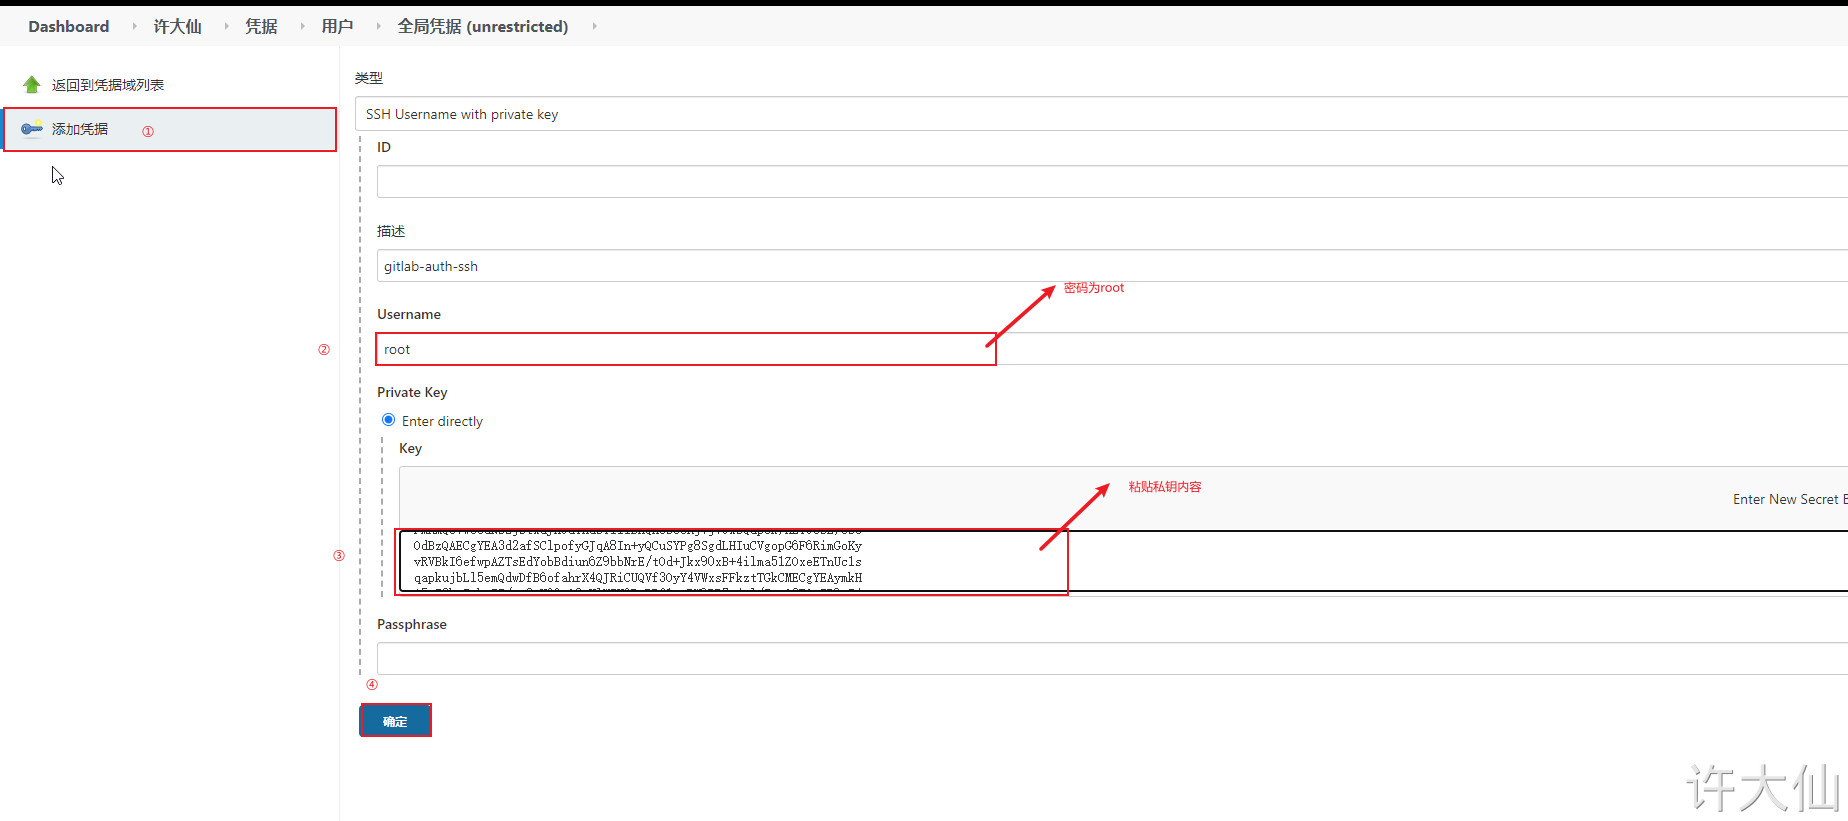
9.5.4 add credentials and configure private keys in Jenkins
● add a certificate in Jenkins with the type of "SSH Username with private key" and copy the contents of the private key file just generated.

9.5.5 is the test voucher available
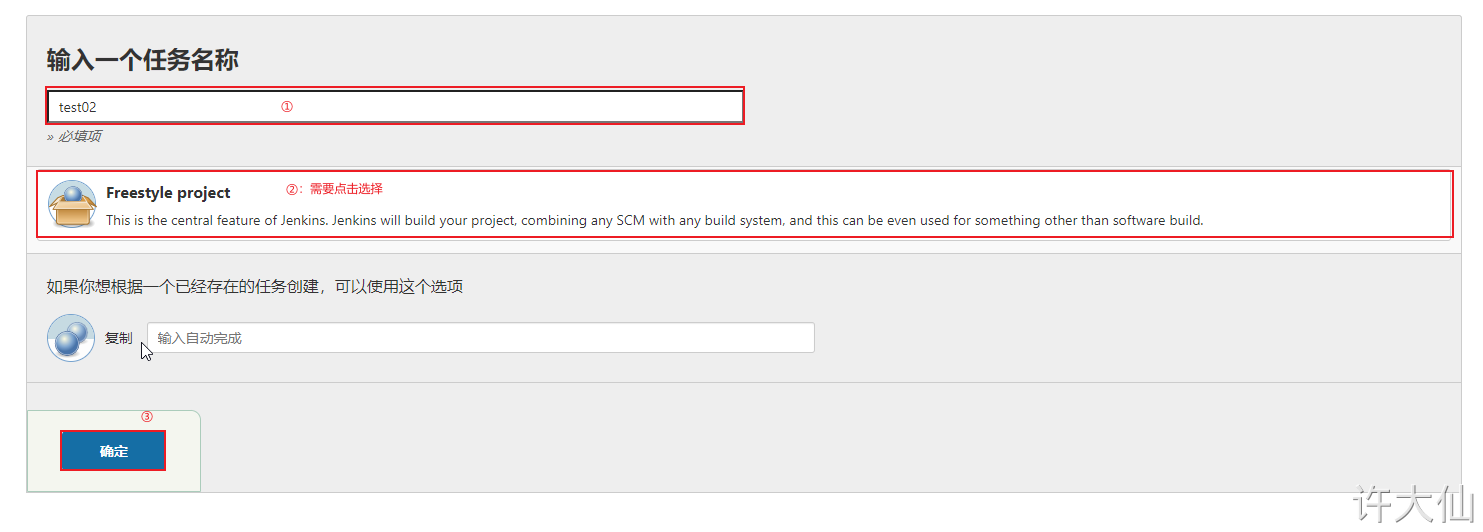
● create a new "test02" project – > source code management – > GIT. Here, use Gitlab's SSH connection and select SSH credentials:
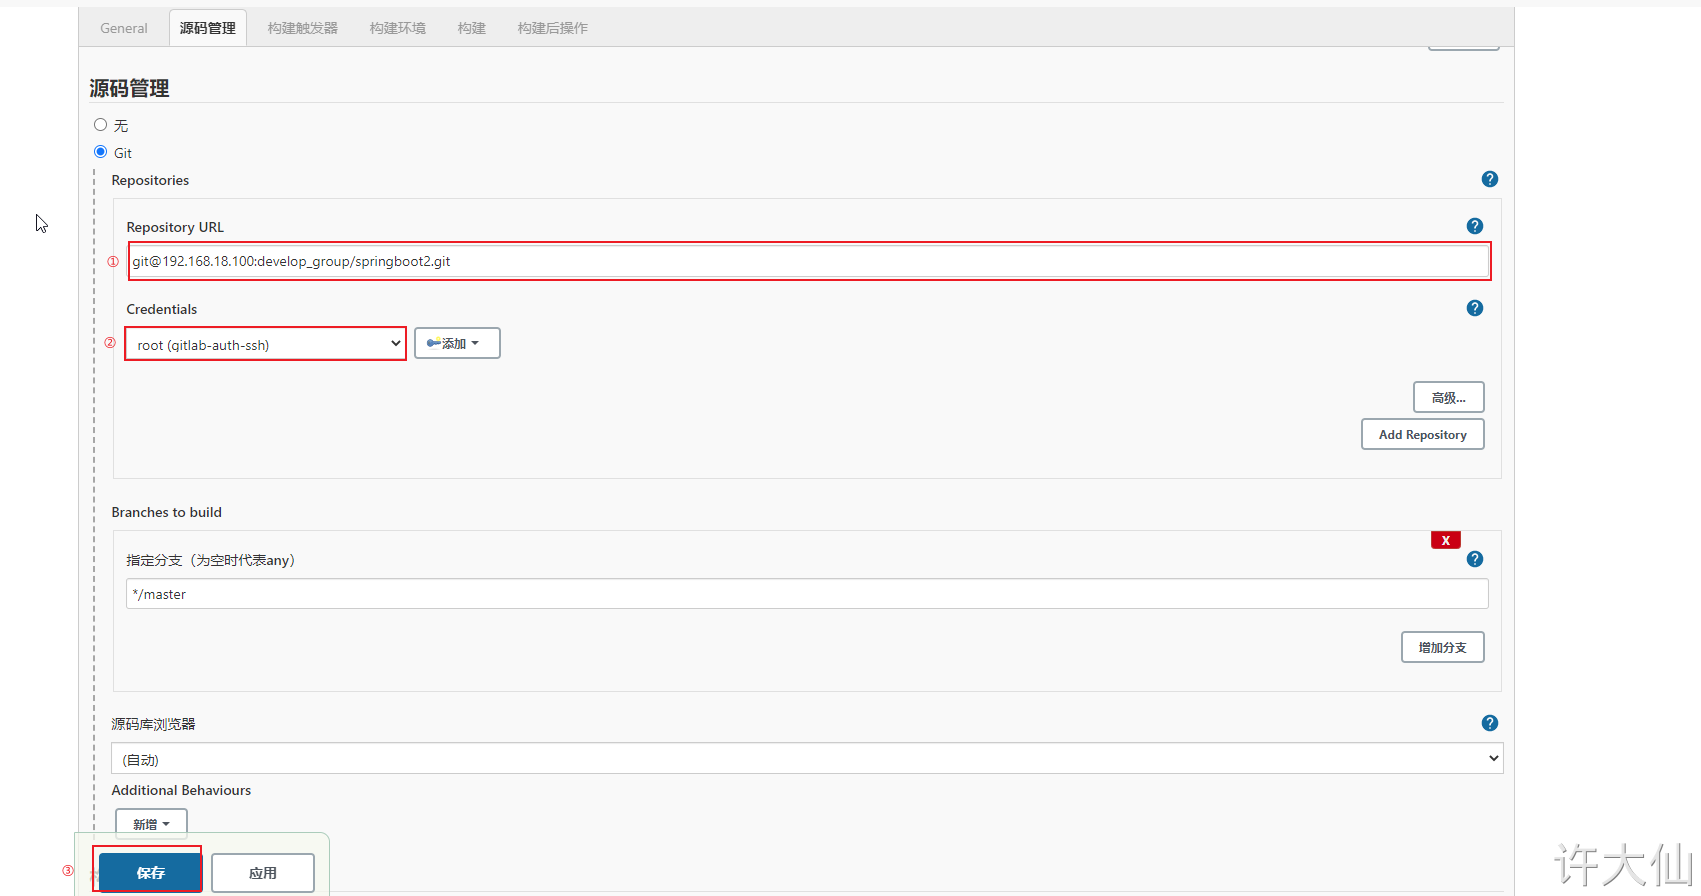
● also try to build the project. If the code can be pulled normally, it means that the voucher configuration is successful.
10 Maven installation and configuration
10.1 premise description
The IP address of the server is 192.168.18.101.
The firewall is turned off.
10.2 downloading, installing and configuring Maven
Download Maven:
wget https://mirrors.bfsu.edu.cn/apache/maven/maven-3/3.6.3/binaries/apache-maven-3.6.3-bin.zip
Unzip Maven:
unzip -d /usr/local apache-maven-3.6.3-bin.zip
Configure environment variables:
vim /etc/profile
# Add to end of file
export JAVA_HOME=/usr/lib/jvm/java-11-openjdk-11.0.9.11-2.el7_9.x86_64
export MAVEN_HOME=/usr/local/apache-maven-3.6.3
export PATH=$PATH:$JAVA_HOME/bin:$MAVEN_HOME/bin
source /etc/profile
To see if the installation was successful:
mvn -v
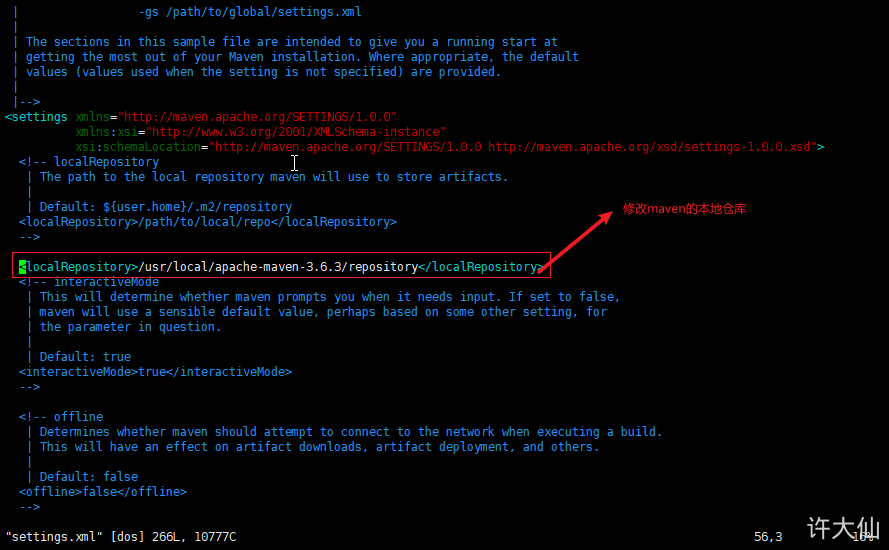
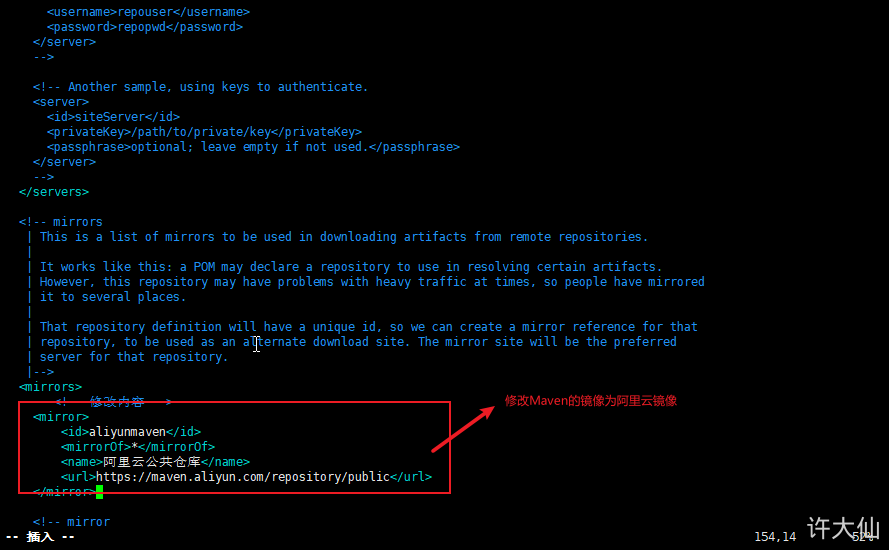
Modify Maven's local warehouse and configure alicloud image:
cd /usr/local/apache-maven-3.6.3
mkdir repository
vim conf/settings.xml
<!-- Modification content -->
<localRepository>/usr/local/apache-maven-3.6.3/repository</localRepository>
<mirrors>
    <!-- Modification content -->
    <mirror>
        <id>aliyunmaven</id>
        <mirrorOf>*</mirrorOf>
        <name>Alibaba cloud public warehouse</name>
        <url>https://maven.aliyun.com/repository/public</url>
    </mirror>
</mirrors>
10.3 global tool association JDK and Maven
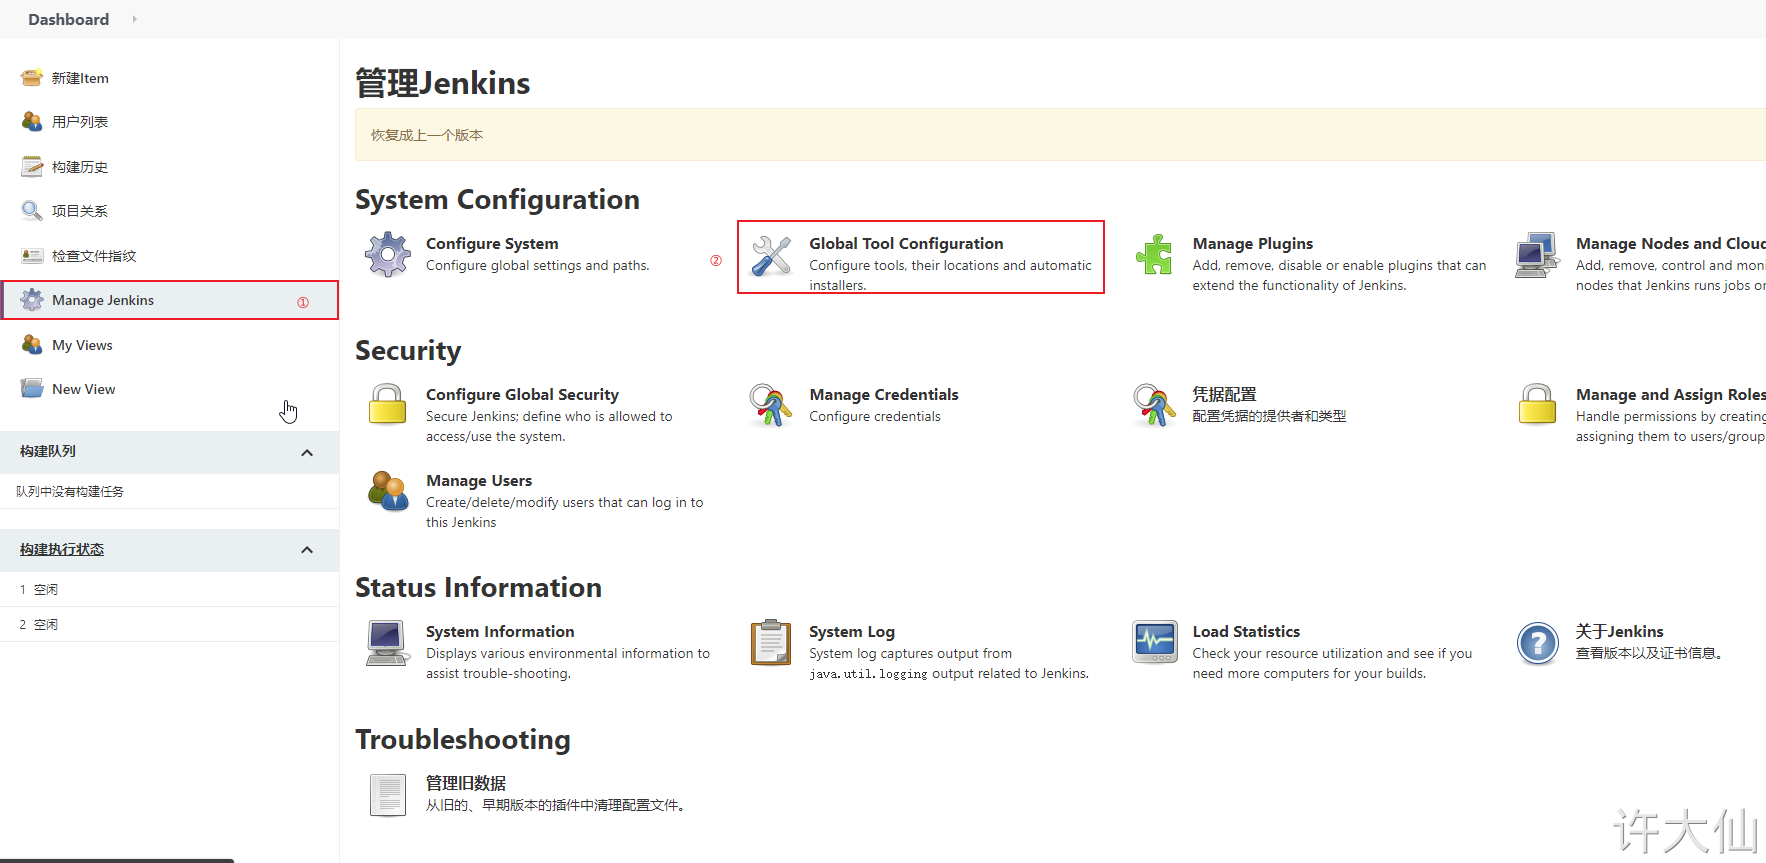
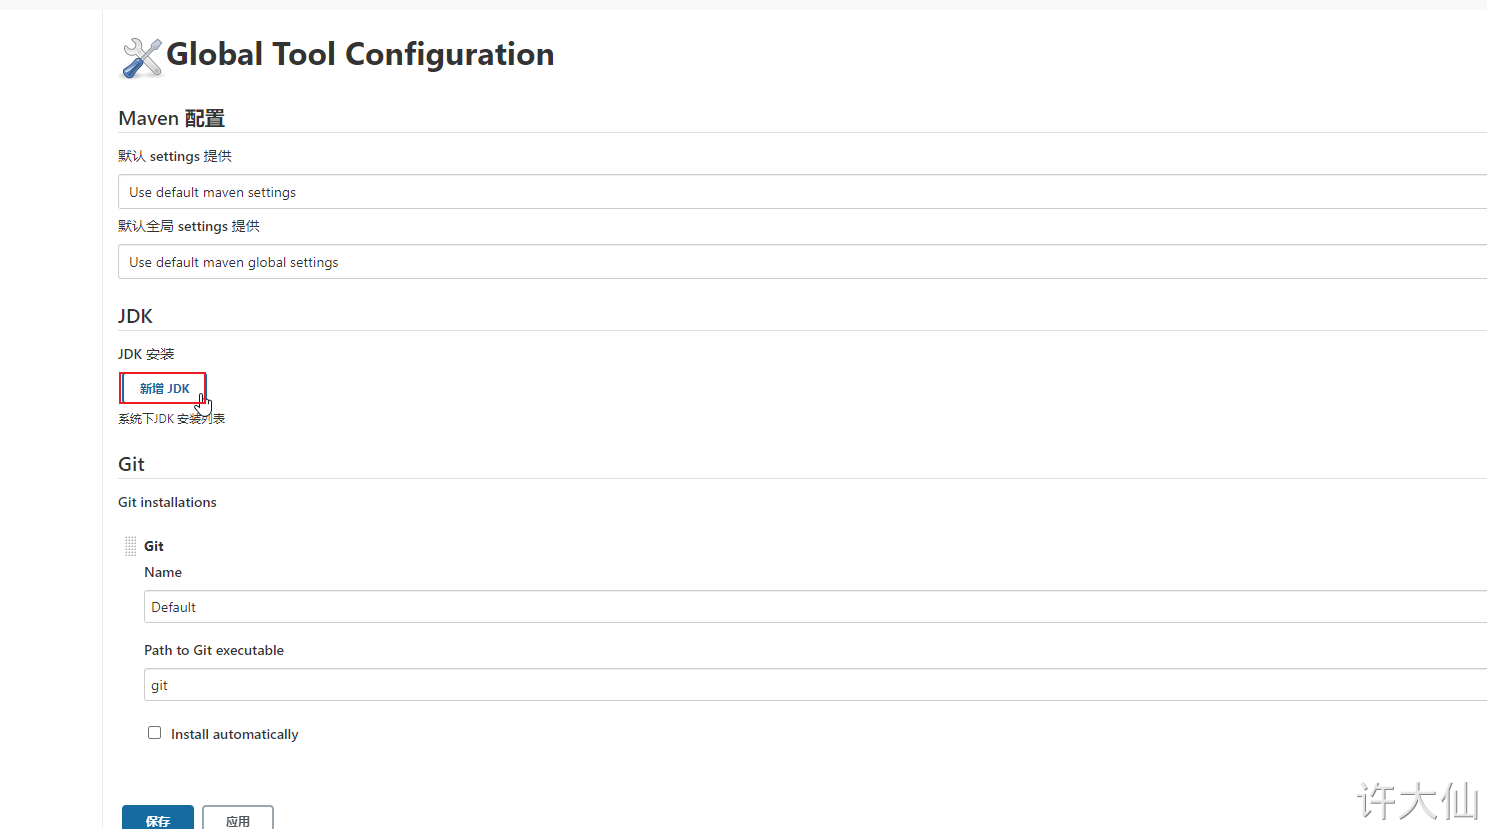
● Jenkins – > Manage Jenkins – > global tool configuration – > JDK – > Add JDK:
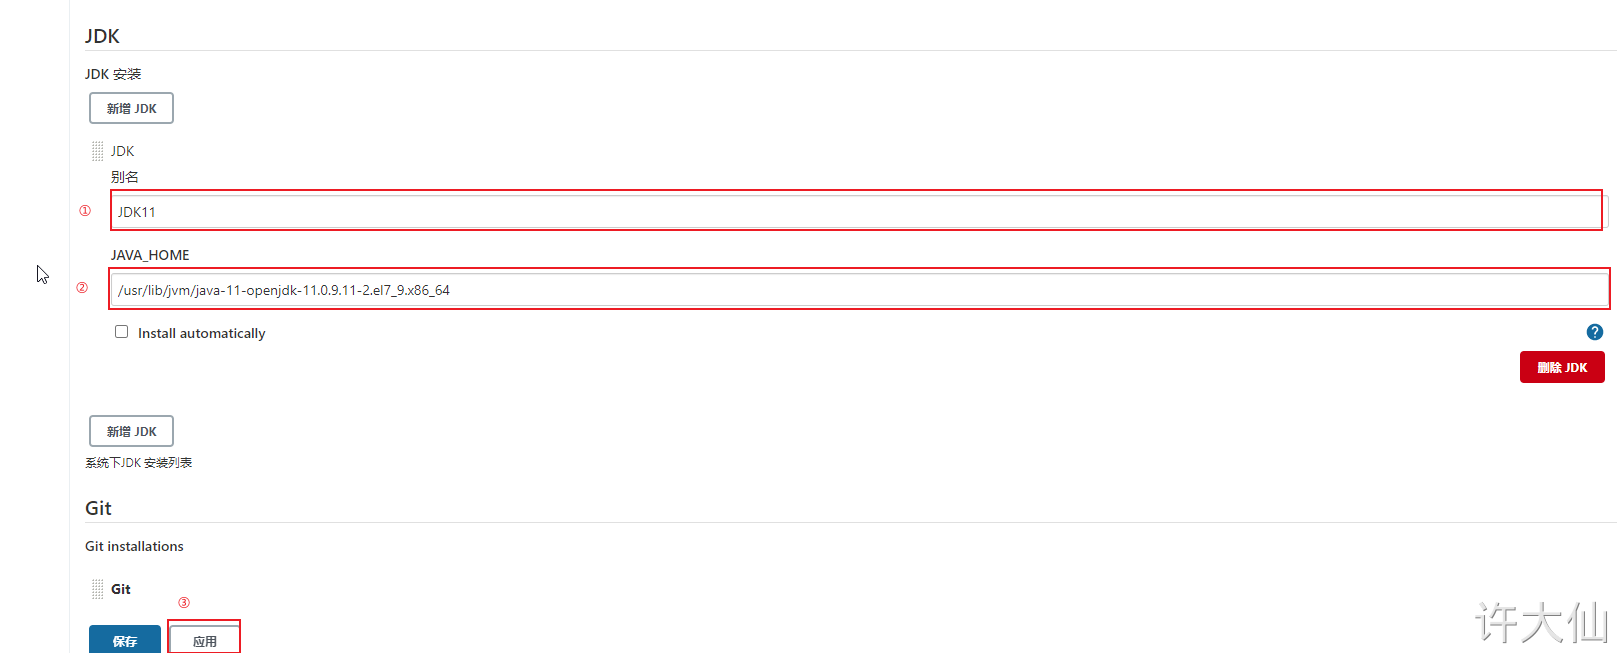
JDK11
/usr/lib/jvm/java-11-openjdk-11.0.9.11-2.el7_9.x86_64
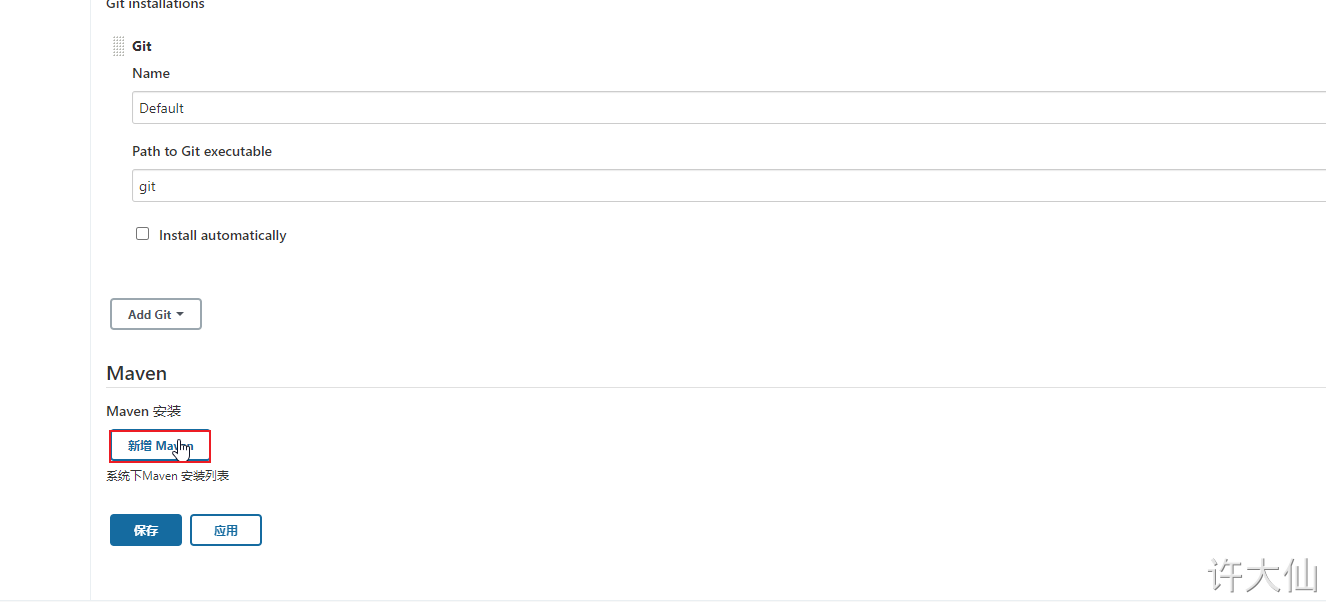
● Jenkins – > Manage Jenkins – > global tool configuration – > Maven - > Add Maven:
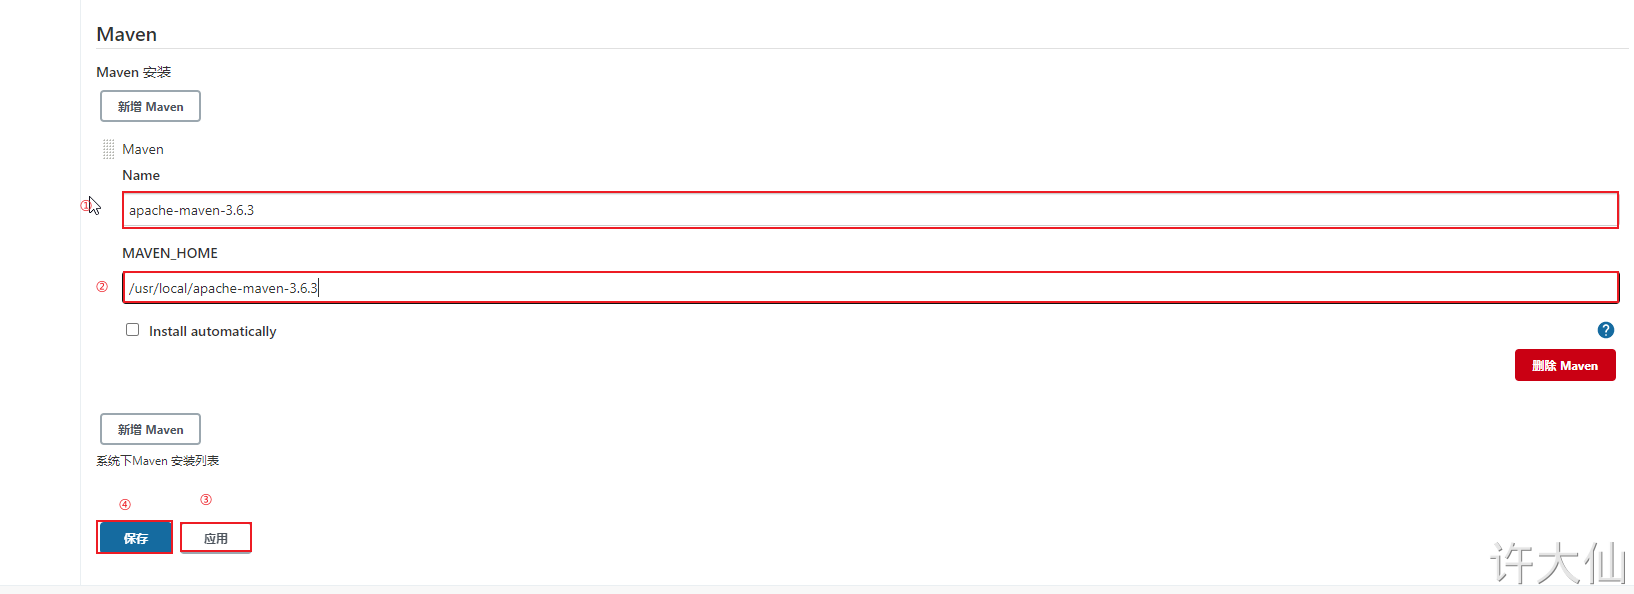
apache-maven-3.6.3
/usr/local/apache-maven-3.6.3
10.4 add Jenkins global variable
● Jenkins – > Manage Jenkins – > configure system – > global properties, add three global variables: JAVA_HOME,M2_HOME and PATH+EXTRA.

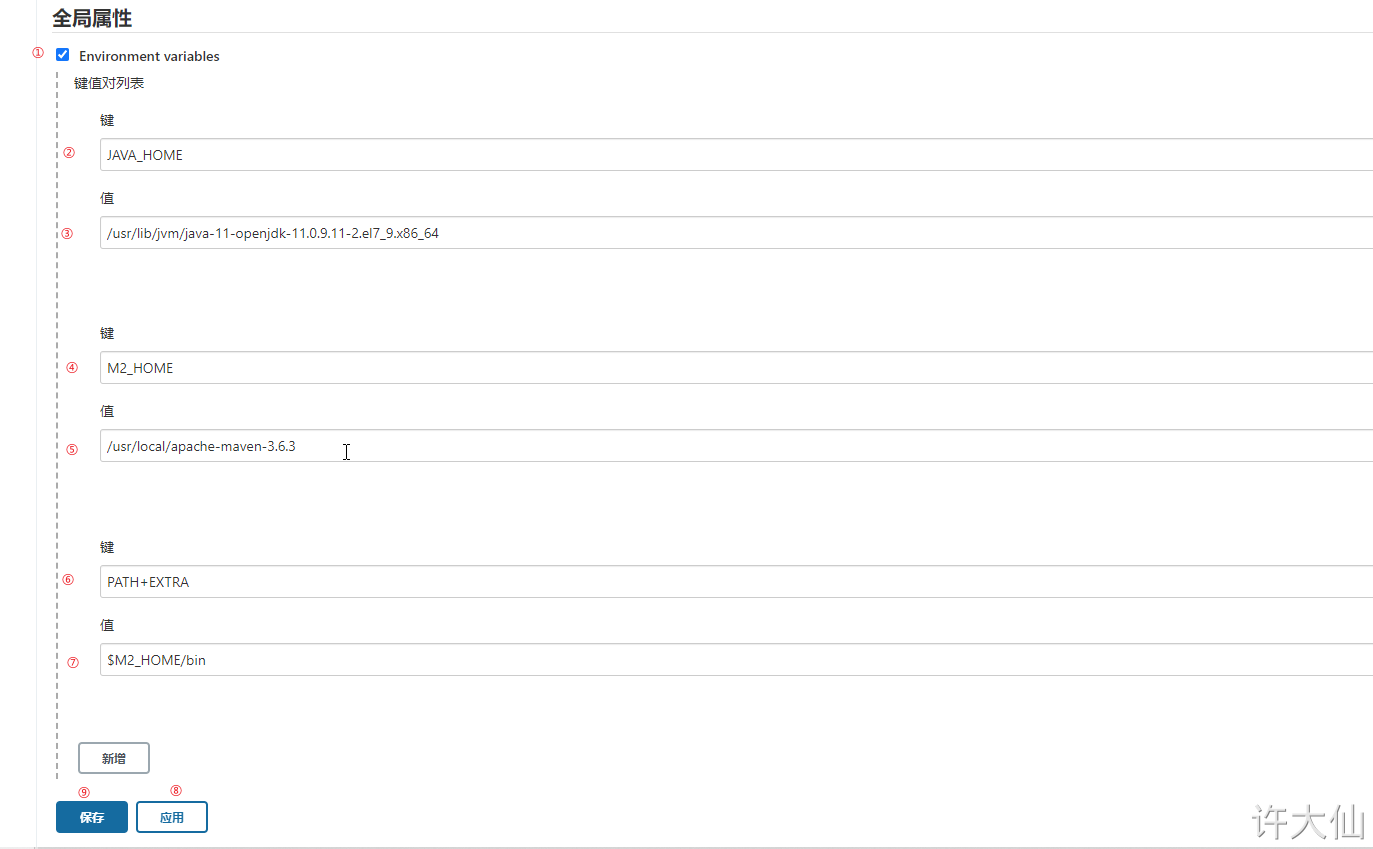
JAVA_HOME
/usr/lib/jvm/java-11-openjdk-11.0.9.11-2.el7_9.x86_64
M2_HOME
/usr/local/apache-maven-3.6.3
PATH+EXTRA
$M2_HOME/bin
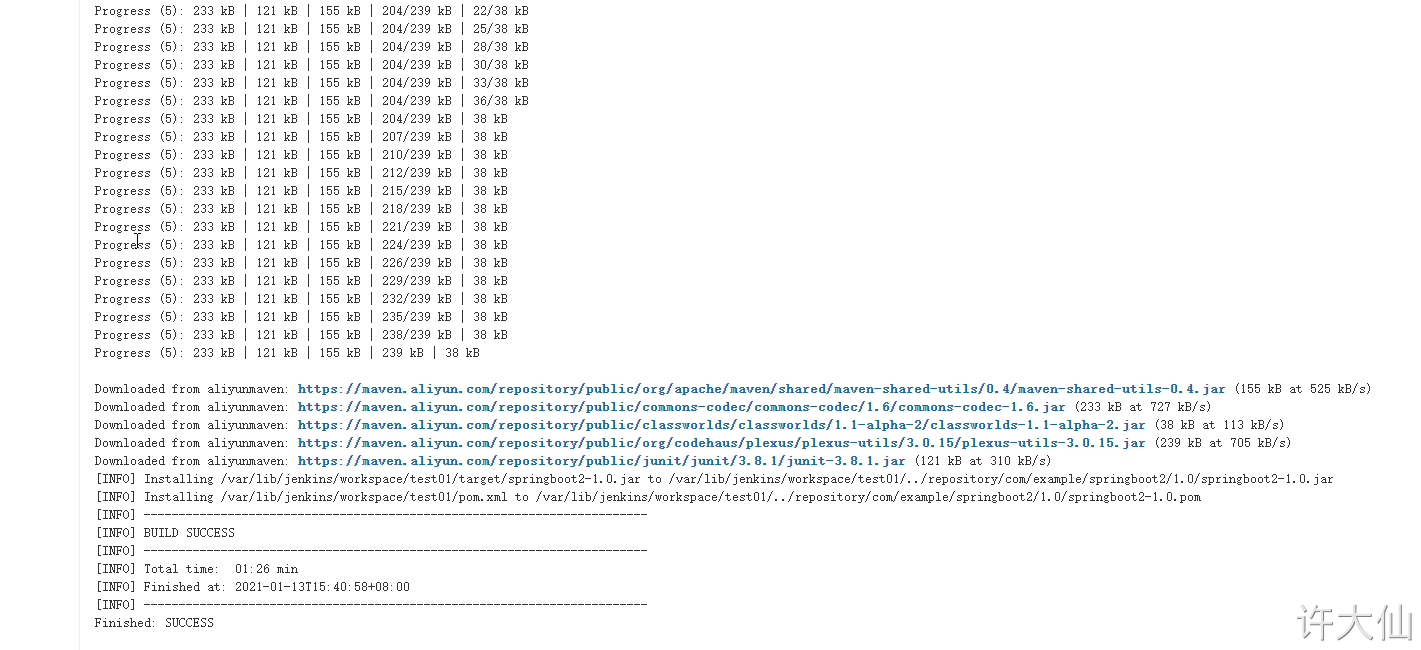
10.5 test whether Maven is configured successfully
● modify the configuration by using the previous gitlab password test items:
● build – > add build steps – > execute shell.
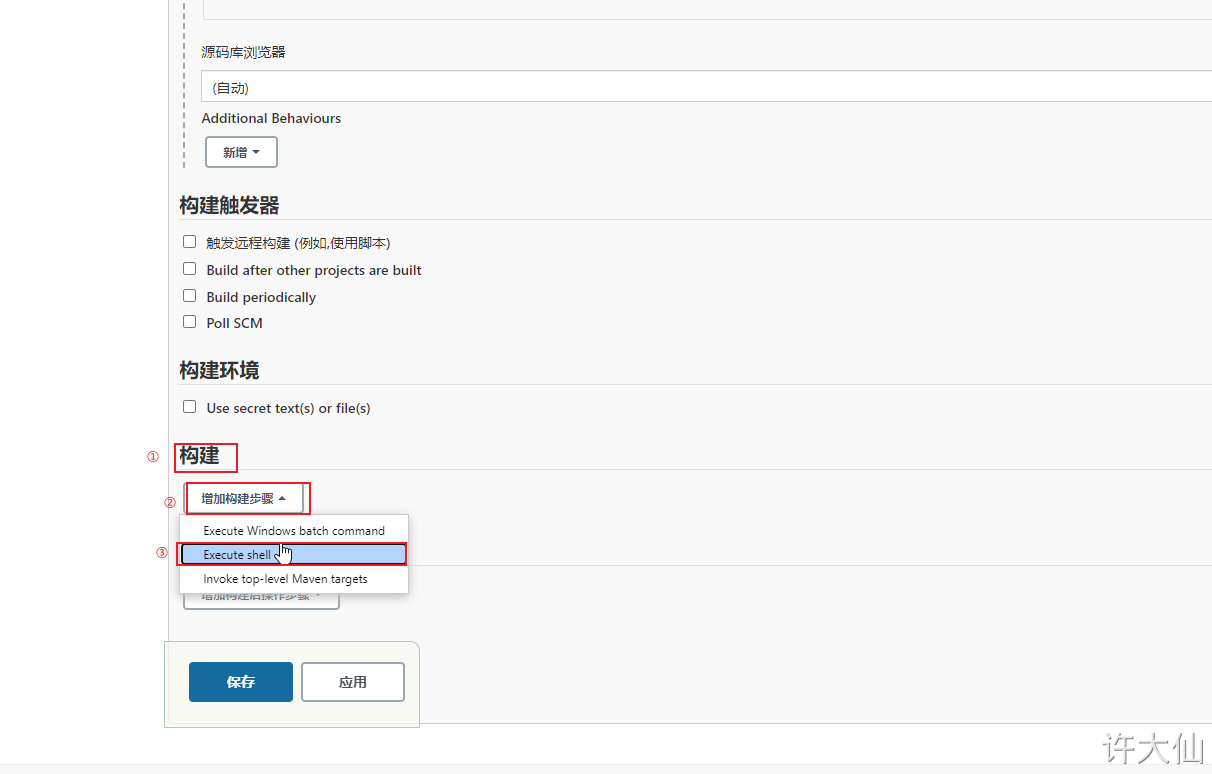
Enter the following build command:
mvn clean install
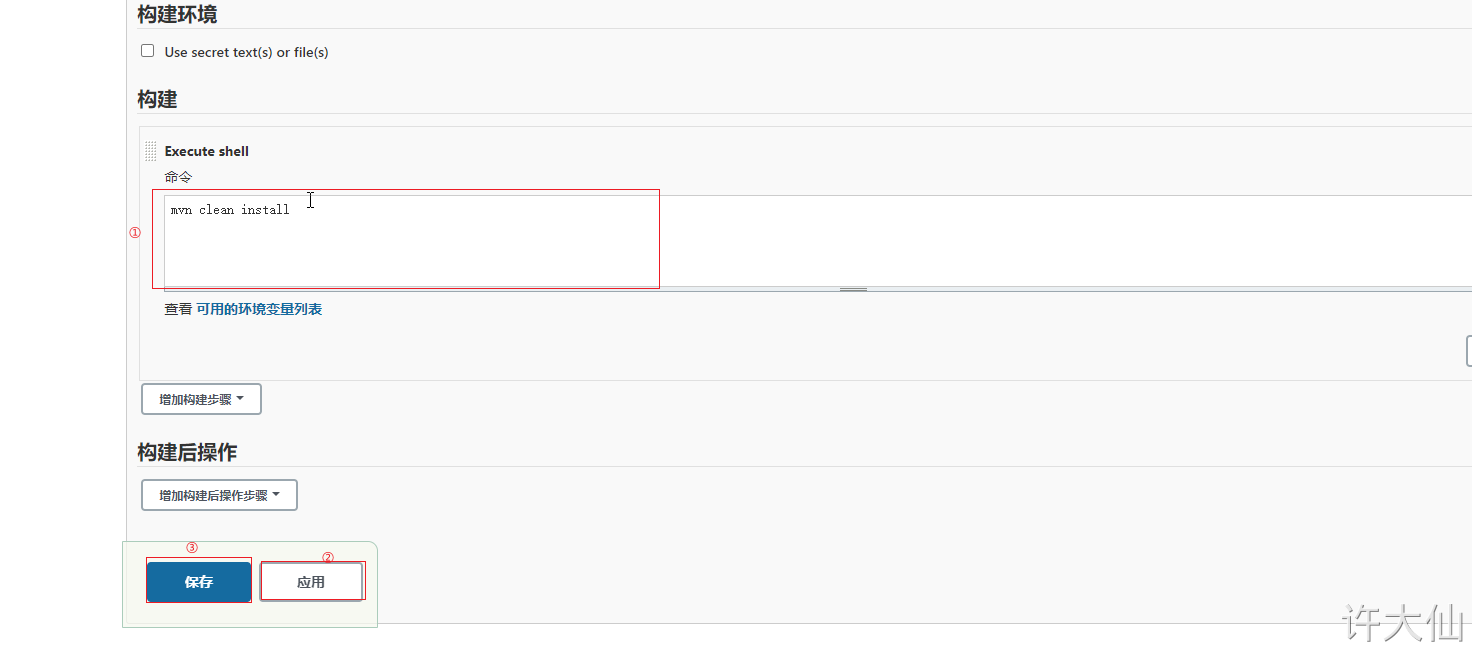
● build again. If the project is made into a jar package, it means that the Maven environment configuration is successful.