preface
This paper mainly introduces the installation steps, project packaging and deployment process of Jenkins on linux. The Jenkins version used in this article is Jenkins 2.319.3.
1, Jdk8 download and install
Jenkins relies on JDK, so you need to follow jdk1.0 first 8:
# Check whether java related commands already exist
rpm -qa|grep java
rpm -qa|grep jdk
rpm -qa|grep gcj
# If you need to uninstall
rpm -qa | grep java | xargs rpm -e --nodeps
# Retrieve Java 1 8 source list
yum list java-1.8*
# Install Java 1 eight
yum install java-1.8.0-openjdk* -y
# Query JAVA_HOME
which java
# return
/usr/bin/java
# ls -l command
ls -l /usr/bin/java
# return
lrwxrwxrwx 1 root root 22 Nov 13 14:37 /usr/bin/java -> /etc/alternatives/java
# ls -l command
ls -l /etc/alternatives/java
# return
lrwxrwxrwx 1 root root 73 Nov 13 14:37 /etc/alternatives/java -> /usr/lib/jvm/java-1.8.0-openjdk-1.8.0.272.b10-1.el7_9.x86_64/jre/bin/java
# Java_ The home path is: / usr / lib / JVM / java-1.8.0-openjdk-1.8.0.272 b10-1. el7_ 9.x86_ sixty-four

#After successful installation, the default installation path is under / usr/lib/jvm /,
#For example, / usr / lib / JVM / java-1.8.0-openjdk-1.8.0.272 b10-1. el7_ 9.x86_ sixty-four
#Use the command to check whether the installation is successful
java -version
#This is the end of the installation. One advantage of this installation is that there is no need to set the path, which is automatically set
2, Jenkins download and install
1. jenkins installation
Command to switch to the download directory
 Download with command
    wget http://pkg.jenkins-ci.org/redhat-stable/jenkins-2.319.3-1.1.noarch.rpm
 Download direct installation
    rpm -ivh jenkins-2.190.3-1.1.noarch.rpm
2. Modify Jenkins configuration
vi /etc/syscofig/jenkins
The modification information is as follows:
JENKINS_USER="root"
JENKINS_PORT="8888"
3. Start Jenkins
Start command: systemctl start jenkins
If the following error occurs during startup:
Job for jenkins.service failed because the control process exited with error code. See "systemctl status jenkins.service" and "journalctl -xe" for details.
resolvent:
Open the file: VIM / etc / init d/jenkins
Configure JDK path in Jenkins
After configuration, execute the following commands in sequence
implement systemctl daemon-reload Command to reload the configuration file
 implement systemctl start jenkins Command start Jenkins
 implement systemctl status jenkins.service Command view Jenkins Status of the service
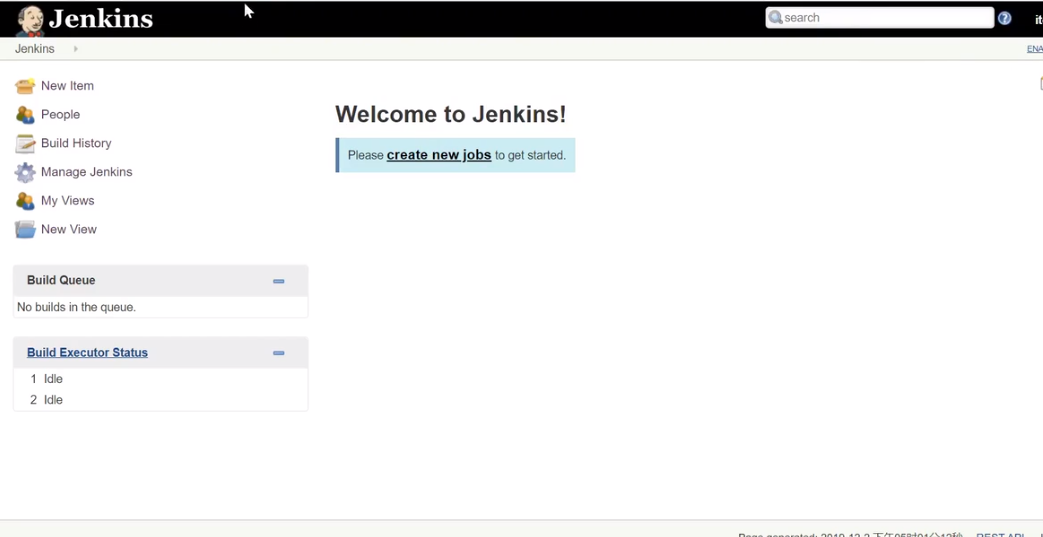
4. Open the browser to access Jenkins
visit: http://ip:8888
Note: you need to turn off the server firewall. If you turn on the firewall, you need to add an access port in the firewall. CentOS:
		1,Turn on the firewall
		    systemctl start firewalld
		2,Open specified port
		      firewall-cmd --zone=public --add-port=8888/tcp --permanent
		 Command meaning:
		--zone #Scope
		--add-port=8888/tcp  #Add a port in the format of port / communication protocol
		--permanent  #It will take effect permanently. It will become invalid after restart without this parameter
		3,service iptables restart
		      firewall-cmd --reload
		4,View port number
		netstat -ntlp #View all current tcp ports·
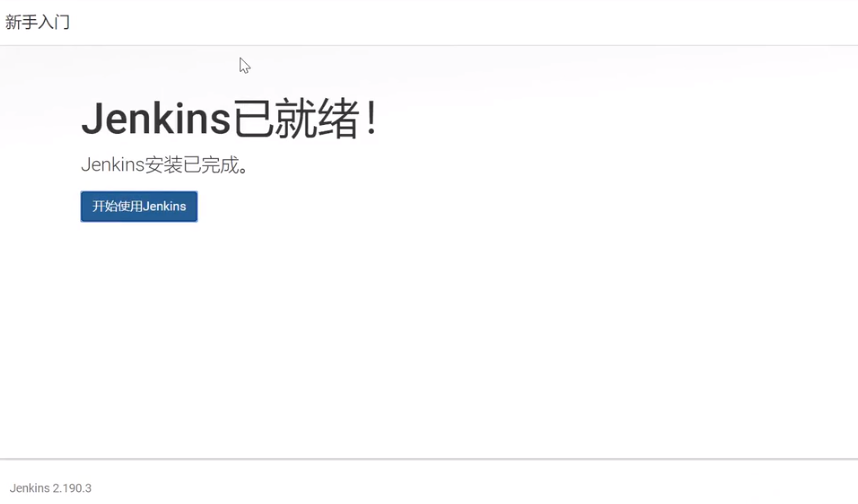
As shown in the figure, the installation is successful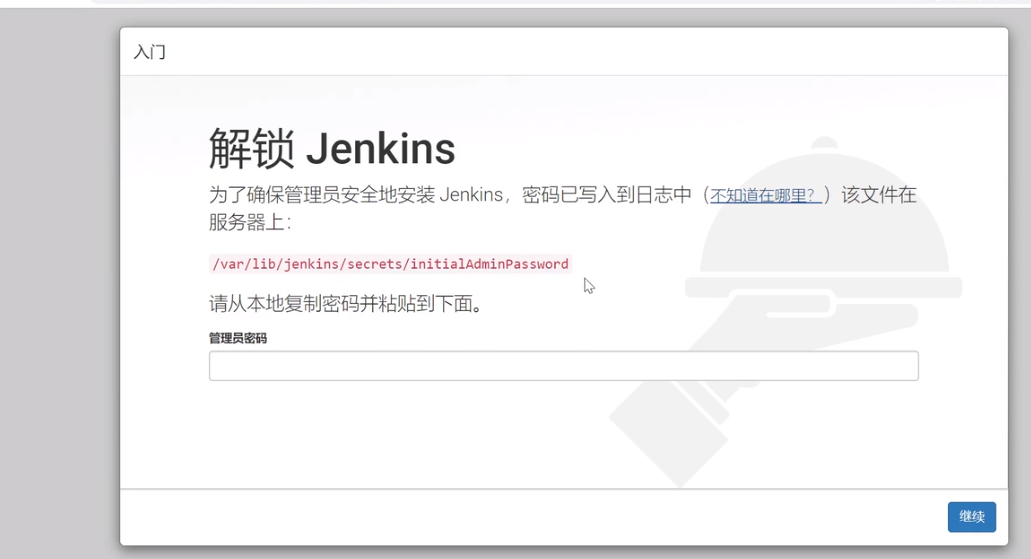
5. Get the administrator password
cat /var/lib/jenkins/secrets/initialAdminPassword
Then copy and paste the password into the administrator password input box in the login interface above, and click continue.
6. Customize Jenkins
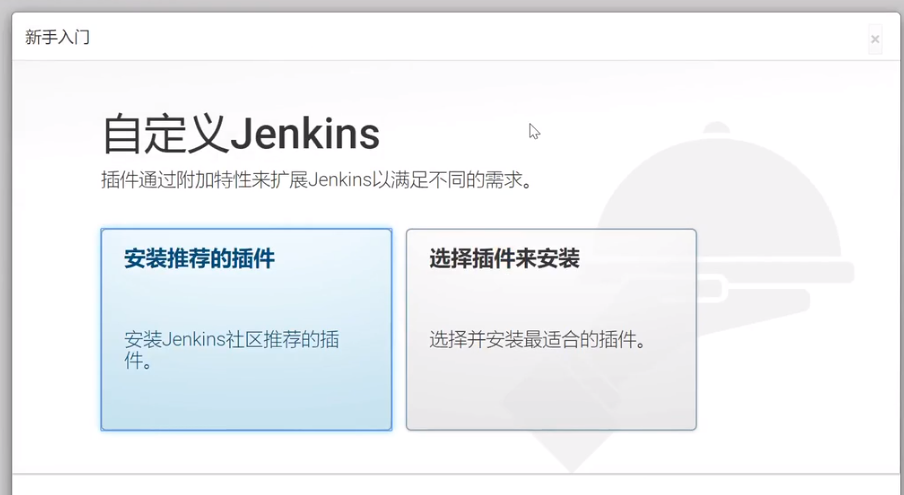
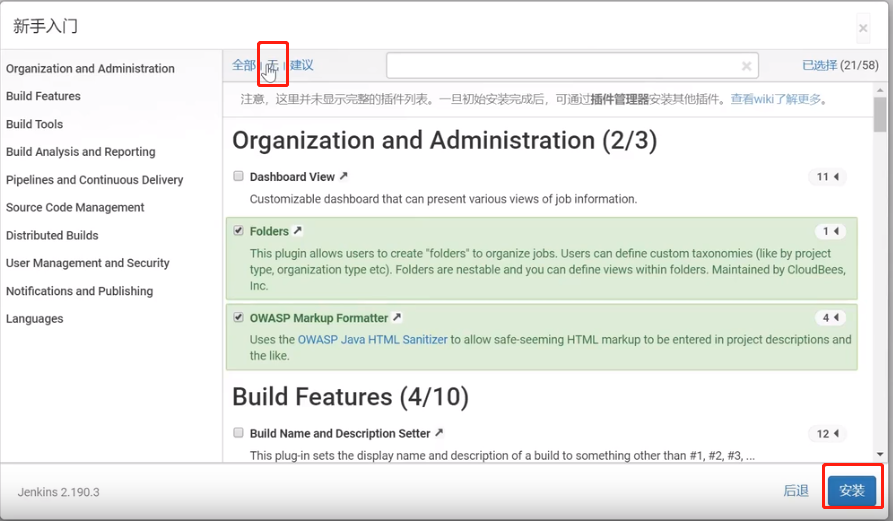
It is recommended to click "select plug-ins to install"
Then cancel all the checked plug-ins in the next interface
Because Jenkins connects to the official by default, the speed is very slow, and it will fail, so skip the plug-in installation first (you can modify the plug-in download address later to speed up the plug-in installation).
7. Create administrator user
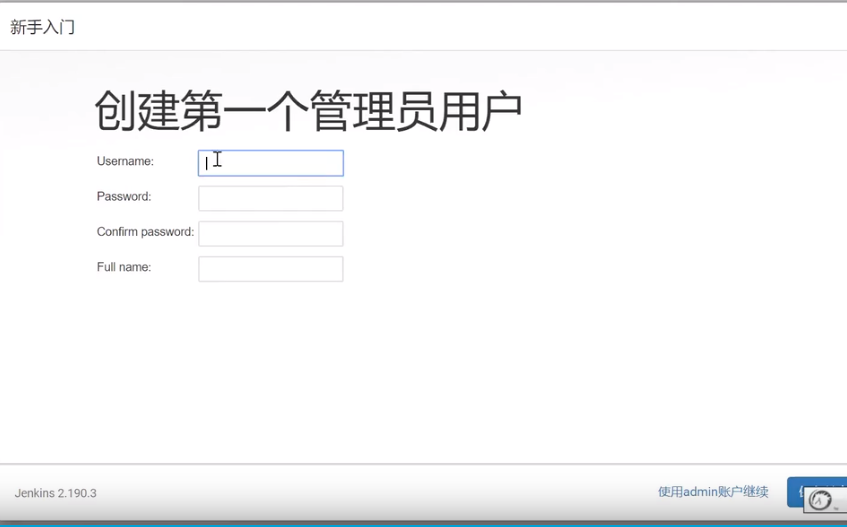
1) Follow the prompts to create an administrator user
2) Instance configuration (default)
3) Seeing that Jenkins is ready indicates that there is no problem. Click to start using and wait for a while
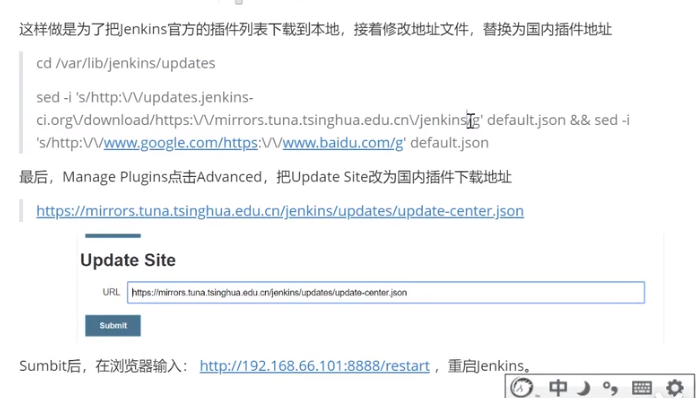
8. Modify the plug-in download address
To enter plug-in management, you need to click the "optional plug-ins" tab, wait for the response to complete, and wait for the plug-in address file download to complete.

9. Install Chinese plug-in

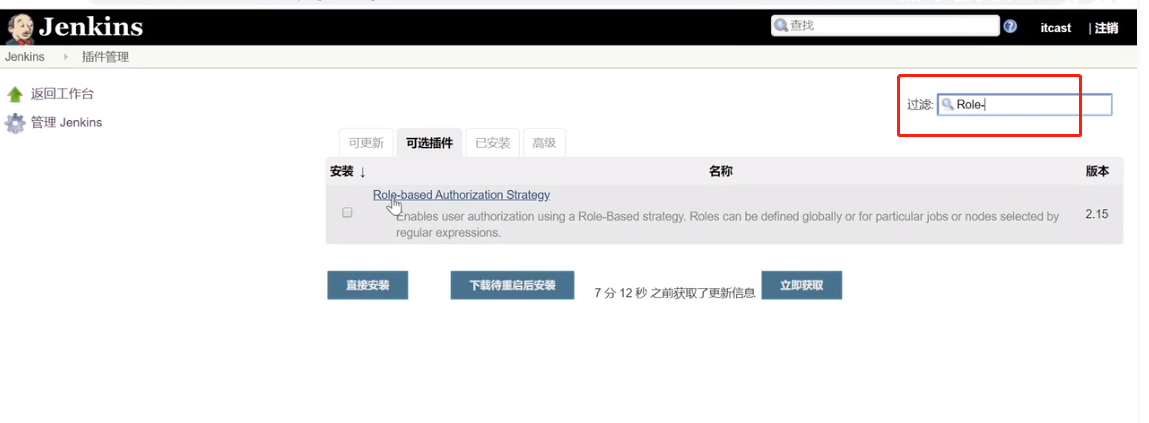
10. User authority management
1. Install plug-ins (function: users can be set to have different permissions according to their roles. If plug-ins are not installed by default, jenkins's permission management is relatively coarse-grained: login users can do anything)
2. Enable global security configuration
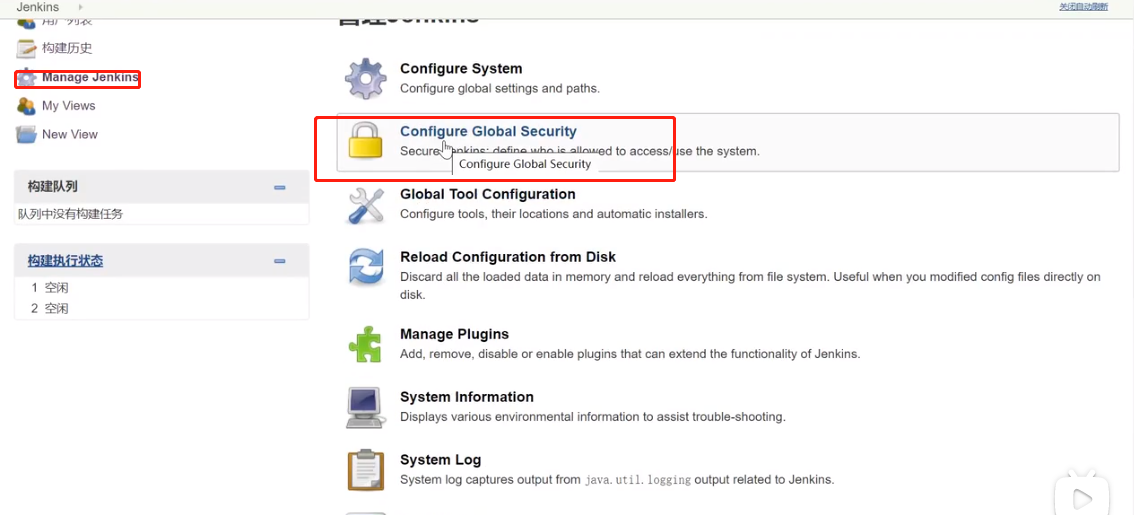

3. Set roles (mainly basic roles and project roles)


4. Assign user roles
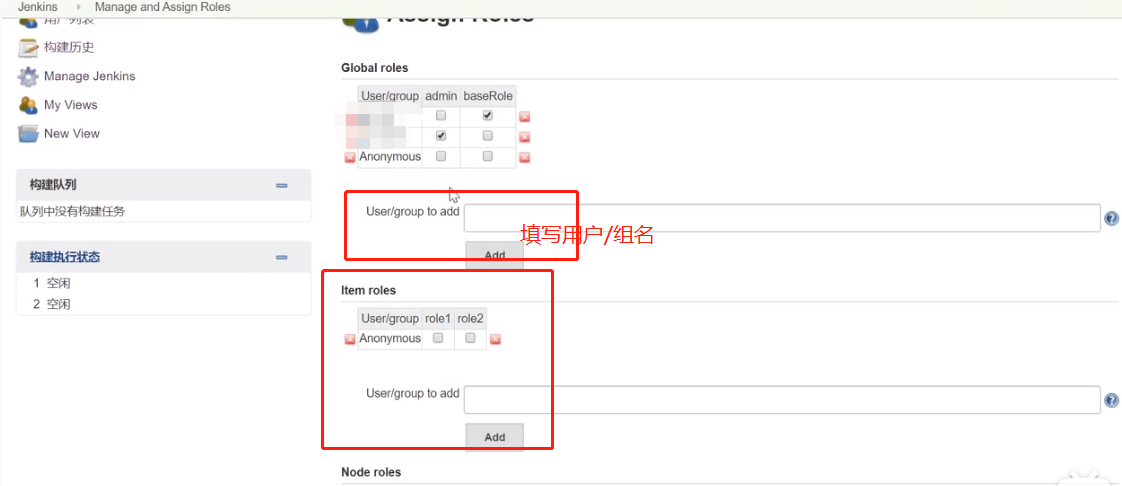
5. After you assign a corresponding project role, you can only see the items that match the corresponding project role
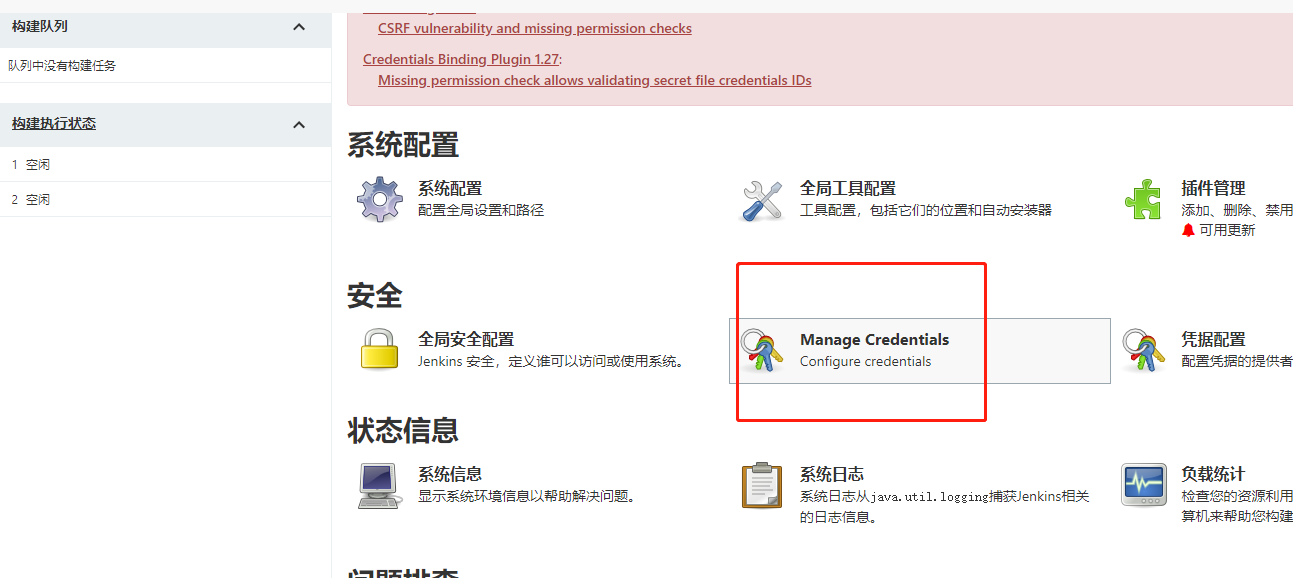
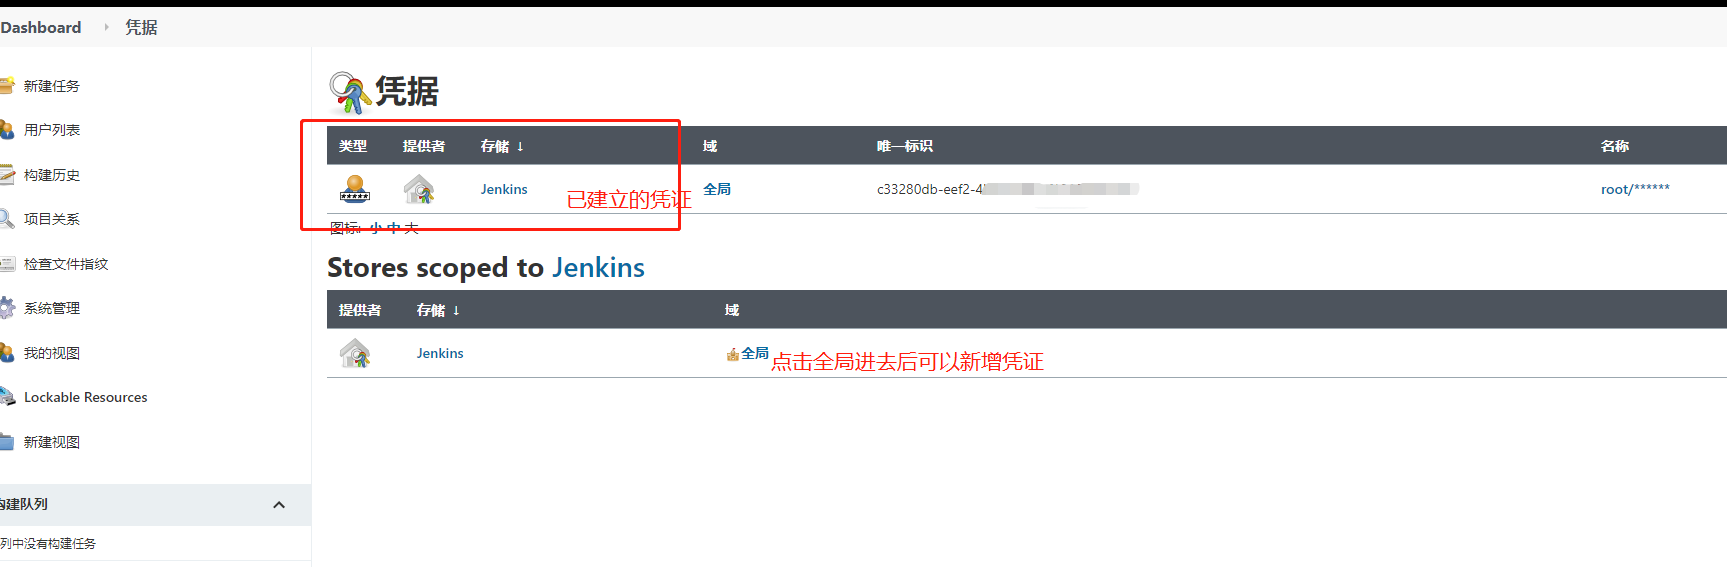
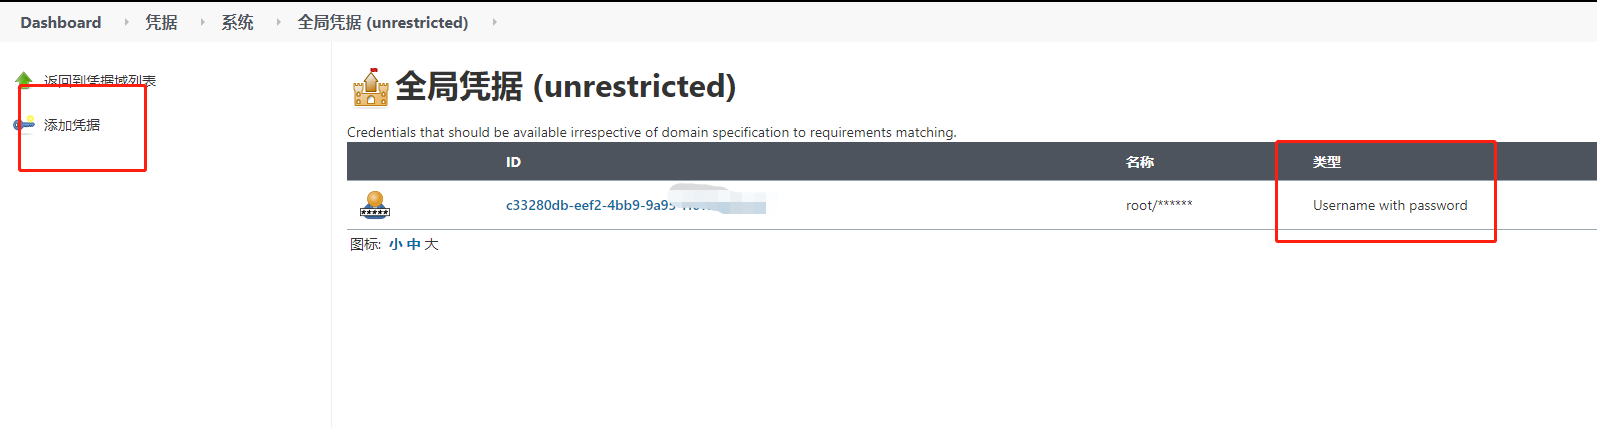
11. jenkins voucher management
1. Install plug-ins

2. After the plug-in is installed, enter voucher management and add a new voucher
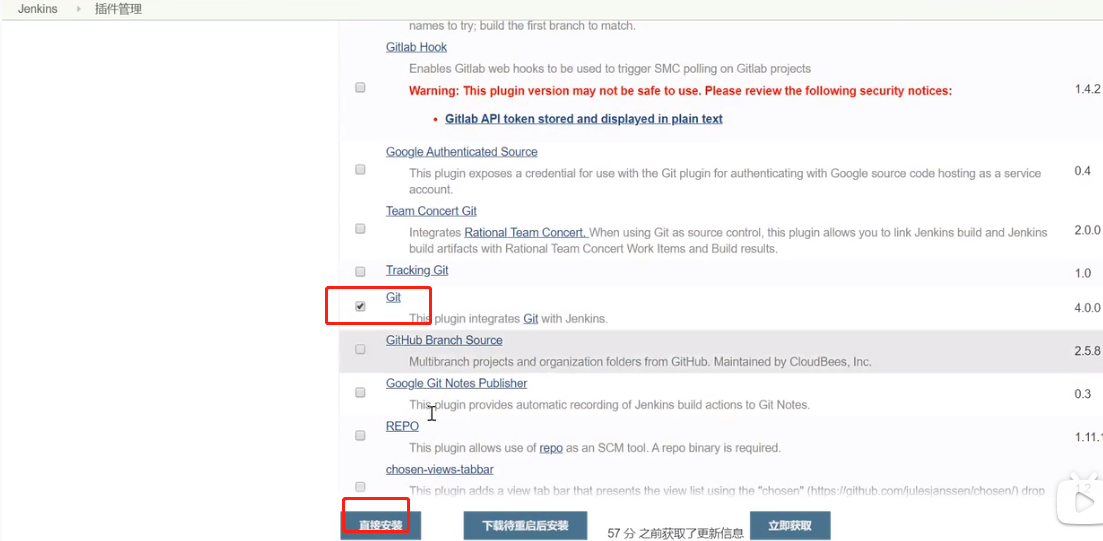
12. Install Git plug-ins and Git tools
In order for Jenkins to support pulling source code from gitlab, you need to install git plug-in and git tool on linux system
git plug-in installation:
To install git tools on linux:
yum install git -y  install
git --version  View version after installation
13. Maven installation
1. Download address installation
wget https://mirrors.tuna.tsinghua.edu.cn/apache/maven/maven-3/3.6.3/binaries/apache-maven-3.6.3-bin.tar.gz
2. Decompression installation
tar -xzvf apache-maven-3.6.3-bin.tar.gz
mv apache-maven-3.6.3 /opt/maven
3. Configure environment variables
Edit the / etc/profile file using vim
vim /etc/profile
Add the following configuration at the end of / etc/profile file:
Tip: since maven depends on jdk, it's better to configure the environment variables of jdk (Note: JAVA_HOME is the installation path of jdk).
#set maven environment
JAVA_HOME=/usr/lib/jvm/java-1.8.0-openjdk-1.8.0.272.b10-1.el7_9.x86_64
PATH=$JAVA_HOME/bin:$PATH
CLASSPATH=.:$JAVA_HOME/tools.jar:$JAVA_HOME/dt.jar
export JAVA_HOME PATH CLASSPATH

M2_HOME=/maven
PATH=$M2_HOME/bin:${PATH}
export M2_HOME PATH
4. Reload the / etc/profile file
source /etc/profile
java -version #View jdk version
mvn -v  #View maven version
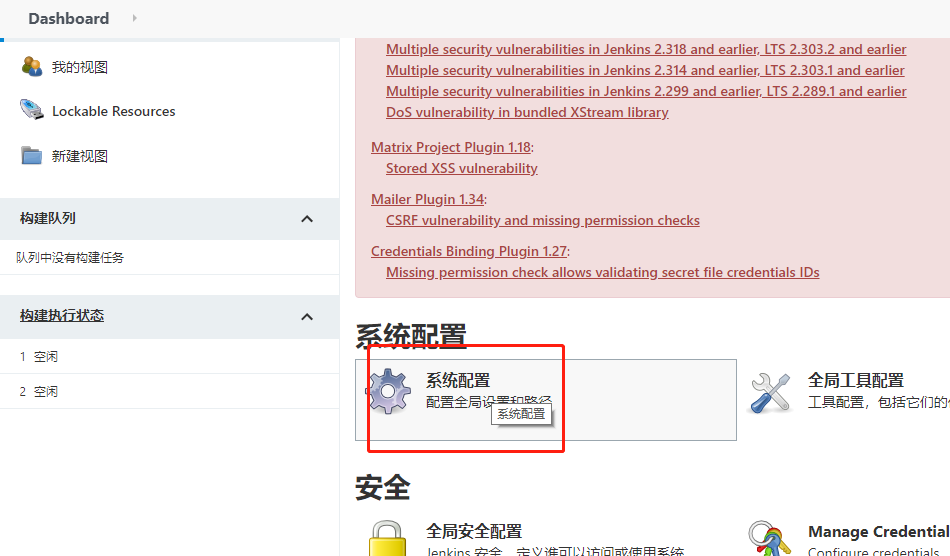
14. Configure jdk and maven on jenkins

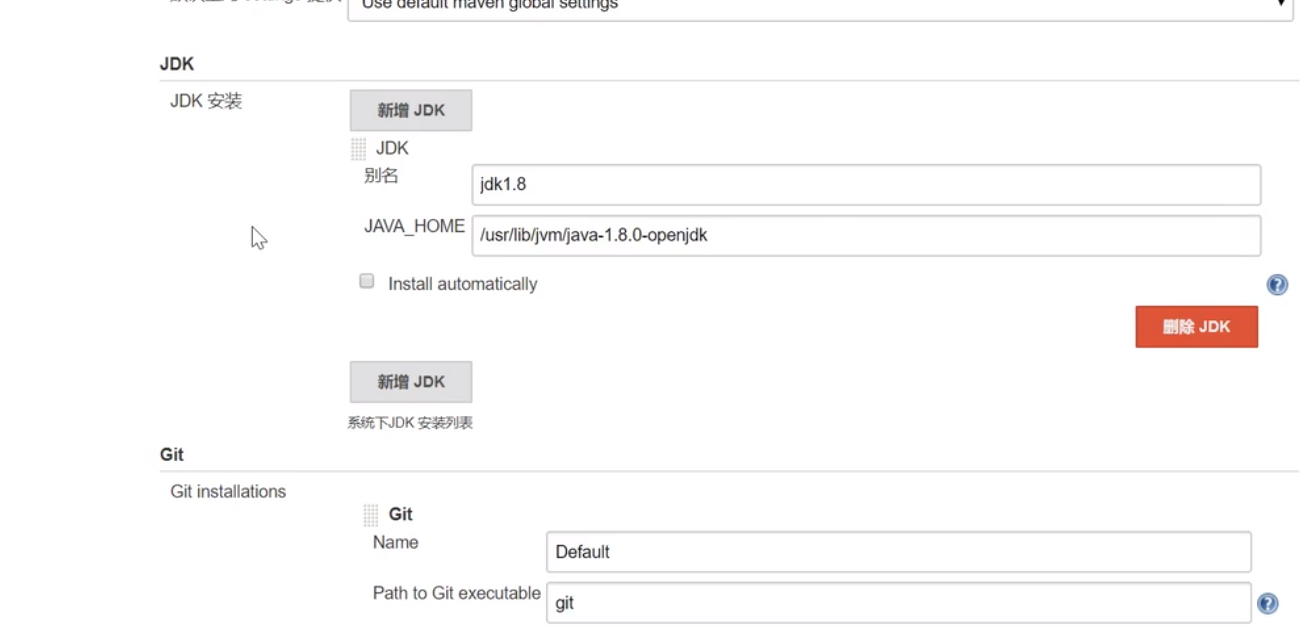
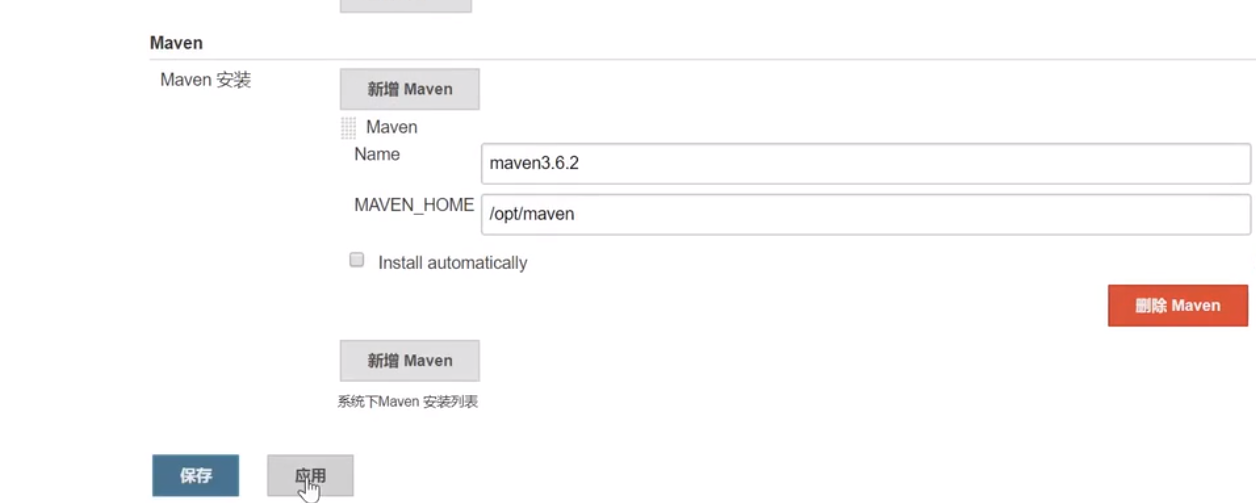
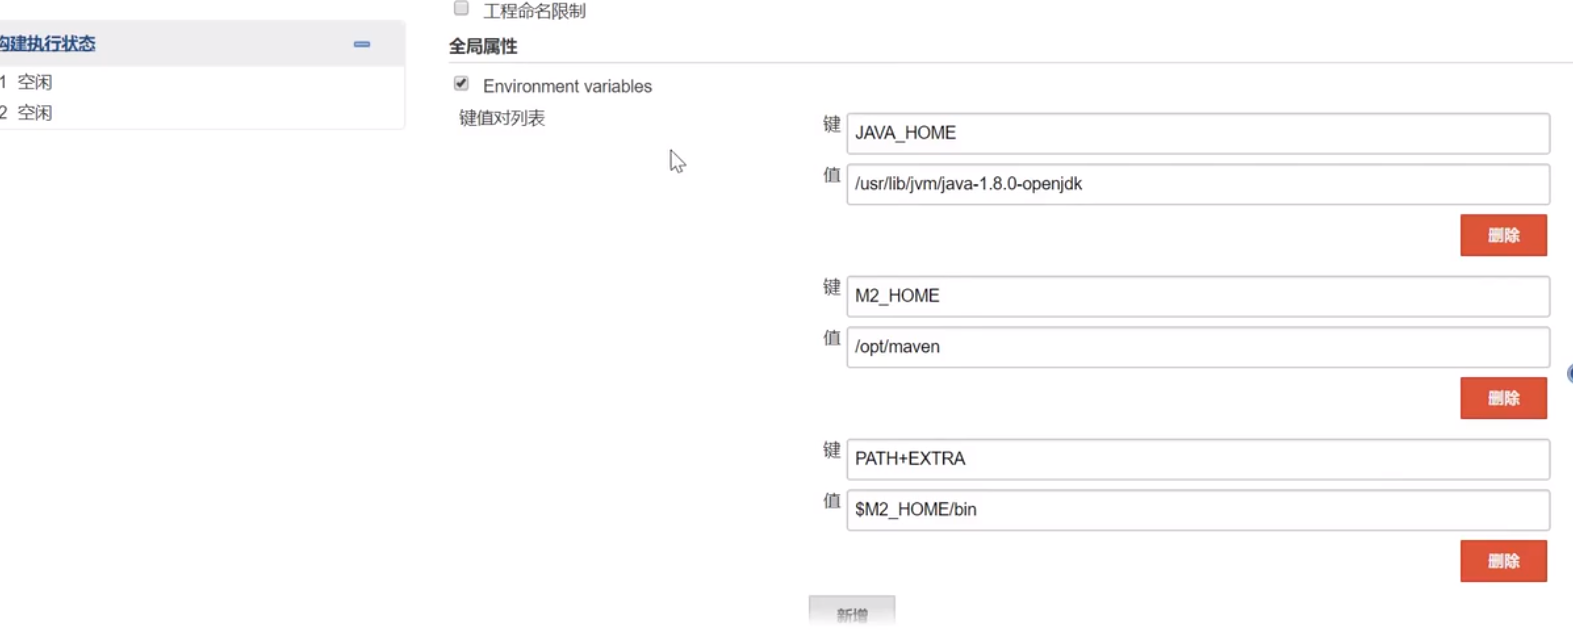
15. Adding global attributes to the system configuration on jenkins is similar to adding environment variables to the linux profile file, so that jenkins can recognize relevant commands
16. Modify maven's settings XML file

17. Install the maven plug-in so that you can create maven style projects

So far, the arrangement and configuration related to Jenkins have been roughly completed, and the project can be built.
3, Jenkins free style project construction
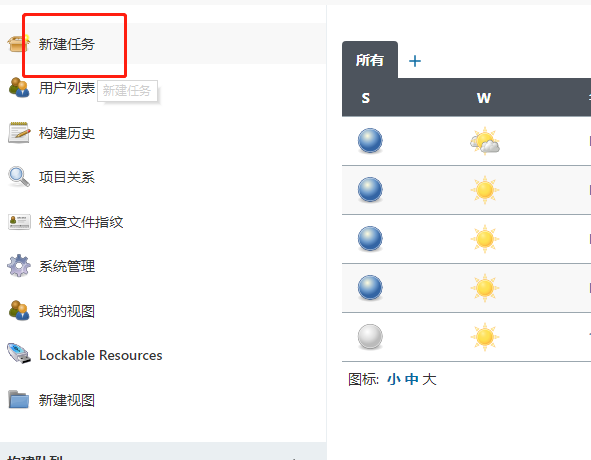
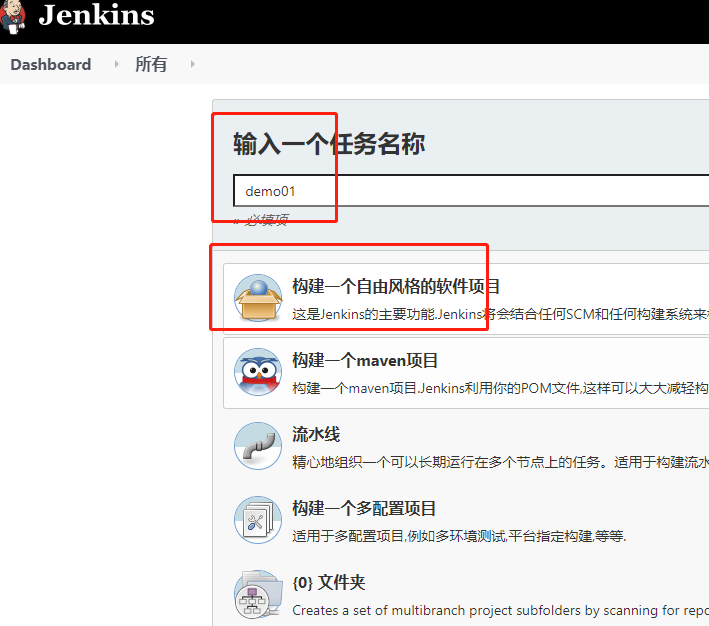
1. New freestyle project
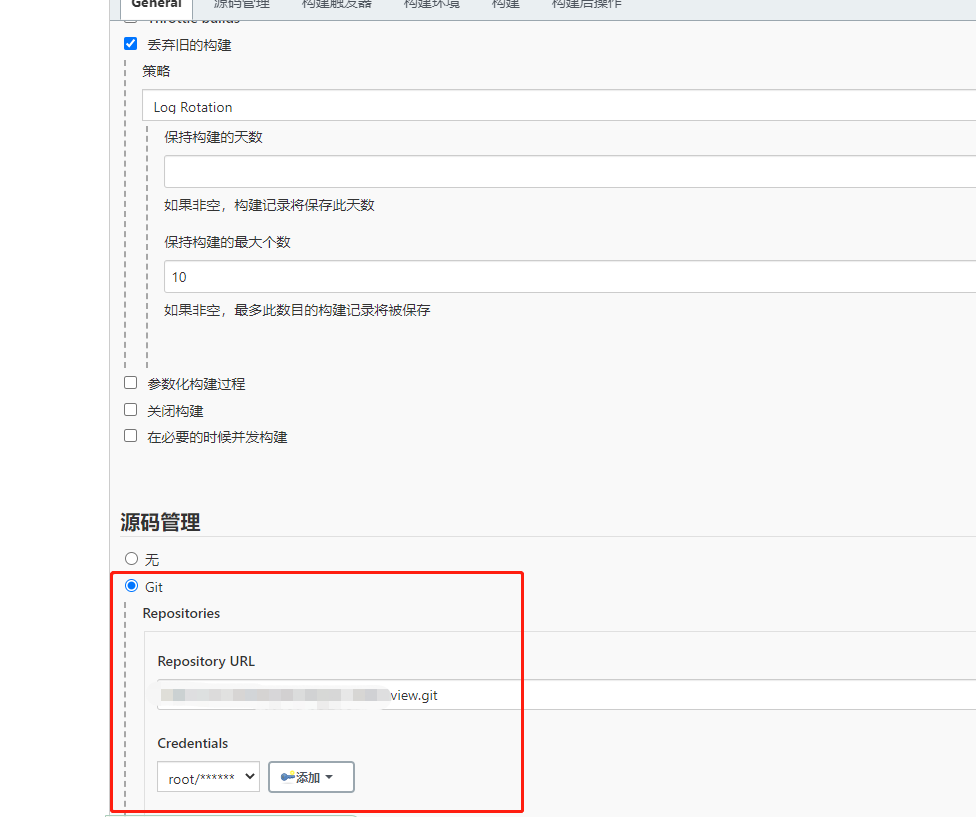
2. Configure git pull code (this example is a front-end vue project)

3. Compile and package (build - > add build steps - > execute shell)
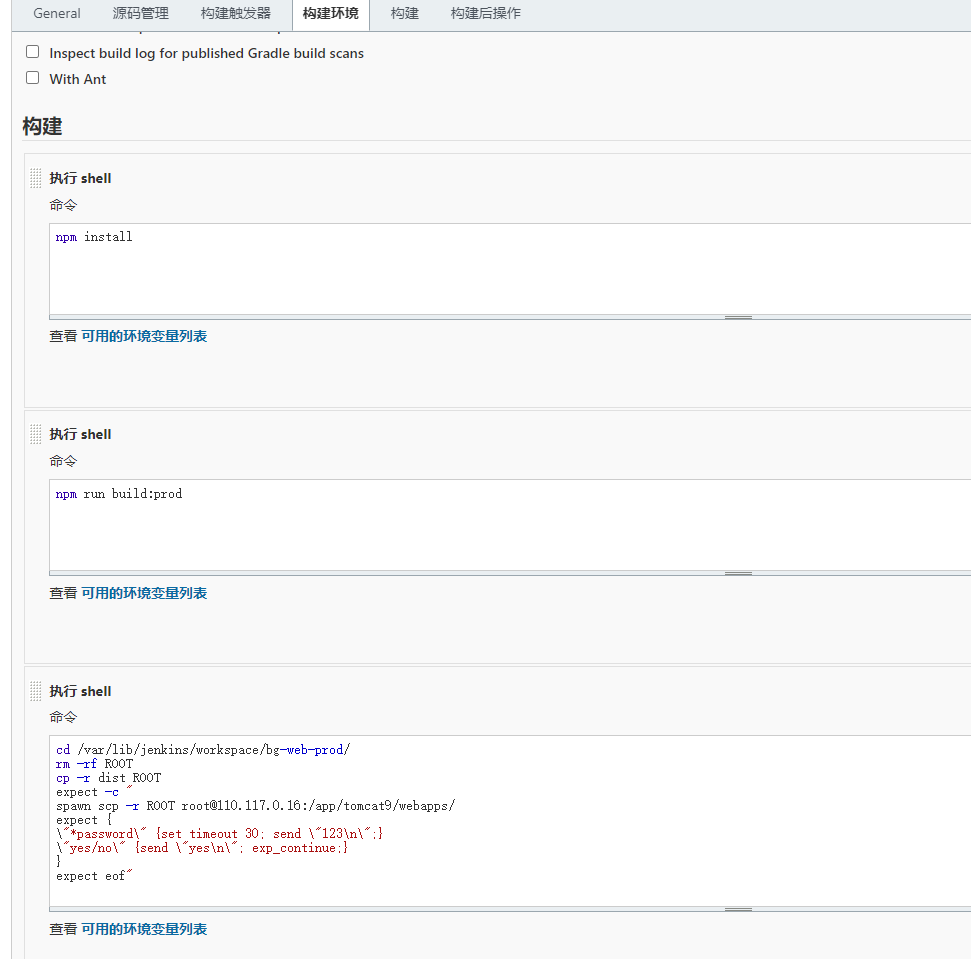
cd /var/lib/jenkins/workspace/bg-web-prod/
rm -rf ROOT
cp -r dist ROOT
expect -c "
spawn scp -r ROOT root@110.117.0.16:/app/tomcat9/webapps/
expect {
\"*password\" {set timeout 30; send \"123\n\";}
\"yes/no\" {send \"yes\n\"; exp_continue;}
}
expect eof"
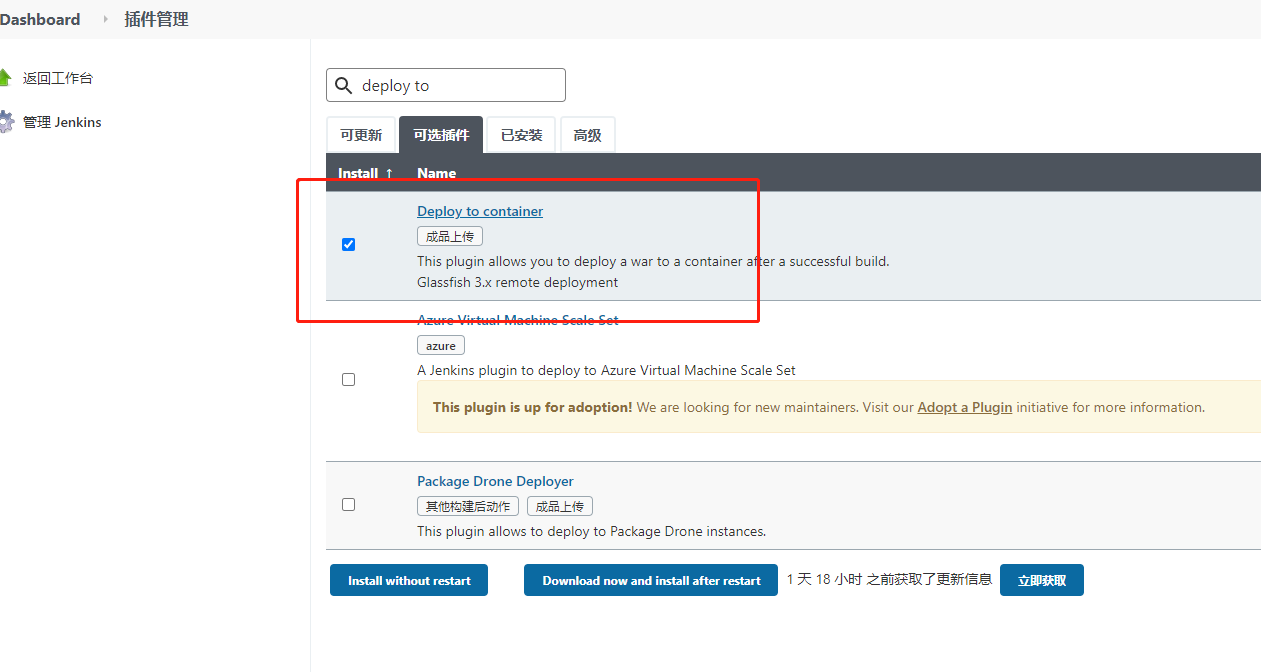
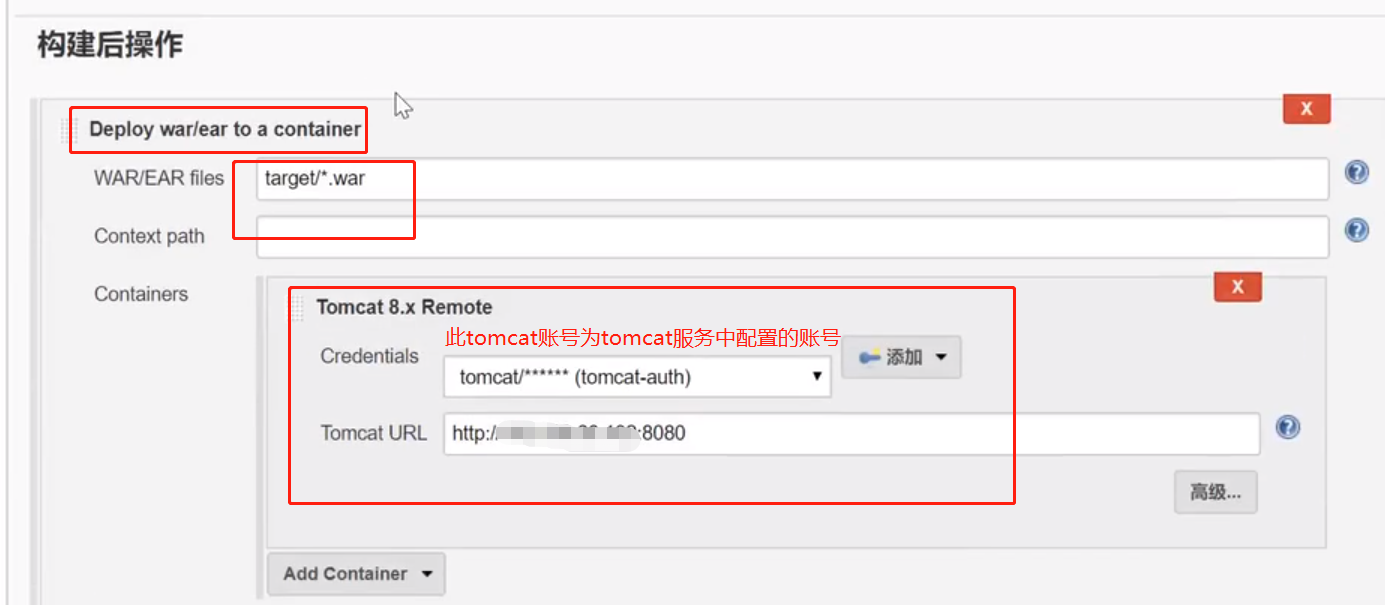
The above script can also use the second method to put the compiled package into tomcat, that is, the following plug-ins deployed to the container can be used to upload the packaged project package to Tomcat for remote deployment:
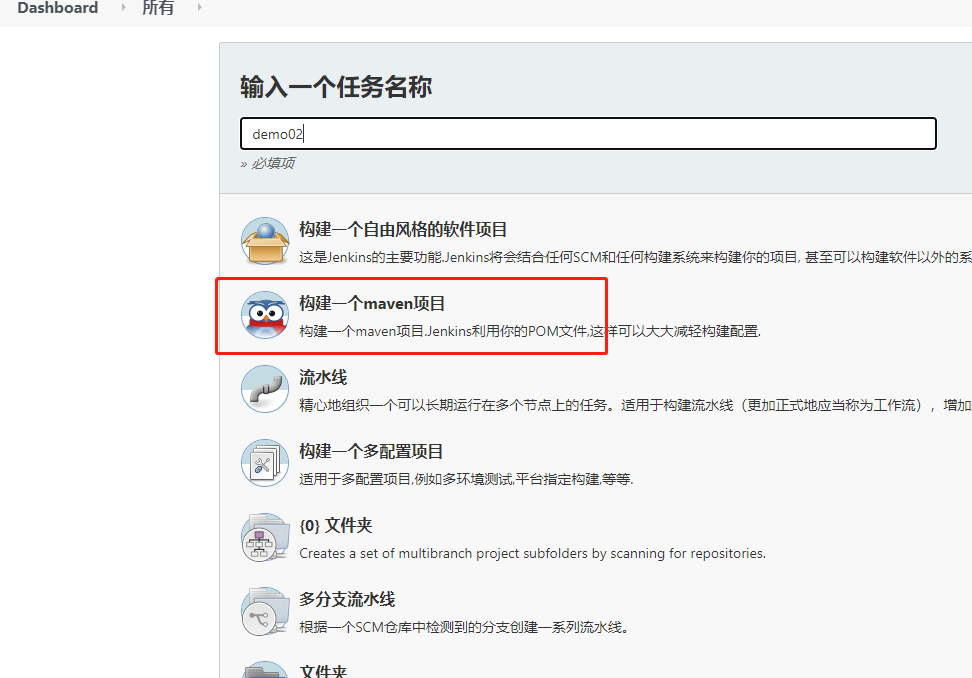
4, Jenkins Maven project construction
1. New maven style project
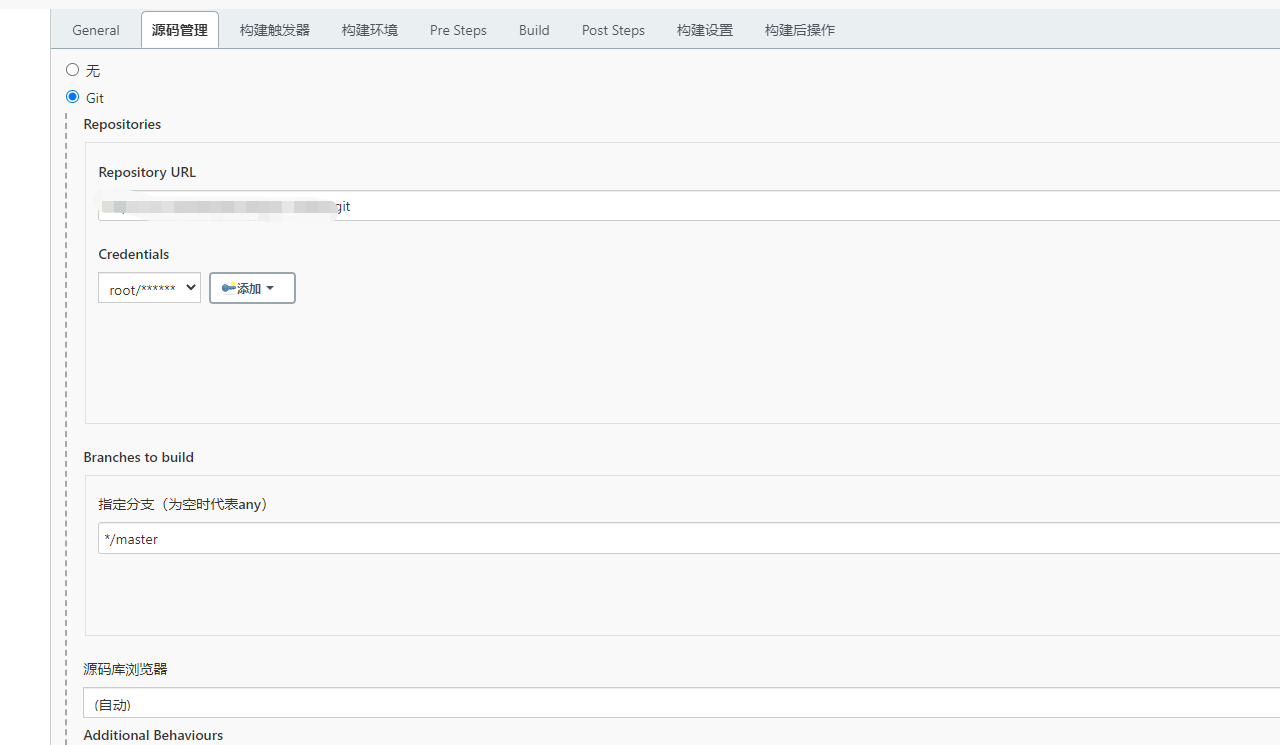
2. Configure git pull code (this example is a backend java project)
3. Compile and package (build - > add build steps - > execute shell)
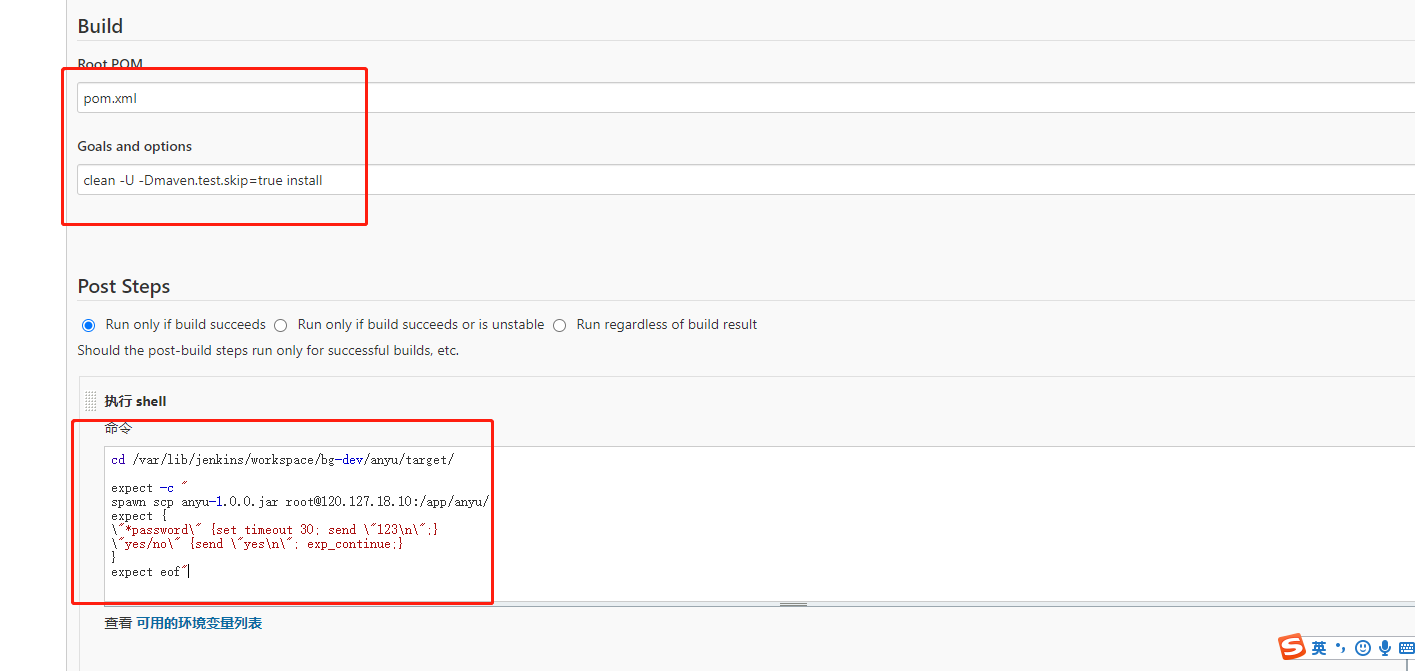
cd /var/lib/jenkins/workspace/bg-dev/anyu/target/

expect -c "
spawn scp anyu-1.0.0.jar root@120.127.18.10:/app/anyu/
expect {
\"*password\" {set timeout 30; send \"123\n\";}
\"yes/no\" {send \"yes\n\"; exp_continue;}
}
expect eof"
At this point, you can build the project immediately!