Article catalog
First, follow my other instructions Blog Complete the configuration of the jetson nano basic environment. The deep learning framework can then be installed. It should be noted that the system time is wrong every time the nano is powered off and then powered on. It should be set manually first.
1. Tensorflow multi version installation
Create a virtual environment and activate:
mkvirtualenv nano
workon nano
- 1
- 2
Different versions of Tensorflow will be installed in different virtual environments.
1.1 Protobuf installation
Exit the virtual environment and install Protobuf in the system.
First, configure protobuf to make tensorflow run faster. If protobuf and libprotobuf are not installed, tensorflow's performance will be greatly reduced. Of course, when using pip to install tensorflow, a protobuf version will be installed automatically, but it may not be very appropriate. For the performance impact of this part, see Nvidia's Forum
The installation command script sh contents are as follows:
#!/bin/bash

set -e

folder=${HOME}/src
mkdir -p $folder

echo "** Install requirements"
sudo apt-get install -y autoconf libtool

echo "** Download protobuf-3.8.0 sources"
cd $folder
if [ ! -f protobuf-python-3.8.0.zip ]; then
  wget https://github.com/protocolbuffers/protobuf/releases/download/v3.8.0/protobuf-python-3.8.0.zip
fi
if [ ! -f protoc-3.8.0-linux-aarch_64.zip ]; then
  wget https://github.com/protocolbuffers/protobuf/releases/download/v3.8.0/protoc-3.8.0-linux-aarch_64.zip
fi

echo "** Install protoc"
unzip protobuf-python-3.8.0.zip
unzip protoc-3.8.0-linux-aarch_64.zip -d protoc-3.8.0
sudo cp protoc-3.8.0/bin/protoc /usr/local/bin/protoc

echo "** Build and install protobuf-3.8.0 libraries"
export PROTOCOL_BUFFERS_PYTHON_IMPLEMENTATION=cpp
cd protobuf-3.8.0/
./autogen.sh
./configure --prefix=/usr/local
make -j$(nproc)
make check
sudo make install
sudo ldconfig

echo "** Update python3 protobuf module"
# remove previous installation of python3 protobuf module
sudo pip uninstall -y protobuf
sudo pip install Cython
cd python/
python3 setup.py build --cpp_implementation
sudo python3 setup.py install --cpp_implementation

echo "** Build protobuf-3.8.0 successfully"
Commands can also be executed line by line in the terminal.
Then activate the virtual environment and install protobuf into the virtual environment:
workon nano
cd ~
cp -r ~/src/protobuf-3.8.0/python/ .
cd python
python setup.py install --cpp_implementation
1.2 install dependency package and tensorflow1 fifteen
After installing protobuf, install numpy and python in the virtual environment:
pip install cython
pip install numpy==1.16.1
It takes about 20 minutes to compile.
When numpy is installed at the same time, an error may be reported:
numpy/core/src/multiarray/numpyos.c:18:10: fatal error: xlocale.h: No such file or directory
You need to exit the virtual environment, install numpy for the system, and then make the virtual environment available through a soft link:
sudo pip install numpy=1.16.1
cd ~/.virtualenvs/nano/lib/python3.6/site-packages/
ln -s /usr/local/lib/python3.6/dist-packages/numpy numpy
Then enter the virtual environment for numpy installation
pip install numpy==1.16.1
Install other dependent packages:
pip install -U testresources setuptools
pip install -U future mock h5py keras_preprocessing keras_applications gast futures pybind11
During the installation process, it is recommended that when an error is reported in the installation of that package, the installation without an error can be completed first, and then the installation with an error can be installed separately, which takes a long time.
At the time of writing this blog (November 11, 2020), official Versions 1.15 and 2.3 are available for installation. The current version of 1.15 is more stable. Install tensorflow 1.1 in this virtual environment 15.2:
pip install --pre --extra-index-url https://developer.download.nvidia.com/compute/redist/jp/v44 tensorflow==1.15.2
Other dependencies will be automatically installed during installation.
For more understanding of the installation process, refer to Official forum and Official installation instructions.
Complete the installation of Tensorflow through the above steps.
The installation time is long, wait patiently.
1.3 installation of other common libraries
Each package takes a long time and waits patiently. If it fails, try it many times. Considering that the installation is too slow, you can open several more shell s to implement it (keras and scikit learn jupyter need to install scipy first, so you can pay attention to the order when installing first; in addition, the latest version of keras requires tensorflow > 2, so you should specify an earlier version)
pip install scipy
pip install keras==2.3.0
pip install pillow
pip install matplotlib
pip install scikit-learn
pip install scikit-image
pip install jupyter
1.4 test whether the python package is installed successfully
python -c 'import numpy; print(numpy.__version__)'
python -c 'import jupyter; print(jupyter.__version__)'
python -c 'import PIL; print(PIL.__version__)'
python -c 'import matplotlib; print(matplotlib.__version__)'
python -c 'import tensorflow; print(tensorflow.__version__)'
python -c 'import keras; print(keras.__version__)'
python -c 'import scipy; print(scipy.__version__)'

At the same time, you can verify whether tensorflow supports GPU: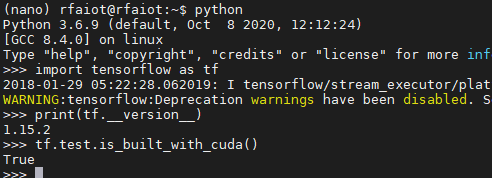
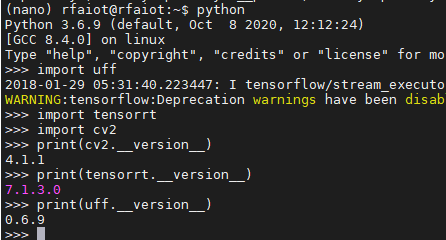
1.5 installation of tensorrt and Opencv
Relevant components of tensorrt and opencv have been installed in the system, as shown in the following figure:
You can see that there are UFF, tensorrt, graphsurgeon and CV2 modules. You only need to add the paths of these packages to the environment variables of the virtual environment.
workon nano
add2virtualenv /usr/lib/python3.6/dist-packages
lssitepackages #List all packages
1.6 pycuda and onnx installation
To use tensorrt to transform and accelerate the models of various mainstream frameworks (tensorflow, pytorch, cafe), pycuda and onnx should also be installed
pip install pycuda
pip install onnx==1.4.1
The lower version of onnx is also selected, and the latest version can also be installed. An error may be reported, and it can be downgraded at this time.
1.7 Tensorflow2.3 installation
tensorflow1.15.2 has been installed in the nano virtual environment, and most packages are tensorflow2 The installation of 3 depends on, so do the following.
Copy nano environment:
cpvirtualenv nano nano_tf2
This creates a file called nano_ The environment of TF 2 is the same as that of nano
Install tensorflow2 three
#Uninstall tensorflow1.0 first 15 and keras
pip uninstall keras
pip uninstall tensorflow
#Then install
pip install --pre --extra-index-url https://developer.download.nvidia.com/compute/redist/jp/v44 tensorflow==2.3.1
Verify installation: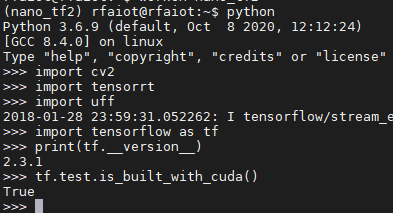
At this point, the installation of tensorflow is complete. With the update of jetson series, you can refer to this article to view the command on the official website to install.
2. Pytoch installation
This section is mainly for reference https://forums.developer.nvidia.com/t/pytorch-for-jetson-version-1-7-0-now-available/72048 Content.
In accordance with Blog After completing the basic configuration, you can perform the following installation steps.
2.1 installation of pytroch and torch vision
Copy nano environment:
cpvirtualenv nano nano_ptch
This creates a file called nano_ptch has the same environment as nano
#Uninstall tensorflow1.0 first 15 and keras
pip uninstall keras
pip uninstall tensorflow
Execute the jtop command, press 6, view the current jetpack version, and select the appropriate pytorch version for installation.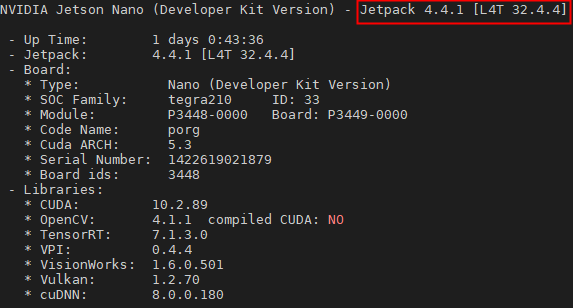
It seems that the system version is jetpack4 4.1 is the latest one at present (November 13, 2020).
The requirements of several versions are listed below: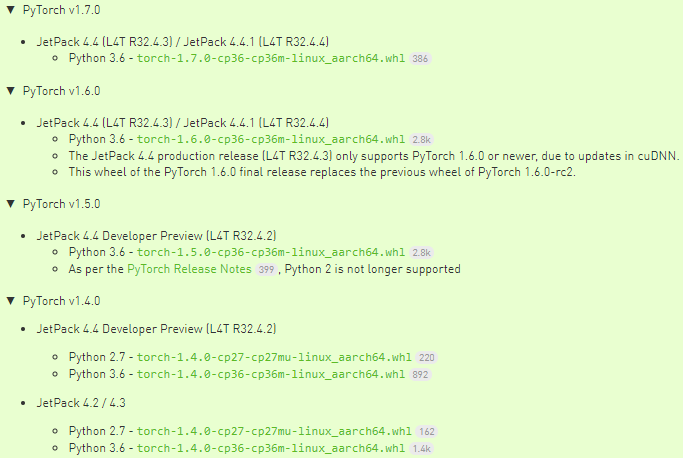
Choose to install the latest version of pytorch1 seven
wget https://nvidia.box.com/shared/static/wa34qwrwtk9njtyarwt5nvo6imenfy26.whl -O torch-1.7.0-cp36-cp36m-linux_aarch64.whl # needs scientific Internet access
workon nano_ptch
pip install torch-1.7.0-cp36-cp36m-linux_aarch64.whl
For network reasons, I put pytorch1 7 upload to CSDN, Free download.
Then install torchvision. Since the version of torchvision should correspond to the version of pytorch, select the appropriate version. The version correspondence is as follows:
PyTorch v1.0 - torchvision v0.2.2
PyTorch v1.1 - torchvision v0.3.0
PyTorch v1.2 - torchvision v0.4.0
PyTorch v1.3 - torchvision v0.4.2
PyTorch v1.4 - torchvision v0.5.0
PyTorch v1.5 - torchvision v0.6.0
PyTorch v1.6 - torchvision v0.7.0
PyTorch v1.7 - torchvision v0.8.1
The installation command is:
git clone --branch <version> https://github.com/pytorch/vision torchvision   # see below for version of torchvision to download
cd torchvision
export BUILD_VERSION=0.x.0  # where 0.x.0 is the torchvision version
sudo python setup.py install     # use python3 if installing for Python 3.6
cd ../  # attempting to load torchvision from build dir will result in import error
It corresponds to pytorch1 At 7:00:
git clone --branch v0.8.1 https://github.com/pytorch/vision torchvision   # see below for version of torchvision to download
cd torchvision
export BUILD_VERSION=0.8.1  # where 0.x.0 is the torchvision version
sudo python setup.py install     # use python3 if installing for Python 3.6
cd ../  # attempting to load torchvision from build dir will result in import error
2.2 installation environment verification
To verify whether pytorch and torchvision are installed successfully, see the following: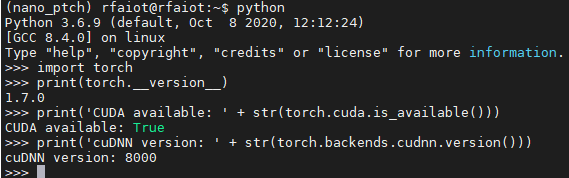
The commands used are as shown in Figure 4:
import torch
print(torch.__version__)
print('cuda available:'+str(torch.cuda.is_available()))
print('cuDNN version:'+str(torch.backends.cudnn.version()))
Now, complete the installation of tensorflow and pytorch, the mainstream deep learning frameworks, on the jetson nano.