jQuery is a practical JavaScript library. jQuery greatly simplifies the operation of JS on DOM and implements some common methods. jQuery can also chain operation.
Import and store files before using jQuery
-
Online introduction:
<script src="https://code.jquery.com/jquery-3.0.0.min.js"></script>
-
Local import:
<script src="js/jquery-1.11.2.min.js" type="text/javascript" charset="utf-8"></script>
JQuery objects and JavaScript objects are converted to each other
-
jq to js: just call the get method of jq object, such as:
<body> <div id="did">hello jquery</div> </body> <script type="text/javascript"> $(document).ready(function(){ var div2 = $("#Did "); / / div2 is a jq object var div3 = div2.get(0);//Call the get method of jq object, the parameter is fixed to 0, and div3 is a JavaScript object at this time }); </script> -
js to jq: $(js object), such as:
	<body>
		<div id="did">hello jquery</div>
	</body>
	<script type="text/javascript">
		$(document).ready(function(){
			// Get js object by id
			var div1 = document.getElementById("did");//At this point div1 is a js object
			var div2 = $(div1); //Pass the js object into $() and the div2 you get is a jq object
		});
	</script>
Basic selector
- Tag selector, which matches all elements according to the given element tag name, such as [tag name]
- #ID selector, which matches an element according to the given ID. Such as #[id name,
- . Class selector to match elements according to the given css class name. Such as [class name]
Hierarchy selector
-
Descendant: matches all descendant elements under a given ancestor element
For example, find all input elements in the form
HTML code:
<form>
  <label>Name:</label>
  <input name="name" />
  <fieldset>
      <label>Newsletter:</label>
      <input name="newsletter" />
 </fieldset>
</form>
<input name="none" />
jQuery Code:
$("form input")result:
[ <input name="name" />, <input name="newsletter" /> ]
-
Parent > child: matches all child elements under a given parent element
For example, match all child input elements in the form.
HTML code:
<form>
  <label>Name:</label>
  <input name="name" />
  <fieldset>
      <label>Newsletter:</label>
      <input name="newsletter" />
 </fieldset>
</form>
<input name="none" />
jQuery Code:
$("form > input")result:
[ <input name="name" /> ]
-
Peer and adjacent (prev+next): that is, match all the next elements immediately after the prev element
For example, match all input elements following label
HTML code:
<form>
  <label>Name:</label>
  <input name="name" />
  <fieldset>
      <label>Newsletter:</label>
      <input name="newsletter" />
 </fieldset>
</form>
<input name="none" />
jQuery Code:
$("label + input")result:
[ <input name="name" />, <input name="newsletter" /> ]
-
Sibling but separable (prev~siblings): that is, all siblings after matching prev elements
For example, find all input elements of the same generation as the form
HTML code:
<form>
  <label>Name:</label>
  <input name="name" />
  <fieldset>
      <label>Newsletter:</label>
      <input name="newsletter" />
 </fieldset>
</form>
<input name="none" />
jQuery Code:
$("form ~ input")result:
[ <input name="none" /> ]
Filter selector
- : first
- : last
- : even, starting from 0
- : odd
- : eq equals
- : lt less than
- : gt greater than
- : not invert
- : focusget focus
- : contains
- : empty
- : has
- : parent contains child elements or text
Get form content:
give an example:
<form id="f">
            name:
            <input type="text" value="123"/><br>
            password:
            <input type="password"><br>
            <input type="radio" value="a">a<br>
            <input type="radio" value="b">b<br>
            <input type="checkbox" checked value="A">A<br>
            <input type="checkbox">B<br>
            <input type="checkbox">C<br>
            <input type="checkbox">D<br>
            <input type="button" value="button"><br>
            <select name="" id="">
                <option value="java" selected>java</option>
                <option value="html">html</option>
                <option value="css">css</option>
            </select><br>
        </form>
$(function(){
        // Get form elements, excluding select and textArea
        console.log($("#f input").length)
        // Gets the form element containing textArea and select
        console.log($("#f :input").length)
        // Get the properties of the elements of the corresponding form
        console.log($("#f :text").length)
        // Ibid
        console.log($("#f :text").val())
        console.log($("#f :password").length)
        console.log($("#f :checkbox").length)
        // Print the selected value
        console.log($("#f :checked").val())
        console.log($("#f :selected").val())
    })
The results are as follows:
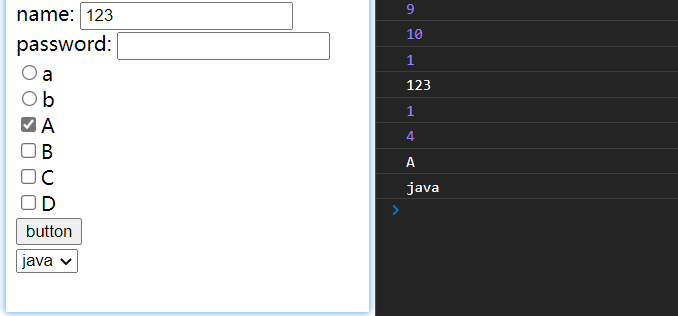
As you can see from the above, we can easily manipulate the inner elements of the form.
attr() usage:
You can either read the attribute value or set the attribute value, such as:
		<label>input:
            <input type="text" id="tid" size="17" value="20">
        </label>
        <br>
        <input type="button" id="btn1" value="Read input box value">
        <input type="button" id="btn2" value="Set text box value">
	$(function () {
        $("#btn1").click(function () {
            // Get property value
            console.log($("#tid").attr("value"));
            console.log($("#tid").attr("size"))
        })
        $("#btn2").click(function () {
            // Set attribute value
            $("#tid").attr("value", "demo")
        })
   }

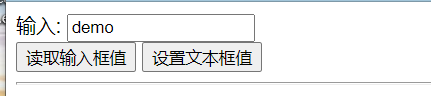
Click the button to find that through attr, we only need to pass in the attribute name when we want to read the attribute value, and pass in the attribute name + attribute value to attr when we want to add an attribute.
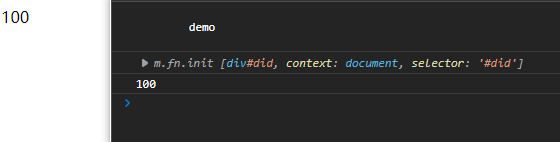
text() usage:
If there is a parameter in text(), it is the set value; if there is no parameter, it is the obtained value, such as:
	<div id="did">
        <p>demo</p>
    </div>
	<script>
        console.log($("#did").text())
		// Sets the value of text
        console.log($("#did").text(100))
        // Read the value of text
        console.log($("#did").text())
	</script>
The effect is as follows: first read the original value, then reset it, and read the effect again
html() usage:
It is the same as text. It determines whether to set or read the value according to whether to pass parameters to html, such as:
	<div id="did">
        <p>demo</p>
    </div>
	<script>
        console.log($("#did").html())
        console.log($("#did").html("<h3>hello</h3>"))
	</script>

val() usage:
It is the same as text(). It will not be demonstrated here. You can try it yourself
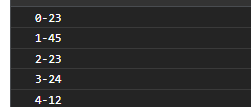
Circular each usage:
Simple array loop:
There are two parameters in each method. Parameter 1 is the array to loop, and parameter 2 is the function to execute the loop. Parameter 1 in this function is the subscript value of the current traversal element, and parameter 2 is the current element value of the traversal array.
	var arr = [23, 45, 23, 24, 12];
    $.each(arr, function (indexInArray, valueOfElement) {
        console.log(indexInArray + "-" + valueOfElement)
    });
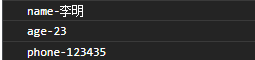
Object loop:
	var stu = {
        name: 'Li Ming',
        age: 23,
        phone: '123435'
    }
    $.each(stu, function (indexInArray, valueOfElement) {
        console.log(indexInArray + "-" + valueOfElement)
    });
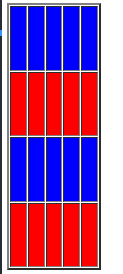
Exercise: setting different styles for tables by cycling
<table border="3px" style="height: 300px;height: 400px;">
            <tr>
                <td></td>
                <td></td>
                <td></td>
                <td></td>
                <td></td>
            </tr>
            <tr>
                <td></td>
                <td></td>
                <td></td>
                <td></td>
                <td></td>
            </tr>
            <tr>
                <td></td>
                <td></td>
                <td></td>
                <td></td>
                <td></td>
            </tr>
            <tr>
                <td></td>
                <td></td>
                <td></td>
                <td></td>
                <td></td>
            </tr>
        </table>
        <script>
                    $("tr").each(function (index, element) {
                if (index % 2 === 0) {
                    var ele = $(element);
                    ele.css("background", "blue")
                }else {
                    var ele = $(element);
                    ele.css("background", "red")
                }
            })
        </script>
effect:
css() usage:
This method can set the style, using css('style name ',' style value '), such as:
	$(function(){
        $("#b1").click(function(){
            $("p").css('color','blue')
        })
    })
addClass() usage:
This method is used to add already defined styles, such as
<style>
        .s1{
            color: green;
            font-size: larger;
        }

        .s2{
            background-color: yellow;
        }
   </style>

    <p>java</p>
    <p>spring</p>
    <p>mybatis</p>
    <button id="b2">Modify style 2</button>

    <script>
        $(function(){
            $("#b2").click(function(){
                // Class style can add more than one, separated by spaces
                $("p").addClass("s1 s2")
            })
        })
    </script>
Delete style: removeclass (style name)
Switch style: toggleclass (style name), such as:
	<style>
        .s3{
            background-color: blueviolet;
        }
    </style>


	<div style="height: 50px;width:50px;border: 3px solid red;" id="d1">

    </div>
    <button id="b4">Toggle style</button>


	<script>
		$(function(){
            $("#b4").click(function(){
                // Class styles can add more than one
                $("#d1").toggleClass("s3")
            })
  		  })
	</script>
The effects are as follows:
This time I share it here. See you next!