1, Jquery3 three point one
1. Overview
Introduction: jquery is an excellent lightweight framework for javascript, compatible with css3 and major browsers, and provides simple operations such as dom, events, animate, ajax, etc. Moreover, jquery has rich plug-ins, and most functions have corresponding plug-in solutions.
Jquery is a JS file, but it simplifies JS.
Jquery was founded by American John Resig in 2006.
Official website: http://jquery.com/
Divided into 1 X,2.X,3. The methods provided by the three major versions of X are basically the same, only 2 X 3.X is no longer compatible with lower version browsers such as IE 6, 7 and 8.
purpose: Write less, do more. Write less, do more.
Features: jQuery is a JavaScript function library.
The jQuery library contains the following features:
- HTML element selection
- HTML element operation
- CSS operation
- HTML event function
- JavaScript effects and animation
- HTML DOM traversal and modification
- AJAX
- Utilities
introduce:
<script src="jquery-3.3.1.min.js></script> If the label is used to lead the package, it is not allowed to write anything in it js sentence!
-
<script src=
"../js/jquery-3.3.1.min.js"></script>
-
<script>
-
alert(
"hello world.");
-
</script>
Note: to use jQuery, you must first introduce package and jquery-3.3.1 Min.js annotates and shortens the length of variables, which is relatively small, so this min.js package is referenced
2. Entry function
$() or jQuery() is called jq selector environment. Just put quotation marks inside and fill in the relevant selector to obtain the matching elements.
-
js:
window.οnlοad=
function(...){}
-
jq: $(
document).ready(
function(){...});
-
$(
function(){...});
-
1. Both functions are consistent, which can make the behavior of obtaining elements occur after rendering elements;
-
2. JS Only one entry is allowed. If multiple entries are written, the latter will cover the former;
-
3. JQ Multiple entries are allowed and exist in parallel, which will take effect;
-
4. JS The portal needs to wait until all resources on the page are loaded, and JQ The entry only needs to wait for the label on the page to be rendered, JQ The entrance speed is faster.
demonstration:
-
<script src="../js/jquery-3.3.1.min.js">
</script>
-
<script>
-
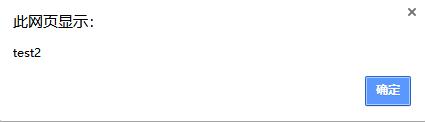
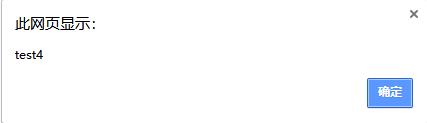
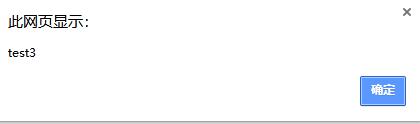
-
// JS page loading completed
-
window.onload =
function () {
-
alert(
"test1");
-
}
-
-
window.onload =
function () {
-
alert(
"test2");
-
}
-
-
// The $symbol is short for jquery
-
// Complex writing:
-
$(
document).ready(
function () {
-
alert(
"test3");
-
});
-
-
// Simplified writing
-
$(
function () {
-
alert(
"test4");
-
})
-
-
</script>
3. Events
-
js: js object.onclick =
function(){...}
-
jq: jquery object.click(
function(){...})
-
be careful: jq The event types in are unified and do not add on
demonstration:
js code:
-
<script src=
"../js/jquery-3.3.1.min.js"></script>
-
<script>
-
// Note: JS code is written after = jquery code is basically written in ()
-
// jquery entry function:
-
$(
function () {
-
-
// JS code:
-
var btn =
document.getElementById(
"btn");
-
btn.onclick =
function () {
-
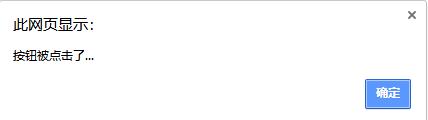
alert(
"The button was clicked...");
-
}
-
});
-
</script>
jQuery Code:
-
<script src=
"../js/jquery-3.3.1.min.js"></script>
-
<script>
-
// Note: JS code is written after = jquery code is basically written in ()
-
// jquery entry function:
-
jQuery(
function () {
-
-
// jquery Code:
-
$(
"#btn").click(
function () {
-
alert(
"The button was clicked...");
-
});
-
});
-
</script>
<input type="button" value="Button" id = "btn"/>
4. Overall operation
-
1,stay jq Inside, through $()The returned array allows the developer to manipulate the whole
-
2,Select one of the elements in the array: js object[subscript] jq object.e
q(subscript)
html code:
-
<body>
-
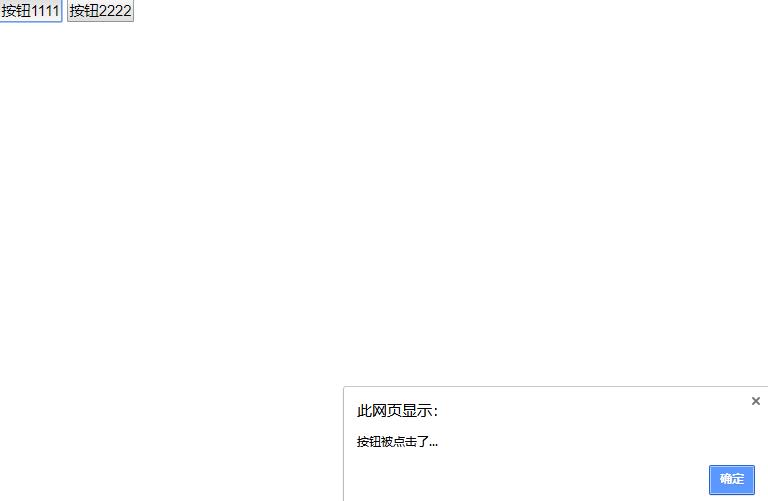
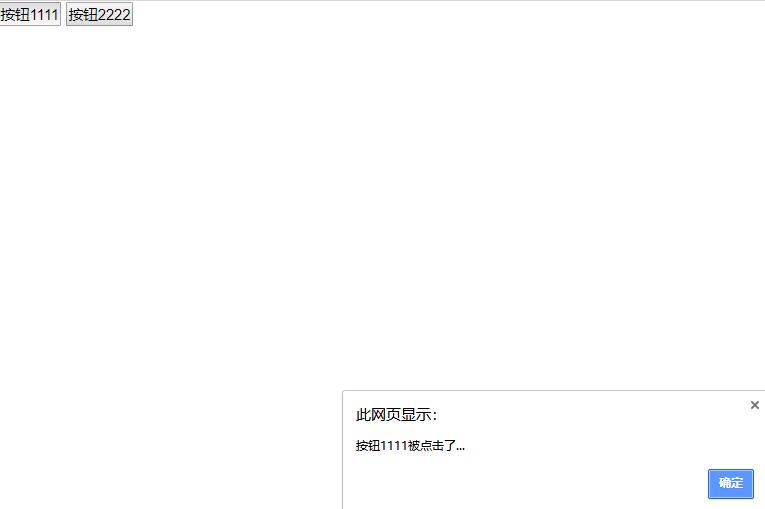
<input type="button" value="Button 1111" />
-
<input type="button" value="Button 2222" />
-
</body>
js code:
-
<script src=
"../js/jquery-3.3.1.min.js"></script>
-
<script>
-
// jquery entry function:
-
$(
function () {
-
-
// JS code binds events for two buttons (JS code cannot bind as a whole)
-
// Document. In JS GetElementsByTagName this method returns an array. Only the corresponding element can be bound
-
var inputs =
document.getElementsByTagName(
"input");
-
inputs[
0].onclick =
function () {
-
alert(
"Button 1111 was clicked...");
-
}
-
-
inputs[
1].onclick =
function () {
-
alert(
"Button 2222 was clicked...");
-
}
-
});
-
</script>
jQuery Code:
A. JQuery overall operation binding
-
<script src=
"../js/jquery-3.3.1.min.js"></script>
-
<script>
-
// jquery entry function:
-
$(
function () {
-
-
// jquery writing:
-
$(
"input").click(
function () {
-
alert(
"The button was clicked...");
-
});
-
});
-
</script>
B. A single tag implements event binding
-
<script src=
"../js/jquery-3.3.1.min.js"></script>
-
<script>
-
// jquery entry function:
-
$(
function () {
-
-
// jquery writing:
-
$(
"input").eq(
0).click(
function () {
-
alert(
"Button 1111 was clicked...");
-
});
-
-
$(
"input").eq(
1).click(
function () {
-
alert(
"Button 2222 was clicked...");
-
});
-
});
-
</script>
5. Object rotation
explain:
Although jquery is essentially js, the properties and methods of jquery must ensure that the objects are obtained through jquery, the objects obtained by js are js objects, and the objects obtained by jquery are jquery objects. If you want to use them interchangeably, you must rotate the objects to each other.
Format:
-
js Object to jq Object: $(js object)
-
jq Object to js Object: jq object[Indexes] or jq object.get(Indexes)
demonstration:
html code:
-
<body>
-
<input type="button" value="Button" id="btn" />
-
</body>
js to jQuery object
-
<script src=
"../js/jquery-3.3.1.min.js"></script>
-
<script>
-
// jquery entry function:
-
$(
function () {
-
-
// JS object to jquery object
-
var btn =
document.getElementById(
"btn");
-
// JS object calls jquery method (not working)
-
/*btn.click(function () {
-
alert("The button was clicked ");
-
});*/
-
-
// Requirement: convert JS object into jquery object Just give me some money
-
$(btn).click(
function () {
-
alert(
"The button was clicked...");
-
});
-
});
-
</script>
jQuery to js object
-
<script src=
"../js/jquery-3.3.1.min.js"></script>
-
<script>
-
// jquery entry function:
-
$(
function () {
-
-
// jquery object to JS object
-
/*$("#btn").onclick = function () {
-
alert("The button was clicked ");
-
}*/
-
: jq object[Indexes] or jq object.get(Indexes)
-
// Method 1: [subscript]
-
/*$("#btn")[0].onclick = function () {
-
alert("The button was clicked ");
-
}*/
-
-
// Method 2: get (subscript)
-
$(
"#btn").get(
0).onclick =
function () {
-
alert(
"The button was clicked...");
-
}
-
});
-
</script>
6. Control css
6.1. Single attribute access:
jq object.css('width');
6.2. Single attribute modification:
jq object.css('width','100px');
6.3. Multi attribute modification:
-
jq object.css({
'width':
'100px',
'height':
'100px'});
-
You can modify more than one at a time css attribute
demonstration:
html code:
-
<body>
-
<div id="box">
</div>
-
</body>
js code:
-
<script src=
"../js/jquery-3.3.1.min.js"></script>
-
<script>
-
$(
function () {
-
-
// JS control style: Style
-
var box =
document.getElementById(
"box");
-
-
box.style.width =
"100px";
-
box.style.height =
"100px";
-
box.style.backgroundColor =
"pink";
-
});
-
</script>
jQuery Code:
-
<script src="../js/jquery-3.3.1.min.js">
</script>
-
<script>
-
$(
function () {
-
-
// jquery control style: css
-
$(
"#box").css({
-
width:
"100px",
-
height:
"100px",
-
backgroundColor:
"skyblue"
-
});
-
-
// Single attribute:
-
$(
"#box").css(
"backgroundColor",
"red");
-
});
-
</script>

7. Control label properties
7.1. Single attribute access:
jq object.attr('class');
7.2. Single attribute modification:
jq object.attr('class ','myClass');
7.3. Multi attribute modification:
-
jq object.attr({
'class':
'myClass',
'id':
'myId'});
-
You can modify more than one at a time attr attribute
demonstration:
html code:
-
<body>
-
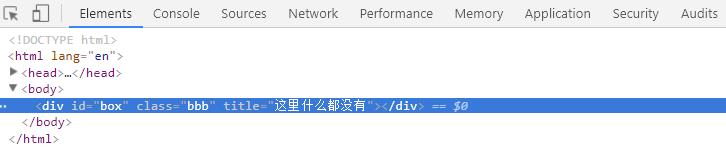
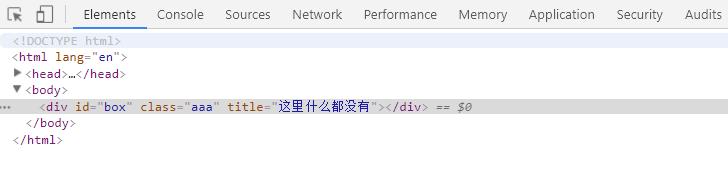
<div id="box" class="test" title="bbb">
</div>
-
</body>
js code: view in browser F12 / developer mode
-
<script src=
"../js/jquery-3.3.1.min.js"></script>
-
<script>
-
$(
function () {
-
-
// Requirement: modify the class and title attribute values of the box tag
-
var box =
document.getElementById(
"box");
-
-
box.className =
"bbb";
-
box.title =
"There's nothing here";
-
});
-
</script>
jQuery Code:
-
<script src=
"../js/jquery-3.3.1.min.js"></script>
-
<script>
-
$(
function () {
-
-
// Requirement: modify the class and title attribute values of the box tag
-
$(
"#box").attr(
"class",
"aaa");
-
$(
"#box").attr(
"title",
"There's nothing here");
-
});
-
</script>
7.4. Delete attribute:
jq object.removeAttr('class ');
demonstration:
html code:
-
<body>
-
<input type="checkbox" id="ck">
-
<input type="button" value="Click" id="btn">
-
</body>
jQuery Code:
-
<script src=
"../js/jquery-3.3.1.min.js"></script>
-
<script>
-
$(
function () {
-
-
// Requirement: click the button to delete the id attribute of the checkbox tag
-
$(
"#btn").click(
function () {
-
$(
"#ck").removeAttr(
"id");
-
});
-
-
});
-
</script>

be careful:
We can also use prop() to obtain attributes, which is complementary to attr(). Generally speaking, we use attr() to obtain tag attributes, but sometimes we can't obtain them. At this time, we can use prop() to obtain them, such as the checked attribute of form elements.
jq object.prop();
prop() is used for attributes with both true and false attributes, such as checked, selected or disabled. attr() is used for others
demonstration:
-
<script src=
"../js/jquery-3.3.1.min.js"></script>
-
<script>
-
$(
function () {
-
-
// Requirement: click the click button to view the checked attribute value of the checkbox option box
-
$(
"#btn").click(
function () {
-
// attr can obtain attributes, but the checked attribute of the option box cannot be obtained
-
var result = $(
"#ck").attr(
"checked");
-
alert(
"result = " + result);
-
-
// Abbreviation for prop attribute
-
result = $(
"#ck").prop(
"checked");
-
alert(
"result = " + result);
-
});
-
});
-
</script>


8. Case 1: whether to accept the agreement
The picture is shown below:
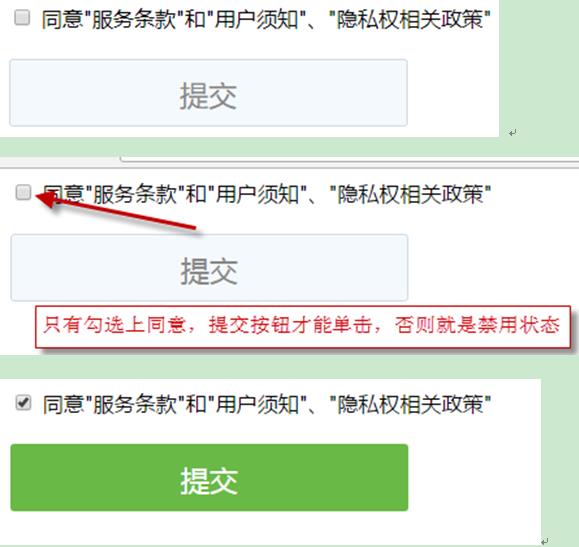
8.1 Description:
-
The button itself is disabled Disabled status
-
When the check box is checked, the button becomes enabled, and then the style changes
-
Button style changes have been made through a specific
class The name is written in style, as long as you check the button class You can modify the name
8.2. Demonstration:
html code:
-
<!DOCTYPE html>
-
<html>
-
<head>
-
<meta charset="UTF-8">
-
<title>
</title>
-
<style type="text/css">
-
/*input The label contains the class name of submit*/
-
input
.submit {
-
background:
#69b946;
-
display: inline-block;
-
height:
52px;
-
width:
306px;
-
text-align: center;
-
cursor: pointer;
-
font:
22px/
52px
"Microsoft YaHei ";
-
color:
#fff;
-
border-radius:
3px;
-
border-style: solid;
-
border-width:
1px;
-
border-color: transparent;
-
}
-
-
input
.disabled {
-
background:
#f4f9fd;
-
color:
#888;
-
cursor: default;
-
border-color:
#d0dae3;
-
cursor: default;
-
outline: none;
-
}
-
</style>
-
</head>
-
<body>
-
<form action="https://www.baidu.com">
-
<input id="kuang" type="checkbox" />
-
<label for="kuang">agree"Terms of service"and"User instructions","Privacy related policies"
</label>
-
<br />
-
<br />
-
<input type="submit" disabled="disabled" class="submit disabled" id="btn" />
-
</form>
-
</body>
-
</html>
jQuery Code:
-
<script src="../js/jquery-3.3.1.min.js">
</script>
-
<script>
-
$(
function () {
-
// 1. Get the option box and bind the click event
-
$(
"#kuang").click(
function () {
-
-
// 2. Get the status of the option box
-
// var checked = $("#kuang").attr("checked"); it won 't work
-
var checked = $(
"#kuang").prop(
"checked");
-
// alert("checked = " + checked);
-
-
// 3. Judgment
-
if (checked ==
true) {
-
-
// Modify the attribute value of btn submit button`
-
$(
"#btn").attr({
-
"disabled" :
false,
-
class:
"submit"
-
});
-
}
else {
-
$(
"#btn").attr({
-
"disabled" :
true,
-
class:
"submit disabled"
-
});
-
}
-
});
-
})
-
</script>
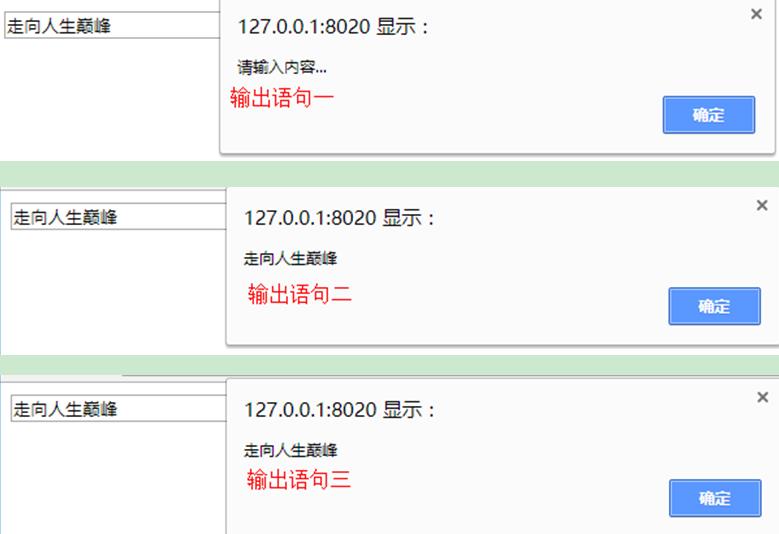
9. val() function
For the value of the value attribute of the form element, a method is separately encapsulated in jq, which cannot be obtained correctly by using attr().
Format:
jq object.val();
Note: when the val() function has parameters, modify the value value; When there is no parameter, the value value is returned.
demonstration:
html code:
-
<body>
-
<input type="text" id="text" value="Please enter the content..." />
-
<input type="button" value="Click" id="btn" />
-
</body>
js code:
-
<script src=
"../js/jquery-3.3.1.min.js"></script>
-
<script>
-
$(
function () {
-
-
// Requirement: click the btn button to obtain the value in the text box
-
// JS mode:
-
var btn =
document.getElementById(
"btn");
-
var text =
document.getElementById(
"text");
-
btn.onclick =
function () {
-
var value = text.value;
-
alert(
"value = " + value);
-
}
-
});
-
</script>
jQuery Code:
-
<script src=
"../js/jquery-3.3.1.min.js"></script>
-
<script>
-
$(
function () {
-
-
// Requirement: click the btn button to obtain the value in the text box
-
// jquery get properties
-
$(
"#btn").click(
function () {
-
-
// Method 1: attr doesn't work
-
var value = $(
"#text").attr(
"value");
-
alert(value);
-
-
// Mode 2: prop insurance, safety
-
value = $(
"#text").prop(
"value");
-
alert(value);
-
-
// Method 3: val();
-
value = $(
"#text").val();
-
alert(value);
-
});
-
});
-
</script>
10. Case 2: online search box
10.1 Description:
-
1. When the text input box gets the focus, the default text inside is cleared. When the focus is lost, the text inside will come back.
-
2. When there is content entered by the user, the text cannot be cleared when obtaining the focus. You can't restore text even if you lose focus.
10.2. Demonstration:
html code:
-
<!DOCTYPE html>
-
<html>
-
<head>
-
<meta charset="UTF-8">
-
<title>
</title>
-
<style type="text/css">
-
* {
-
margin:
0;
-
padding:
0;
-
border:
0;
-
list-style: none;
-
}
-
-
.box {
-
height:
40px;
-
width:
258px;
-
margin:
100px auto
0;
-
}
-
-
.box
input {
-
float: left;
-
width:
210px;
-
padding-left:
6px;
-
height:
40px;
-
background:
url(../img/left.jpg);
-
color:
#ccc;
-
}
-
-
.box
button {
-
float: right;
-
width:
42px;
-
height:
40px;
-
background:
url(../img/right.jpg);
-
}
-
-
</style>
-
</head>
-
<body>
-
<div class="box">
-
<input type="text" value="Please enter text..." />
-
<button>
</button>
-
</div>
-
</body>
-
</html>
jQuery implementation method 1:
-
<script src="../js/jquery-3.3.1.min.js">
</script>
-
<script>
-
$(
function () {
-
-
// Requirement: bind the focus event for the input tag
-
$(
"input").focus(
function () {
-
// 1. Get the value of the input tag
-
var value = $(
"input").val();
-
// alert(value);
-
-
// 2. Judgment
-
if (value ==
"Please enter text...") {
-
// 3. Clear the text and set the style at the same time
-
$(
"input").val(
"").css(
"color",
"black");
-
}
-
});
-
-
// Requirement: bind blur focus event for input tag
-
$(
"input").blur(
function () {
-
if ($(
"input").val() ==
"") {
-
$(
"input").val(
"Please enter text...").css(
"color",
"gray");
-
}
-
});
-
})
-
</script>
jquery implementation mode 2:
-
<script src="../js/jquery-3.3.1.min.js">
</script>
-
<script>
-
$(
function () {
-
-
// Requirement: bind focus and defocus events for the input tag
-
$(
"input").focus(
function () {
-
// 1. Get the value of the input tag
-
var value = $(
"input").val();
-
// alert(value);
-
-
// 2. Judgment
-
if (value ==
"Please enter text...") {
-
// 3. Clear the text and set the style at the same time
-
$(
"input").val(
"").css(
"color",
"black");
-
}
-
}).blur(
function () {
-
if ($(
"input").val() ==
"") {
-
$(
"input").val(
"Please enter text...").css(
"color",
"gray");
-
}
-
});
-
})
-
</script>

11. Control label content
-
jq object
.html();
-
Write parameters in parentheses to represent modification, and do not write to represent acquisition.
demonstration:
-
<body>
-
<div id="box">
</div>
-
</body>
js code:
-
<script src="../js/jquery-3.3.1.min.js">
</script>
-
<script>
-
$(
function () {
-
// 1. Get box container
-
document.getElementById(
"box").innerHTML =
"<h1>Hello, JS.</h1>";
-
})
-
</script>
JQuery Code:
-
<script src="../js/jquery-3.3.1.min.js">
</script>
-
<script>
-
$(
function () {
-
// 1. Get box container
-
$(
"#box").html(
"<h1>Hello, world!</h1>");
-
})
-
</script>
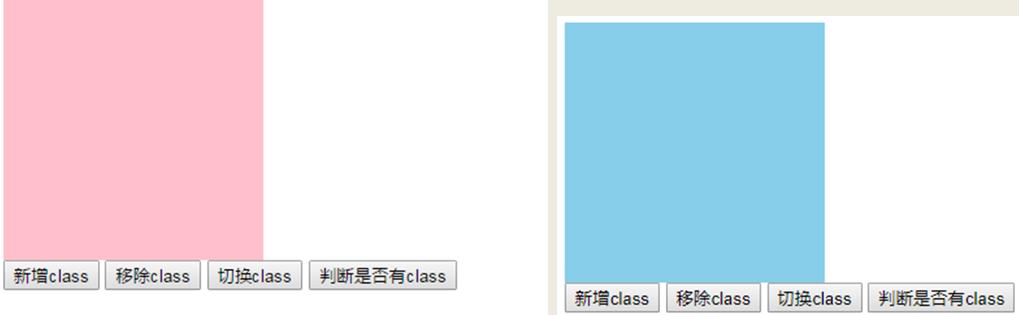
12. Control class
-
Jq object.addClass() Add class
-
Jq object.removeClass() Delete class
-
Jq object.hasClass() Determine whether there are classes
-
Jq object.toggleClass() Switch class
demonstration:
html code:
-
<!DOCTYPE html>
-
<html>
-
<head>
-
<meta charset="utf-8" />
-
<title>
</title>
-
<style>
-
.box{
-
width:
200px;
-
height:
200px;
-
background: pink;
-
}
-
.bgcolor{
-
background: skyblue;
-
}
-
</style>
-
</head>
-
<body>
-
<div class="box">
</div>
-
<input type="button" value="newly added class" />
-
<input type="button" value="remove class" />
-
<input type="button" value="switch class" />
-
<input type="button" value="Judge whether there is class" />
-
</body>
-
</html>
jQuery Code:
-
<script src=
"../js/jquery-3.3.1.min.js"></script>
-
<script>
-
$(
function () {
-
var inputs = $(
"input");
-
-
// Add class
-
inputs.eq(
0).click(
function () {
-
$(
".box").addClass(
"bgcolor");
-
});
-
-
// Remove class
-
inputs.eq(
1).click(
function () {
-
$(
".box").removeClass(
"bgcolor");
-
});
-
-
// Switch class
-
inputs.eq(
2).click(
function () {
-
$(
".box").toggleClass(
"bgcolor");
-
});
-
-
// Determine whether class exists
-
inputs.eq(
3).click(
function () {
-
var result = $(
".box").hasClass(
"bgcolor");
-
alert(
"result = " + result);
-
});
-
});
-
</script>