An event is an action of a user, and event handling is a function that handles that action.In this section, let's look at event handling in JS.
Article Directory
Three ways to add event handling
Events are NOUN strings, such as click, and event handling is a function, starting with on, such as on click.
Add in line
for example
<button type="button" onclick="change1()">Boom!</button>
Click this button here to execute the change1 function defined in JS.The disadvantage of this approach is that the code for html and JS is not decoupled, so it is not recommended.
Label Attribute Add
for example
var box=document.getElementById('box');
box.onclick=()=>{
	box.style.backgroundColor='yellow';
}
Assign a function to the onclick attribute of an element and click to execute it.This addition has decoupled the html and js code, but its disadvantage is that event handling after multiple settings overrides the previous one.
for example
box.onclick=()=>{
	alert("'hey, what's up?");
}
box.onclick=()=>{
	alert('hey, WTF?');
}
Click to display only the following hey, WTF?.
If you want to clear event handling, assign null, for example
box.onclick=null;
Add Event Listening
for example
function f(){
	this.style.backgroundColor='blue';
}
box.addEventListener('click',f,false);
An event listener is added to the box element. The first two parameters are the event, the handler, and the third parameter is the event stream, with false first.Processing functions are defined separately here, rather than anonymous functions, to facilitate subsequent cleanup operations.
Notice that the keyword this, in most cases, points to the window itself, but executes the tag element of the event in the event handler.
What's odd is that when I use anonymous functions as event handlers, this points to window, which is a bit confusing
This way of adding multiple events will not be overwritten compared to the tag properties above, which is recommended.
If you want to clear event handling, use the following method
box.removeEventListener('click',f,false);
The parameters are consistent with the three above parameters.
Next, use this last method to learn about several common events.
Focus Events
Focus and defocus events are for input tags, for example, for text input boxes, when the mouse clicks on the text box, the cursor is focused when it flashes, and when the mouse clicks elsewhere, the cursor disappears, the cursor is defocused.
<!DOCTYPE html>
<html>
	<head>
		<meta charset="utf-8" />
		<script src="js/test.js" type="text/javascript" charset="utf-8"></script>
		<title></title>
	</head>
	<style type="text/css">
		* {
			margin: 0;
			padding: 0;
		}
		p {
			visibility: hidden;
		}
	</style>
	<body>
	<input type="text" name="info" id="info" value="" /><p>Surprise!</p>
	<script type="text/javascript">
		var input=document.getElementById('info');
		var p=document.getElementsByTagName('p')[0];

		input.addEventListener('focus',()=>{
			p.style.visibility='visible';
		},false);
		input.addEventListener('blur',()=>{
			p.style.visibility='hidden';
		},false);
	</script>
	</body>
</html>
Here is a text input box followed by a p tag.The content of the P-Label is displayed when the text input box gets focus, and hidden when the text input box loses focus.This scenario is a bit like a web form's content prompt.
Click and double click events
We've already used click events before. Double-click events simply change events to dblclick.
But now there is a problem that if a picture exists with both a click event and a double-click event, double-clicking also triggers two click events.This problem can be solved by using a delay timer in the following ways.
<!DOCTYPE html>
<html>
	<head>
		<meta charset="utf-8" />
		<script src="js/test.js" type="text/javascript" charset="utf-8"></script>
		<title></title>
	</head>
	<style type="text/css">
		* {
			margin: 0;
			padding: 0;
		}

	</style>
	<body>
	<p>Click me!</p>
	<script type="text/javascript">
		var p=document.getElementsByTagName('p')[0];
		var timer;
		p.addEventListener('click',()=>{
			window.clearTimeout(timer);
			timer=window.setTimeout(()=>{
				console.log('One');
			},500);
		},false);
		p.addEventListener('dblclick',()=>{
			window.clearTimeout(timer);
			console.log('Two');
		},false);
	</script>
	</body>
</html>
Each click of the event delays execution by 500ms, and either double-click or single-click will clear the timer first.That is, as long as the double-click interval is less than 500 ms, it will only respond to the double-click event, but the disadvantage is that each click delays the response by 500 ms, but has little effect on the human eye.
Mouse events
There are many mouse events, here are four common examples.
<!DOCTYPE html>
<html>
	<head>
		<meta charset="utf-8" />
		<script src="js/test.js" type="text/javascript" charset="utf-8"></script>
		<title></title>
	</head>
	<style type="text/css">
		* {
			margin: 0;
			padding: 0;
		}
		p {
			width: 200px;
		}
	</style>
	<body>
	<p>Mouse Event</p>
	<script type="text/javascript">
		var p=document.getElementsByTagName('p')[0];
		p.addEventListener('mouseenter',()=>{
			p.style.backgroundColor='orangered';
		},false);
		p.addEventListener('mouseout',()=>{
			p.style.backgroundColor='white';
		},false);
		p.addEventListener('mousedown',()=>{
			p.style.fontSize=parseInt(window.getComputedStyle(p,null).fontSize)*2+'px';
		},false);
		p.addEventListener('mouseup',()=>{
			p.style.fontSize=parseInt(window.getComputedStyle(p,null).fontSize)/2+'px';
		},false);
	</script>
	</body>
</html>
Mouse moves in, p label background turns red, mouse moves out background recovery.Mouse press font twice larger, release restore.
The problem here is that if the mouse does not release the font on the p tag it cannot be restored
In addition to adding mouse events to specific tags, you can also add document s directly.One extension left here is to make a page where raising the mouse anywhere will show the effect of custom text, and I'll share my own code in the next section.
Keyboard events
Keyboard events are usually added to document s.
<!DOCTYPE html>
<html>
	<head>
		<meta charset="utf-8" />
		<script src="js/test.js" type="text/javascript" charset="utf-8"></script>
		<title></title>
	</head>
	<style type="text/css">
		* {
			margin: 0;
			padding: 0;
		}
	</style>
	<body>
	<script type="text/javascript">
		document.addEventListener('keydown',(e)=>{
			var event = e || window.event;
			console.log(event);
		},false);
	</script>
	</body>
</html>
There are three events: keydown, keyup and keypress. The first two are for all keys, while the third only supports character keys.
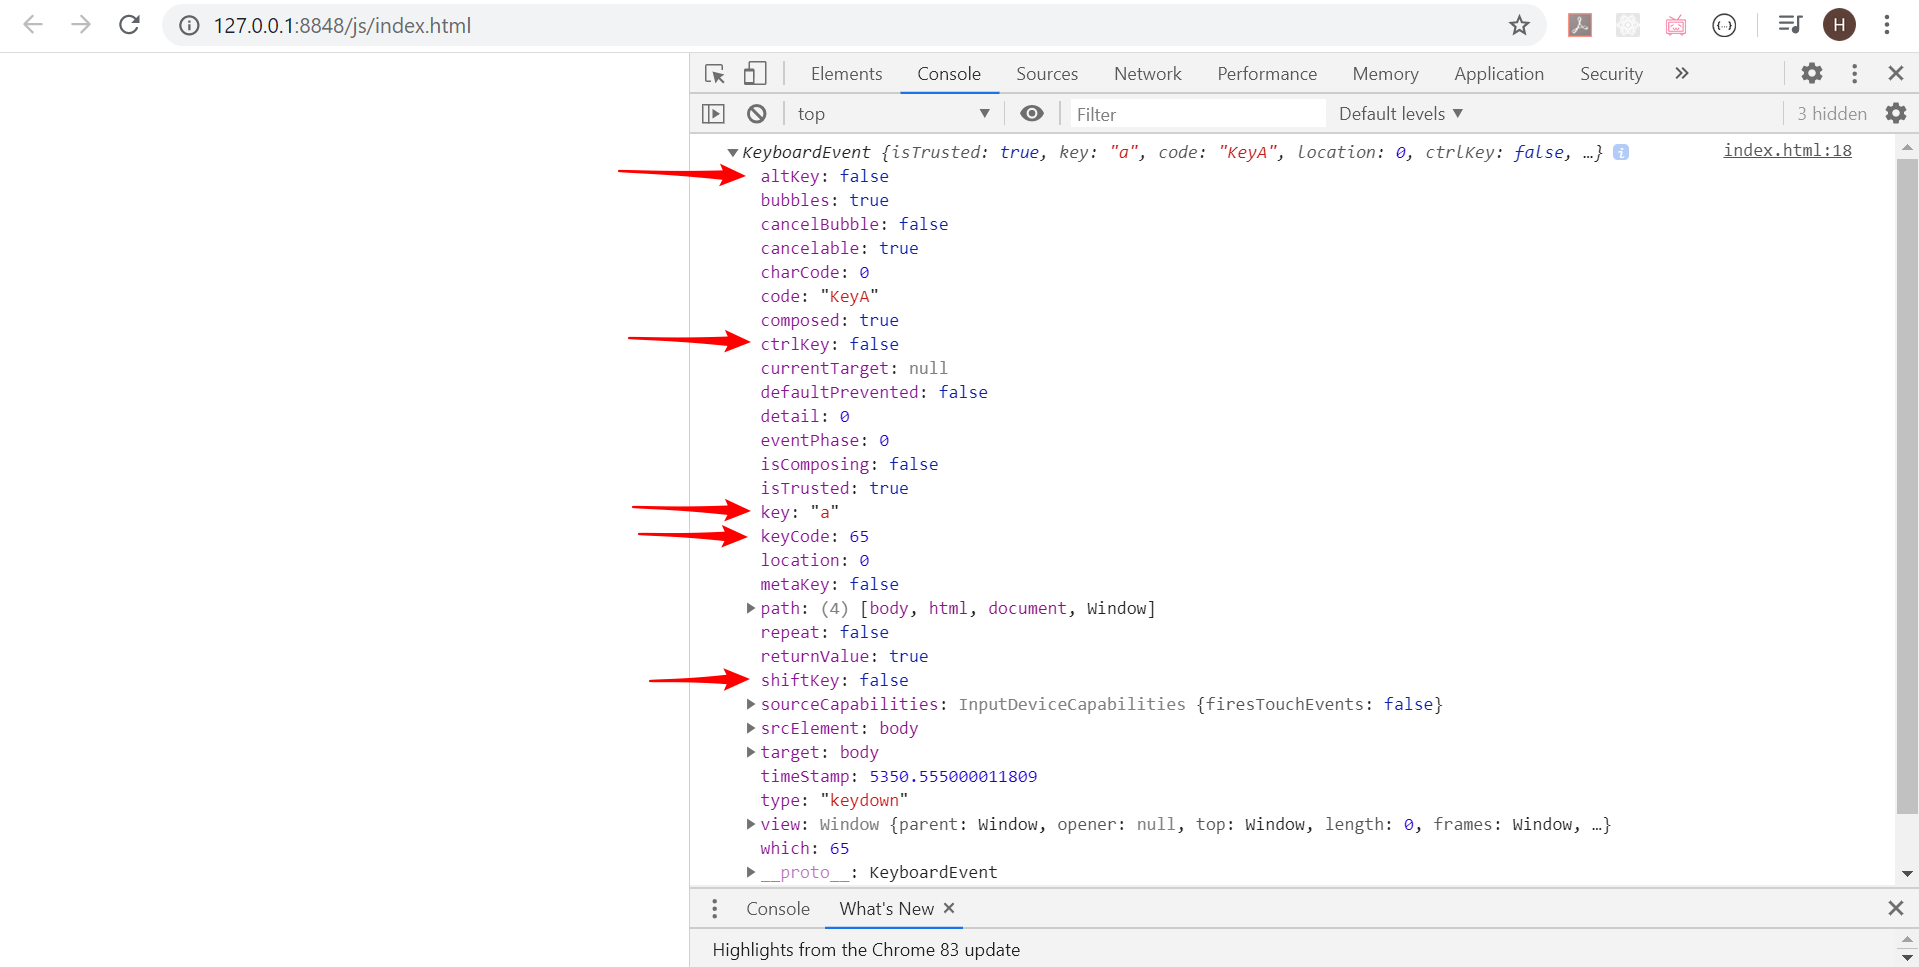
If you press a at this time, the following will be printed

The arrows are the fields where we compare the relationships. For example, if you hold down Ctrl+a, ctrlKey will be true.
The following code achieves the effect of four buttons to control the movement of text in the browser
<!DOCTYPE html>
<html>
	<head>
		<meta charset="utf-8" />
		<script src="js/test.js" type="text/javascript" charset="utf-8"></script>
		<title></title>
	</head>
	<style type="text/css">
		* {
			margin: 0;
			padding: 0;
		}
		p {
			width: 100px;
			position: relative;
		}
	</style>
	<body>
	<p>Move me!</p>
	<script type="text/javascript">
		document.addEventListener('keydown',(e)=>{
			var event = e || window.event;
			var delta_x = 1;
			var delta_y = 1;
			var unit = 10;
			var p = document.getElementsByTagName('p')[0];
			var left = window.getComputedStyle(p,null).left;
			var top = window.getComputedStyle(p,null).top;
			switch(event.keyCode){
				case 37:
				delta_x=-1;
				delta_y=0;
				break;
				case 38:
				delta_x=0;
				delta_y=-1;
				break;
				case 39:
				delta_x=1;
				delta_y=0;
				break;
				case 40:
				delta_x=0;
				delta_y=1;
				break;
				default:
				delta_x=0;
				delta_y=0;
				break;
			}
			p.style.left=parseInt(left)+delta_x*unit+'px';
			p.style.top=parseInt(top)+delta_y*unit+'px';
		},false);
	</script>
	</body>
</html>
You just need to remember the keyCode number of the keys to make a judgement, which is made using the switch...case statement.
Note, however, that the disadvantage of this code is that it can't respond to two keystrokes simultaneously, and the improved version will be shared in a later blog.
Evet event of mouse
The event handler for the keyboard takes a parameter e, but the event handler for the mouse does the same thing
<!DOCTYPE html>
<html>
	<head>
		<meta charset="utf-8" />
		<script src="js/test.js" type="text/javascript" charset="utf-8"></script>
		<title></title>
	</head>
	<style type="text/css">
		* {
			margin: 0;
			padding: 0;
		}
		#box {
			width: 100px;
			height: 100px;
			background-color: red;
			position: relative;
			left: 20px;
			top: 20px;
		}
	</style>
	<body>
	<div id="box">

	</div>
	<script type="text/javascript">
		var box=document.getElementById('box');
		box.addEventListener('click',(e)=>{
			var ev = e || window.event;
			console.log(ev);
		},false);
	</script>
	</body>
</html>
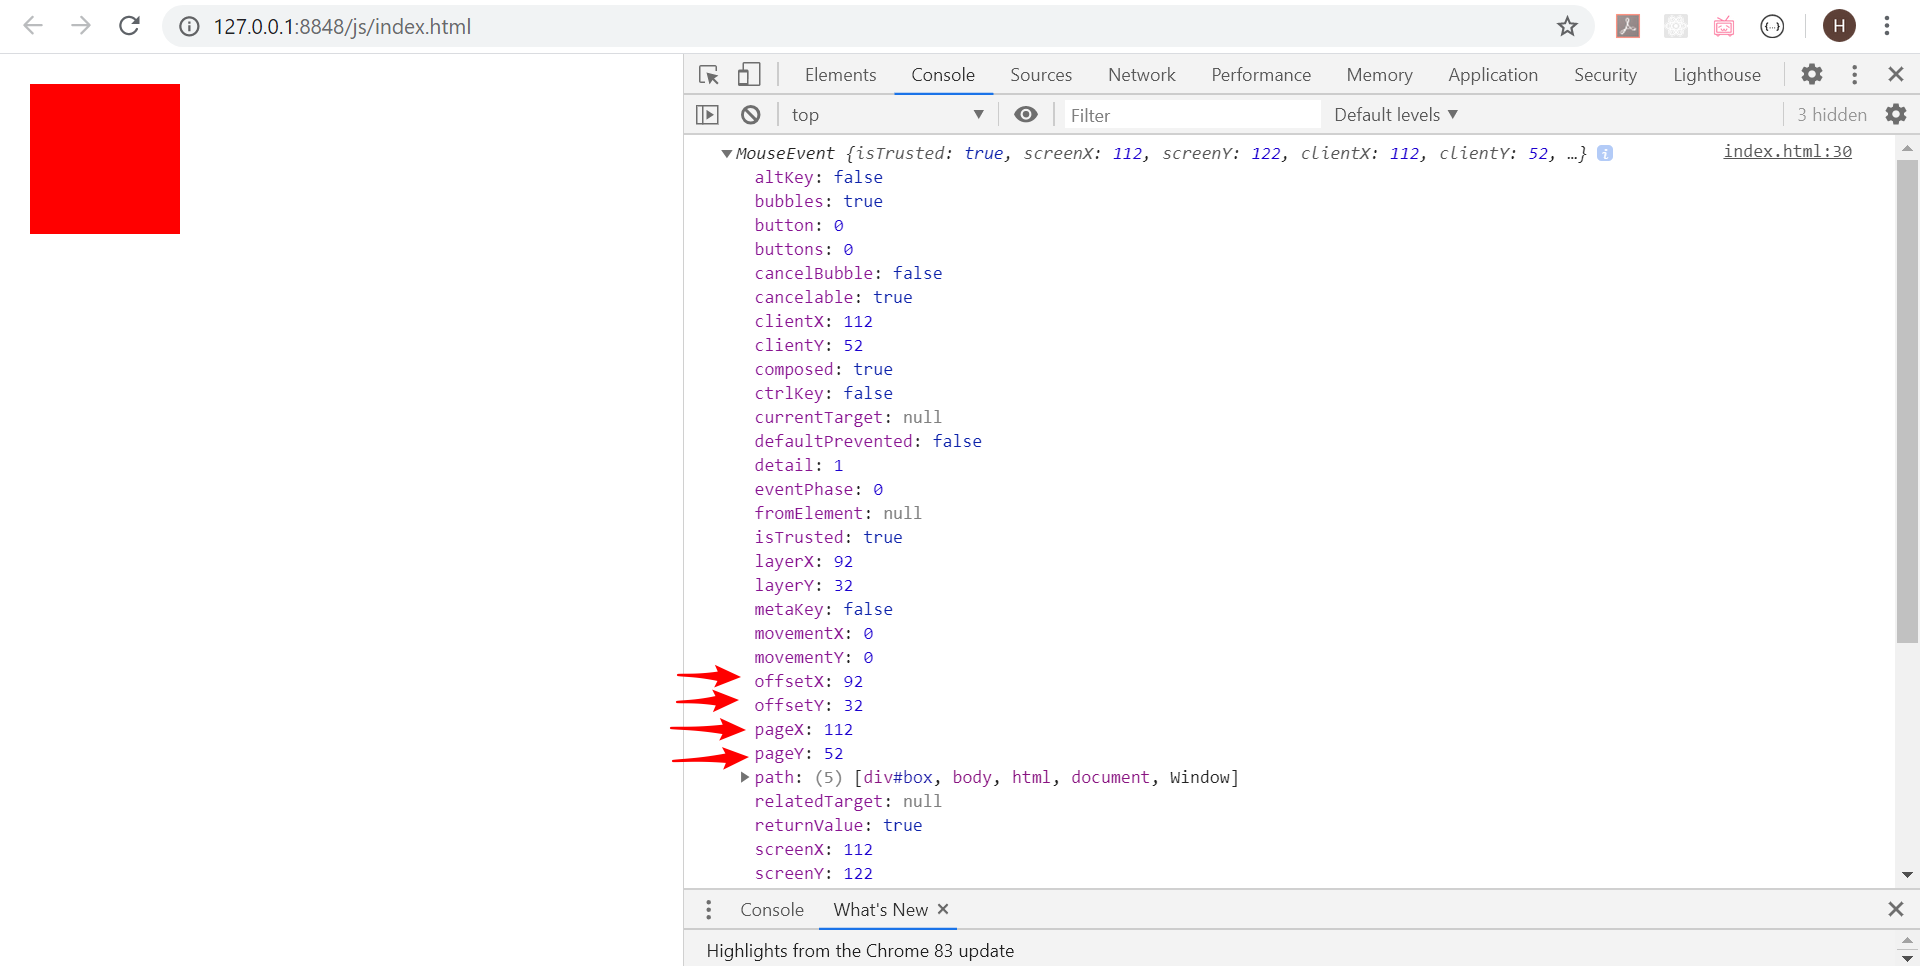
Clicking on the edge of the red box near the right will print the following

Four of the fields at the arrow need to be noted that offsetX and offsetY are distances from the element's border, while pageX and pageY are distances from the page's border.The latter is more common, such as achieving element drag effects.
Event Flow
The flow of events comes from an argument in the scenario below.
Suppose there are three divs, one div2 in div1, one div3 in div2, and each has its own click event.So what is the order in which the three events are triggered when the mouse clicks on the innermost div3?
Some browsers are triggered from the outside to the inside, while others are from the inside to the outside, resulting in disharmony.Finally, after negotiation, the scenario is divided into three phases, as follows
- Event Capture Phase - Outer-to-Inner Order
- In target phase
- Event Bubble Phase - Order from Inside to Outside
There is a third parameter in the addEventListener method, if true means capture phase response events, that is, div1 to div3 responds in turn, if false means bubble phase response events, that is, div3 to div1 responds in turn.
Usually set to false to respond to events during the bubble phase.
Prevent bubbles
At this point there is demand, and most of the time I click on an element inside, I don't want the external element to follow.This is when you can break the process while bubbling.
<!DOCTYPE html>
<html>
	<head>
		<meta charset="utf-8" />
		<script src="js/test.js" type="text/javascript" charset="utf-8"></script>
		<title></title>
	</head>
	<style type="text/css">
		* {
			margin: 0;
			padding: 0;
		}
		#box {
			width: 100px;
			height: 100px;
			background-color: red;
		}
	</style>
	<body>
	<div id="box">
	</div>
	<script type="text/javascript">
		var box = document.getElementById('box');
		var body = document.getElementsByTagName('body')[0];
		box.addEventListener('click',(e)=>{
			var ev = e || window.event;
			box.style.backgroundColor='yellow';
			ev.stopPropagation();
		},false);
		body.addEventListener('click',()=>{
			body.style.backgroundColor='yellow';
		},false);
	</script>
	</body>
</html>
Here, the bubbles are pinched by executing the stopPropagation method on the box's event so that the body does not turn yellow after clicking on the box.
Note that blocking bubbles needs to be done in the click event of all the inner elements of the outer element, otherwise clicking on other inner elements or triggering the click event of the outer element
Prevent default behavior
Sometimes you don't want the default behavior of an element to happen, such as a tag's click-jump behavior, so you can stop the default jump behavior in a tag's click event.
For example, the following effect is to ask a question before jumping, jump to Baidu if you are sure, or cancel the jump if you are not sure.
<!DOCTYPE html>
<html>
	<head>
		<meta charset="utf-8" />
		<script src="js/test.js" type="text/javascript" charset="utf-8"></script>
		<title></title>
	</head>
	<style type="text/css">
		* {
			margin: 0;
			padding: 0;
		}
	</style>
	<body>
	<a href="https://www.baidu.com" id="link">Click me!</a>
	<script type="text/javascript">
		var link = document.getElementById('link');
		link.addEventListener('click',(e)=>{
			var ev = e || window.event;
			var answer = window.confirm('Are you sure?');
			if (!answer){
				ev.preventDefault();
			}
		},false);

	</script>
	</body>
</html>
I am a T-type person Xiao Pay, an Internet practitioner who insists on lifelong learning.Like my blog, welcome to follow me on csdn. If you have questions, welcome to the comments section below. Thank you.