JSP
Today's goal:
- Understand JSP and its principle
- Able to use EL expressions and JSTL tags in JSP
- Understand MVC pattern and three-tier architecture
- It can complete the function of adding, deleting, modifying and querying brand data
1. JSP overview
==jsp (full name: Java Server Pages): Java server page== It is a dynamic web page technology, which can define not only static content such as HTML, JS and CSS, but also dynamic content of Java code, that is, JSP = HTML + Java. The following is the jsp code
<html>
    <head>
        <title>Title</title>
    </head>
    <body>
        <h1>JSP,Hello World</h1>
        <%
        	System.out.println("hello,jsp~");
        %>
    </body>
</html>
The content of the above code h1 tag is displayed on the page, and the Java output statement is output on the idea console.
So, what can JSP do? Now we only use servlet s to realize functions and see what problems exist. As shown in the figure below, when we log in successfully, we need to display the user name on the page

The user name in the figure above is a dynamic display, that is, the user name of whoever logs in will be displayed. How do you implement it with only servlets? A LoginServlet has been provided in today's materials, which realizes this function. Now we will use the LoginServlet in the materials Copy java to the request demo project to demonstrate. Next, start the server and visit the login page
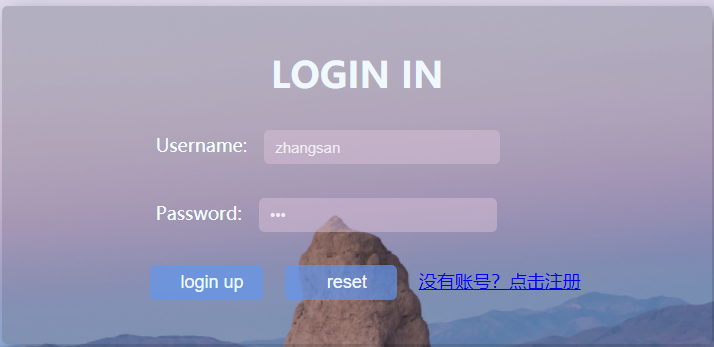
After inputting the login information of zhangsan user, click the login button to see the effect as shown in the figure below

Of course, if it is lisi login, what is displayed on this page is lisi. Welcome, and the dynamic display effect will be realized. So how to implement LoginServlet? Let's take a look at its contents
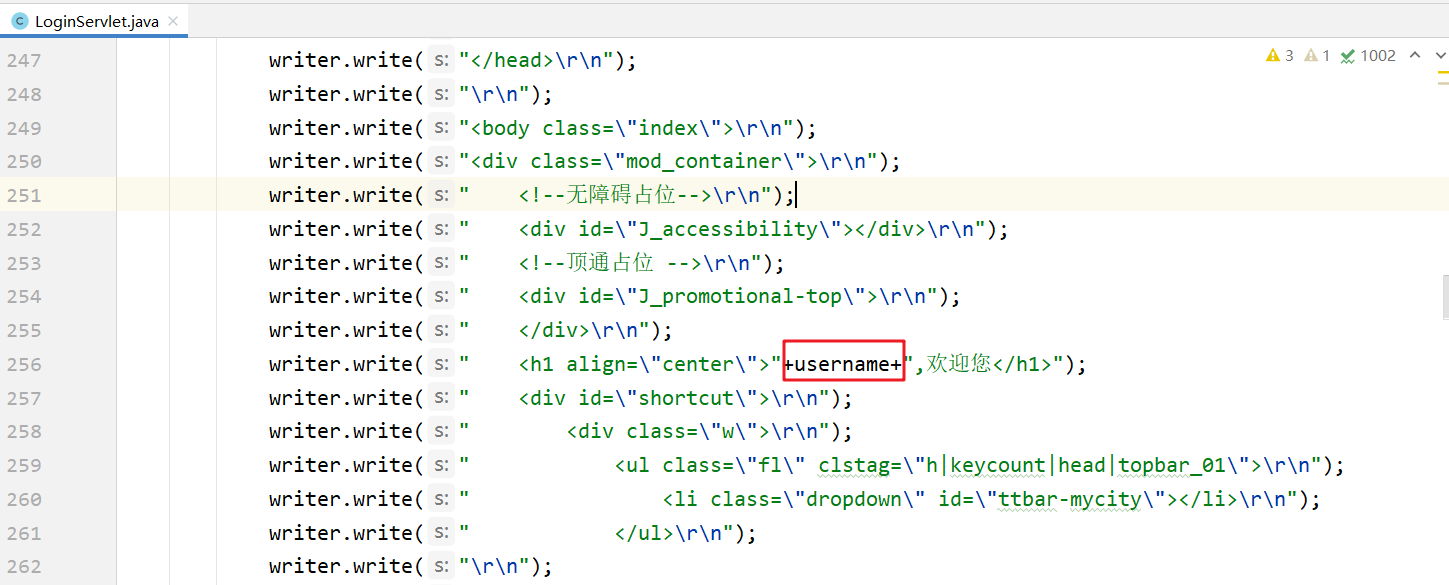
The above code uses a lot of writer objects to write label content to the page, which makes our code very troublesome; In the future, if there is a problem with the display effect, the troubleshooting will be a little weak. How does JSP solve this problem? A login is also provided in the data JSP page, which can also realize this function. Now copy this page to the webapp of the project, and you need to modify login The path of form data submission in html is shown in the figure below

Restart the server and test it. It is found that the same function can be realized. So login How is JSP implemented? Let's take a look at login Jsp code

From the above code, you can see that there are basically HTML tags, and the dynamic data is displayed in Java code; This operation looks much more comfortable than using servlet s.
JSP function: simplify development and avoid directly outputting HTML tags in Servlet.
2. JSP quick start
Next, let's do a simple quick start code.
2.1 construction environment
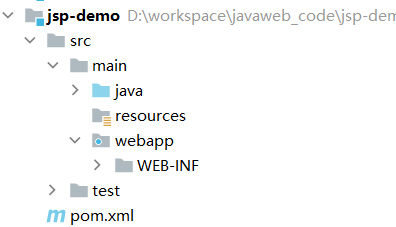
Create a maven web project. The project structure is as follows:
pom. The contents of the XML file are as follows:
<?xml version="1.0" encoding="UTF-8"?>
<project xmlns="http://maven.apache.org/POM/4.0.0"
         xmlns:xsi="http://www.w3.org/2001/XMLSchema-instance"
         xsi:schemaLocation="http://maven.apache.org/POM/4.0.0 http://maven.apache.org/xsd/maven-4.0.0.xsd">
    <modelVersion>4.0.0</modelVersion>

    <groupId>org.example</groupId>
    <artifactId>jsp-demo</artifactId>
    <version>1.0-SNAPSHOT</version>
    <packaging>war</packaging>

    <properties>
        <maven.compiler.source>8</maven.compiler.source>
        <maven.compiler.target>8</maven.compiler.target>
    </properties>

    <dependencies>
      <dependency>
            <groupId>javax.servlet</groupId>
            <artifactId>javax.servlet-api</artifactId>
            <version>3.1.0</version>
            <scope>provided</scope>
        </dependency>
    </dependencies>

    <build>
        <plugins>
            <plugin>
                <groupId>org.apache.tomcat.maven</groupId>
                <artifactId>tomcat7-maven-plugin</artifactId>
                <version>2.2</version>
            </plugin>
        </plugins>
    </build>
</project>
2.2 importing JSP dependencies
Import the dependencies of JSP in the dependencies tag, as follows
<dependency>
    <groupId>javax.servlet.jsp</groupId>
    <artifactId>jsp-api</artifactId>
    <version>2.2</version>
    <scope>provided</scope>
</dependency>
The scope of the dependency must be set to provided, because there is a jar package in tomcat, so we don't want to put the dependency into the war package of our project during packaging.
2.3 creating jsp pages
Create a jsp page under the webapp of the project

Create a file named hello JSP page.
2.4 coding
In hello HTML tags and Java code are written in the JSP page, as follows
<%@ page contentType="text/html;charset=UTF-8" language="java" %>
<html>
<head>
    <title>Title</title>
</head>
<body>
    <h1>hello jsp</h1>

    <%
        System.out.println("hello,jsp~");
    %>
</body>
</html>
2.5 testing
Start the server and enter in the browser address bar http://localhost:8080/jsp-demo/hello.jsp, we can see the following on the page
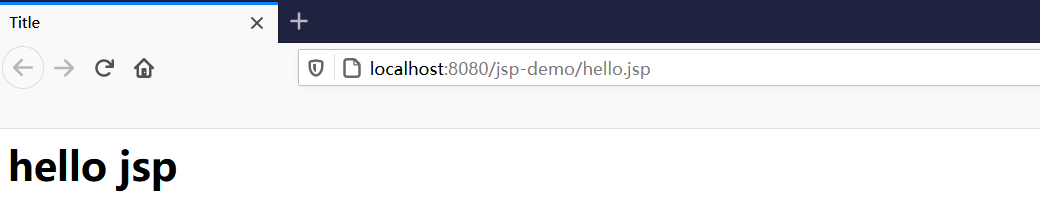
At the same time, you can also see the output Hello and JSP ~ content on the idea console.
3. JSP principle
We said before that JSP is a page, so we can understand writing html tags in JSP, but why can we write Java code?
Because = = jsp is essentially a Servlet== Next, let's talk about the process of accessing jsp
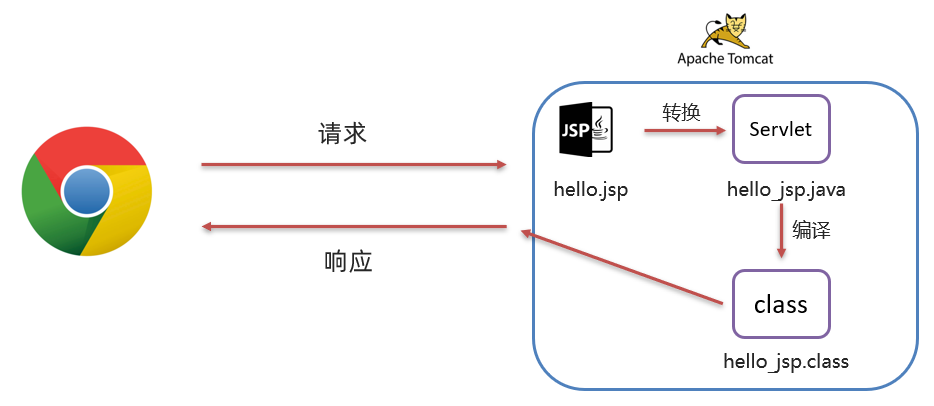
- Browser first visit hello JSP page
- tomcat will send hello JSP is converted to hello_ jsp. A Servlet of Java
- tomcat then compiles the converted servlet into a bytecode file hello_jsp.class
- tomcat will execute the bytecode file to provide external services
We can find the target \ Tomcat \ work \ Tomcat \ localhost \ JSP demo \ ORG \ Apache \ JSP directory in the disk directory where the project is located, and we can see the converted servlet in this directory

Open hello_ jsp. Check the code in the java file

From the inheritance relationship of the above class, we can see that the class named HttpJspBase is inherited. Then we are looking at the inheritance relationship of this class. Find the following directory in the materials: materials \ Tomcat source code \ apache-tomcat-8.5.68-src\java\org\apache\jasper\runtime. Under this directory, there is the HttpJspBase class. Check the inheritance relationship of this class

You can see that this class inherits HttpServlet; So hello_jsp class indirectly inherits HttpServlet, which means hello_jsp is a servlet.
Continue reading hello_jsp class code, you can see that there is a code named_ The method of jspService(), which is automatically executed every time jsp is accessed, is the same as the service method in servlet.
And in_ In the jspService() method, you can see the code for writing tags to the browser:
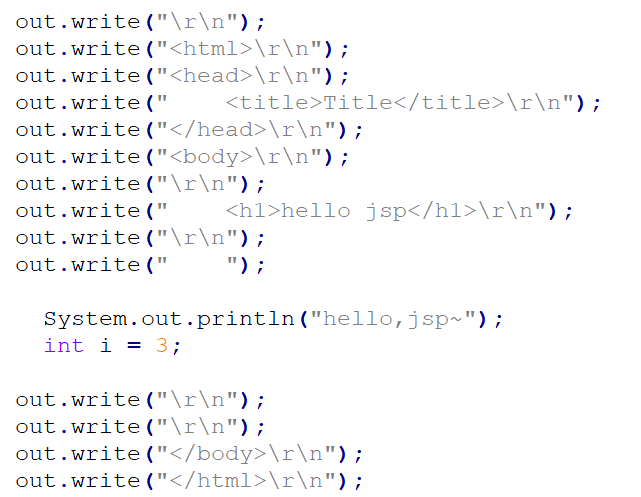
In the past, when we wrote the servlet ourselves, we wrote this part of the code ourselves. Now with jsp, tomcat completes this part of the function.
4. JSP script
JSP scripts are used to define java code within JSP pages. In the previous introductory case, the Java code we defined on the JSP page is the JSP script.
4.1 JSP script classification
JSP scripts have the following three categories:
- <%...% >: the content will be put directly into_ jspService() method
- <% =...% >: the content will be put in out In print(), as out Parameters of print()
- <%!…%>: The content will be put in_ Outside the jspService() method, it is directly contained by the class
Code demonstration:
In hello Writing in JSP
<%
    System.out.println("hello,jsp~");
    int i = 3;
%>
Access hello.com via browser JSP, view the transformed hello_jsp.java file, i variable is defined in_ In the jspService() method

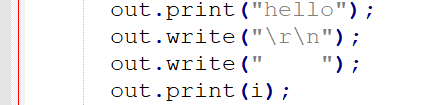
In hello Writing in JSP
<%="hello"%>
<%=i%>
Access hello.com via browser JSP, view the transformed hello_jsp.java file, the contents of the script are placed in out Print() as a parameter
In hello Writing in JSP
<%!
    void  show(){}
	String name = "zhangsan";
%>
Access hello.com via browser JSP, view the transformed hello_jsp.java file, the contents of the script are placed in the member location

4.2 cases
4.2.1 requirements
Using JSP script to display brand data

explain:
- In data \ 1 JSP case material provides brand HTML static page
- In this case, the data is not queried from the database, but written on the JSP page
4.2.2 realization
-
Add data \ 1 Brand. In JSP case material The java file is placed in the project's com itheima. POJO package
-
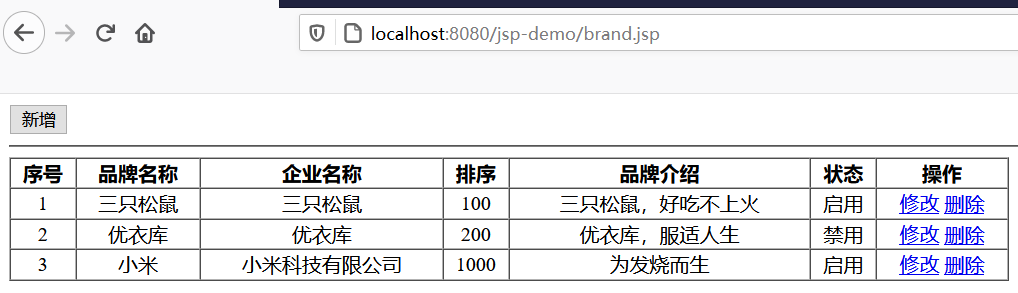
Create a brand in the webapp of the project JSP and put brand Copy the content from the HTML page. brand.jsp contents are as follows
<%@ page contentType="text/html;charset=UTF-8" language="java" %>
<!DOCTYPE html>
<html lang="en">
<head>
    <meta charset="UTF-8">
    <title>Title</title>
</head>
<body>
<input type="button" value="newly added"><br>
<hr>
    <table border="1" cellspacing="0" width="800">
        <tr>
            <th>Serial number</th>
            <th>Brand name</th>
            <th>Enterprise name</th>
            <th>sort</th>
            <th>Brand introduction</th>
            <th>state</th>
            <th>operation</th>

        </tr>
        <tr align="center">
            <td>1</td>
            <td>Three squirrels</td>
            <td>Three squirrels</td>
            <td>100</td>
            <td>Three squirrels, delicious but not hot</td>
            <td>Enable</td>
            <td><a href="#">modify</a> <a href="#"> delete</a></td>
        </tr>

        <tr align="center">
            <td>2</td>
            <td>Uniqlo</td>
            <td>Uniqlo</td>
            <td>10</td>
            <td>UNIQLO suits life</td>
            <td>Disable</td>

            <td><a href="#">modify</a> <a href="#"> delete</a></td>
        </tr>

        <tr align="center">
            <td>3</td>
            <td>millet</td>
            <td>Xiaomi Technology Co., Ltd</td>
            <td>1000</td>
            <td>Born with a fever</td>
            <td>Enable</td>

            <td><a href="#">modify</a> <a href="#"> delete</a></td>
        </tr>
    </table>
</body>
</html>
Now the data in the page is false data.
-
At brand Prepare some data in JSP
<%
    // query data base
    List<Brand> brands = new ArrayList<Brand>();
    brands.add(new Brand(1,"Three squirrels","Three squirrels",100,"Three squirrels, delicious but not hot",1));
    brands.add(new Brand(2,"Uniqlo","Uniqlo",200,"UNIQLO suits life",0));
    brands.add(new Brand(3,"millet","Xiaomi Technology Co., Ltd",1000,"Born with a fever",1));
%>
==Note: = = the classes here need to be guided
-
Brand The data in the table tag in the JSP page is changed to dynamic
<table border="1" cellspacing="0" width="800">
    <tr>
        <th>Serial number</th>
        <th>Brand name</th>
        <th>Enterprise name</th>
        <th>sort</th>
        <th>Brand introduction</th>
        <th>state</th>
        <th>operation</th>

    </tr>

    <%
     for (int i = 0; i < brands.size(); i++) {
         //Gets each Brand object in the collection
         Brand brand = brands.get(i);
     }
    %>
    <tr align="center">
        <td>1</td>
        <td>Three squirrels</td>
        <td>Three squirrels</td>
        <td>100</td>
        <td>Three squirrels, delicious but not hot</td>
        <td>Enable</td>
        <td><a href="#">modify</a> <a href="#"> delete</a></td>
    </tr>
</table>
The above for loop needs to wrap the tr tag, so as to achieve the effect of the loop. The code is improved to
<table border="1" cellspacing="0" width="800">
    <tr>
        <th>Serial number</th>
        <th>Brand name</th>
        <th>Enterprise name</th>
        <th>sort</th>
        <th>Brand introduction</th>
        <th>state</th>
        <th>operation</th>

    </tr>

    <%
     for (int i = 0; i < brands.size(); i++) {
         //Gets each Brand object in the collection
         Brand brand = brands.get(i);
    %>
    	 <tr align="center">
            <td>1</td>
            <td>Three squirrels</td>
            <td>Three squirrels</td>
            <td>100</td>
            <td>Three squirrels, delicious but not hot</td>
            <td>Enable</td>
            <td><a href="#">modify</a> <a href="#"> delete</a></td>
        </tr>
    <%
     }
    %>

</table>
Note: <%% > what is written inside is Java code, while what is written outside is HTML tag
The data in the td tag in the above code needs to be dynamic, so it needs to be improved
<table border="1" cellspacing="0" width="800">
    <tr>
        <th>Serial number</th>
        <th>Brand name</th>
        <th>Enterprise name</th>
        <th>sort</th>
        <th>Brand introduction</th>
        <th>state</th>
        <th>operation</th>

    </tr>

    <%
     for (int i = 0; i < brands.size(); i++) {
         //Gets each Brand object in the collection
         Brand brand = brands.get(i);
    %>
    	 <tr align="center">
            <td><%=brand.getId()%></td>
            <td><%=brand.getBrandName()%></td>
            <td><%=brand.getCompanyName()%></td>
            <td><%=brand.getOrdered()%></td>
            <td><%=brand.getDescription()%></td>
            <td><%=brand.getStatus() == 1 ? "Enable":"Disable"%></td>
            <td><a href="#">modify</a> <a href="#"> delete</a></td>
        </tr>
    <%
     }
    %>

</table>
4.2.3 finished product code
<%@ page import="com.itheima.pojo.Brand" %>
<%@ page import="java.util.List" %>
<%@ page import="java.util.ArrayList" %>
<%@ page contentType="text/html;charset=UTF-8" language="java" %>

<%
    // query data base
    List<Brand> brands = new ArrayList<Brand>();
    brands.add(new Brand(1,"Three squirrels","Three squirrels",100,"Three squirrels, delicious but not hot",1));
    brands.add(new Brand(2,"Uniqlo","Uniqlo",200,"UNIQLO suits life",0));
    brands.add(new Brand(3,"millet","Xiaomi Technology Co., Ltd",1000,"Born with a fever",1));

%>


<!DOCTYPE html>
<html lang="en">
<head>
    <meta charset="UTF-8">
    <title>Title</title>
</head>
<body>
<input type="button" value="newly added"><br>
<hr>
<table border="1" cellspacing="0" width="800">
    <tr>
        <th>Serial number</th>
        <th>Brand name</th>
        <th>Enterprise name</th>
        <th>sort</th>
        <th>Brand introduction</th>
        <th>state</th>
        <th>operation</th>
    </tr>
    <%
        for (int i = 0; i < brands.size(); i++) {
            Brand brand = brands.get(i);
    %>

    <tr align="center">
        <td><%=brand.getId()%></td>
        <td><%=brand.getBrandName()%></td>
        <td><%=brand.getCompanyName()%></td>
        <td><%=brand.getOrdered()%></td>
        <td><%=brand.getDescription()%></td>
		<td><%=brand.getStatus() == 1 ? "Enable":"Disable"%></td>
        <td><a href="#">modify</a> <a href="#"> delete</a></td>
    </tr>

    <%
        }
    %>
</table>
</body>
</html>
4.2.4 testing
Enter in the browser address bar http://localhost:8080/jsp-demo/brand.jsp, the page display effect is as follows
4.3 JSP disadvantages
Through the above case, we can see many shortcomings of JSP.
Because HTML tags and Java codes can be defined in JSP pages, the following problems are caused:
-
Writing trouble: especially complex pages
Write both HTML tags and Java code
-
Reading trouble
I believe it will take a long time to sort out the code of the above case when you look at this code later
-
High complexity: the operation needs to depend on various environments, JRE, JSP container, JavaEE
-
Occupy memory and disk: JSP will be generated automatically java and class file occupies the disk and is running class file occupies memory
-
Debugging difficulty: after an error, you need to find the automatically generated java file for debugging
-
Not conducive to teamwork: front-end personnel can't Java, and back-end personnel can't understand HTML
If the page layout changes, the front-end engineer will modify the static page, and then hand it to the back-end engineer, who will change the page to JSP page
Due to the above problems, = = JSP has gradually withdrawn from the stage of history, = = later development is more replaced by HTML + Ajax. AJAX is the technology we will focus on in the future. With this technology, the front-end engineer is responsible for front-end page development, while the back-end engineer is only responsible for front-end code development. Here is a brief description of the development of technology

-
The first stage: the use of servlet not only realizes the writing of logic code, but also splices the pages. We've been in touch with this model before
-
The second stage: with the development of technology, JSP appears. People find that JSP is much more convenient to use than Servlet, but it is still necessary to nest Java code in JSP, which is not conducive to later maintenance
-
The third stage: use Servlet for logic code development, and use JSP for data display

-
The fourth stage: use servlet to develop back-end logic code, and use HTML to display data. There is a problem. Html is a static page. How to display dynamic data? That's what ajax does.
Since JSP has gradually withdrawn from the historical stage, why should we learn jsp? There are two reasons:
- Some companies may still use JSP for some old projects, so we are required to move JSP
- If we don't go through these complex processes, we can't reflect the simplicity of development in the later stage
Next, let's learn the third stage, replacing Java code in JSP with EL expression and JSTL tag library.
5. EL expression
5.1 general
EL (full name Expression Language) Expression Language is used to simplify Java code in JSP pages.
The main function of EL expression is to obtain data. In fact, it is to obtain data from the domain object and display the data on the page.
The syntax of EL expression is also relatively simple== e x p r e s s i o n = = . example as : {expression}== . For example: expression==. For example: {brands} is to obtain the data with the key brands stored in the domain.
5.2 code demonstration
-
Define a servlet, encapsulate some data in the servlet, store it in the request domain object and forward it to El demo JSP page.
@WebServlet("/demo1")
public class ServletDemo1 extends HttpServlet {
    @Override
    protected void doGet(HttpServletRequest request, HttpServletResponse response) throws ServletException, IOException {
        //1. Prepare data
        List<Brand> brands = new ArrayList<Brand>();
        brands.add(new Brand(1,"Three squirrels","Three squirrels",100,"Three squirrels, delicious but not hot",1));
        brands.add(new Brand(2,"Uniqlo","Uniqlo",200,"UNIQLO suits life",0));
        brands.add(new Brand(3,"millet","Xiaomi Technology Co., Ltd",1000,"Born with a fever",1));

        //2. Store in the request field
        request.setAttribute("brands",brands);

        //3. Forward to El demo jsp
        request.getRequestDispatcher("/el-demo.jsp").forward(request,response);
    }

    @Override
    protected void doPost(HttpServletRequest request, HttpServletResponse response) throws ServletException, IOException {
        this.doGet(request, response);
    }
}
Note: you need to use forwarding here, because forwarding can use the request object as a domain object for data sharing
-
In EL demo Get data through EL expression in JSP
<%@ page contentType="text/html;charset=UTF-8" language="java" %> <html> <head> <title>Title</title> </head> <body> ${brands} </body> </html> -
Enter in the address bar of the browser http://localhost:8080/jsp-demo/demo1, the page effect is as follows:

5.3 domain objects
There are four domain objects in JavaWeb, which are:
- Page: the current page is valid
- Request: the current request is valid
- Session: the current session is valid
- Application: the current application is valid
When the el expression obtains data, it will look for it from these four fields in turn until it is found. The scope of these four domain objects is shown in the following figure
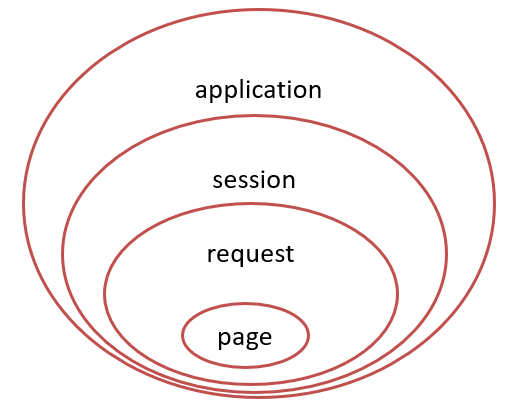
For example, ${brands}, the el expression gets data from the page domain object first. If it doesn't get data from the request domain object, if it doesn't get data from the session domain object, if it doesn't get data from the application domain object.
6. JSTL label
6.1 general
JSP standard tag library uses tags to replace Java code on JSP pages. The following code is the JSTL tag
<c:if test="${flag == 1}">
    male
</c:if>
<c:if test="${flag == 2}">
    female
</c:if>
Does the above code look more comfortable than nested Java code in JSP. Moreover, front-end engineers are particularly sensitive to labels. They can understand this code.
JSTL provides many tags, as shown below
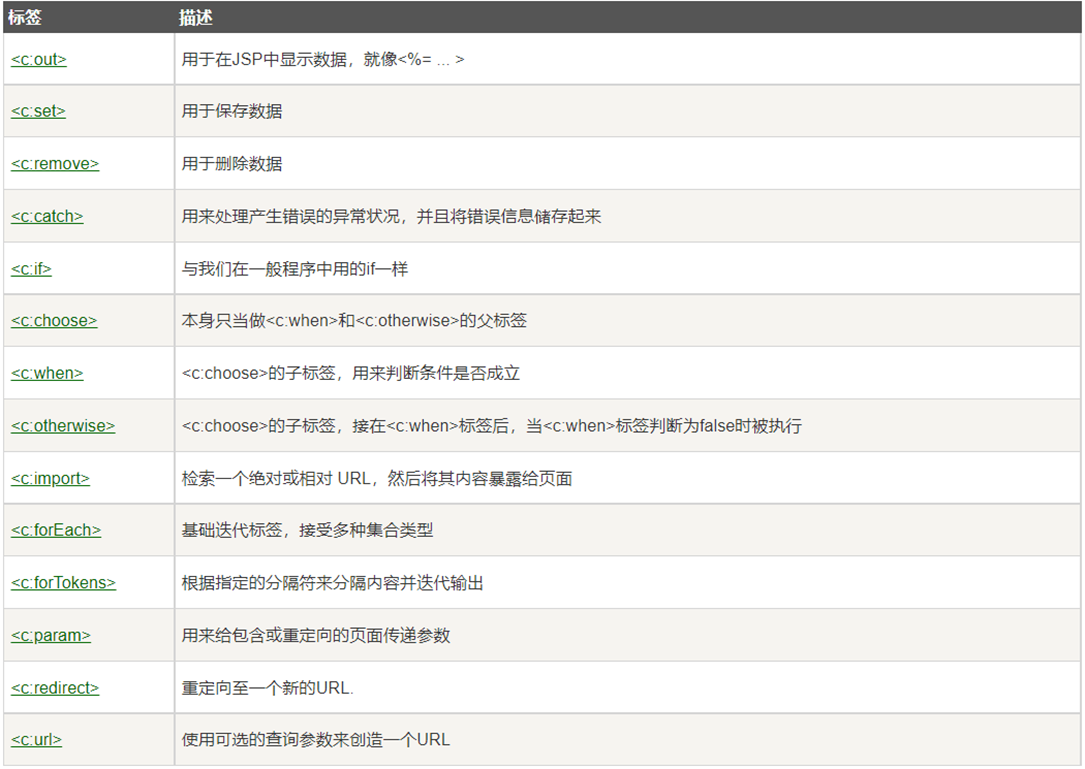
We will only explain the two most commonly used tags, < C: foreach > tag and < C: if > tag.
JSTL is also relatively simple to use, which is divided into the following steps:
-
Import coordinates
<dependency> <groupId>jstl</groupId> <artifactId>jstl</artifactId> <version>1.2</version> </dependency> <dependency> <groupId>taglibs</groupId> <artifactId>standard</artifactId> <version>1.1.2</version> </dependency> -
Introduce JSTL tag library on JSP page
<%@ taglib prefix="c" uri="http://java.sun.com/jsp/jstl/core" %>
-
Use label
6.2 if label
< C: if >: equivalent to if judgment
- Attribute: test, used to define conditional expressions
<c:if test="${flag == 1}">
    male
</c:if>
<c:if test="${flag == 2}">
    female
</c:if>
Code demonstration:
-
Define a servlet and add data with the key status and value 1 to the request domain object in the servlet
@WebServlet("/demo2") public class ServletDemo2 extends HttpServlet { @Override protected void doGet(HttpServletRequest request, HttpServletResponse response) throws ServletException, IOException { //1. Store data in the request domain request.setAttribute("status",1); //2. Forward to JSTL if jsp data request.getRequestDispatcher("/jstl-if.jsp").forward(request,response); } @Override protected void doPost(HttpServletRequest request, HttpServletResponse response) throws ServletException, IOException { this.doGet(request, response); } } -
Define JSTL if JSP page, where the < C: if > tag is used
<%@ page contentType="text/html;charset=UTF-8" language="java" %>
<%@ taglib prefix="c" uri="http://java.sun.com/jsp/jstl/core" %>
<html>
<head>
    <title>Title</title>
</head>
<body>
    <%--
        c:if: To complete logical judgment and replace java  if else
    --%>
    <c:if test="${status ==1}">
        Enable
    </c:if>

    <c:if test="${status ==0}">
        Disable
    </c:if>
</body>
</html>
Note: the JSTL core tag library has been introduced on this page
<%@ taglib prefix="c" uri="http://java.sun.com/jsp/jstl/core" %>
6.3 forEach label
< C: foreach >: equivalent to a for loop. There are enhanced for loops and ordinary for loops in java, and < C: foreach > in JSTL also has two uses
6.3.1 usage I
Similar to the enhanced for loop in Java. The properties in < C: foreach > involved are as follows
-
items: traversed container
-
var: temporary variable generated by traversal
-
varStatus: traversal status object
The following code is the data named brands obtained from the domain object, which is a collection; Traverse, and name each element in the collection Brand, which is a Brand object. In the loop, use EL expression to obtain the attribute value of each Brand object
<c:forEach items="${brands}" var="brand">
    <tr align="center">
        <td>${brand.id}</td>
        <td>${brand.brandName}</td>
        <td>${brand.companyName}</td>
        <td>${brand.description}</td>
    </tr>
</c:forEach>
Code demonstration:
-
The servlet still uses the previous name ServletDemo1.
-
The definition name is JSTL foreach JSP page, the content is as follows:
<%@ page contentType="text/html;charset=UTF-8" language="java" %>
<%@ taglib prefix="c" uri="http://java.sun.com/jsp/jstl/core" %>

<!DOCTYPE html>
<html lang="en">
<head>
    <meta charset="UTF-8">
    <title>Title</title>
</head>
<body>
<input type="button" value="newly added"><br>
<hr>
<table border="1" cellspacing="0" width="800">
    <tr>
        <th>Serial number</th>
        <th>Brand name</th>
        <th>Enterprise name</th>
        <th>sort</th>
        <th>Brand introduction</th>
        <th>state</th>
        <th>operation</th>
    </tr>

    <c:forEach items="${brands}" var="brand" varStatus="status">
        <tr align="center">
            <%--<td>${brand.id}</td>--%>
            <td>${status.count}</td>
            <td>${brand.brandName}</td>
            <td>${brand.companyName}</td>
            <td>${brand.ordered}</td>
            <td>${brand.description}</td>
            <c:if test="${brand.status == 1}">
                <td>Enable</td>
            </c:if>
            <c:if test="${brand.status != 1}">
                <td>Disable</td>
            </c:if>
            <td><a href="#">modify</a> <a href="#"> delete</a></td>
        </tr>
    </c:forEach>
</table>
</body>
</html>
6.3.2 usage II
Similar to the ordinary for loop in Java. The properties in < C: foreach > involved are as follows
-
begin: start number
-
End: end number
-
Step: step size
Example code:
From 0 to 10, the variable name is i, and each time it increases by 1
<c:forEach begin="0" end="10" step="1" var="i">
    ${i}
</c:forEach>
7. MVC mode and three-tier architecture
MVC pattern and three-tier architecture are some theoretical knowledge. In the future, we will use them for code development to make our code more maintainable and extensible.
7.1 MVC mode
MVC is a layered development mode, in which:
-
M: Model, business model, processing business
-
5: V iew, View, interface display
-
C: Controller, controller, processing requests, invoking models and views
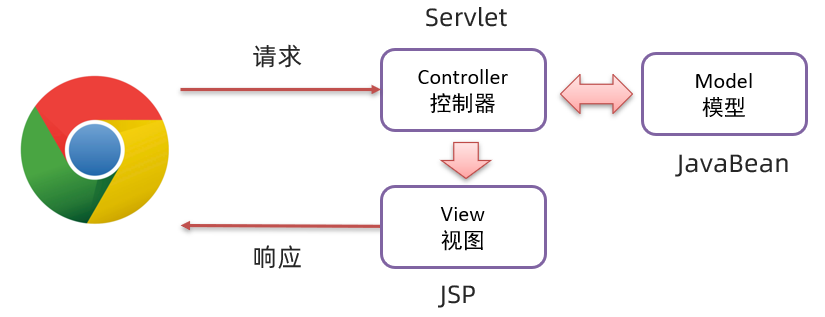
The controller (servlet) is used to receive the request sent by the browser. The controller calls the model (JavaBean) to obtain data, such as querying data from the database; After the controller obtains the data, it is handed over to the view (JSP) for data display.
MVC benefits:
-
Single responsibility without mutual influence. Each role does its own thing and performs its own duties.
-
It is conducive to division of labor and cooperation.
-
Conducive to component reuse
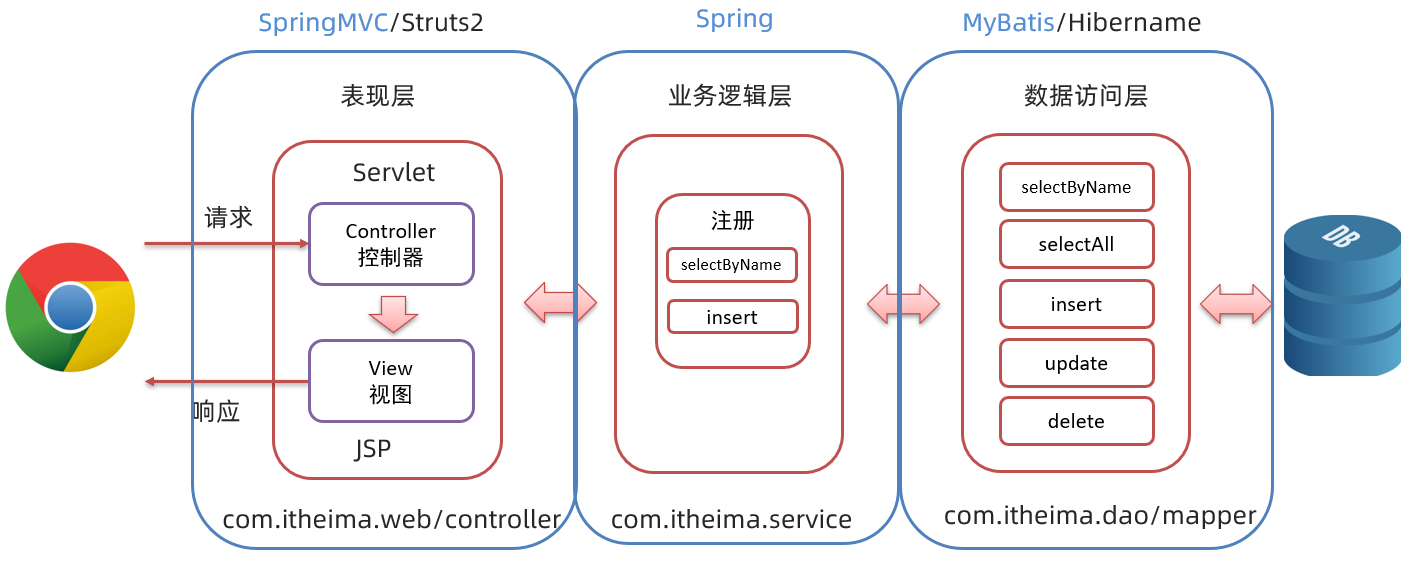
7.2 three tier architecture
The three-tier architecture divides our project into three layers: presentation layer, business logic layer and data access layer.
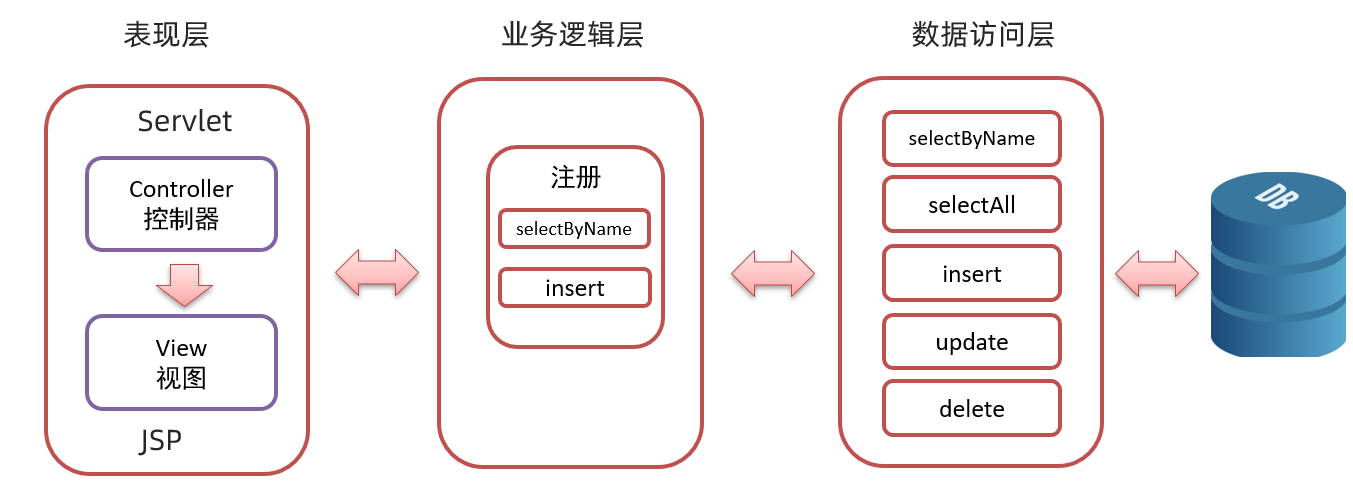
- Data access layer: basic CRUD operations on the database
- Business logic layer: encapsulate the business logic and combine the basic functions in the data access layer to form complex business logic functions. For example, to register business functions, we will first call the selectByName() method of the data access layer to determine whether the user name exists. If it does not exist, we will call the insert() method of the data access layer to add data
- Presentation layer: receive the request, encapsulate the data, call the business logic layer and respond to the data
The whole process is that the browser sends the request, the servlet of the presentation layer receives the request and calls the method of the business logic layer for business logic processing, while the method of the business logic layer calls the method of the data access layer for data operation, and then returns to the servlet in turn, and then the servlet hands over the data to the JSP for display.
Each layer of the three-tier architecture has a unique package name:
- Presentation layer: com itheima. Controller or com itheima. web
- Business logic layer: com itheima. service
- Data access layer: com itheima. Dao or com itheima. mapper
Later, we will learn some frameworks. Different frameworks encapsulate different layers
7.3 MVC and three-tier architecture
Through the study of MVC and three-tier architecture, some people must be confused. What are the differences and connections between them?
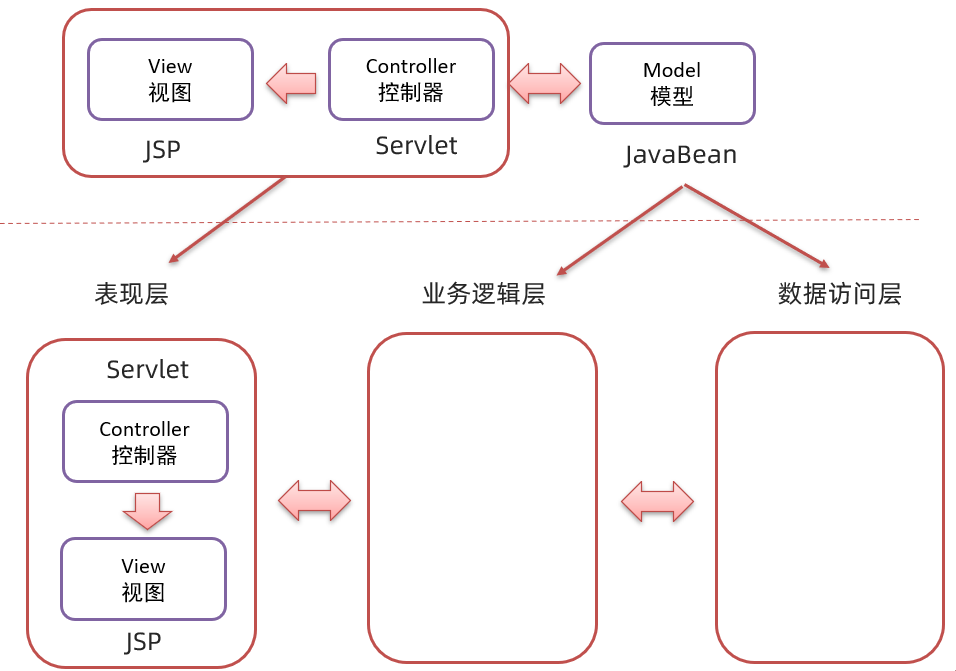
As shown in the figure above, the upper part is MVC mode, and the lower part of the figure above is three-tier architecture. C (controller) and V (view) in MVC mode are the presentation layer in the three-tier architecture, while M (model) in MVC mode is the business logic layer and data access layer in the three-tier architecture.
MVC pattern can be understood as a big concept, and three-tier architecture is the idea of MVC pattern implementation architecture. In the future, we will write the codes of different layers under different packages according to the requirements, and the functions and responsibilities of each layer will be single. In the future, if the technology of the presentation layer is replaced, the codes of the business logic layer and the data access layer do not need to be changed.
8. Cases
Demand: complete the addition, deletion, modification and query of brand data

We have been doing this function before, and this case is to apply all the contents learned today (including MVC mode and three-tier architecture) and run through the whole process.
8.1 environmental preparation
Environmental preparation is realized in the following steps:
-
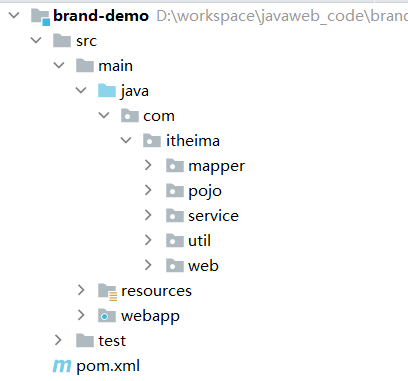
Create a new module brand_demo, introducing coordinates
-
Create a three-tier package structure
-
Database table tb_brand
-
Entity class Brand
-
MyBatis basic environment
-
Mybatis-config.xml
-
BrandMapper.xml
-
BrandMapper interface
-
8.1.1 create project
Create a new module brand_demo, introduce coordinates. As long as we analyze the technologies to be used, the coordinates will be clear
- Database operation is required. mysql driver package
- To use the mybatis framework. Dependency package of mybaits
- web projects require servlets and JSPS. Dependency packages for servlets and JSPS
- You need to use jstl for data presentation. Dependent package of jstl
pom. The XML content is as follows:
<?xml version="1.0" encoding="UTF-8"?>
<project xmlns="http://maven.apache.org/POM/4.0.0"
         xmlns:xsi="http://www.w3.org/2001/XMLSchema-instance"
         xsi:schemaLocation="http://maven.apache.org/POM/4.0.0 http://maven.apache.org/xsd/maven-4.0.0.xsd">
    <modelVersion>4.0.0</modelVersion>
    <groupId>org.example</groupId>
    <artifactId>brand-demo</artifactId>
    <version>1.0-SNAPSHOT</version>
    <packaging>war</packaging>

    <properties>
        <maven.compiler.source>8</maven.compiler.source>
        <maven.compiler.target>8</maven.compiler.target>
    </properties>

    <dependencies>
        <!-- mybatis -->
        <dependency>
            <groupId>org.mybatis</groupId>
            <artifactId>mybatis</artifactId>
            <version>3.5.5</version>
        </dependency>

        <!--mysql-->
        <dependency>
            <groupId>mysql</groupId>
            <artifactId>mysql-connector-java</artifactId>
            <version>5.1.34</version>
        </dependency>

        <!--servlet-->
        <dependency>
            <groupId>javax.servlet</groupId>
            <artifactId>javax.servlet-api</artifactId>
            <version>3.1.0</version>
            <scope>provided</scope>
        </dependency>

        <!--jsp-->
        <dependency>
            <groupId>javax.servlet.jsp</groupId>
            <artifactId>jsp-api</artifactId>
            <version>2.2</version>
            <scope>provided</scope>
        </dependency>

        <!--jstl-->
        <dependency>
            <groupId>jstl</groupId>
            <artifactId>jstl</artifactId>
            <version>1.2</version>
        </dependency>
        <dependency>
            <groupId>taglibs</groupId>
            <artifactId>standard</artifactId>
            <version>1.1.2</version>
        </dependency>
    </dependencies>

    <build>
        <plugins>
            <plugin>
                <groupId>org.apache.tomcat.maven</groupId>
                <artifactId>tomcat7-maven-plugin</artifactId>
                <version>2.2</version>
            </plugin>
        </plugins>
    </build>
</project>
8.1.2 create package
Create different package structures to store different classes. The package structure is as follows
8.1.3 create table
-- delete tb_brand surface
drop table if exists tb_brand;
-- establish tb_brand surface
create table tb_brand
(
    -- id Primary key
    id           int primary key auto_increment,
    -- Brand name
    brand_name   varchar(20),
    -- Enterprise name
    company_name varchar(20),
    -- sort field
    ordered      int,
    -- Description information
    description  varchar(100),
    -- Status: 0: Disabled 1: enabled
    status       int
);
-- Add data
insert into tb_brand (brand_name, company_name, ordered, description, status)
values ('Three squirrels', 'Three squirrels Co., Ltd', 5, 'Delicious but not hot', 0),
       ('Huawei', 'Huawei Technology Co., Ltd', 100, 'Huawei is committed to bringing the digital world into everyone, every family and every organization to build an interconnected intelligent world', 1),
       ('millet', 'Xiaomi Technology Co., Ltd', 50, 'are you ok', 1);
8.1.4 create entity class
Create a class named Brand under the pojo package.
public class Brand {
    // id primary key
    private Integer id;
    // Brand name
    private String brandName;
    // Enterprise name
    private String companyName;
    // sort field
    private Integer ordered;
    // Description information
    private String description;
    // Status: 0: Disabled 1: enabled
    private Integer status;


    public Brand() {
    }

    public Brand(Integer id, String brandName, String companyName, String description) {
        this.id = id;
        this.brandName = brandName;
        this.companyName = companyName;
        this.description = description;
    }

    public Brand(Integer id, String brandName, String companyName, Integer ordered, String description, Integer status) {
        this.id = id;
        this.brandName = brandName;
        this.companyName = companyName;
        this.ordered = ordered;
        this.description = description;
        this.status = status;
    }

    public Integer getId() {
        return id;
    }

    public void setId(Integer id) {
        this.id = id;
    }

    public String getBrandName() {
        return brandName;
    }

    public void setBrandName(String brandName) {
        this.brandName = brandName;
    }

    public String getCompanyName() {
        return companyName;
    }

    public void setCompanyName(String companyName) {
        this.companyName = companyName;
    }

    public Integer getOrdered() {
        return ordered;
    }

    public void setOrdered(Integer ordered) {
        this.ordered = ordered;
    }

    public String getDescription() {
        return description;
    }

    public void setDescription(String description) {
        this.description = description;
    }

    public Integer getStatus() {
        return status;
    }

    public void setStatus(Integer status) {
        this.status = status;
    }

    @Override
    public String toString() {
        return "Brand{" +
                "id=" + id +
                ", brandName='" + brandName + '\'' +
                ", companyName='" + companyName + '\'' +
                ", ordered=" + ordered +
                ", description='" + description + '\'' +
                ", status=" + status +
                '}';
    }
}
8.1.5 prepare mybatis environment
Define the core configuration file mybatis config XML and place the file under resources
<?xml version="1.0" encoding="UTF-8" ?>
<!DOCTYPE configuration
PUBLIC "-//mybatis.org//DTD Config 3.0//EN"
"http://mybatis.org/dtd/mybatis-3-config.dtd">
<configuration>
<!--Alias-->
<typeAliases>
<package name="com.itheima.pojo"/>
</typeAliases>
<environments default="development">
<environment id="development">
<transactionManager type="JDBC"/>
<dataSource type="POOLED">
<property name="driver" value="com.mysql.jdbc.Driver"/>
<property name="url" value="jdbc:mysql:///db1?useSSL=false&useServerPrepStmts=true"/>
<property name="username" value="root"/>
<property name="password" value="1234"/>
</dataSource>
</environment>
</environments>
<mappers>
<!--scanning mapper-->
<package name="com.itheima.mapper"/>
</mappers>
</configuration>
Create the directory structure com/itheima/mapper to place the mapping configuration file under resources, and create the mapping configuration file brandmapper xml
<?xml version="1.0" encoding="UTF-8" ?>
<!DOCTYPE mapper
        PUBLIC "-//mybatis.org//DTD Mapper 3.0//EN"
        "http://mybatis.org/dtd/mybatis-3-mapper.dtd">
<mapper namespace="com.itheima.mapper.BrandMapper">

</mapper>
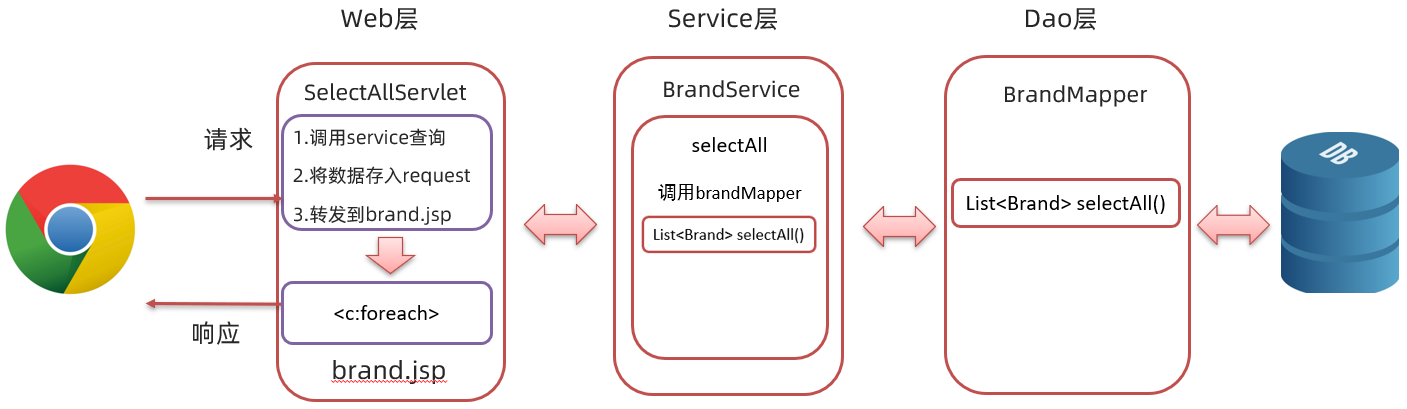
All queries

When we click index When you query all the hyperlinks in the HTML page, you can query the data in the right half of the figure above.
For the above functions, click to query all hyperlinks. You need to first ask the backend servlet to jump to the corresponding page for dynamic display of data. The whole process is as follows:
8.2.1 writing BrandMapper
Create the BrandMapper interface under the mapper package, and define the selectAll() method in the interface
/**
  * Query all
  * @return
  */
@Select("select * from tb_brand")
List<Brand> selectAll();
8.2.2 writing tools
On COM Create utils package under itheima package, and create a tool class named SqlSessionFactoryUtils under this package
public class SqlSessionFactoryUtils {

    private static SqlSessionFactory sqlSessionFactory;

    static {
        //Static code blocks are executed automatically and only once as the class is loaded
        try {
            String resource = "mybatis-config.xml";
            InputStream inputStream = Resources.getResourceAsStream(resource);
            sqlSessionFactory = new SqlSessionFactoryBuilder().build(inputStream);
        } catch (IOException e) {
            e.printStackTrace();
        }
    }

    public static SqlSessionFactory getSqlSessionFactory(){
        return sqlSessionFactory;
    }
}
8.2.3 writing BrandService
Create BrandService class under service package
public class BrandService {
    SqlSessionFactory factory = SqlSessionFactoryUtils.getSqlSessionFactory();

    /**
     * Query all
     * @return
     */
    public List<Brand> selectAll(){
        //Call brandmapper selectAll()

        //2. Get SqlSession
        SqlSession sqlSession = factory.openSession();
        //3. Get BrandMapper
        BrandMapper mapper = sqlSession.getMapper(BrandMapper.class);

        //4. Call method
        List<Brand> brands = mapper.selectAll();

        sqlSession.close();

        return brands;
    }
}
8.2.4 writing servlets
Create a servlet named SelectAllServlet under the web package. The logic of the servlet is as follows:
- Call the selectAll() method of BrandService for business logic processing and receive the returned results
- Store the result returned in the previous step in the request domain object
- Jump to brand JSP page for data display
The specific codes are as follows:
@WebServlet("/selectAllServlet")
public class SelectAllServlet extends HttpServlet {
    private  BrandService service = new BrandService();

    @Override
    protected void doGet(HttpServletRequest request, HttpServletResponse response) throws ServletException, IOException {

        //1. Call BrandService to complete the query
        List<Brand> brands = service.selectAll();
        //2. Store in the request field
        request.setAttribute("brands",brands);
        //3. Forward to brand jsp
        request.getRequestDispatcher("/brand.jsp").forward(request,response);
    }

    @Override
    protected void doPost(HttpServletRequest request, HttpServletResponse response) throws ServletException, IOException {
        this.doGet(request, response);
    }
}
8.2.5 prepare brand JSP page
Add data \ 2 Brand addition, deletion and modification cases \ brand.com under the static page Copy the HTML page to the webapp directory of the project and change the page to brand JSP page, and brand The JSP page uses JSTL and EL expressions in the table to obtain and display the set data named brands from the request field object. The content of the page is as follows:
<%@ page contentType="text/html;charset=UTF-8" language="java" %>
<%@ taglib prefix="c" uri="http://java.sun.com/jsp/jstl/core" %>

<!DOCTYPE html>
<html lang="en">
<head>
    <meta charset="UTF-8">
    <title>Title</title>
</head>
<body>
<hr>
<table border="1" cellspacing="0" width="80%">
    <tr>
        <th>Serial number</th>
        <th>Brand name</th>
        <th>Enterprise name</th>
        <th>sort</th>
        <th>Brand introduction</th>
        <th>state</th>
        <th>operation</th>
    </tr>

    <c:forEach items="${brands}" var="brand" varStatus="status">
        <tr align="center">
            <%--<td>${brand.id}</td>--%>
            <td>${status.count}</td>
            <td>${brand.brandName}</td>
            <td>${brand.companyName}</td>
            <td>${brand.ordered}</td>
            <td>${brand.description}</td>
            <c:if test="${brand.status == 1}">
                <td>Enable</td>
            </c:if>
            <c:if test="${brand.status != 1}">
                <td>Disable</td>
            </c:if>
            <td><a href="/brand-demo/selectByIdServlet?id=${brand.id}">modify</a> <a href="#"> delete</a></td>
        </tr>
    </c:forEach>
</table>
</body>
</html>
8.2.6 testing
Start the server and enter in the browser http://localhost:8080/brand-demo/index.html, see the following query all hyperlinks. Click the link to query all brand data

Why is this problem? This is because the queried field name does not correspond to the attribute name of the entity class object one by one. Compared with this, you will certainly solve it, that is, use the resultMap tag in the mapping configuration file to define the mapping relationship. The contents of the mapping configuration file are as follows:
<?xml version="1.0" encoding="UTF-8" ?>
<!DOCTYPE mapper
        PUBLIC "-//mybatis.org//DTD Mapper 3.0//EN"
        "http://mybatis.org/dtd/mybatis-3-mapper.dtd">
<mapper namespace="com.itheima.mapper.BrandMapper">

    <resultMap id="brandResultMap" type="brand">
        <result column="brand_name" property="brandName"></result>
        <result column="company_name" property="companyName"></result>
    </resultMap>
</mapper>
And use the @ ResuleMap annotation on selectAll() in the BrandMapper interface to specify the use of this mapping
/**
  * Query all
  * @return
  */
@Select("select * from tb_brand")
@ResultMap("brandResultMap")
List<Brand> selectAll();
Restart the server and visit again to see the data we want

8.3 addition

The figure above shows the process of adding functions. After clicking the Add button, you will jump to addbrand JSP new page, enter the data to be added on this page, and click the submit button after input. The data needs to be submitted to the back end, which will add the data and query all the data again. The whole process is as follows:
Next, we implement the functions according to the process:
8.3.1 writing BrandMapper method
In the BrandMapper interface, define the add (brand) method in the interface
@Insert("insert into tb_brand values(null,#{brandName},#{companyName},#{ordered},#{description},#{status})")
void add(Brand brand);
8.3.2 writing BrandService method
Define the add brand data method add(Brand brand) in BrandService class
 	/**
     * add to
     * @param brand
     */
    public void add(Brand brand){

        //2. Get SqlSession
        SqlSession sqlSession = factory.openSession();
        //3. Get BrandMapper
        BrandMapper mapper = sqlSession.getMapper(BrandMapper.class);

        //4. Call method
        mapper.add(brand);

        //Commit transaction
        sqlSession.commit();
        //Release resources
        sqlSession.close();
    }
8.3.3 improve brand JSP page
We need to add a new button to the table on this page
<input type="button" value="newly added" id="add"><br>
And bind the click event to the button. When the button is clicked, you need to jump to brand JSP page for adding brand data
<script>
    document.getElementById("add").onclick = function (){
        location.href = "/brand-demo/addBrand.jsp";
    }
</script>
==Note: = = the script tag is recommended to be placed in front of the body end tag.
8.3.4 write addbrand JSP page
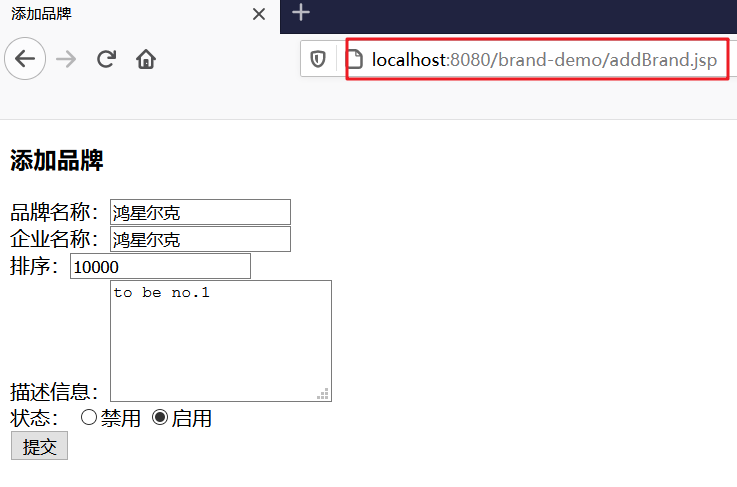
From data \ 2 Brand addition, deletion and modification query cases \ addbrand.com in the static page Copy the HTML page to the webapp of the project and change it to addbrand JSP dynamic page
<%@ page contentType="text/html;charset=UTF-8" language="java" %>
<!DOCTYPE html>
<html lang="en">

<head>
    <meta charset="UTF-8">
    <title>Add brand</title>
</head>
<body>
<h3>Add brand</h3>
<form action="/brand-demo/addServlet" method="post">
    Brand name:<input name="brandName"><br>
    Enterprise name:<input name="companyName"><br>
    Sort:<input name="ordered"><br>
    Description information:<textarea rows="5" cols="20" name="description"></textarea><br>
    Status:
    <input type="radio" name="status" value="0">Disable
    <input type="radio" name="status" value="1">Enable<br>

    <input type="submit" value="Submit">
</form>
</body>
</html>
8.3.5 writing servlet s
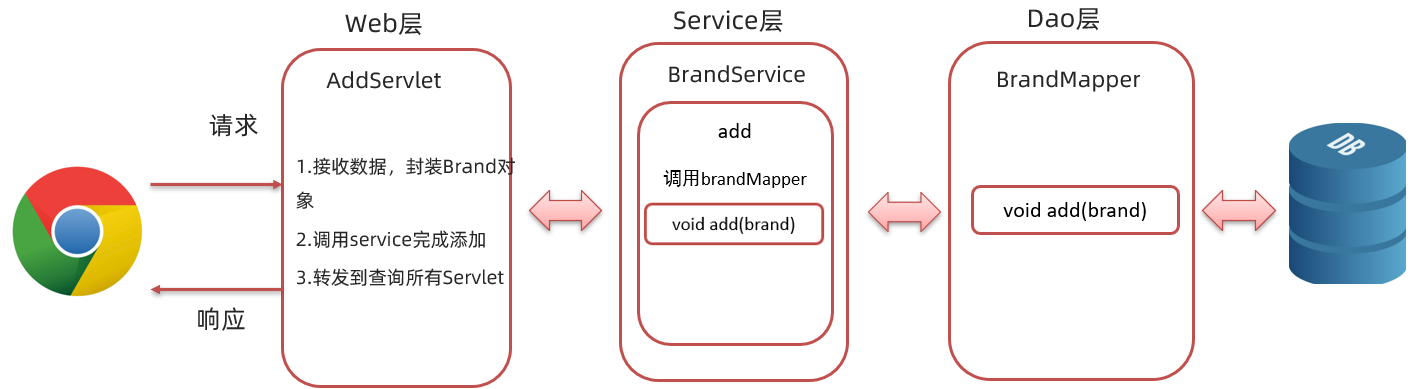
Create a servlet of AddServlet under the web package. The logic of the servlet is as follows:
- Set the character set for handling post request garbled code
- Receive data submitted by the client
- Encapsulate the received data into a Brand object
- Call the add() method of BrandService to process the added business logic
- Jump to the selectAllServlet resource and re query the data
The specific codes are as follows:
@WebServlet("/addServlet")
public class AddServlet extends HttpServlet {
    private BrandService service = new BrandService();


    @Override
    protected void doGet(HttpServletRequest request, HttpServletResponse response) throws ServletException, IOException {

        //Handle the garbled code of POST request
        request.setCharacterEncoding("utf-8");

        //1. Receive the data submitted by the form and encapsulate it into a Brand object
        String brandName = request.getParameter("brandName");
        String companyName = request.getParameter("companyName");
        String ordered = request.getParameter("ordered");
        String description = request.getParameter("description");
        String status = request.getParameter("status");

        //Encapsulated as a Brand object
        Brand brand = new Brand();
        brand.setBrandName(brandName);
        brand.setCompanyName(companyName);
        brand.setOrdered(Integer.parseInt(ordered));
        brand.setDescription(description);
        brand.setStatus(Integer.parseInt(status));

        //2. Call service to finish adding
        service.add(brand);

        //3. Forward to query all servlets
        request.getRequestDispatcher("/selectAllServlet").forward(request,response);
    }

    @Override
    protected void doPost(HttpServletRequest request, HttpServletResponse response) throws ServletException, IOException {
        this.doGet(request, response);
    }
}
8.3.6 testing
Click brand The Add button on the JSP page will jump to addbrand JSP page
Click the submit button to see the following page, which contains the data we just added

8.4 modification
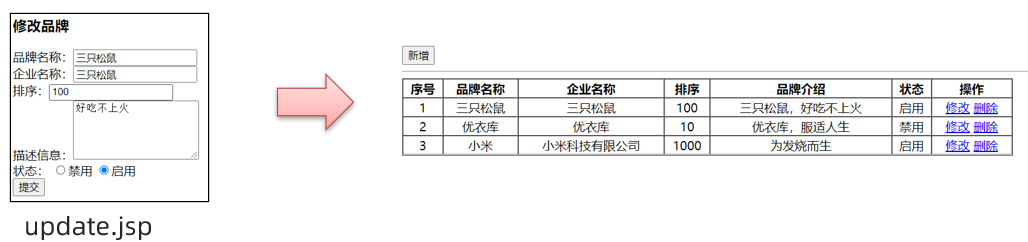
Click the Edit button behind each data to jump to the modification page, as shown in the following figure:

On this modification page, we can see that the data of the row where the Edit button is located is echoed to the form, and then the data that needs to be modified is modified in the form, and then click the submit button to submit the data to the back end, which then stores the data in the database.
From the above example, we know that the modification function needs to be implemented from two aspects: Data echo and modification.
8.4.1 echo data
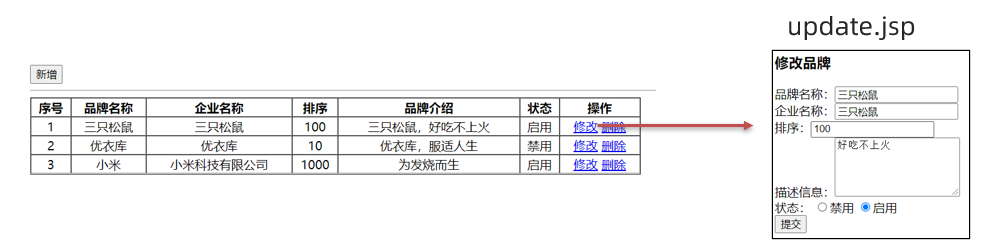
The above figure shows the effect of echoing data. To achieve this effect, you can't directly jump to update when you click the Modify button JSP page, but first request the back-end program with the id of the current row of data. The back-end program queries the data according to the id, stores the data in the domain object, and jumps to update JSP page for data display. The overall process is as follows
8.4.1.1 writing BrandMapper method
In the BrandMapper interface, define the selectById(int id) method in the interface
	/**
     * Query by id
     * @param id
     * @return
     */
    @Select("select * from tb_brand where id = #{id}")
    @ResultMap("brandResultMap")
    Brand selectById(int id);
8.4.1.2 writing BrandService method
Define the data query method selectById(int id) according to id in BrandService class
    /**
     * Query by id
     * @return
     */
    public Brand selectById(int id){
        //Call brandmapper selectAll()
        //2. Get SqlSession
        SqlSession sqlSession = factory.openSession();
        //3. Get BrandMapper
        BrandMapper mapper = sqlSession.getMapper(BrandMapper.class);
        //4. Call method
        Brand brand = mapper.selectById(id);
        sqlSession.close();
        return brand;
    }
8.4.1.3 writing servlet s
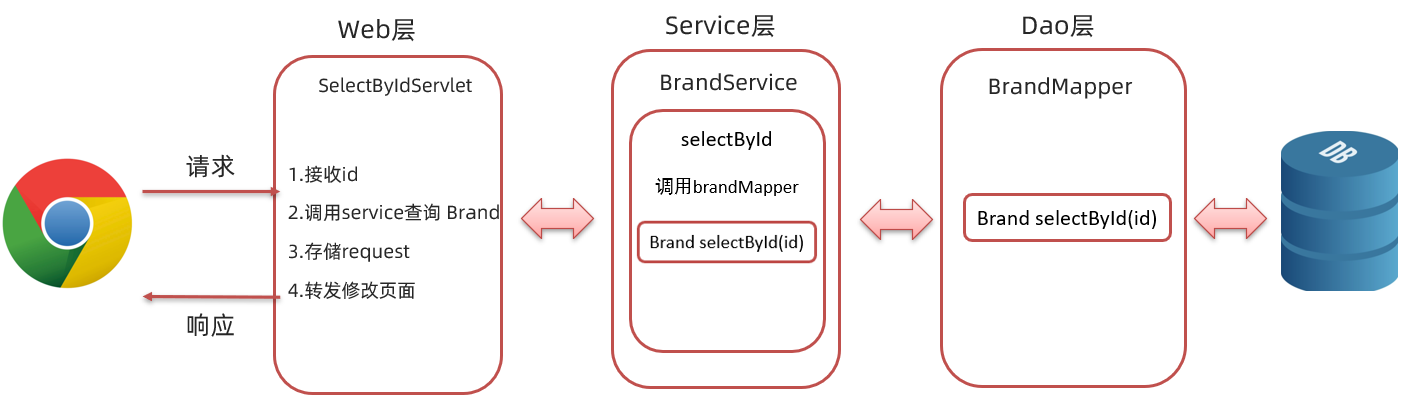
Create a servlet of SelectByIdServlet under the web package. The logic of the servlet is as follows:
- Get request data id
- Business logic of calling the selectById() method of BrandService to query data
- Store the queried data in the request domain object
- Jump to update JSP page for data authenticity
The specific codes are as follows:
@WebServlet("/selectByIdServlet")
public class SelectByIdServlet extends HttpServlet {
    private  BrandService service = new BrandService();

    @Override
    protected void doGet(HttpServletRequest request, HttpServletResponse response) throws ServletException, IOException {
        //1. Receiving id
        String id = request.getParameter("id");
        //2. Call service query
        Brand brand = service.selectById(Integer.parseInt(id));
        //3. Store in request
        request.setAttribute("brand",brand);
        //4. Forward to update jsp
        request.getRequestDispatcher("/update.jsp").forward(request,response);
    }

    @Override
    protected void doPost(HttpServletRequest request, HttpServletResponse response) throws ServletException, IOException {
        this.doGet(request, response);
    }
}
8.4.1.4 write update JSP page
Copy addbrand JSP page, renamed update JSP and make the following modifications:
-
Change the content of the title label to modify the brand
-
The action attribute value of the form tag is changed to / brand demo / updateservlet
-
To echo data in the input tag, you need to set the value attribute
Brand name:<input name="brandName" value="${brand.brandName}"><br> Enterprise name:<input name="companyName" value="${brand.companyName}"><br> Sort:<input name="ordered" value="${brand.ordered}"><br> -
textarea tag needs to use EL expression in the tag body for data echo
Description information:<textarea rows="5" cols="20" name="description">${brand.description} </textarea><br> -
If the radio box uses the if tag, you need to judge brand Whether the value of status is 1 or 0. Use the checked property on the specified radio box to indicate the selected status
Status:
<c:if test="${brand.status == 0}">
    <input type="radio" name="status" value="0" checked>Disable
    <input type="radio" name="status" value="1">Enable<br>
</c:if>

<c:if test="${brand.status == 1}">
    <input type="radio" name="status" value="0" >Disable
    <input type="radio" name="status" value="1" checked>Enable<br>
</c:if>
To sum up, update The JSP code is as follows:
<%@ page contentType="text/html;charset=UTF-8" language="java" %>
<%@ taglib prefix="c" uri="http://java.sun.com/jsp/jstl/core" %>
<!DOCTYPE html>
<html lang="en">
<head>
    <meta charset="UTF-8">
    <title>Modify brand</title>
</head>
<body>
<h3>Modify brand</h3>
<form action="/brand-demo/updateServlet" method="post">

    Brand name:<input name="brandName" value="${brand.brandName}"><br>
    Enterprise name:<input name="companyName" value="${brand.companyName}"><br>
    Sort:<input name="ordered" value="${brand.ordered}"><br>
    Description information:<textarea rows="5" cols="20" name="description">${brand.description} </textarea><br>
    Status:
    <c:if test="${brand.status == 0}">
        <input type="radio" name="status" value="0" checked>Disable
        <input type="radio" name="status" value="1">Enable<br>
    </c:if>

    <c:if test="${brand.status == 1}">
        <input type="radio" name="status" value="0" >Disable
        <input type="radio" name="status" value="1" checked>Enable<br>
    </c:if>

    <input type="submit" value="Submit">
</form>
</body>
</html>
8.4.2 data modification
After echoing the data, we will modify the data. The following figure shows the effect of modifying the data:
Modify the data on the modify page and click submit to submit the data to the back-end program. The back-end program will modify the data in the table, and then re query the data. The overall process is as follows:
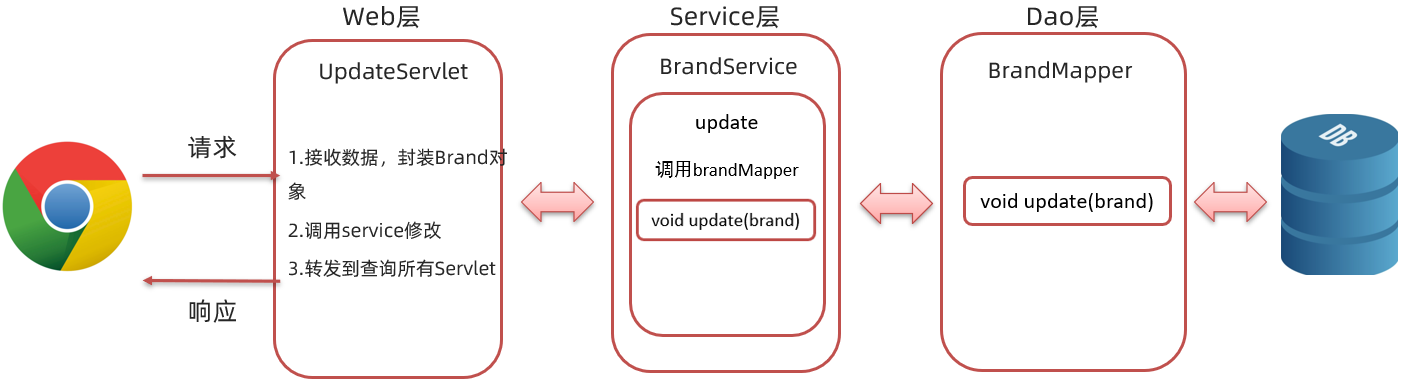
8.4.2.1 writing BrandMapper method
In the BrandMapper interface, define the update (brand) method in the interface
/**
  * modify
  * @param brand
  */
@Update("update tb_brand set brand_name = #{brandName},company_name = #{companyName},ordered = #{ordered},description = #{description},status = #{status} where id = #{id}")
void update(Brand brand);
8.4.2.2 writing BrandService method
In the BrandService class, define the method update(Brand brand) to query data according to id
	/**
     * modify
     * @param brand
     */
    public void update(Brand brand){
        //2. Get SqlSession
        SqlSession sqlSession = factory.openSession();
        //3. Get BrandMapper
        BrandMapper mapper = sqlSession.getMapper(BrandMapper.class);
        //4. Call method
        mapper.update(brand);
        //Commit transaction
        sqlSession.commit();
        //Release resources
        sqlSession.close();
    }
8.4.2.3 writing servlet s
Create a servlet of AddServlet under the web package. The logic of the servlet is as follows:
- Set the character set for handling post request garbled code
- Receive data submitted by the client
- Encapsulate the received data into a Brand object
- Call the update() method of BrandService to process the added business logic
- Jump to the selectAllServlet resource and re query the data
The specific codes are as follows:
@WebServlet("/updateServlet")
public class UpdateServlet extends HttpServlet {
    private BrandService service = new BrandService();

    @Override
    protected void doGet(HttpServletRequest request, HttpServletResponse response) throws ServletException, IOException {

        //Handle the garbled code of POST request
        request.setCharacterEncoding("utf-8");
        //1. Receive the data submitted by the form and encapsulate it into a Brand object
        String id = request.getParameter("id");
        String brandName = request.getParameter("brandName");
        String companyName = request.getParameter("companyName");
        String ordered = request.getParameter("ordered");
        String description = request.getParameter("description");
        String status = request.getParameter("status");

        //Encapsulated as a Brand object
        Brand brand = new Brand();
        brand.setId(Integer.parseInt(id));
        brand.setBrandName(brandName);
        brand.setCompanyName(companyName);
        brand.setOrdered(Integer.parseInt(ordered));
        brand.setDescription(description);
        brand.setStatus(Integer.parseInt(status));

        //2. Call the service to complete the modification
        service.update(brand);

        //3. Forward to query all servlets
        request.getRequestDispatcher("/selectAllServlet").forward(request,response);
    }

    @Override
    protected void doPost(HttpServletRequest request, HttpServletResponse response) throws ServletException, IOException {
        this.doGet(request, response);
    }
}
Problem: update The JSP page does not carry the primary key data when submitting data, and the background modification data needs to be modified according to the primary key.
To solve this problem, we don't want the page to show the primary key id to users, but we want to submit the primary key id to the back end when submitting data. At this point, we think of the hidden fields learned when learning HTML, which are in update. HTML Add the following code to the form of the JSP page:
<%--Hide fields, submit id--%>
<input type="hidden" name="id" value="${brand.id}">
update. The final code of the JSP page is as follows:
<%@ page contentType="text/html;charset=UTF-8" language="java" %>
<%@ taglib prefix="c" uri="http://java.sun.com/jsp/jstl/core" %>
<!DOCTYPE html>
<html lang="en">
<head>
    <meta charset="UTF-8">
    <title>Modify brand</title>
</head>
<body>
<h3>Modify brand</h3>
<form action="/brand-demo/updateServlet" method="post">

    <%--Hide fields, submit id--%>
    <input type="hidden" name="id" value="${brand.id}">

    Brand name:<input name="brandName" value="${brand.brandName}"><br>
    Enterprise name:<input name="companyName" value="${brand.companyName}"><br>
    Sort:<input name="ordered" value="${brand.ordered}"><br>
    Description information:<textarea rows="5" cols="20" name="description">${brand.description} </textarea><br>
    Status:
    <c:if test="${brand.status == 0}">
        <input type="radio" name="status" value="0" checked>Disable
        <input type="radio" name="status" value="1">Enable<br>
    </c:if>

    <c:if test="${brand.status == 1}">
        <input type="radio" name="status" value="0" >Disable
        <input type="radio" name="status" value="1" checked>Enable<br>
    </c:if>
    <input type="submit" value="Submit">
</form>
</body>
</html>
8.5 deletion
  @Select("delete from tb_brand where id = #{id}")
    void delete(int id);
```java
public void delete(int id){
    SqlSession sqlSession = factory.openSession();
    BrandMapper mapper = sqlSession.getMapper(BrandMapper.class);
    mapper.delete(id);
    sqlSession.commit();
    sqlSession.close();
}
<td><a href="/brand-demo/selectByIdServlet?id=${brand.id}">modify</a> <a href="/brand-demo/deleteByIdServlet?id=${brand.id}">delete</a></td>
@WebServlet("/deleteByIdServlet")
public class DeleteByIdServlet extends HttpServlet {
    BrandService service = new BrandService();
    @Override
    protected void doGet(HttpServletRequest request, HttpServletResponse response) throws ServletException, IOException {
        String id = request.getParameter("id");
        service.delete(Integer.parseInt(id));

        request.getRequestDispatcher("/selectAllServlet").forward(request,response);

    }

    @Override
    protected void doPost(HttpServletRequest request, HttpServletResponse response) throws ServletException, IOException {
        this.doGet(request, response);
    }
}