concept
The core idea of MVC mode is to separate the input, processing and output processes of an application in the way of Model, View and Controller. Such an application is divided into three layers: Model layer, View layer and control layer
The MVC pattern defines the interaction between these three parts in detail:
- The user interacts with the view, enters data and clicks a button
- The controller receives events from the view and operates on the model to update the model according to the data provided by the user
- At the same time, the view will also receive the event notification of "model update", so as to update itself and present the results to the user
Application of MVC mode in Web:
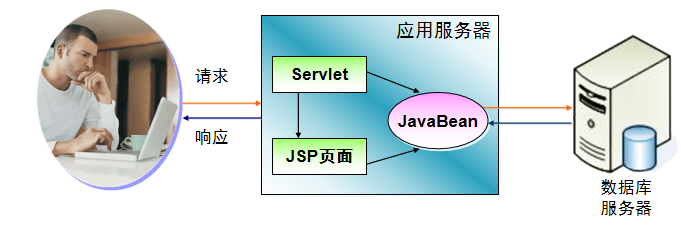
- View is in the Web layer or Client layer, usually JSP or Servlet, that is, the page display part.
- The Controller is also in the Web layer, which is usually implemented by Servlet, that is, the logical part of page display.
- The Model is in the Middle layer and is usually implemented with JavaBean s or EJB s on the server side, that is, the implementation of business logic
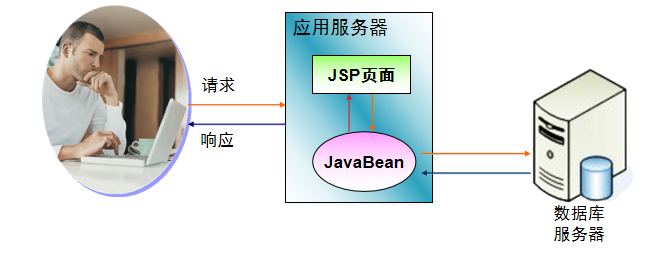
JSP page has two roles of View and Controller, mixing control logic and presentation logic. The writer of JSP page must be both the designer of web page and the developer of Java.
The embedded logic enables developers to understand the whole process of the application, they must browse all pages, and the workload is very heavy. HTML tags, Java code and JavaScript code are concentrated in the same page, making debugging difficult.
Strong coupling, changing business logic and data will involve multiple pages
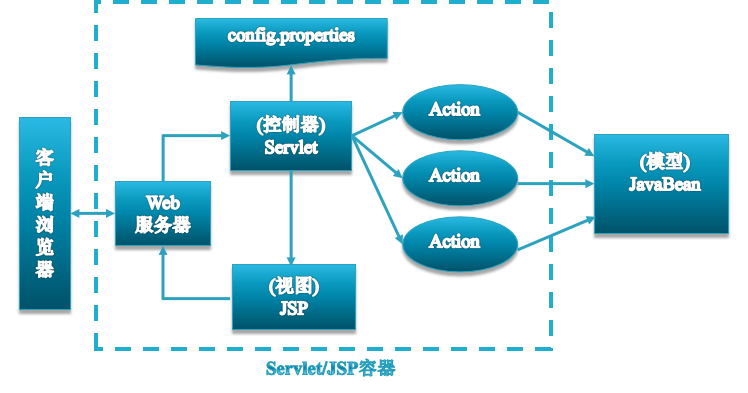
The core of the framework is the front controller, which is implemented as a Servlet. Its main function is to initialize and parse the configuration file, and map the URL requested by the user to the command instance to be executed. The command instance is actually Action.
The front-end controller accepts each request of the user, and simply delegates the request to the dispatcher, which performs the corresponding Action. The scheduler returns the url returned by the Action to the front-end controller, which is responsible for forwarding it.
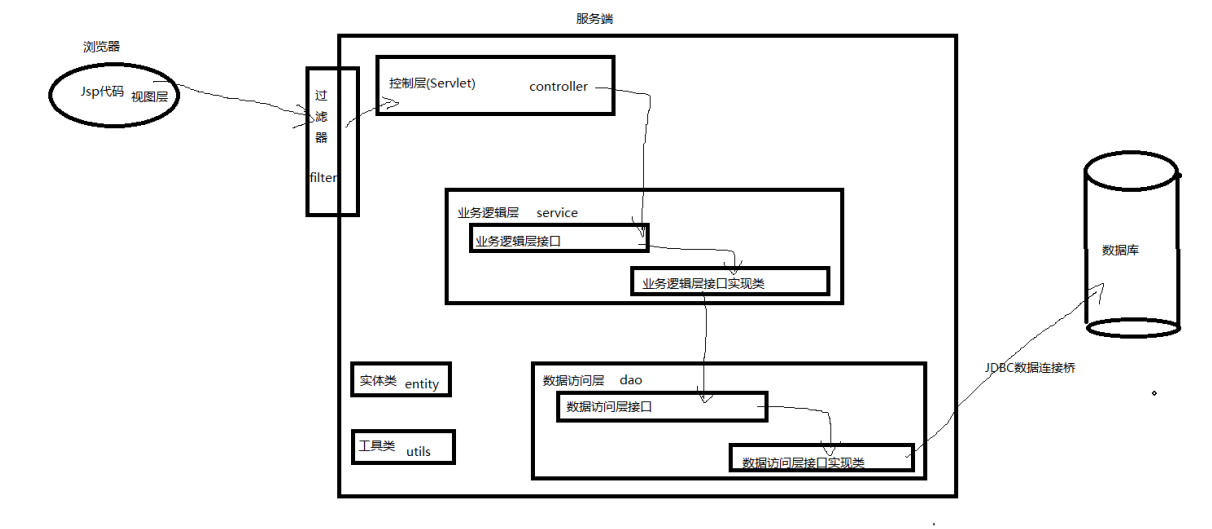
 MVC + three-tier architecture development mode
M: mode model
5: V iew view
C:controller control
Three tier architecture:
Control layer
Business logic layer
Data access layer
Development steps
1. Create projects and tier them
Here, we use the database in the previous articles as the data of the project. The process of creating the database will not be repeated here. If beginners are not proficient in the establishment of the database, they can check it [Jsp] Lesson 11 review of JDBC and use of unit test framework_ Blog with wild strokes - CSDN blog
After creating the web server project, create different packages in the src folder as the hierarchy of the project.
com.student.filter,com.student.controller,com.student.service,com.student.dao,com.student.util, wait.
2. Create a filter
According to the flow chart, the browser needs the interception audit of the filter to access through the address, so let's start at com student. Create a MyFilter filter under the filter package and set the interception address to / * to intercept the access requests of all browsers.
package com.student.filter;

import java.io.IOException;
import javax.servlet.Filter;
import javax.servlet.FilterChain;
import javax.servlet.FilterConfig;
import javax.servlet.ServletException;
import javax.servlet.ServletRequest;
import javax.servlet.ServletResponse;
import javax.servlet.annotation.WebFilter;

/**
 * Block all browser requests to access the server
 */
@WebFilter("/*")
public class MyFilter implements Filter {

    /**
     * Default constructor.
     */
    public MyFilter() {
        // TODO Auto-generated constructor stub
    }

	/**
	 * @see Filter#destroy()
	 */
	public void destroy() {
		// TODO Auto-generated method stub
	}

	/**
	 * @see Filter#doFilter(ServletRequest, ServletResponse, FilterChain)
	 */
	public void doFilter(ServletRequest request, ServletResponse response, FilterChain chain) throws IOException, ServletException {
		response.setContentType("text/html");
		response.setCharacterEncoding("UTF-8");
		request.setCharacterEncoding("UTF-8");
		chain.doFilter(request, response);
	}

	/**
	 * @see Filter#init(FilterConfig)
	 */
	public void init(FilterConfig fConfig) throws ServletException {
		// TODO Auto-generated method stub
	}

}
Before allowing further access, the encoding format of the data of the request and response objects is changed to UTF-8 format in advance to save repetitive code for the Servlet of the control layer and improve the performance of the project with high cohesion and low coupling.
3. Create control layer
According to the flow chart, we start to enter the control layer. We are at com student. HomeServlet is established in the controller package to handle the request that the browser needs to display all student information lists in the database.
package com.student.controller;

import java.io.IOException;
import java.util.List;
import java.util.Map;

import javax.servlet.ServletException;
import javax.servlet.annotation.WebServlet;
import javax.servlet.http.HttpServlet;
import javax.servlet.http.HttpServletRequest;
import javax.servlet.http.HttpServletResponse;
import javax.servlet.http.HttpSession;

import com.student.service.IStudentService;
import com.student.service.StudentServiceImp;

/**
 * Servlet implementation class HomeServlet
 */
@WebServlet("/HomeServlet")
public class HomeServlet extends HttpServlet {
	private static final long serialVersionUID = 1L;

    /**
     * @see HttpServlet#HttpServlet()
     */
    public HomeServlet() {
        super();
        // TODO Auto-generated constructor stub
    }

	/**
	 * @see HttpServlet#doGet(HttpServletRequest request, HttpServletResponse response)
	 */
	protected void doGet(HttpServletRequest request, HttpServletResponse response) throws ServletException, IOException {
		//Receive the task of the browser and ask for all student information
		//Assign tasks to business logic layer


	}

	/**
	 * @see HttpServlet#doPost(HttpServletRequest request, HttpServletResponse response)
	 */
	protected void doPost(HttpServletRequest request, HttpServletResponse response) throws ServletException, IOException {
		// TODO Auto-generated method stub
		doGet(request, response);
	}

}
And take the Servlet as the default access address of the project, which is displayed on the web Set in XML file
<?xml version="1.0" encoding="UTF-8"?>
<web-app xmlns:xsi="http://www.w3.org/2001/XMLSchema-instance" xmlns="http://xmlns.jcp.org/xml/ns/javaee" xmlns:jsp="http://java.sun.com/xml/ns/javaee/jsp" xsi:schemaLocation="http://xmlns.jcp.org/xml/ns/javaee http://xmlns.jcp.org/xml/ns/javaee/web-app_3_1.xsd" id="WebApp_ID" version="3.1">
  <display-name>Day17Jsp</display-name>
  <welcome-file-list>
    <welcome-file>HomeServlet</welcome-file>
  </welcome-file-list>

</web-app>
4. Establish business logic layer
According to the flow chart, the control layer needs to send tasks to the business logic layer for execution, so we Student. Establish the interface file istudentservice in the Service (I indicates that the file is an interface file, Student indicates that the file operates the Student table, and Service indicates that the file is a business logic layer file). Establish the method of receiving control layer tasks in the interface:
package com.student.service;
/**
 * The business logic layer operates the interface of the student table
 * @author Administrator
 *
 */

import java.util.List;
import java.util.Map;

public interface IStudentService {

	List<Map<String, Object>> getStudents();

}
Because the interface is an unimplemented method that cannot be implemented, it is necessary to establish an implementation class of the interface, StudentServiceImp(Student represents the file that operates the Student table, Service represents the file that is the file of the business logic layer, Imp represents the file that is the implementation class of the interface file):
package com.student.service;
import java.util.List;
import java.util.Map;
import com.student.dao.IStudentDao;
import com.student.dao.StudentDaoImp;
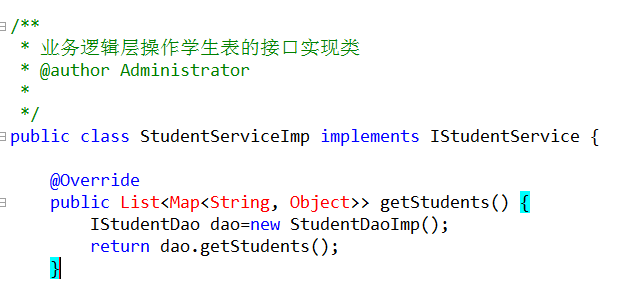
/**
* Interface implementation class of business logic layer operating student table
* @author Administrator
*
*/
public class StudentServiceImp implements IStudentService {
@Override
public List<Map<String, Object>> getStudents() {
return null;
}
}
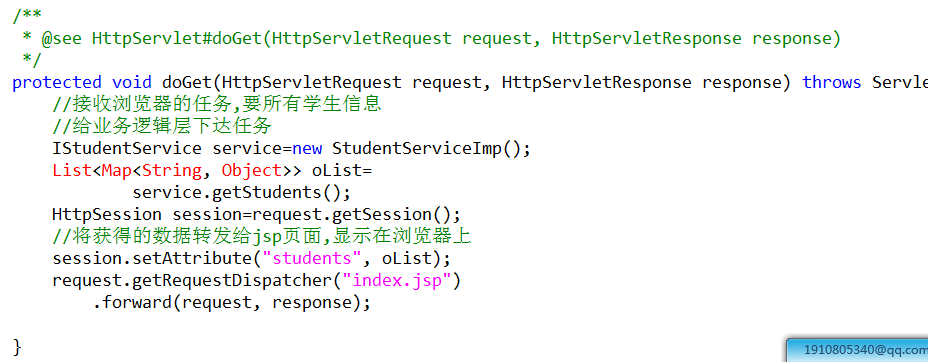
Then, according to the flow chart, the tasks in the control layer are handed over to the interface of the business logic layer for execution:
/**
	 * @see HttpServlet#doGet(HttpServletRequest request, HttpServletResponse response)
	 */
	protected void doGet(HttpServletRequest request, HttpServletResponse response) throws ServletException, IOException {
		//Receive the task of the browser and ask for all student information
		//Assign tasks to business logic layer
		IStudentService service=new StudentServiceImp();
		List<Map<String, Object>> oList=
				service.getStudents();


	}
5. Establish data access layer
According to the flow chart, the implementation class of the business logic layer needs to send tasks to the data access layer, so we Student. Create istudentdao in the Dao package (I indicates that the file is an interface file, Student indicates that the file operates the Student table, and Dao indicates that the file is a file of the data access layer):
package com.student.dao;
/**
 * The data access layer operates the interface of student table
 * @author Administrator
 *
 */

import java.util.List;
import java.util.Map;

public interface IStudentDao {

	List<Map<String, Object>> getStudents();


}
And create the implementation class of the interface:
package com.student.dao;
import java.util.List;
import java.util.Map;
import com.student.utils.DBUtil;
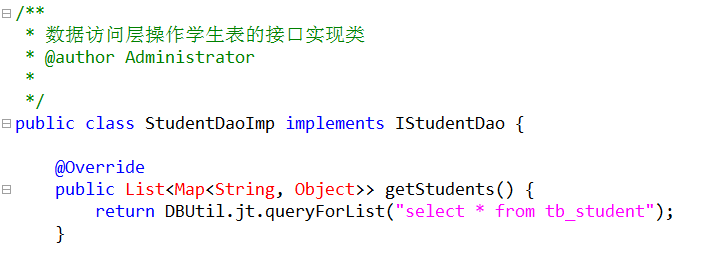
/**
* Interface implementation class of data access layer operating student table
* @author Administrator
*
*/
public class StudentDaoImp implements IStudentDao {
@Override
public List<Map<String, Object>> getStudents() {
return null;
}
}
Implementing classes according to the business logic layer of the flowchart requires the task to be given to the data access layer interface, so calling IStudentDao: in the StudentServiceImp implementation class.
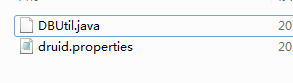
6. Establish database connection pool tool class
It can be seen from the flow chart that the implementation class of the data access layer needs to operate JDBC to connect to the database and perform operations. According to what we have learned before, we use Druid to create a connection pool and combine the JDBC template class of the Spring framework to complete the addition, deletion, modification and query of the database. It is available on COM student. Create DBUtil class in util package:
package com.student.utils;

import java.io.IOException;
import java.io.InputStream;
import java.util.Properties;

import javax.sql.DataSource;

import org.springframework.jdbc.core.JdbcTemplate;

import com.alibaba.druid.pool.DruidDataSourceFactory;

public class DBUtil {

	public static JdbcTemplate jt=null;
	static {
		//The druid configuration file is converted into an input stream using a reflection mechanism
		InputStream is=DBUtil.class
				.getClassLoader()
				.getResourceAsStream
				("com/student/utils/druid.properties");
		Properties properties=new Properties();
		try {
			properties.load(is);
			//Get connection pool object
			DataSource ds=DruidDataSourceFactory
					.createDataSource(properties);
			jt=new JdbcTemplate(ds);
		} catch (Exception e) {
			e.printStackTrace();
		}
	}
}
Import the Druid plug-in into the lib folder and the Druid configuration file into com student. Util package

And import the jar package required by the JDBC template into the lib folder


Then import the database connection bridge plug-in into the lib folder

Then we only need to call the DBUtil tool class in the data access layer implementation class to execute the sql statement to complete the query operation of the database.
 According to the operation of the flow chart, the data queried in the database will be returned layer by layer, and the final return value will be sent to the HomeServlet of the control layer. The control layer needs to send all the data to the Jsp page for display.
7. Create view layer
According to the flow chart, the control layer sends the obtained data to the JSP page for display, so we create a new JSP file under the WebContent file, index JSP, because the queried data is student list information, it is displayed in the JSP page using table tags, and the data is displayed in combination with the iterative tags of the core tag library and the knowledge of EL expressions.
<%@ page language="java" contentType="text/html; charset=UTF-8"
    pageEncoding="UTF-8"%>
    <%@ taglib uri="http://java.sun.com/jsp/jstl/core" prefix="c" %>
<!DOCTYPE html>
<html>
<head>
<meta charset="UTF-8">
<title>Student information list</title>
<style type="text/css">
	input{
		color: white;
		font-weight: bold;
		padding-top: 5px;
		padding-bottom: 5px;
		padding-left: 10px;
		padding-right: 10px;
		border-width: 0px;
		border-radius: 5px;
	}

	.in1{
		background-color: green;
	}
	.in2{
		background-color: blue;
	}
	.in3{
		background-color: red;
	}
</style>
</head>
<body>
	<!-- Use forms to display student information -->
	<div align="center">
		<table border="1" style="width: 400px;
		border-collapse: collapse;text-align: center;">
			<tr>
				<th>Student number</th>
				<th>full name</th>
				<th>Age</th>
				<th>operation</th>
			</tr>
			<c:forEach items="${students}" var="map" varStatus="v">
				<tr>
					<td>${map.id }</td>
					<td>${map.name }</td>
					<td>${map.age }</td>
					<td>
						<a ><input class="in1" type="button" value="add to"></a>
						<a ><input class="in2" type="button" value="modify"></a>
						<a ><input class="in3" type="button" value="delete"></a>
					</td>
				</tr>
			</c:forEach>
		</table>
	</div>
</body>
</html>
Effect
