I believe you are familiar with the bastion machine (springboard machine). In order to ensure the security of the server, add a bastion machine. All ssh connections are completed through the bastion machine. The bastion machine also needs to have identity authentication, authorization, access control, log audit and other functions.
Jumpserver is the first fully open-source bastion machine in the world, and it is a professional operation and maintenance audit system conforming to 4A.
Jumpserver uses Python / Django for development, adopts distributed architecture, supports cross regional deployment of multiple computer rooms, provides API s for central nodes, and deploys login nodes for each computer room, which can be horizontally expanded without concurrent access restrictions.
Jumpserver now supports the management of SSH, Telnet, RDP and VNC protocol assets.
The architecture is as follows:
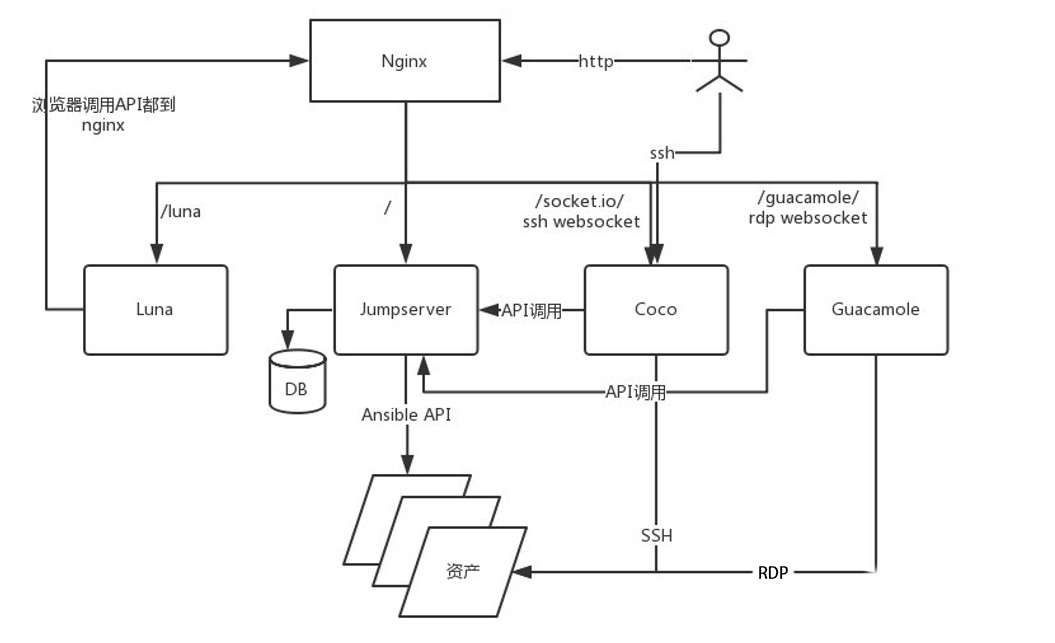
Jumpserver consists of four components. The functions of each component are as follows:
- Jumpserver is the management background. Administrators can perform asset management, user management, asset authorization and other operations through the Web page. Users can perform asset login, file management and other operations through the Web page
- Coco is SSH Server and Web Terminal Server. Users can use their own account to access SSH protocol and Telnet protocol assets through SSH or Web Terminal
- Luna is the front-end page of the Web Terminal Server. Users log in to the required components using the Web Terminal mode
- Guacamole is the asset component of RDP protocol and VNC protocol. Users can connect the RDP protocol and VNC protocol assets through Web Terminal (only through Web Terminal temporarily)
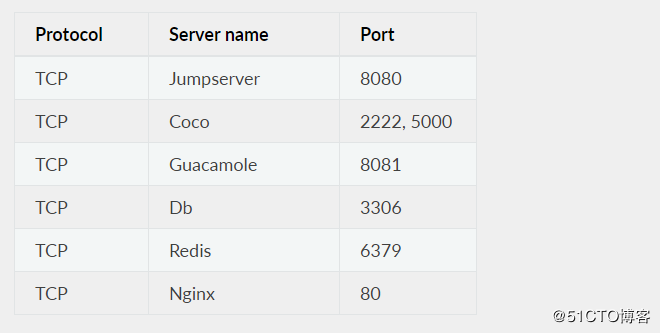
Port specification
The listening ports of each component are as follows:
- Jumpserver default port is 8080/tcp configuration file jumpserver/config.yml
- The default SSH port of Coco is 2222/tcp, and the default Web Terminal port is 5000/tcp. The configuration file is located in coco/config.yml
- The default port of Guacamole is 8081/tcp, and the configuration file is / config/tomcat8/conf/server.xml
- Nginx default port is 80/tcp
- Redis default port is 6379/tcp
- The default port of Mysql is 3306/tcp
1, The environment is as follows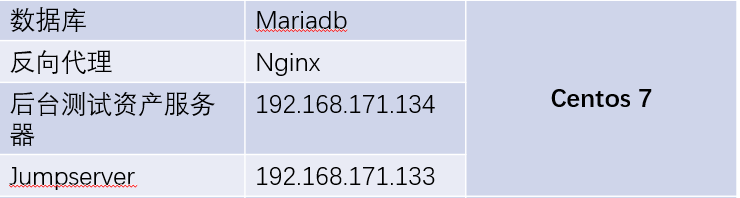
Note: for the test environment, the minimum memory is 4G, dual core CPU.
Source package required: https://pan.baidu.com/s/1PVebXabJpLH4wfTUL5d1Mw
Extraction code: jy8m
First of all, you need to set the environment font to Chinese, because the content in the log file of jumpserver will contain Chinese characters, which may be garbled if not supported.
[root@jumpserver ~]# localedef -c -f UTF-8 -i  zh_CN  zh_CN.UTF-8
[root@jumpserver ~]# export LC_ALL=zh_CN.UTF-8
[root@jumpserver ~]# echo 'LC_ALL=zh_CN.UTF-8' > /etc/locale.conf
2, Configure Python 3 environment
[root@jumpserver jumpserver]# wget -O /etc/yum.repos.d/CentOS-Base.repo http://mirrors.aliyun.com/repo/Centos-7.repo - download the required yum source
[root@jumpserver jumpserver]# yum -y install wget sqlite-devel xz gcc automake zlib-devel openssl-devel epel-release git      # Install dependency package
[root@jumpserver /]# mkdir jumpserver        # Personal habits
[root@jumpserver /]# cd jumpserver/
[root@jumpserver jumpserver]# rz                 # Upload required packages
[root@jumpserver jumpserver]# tar xf Python-3.6.1.tar.xz           # Unpacking
[root@jumpserver jumpserver]# cd Python-3.6.1/
[root@jumpserver Python-3.6.1]# ./configure && make && make install                # Compile and install
[root@jumpserver Python-3.6.1]# cd /opt/
[root@jumpserver opt]# python3 -m venv py3
[root@jumpserver opt]# source /opt/py3/bin/activate       # Execute script to enter Python 3 environment
#Set to automatically load PY3 virtual environment (in the future, as long as you enter this directory, it will be PY3 environment)
(py3) [root@jumpserver opt]# cd /jumpserver/
(py3) [root@jumpserver jumpserver]# unzip autoenv.zip -d /opt/
(py3) [root@jumpserver jumpserver]# cd /opt/autoenv
(py3) [root@jumpserver autoenv]# echo "source /opt/autoenv/activate.sh" >> /root/.bashrc
(py3) [root@jumpserver autoenv]# . ~/.bashrc
3, Install Jumpserver
(py3) [root@jumpserver autoenv]# cd /jumpserver/
(py3) [root@jumpserver jumpserver]# unzip jumpserver.zip -d /opt/
(py3) [root@jumpserver jumpserver]# cd /opt/
(py3) [root@jumpserver opt]# echo "source /opt/py3/bin/activate" > /opt/jumpserver/.env
(py3) [root@jumpserver opt]# cd jumpserver/
autoenv:
autoenv: WARNING:
autoenv: This is the first time you are about to source /opt/jumpserver/.env:
autoenv:
autoenv:   --- (begin contents) ---------------------------------------
autoenv:     source /opt/py3/bin/activate$
autoenv:
autoenv:   --- (end contents) -----------------------------------------
autoenv:
autoenv: Are you sure you want to allow this? (y/N) y         # Enter Y to load py3 environment automatically
(py3) [root@jumpserver jumpserver]# cd requirements/
(py3) [root@jumpserver requirements]# yum -y install `cat rpm_requirements.txt`
(py3) [root@jumpserver requirements]# pip install --upgrade pip
(py3) [root@jumpserver requirements]# pip install -r requirements.txt -i https://mirrors.aliyun.com/pypi/simple/
4, Install MySQL and Redis
#Install MySQL:
(py3) [root@jumpserver requirements]# yum -y install mariadb*
(py3) [root@jumpserver requirements]# systemctl start mariadb
(py3) [root@jumpserver /]# netstat -anput | grep 3306
tcp        0      0 0.0.0.0:3306            0.0.0.0:*               LISTEN      21063/mysqld
(py3) [root@jumpserver /]# mysqladmin -u root password 123.com
(py3) [root@jumpserver /]# mysql -u root -p
Enter password:
MariaDB [(none)]> create database jumpserver default charset 'utf8';
MariaDB [(none)]> grant all on jumpserver.* to jumpserver@127.0.0.1 identified by '123.com';
MariaDB [(none)]> exit
#Install Redis
(py3) [root@jumpserver /]# yum -y install redis
(py3) [root@jumpserver /]# systemctl start redis
(py3) [root@jumpserver /]# netstat -anput | grep 6379
tcp        0      0 127.0.0.1:6379          0.0.0.0:*               LISTEN      21339/redis-server
5, Modify jumpserver configuration file
(py3) [root@jumpserver /]# cd /opt/jumpserver/
(py3) [root@jumpserver jumpserver]# cp config_example.yml config.yml
#Generate secret key token
(py3) [root@jumpserver jumpserver]# SECRET_KEY=`cat /dev/urandom | tr -dc A-Za-z0-9 | head -c 50`
(py3) [root@jumpserver jumpserver]# echo "SECRET_KEY=$SECRET_KEY" >> ~/.bashrc
(py3) [root@jumpserver jumpserver]# BOOTSTRAP_TOKEN=`cat /dev/urandom | tr -dc A-Za-z0-9 | head -c 16`
(py3) [root@jumpserver jumpserver]# echo "BOOTSTRAP_TOKEN=$BOOTSTRAP_TOKEN" >> ~/.bashrc
(py3) [root@jumpserver jumpserver]# sed -i "s/SECRET_KEY:/SECRET_KEY: $SECRET_KEY/g" /opt/jumpserver/config.yml
(py3) [root@jumpserver jumpserver]# sed -i "s/BOOTSTRAP_TOKEN:/BOOTSTRAP_TOKEN: $BOOTSTRAP_TOKEN/g" /opt/jumpserver/config.yml
(py3) [root@jumpserver jumpserver]# sed -i "s/# DEBUG: true/DEBUG: false/g" /opt/jumpserver/config.yml
(py3) [root@jumpserver jumpserver]# sed -i "s/# LOG_LEVEL: DEBUG/LOG_LEVEL: ERROR/g" /opt/jumpserver/config.yml
(py3) [root@jumpserver jumpserver]# sed -i "s/# SESSION_EXPIRE_AT_BROWSER_CLOSE: False/SESSION_EXPIRE_AT_BROWSER_CLOSE: true/g" /opt/jumpserver/config.yml
(py3) [root@jumpserver jumpserver]# sed -i "s/DB_PASSWORD: /DB_PASSWORD: 123.com/g" /opt/jumpserver/config.yml
(py3) [root@jumpserver jumpserver]# echo -e "3[31m your secret key is $secret key \ 033 [0m"
 //Your secret key is igbsk8366vw92hik8ivitd8npo6rf2d990jhnnd3ewu6kh7e
(py3) [root@jumpserver jumpserver]# echo -e "3[31m your bootstrap \ token is $bootstrap \ token \ 033 [0m"
 //Your bootstrap'token is t7SHqC5CKbMmsFVO
(py3) [root@jumpserver jumpserver]# egrep -v '^$|^#' config.yml
SECRET_KEY: IGbsKK8366vW92hIk8IViTd8npO6Rf2d990jhnNNd3EWU6Kh7E
BOOTSTRAP_TOKEN: t7SHqC5CKbMmsFVO
DEBUG: false
LOG_LEVEL: ERROR
DB_ENGINE: mysql
DB_HOST: 127.0.0.1
DB_PORT: 3306
DB_USER: jumpserver
DB_PASSWORD: 123.com
DB_NAME: jumpserver
HTTP_BIND_HOST: 0.0.0.0
HTTP_LISTEN_PORT: 8080
REDIS_HOST: 127.0.0.1
REDIS_PORT: 6379
(py3) [root@jumpserver jumpserver]# ./jms start all -d       # Start jumpserver
(py3) [root@jumpserver jumpserver]# netstat -anput | grep 8080
tcp        0      0 0.0.0.0:8080            0.0.0.0:*               LISTEN      78950/python3
6, Install and configure coco components
(py3) [root@jumpserver jumpserver]# cd /jumpserver/
(py3) [root@jumpserver jumpserver]# unzip coco.zip -d /opt/
(py3) [root@jumpserver jumpserver]# cd /opt/
(py3) [root@jumpserver opt]# echo "source /opt/py3/bin/activate" > /opt/coco/.env
(py3) [root@jumpserver opt]# cd coco/requirements/
autoenv:
autoenv: WARNING:
autoenv: This is the first time you are about to source /opt/coco/.env:
autoenv:
autoenv:   --- (begin contents) ---------------------------------------
autoenv:     source /opt/py3/bin/activate$
autoenv:
autoenv:   --- (end contents) -----------------------------------------
autoenv:
autoenv: Are you sure you want to allow this? (y/N) y
(py3) [root@jumpserver requirements]# yum -y install `cat rpm_requirements.txt`
(py3) [root@jumpserver requirements]# pip install -r requirements.txt
#Modify profile
(py3) [root@jumpserver requirements]# cd ..
(py3) [root@jumpserver coco]# cp config_example.yml config.yml
#View the value of bootstrap'token
(py3) [root@jumpserver coco]# Echo -e "033[31m your BOOTSTRAP TOKEN is $BOOTSTRAP TOKEN 033[0m"
 //Your bootstrap'token is t7SHqC5CKbMmsFVO
 #Note that when you execute the following command, you need to modify it to the value you see:
(py3) [root@jumpserver coco]# sed -i 's/BOOTSTRAP_TOKEN: <PleasgeChangeSameWithJumpserver>/BOOTSTRAP_TOKEN: t7SHqC5CKbMmsFVO/g' config.yml
(py3) [root@jumpserver coco]# sed -i 's/# LOG_LEVEL: INFO/LOG_LEVEL: ERROR/g' config.yml
(py3) [root@jumpserver coco]# egrep -v '^$|^#' config.yml
CORE_HOST: http://127.0.0.1:8080
BOOTSTRAP_TOKEN: t7SHqC5CKbMmsFVO
LOG_LEVEL: ERROR
(py3) [root@jumpserver coco]# ./cocod start -d           # Start coco in the background
7, Install guacamole and luna
Here, the docker container is used for deployment
(py3) [root@jumpserver /]# yum -y install yum-utils device-mapper-persistent-data lvm2                 # Installation dependency
(py3) [root@jumpserver /]# yum-config-manager  --add-repo http://mirrors.aliyun.com/docker-ce/linux/centos/docker-ce.repo
(py3) [root@jumpserver /]# yum makecache fast
(py3) [root@jumpserver /]# yum -y install docker-ce
(py3) [root@jumpserver /]# systemctl start docker
(py3) [root@jumpserver /]# docker load --input /jumpserver/guacamole.tar
#Starting container
(py3) [root@jumpserver /]# docker  run   --name  jms_guacamole   -d -p  8081:8080 -v /opt/guacamole/key:/config/guacamole/key  -e JUMPSERVER_KEY_DIR=/config/guacamole/key -e JUMPSERVER_SERVER=http://192.168.171.133:8080 jumpserver/guacamole:latest
(py3) [root@jumpserver /]# netstat -anput | grep 8081
tcp6       0      0 :::8081                 :::*                    LISTEN      80767/docker-proxy
(py3) [root@jumpserver jumpserver]# tar zxf luna.tar.gz -C /opt/        # Decompression luna
8, Install Nginx
(py3) [root@jumpserver jumpserver]# tar zxf nginx-1.2.4.tar.gz
(py3) [root@jumpserver jumpserver]# cd nginx-1.2.4/
(py3) [root@jumpserver nginx-1.2.4]# ./configure --prefix=/usr/local/nginx && make && make install
(py3) [root@jumpserver nginx-1.2.4]# ln -s /usr/local/nginx/sbin/nginx /usr/local/sbin/
(py3) [root@jumpserver nginx-1.2.4]# cd /usr/local/nginx/conf/
(py3) [root@jumpserver conf]# mv nginx.conf nginx.conf.bak
(py3) [root@jumpserver conf]# mv /jumpserver/nginx.conf /usr/local/nginx/conf/
(py3) [root@jumpserver conf]# nginx -t            # Confirm that nginx configuration has no measures
nginx: the configuration file /usr/local/nginx/conf/nginx.conf syntax is ok
nginx: configuration file /usr/local/nginx/conf/nginx.conf test is successful
(py3) [root@jumpserver conf]# nginx          # Start Nginx
9, client access test
Visit the IP address of the Nginx server to see the login page (the default user name and password are "admin"):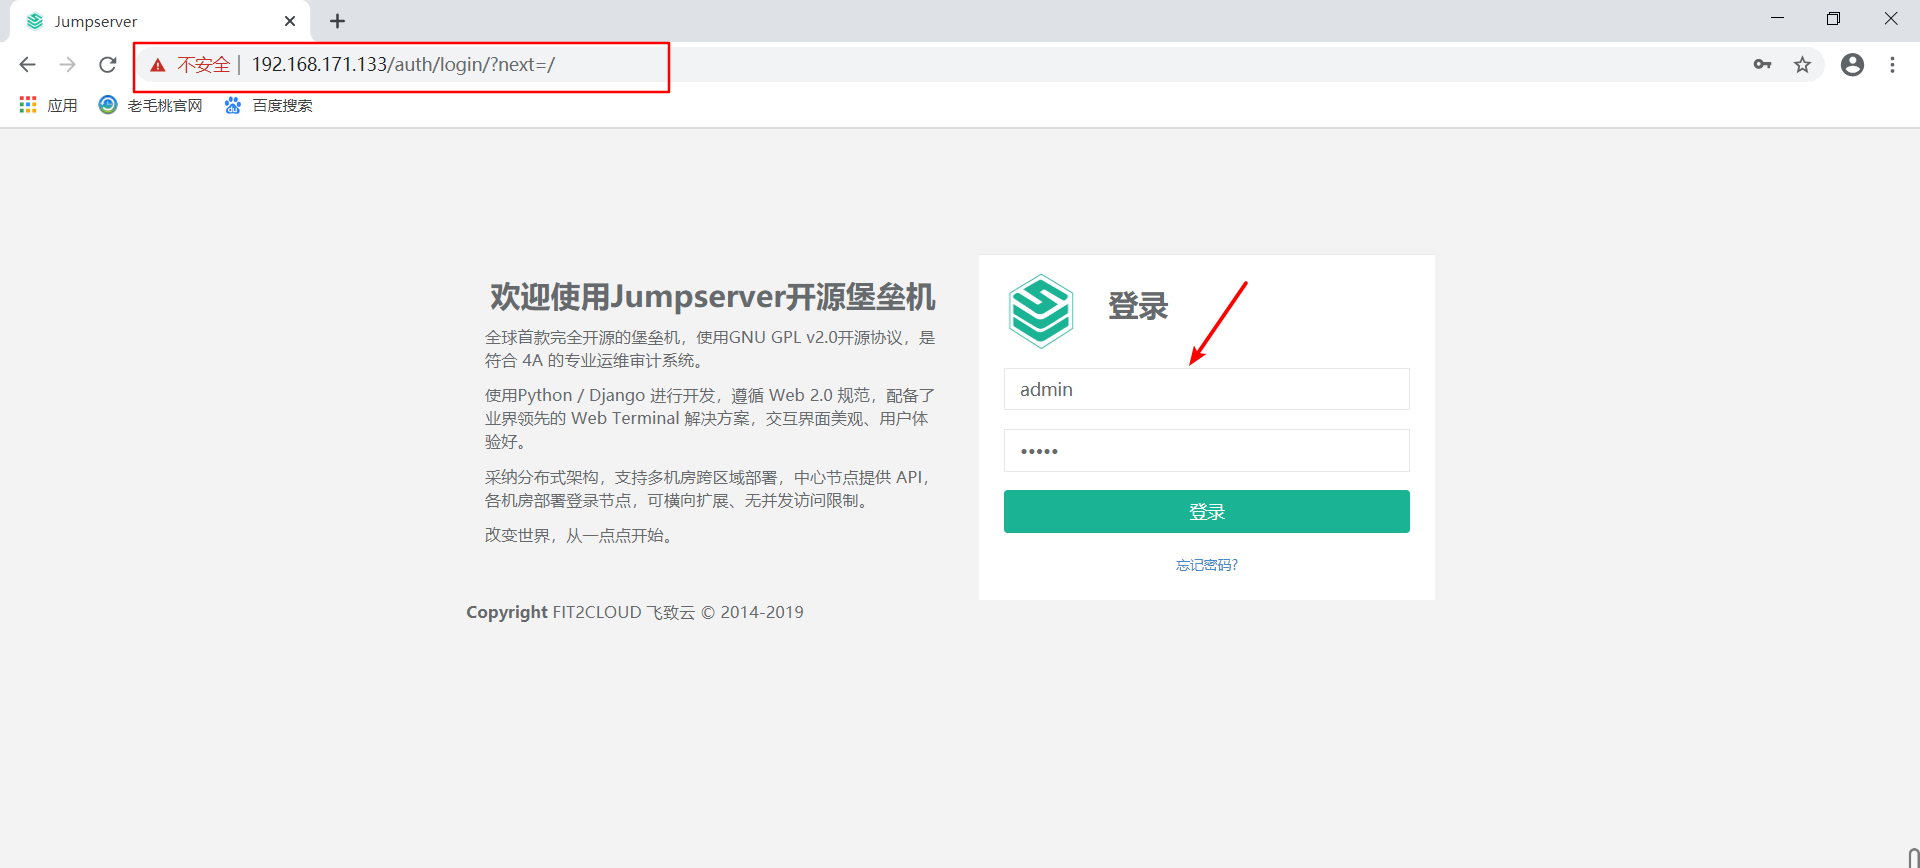
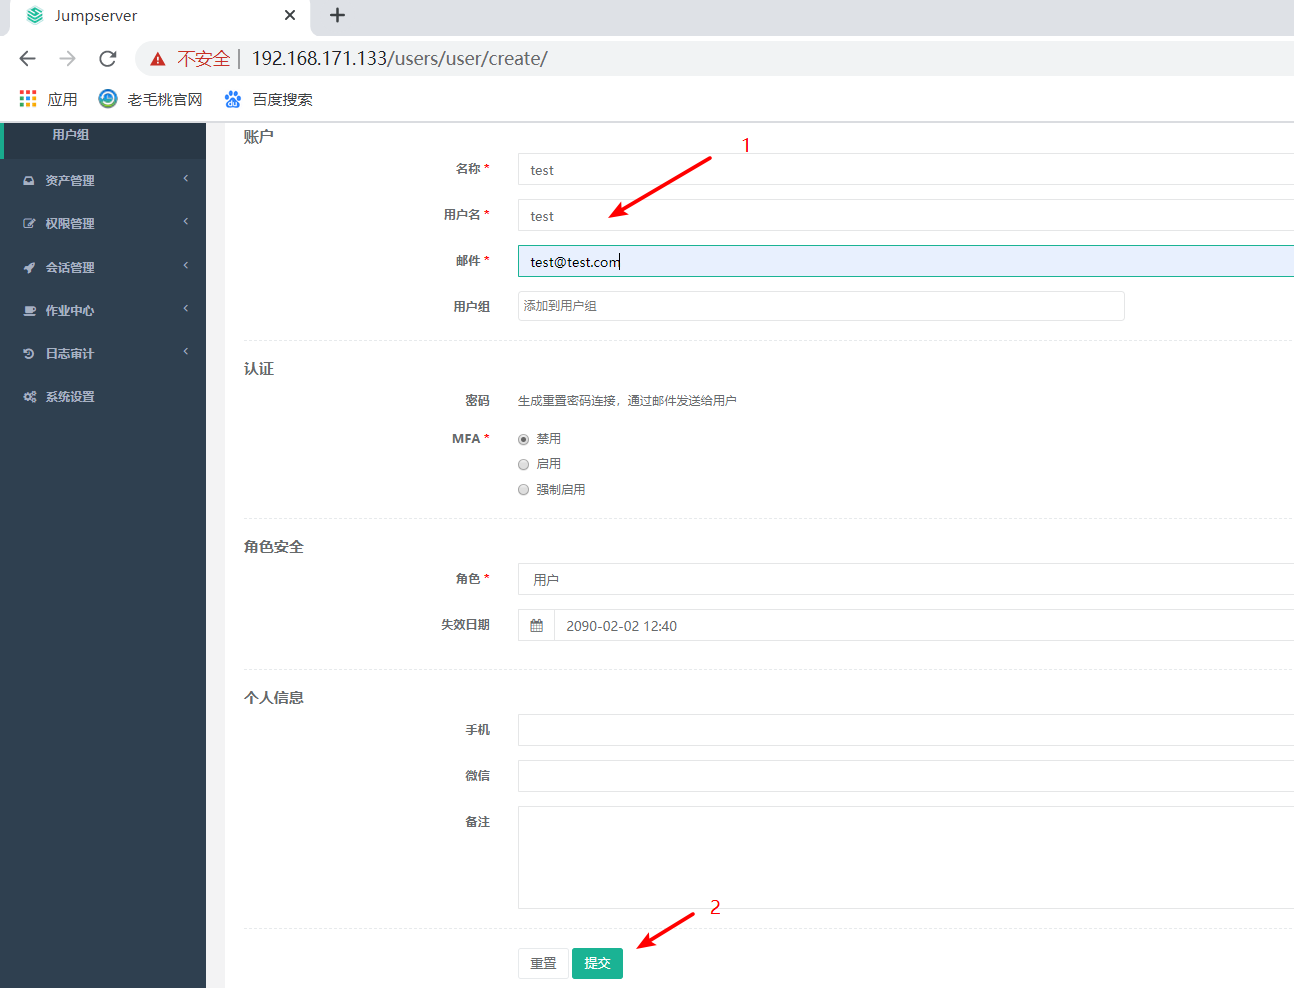
1. Create user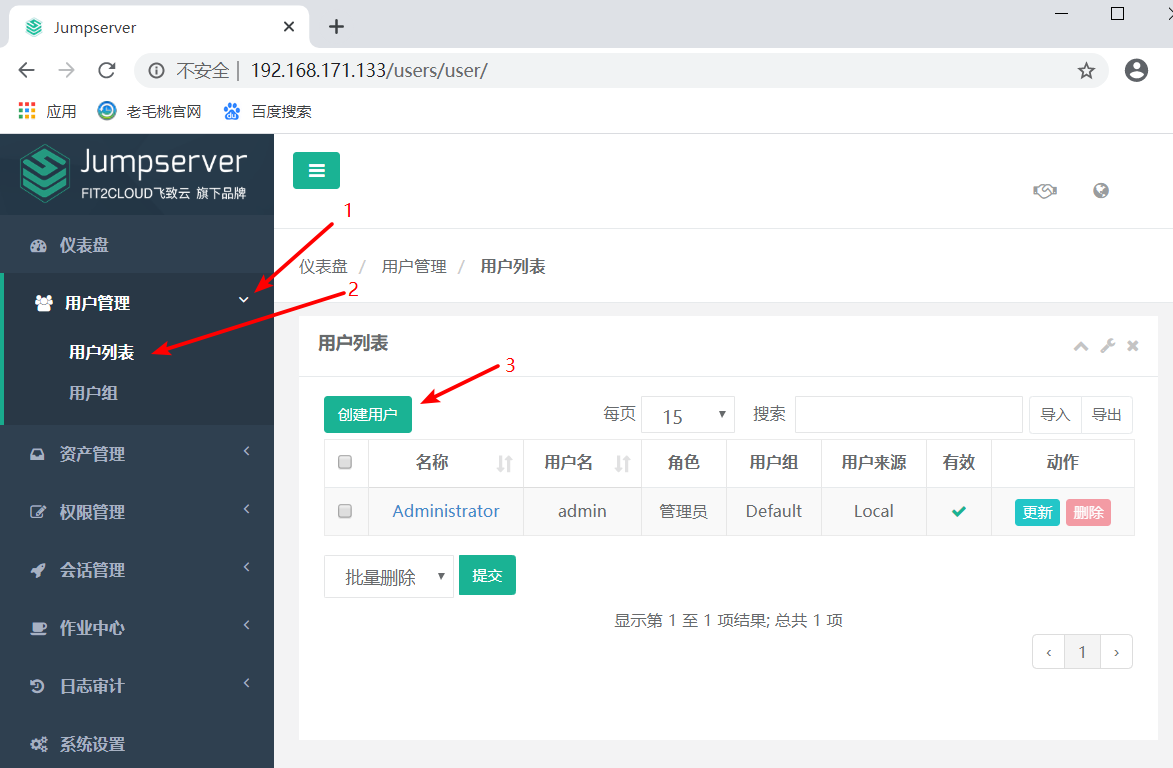
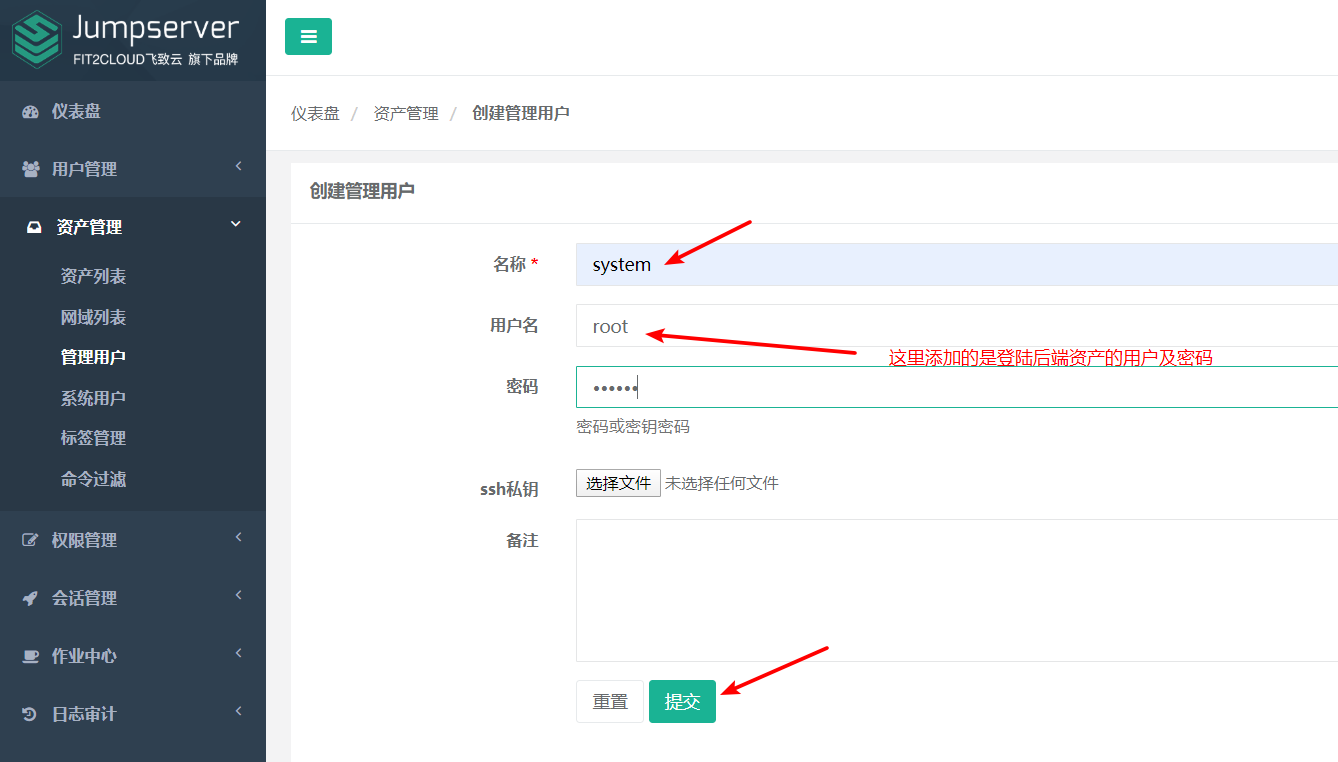
2. Create administrative user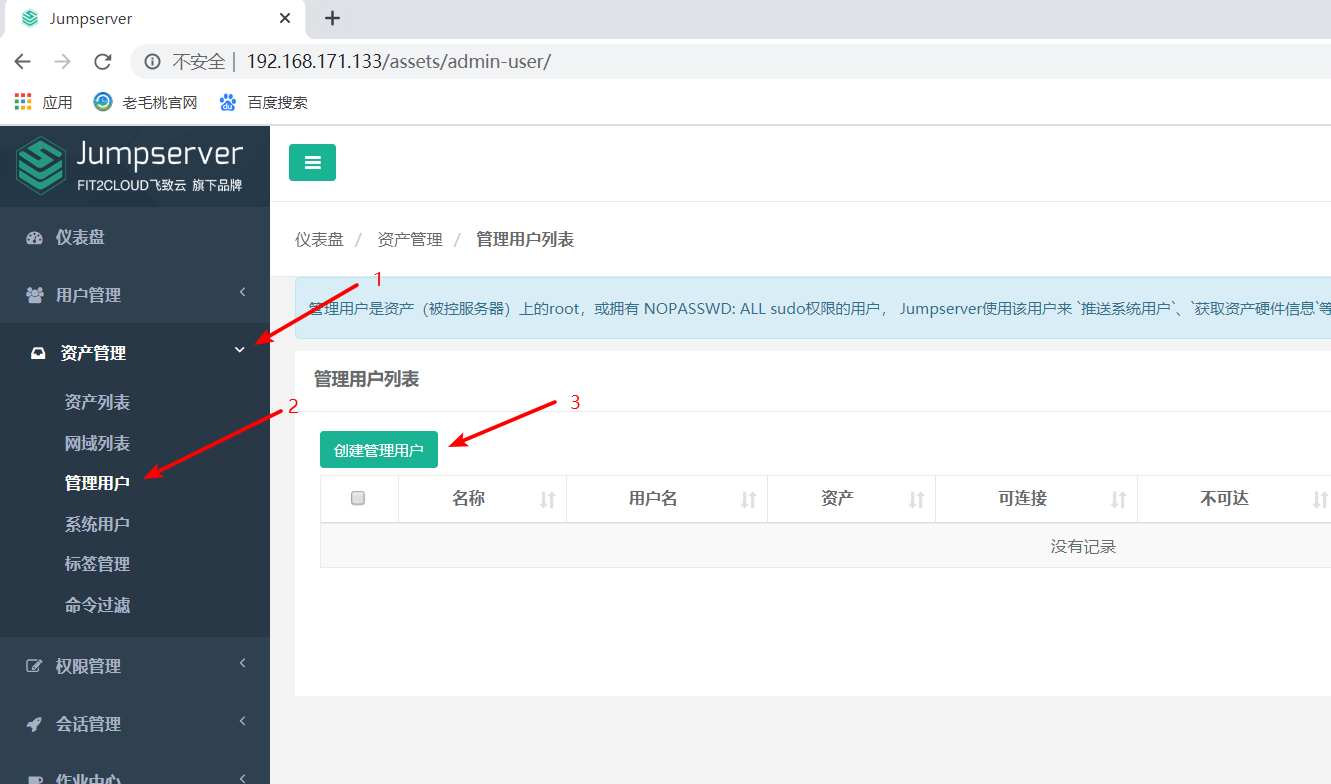
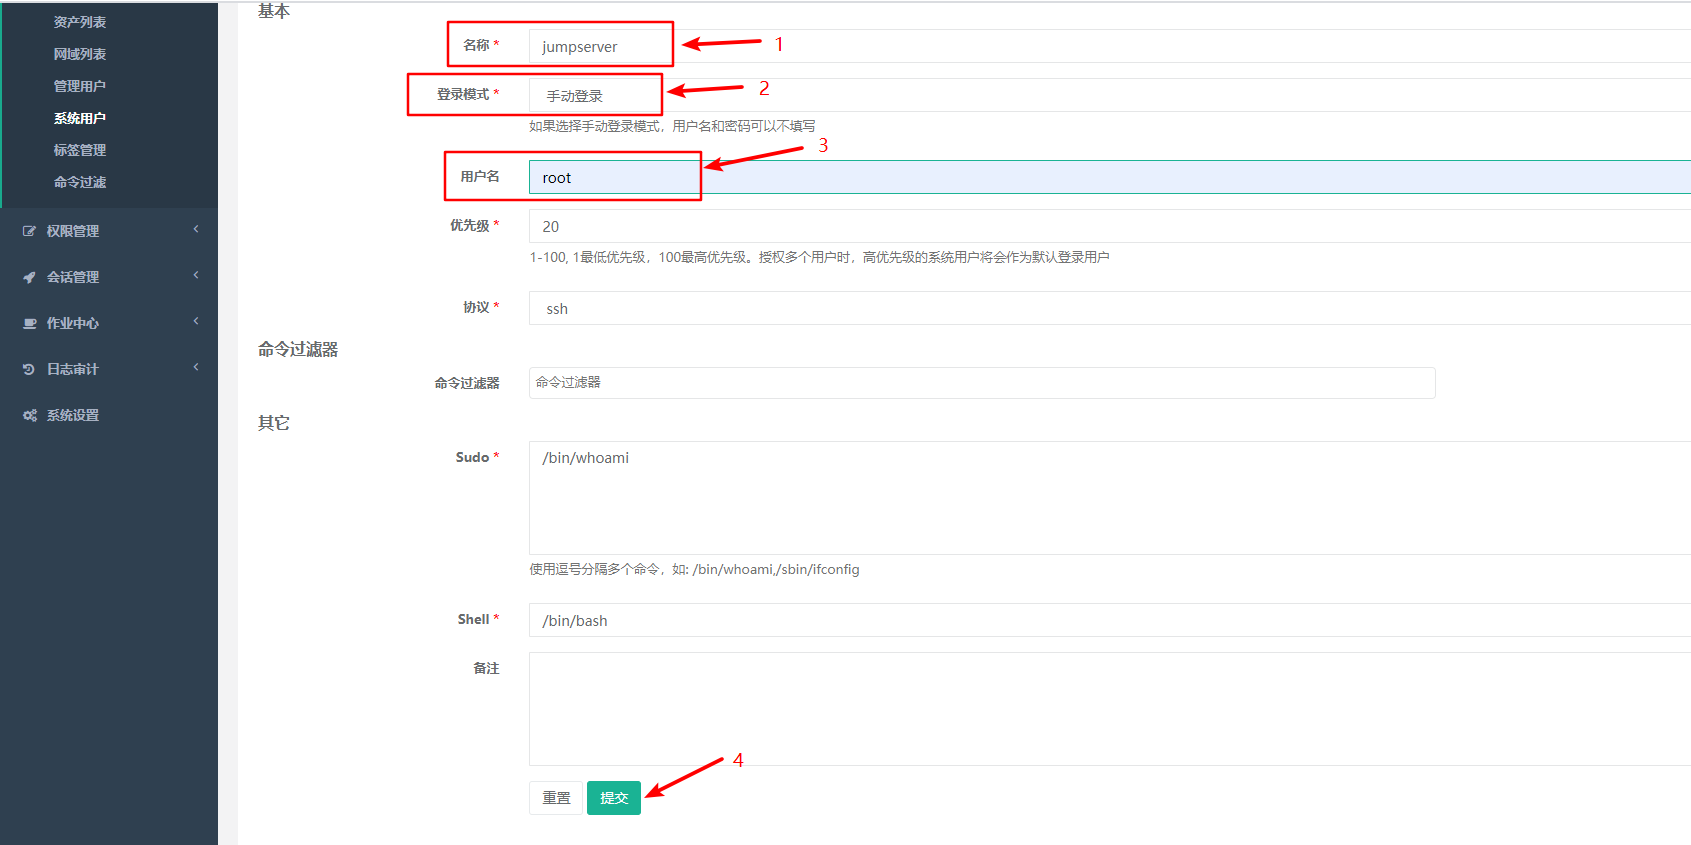
3. Create system user
The user name should be root as far as possible. Select Manual login. This user is used to connect back-end assets.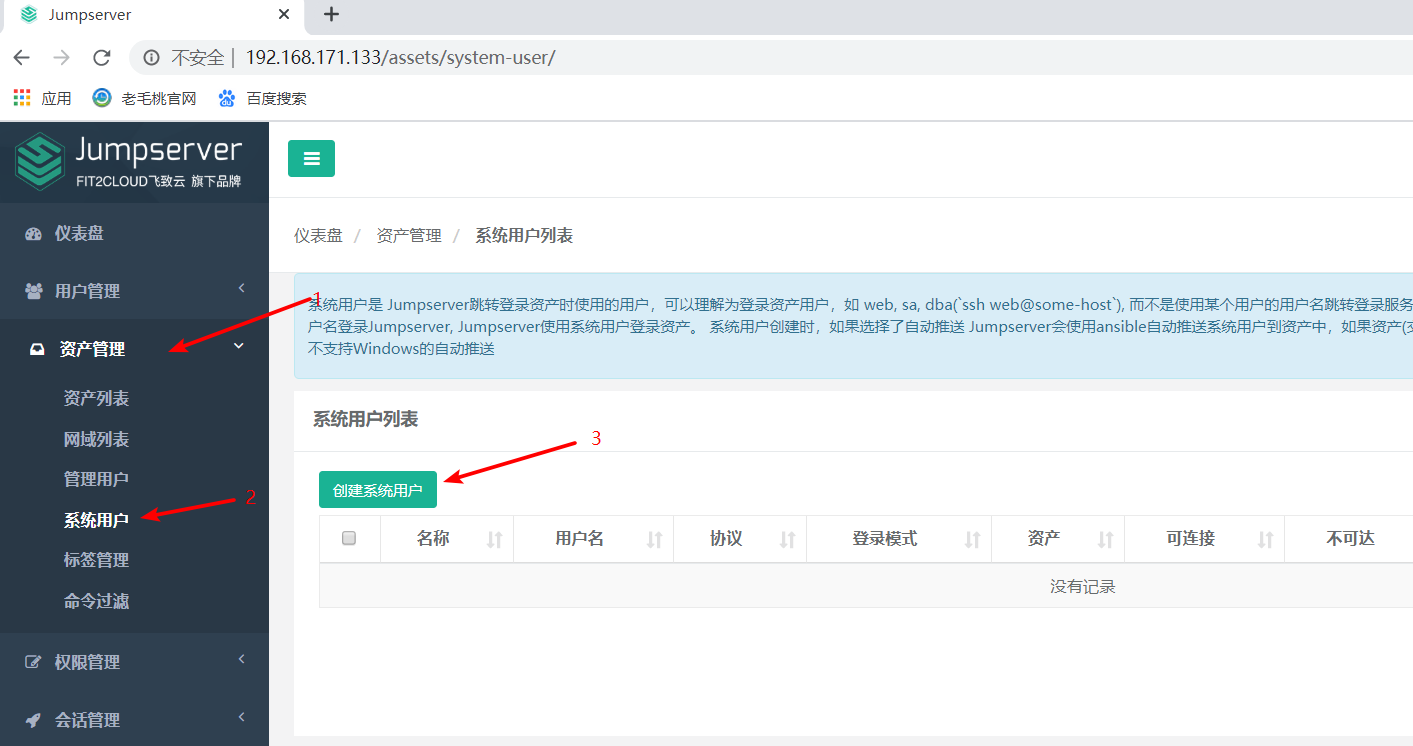
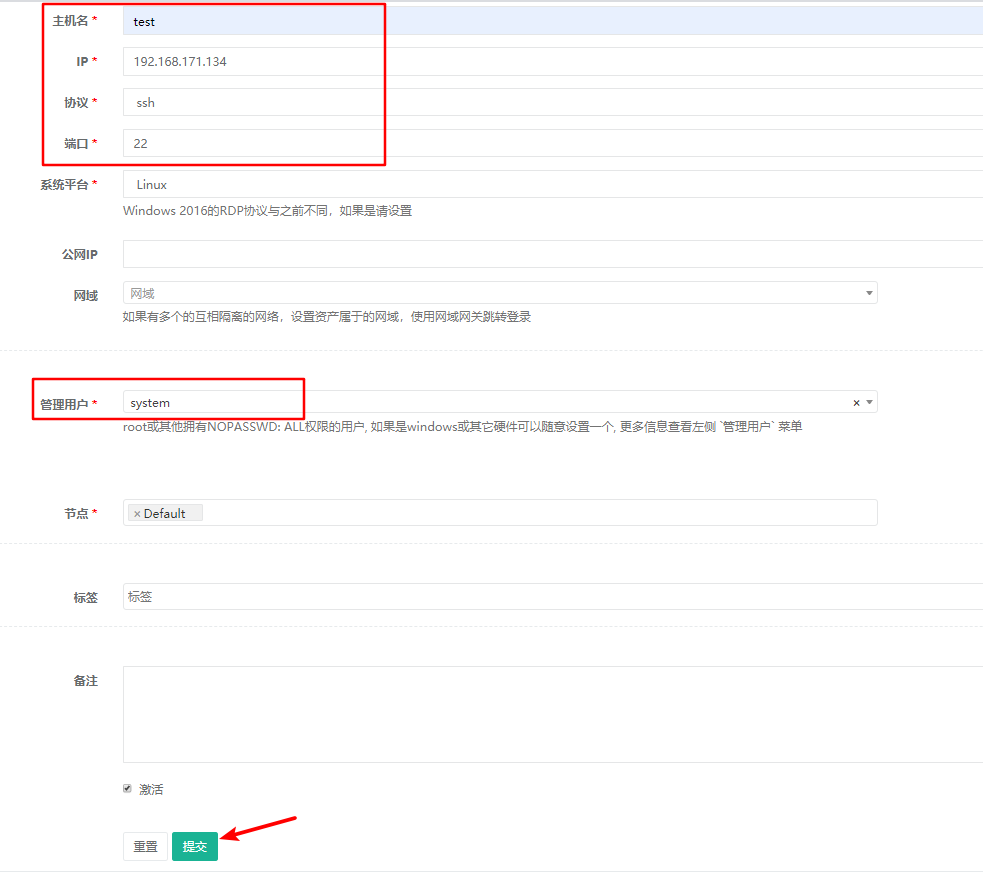
4. Create assets
Here, a host with IP of 192.168.171.134 is started as the back-end asset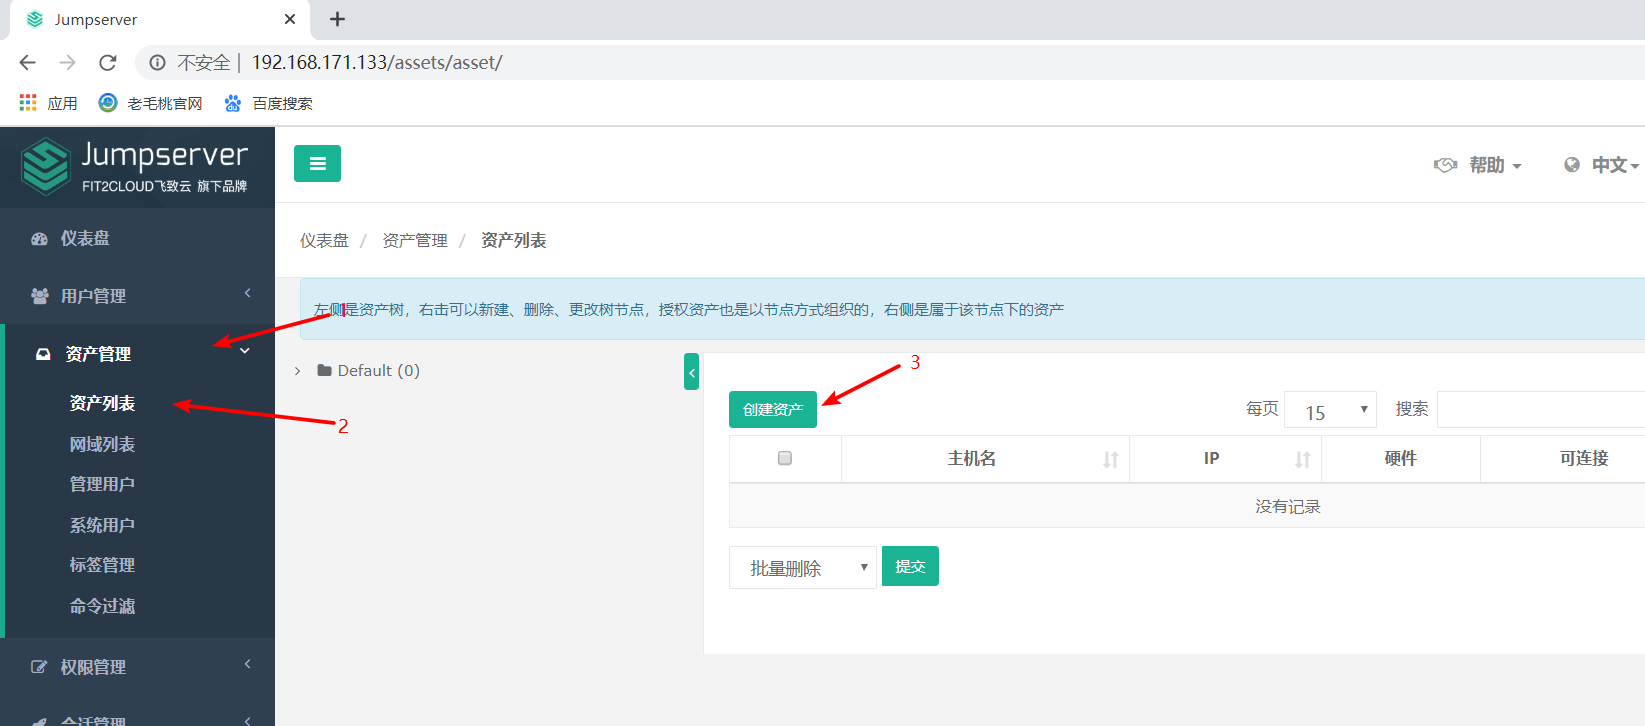
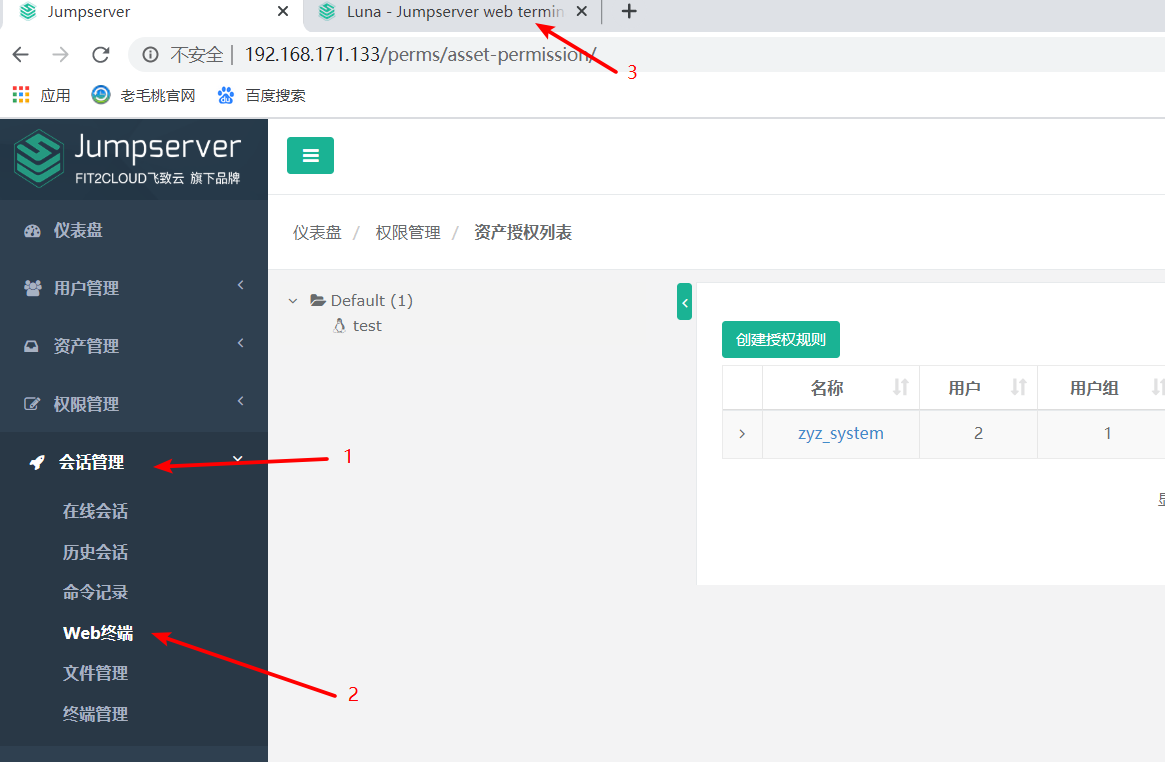
5. Create authorization rule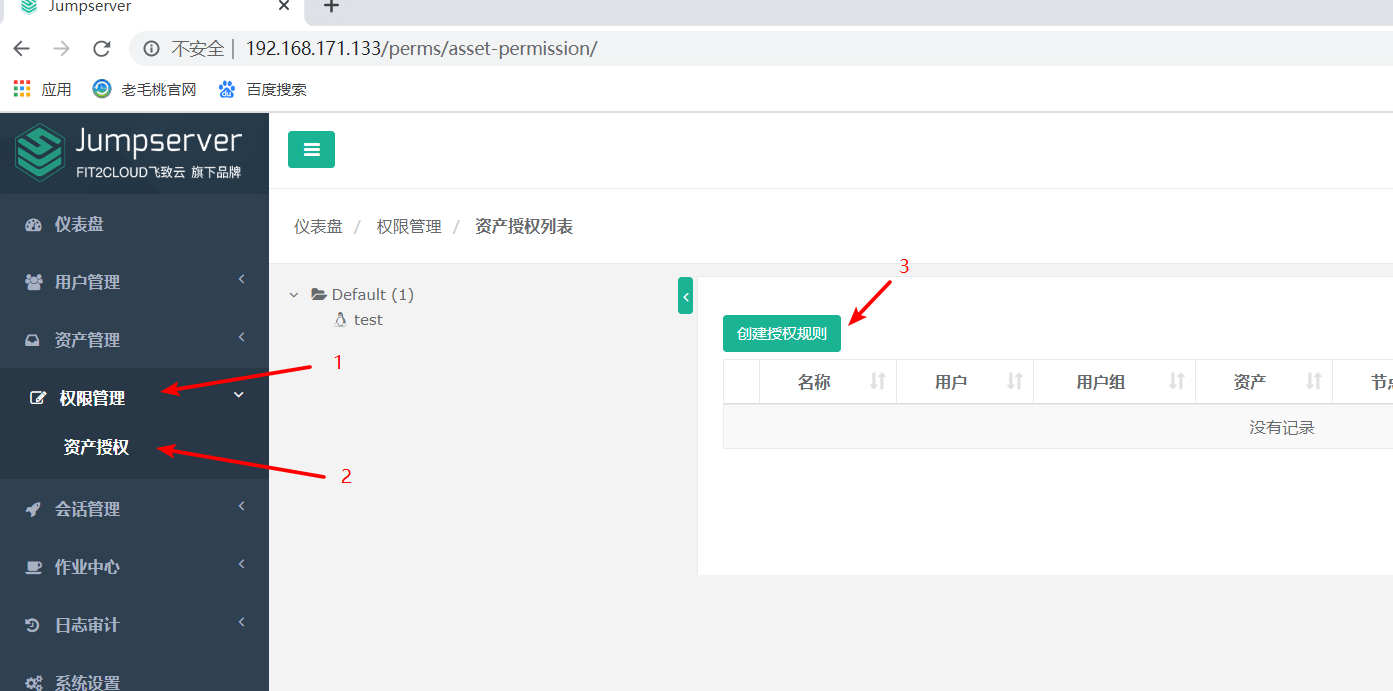

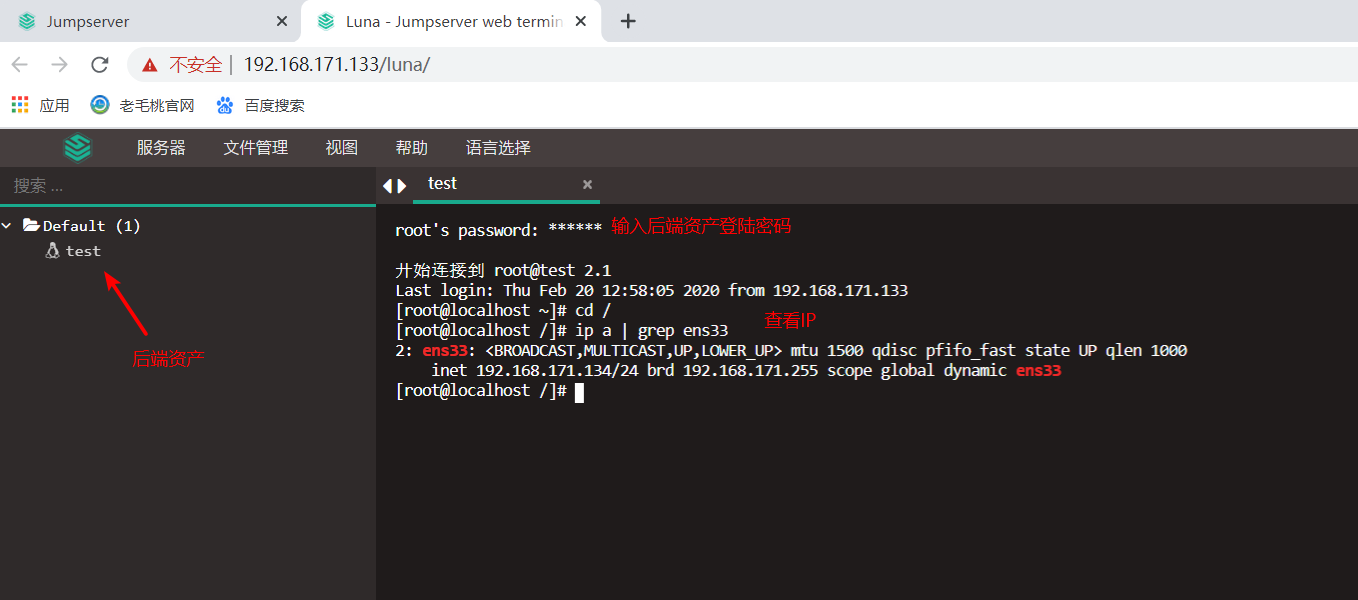
6. Connect back-end asset test