Unit test is to write test code, which should ensure the correctness of basic program modules accurately and quickly.
Good unit test standards
JUnit is a Java unit testing framework that has been installed by default in Eclipse.
JUnit4###
JUnit 4 identifies test methods by annotations. Currently, the main comments supported are:
- @BeforeClass global only executes once, and is the first to run
- @Before run before test method runs
- @Test method
- @After allows
- @AfterClass is only executed once globally, and it is the last run
- @Ignore ignore this method
The basic application of JUnit is introduced based on Eclipse####
Basic test
- A new project is called JUnitTest. We write a Calculator class. This is a Calculator class that can simply implement addition, subtraction, multiplication, division, square and square root, and then unit test these functions.
public class Calculator {
    private static int result; // Static variables to store run results
    public void add(int n) {
        result = result + n;
    }
    public void substract(int n) {
        result = result - 1;  //Bug: the correct one should be result =result-n
    }
    public void multiply(int n) {
    }         // This method has not been written yet
    public void divide(int n) {
        result = result / n;
    }
    public void square(int n) {
        result = n * n;
    }
    public void squareRoot(int n) {
        for (; ;) ;            //Bug: dead cycle
    }
    public void clear() {     // Clear result
        result = 0;
    }
    public int getResult(){
        return result;
    }
}
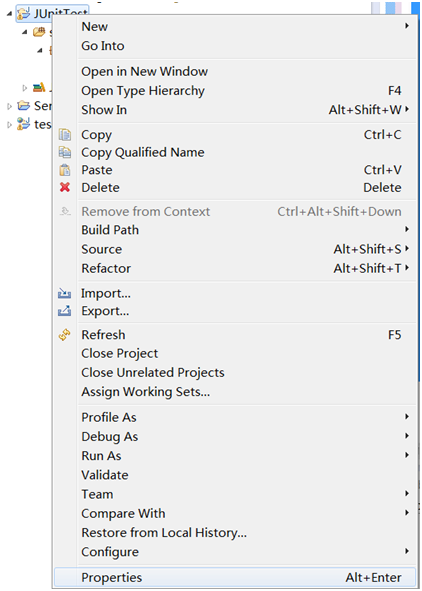
- Introduce JUnit4 unit test package into the project: right click the project and click properties, as shown in the figure
In the pop-up property window, first select "Java Build Path" on the left, then select the "Libraries" tab on the top right, and then click "Add Library..." on the far right Button, as shown in the figure below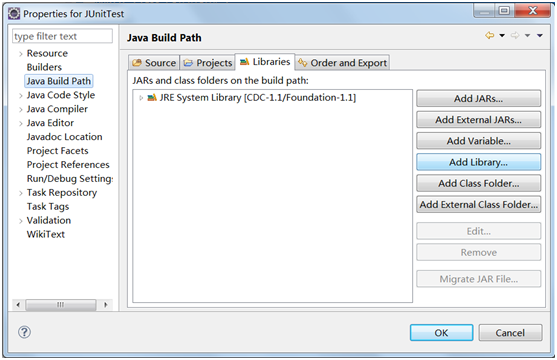
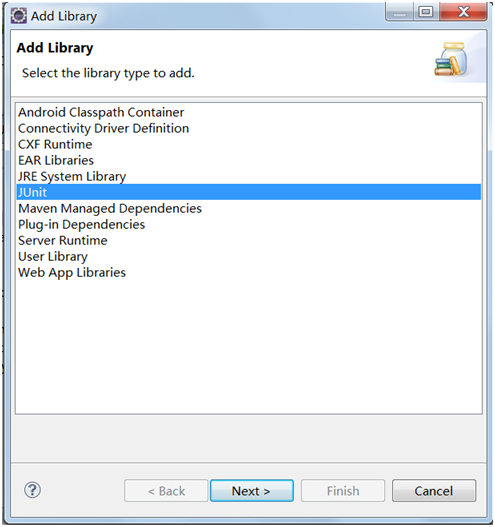
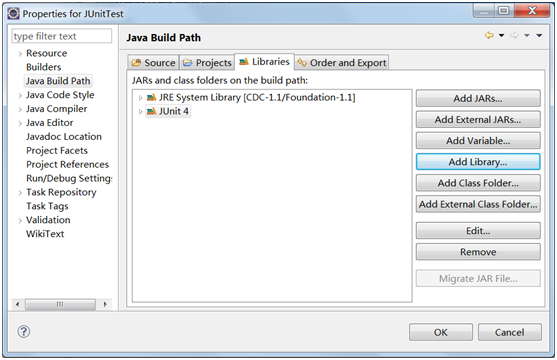
Then select JUnit 4 in the new pop-up dialog box and click OK. As shown in the above figure, JUnit 4 software package is included in our project.
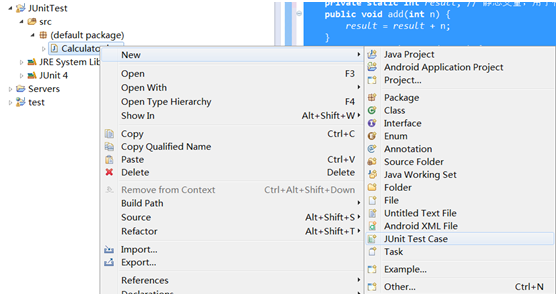
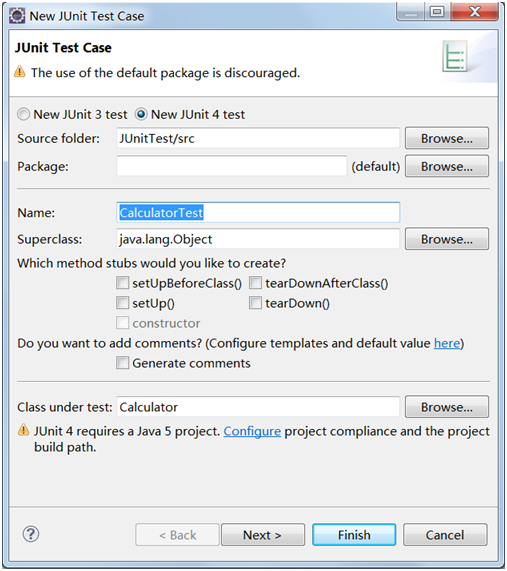
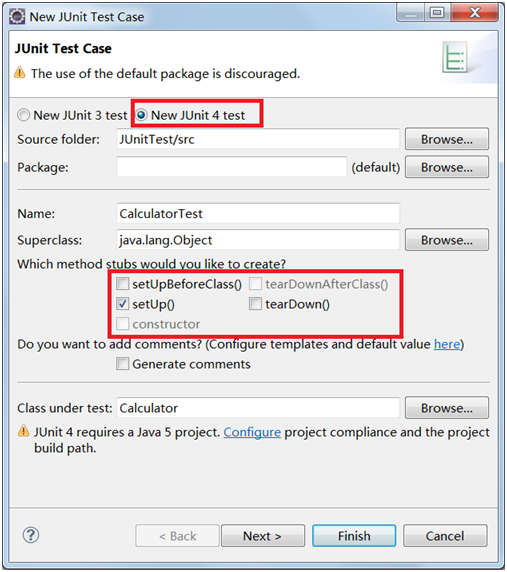
- Generate JUnit test framework: in the Package Explorer of Eclipse, right-click the class to pop up the menu and select "New JUnit Test Case". As shown in the figure below:
After clicking "next", the system will automatically list the methods contained in your class and select the methods you want to test. In this example, we only test the "add, subtract, multiply, divide" four methods.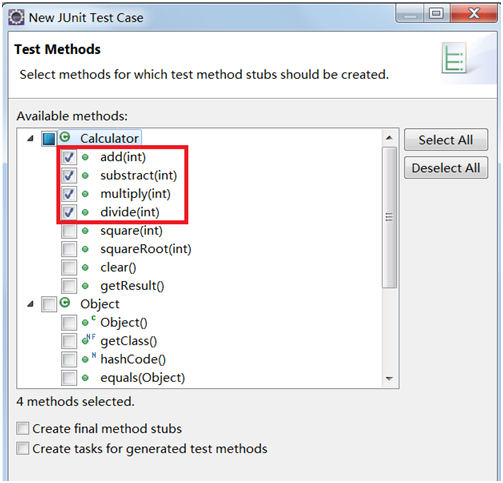
After that, the system will automatically generate a new class CalculatorTest, which contains some empty test cases. You only need to modify these test cases to use them.
The complete CalculatorTest code is as follows:
public class CalculatorTest {
	private static Calculator calculator = new Calculator();

	@Before
	public void setUp() throws Exception {
		calculator.clear();
	}

	@Test
	public void testAdd() {
		calculator.add(3);
        calculator.add(4);
        assertEquals(7, calculator.getResult());

	}

	@Test
	public void testSubstract() {
		calculator.add(8);
        calculator.substract(3);
        assertEquals(5, calculator.getResult());

	}

	@Ignore("Multiply() Not yet implemented")
	@Test
	public void testMultiply() {
		fail("Not yet implemented");
	}

	@Test
	public void testDivide() {
		calculator.add(8);
        calculator.divide(2);
        assertEquals(4, calculator.getResult());

	}

}
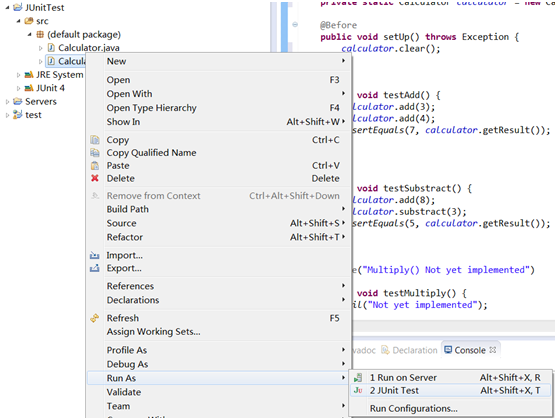
- Run test code: right click the CalculatorTest class and select Run As a JUnit Test to run our test, as shown in the following figure
The operation results are as follows: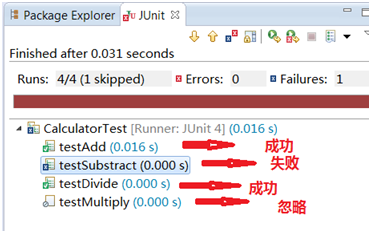
The red color of the progress bar indicates that errors are found. The specific test results on the progress bar indicate that "there are 4 tests in total, one of which is ignored and one of which is failed".
Time limited test
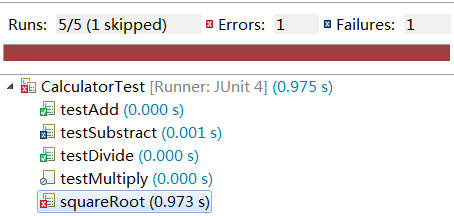
For those programs with complex logic and deep loop nesting, it is likely to have a dead loop, so some preventive measures must be taken. Time limited testing is a good solution. Let's set an execution time for these Test functions. After this time, they will be forcibly terminated by the system, and the system will report to you that the reason for the end of the function is because of the timeout, so you can find these bugs. To realize this function, you only need to add a parameter to the @ Test annotation. The code is as follows:
    @Test(timeout = 1000)
    public void squareRoot() {
        calculator.squareRoot(4);
        assertEquals(2, calculator.getResult());
    }
The Timeout parameter indicates the time you want to set, in milliseconds, so 1000 represents one second.

Test exception##
JAVA exception handling is also a key point, so you often write some functions that need to throw exceptions. So, if you think a function should throw an exception, but it doesn't, isn't it a Bug? This is of course a Bug, and JUnit has taken this into consideration to help us find this Bug. For example, the calculator class we wrote has division function. If the divisor is a 0, we must throw "divide by 0 exception". Therefore, it is necessary to test these. The code is as follows:
  @Test(expected = ArithmeticException.class)
  public void divideByZero(){
        calculator.divide(0);
   }
As shown in the above code, we need to use the expected attribute of the @ Test annotation to pass the exception we want to verify to him, so that the JUnit framework can automatically help us detect whether the exception we specified has been thrown.
Parametric test
We may have encountered such a function whose parameters have many special values, or whose parameters are divided into many regions.
For example, to test the function of "calculating the square of a number", it can be divided into three categories: positive, 0, and negative. When writing tests, you should write at least three tests, including all three cases. This is really a troublesome thing. The test code is as follows:
    public class AdvancedTest {
        private static Calculator calculator = new Calculator();
        @Before
        public void clearCalculator(){
            calculator.clear();
        }

        @Test
        public void square1() {
            calculator.square(2);
            assertEquals(4, calculator.getResult());
        }

        @Test
        public void square2(){
            calculator.square(0);
            assertEquals(0, calculator.getResult());
        }

        @Test
        public void square3(){
            calculator.square(-3);
            assertEquals(9, calculator.getResult());
        }
     }
In order to simplify similar tests, JUnit 4 puts forward the concept of "parameterized test", which only writes a test function, passes these situations as parameters, and completes the test at one time. The code is as follows:
    @RunWith(Parameterized.class)
    public class SquareTest{
        private static Calculator calculator = new Calculator();
        private int param;
        private int result;

    @Parameters
    public static Collection data() {
        return Arrays.asList(new Object[][]{
               {2, 4},
               {0, 0},
               {-3, 9},
        });
    }

    //Constructor, initializing variables
    public SquareTest(int param, int result){
        this.param = param;
            this.result = result;
    }

    @Test
    public void square(){
        calculator.square(param);
        assertEquals(result, calculator.getResult());
    }
 }
The test class has been executed three times, and the data {processing value and expected processing result} in the data set are used in turn. The results are as follows: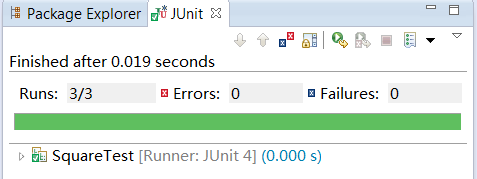
Code analysis is as follows:
- A new class is specially generated for this kind of test, instead of sharing the same class with other tests. In this example, we define a SquareTest class.
- Specify a Runner for this class instead of using the default Runner. The statement @ RunWith(Parameterized.class) specifies a parameterized Runner for this class
- Define a class to be tested and two variables, one for parameters and one for expected results.
- Define the collection of test data, that is, the data() method above. This method can be named arbitrarily, but it must be decorated with @ Parameters annotation.
- Define a constructor whose function is to initialize the two previously defined parameters
source: https://www.cnblogs.com/happyzm/p/6482886.html
==============================================================
The combination of spring boot and unit test JUnit
Some people think that writing unit tests is a waste of time. After writing the code, it can still be tested. However, it is still recommended to write unit tests, which can make your organization clearer, and when there is a problem with a function, it may be easy to locate and solve the problem through unit tests. This paper mainly summarizes the methods of using unit test in Spring and Spring boot projects. Compare JUnit 4 and JUnit 5, because I find that my colleagues often don't understand how to use them.
Juint Version Description
Here we mainly show their dependency packages under Maven
Junit4
<dependency>
	<groupId>junit</groupId>
	<artifactId>junit</artifactId>
	<version>4.13</version>
  <!--Please pay attention to this scope Usage of-->
  <scope>test</scope>
</dependency>
Junit5
<dependency>
  <groupId>org.junit.jupiter</groupId>
  <artifactId>junit-jupiter</artifactId>
  <version>5.6.2</version>
  <!--Please pay attention to this scope Usage of-->
  <scope>test</scope>
</dependency>
In the above dependency, the scope attribute is written for the two dependencies respectively. Here is an explanation:
The structure of a standard maven project is as follows:
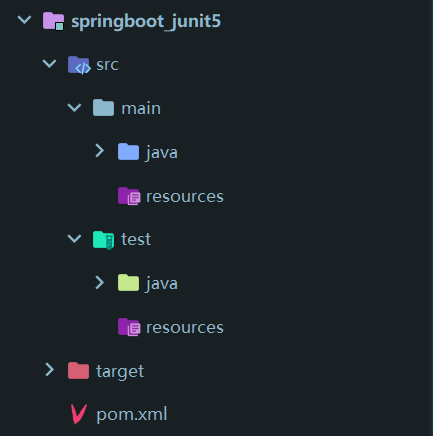
There are two places to write java code: src/main/java and src/test/java. If we do not add scope as the Test attribute in the upper dependency, we can write @ Test test methods anywhere in the two places. However, if we add this attribute, we can only write unit Test code in src/test/java. This is what maven calls the Test domain. It can also be seen from the above figure that the Test domain can have its own configuration file. If it does not, it will load the resources configuration file under main. If it does, its own will take precedence.
JUnit 5 common notes and their usage
No matter which method is used, a standard unit test method is as follows:
public class TestDemo {

    @Test
    void fun1(){
        System.out.println("Welcome to my WeChat official account, "little fish". Java");
    }
}
But for JUnit 4, all Test methods should be declared in public, while JUnit 5 does not. Only in different versions, the @ Test class is different:
Junit4: org.junit.Test
Junit5: org.junit.jupiter.api.Test
Compared with Junit4, 5 added some new annotations, but the common annotations are the same, mainly as follows:
| annotation | Description |
|---|---|
| @Test | A meta annotation written in a test method of a test class, that is, it should be added to every unit test method for it to take effect |
| @ParameterizedTest | Parameterized test is to add some parameters automatically when your test method is executed |
| @RepeatedTest | Repeat this test method |
| @TestFactory | Factory method of dynamic testing |
| @TestTemplate | Test template |
| @TestMethodOrder | The execution order of the test method is in the order before and after the code by default |
| @DisplayName | Custom test method name display |
| @DisplayNameGeneration | Custom name generator |
| @BeforeEach | In Junit4, this annotation is called @ Before. This is the method that will be executed Before each test method is executed, including @ Test, @RepeatedTest, @ParameterizedTest, or @ TestFactory annotated method |
| @AfterEach | Similar to the above, in Junit4, this annotation is called @ After. This is the method that will be executed After each test method is executed, including @ Test, @RepeatedTest, @ParameterizedTest, or @ TestFactory annotated method |
| @BeforeAll | Execute before the method in the current test class, only once. In Junit4, @ BeforeClass |
| @AfterAll | After all the test methods in the current test class are executed, they will only be executed once. In Junit4, @ AfterClass |
| @Nested | Represents a non static test method, that is, @ BeforeAll and @ AfterAll are not valid for this method. If you simply execute this method, the @ BeforeAll and @ AfterAll methods in this class will not be triggered |
| @Tag | Custom tag is to customize an annotation with the same function as @ Test |
| @Disabled | Indicates that this method is not available and will not execute, @ Ignore in JUnit4 |
| @Timeout | Set the timeout of method execution. If it is exceeded, an exception will be thrown |
These are the most commonly used annotations in JUnit 5. You can try one by one and understand their usage in a moment. Pay attention to me. I will give you the specific usage later.
Using Junit in a normal Maven project
After introducing related dependencies, you can test them at the corresponding location. You can download the code and view it without demonstration here
Using Junit in a Spring project
The Spring and Spring boot projects here are also built on Maven. The biggest difference between them is to load the Spring container. Generally speaking, the Spring container can be loaded from the configuration file or configuration class by using the context ApplicationContext provided by Spring. The following code:
/**
 * Use the normal Spring context to load the Spring container
 *
 * @auther WeChat official account: small fish and Java
 * 2020/4/23
 */
public class MyMain {
    public static void main(String[] args) {
        ApplicationContext ctx = new ClassPathXmlApplicationContext("application.xml");
        Teacher teacher = (Teacher) ctx.getBean("teacher");
        System.out.println(teacher.getName());
    }
}
However, we can automatically load the Spring context by introducing Spring related test dependency, so that we can take advantage of automatic injection methods such as @ Autowired to get bean s
<dependency>
  <groupId>org.springframework</groupId>
  <artifactId>spring-test</artifactId>
  <version>5.2.5.RELEASE</version>
</dependency>
But there are some differences between JUnit 4 and JUnit 5 when they write test methods, as follows:
Junit4
@RunWith(SpringJUnit4ClassRunner.class)
@ContextConfiguration(locations = {"classpath:application.xml"})
public class TestDemo {
    @Resource
    private Teacher teacher;

    @Test
    public void fun(){
        System.out.println(teacher.getName());
    }
}
Junit5
@SpringJUnitConfig
//Specify the configuration file path, which will be found in the test domain first
@ContextConfiguration("classpath:application.xml")
public class SpringTest {

    @Resource
    private Teacher teacher;

    @Test
    void fun(){
        System.out.println(teacher.getName());
    }
}
They all add extra annotations to load the
Using Junit in a SpringBoot project
In Spring boot, we provide an annotation of Spring boot test to load the Spring container. JUnit 4 before Spring boot 2.2.0 and JUnit 5 after Spring boot. But I suggest that JUnit 5 should be used most.
Junit4
<dependencies>
  <dependency>
    <groupId>org.springframework.boot</groupId>
    <artifactId>spring-boot-starter</artifactId>
    <version>2.1.6.RELEASE</version>
  </dependency>
  <dependency>
    <groupId>org.springframework.boot</groupId>
    <artifactId>spring-boot-starter-test</artifactId>
    <version>2.1.6.RELEASE</version>
    <!--Indicates that the maven Used in the test domain of-->
    <scope>test</scope>
  </dependency>
</dependencies>
@SpringBootTest
@RunWith(SpringJUnit4ClassRunner.class)
public class TestDemo {

   @Resource
   private Student student;

   @Test
   public void fun1(){
        System.out.println(student.getName());
    }
}
Junit5
<dependencies>
  <dependency>
    <groupId>org.springframework.boot</groupId>
    <artifactId>spring-boot-starter</artifactId>
    <version>2.2.6.RELEASE</version>
  </dependency>
  <dependency>
    <groupId>org.springframework.boot</groupId>
    <artifactId>spring-boot-starter-test</artifactId>
    <version>2.2.6.RELEASE</version>
    <!--Indicates that the maven Used in the test domain of-->
    <scope>test</scope>
    <exclusions>
      <!--This is JUnit5 In order to support the use of JUint4 An overreaction
       That is to say, you only need to JUnit4 Add this dependency to the old project,
       It can make a perfect transition without modifying the previous code
       If it doesn't work here, it will be ruled out. Here, of course, it doesn't matter
			-->
      <exclusion>
        <groupId>org.junit.vintage</groupId>
        <artifactId>junit-vintage-engine</artifactId>
      </exclusion>
    </exclusions>
  </dependency>
</dependencies>
@SpringBootTest //It loads the Spring container for us by default,
public class TestDemo {

    @Resource
    private Student student;

    @Test
    void fun1(){
        System.out.println(student.getName());
    }
}
Why not specify the configuration file of Spring container in Spring boot?
In fact, it will automatically load the SpringBoot startup class in the classpath. Even if you specify the configuration file, you also specify the startup class as the configuration class. If the package structure you write does not meet its requirements, you need to use the @ ContextConfiguration annotation to specify the Spring configuration class
Focus on WeChat official account "small fish and Java", reply 2001 to get the source code of this article.