To use this example, you need to go through the docker container. Please drop down first docker image of jxTMS Start the tms container according to the instructions and helloWorld Start trying.
Query of jxTMS
In the previous section, we demonstrated the definition and ORM operation of tables in the database. In this section, we mainly demonstrate conditional query. In most cases, we are:
-
The queried data is displayed in the data table of a web interface for users to view
-
The user clicks a toolbar of a line, and jxTMS executes the corresponding response function to process the data of the line
In this section, we first demonstrate how to query data from the database and display it in the data table of a web interface.
Definition of data source
jxTMS refers to a query statement as a data source. The definition of data source is defined in SQL file in SQL like syntax. Please create a new file named SQL in demo1 directory, and then enter:
#Please note: we use sql like syntax, so it is a little different from sql syntax
sql listDemoData
#The from clause should precede the select clause
from demoData as ta
#All is equivalent to * in sql, that is, read all
select ta.all
#The equality comparison in the where clause is = =, two equal signs
where ta.Type=='test'
orderBy ta.CreateTime DESC;
Note: at present, the conditions in the where clause are and connection, and the conditions of or connection should be converted to and connection first
Each data source definition statement starts with sql and ends with an English semicolon. Please refer to the specific syntax sql data source.
Listdemodata data source must use the full name when using, and the full name of the data source is [module name. Data source name], then the full name in the example should be: demo listDemoData. It means to query all demoData objects whose Type is test.
Corresponding data sheet
In order to display the data queried by listDemoData, we also need to define a data table. We add the following definitions to the web file [for specific syntax, please refer to Data table control]:
web listDemoData type div;
web listDemoDatat1 bind tableTotalCount parent listDemoData type table title="demoData list",width=900,pagination=true,query=search,queryParam={'listTable':'listDemoDatat1'};
with listDemoDatat1 col ID head ID hide=true;
with listDemoDatat1 col CreateTime head Creation time width=150;
with listDemoDatat1 col Type head type width=100;
with listDemoDatat1 col Name head name width=80;
with listDemoDatat1 col NoUsed head Deleted width=80;
The above text defines a listDemoData interface. The main body of the interface is the listDemoDatat1 data table. The data table is a paging table [pagination=true, 15 rows per page by default]. Since it is a paging table, tableTotalCount must be bound. jxTMS will query the total number of qualified data rows first, To facilitate the initialization of paging control [determine the number of pages, etc.], the query, and queryParam properties must also be written as examples. queryParam is a json type property, which must specify the listTable value as the name of the data table. Because the database name is listDemoDatat1, the listTable value must be set to listDemoDatat1, otherwise the data cannot be displayed correctly.
listDemoDatat1 data table defines a total of 5 columns, corresponding to the five attributes in demoData respectively. However, the ID generally does not need to be displayed, so the hide attribute is used, and the width attribute is defined for other visible columns. You can observe the effect later.
Note 1: what is defined here is actually the relative width of each column. In listDemoDatat1 table, we define the width of 900. The actual width of each column in the table is:
Relative width of this column * 900 /Sum of relative widths of columns
Note 2: the reason why the ID is not displayed and needs to be written here is very simple. If there are operations for each row [i.e. for each demoData object], these operations need to locate the row with the ID. How to use such an ID will be shown later
Add entrance
To display the data table defined above, we need an entry before we can find it and use it. Therefore, we need to add an entry for listDemoData in op.py:
@biz.Motion('demo.demo1','disp','listDemoData')
@biz.OPDescr
def op1(json):
	json.setShortcut('demonstration'.decode('utf-8'),'listDemoData')
	json.setParam('objType','demoData').setParam('dispType','list').setParam('dataSource','demo.listDemoData')
Compared with the entry definition of helloWorld in the previous section, we can find that listDemoData has three more setParam statements. setParam is used to set parameters for the entry. In order to correctly execute listDemoData, we set three parameters:
-
objType: what type of data object should we convert the data queried from the database
-
dispType: for a data table, it must be fixed to list
-
dataSource: Specifies the full name of the data source for this query
Now let's press sql, web and op.py Managing jxTMS code with sftp Update the to the / home/tms/codeDefine/demo/demo/demo1 directory.
Then execute once Heat engine refresh . Because we have added an entry in the shortcut bar on the left, and the shortcut bar is loaded at one time after each login, we have to log out and log in again to see the newly added entry.
After logging in again, click [Demo - > listdemodata] in the shortcut bar to see the display effect:
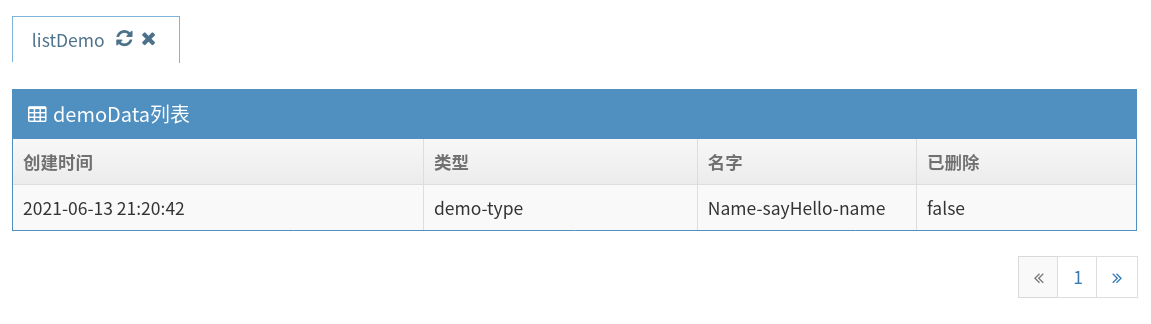
Note: since we only created one demoData object, there is only one row. Therefore, there is only one page in the bottom pagination column
Display details
The above explains why the ID is hidden. Now let's see how to use the hidden ID. Let's first add a detail interface of demoData in the web file:
web dispDemoData type div;
web dispDemoDatat1 parent dispDemoData type table title="Hello, world",width=900;
with dispDemoDatat1 row 0 col c0 web n type text text='Type:',width=100;
with dispDemoDatat1 row 0 col c1 web n bind demoType type text width=350;
with dispDemoDatat1 row 0 col c2 web n type text text='name:',width=100;
with dispDemoDatat1 row 0 col c3 web n bind demoName type text width=350;
It doesn't matter what the columns in the same row are called, but they can't have duplicate names, otherwise the previous one will be lost.
Then in capa Py file, add the prepareDisp event response function of dispDemoData:
@myModule.event('prepareDisp', 'dispDemoData')
def dispDemoData(self, db, ctx):
	dd = pyORM.getByID(db.getDBConn(),'demoData',self.getInput('ID'))
	self.setOutput('demoType',dd.Type)
	self.setOutput('demoName',dd.Name)
Then, add a row to the listDemoData table:
with listDemoDatat1 col op1 head Display details web n type a width=80,capaname='demo.demo1',motion=disp,
	demand=dispDemoData,primary=true,text='see',require=[{"paramName":"ID"}];
web, capa Py and other files Managing jxTMS code with sftp Update the to the / home/tms/codeDefine/demo/demo/demo1 directory.
Then execute once Hot engine refresh , click [Demo - > listdemodata] in the shortcut bar to see the display effect.
You will see an additional column in the list. Click the [view] toolbar to see what will happen.
Please go back and think about what we have done:
-
In order to display the details of an object, we define a detail display interface for the object
-
In order to display the detailed information of the object, we define the prepareDisp event response function of the detailed interface, which is used to read the corresponding data object from the database after loading the interface, and then initialize the detailed interface with the properties of the data object
-
As mentioned earlier, we need an entry for any operation, so we also need to prepare an entry for the details interface. Since viewing details views the details of each row of data in the listDemoData table, its entry can only be attached to the table. Therefore, we have added an op1 column in listDemoDatat1 to place the entry for viewing details.
In addition, how does the prepareDisp function of dispDemoData know which object details it should display?! This uses the ID column we started hiding. The require attribute is used to prepare parameters for the dispDemoData operation. We specify that there is only one parameter, and the parameter name is ID. since the column name of exactly one column in this line is called ID, jxTMS will take the value of this column as a parameter and send it to the dispDemoData function.
Data processing
We directly display the data in the database, but what if we need to display the processed data? For example, when we are over 70, we want to add a special reminder when the list is displayed. Let's make the following simple modifications to dispDemoData:
web listDemoData type div;
web listDemoDatat1 bind tableTotalCount parent listDemoData type table title="demoData list",width=900,pagination=true,query=search,queryParam={'listTable':'listDemoDatat1'};
with listDemoDatat1 col demoID head demoID hide=true;
with listDemoDatat1 col demoCreateTime head Creation time width=150;
with listDemoDatat1 col demoType head type width=100;
with listDemoDatat1 col demoName head name width=80;
with listDemoDatat1 col demoTypeName head Type name width=180;
with listDemoDatat1 col demoNoUsed head Deleted width=80;
with listDemoDatat1 col op1 head Display details web n type a width=80,capaname='demo.demo1',motion=disp,
	demand=dispDemoData,primary=true,text='see',require=[{"paramName":"demoID"}];
It can be seen that we have added a demo to the column names of each column. This is mainly because when we program, it is best to give all names a certain business meaning, so that we can know what they are used for at a glance, which can greatly reduce the possibility of quantity mixing. In addition, a column of demoTypeName is added.
Note: since we changed the ID to demoID, let's take a closer look at the definition of op1 in the last line, and the parameter of require must be changed accordingly
Then we went to capa Py function, add a dispAffairInfo function:
#json is a row in the listDemoDatat1 data table
#jo is the demoData data object converted from each row in the demoData table in the database
def dispAffairInfo(self,db,ctx,json, jo):
	#Set the ID property value of the jo object to the demoID column
	json.set("demoID", jo.ID)
	json.set("demoCreateTime", jo.CreateTime)
	json.set("demoType", utils.getMsg('{}-type',jo.Type))
	json.set("demoName", utils.getMsg('{}-name',jo.Name))
	#Set data for demoTypeName column
	json.set("demoTypeName", utils.getMsg('{}-{}',jo.Type,jo.Name))
	json.set("demoNoUsed", jo.NoUsed)
Above, we changed the parameter name of require in op1, so the prepareDisp event response function of dispDemoData has to change the input parameter name from ID to demoID:
@myModule.event('prepareDisp', 'dispDemoData')
def dispDemoData(self, db, ctx):
	dd = pyORM.getByID(db.getDBConn(),'demoData',self.getInput('demoID'))
	self.setOutput('demoType',dd.Type)
	self.setOutput('demoName',dd.Name)
web, capa Py and other files Managing jxTMS code with sftp Update the to the / home/tms/codeDefine/demo/demo/demo1 directory.
Then execute once Hot engine refresh , click [Demo - > listdemodata] in the shortcut bar to see the display effect.
In jxTMS, for the data table query executed by default, when the data query is completed and ready to be submitted to the front end, the dispAffairInfo function will be called row by row to process the output of each row. If the dispAffairInfo function is not overloaded, the default dispAffairInfo function simply outputs all the attributes of jo this data object to json.
Because we overloaded the dispAffairInfo function above, we will call the above dispAffairInfo function line by line for the read data. In our dispAffairInfo function, we can process the data and then display it to the user.
Direct output
You should see that the query output mentioned above needs to be converted into a data object first, and then call the dispAffairInfo function line by line for data processing. If we don't need data processing, and the data column names we want to output are demoType with business semantics, can we not be so troublesome?
Of course, we only need two steps:
1. Modify sql definition and add alias:
#So please note: equality is = =, two equal signs
sql listDemoData
from demoData as ta
select ta.ID as demoID,ta.CreateTime as demoCreateTime,ta.Type as demoType,ta.Name as demoName
where ta.Type=='test'
orderBy ta.CreateTime DESC;
2. Modify the entry definition in the op.py file and add a parameter of resultType:
@biz.Motion('demo.demo1','disp','listDemoData')
@biz.OPDescr
def op1(json):
	json.setShortcut('demonstration'.decode('utf-8'),'listDemoData')
	json.setParam('dispType','list').setParam('dataSource','demo.listDemoData')
	json.setParam('resultType','json')
In this way, jxTMS will no longer convert each row of data into a data object after querying the data, but directly generate a json row [that is, the json in the parameter of dispAffairInfo function] without calling dispAffairInfo for conversion. Finally, it will be collected and sent to the front end. This is very easy and more efficient.