k8s CI/CD Presentation
Introduction (ppt1):
- Hello, colleagues. I'm glad that you are interested in CI/CD in k8s environment. The content shared in this topic is how to quickly integrate, deploy and deliver applications in kubernetes environment. It has both principles and practice. My explanation of this part is to tell you how to do it. As for how to do it, you need to make your own planning and design according to the contents I explain and in combination with the characteristics of the project.
What is DevOps? (ppt2)
- DevOps (a combination of Development and Operations) is a general term for a group of processes, methods and systems, which is used to promote communication, cooperation and integration among Development (Dev), operation and maintenance personnel (ops) and quality assurance (QA) departments.
- Its purpose is to build a culture and environment to make building, testing and publishing software faster, more frequent and reliable.
- DevOps is an open system, which comes from practice and is still developing. There is no consistent routine for an organization, so the implementation of DevOps varies from organization to organization, from goal to goal, and from person to person
- Look at the following figure:
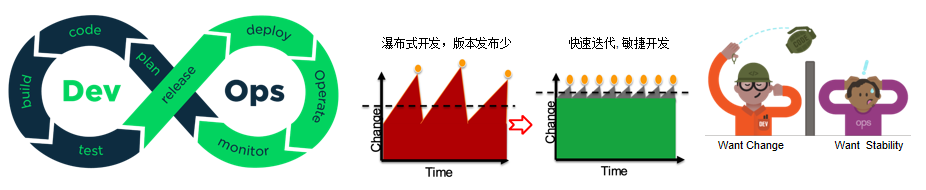
- The first figure describes the division of labor and cooperation between Dev developers and Ops operation and maintenance personnel;
- The second figure describes the evolution of software development mode from waterfall development mode to agile development mode
- The third figure is more interesting. Developers have to deal with the changing requirements. However, the operation and maintenance team considers the stability, availability and security of the system. Therefore, when the software system is transferred from one end of the wall (Dev) to the other end (Ops), a variety of unpredictable "exceptions" will occur.
These "exceptions" are usually due to the delivery of incorrect things, including:- The developers don't know the production environment, and the operation and maintenance personnel can't determine the configuration without specifications and documents
- The immature version in the development process enters the production environment
- When in waterfall development mode, because the software delivery cycle is long, the operation and maintenance personnel usually have enough time to deploy and deliver the software; However, in the case of agile development mode, there are many problems. See the following slide - >
DevOps comes from agile development (ppt3)
- The core concept of agile development is:
- We can't fully understand the real needs of users, so it's better to continuously disassemble a large goal, turn it into deliverable small goals, and then continuously deliver it in a small step through continuous iteration
- At the same time, the testing work is injected into the whole development activity from an independent link at the end of R & D, and the content of development and delivery is continuously verified to ensure that each deliverable is an available function set, and because the quality is built in the R & D link, the quality of delivery function is also guaranteed.
However, agile development ignores an important problem, that is, frequent software iteration and frequent delivery, which is a great challenge for the operation and maintenance personnel, that is, it amplifies the abnormal conditions from the developers to the operation and maintenance personnel mentioned earlier, resulting in the operation and maintenance team to continuously extend the preset Online time window and continuously raise the online threshold in order to avoid risks;
Therefore, in the agile development mode, facing the rapid iteration of requirements, in order to deliver software products and services on time, the development, operation and maintenance work must cooperate closely, break the barriers, and start the evolution from agile development mode to DevOps development mode; And DevOps is an open system and an evolving model. At present, it includes agile open model and is not limited to agile!
DevOps principles and practices (ppt4)
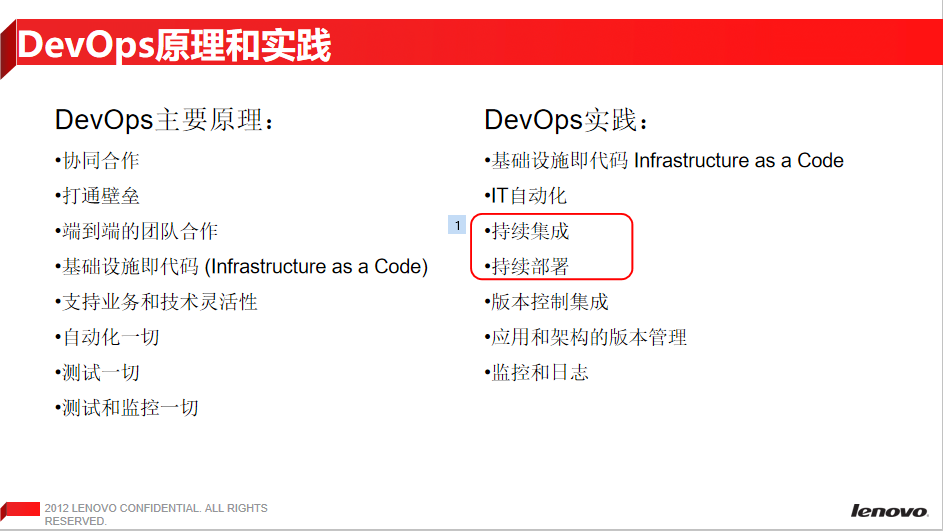
The main principle of DevOps is not the focus of this sharing, so I won't repeat it
Although we said that the DevOps development model is still evolving, the CI/CD we talked about today is a relatively definite part and a necessary part of DevOps:
Let's focus on the core concepts of CI/CD:
CI/CD concept explanation (ppt5)
CI/CD concept: a method of frequently delivering applications to customers by introducing automation in the application development stage. The core concepts are continuous integration, continuous delivery and continuous deployment;
- CI (i.e. CONTINUOUS INTEGRATION): the automated process of developers, that is, any update of application code will be built, tested and merged into a repository regularly or triggered, such as Gitlab. Code can be frequently integrated into the trunk many times a day according to requirements to achieve rapid iteration. The core measure is that before the code is integrated into the trunk, it must pass automated testing. As long as one test case fails, it cannot be integrated. CONTINUOUS INTEGRATION does not eliminate bugs, but makes them easier to find and correct.
- CD: refers to developers publishing changes from storage to production environment. It has two meanings:
- CONTINUOUS DELIVERY: frequently deliver software to users for review. If it is correct, it can enter the production stage. No matter how it is updated, the software can be delivered anytime, anywhere.
- CONTINUOUS DEPLOYMENT: it means that the delivered code is automatically deployed to the production environment after passing the review.
- Continuous deployment is the highest stage of continuous delivery.
Diversity of CI/CD (ppt6)
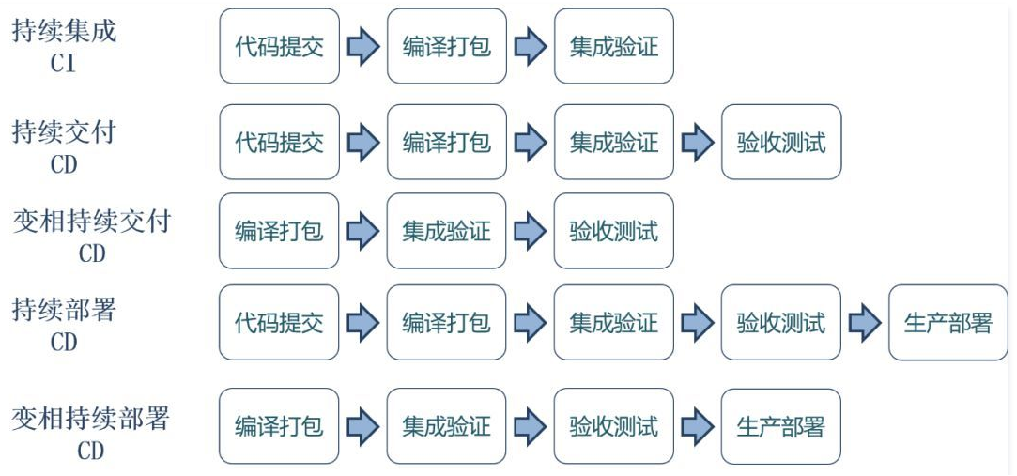
As can be seen from the above figure, the process of CI/CD varies with the actual situation of the project; Moreover, CI and CD do not have a completely determined priority relationship, which needs to be standardized and defined according to the characteristics of project requirements.
About k8s CI/CD Task Disassembly (ppt7)
- As mentioned above, DevOps is an open system, and the implementation of DevOps varies from organization to organization, from goal to goal, and from person to person; As long as it covers the core principles and models of DevOps, it is a good practice:
- This article explains that CI/CD is a good practice of DevOps under k8s this operation and maintenance framework, which can greatly improve the operation and maintenance efficiency and effectively shorten the learning curve of individuals and organizations
- Of course, the principles and practices are relatively stable, and the changes of tools and commands are very fast. Therefore, the advantages of CI/CD practice in this paper only lie in the effective range of relative time and project demand space;
- According to the task of disassembling components, CI/CD is divided into the following parts:
- Jenkins: open source continuous integration (CI) tool with friendly operation interface; Automation core engine;
- Gitlab: Git based code management tool and provides web services; Code base and automatic trigger (webhook);
- Custom trigger: Jenkins provides a standard API. Users can build their own trigger rule services according to their needs; It provides an interface for us to develop an operation and maintenance platform suitable for our own projects;
- kubernetes: used to manage containerized applications on multiple hosts in the cloud platform; Operating system for Automated Deployment
- Docker and image management harbor: an open source application container engine; Carrier and warehouse for Automated Deployment
Let's take a look at the schematic diagram of their relationship
About k8s CI/CD diagram (1) (ppt8)
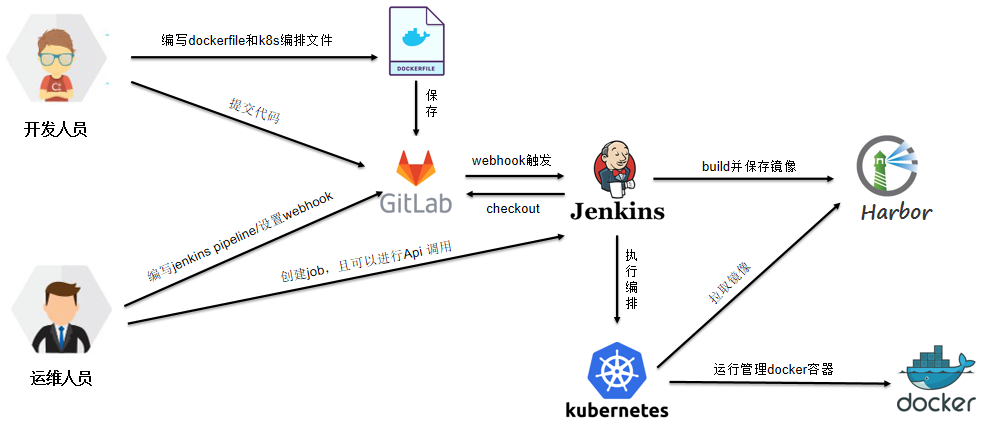
- Developers: write code and dockerfile, k8s arrange files, etc., and upload them to gitlab for storage;
- Operation and maintenance personnel:
- Create different Jenkins jobs and define trigger rules
- jenkins checked out the code from gitlab,
- jenkins uses dockerfile to build docker images,
- jenkins saves the image to harbor,
- jenkins calls kubernetes api, pulls the docker image on harbor, creates a pod, and runs the docker container;
- This is the general process of CI/CD in the k8s environment. Later, we will explain the specific distribution;
- Another point, we can note that only the first step needs to be triggered manually, and jenkins is doing everything else. Therefore, this is the basis for CI/CD automation.
Next, look at this ppt
About k8s CI/CD diagram (2) (ppt9)
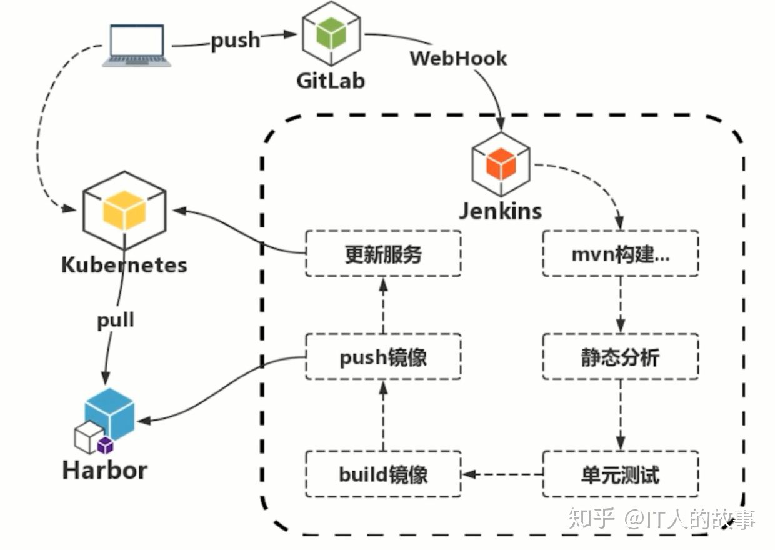
This flow chart is similar to the schematic diagram above the ppt, but it can more specifically reflect the internal function flow of jenkins, including:
- maven builds project code,
- Static code analysis using sonar,
- Run unit tests to test unit functions,
- build docker image
- Upload docker image
- Call k8s API for service update delivery, etc
Jenkins use explanation
To sum up, jenkins defines a programming syntax, plug-in rules and rich external API interfaces to realize complex processes:
- Pipeline: a set of workflow framework running on Jenkins, which connects tasks that originally run independently on a single or multiple nodes to realize the arrangement and visualization of complex processes that are difficult to complete for a single task;
- Plugin mechanism: almost all the deployment of jenkins for specific projects, such as java and python, depends on the relevant plug-ins to build and run
- Open API: provide CRUD, customize trigger rules, specify operating environment parameters, etc
- In order to understand the functions of jenkins mentioned above more quickly, let's take a look at the demonstration of CI
- The goal of our CI is to generate and save docker images. The steps are:
- Check out the source code in gitlab and mirror the packaged dockerfile
- Use maven command to compile and package the code into a runnable spring boot runnable jar package
- Use dockerfile to print the jar package into a docker image, and push the docker image to harbor for saving.
- Let's take a look at the general steps of jenkins automatic deployment:
- Log in to jenkins management page
http://10.110.149.185
ssh login: 10.110.149.185 - Create setup job
Open UUID Images configuration page Jenkins - > Demo - > UUID images
http://10.110.149.185/view/demo/job/uuid.image/configure - Plug in settings
First of all: the Generic Webhook Trigger plug-in provides external trigger function through token = UUID Image can call the API externally to trigger task execution. In addition, the plug-in also provides the function of passing in parameters. We will see the CD process later to see the relevant parameter settings and how to use them - pipeline process:
This process is the core part, in which all functions are implemented;
We see the definition of pipeline. In order to facilitate unified code management, I put it in gitlab. In fact, it can also be defined locally in jenkins. Let's look at the process of pipeline
- Log in to jenkins management page
pipeline{
    agent any
    tools {
        maven 'maven-3.5.2'
        jdk 'JDK8'
    }
    stages {
        stage('=============================================Code check out has been packaged docker image=============================================') {
            steps{
                script{
                    uuidUrl="git@gitlab.lenovo.com:saas/uuid-service.git";
                    deployUrl="git@gitlab.lenovo.com:caoyong1/knowledge_share.git";
                    credentialsId="caoyong1-gitlab-lenovo-com";
                }
                echo "Clean up code in the current directory"
                sh("rm -rf *")
                dir("deploy"){
                    echo "=============================================start deploy Partial check out code============================================="
                    checkout([$class: 'GitSCM', branches: [[name: 'refs/heads/master']], userRemoteConfigs: [[credentialsId: "$credentialsId", url: "$deployUrl"]], doGenerateSubmoduleConfigurations: false, extensions: [], submoduleCfg: []])
                }
                dir("uid"){
                    echo "=============================================start uuid Partial check out code============================================="
                    checkout([$class: 'GitSCM', branches: [[name: 'refs/heads/master']], userRemoteConfigs: [[credentialsId: "$credentialsId", url: "$uuidUrl"]], doGenerateSubmoduleConfigurations: false, extensions: [], submoduleCfg: []])
                    ## Here is the version in the read pom file, which is used to specify the version number $vName of the image
                    script{
                        pom = readMavenPom file: 'pom.xml'
                        vName=pom.version
                    }

                    echo "=============================================Package image uuid:$vName============================================="
                    sh("mvn clean compile package -P saas")
                    sh("docker build --no-cache -f ../deploy/demo/docker/uuid/uuid.dockerfile -t harbor.aipo.lenovo.com/apps/uuid:$vName .")
                    sh("docker push harbor.aipo.lenovo.com/apps/uuid:$vName")
                }
            }
        }
    }
}
By the way, take a look at dockerfile:
FROM  harbor.aipo.lenovo.com/base_env/alpine_java:8
WORKDIR /root/services
COPY target/*.jar ./app.jar
EXPOSE 30001
ENTRYPOINT ["java","-jar","app.jar","--server.port=30001"]
Briefly explain the steps of dockerfile
The above is the whole process of continuous integration, because one of our CI/CD requirements is automation, that is, the less manual participation, the better. So how to trigger the whole job is a very important problem: we can choose 1. Set webhook in gitlab, 2. Trigger externally using postman; 3: It can also be triggered locally in jenkins
Open: https://gitlab.lenovo.com/saas/uuid-service/-/settings/integrations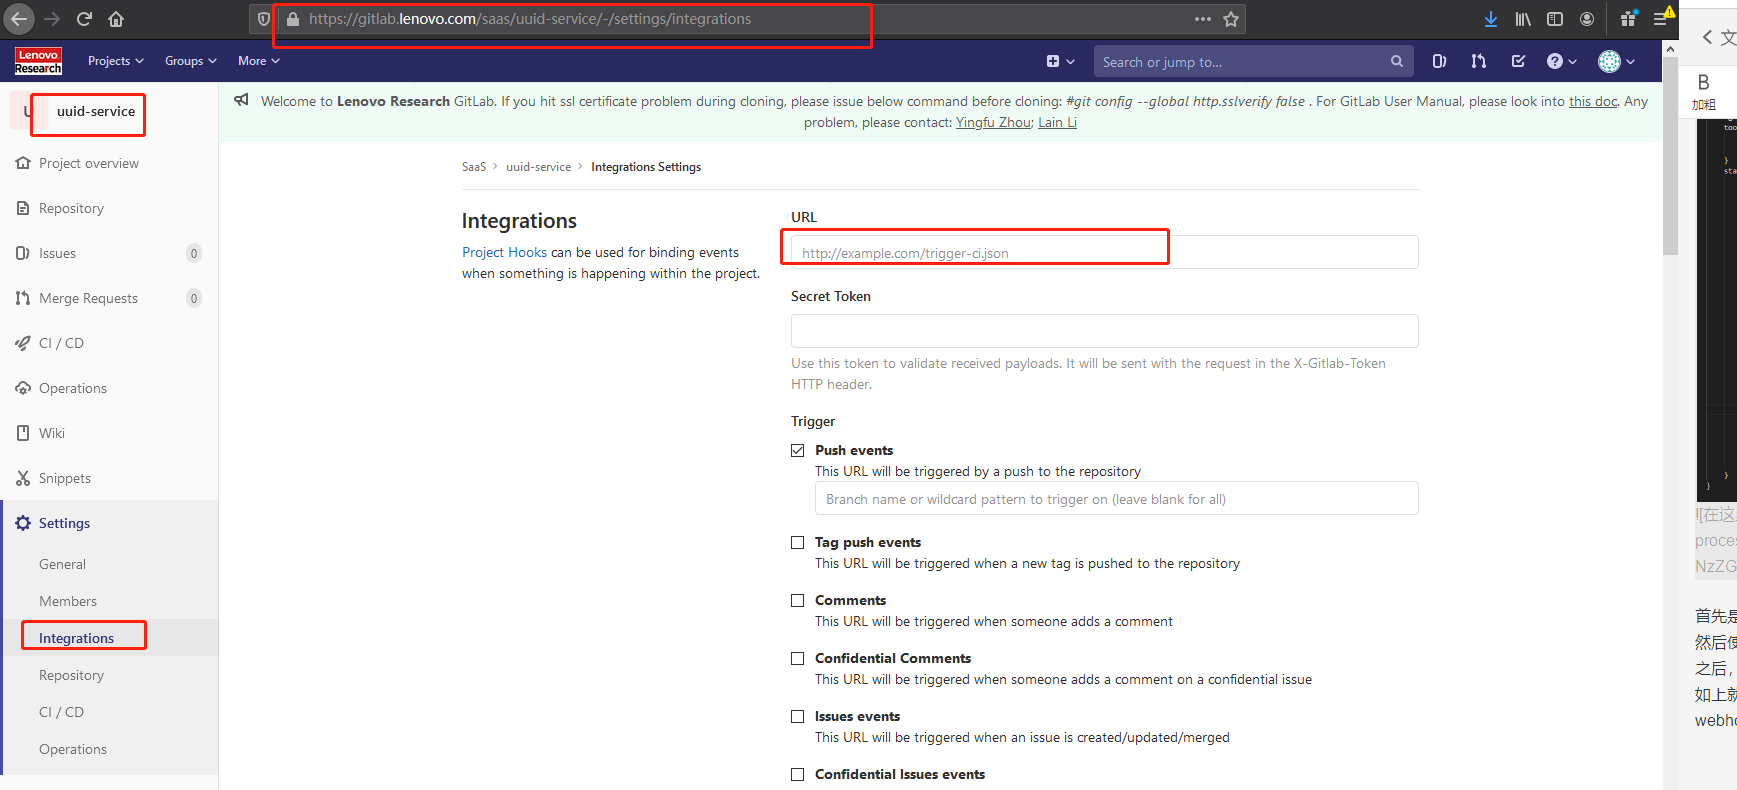
If gitlab is used to trigger, you can specify push event, tag push and other event rules to trigger. At present, because jenkins and gitlab are not in the same network segment, webhook cannot succeed;
Next, we demonstrate the external triggering through postman simulation;
In order to save events, let's directly look at the results triggered earlier: http://10.110.149.185/view/demo/job/uuid.image/21/console
Simple process explanation through log
As a result of this operation, our packaged docker image can be displayed in the https://harbor.aipo.lenovo.com See in (caoyong1)
/Caoyong1@lenovo)
Open harbor to mirror and view apps/uuid
Next, let's continue to look at the related functions of gitlab:
GitLab usage explanation (ppt11)
In fact, everyone is familiar with gitlab. Let's talk about the content
- Its basic function is code version management,
- Secondly, gitlab also has cicd function, which is called jenkins
- In addition, as mentioned above, you can set webhook to trigger external events,
- It also has rich open API s
Next, let's introduce docker
docker explanation (ppt12)
First, we give docker a very simple definition:
- The docker container is essentially a process on the host
- docker implements resource isolation through namespace
- The resource limitation is realized through cgroups, that is, cpu, memory and other resources
Several important concepts: - Image: the abstract definition of the file system required to run the container;
- Container: it is a collection of processes with view isolation, resource limitation and independent file system.
In fact, docker solves the isolation of files and directories and the creation of process collections during project deployment. Here are the two parts:
docker file system stack structure (ppt13)
ppt the above figure describes the layered structure of image and container file system. How to understand it? The following demonstration will make it easy for you to understand: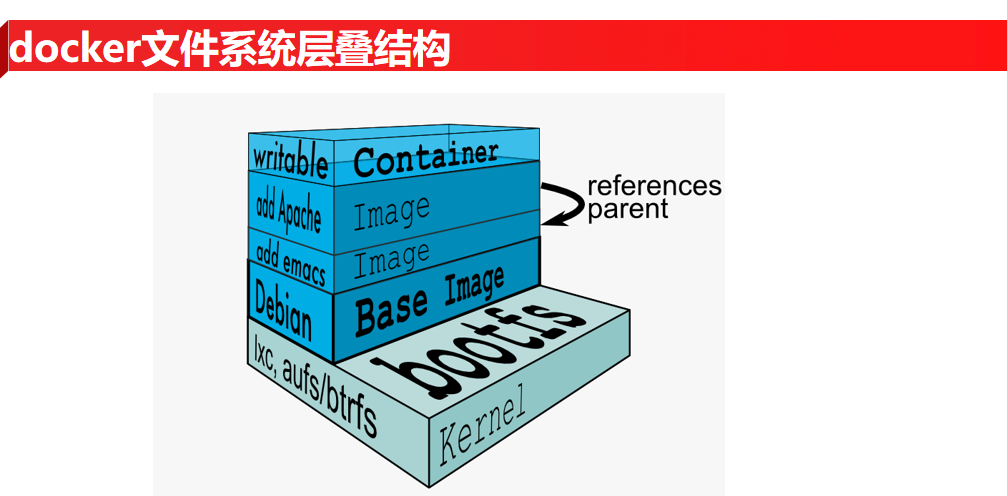
Let's look at the next dockerfile, the so-called dockerfile, which is the configuration file for creating an image
FROM centos:7.6.1810
LABEL maintainer=caoyong1
WORKDIR /root
COPY caoyong.txt .
#Specify the time zone and install various plug-ins
RUN yum -y install iputils && yum -y install net-tools.x86_64 && yum install -y redhat-lsb && yum -y install bridge-utils && yum -y install traceroute && yum -y install vim*
#Specify character set
COPY caoyong2.txt .
Roughly speaking, the process,
1. Rely on CentOS 7 6 basic image
2. Copy the host file caoyong Txt to image
3. Install several software into the image
4. Copy caoyong2 Txt to image
FROM centos:7.6.1810
LABEL maintainer=caoyong1
WORKDIR /root
COPY caoyong.txt .
#Specify the time zone and install various plug-ins
RUN yum -y install iputils && yum -y install net-tools.x86_64 && yum install -y redhat-lsb && yum -y install bridge-utils && yum -y install traceroute && yum -y install vim*
COPY caoyong2.txt .
Similarly, in order to save time, I run the machine in advance and get the results;
Let's first look at the hierarchical structure of the image file:
docker images
docker inspect 5d647d726379
First look at the Upper layer and then at the Lower layer
among
- The mirror layer is lowerdir, read-only
- The container layer is upperdir and writable
- The exposed unified view is called merged
Look at LowerDir from top to bottom,- First floor caoyong2 txt,
- Layer 2: all files installed using yum
find . -type f |more
- Third floor: caoyong txt
- The last layer: system level software
Take a look at UpperDir and you can see that we COPY the jar package in this directory
Let's start the next container: docker run -itd 5d647d726379 /bin/bash
Also look at the file composition of the container: docker inspect ef6f2aab9bec
The hierarchical structure is the same as the mirror structure, including lower and upper layers
If you have time, you can compare. I can tell you here that the comparison result is that the container layer will merge the Upper and Lower of the image layer into a new Lower layer, and the corresponding read-write layer and Upper layer will be added
Therefore, you can see that docker's file directories are stacked layer by layer
https://blog.csdn.net/11b202/article/details/21389067
After the container is started, when reading the file, read it from top to bottom. If it is found in a layer, read the copy to the Upper layer. If it is modified, it is also the copy in the modified Upper layer. Therefore, the file of the image layer is read-only. The file of the container layer, that is, the Upper layer, is writable, and the file can be written in the Upper layer.
Therefore, when writing dockerfile, we try to copy all files at one time and install all files at one time, so as to avoid unnecessary layering
Other resource isolation, such as network isolation, pid isolation, ipc (i.e. inter process communication) isolation, UTS (host and domain name) isolation, can be studied. I won't talk about it here.
See how processes are isolated through examples
On the host, view the process ps -ef|grep ef6f2aab9bec
Execute docker exec -it ef6f2aab9bec /bin/bash and switch to the namespace of the container. ps -ef can see the process id with PID 1,
In fact, the two processes are the same process, but in the container's namespace, the process is cloned and the name and id are changed; Other processes in the container are actually sub processes of the process with PID 1. Therefore, if the PID process exits, other processes will exit automatically; In the pod of k8s, the process with PID 1 of the container is also managed to control the start and exit of the container;
Another noteworthy aspect is that the docker exec command can enter the specified container to execute commands. The process started by it belongs to the container's namespace and the corresponding cgroup. However, the parent process of these processes is Docker Daemon, not the PID1 process of the container.
The essence of docker described above is the isolation of process collection and file system. All required functions must be provided by the interface of the host. To do this, we can only configure the deployment environment once and deploy the application to any host in the form of cloning.
Of course, we can't just isolate, because isolation brings benefits, but also brings many related problems, such as lack of network, such as storage, chaotic management of various mounts, log collection, service detection, etc., so we need a tool that can get through isolation, storage and other resources to deal with the chaos, so, That's how kubernetes came on stage.
k8s explanation - Introduction (ppt14)
kubernetes is Google's open source container cluster management system, which is very good. At present, the industry standard is over.
k8s explanation - several important concepts (ppt15)
- namespace: logical isolation mechanism within k8s cluster (authentication, resource quota, etc.);
- Pod: abstraction of one or a group of containers (pod is only a logical concept), k8s minimal scheduling and resource unit;
- service: provides a stable access address for accessing one or more pod cities
- Label Selector: k8s the definition of loosely coupled association between entities
- Container: a container is a package for an application and its dependencies at runtime, running on a pod
- Deployment: defines the number and version of replicas of a group of pods; Maintain the number of pods through the controller (automatically recover failed pods); Control the version with the specified measurement through the controller (rolling upgrade, regeneration, rollback, etc.)
k8s explanation - overall architecture (ppt16)
(Reference: https://www.cnblogs.com/Tao9/p/12026232.html )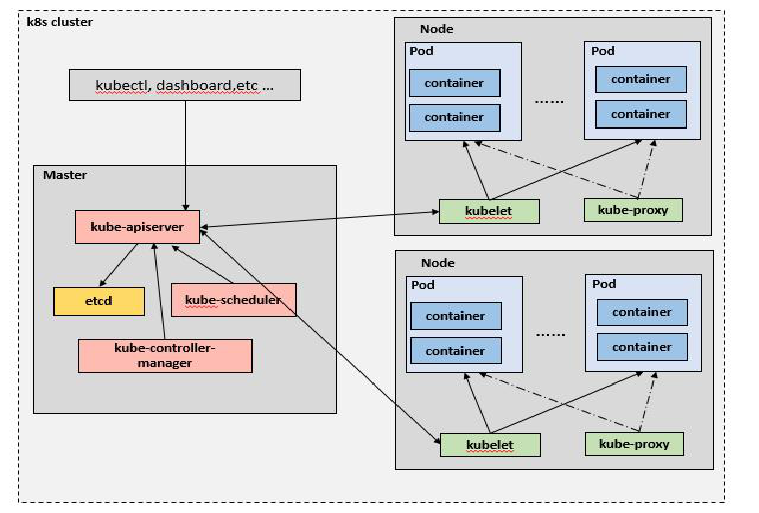
- We usually issue commands to Kubernetes through kubectl,
- Interact with Kubernetes APIServer through the command-line tool kubectl, and call various processes through APIServer to complete the deployment and control of nodes.
- The core function of APIServer is to add, delete, modify and query core objects (such as Pod, Service and RC). At the same time, it is also the hub of data exchange between modules in the cluster.
- etcd is included in APIServer to store resource information
- Controller Manager is the manager of Kubernetes resources and the core of operation and maintenance automation. It defines a set of management rules. It includes 8 controllers, corresponding to replicas, nodes, resources, namespaces, services, etc.
- The Scheduler puts the Pod into the appropriate Node through the scheduling algorithm / policy. After scheduling, kubelet manages the Node
kubelet is used to handle the tasks sent by the Master to the Node (i.e. the scheduling tasks of the Scheduler), and manage the Pod and the containers in the Pod at the same time. - After completing resource scheduling, kubelet process will also register Node information on APIServer, regularly report Node information to the Master, and monitor container and Node resources through cdadvisor.
- Since the deployment of microservices is distributed, so is the deployment of the corresponding Pod and container. In order to find these pods or containers easily, a Service (Kube proxy) process is introduced, which is responsible for the implementation of reverse proxy and load balancing.
k8s explanation - operation process (ppt17)
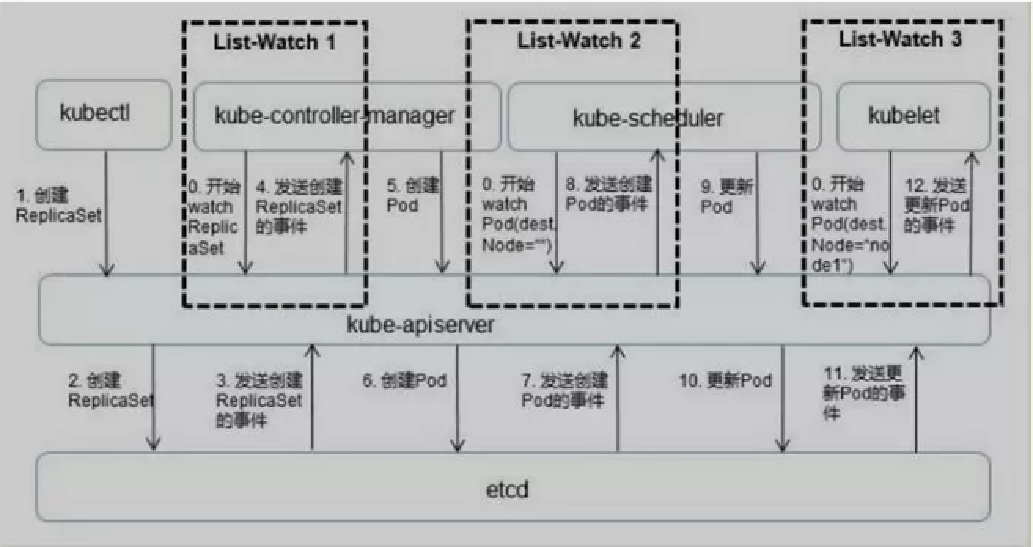
Because of the time relationship, I won't talk about it here. You can also roughly see the whole process of pod creation and maintenance in the figure. You can study it yourself when you have time
k8s explain - Application demo CD process (ppt18)
- pipeline of CD
pipeline{ agent any tools { maven 'maven-3.5.2' jdk 'JDK8' } stages { stage('=========================================Service in k8s Run on Cluster============================================') { steps{ script{ uuidUrl="git@gitlab.lenovo.com:saas/uuid-service.git"; deployUrl="git@gitlab.lenovo.com:caoyong1/knowledge_share.git"; credentialsId="caoyong1-gitlab-lenovo-com"; ns = "ns-uuid-$envName" } dir("namespaces/$ns"){ echo "==================================establish namespace:$ns==================================" sh("cp ../../demo/k8s/uid/namespace.yaml .") sh("cp ../../demo/k8s/uid/cm-${envName}.yaml .") sh("sed -i -e 's/\${NAMESPACE}/${ns}/g' namespace.yaml") sh("kubectl apply -f namespace.yaml --validate=false") echo "===================================establish configMap:env-config==================================" sh("kubectl apply -f cm-${envName}.yaml --validate=false") } dir("pods/uuid"){ echo "===================================Create application pod:uuid:${version}====================================" sh("cp ../../demo/k8s/uid/uuid.yaml .") sh("sed -i -e 's/\${NAMESPACE}/${ns}/g' \ -e 's/\${VERSION}/$version/g' \ -e 's/\${NODEPORT}/$nodePort/g' \ uuid.yaml") sh("kubectl apply -f uuid.yaml --validate=false") } } } } } - The objectives of the CD are three:
- Deliver the service started in the test environment for testing
- Launch the service started under prod environment
- Upgrade of application version, online fallback
- Let's look at the steps of the CD:
- Create a namespace according to the parameters passed in from the front end: NS UUID test for delivery test and NS UUID prod for online deployment
apiVersion: v1 kind: Namespace metadata: name: ${NAMESPACE} - Creating configMap is also two deployment environments, namely test environment and prod production environment. configMap is what we usually call a configuration file. In test environment and prod environment, there are different configuration files; At present, in the configuration file, we only have one key: demoValue. The demoValue values in the two environments are test and prod respectively;
- prod environment
	apiVersion: v1
	kind: ConfigMap
	metadata:
	  name: env-config
	  namespace: ns-uuid-prod
	data:
	  demo.value: prod   #The value of demoValue is prod
- test environment
apiVersion: v1
kind: ConfigMap
metadata:
  name: env-config
  namespace: ns-uuid-test
data:
  demo.value: test 		#The value of demoValue is test
- prod environment
When we demonstrate later, we will see the value in demoValue in the provider
3. Run pod and start uuidService container
Explain the deployment layout file of uuid:
apiVersion: apps/v1
kind: Deployment  # Deployment is only responsible for managing different versions of ReplicaSet, and ReplicaSet manages the number of Pod replicas
# Each ReplicaSet corresponds to a version of the Deployment template
# Pod under a ReplicaSet is the same version.
metadata:
  name: uuid-deploy
  namespace: ${NAMESPACE}
spec:	#At the beginning of the manual, it is actually the manual of ReplicaSet, which hides the ReplicaSet, which is also the reason why the configuration is difficult to understand
  replicas: 3  # Number of pod copies
  selector:
    matchLabels:
      app: uuid-label  #Specify which pods this ReplicaSet manages through the spec.selector field. In the above example, the newly created ReplicaSet will manage all pods with app:nginxLabel.
  strategy:
    type: Recreate
  template:  # The template describes pod
    metadata:
      labels:
        app: uuid-label  # Tag of pod
    spec:
      containers: # Container description
      - name: uuid-server  #Name of the container
        image: harbor.aipo.lenovo.com/apps/uuid:${VERSION}  # The full name of the container
        imagePullPolicy:  Always # Container pull strategy
        ports:
        - name: http
          containerPort: 30001  #Container exposed port
        envFrom:
          - configMapRef:
              name: env-config  #configMap environment variable used
---
apiVersion: v1
kind: Service  #Define service
metadata:
  name:  uuidservice
  namespace: ${NAMESPACE}
spec:
  type: NodePort #Service type. NodePort is a service that can be exposed externally
  selector:
    app: uuid-label  #The selector here selects pod
  ports:
  - name: http
    port: 80  #service exposed port
    targetPort: 30001 #Port of the corresponding container
    nodePort: ${NODEPORT} # service exposed port
#Through template metadata. The labels field attaches a Label to the Pod to be created. In the above example, a new Pod named nginx is created, which has a Label with a key value pair of app:nginx.
#Specify which pods this RC manages through the spec.selector field. In the above example, the newly created RC will manage all pods with app:nginxLabel. Such a spec.selector is called a Label Selector in Kubernetes.
Call prod procedure: use postman:
curl --location --request POST 'http://10.110.149.185/generic-webhook-trigger/invoke?token=uuid.runner' \
--header 'Content-Type: application/json' \
--header 'X-Gitlab-Event: Tag Push Hook' \
--header 'X-Gitlab-Token: 93e7593af81a3862890f99dc53dee758' \
--header 'Content-Type: text/plain' \
--data-raw '{
    "version": "v1.0.0.0",
    "envName": "prod",
    "nodePort":30051
}'
Call the test procedure: use postman to trigger jenkins: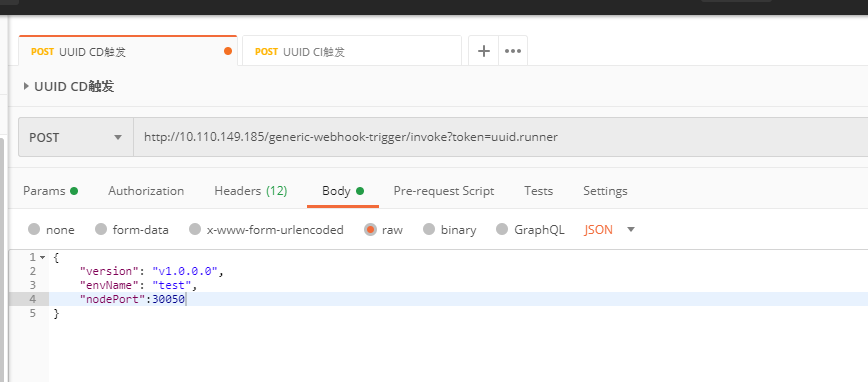
4. Open browser test
test environment: http://10.110.149.172:30050/status
prod environment: http://10.110.149.172:30051/status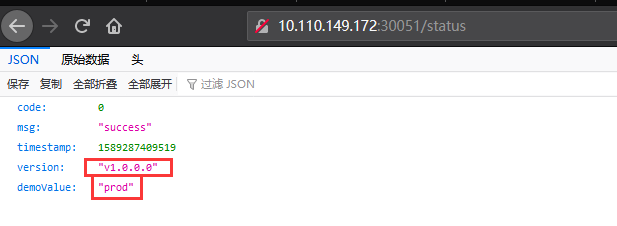
In the above interface, we can see that the values of demoValue are different in different namespaces, that is, in the test environment and the generation environment. The two values come from the configMap under the two namespaces respectively;
Next, let's introduce version fallback and upgrade:
As mentioned earlier, in the uuid project, the version of the image is defined according to the version in the pom; I packaged two images in advance. We can also see them on harbor. They are v1.0 0.0.0 and V2 0.0.0
Application version upgrade:
You can directly call jenkins again, specify the image version in the parameters, and rearrange the pod on k8s, which is a little inefficient and a little waste of time and resources
A better way is to upgrade the image directly:
#Image upgrade command
#Look at pods first. There are three copies
kubectl get pods -n ns-uuid-test
kubectl set image deployment/uuid-deploy uuid-server=harbor.aipo.lenovo.com/apps/uuid:v2.0.0.0 -n ns-uuid-test
#Look at pods, there are three copies
kubectl get pods -n ns-uuid-test
#View events during pod startup
kubectl describe pod/uuid-deploy-577cfb7467-cggr4 -n ns-uuid-test
#View mirror version
kubectl get pod/uuid-deploy-5fcdc755f6-6hb8w -o yaml -n ns-uuid-test
When accessing through the interface, you can see that the version of the image is v2 0.0.0;
Rollback version process:
#Take a look at the reversion of the deployment
 kubectl describe deployment/uuid-deploy -n ns-uuid-test
 #Query version list
kubectl rollout history deployment/uuid-deploy -n ns-uuid-test
#The number of saved versions can be specified
#To roll back to a Deployment version, you need to query the version list first
kubectl rollout undo deployment/uuid-deploy --to-revision=1 -n ns-uuid-test
#Fallback to previous version
kubectl rollout undo deployment/uuid-deploy -n ns-uuid-test
When accessing through the interface, you can see that the version of the image is v1.0 0.0.0;
Configuration files can also be used
Although there may be many things to do in the process of version upgrade and rollback, such as the change of data structure in the database, the change of configuration file, etc., at least at the application level, k8s mode provides us with a version upgrade rollback function without manual, which brings great convenience.
Conclusion:
The above is all about CI/CD integration in the k8s environment I shared today. Thank Li Fei, Li Bingjie and Wang Lei for their strong support for this sharing. In the large amount of materials they provided, I only sorted out some of the materials and provided a demonstration environment. Thank you!
Reprinted to https://blog.csdn.net/cyxinda/article/details/106013583