Because the departmental oa system is deployed in the form of multi tenancy in k8s, it usually only solves some common errors in k8s. I have always wanted to seriously study the deployment process of k8s. After all, I know that the problems can be solved faster after the deployment process, so I took the time to study it.
1, k8s common components
The master node consists of four components: apiserver, etcd, controllers and scheduler
The nodes node has three components: kubelet, Kube proxy, and container runtime
2, Environmental installation preparation
1. Turn off the firewall
systemctl stop friewalld
systemctl disable friewalld
2. Turn off selinux (security mechanism)
sed -i 's/enforcing/disabled/' /etc/selinux/config #permanent
setenforce 0 #temporary
3. Turn off swap (k8s disable virtual memory to improve performance)
sed -ri  's/.*swap.*/#&/' /etc/fstab #permanent
swapoff -a #temporary

free -m #If the swap is all 0, it means it has been closed
4. Add hosts in master
Two ways
a. Text output to hosts file
cat >> /etc/hosts <<EOF
master node ip  master
nodes node ip   nodes
EOF
b. Direct vim
vim /etc/hosts
master node ip  master
nodes node ip   nodes
5. Set bridge parameters
cat >  /etc/sysctl.d/k8s <<EOF
net.bridge.bridge-nf-call-ip6tables = 1
net.bridge.bridge-nf-call-iptables = 1
EOF
sysctl --system #take effect
6. Ensure time synchronization
yum -y install ntpdate
ntpdate time.windows.com
Modify the time EDT of linux system to CST (time zone modification method)
--------------
a,mv /etc/localtime /etc/localtime.bak
b,ln -s /usr/share/zoneinfo/Asia/Shanghai /etc/localtime
c,date
--------------
3, Deploying k8s using kubedm
Build docker
1. Update the yum source of docker (master and slave nodes operate at the same time)
wget http://mirrors.aliyun.com/docker-ce/linux/centos/docker-ce.repo -O /etc/yum.repos.d/docker-ce.repo # writes down the previous file and writes it to the following file
Install docker (master and slave nodes operate simultaneously)
yum -y install docker-ce-19.03.13
Configure docker accelerator (master and slave nodes operate simultaneously)
/etc/docker/daemon.json (New if not)
{
"registry-mirrors" : ["https://registry.docker-cn.com"]
}
Start docker and start it automatically (the master and slave nodes operate at the same time)
systemctl enable docker
Build kubedm and kubelet
2. Add k8s Alibaba cloud yum source (master and slave nodes operate simultaneously)
cat > /etc/yum.repos.d/kubernetes.repo <<EOF
[kubernetes]
name=Kubernetes
baseur1=https://mirrors.aliyun.com/kubernetes/yum/repos/kubernetes-el7-x86_64
enabled=1
gpgcheck=0
repo_gpgcheck=0
gpgkey=https://mirrors.aliyun.com/kubernetes/yum/doc/yum-key.gpg
https://mirrors.aliyun. com/kubernetes/yum/doc/rpm-package-key.gpg
EOF
3. Install kubedm, kubelet and kubectl (the master and slave nodes operate at the same time and choose the appropriate version by themselves)
yum -y install kubelet-1.19.4 kubeadm-1.19.4 kubectl-1.19.4
systemctl enable kubelet.service
Check whether the installation is successful
yum list installed | grep kubeadm
yum list installed | grep kubelet
yum list installed | grep kubectl
View k8s version
kubelet version
kubelet: runs on all nodes of the cluster and is responsible for starting the pod and container
kubeadm: a tool used to initialize the cluster
Kubectl: kubectl is a kubenetes command line tool. Through kubectl, you can deploy and manage applications, view various resources, create, delete and update components;
4. Deploy kubernetes Master node (executed by master machine)
kubeadm init --apiserver-advertise-address=192.168.125.128
--image-repository=registry.aliyuncs.com/google_containers
--kubernetes-version=v1.19.4
--service-cidr=10.96.0.0/12
--pod-network-cidr=10.244.9.0/16
– apiserver advertisement address =: followed by the master host ip;
– image repository: followed by the image address. Alibaba cloud is used here;
– kubernetes version: k8s Version (kubelet --version);
– service CIDR =: if there is overlap or conflict between podcidr and local network, you can generally select a private network address segment that is not used by local network and podcidr. For example, podcidr uses 10.244.0.0/16, then – service CIDR can select 10.86.0.0/12, and the network has no overlap or conflict;
The latter two can be copied directly without modification
docker images view the image pulled after init
Next:
mkdir -p $HOME/.kube
cp -i /etc/kubernetes/admin.conf $HOME/.kube/config
chown $(id -u):$(id -g) $HOME/.kube/config``
5. Join the node node to the master node (on the node machine)
After the master node kubedm init succeeds, a kubedm join command will be generated and copied to the node node for execution
**Format:
kubeadm join --token <token> <master-ip>:<master-port(6443)> --discovery-token-ca-cert-hash sha256:<hash>**
If not, do the following:
To view the token, execute on the machine where the master is located:
kubeadm token list
If the token has expired for 24 hours, by default:
kubeadm token create
If the hash cannot be found, you can execute:
openssl x509 -pubkey -in /etc/kubernetes/pki/ca.crt | openssl rsa -pubin -outform der 2>/dev/null | openssl dgst -sha256 -hex | sed 's/^.* //'
6. Get in touch with the master and node, and deploy the network to check the documents (how to operate the master)
kubectl get nodes
When you view the node status, you will find that the node is not ready. Execute the following two commands
wget https://raw.githubusercontent.com/coreos/flannel/master/Documentation/kube-flannel.yml
kubectl apply -f kube-flannel.yml
After a while, execute kubectl get nodes and you will see that the node status changes to READY**
Check those pod s in kubelet system
kubectl get pods -n kube-system
4, kubenetes deploys containerized applications
Deploy an nginx in the cluster
kubectl create deployment nginx --image=nginx #Pull an nginx image
kubectl get pod -o wide #Check whether nginx has been pulled successfully. At which node
[the external chain picture transfer fails. The source station may have an anti-theft chain mechanism. It is recommended to save the picture and upload it directly (img-KNvKZDnO-1618234693253)(en-resource://database/871:1)]
You can execute docker images on the node to see the newly pulled nginx image
kubectl expose deployment nginx --port=80 --type=NodePort #Expose nginx port
After exposure, execute kubectl get svc to see a new service
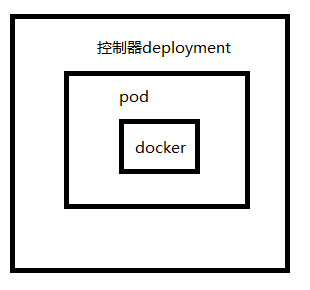
deployment: controller nginx: choose a name by yourself
– image: execute a mirror image
latest: version
– port: exposed port
– type: type
Basic process of deploying microservices
1. Project packaging (jar, war) - > you can use some tools git, maven, jenkins
2. Make Dockerfile file and generate image;
3. kubectl create deployment image name -- Image = your image
Relationship among controller, pod and docker