k8s cluster environment construction
preface
Today, let's use kubeam to build a k8s cluster to prepare the environment for the microservice project we will write later. First, let's take a look
Construction steps
Turn off firewall
systemctl stop firewalld.service
systemctl disable firewalld.service
Modify selinux
setenforce 0  temporary

sed -i 's/enforcing/disabled/' /etc/sysconfig/selinux    ##Modify profile
Close swap
swapoff -a   ##temporary
vi  /etc/fstab   ##permanent
sed -i '/swap/d' /etc/fstab  ##Delete the word swap in the configuration file
sed  -ri   's/.*swap.*/#&/'  /etc/fstab    ##Note permanent
Modify host name
hostname set-homename <host name>  ##Note: the purchased ECS does not need to be modified
## master node
hostnamectl set-hostname k8s-master
## Node node
hostnamectl set-hostname k8s-node1
master host configuration
cat >> /etc/hosts << EOF

<master node ip>  k8s-master k8s-master
<node1 node ip>  k8s-node1
<node2 node ip>  k8s-node2
<node3 node ip>  k8s-node3

EOF
k8s.conf file configuration
cat > /etc/sysctl.d/k8s.conf << EOF

net.bridge.bridge-nf-call-ip6tables = 1

net.bridge.bridge-nf-call-iptables = 1

EOF
sysctl --system ##Refresh effective
echo 1 > /proc/sys/net/ipv4/ip_forward Route forwarding changed 0 to 1
cat /proc/sys/net/ipv4/ip_forward
time synchronization
master, node1, node2, node3 machine installation time update service
yum -y install  ntpdate -y
ntpdate  time.windows.com      ##time synchronization
The city is not right
export TZ='Asia/Shanghai' ##Change to Shanghai time
Install docker kubedm kubelet on all nodes (master and node)
yum install wget ##Install wget (ignore this step if the system comes with)
wget  https://mirrors.aliyun.com/docker-ce/linux/centos/docker-ce.repo -O /etc/yum.repos.d/docker-ce.repo
yum -y install docker-ce.x86_64 --skip-broken ##Install docker environment
systemctl enable docker && systemctl start docker ##Enable and start docker
docker --version ##View docker version
##Configure docker image warehouse address
cat > /etc/docker/daemo.json << EOF
{
    "registry-mirrors": [
    "https://kfwkfulq.mirror.aliyuncs.com",
    "https://2lqq34jg.mirror.aliyuncs.com",
    "https://pee6w651.mirror.aliyuncs.com",
    "https://registry.docker-cn.com",
    "http://hub-mirror.c.163.com"
    ]
}
EOF
systemctl restart docker ##Restart docker all
Add alicloud YUM software source
cat  > /etc/yum.repos.d/kubernetes.repo <<EOF

[kubernetes]

name=Kubernetes

baseurl=https://mirrors.aliyun.com/kubernetes/yum/repos/kubernetes-el7-x86_64

enabled=1

gpgcheck=1

repo_gpgcheck=1

gpgkey=https://mirrors.aliyun.com/kubernetes/yum/doc/yum-key.gpg https://mirrors.aliyun.com/kubernetes/yum/doc/rpm-package-key.gpg

EOF
Install kubedm, kubelet, and kubectl
Download the specified version
yum -y install -y kubelet-1.20.0 kubeadm-1.20.0 kubectl-1.20.0
Enable kubelet
systemctl enable kubelet
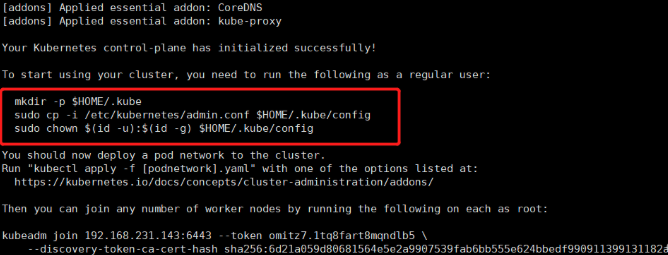
Deploy Kubernetes Master
kubeadm init --image-repository registry.aliyuncs.com/google_containers --kubernetes-version v1.20.0 --pod-network-cidr=10.244.0.0/16
join token expiration problem
If the join token expires, it can be regenerated
kubeadm token create --print-join-command

node join
In the above k8s basic environment, the master node is basically the same as the node node. The only difference is that the master requires kubedm init, while the node phase requires kubedm join.
Execute the following commands on the node machine:
kubeadm join 172.17.xx.xxx:6443 --token wevva0.ln5ovpyphbatcki9 --discovery-token-ca-cert-hash sha256:xxxxxxxxx
Note: - pod network CIDR = 10.244.0.0/16 is to prepare for the installation of CNI network plug-in flaannel later.
It is better to copy the feedback information in detail
mkdir -p $HOME/.kube
sudo cp -i /etc/kubernetes/admin.conf $HOME/.kube/config
sudo chown $(id -u):$(id -g) $HOME/.kube/config
Other related commands
kubectl get nodes ##View node status
After adding a node, the query results are as follows:

Deploy CNI network plug-in
The CNI network plug-in used this time is flannel. I won't say much about others. If it needs to be changed by myself, it's not difficult.
Download Kube flannel from the master node yml
wget https://raw.githubusercontent.com/coreos/flannel/master/Documentation/kube-flannel.yml
Deploy network plug-ins
kubectl apply -f "https://cloud.weave.works/k8s/net?k8s-version=$(kubectl version | base64 | tr -d '\n')"
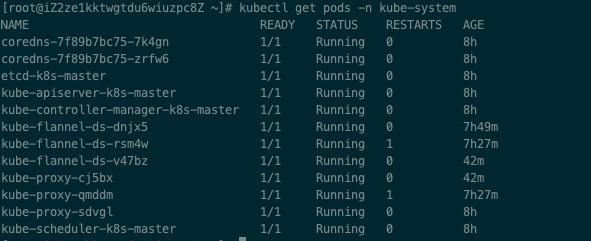
View node usage status after plug-in installation
kubectl get pods -n kube-system
Test kubernetes cluster
Create a pod in the kubernetes cluster to verify that it is working properly
kubectl create deployment  nginx --image=nginx        #####Create nginx pod node

kubectl expose deployment nginx --port=88 --type=NodePort --target-port=80 --name=nginx-service   ###For exposed ports
kubectl expose deployment  tomcat --port=80  --type=NodePort

kubectl expose rc nginx --port=80 --target-port=8000

kubectl get pod,svc
After creation, you can use the nodeip display feedback exposure port to access the nginx page through testing.
Installing dashboard
wget https://raw.githubusercontent.com/kubernetes/dashboard/v2.4.0/aio/deploy/recommended.yaml
# Create pod
kubectl apply -f recommended.yaml
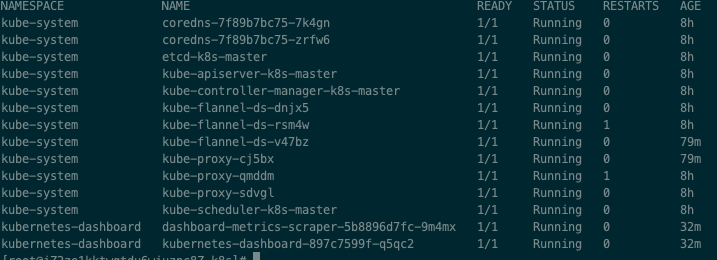
View, successfully created
kubectl get pods --all-namespaces
Delete the existing dashboard service. The namespace of the dashboard service is kubernetes dashboard, but the service type is ClusterIP, which is not convenient for us to access through the browser. Therefore, it needs to be changed to NodePort
# delete
kubectl delete service kubernetes-dashboard --namespace=kubernetes-dashboard
create profile
vi dashboard-svc.yaml
# content
kind: Service
apiVersion: v1
metadata:
  labels:
    k8s-app: kubernetes-dashboard
  name: kubernetes-dashboard
  namespace: kubernetes-dashboard
spec:
  type: NodePort
  ports:
    - port: 8443
      targetPort: 8443
  selector:
    k8s-app: kubernetes-dashboard


# implement
kubectl apply -f dashboard-svc.yaml
View the service again, successful
kubectl get pods --all-namespaces

To access the dashboard service, you must have access rights and create the kubernetes dashboard administrator role
vi dashboard-svc-account.yaml

# content
apiVersion: v1
kind: ServiceAccount
metadata:
  name: dashboard-admin
  namespace: kube-system
---
kind: ClusterRoleBinding
apiVersion: rbac.authorization.k8s.io/v1
metadata:
  name: dashboard-admin
subjects:
  - kind: ServiceAccount
    name: dashboard-admin
    namespace: kube-system
roleRef:
  kind: ClusterRole
  name: cluster-admin
  apiGroup: rbac.authorization.k8s.io

# implement
kubectl apply -f dashboard-svc-account.yaml
Get token
kubectl get secret -n kube-system |grep admin|awk '{print $1}'
kubectl describe secret dashboard-admin-token-dtp5d -n kube-system|grep '^token'|awk '{print $2}'
Then you will get a string of token s
Check the port and you can see that the external address is 31083. Note: this port is random, and everyone's execution results may be different.
kubectl get svc --all-namespaces

visit
https://{myip}:31083

Note: there may be a problem of https certificate verification interception. Just skip it by baidu.
summary
In general, it is simpler to use kubeamd. If you are concerned about my official account during installation, contact me.