What is Deployment
Deployment provides a declarative method for Pod and ReplicaSet to replace the previous replication controller to facilitate the management of applications. Typical application scenarios include:
- Define Deployment to create Pod and ReplicaSet
- Rolling upgrade and rollback application
- Expansion and shrinkage
- Pause and resume Deployment
Deployment refers to a user's update operation on the K8S cluster. Deployment is an API object wider than RS (replica set) application model. It can create a new service, update a new service, or upgrade a service by rolling. Rolling upgrade of a service is actually a composite operation of creating a new RS, gradually increasing the number of copies in the new rs to the ideal state and reducing the number of copies in the old rs to 0.
Such a composite operation is not easy to describe with an RS, so it is described with a more general Deployment. With the development direction of K8S, all long-term servo businesses will be managed through Deployment in the future.
Deployment deployment application
We have also used Deployment to deploy applications before, as shown in the following code
kubectrl create deployment web --image=nginx
However, the above code is not well reused, because we need to re-enter the code every time, so we configure it through YAML
However, we can try to use the above code to create an image [just try, not create]
kubectl create deployment web --image=nginx --dry-run -o yaml > nginx.yaml
Then output a yaml configuration file nginx YML, the configuration file is as follows
apiVersion: apps/v1
kind: Deployment
metadata:
creationTimestamp: null
labels:
app: web
name: web
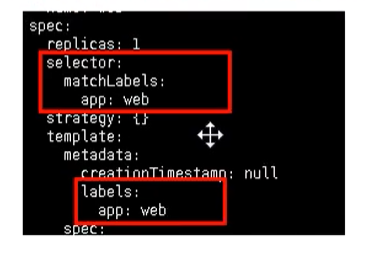
spec:
replicas: 1
selector:
matchLabels:
app: web
strategy: {}
template:
metadata:
creationTimestamp: null
labels:
app: web
spec:
containers:
- image: nginx
name: nginx
resources: {}
status: {}
The selector and label we see are the bridge between our Pod and Controller
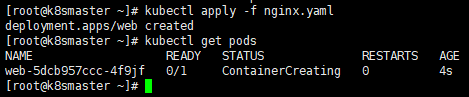
Create Pod using YAML
Through the code just, we have generated the YAML file. Now we can use the configuration file to quickly create the Pod image
kubectl apply -f nginx.yaml
However, because it is created in this way, we can only access it inside the cluster, so we also need to expose the port
kubectl expose deployment web --port=80 --type=NodePort --target-port=80 --name=web1
There are several parameters for the above command
- – port: it's our internal port number
- – target port: refers to the port number exposed for external access
- – Name: name
- – type: type
Similarly, we can export the corresponding configuration file
kubectl expose deployment web --port=80 --type=NodePort --target-port=80 --name=web1 -o yaml > web1.yaml
Get web1 Yaml is shown below
apiVersion: v1
kind: Service
metadata:
  creationTimestamp: "2020-11-16T02:26:53Z"
  labels:
    app: web
  managedFields:
  - apiVersion: v1
    fieldsType: FieldsV1
    fieldsV1:
      f:metadata:
        f:labels:
          .: {}
          f:app: {}
      f:spec:
        f:externalTrafficPolicy: {}
        f:ports:
          .: {}
          k:{"port":80,"protocol":"TCP"}:
            .: {}
            f:port: {}
            f:protocol: {}
            f:targetPort: {}
        f:selector:
          .: {}
          f:app: {}
        f:sessionAffinity: {}
        f:type: {}
    manager: kubectl
    operation: Update
    time: "2020-11-16T02:26:53Z"
  name: web2
  namespace: default
  resourceVersion: "113693"
  selfLink: /api/v1/namespaces/default/services/web2
  uid: d570437d-a6b4-4456-8dfb-950f09534516
spec:
  clusterIP: 10.104.174.145
  externalTrafficPolicy: Cluster
  ports:
  - nodePort: 32639
    port: 80
    protocol: TCP
    targetPort: 80
  selector:
    app: web
  sessionAffinity: None
  type: NodePort
status:
  loadBalancer: {}
Then we can view the exposed services through the following command
kubectl get pods,svc

Then we can visit the corresponding url and see nginx http://192.168.152.173:30889/

Upgrade rollback and elastic scaling
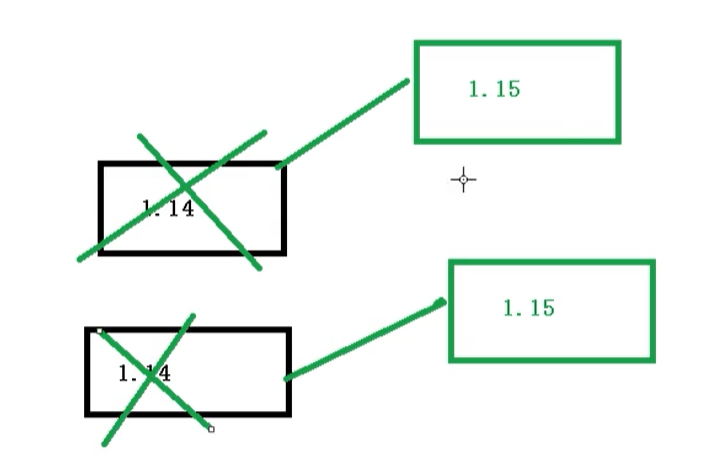
- Upgrade: if you upgrade from version 1.14 to 1.15, this is called application upgrade [upgrade can ensure uninterrupted service]
- Rollback: from version 1.15 to 1.14, which is called application rollback
- Elastic scaling: we change the number of pods according to different business scenarios to provide external services, which is elastic scaling
Apply upgrade and rollback
First, we create a 1.14 version of Pod
apiVersion: apps/v1
kind: Deployment
metadata:
  creationTimestamp: null
  labels:
    app: web
  name: web
spec:
  replicas: 1
  selector:
    matchLabels:
      app: web
  strategy: {}
  template:
    metadata:
      creationTimestamp: null
      labels:
        app: web
    spec:
      containers:
      - image: nginx:1.14
        name: nginx
        resources: {}
status: {}
We first specify the version as 1.14, and then start creating our Pod
kubectl apply -f nginx.yaml
At the same time, using the docker images command, we can see that we have successfully pulled an image of version 1.14

We can upgrade nginx from 1.14 to 1.15 by using the following command
kubectl set image deployment web nginx=nginx:1.15
After we execute the command, we can see the upgrade process
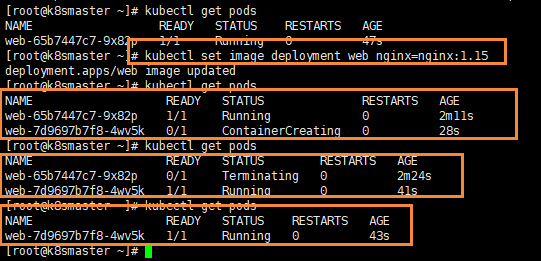
- First, nginx version 1.14 Pod is running, and then version 1.15 Pod is created
- Then, when version 1.15 is created, version 1.14 will be suspended
- Finally, remove the Pod of version 1.14 and complete our upgrade
When we download version 1.15, the container will be in ContainerCreating state. After downloading, we will replace version 1.14 with version 1.15. The advantage of this is that the upgrade can ensure uninterrupted service
We go to our node2 node and check our docker images;
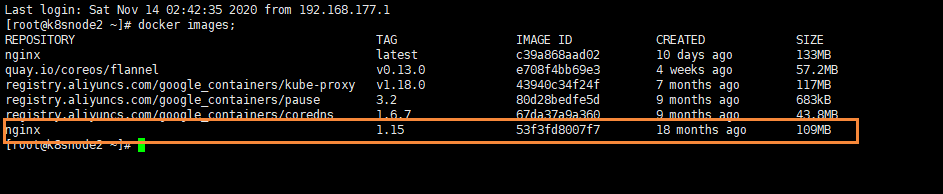
We can see that we have successfully pulled nginx version 1.15
View upgrade status
Next, you can view the upgrade status
kubectl rollout status deployment web

View historical versions
We can also view historical versions
kubectl rollout history deployment web
Apply rollback
We can use the following command to complete the rollback operation, that is, rollback to the previous version
kubectl rollout undo deployment web
Then we can check the status
kubectl rollout status deployment web

At the same time, we can roll back to the specified version
kubectl rollout undo deployment web --to-revision=2
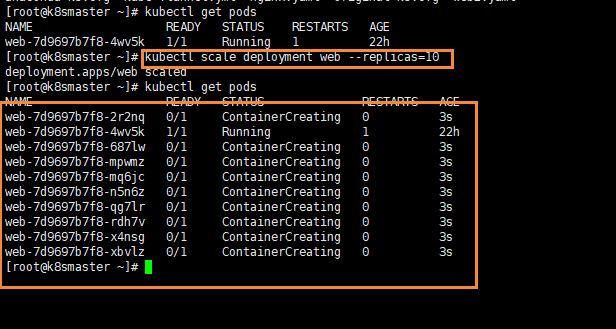
Elastic expansion
Elastic scaling, that is, we create multiple copies by command
kubectl scale deployment web --replicas=10
As you can see clearly, we have created 10 copies at once