1, Test scheme
- Test in a virtual machine (first verify the scheme and configuration, and then deploy to K8S)
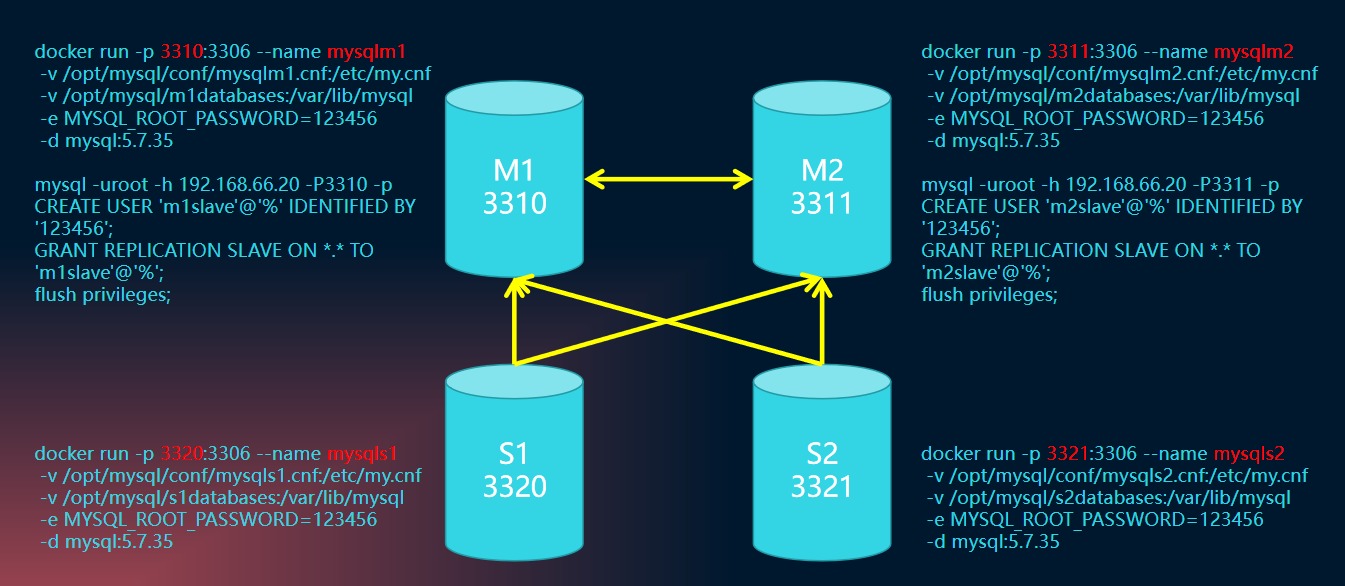
- Master1, port 3310, name mysqlm1, configuration file / opt/mysql/conf/mysqlm1.cnf, database directory / opt/mysql/m1databases, REPLICATION, user name m1slave, password 123456
- Master2, port 3311, name mysqlm1, configuration file / opt/mysql/conf/mysqlm2.cnf, database directory / opt/mysql/m2databases, REPLICATION user name m2slave, password 123456
- Slave1, port 3320, name mysqls1, configuration file / opt/mysql/conf/mysqls1.cnf, database directory / opt/mysql/s1databases
- Slave2, port 3321, name mysqls2, configuration file / opt/mysql/conf/mysqls2.cnf, database directory / opt/mysql/s2databases
2, Prepare profile
1. master1 configuration file: / opt/mysql/conf/mysqlm1.cnf
[mysqld]
server-id=1
auto_increment_offset=1
auto_increment_increment = 2
gtid_mode=on
enforce-gtid-consistency=1
log-bin=m1-bin-log
max_binlog_size=1024M
binlog-format=MIXED
relay-log=m1-relay-log
character-set-server=UTF8MB4
symbolic-links=0
2. master2 configuration file: / opt/mysql/conf/mysqlm2.cnf
[mysqld]
server-id=2
auto_increment_offset=2
auto_increment_increment = 2
gtid_mode=on
enforce-gtid-consistency=1
log-bin=m2-bin-log
max_binlog_size=1024M
binlog-format=MIXED
relay-log=m2-relay-log
character-set-server=UTF8MB4
symbolic-links=0
3. slave1 configuration file: / opt/mysql/conf/mysqls1.cnf
[mysqld]
server-id=3
master_info_repository=table
relay_log_info_repository=table
read_only=on
log-bin=m1-bin-log
max_binlog_size=1024M
binlog-format=MIXED
relay-log=m1-relay-log
character-set-server=UTF8MB4
symbolic-links=0
4. slave2 configuration file: / opt/mysql/conf/mysqls2.cnf
[mysqld]
server-id=4
master_info_repository=table
relay_log_info_repository=table
read_only=on
log-bin=m1-bin-log
max_binlog_size=1024M
binlog-format=MIXED
relay-log=m1-relay-log
character-set-server=UTF8MB4
symbolic-links=0
3, Download Image MySQL 5.7.35
[root@node1 ~]# docker pull mysql:5.7.35
[root@node1 ~]# docker images
REPOSITORY   TAG       IMAGE ID       CREATED       SIZE
mysql        5.7.35    8a8a506ccfdc   3 weeks ago   448MB
[root@node1 ~]#
4, Start MySQL
1. Start Master1: mysqlm1
[root@node1 ~]# mkdir /opt/mysql/m1databases
[root@node1 ~]# docker run -p 3310:3306 --name mysqlm1 -v /opt/mysql/conf/mysqlm1.cnf:/etc/my.cnf -v /opt/mysql/m1databases:/var/lib/mysql -e MYSQL_ROOT_PASSWORD=123456 -d mysql:5.7.35
2. Start Master2: mysqlm2
[root@node1 ~]# mkdir /opt/mysql/m2databases
[root@node1 ~]# docker run -p 3311:3306 --name mysqlm2 -v /opt/mysql/conf/mysqlm2.cnf:/etc/my.cnf -v /opt/mysql/m2databases:/var/lib/mysql -e MYSQL_ROOT_PASSWORD=123456 -d mysql:5.7.35
3. Start Slave1: mysqls1
[root@node1 ~]# mkdir /opt/mysql/s1databases
[root@node1 ~]# docker run -p 3320:3306 --name mysqls1 -v /opt/mysql/conf/mysqls1.cnf:/etc/my.cnf -v /opt/mysql/s1databases:/var/lib/mysql -e MYSQL_ROOT_PASSWORD=123456 -d mysql:5.7.35
4. Start Slave2: mysqls2
[root@node1 ~]# mkdir /opt/mysql/s2databases
[root@node1 ~]# docker run -p 3321:3306 --name mysqls2 -v /opt/mysql/conf/mysqls2.cnf:/etc/my.cnf -v /opt/mysql/s2databases:/var/lib/mysql -e MYSQL_ROOT_PASSWORD=123456 -d mysql:5.7.35
5: Start master-slave synchronization
1. Create sync account
[root@node1 ~]# mysql -uroot -h 192.168.66.20 -P3310 -p
Enter password:
Welcome to the MySQL monitor.  Commands end with ; or \g.
Your MySQL connection id is 16
Server version: 5.7.35-log MySQL Community Server (GPL)

Copyright (c) 2000, 2021, Oracle and/or its affiliates.

Oracle is a registered trademark of Oracle Corporation and/or its
affiliates. Other names may be trademarks of their respective
owners.

Type 'help;' or '\h' for help. Type '\c' to clear the current input statement.

mysql> CREATE USER 'm1slave'@'%' IDENTIFIED BY '123456';
mysql> GRANT REPLICATION SLAVE ON *.* TO 'm1slave'@'%';
mysql> flush privileges;
mysql> exit
[root@node1 ~]# mysql -uroot -h 192.168.66.20 -P3311 -p
Enter password:
Welcome to the MySQL monitor.  Commands end with ; or \g.
Your MySQL connection id is 16
Server version: 5.7.35-log MySQL Community Server (GPL)

Copyright (c) 2000, 2021, Oracle and/or its affiliates.

Oracle is a registered trademark of Oracle Corporation and/or its
affiliates. Other names may be trademarks of their respective
owners.

Type 'help;' or '\h' for help. Type '\c' to clear the current input statement.

mysql> CREATE USER 'm2slave'@'%' IDENTIFIED BY '123456';
mysql> GRANT REPLICATION SLAVE ON *.* TO 'm2slave'@'%';
mysql> flush privileges;
mysql> exit
2. Start dual master replication
[root@node1 ~]# mysql -uroot -h 192.168.66.20 -P3310 -p
Enter password:
mysql> CHANGE MASTER TO MASTER_HOST='192.168.66.20', MASTER_PORT=3311, MASTER_USER='m2slave', MASTER_PASSWORD='123456', master_auto_position=1;
mysql> start slave;
mysql> show slave status\G;
*************************** 1. row ***************************
               Slave_IO_State: Waiting for master to send event
                  Master_Host: 192.168.66.20
                  Master_User: m2slave
                  Master_Port: 3311
                Connect_Retry: 60
              Master_Log_File: m2-bin-log.000003
          Read_Master_Log_Pos: 859
               Relay_Log_File: m1-relay-log.000003
                Relay_Log_Pos: 1074
        Relay_Master_Log_File: m2-bin-log.000003
             Slave_IO_Running: Yes
            Slave_SQL_Running: Yes
mysql> exit
[root@node1 ~]# mysql -uroot -h 192.168.66.20 -P3311 -p
Enter password:
mysql> CHANGE MASTER TO MASTER_HOST='192.168.66.20', MASTER_PORT=3310, MASTER_USER='m1slave', MASTER_PASSWORD='123456', master_auto_position=1;
mysql> start slave;
mysql> show slave status\G;
*************************** 1. row ***************************
               Slave_IO_State: Waiting for master to send event
                  Master_Host: 192.168.66.20
                  Master_User: m1slave
                  Master_Port: 3310
                Connect_Retry: 60
              Master_Log_File: m1-bin-log.000003
          Read_Master_Log_Pos: 19771
               Relay_Log_File: m2-relay-log.000003
                Relay_Log_Pos: 19986
        Relay_Master_Log_File: m1-bin-log.000003
             Slave_IO_Running: Yes
            Slave_SQL_Running: Yes
              Replicate_Do_DB:

mysql> exit
3. Start Slave1 replication mysqlm1 + mysqlm2
[root@node1 ~]# mysql -uroot -h 192.168.66.20 -P3320 -p
Enter password:
mysql> stop slave;
mysql> reset master;
mysql> reset slave all;
mysql> set @@global.gtid_purged='34a2a219-405b-11ec-abe9-0242ac110002:1-8,34e41ce3-405b-11ec-9426-0242ac110003:1-8';
mysql> begin;
mysql> commit;
mysql> set SESSION gtid_next='automatic';
mysql> CHANGE MASTER TO MASTER_HOST='192.168.66.20', MASTER_PORT=3310, MASTER_USER='m1slave', MASTER_PASSWORD='123456', master_auto_position=1 for channel 'm1';
mysql> CHANGE MASTER TO MASTER_HOST='192.168.66.20', MASTER_PORT=3311, MASTER_USER='m2slave', MASTER_PASSWORD='123456', master_auto_position=1 for channel 'm2';
mysql> start slave;
mysql> show slave status\G;
Gtid in face operation_ Purged can execute show variables like '% gtid%' on master1 and master2; see
Otherwise, an error occurs when starting: 1236, similar to:
Got fatal error 1236 from master when reading data from binary log: 'The slave is connecting using CHANGE MASTER TO MASTER_AUTO_POSITION = 1, but the master has purged binary logs containing GTIDs that the slave requires. Replicate the missing transactions from elsewhere, or provision a new slave from backup. Consider increasing the master's binary log expiration period. The GTID set sent by the slave is '352f3d45-405b-11ec-a2f7-0242ac110004:1-5', and the missing transactions are '34a2a219-405b-11ec-abe9-0242ac110002:1-8'.'
4. Start Slave2 to copy mysqlm1 + mysqlm2
[root@node1 ~]# mysql -uroot -h 192.168.66.21 -P3320 -p
Enter password:
mysql> stop slave;
mysql> reset master;
mysql> reset slave all;
mysql> set @@global.gtid_purged='34a2a219-405b-11ec-abe9-0242ac110002:1-8,34e41ce3-405b-11ec-9426-0242ac110003:1-8';
mysql> begin;
mysql> commit;
mysql> set SESSION gtid_next='automatic';
mysql> CHANGE MASTER TO MASTER_HOST='192.168.66.20', MASTER_PORT=3310, MASTER_USER='m1slave', MASTER_PASSWORD='123456', master_auto_position=1 for channel 'm1';
mysql> CHANGE MASTER TO MASTER_HOST='192.168.66.20', MASTER_PORT=3311, MASTER_USER='m2slave', MASTER_PASSWORD='123456', master_auto_position=1 for channel 'm2';
mysql> start slave;
mysql> show slave status\G;
5. Testing
Create databases and tables on master1 and check whether the synchronization is successful on master2, slave1 and slave2
Perform table operations on master2, insert records, modify records, delete records, etc. check whether the synchronization is successful on master1, slave1 and slave2
Attachment: column link
K8s demo cluster practice 00: building a mirror warehouse Harbor + security scanning
K8s demo cluster practice 01: preparing VMware virtual machine templates
K8s demo cluster practice 02: prepare 3 VMware virtual machines Master+3 nodes
K8s demo cluster practice 03: prepare x509 certificates required for HTTPS communication between cluster components
K8s demo cluster practice 04: deploy etcd three node high availability cluster
K8s demo cluster practice 05: install kubectl and configure Cluster Administrator account
K8s demo cluster practice 06: deploy Kube apiserver to the master node (3 stateless instances)
K8s demo cluster practice 07: Kube apiserver high availability scheme
K8s demo cluster practice 08: deploying a highly available Kube controller manager cluster
K8s demo cluster practice 09: deploy a highly available Kube scheduler cluster
K8s demo cluster practice 10: deploying Kube proxy components in ipvs mode
K8s demo cluster practice 11: deploying Kube kubelet components in ipvs mode
K8s demo cluster practice 12: deploying Calico network
K8s demo cluster practice 13: deploying cluster CoreDNS
K8s demo cluster practice 14: deploying cluster monitoring service Metrics Server
K8s demo cluster practice 15: deploying Kubernetes Dashboard
K8s demo cluster practice 16: deploying Kube Prometheus
K8s demo cluster practice 17: deploying private cloud disk owncloud (version 10.6)
K8s demo cluster practice 18: building the first basic container image in the universe
- Use it first, understand k8s it through operation and practice, and understand it naturally when you accumulate more
- Share the knowledge of understanding, make your own Futian, and enjoy your own blessings
- Pursue simplicity and easy to understand. The context of knowledge is also a part of knowledge, such as version, time, etc
- You are welcome to leave messages and ask questions. Generally, you can reply and improve the documents at the weekend
- Jason@vip.qq.com 2021-11-08